Blog Archives
How to do a perfect push up
In my opinion two of the hardest bodyweight moves, especially for women, are pull ups and push ups.
These are also, in my opinion, two moves that EVERYONE should be able to do!
The other week, I outlined some tips and progressions to help you build toward a full pull up and today I want to address the push up.
A few things I usually see when clients do “push ups:”
- They don’t go all the way down. They bend their elbows maybe an inch. (Guys do the opposite of this where they don’t actually lock out at the end of the push up)
- Their head juts forward as if they are looking towards their toes.
- Their shoulder blades are jutting out.
- Their elbows flare out way up by their ears and their fingers are rotated in toward their chest.
- They do THE WORM!
Here is a photo of some pretty ugly form….doing a number of the bad things above.
So if you do one….or maybe all…of these things, how do you do a perfect push up?
Perfect push ups form:
- Your body is in line from your heels to the tip of your head. Your finger tips should be pointing forwards and your hands should be right outside your chest. Your feet are together not shoulder or hip width apart.
- At the top of your push up, your arms are locked out and your legs are straight. You are squeezing your butt cheeks and are drawing your belly button in toward your spine. You are in a straight line. Hips aren’t dropping to the ground. Head is jutting forward. Back is not excessively arched.
- As you lower down, you lower your chest directly between your hands, keeping a nice straight line. Your elbows shouldn’t flare out from your body. Your elbows should almost make an arrow with your body. Like –> Your shoulders, elbows and wrists should all be in a straight line.
- Your chest should touch the ground when you lower. Your body should move together. Hips shouldn’t move back up first. Everything should lift as one. Don’t let the hips sag or the elbows flare out as you lift.
- You should then return to the exact same position you started with.

Now that you know the form for a great push up that doesn’t mean you are going to be able to perform one perfectly.
First you have to address the issues you are having with your form.
While a full range of motion is something that you have to practice and developing strength in your chest, shoulders and triceps is always beneficial, there are some other issues you have to address first.
Below I address areas you should foam roll, stretch and strengthen if you are having some of the problems I listed above. If you don’t know if your form is breaking down, have a friend or a trainer watch you perform a push up!
Problems and some fixes:
- Head jutting forward and/or chin tucked to chest – Roll out and stretch your upper traps and neck.
- Scapular winging (aka if your shoulder blades are really popping out) – Roll out and stretch your chest. Strengthen your mid and lower traps with the scapular wall hold. You can also strengthen your traps and your serratus anterior (the muscles sort of on your ribs under your armpit and down the side) with this great exercise, the push up plus or scapular push up.
- Shoulders are up by your ears – If your shoulders are up by your ears, roll out and stretch your traps and your neck. You are also going to want to do a ton of scapular wall holds to strengthen your mid and lower traps! When doing the push up, focus on engaging the muscles between your shoulder blades.
- Elbows flare out – Many people are taught to do a push up like a T, but that puts a ton of strain on the rotator cuff. Make sure to roll out and stretch your chest. Also, having your elbows in closer will require you to strengthen your triceps since having your elbows in closer engages your triceps more. Also to help you remember to do this, start the push up with your hands right outside your chest. As your hands get wider, it becomes easier to revert back to the T form.
- Hands turn in – Make sure to keep the finger tips pointing straight ahead. Pretend your hands are both on a piece of paper. Try pressing down and apart as if you are trying to rip the piece of paper in half. This will help you keep your hands straight and will help you engage your lats and keep your body tight overall.
- Low back sags and hips go toward the ground – Start by rolling out and stretching your low back and your hips. You will then also want to strengthen your core and your glutes. When I say “strengthen your core,” I don’t mean do a trillion crunches. You want to work on “bracing” your core – you want to work on contracting your abs and drawing your belly button in toward you spine. You can practice this by laying on your back with your knees bent and your feet flat on the ground. Draw your belly button in toward your spine and press your low back into the ground. Hold that position. That is how you want to brace your core during a push up. When doing a push up, to keep your hips from sagging, squeeze your glutes and draw in your belly button!
- Butt goes way up in the air – If this happens you are also going to need to work on core strength. Planks are a great way to build up the core stabilization needed for a push up…Because let’s face it…A push up is basically a moving plank. Also, use the drawing in maneuver I went over above to teach yourself to engage your core! Also, if you squeeze your glutes during the push up, it is going to be extremely difficult to have your butt up in the air!
Once you begin to address those issues, you can start to work on building up toward that perfect push up.
Today, I don’t want to get into all the supplemental moves you can do to strengthen your chest, shoulders, triceps and core, but I do want to discuss how you can regress the push up so that you can do it no matter what level you are starting from.
The first push up regress is NOT from your knees.
The wall push up is the first step. Step about a foot or two away from the wall and place your arms out toward the wall right outside your chest. Your finger tips should point straight up toward the ceiling. As you lower your body toward the wall, your hands should be outside your chest. Go as close to the wall as you can (do not smack your face into the wall). Make sure you keep your elbows in super close to your body. This is a great time to really work the triceps and keep your arms against your body. Your wrists, elbows and shoulders should all be in one straight line. Your body should remain in a straight line with your core and glutes engaged. Don’t worry about keeping your heels on the ground.
If you can perform 3 rounds of 20 wall push ups with perfect form easily, it is time to use a lower incline. Squat racks (if no one is using them because people definitely don’t like you doing anything put squatting in them) and Smith machines are great places to help you work on your push ups. I hate Smith machines so this is about the only time I would use one.
Smith machine push ups allow you to control the incline. As you progress, you can lower the bar until you are basically parallel to the ground. You want to keep the same form as the wall push up.
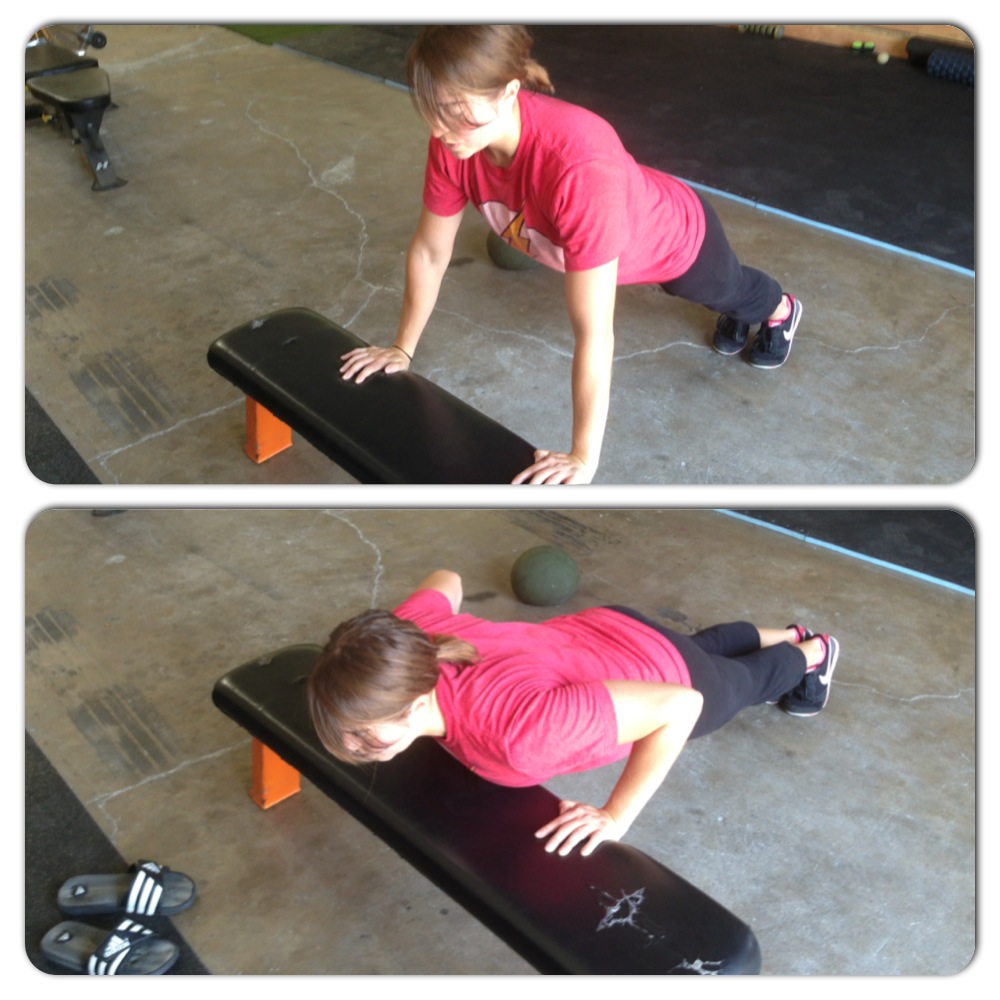
Since we don’t have a Smith machine at the gym (and since we just moved and our jungle gym for squats isn’t set up) I demonstrated these from a bench…which is also another tool you can use if the incline is appropriate.
And if you only have a bench, but the incline is just a bit too low, you can do push ups off the bench two different ways. You can do them from your toes or from your knees.
Doing push ups from your knees can allow you to decrease the incline as you progress down toward the ground.
Once you’ve mastered the incline push up and have gotten down to at least the height of a bench (from your toes), you can start to try push ups from your knees on the ground.
If you aren’t completing full reps and your form is breaking down, don’t keep progressing!
You’ve got to EARN the next level!

Then once you can perform perfect push ups from your knees, start to add in one or two push ups from your toes until you can do 5, 10, 15….100 from your toes!
Doing even one perfect push up doesn’t happen overnight. Take your time! Quality is important if you want to get the most out of each and every push up!
Once you’ve mastered the perfect push up, it is then time to start playing around with decline push ups (feet up on bench or such) and other fun variations…Like my favorite the push up to dip!
But remember…YOU’VE GOT TO EARN THE PROGRESSIONS!
Do you love push ups?
Progressing toward the elusive perfect push up and pull up

I have many women and even some men tell me that they want to be able to do perfect full push ups and push ups.
And I say “OK!”
Because there is a way to get there! Consistent hard work and a well thought out progression based on what you need to work on will get you there!
So this really applies to any exercise that you want to be able to do, but honestly two of the exercises that most people can’t do, but should be able to do are the push up and pull up (also, most people recently have been telling me they want to be able to do these two moves so I figured I would focus on them).
First, consider all of the muscles used in the move.
For push ups, you use your pecs, shoulders, triceps, core and even your quads and legs. Most often though, people need to focus on core strength and either shoulder or tricep strength.
For pull ups, core and back strength are essential. The grip you use will also determine how much bicep is involved.
Once you identify the muscles used, you can work on those muscles. That doesn’t mean you have to start doing tricep extensions and bicep curls.
You can still do compound movements.
So to work on improving your push up, first assess where you are. Can you do a push up with your hands on an incline? Can you do a push up from your knees? And when I say “Do a push up.” I mean a PERFECT form push up from that position.
Same goes for pull ups. Can you do jumping pull ups? Can you do pull ups where you jump up and slowly lower yourself down? Can you do a pull up and hold? Or can you do a chin up but not a full pull up yet?
Get a clear picture of where you are starting from. If you know exactly where you are at, you can design a program that will get you to where you want to be.
If you don’t have a clear starting point, how the heck are you going to outline a clear progression!?! You won’t know how long it will take you to get somewhere if you don’t even know where you are starting from!!
So once you know what muscles are involved and where you are starting from, you must create workouts that strengthen your weak areas and progress you toward you end goal.
While you will want to do lots of push ups and pull ups during your progression they shouldn’t be the only thing that you are doing.
For push ups, do some core strengthening exercises. Do some crawling that targets your shoulders, core and quads. Do some form of dips, be they full dips or dips off a bench. I mean even get creative with it. Try some chest flies on the slider. Do some ab roller to work your arms and core. Battling ropes can be good. Medball chest passes are a good explosive way to work your upper body.
There are lots of ways to work. Pick exercises that target your weak points!
For pull ups, battling ropes again can be good. Working on different variations of pull ups can help. Try some medball slams into the ground. You can do ones straight ahead or rainbow slams where you slam it down on each side. Do some inverted rows. Some pivot prone pulldowns. Work on your grip strength. Heck even just playing on the monkey bars will definitely help!
And the good part about some of the things that you can do to work on both of these moves is that they will improve your overall posture and strength not JUST progress you toward a perfect pull up or push up.
There are even moves that can benefit both exercises in some way such as the parallel bar press. Just hold your body straight up off of parallel bars or a dip machine. Don’t be a “turtle” aka keep your shoulder blades pull back and down and your spine long. Your neck should be long and not tucked back into your shoulders like a turtle pulling its head into its shell. Just hold. Keep your abs engaged and your shoulder blades retracted. You will feel this in your back and your arms and even your core.
Anyway, there are a bazillion ways to strengthen your body to progress toward a pull up or push up. Don’t just flounder blindly and HOPE you will get there. SET UP A PROGRESSION!
If you need help or want some exercises to help you strengthen your weak points, let me know! 🙂


