Category Archives: Benefits of doing “man” exercises
Work On Your Push Ups By Doing More Push Ups
Sometimes push ups are their own best supplemental exercise.
Want to strengthen your basic standard push up?
Then you need to strengthen your weak points AND you need to do more push ups.
Why not strengthen your weak points and do more push ups simply by using a couple different push up variations instead of a ton of different supplemental exercises?
So how do you use push ups to make your push ups better?

Pick variations that target your weaker areas!
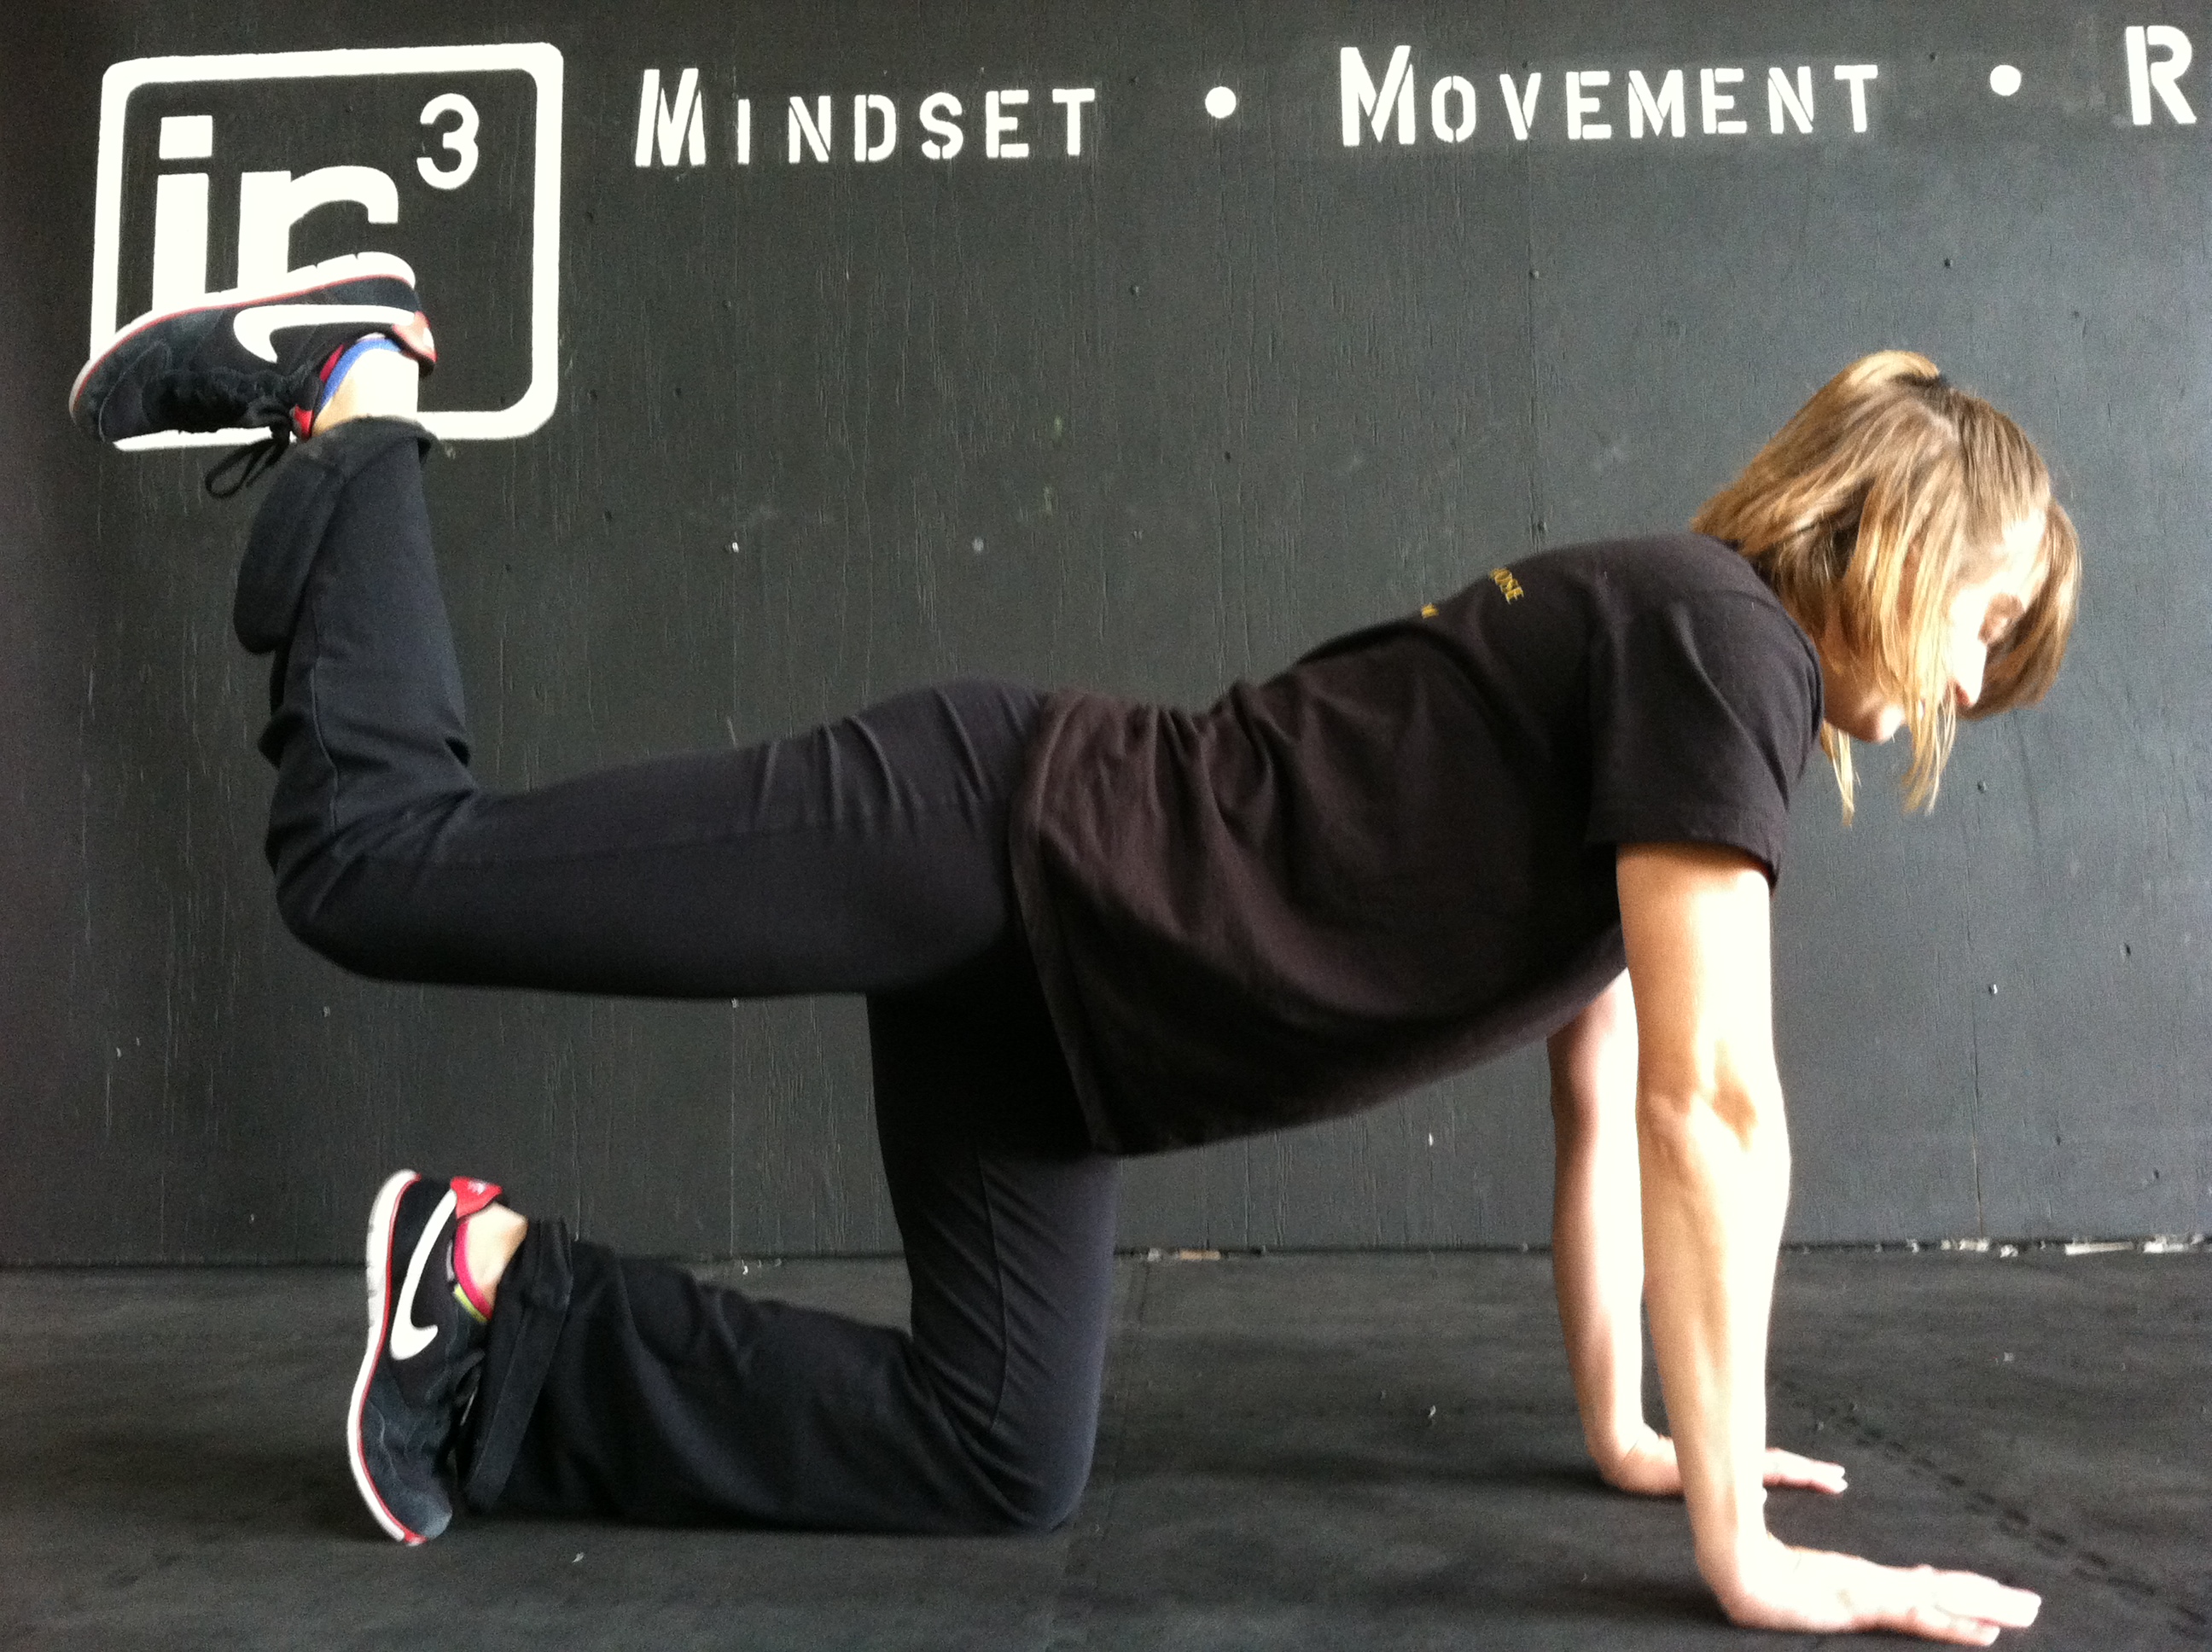
The Turkish Get Up
The Turkish Get Up is one great full body move to work on stability AND strength. It is also a great move because it forces the body to stabilize in more than one plane of motion.
It is also one of the moves I see most often messed up.
People like to skip steps and turn it into a sit up/roll up instead of the step by step move it is.
And honestly, the whole point of the Turkish Get Up is all of the steps and DOING them all in the correct order. That is how you truly reap the benefits of the Turkish Get Up.
Below is a breakdown on the Turkish Get Up. It can be done without weight by just balancing something on your hand or with a kettlebell press up toward the ceiling. It can also be done with a sandbag held on the shoulder.
Each has benefits and are great to strengthen your entire core and improve your coordination.
Breaking Down The Turkish Get Up:

- Start by lying on your back on the ground with your legs out straight.
- Then drive your right arm up straight and have your fist pointing up toward the ceiling. Bend your right knee and place your foot flat on the ground. Straighten your left arm out to the side (not straight out at shoulder height, but not right by your body). Keep your right arm straight up and pointed toward the ceiling at all times (it can even help to balance something on your knuckles to remind you of this while you are learning).
- Then roll up on to your left forearm. Prop yourself up nice and tall on your left forearm. Press through your right foot on the ground. Do not let your right knee cave in and keep your left leg out straight on the ground.
- Once up on your forearm, press up onto your left hand with your left arm going straight. Sit up nice and tall. Do not shrug your shoulders. And remember, your right arm is always straight and pointing straight toward the ceiling.
- Then from the seated position you are going to bridge up, lifting your hips up as high as you can. You will press down through your left hand as well as your left heel and right foot. Keep your right foot flat on the ground and your left leg out straight. Do not let your right heel come up.
- From the bridge position, slide your left leg back and under you so that you are in a kneeling position with your hand on the ground. Make sure you swing your leg back enough so you are in a strong supported kneeling position that will allow you to lift your left hand off the ground.
- Staying nice and tall, lift your left hand and come to a kneeling position. Do not lean forward of slouch forward as you lift your hand up off the ground.
- With your right arm still pointing up at the ceiling, stomp your right foot into the ground and come up to standing, bringing your left foot forward to be even with your right foot.
- Once standing, you will reverse the steps until you are again lying on your back.
- You will first go back to kneeling, stepping your left foot back.
- You will then place your left hand down on the ground out to the side and just a little back from your left knee.
- You will then bridge up and swing your left leg through so it is out straight in front of you. As you bridge, keep your right heel firmly planted on the ground.
- From there, you will return to a seated position supported by your left hand.
- Then you will relax down to your forearm and finally roll on to your back. Do not slouch as you move back down.
- Keep a nice tall posture throughout the entire move.
- You can also do this move with either a sandbag over your shoulder or a kettlbell or dumbbell in the raised hand. Beginners may just want to start by balancing something on their knuckles.

Here is a great workout that breaks down and works on each part of the get up.
Here are also some great workouts using the Turkish Get Up.
Training For A Race? You’ve got to do more than just run!
If you want to run faster, you would think you simply need to practice running more. If you want to be able to run for longer, you would think you just need to push yourself to run further.
But gaining speed and endurance requires that you do more than just run. Staying healthy for your race requires that your training regime isn’t just running.
You must do the proper recovery and strength training as well.
Many people worry that strength training will interfere with their running.
But in reality, a proper strength training regime will actually make their running stronger and keep their body healthy for their training.
No you don’t want to work on your 1 rep max while training for a race, but you do want to lift weights.
And you want to stretch and foam roll.
But you definitely want to lift weights and make your muscles stronger so you can run faster and last longer!
Below are key muscles for runners to roll out and stretch. There are also some great activation moves and then finally, links to workouts I’ve developed for runners.
You can help prevent (or at least alleviate some of the pain of) common running injuries such as plantar fasciitis, shin splints, knee pain, hip pain and even low back pain by using the techniques and exercises below.
TRIGGER POINT RELEASE
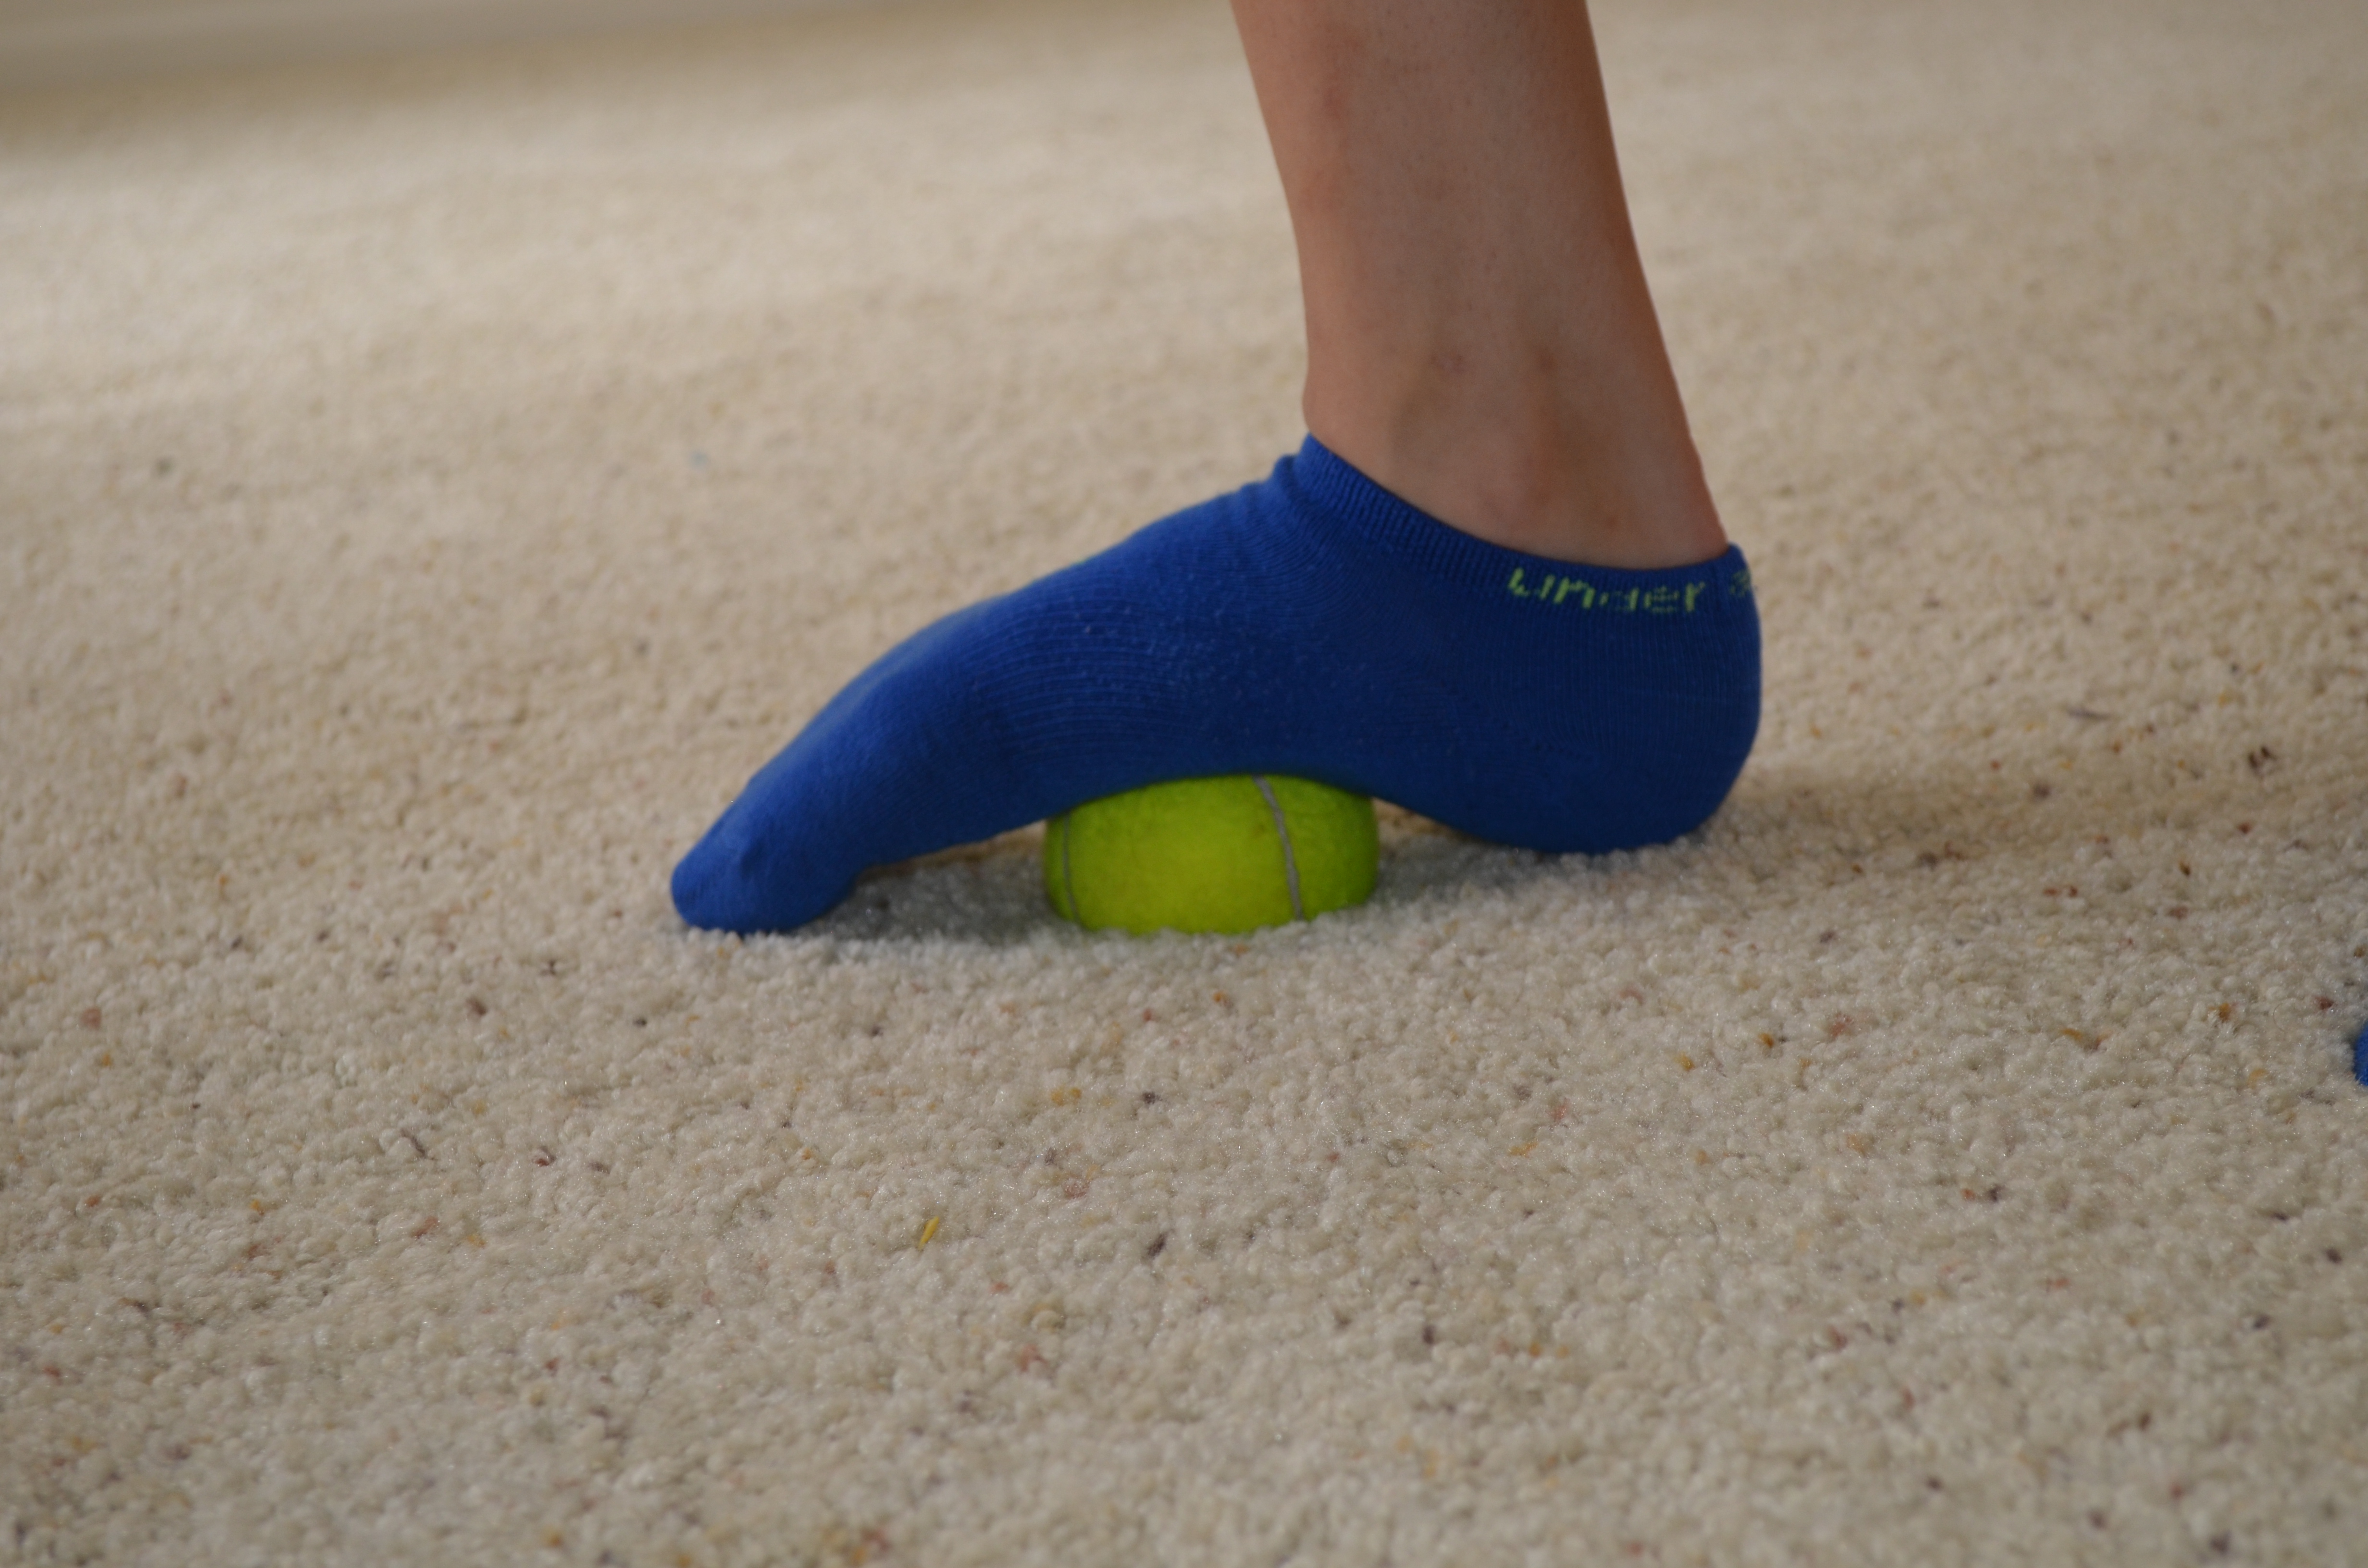
1. Feet – Take a ball, the smaller and harder the ball, the more it will dig in, and place it on the ground. Then, standing, place your foot on top of the ball. Push down into the ball and roll it around under your foot, holding on any tight spots.
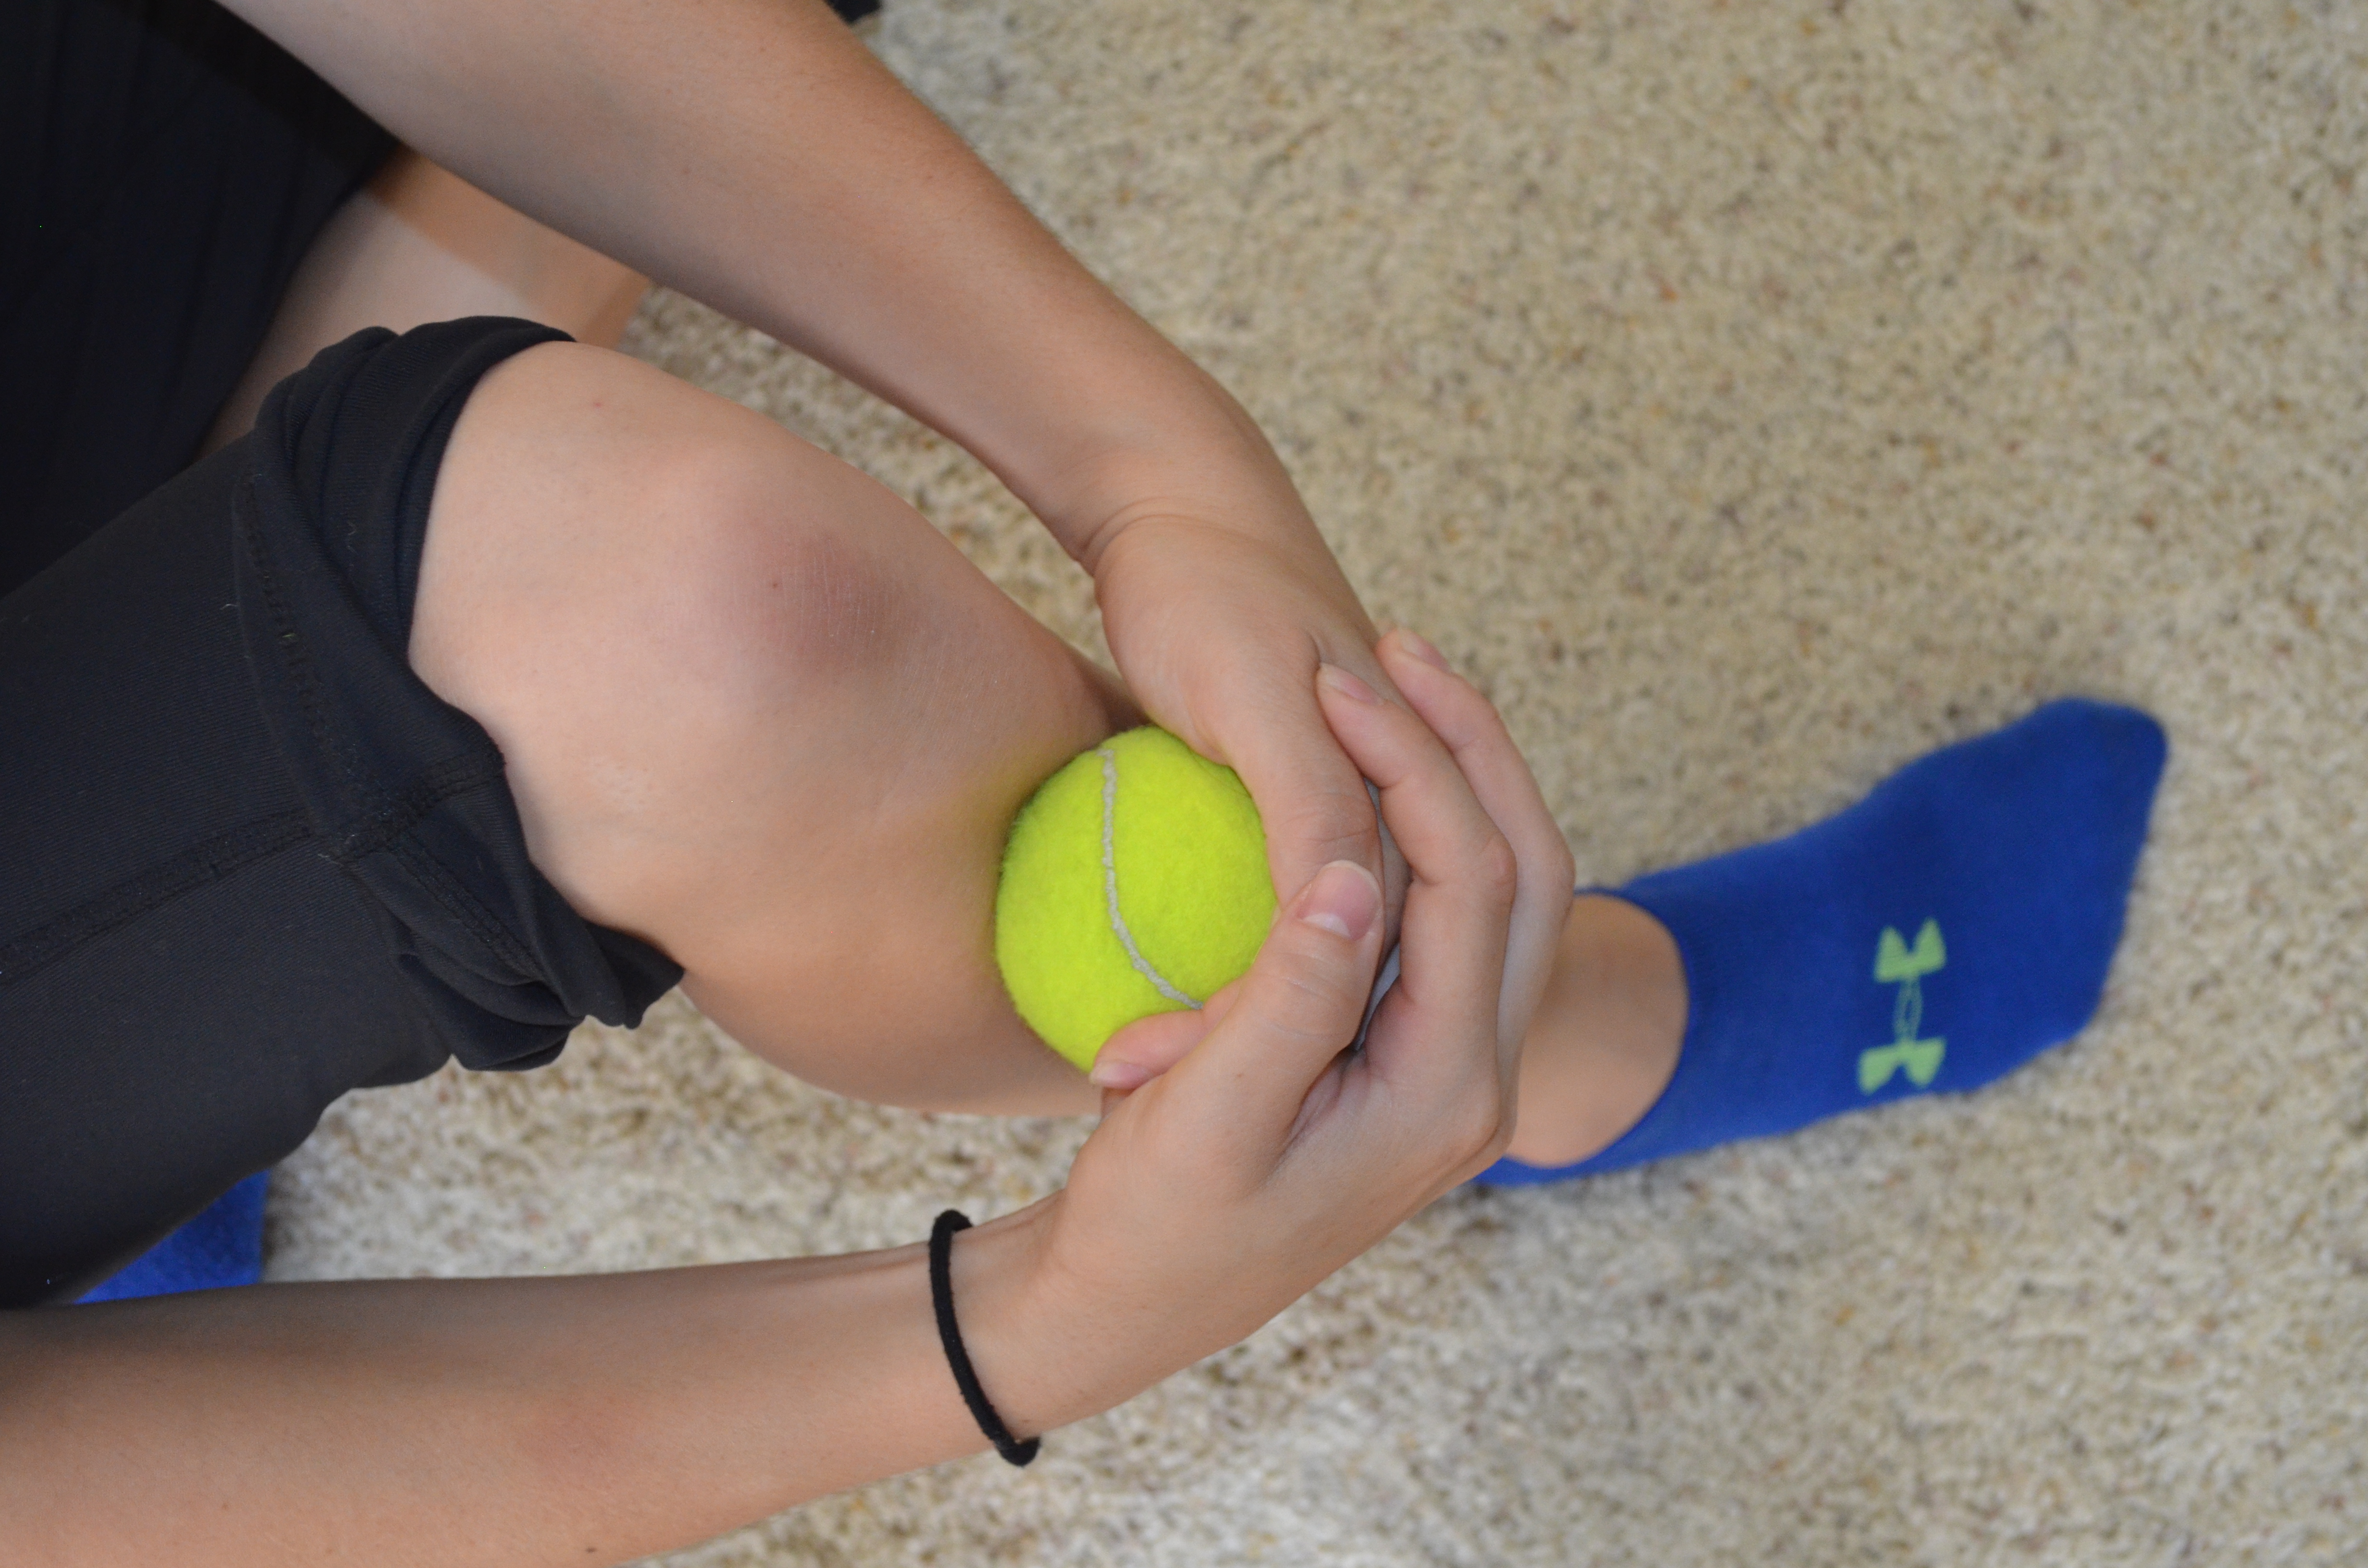
2. Shins – Sit on the ground with one knee bent toward the ceiling and the foot flat on the ground. Take a ball in both hands, and press it into the outside of the shin bone. Push the ball into your shin with both hands, making small circles. Then move the ball up or done and repeat, making small circles. Work all the way from your ankle to right below your knee. Hit the front of your shin, not the bone, all the way around the outside and back toward your calf. Make small circles with the ball, pressing it in as hard as you can.
3. Calves – Sit on the ground with one leg out straight. Take a roller or a ball on a book or block and place it under the calf of the leg out straight. Cross the other leg over the top. Rock the leg on the ball side to side. Then move the ball up or down your calf. Again rock the leg side to side. You can also flex and relax your foot or make small circles with your ankle to dig in deeper to any tight spots you find. Work all the way up and down the back of your lower leg.
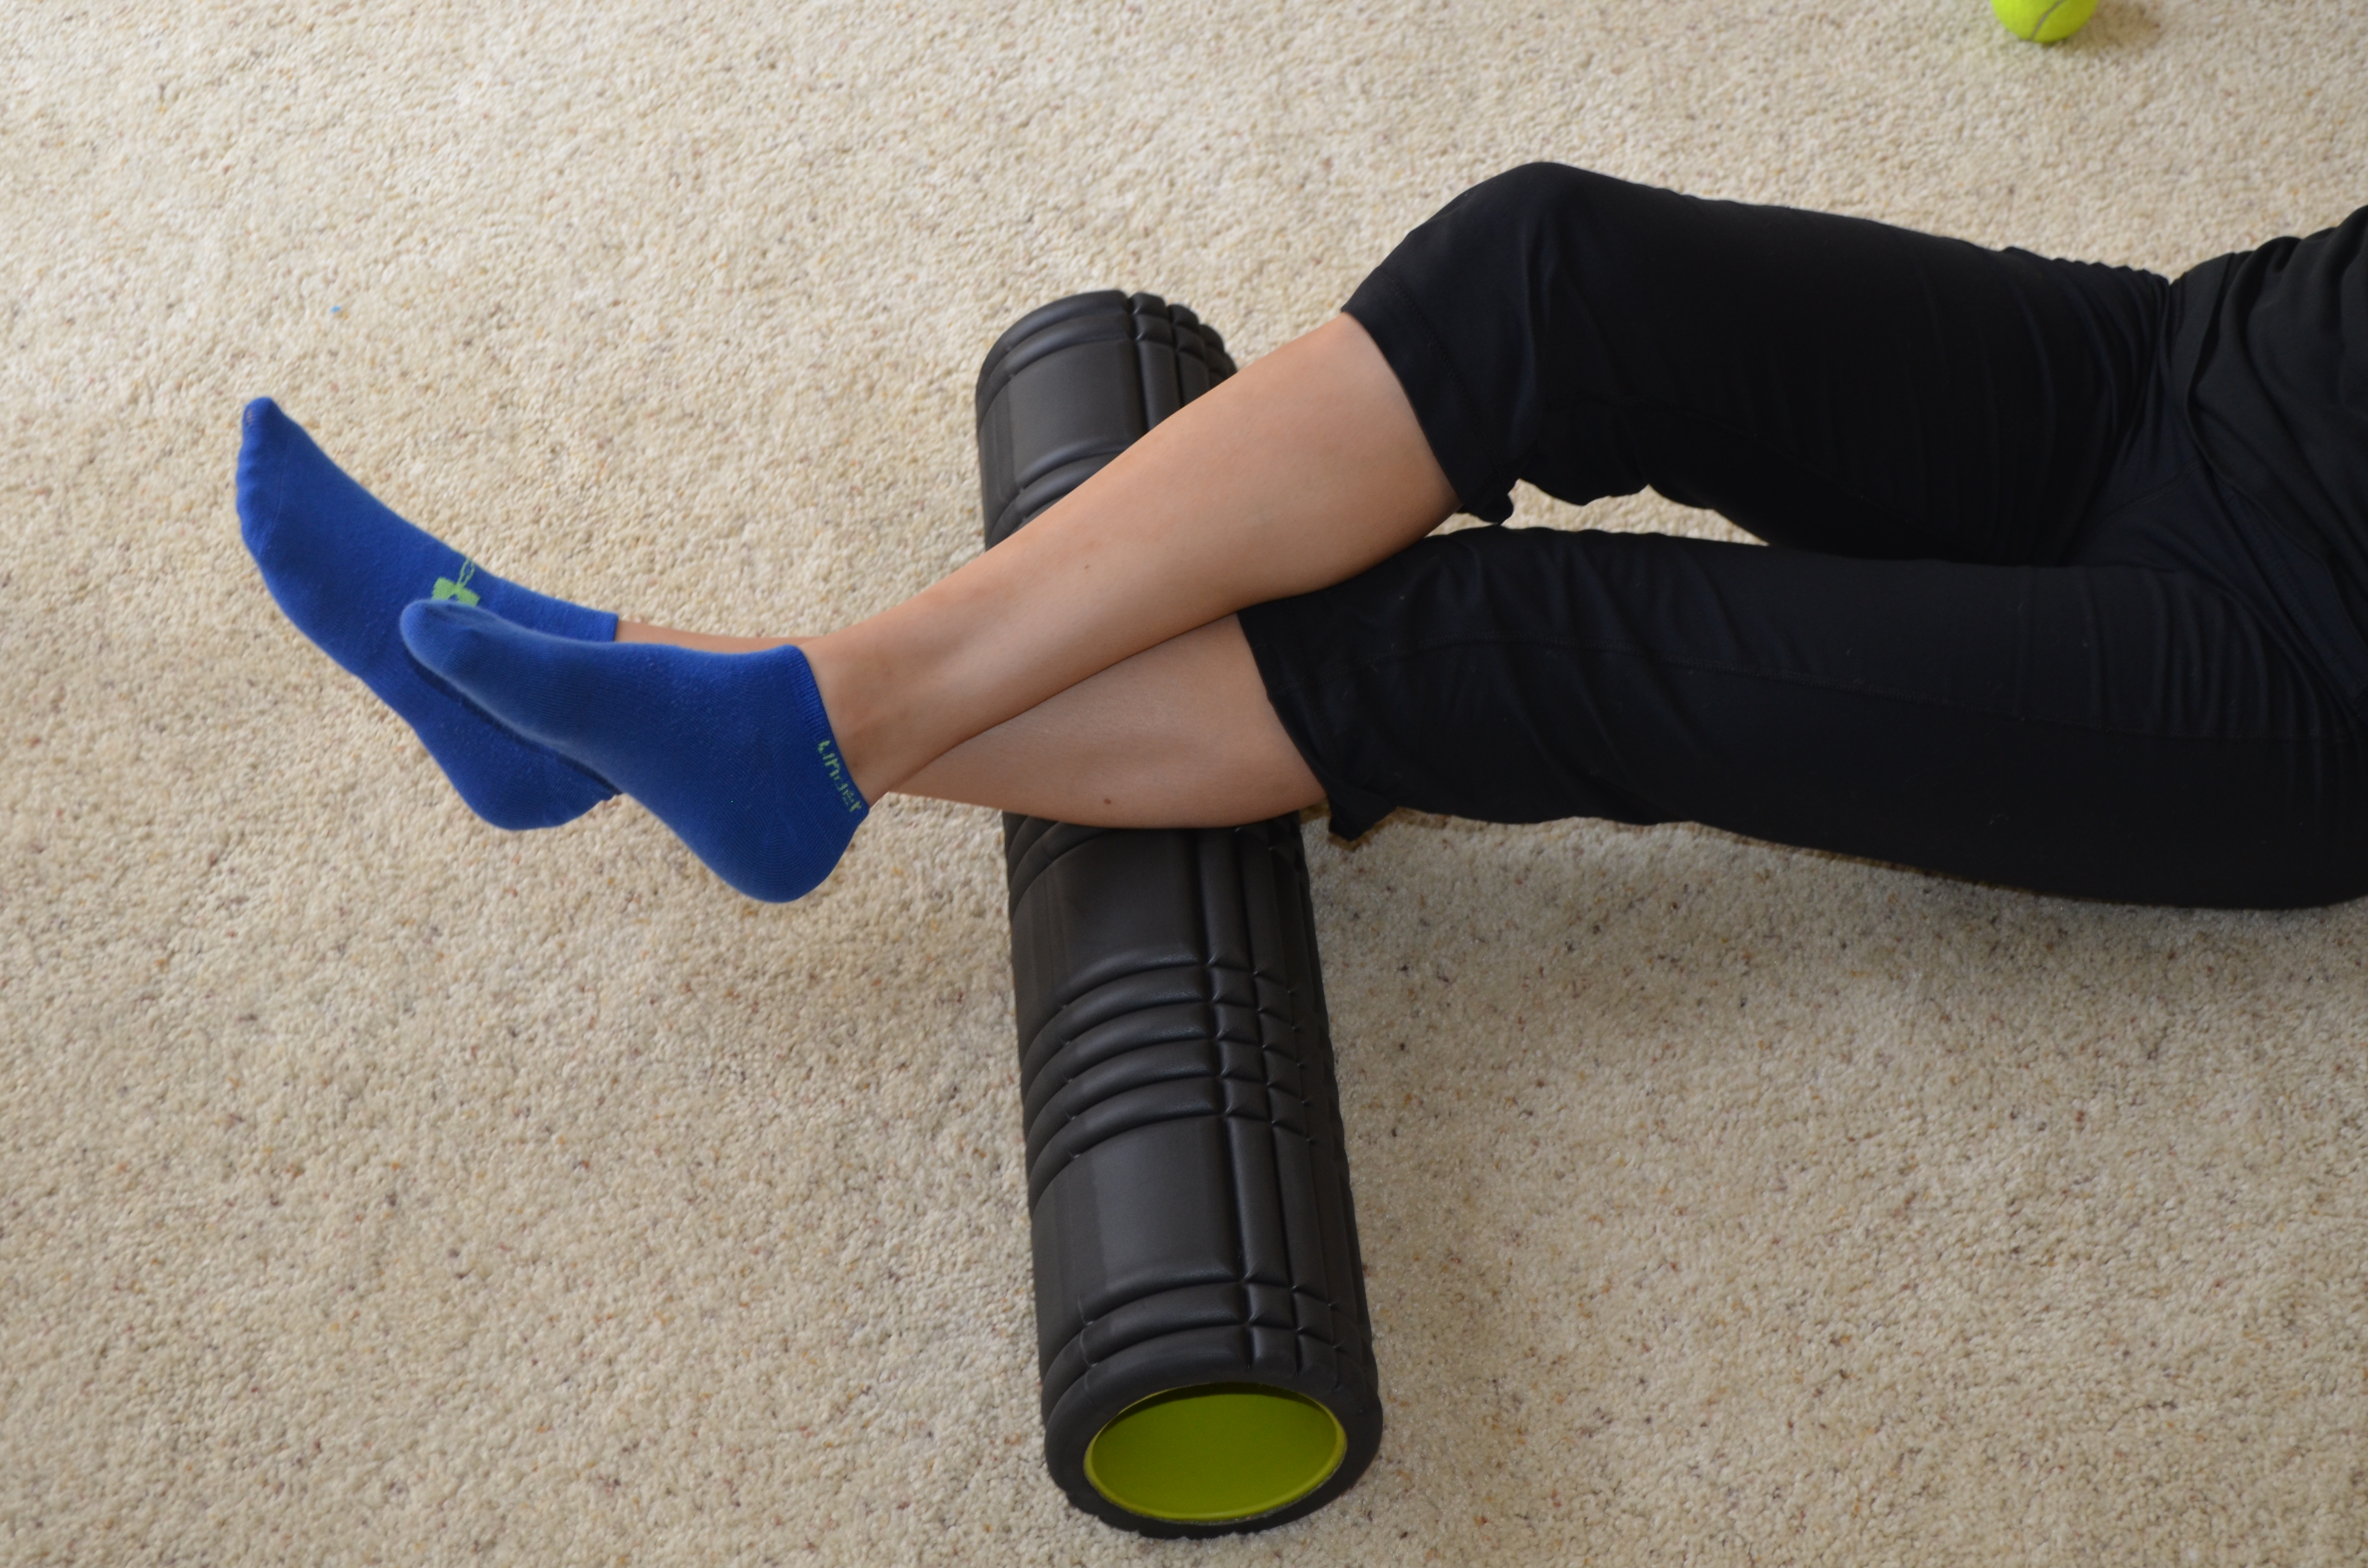
4. Quads – Take a roller and set up with your with it under the front of your legs. You will be lying face down on the ground with your body supported on your forearms and your legs on the roller. Rock side to side on the roller then move it down or up on your quad and again rock side to side. Work all the way from your hips to the top of your knees. Around the top of your knees and right around your hips, you can also use a ball to dig out the muscles. Around your knees, start the ball on the inside of your leg right above your knee. Work your way across the top of your knee to the outside of your leg. Hold on any tight spots. You can do the same all along your groin and hip.

5. Hamstrings – A tennis ball is a great option to really dig out your hamstring, especially the top of your hamstrings right under your butt and the bottom right above your knee. To use a ball, sit on a chair or box. Place the ball under your leg on the box or chair. Roll it side to side and up and down. Hold on any tight spots. Use a box that allows you to really sit all of your weight down onto the ball. You can also do this on a roller on the ground but you won’t be able to dig in as much.

6. Adductors – You can roll out the inside of your leg using a ball or roller. Lie face down with one knee bent out to the side. Place a roller or ball under that leg right above your knee. Rock the leg forward and backward a bit then roll the roller up toward your crotch. Hold on any tight spots as you roll from your knee up toward your groin. Rock toward the front and back of your leg as you move up and down.

7. IT Band – Set up on your side with the roller just under the outside of your hip. You can stack your legs to apply more pressure or bend the top leg in front of you and use it to push off. Rock forward and backward as you move the roller down the outside of your leg. You can work from your hip down to just outside your knee. You can rock slightly forward to work into the front of your leg a bit especially around your hip. This way you can also hit your TFL.

8. Hips/Glutes – Use a ball to roll out your hips and glutes. The smaller and harder the ball, the more you will be able to dig in. Place the ball under one butt cheek. Roll it around your butt from the bottom near your hamstring up to your low back. While you roll under the fleshy part of your butt, you can also lift and lower your leg as well as draw the knee in toward your chest and straighten the leg back out. By moving the leg, you will dig in more with the ball. You can also roll the ball under your hip and around to the front to dig in to your TFL and hip flexors.

STRETCH
1. Feet, Calves – Bear Squat with Foot Stretch – To do this move, start on your hands and knees as if you were about to crawl. Then drive up off your knees onto your toes and hands. Drive your heels as close to the ground as possible and then return back to kneeling. Then lift your hands and sit back onto your heels. Make sure your feet are flexed when you sit back so you feel a nice stretch down the bottom of your feet into your toes. Then place your hands back down on the ground and repeat the stretch, driving your butt up into the air and heels down into the ground.

2. Shins – Standing 3 Way Shin Stretch – Stand facing the wall with one foot forward and the other leg back. Point your toe and rock onto the top of your foot so that the top of your back foot is facing the ground and you are on the front of your toes. Then bend the back knee and rock forward, feeling a nice stretch up the front of your lower leg. Keep the back toe pointing straight back for 10 reps then point it in and then out for 10 more reps in each spot. Do not worry about the front leg during all of this. Focus on stretching the shin of the back leg.
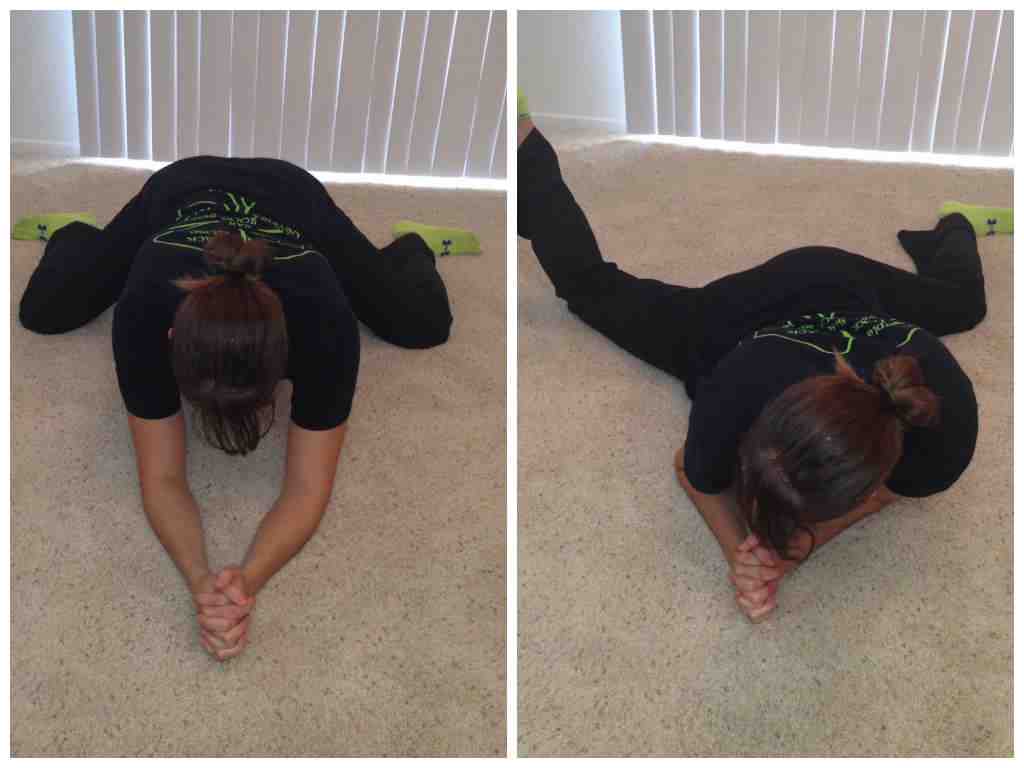
3. Hips, Hamstrings, Back – World’s Greatest Stretch with Hamstring – Start in a high plank position with your hands under your shoulders and feet together. Your body should start in a nice straight line. Step your right foot outside your right hand. Try to get it right outside your hand with the foot flat on the ground. Drop the right elbow down into the instep of your right foot, keeping the foot down. Then rotate open facing your right leg, stretching your right arm up toward the ceiling. Bring the right hand back down to the ground. Sit back on your left heel and straighten your right leg out in front of you. Feel a stretch down your hamstring.You can even hinge over the right leg a bit. Then bend the right leg and move back into the plank position with the foot outside the hand. Again drop the elbow and repeat the move on your right side. Complete all reps and then switch and do the stretch on the other side.

4. Hips/Quads – Kneeling Dynamic Quad Stretch – Set up kneeling on one knee facing a wall or something else you can place your hands on for balance. Make sure your front knee is a few inches away from the wall so you can rock forward. Grab your back foot with the hand on the same side. Pull your heel in toward your butt. Then rock forward, feeling a greater stretch down the front of your back leg. Relax back and repeat.

5. IT Band/Hamstrings – Standing IT Band Stretch – Standing tall, cross one foot over in front of the other. PUsh the front foot back enough though that the toes of both feet are even and your back leg is pushed straight. Clasp your hands together and reach up toward the ceiling. Stretch up nice and tall. Then reach your hands down toward the instep of the foot in back. Press your hip out to the side as you reach and keep your legs straight. Then reach back up and uncross your feet. Cross the other foot over and repeat. Keep alternating sides until all reps are complete.

If you reach more straight on like the bottom left picture, you will hit your hamstring more than your IT band. The bottom right shows the IT Band stretch.
6. Hips/Adductors – Frog Stretch with Rotation – Kneel on the ground and spread your knees as wide as possible. Lower yourself down to your forearms. Keep your feet in line with your lower leg and knees. Do not let your feet come together behind your butt and let them relax so the insides of your feet are flat against the ground. Sit your butt back between your knees as much as possible. Then come forward out of the stretch. As you come back forward, lower your body down to the ground and rotate your lower leg up and forward. Sit back again and then pivot the other hip. Keep alternating sides until all reps are complete.
ACTIVATION
1. Fire Hydrants – Set up on your hands and knees with your hands under your shoulders and your knees under your hips. Flex your feet. Keeping your right knee bent to 90 and your foot flexed as you lift the leg out to the side. Squeeze your butt as you lift. Do not bend your arms or lean to the side as you lift. Hold for a second or two at the top and then lower down and repeat.

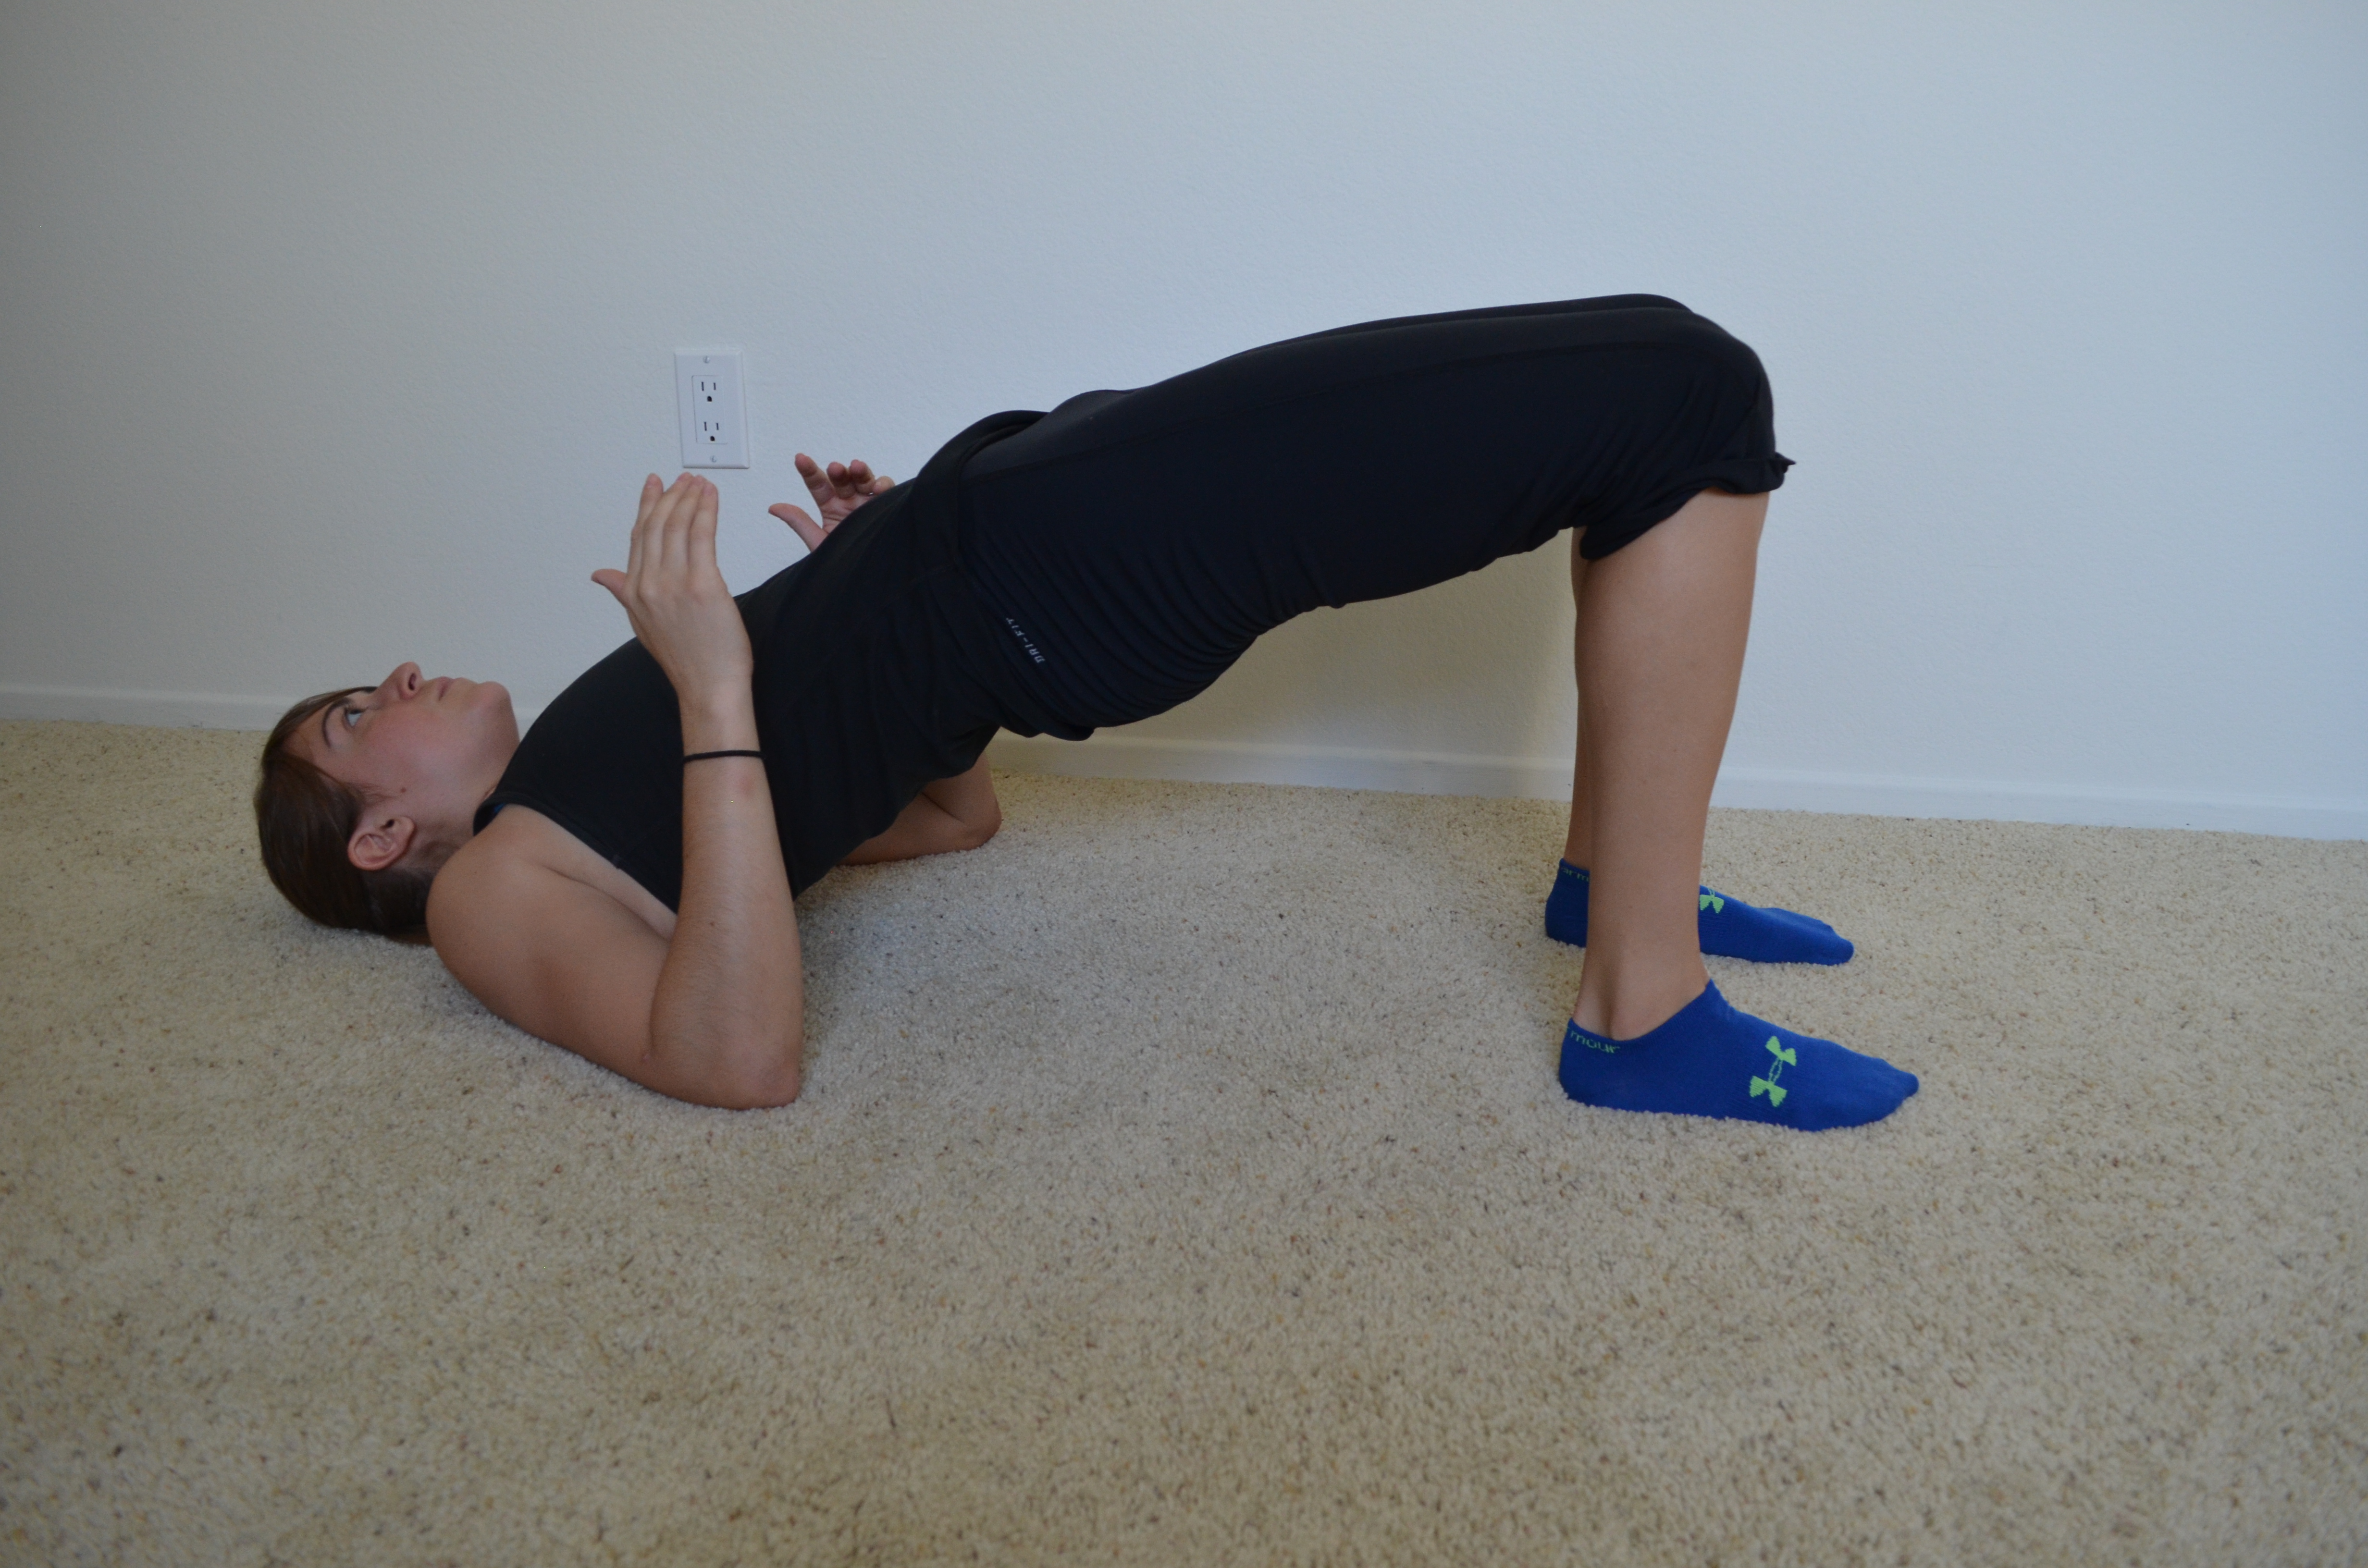
2. Posterior Plank – Start seated on the ground with your legs out straight and your hands on the ground behind your butt. Your finger tips should be pointing toward your butt. Drive through your hands and heels and raise your hips up off the ground toward the ceiling. Keep your legs straight as you lift. Press your chest up and out as you raise your hips. Relax your head back. Your body should be in a nice straight line at the top. Beginners may need to bend their legs a bit to hold the bridge at the top. Advanced exercisers can do a one leg bridge. Hold at the top for a second or two and then lower down and repeat.

3. Hip Circles – Set up on your hands and knees with your knees under your hips and your hands under your shoulders. Flex your foot and keeping the knee bent, drive it straight back and up. Drive the heel toward the ceiling. Keep your core tight and squeeze your glutes. Do not hyperextend your low back. Hold for a second or two and then bring the leg out to the side as if doing the fire hydrant. Do not set the leg down in between. Hold for a second or two and then drive the knee forward into your elbow. Squeeze your core as you drive the knee forward. Keep the foot off the ground. Then set the knee back down and repeat.
This is the first part of the circle.
4. Glute Bridge – Lie on your back with your knees bent and your feet flat on the ground. Your heels should be about hip-width apart and close enough to your butt that you can reach them with your finger tips when your arms are straight down by your side. Bend your elbows to 90 degrees so that your upper arm is on the ground. Then drive up through your heels, arms and upper back. Squeeze your glutes and lift your hips up as high as you can. Keep your core tight so that you don’t feel this in your low back. Make sure you don’t drive off your heels backward. Also, don’t let your knees fall open. Keep them in line with your hips and ankles. Hold at the top or complete reps by lowering back down and then repeating.
Actually, any glute activation moves you do, would be super beneficial. Here is a list of 10 glute activation moves you can do with a mini band. If your knees cave in when you run, you may want to focus on your external rotators as well (clams, side shuffle, standing external rotation, abductors..)
WORKOUTS
1. Runner’s Recovery Workout – Great bodyweight isometric workout you can do anywhere.
2. Stronger Legs With Knee Pain – A great workout to develop great leg strength for running while being super easy on the knees. The workout will also help you prevent the development of knee pain while upping your mileage to train for your race.
3. The Elite Library – In this library, I’ve also written a great warm up for before your run, a sprint workout to work on speed and core strength and a workout to develop leg strength to help you run further without fatigue.
And if you are preparing for a race this year and want some help organizing your running and strength training, you could win a month of FREE online training here!

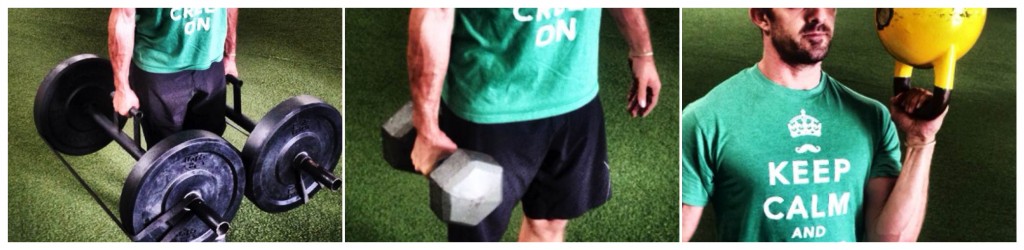
Grip Strength – Farmer’s Walk
If you can’t hold the weight, you can’t use the weight so as obvious as it sounds…We are only as strong as our weakest link.
Often we ignore grip training in favor of lifts that are more fun and that, we feel, give us more bang for our buck.
But there really is no better full-body, functional lift than the farmer’s walk.
You could actually argue this is the MOST functional exercise. I mean just think about how often you need to hold something and walk with it!
And guess what!?!
IT REALLY WORKS YOUR GRIP! Along with your arms, back, shoulders, core and legs…So just about EVERYTHING!
Basic Farmer’s Walk Variations:
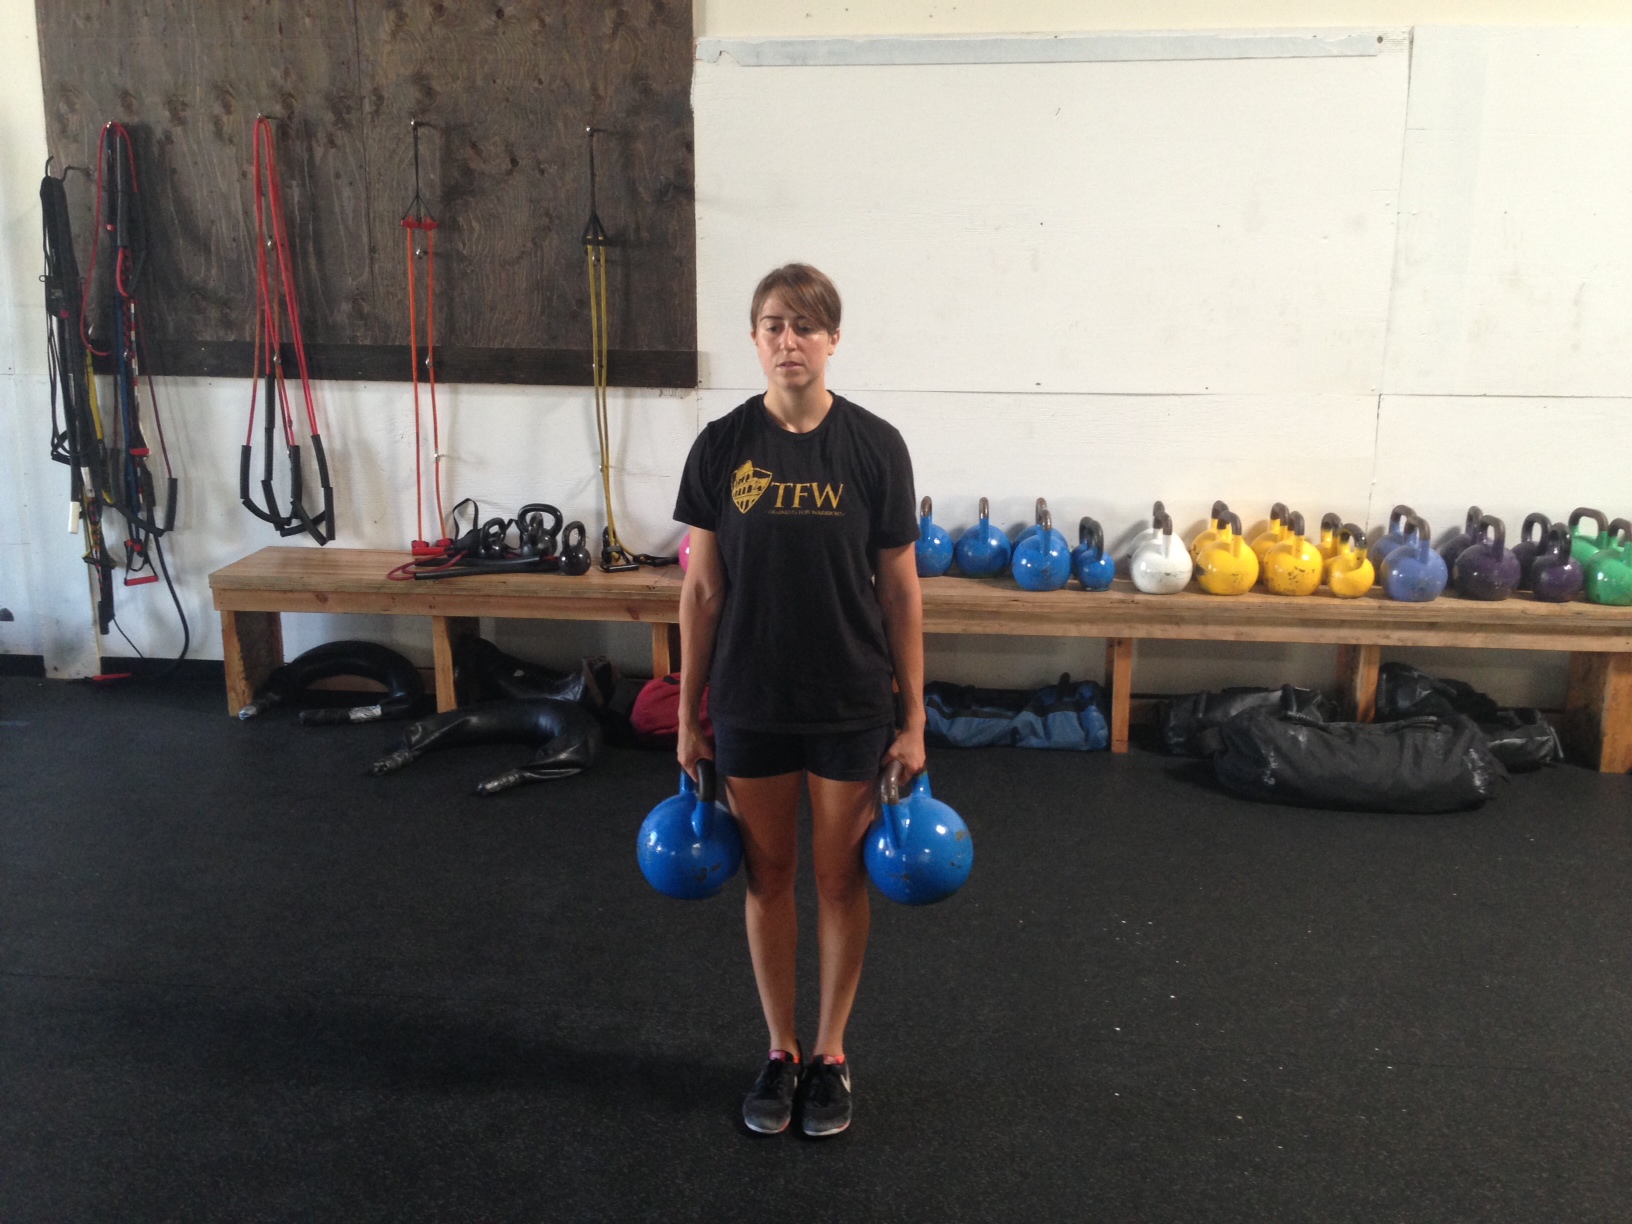
Nice tall posture and walk holding the weights down by your side but don’t let them rest on your legs.
1. Two-handed Dumbbell or Barbell Farmer’s Walk:
Basically, you hold heavy weights in each hand and you walk to set points or for a set amount of time, maintaining perfect posture. You want to use weights that CHALLENGE YOU and make you want to drop them just before your round is done.
Do not let your head jut forward or your shoulders round forward.
Do not let the weights rest on your legs. Hold them just a teeny bit away from your body or at least so they aren’t RESTING on your body.
Keep your core tight and walk with your shoulders down and back and your head up.
2. Two-handed Fat Grip (or Kettlebell) Carry:
This is the exact same as the two-handed Farmer’s Walk except you are challenging your grip even more by making the grip itself BIGGER.
Fat grips are a great way to challenge your grip because they make the handle bigger and more awkward to hold. The more awkward an object is to grip, the more it challenges your strength!
When you do carries with dumbbells that have fat grips on them, really focus on not letting the dumbbell slant forward or backward toward the ground. Make sure you carry the dumbbell so that it is level with the ground.
I also use competition kettlebells instead of dumbbells to challenge my grip more because their handles are bigger than the handles of dumbbells. This can be a great option if you don’t have fat grips.
Kettlebells are also great for carries because the bell wants to hug your legs and you have to lift them out a bit more from your body, which challenges your upper body and core even more.
The point though is…THE LARGER, MORE AWKWARD, THE GRIP THE MORE YOUR FOREARM AND HAND STRENGTH WILL BE CHALLENGED!
3. Unilateral Carry (with or without fat grips):
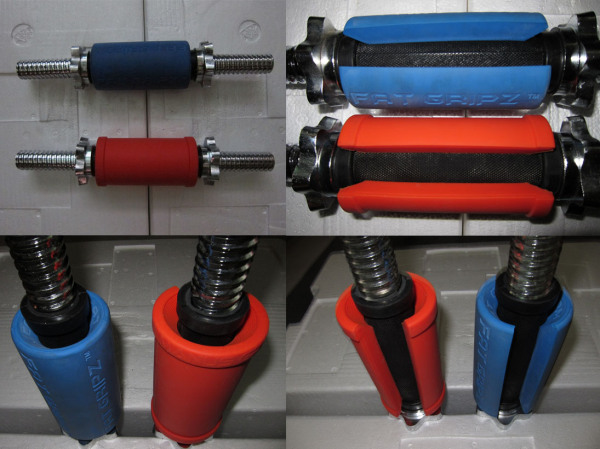
Fat grips can be placed on any dumbbell…or even a kettlebell….
Whenever you load down one side, your core is forced to work harder to stabilize. Plus I just love unilateral exercises because they force each side to work individually and help you correct any imbalances.
When doing a unilateral carry or farmer’s walk, you are going to hold a weight on one side. The more awkward the weight, the harder the move will be.
You are then going to walk forward. Do not allow yourself to either lean away from the side with the weight or toward the side with the weight.
The challenge is to PREVENT ROTATION. This is an anti-rotational move. You want to walk as if you have either no weight or at least equal weight in both hands even though you are only weighted down on the one side.
Keep a nice tall posture and make sure your shoulders stay level and you don’t lean. Keep the weight off of your leg as well. You do not want to rest it on your hip or thigh.
4. Uneven Farmer’s Walk:
I find that I’m often carrying something in both hands; however, those two items are usually different weights.
One of the most functional farmer’s walks, in my opinion, is the uneven carry.
To do this move, carry a lighter weight in one hand and a heavier weight in the other. Make the difference noticeable.
Just like with the unilateral carry, the challenge is to not rotate and to act as if the weights in each hand are even. Keep a nice tall posture and your core tight. The weights should not be resting on your legs and you should not be leaning to one side. Your shoulders should be level and your head should be held high, not looking toward the ground or jutting forward.
5. Overhead Carry (unilateral or two-handed):
While this farmer’s walk (I think it is also known as a waiter’s walk) is not as grip intensive, it is a really REALLY great stabilization exercise and is super core intensive.
This move can be done carrying a weight in both hands or as a unilateral movement.
The goal of both moves is to press the weight straight overhead and keep your core tight and your low back from arching. Try to get your bicep by your ear and your arm(s) locked out straight with the weight overhead. Try to relax your shoulders down and back as you carry and not shrug too much.
REALLY REALLY focus on keeping your core tight.
If you do a unilateral overhead carry, remember to not rotate or compensate for the fact that you have a weight only on one side. You want to walk as if you have an even weight in both hands.
Slosh pipes or awkward weights are great for overhead carries IF you’ve developed the shoulder and core stability. These unstable weights, or uneven weights, can be a great way to progress the overhead carry.
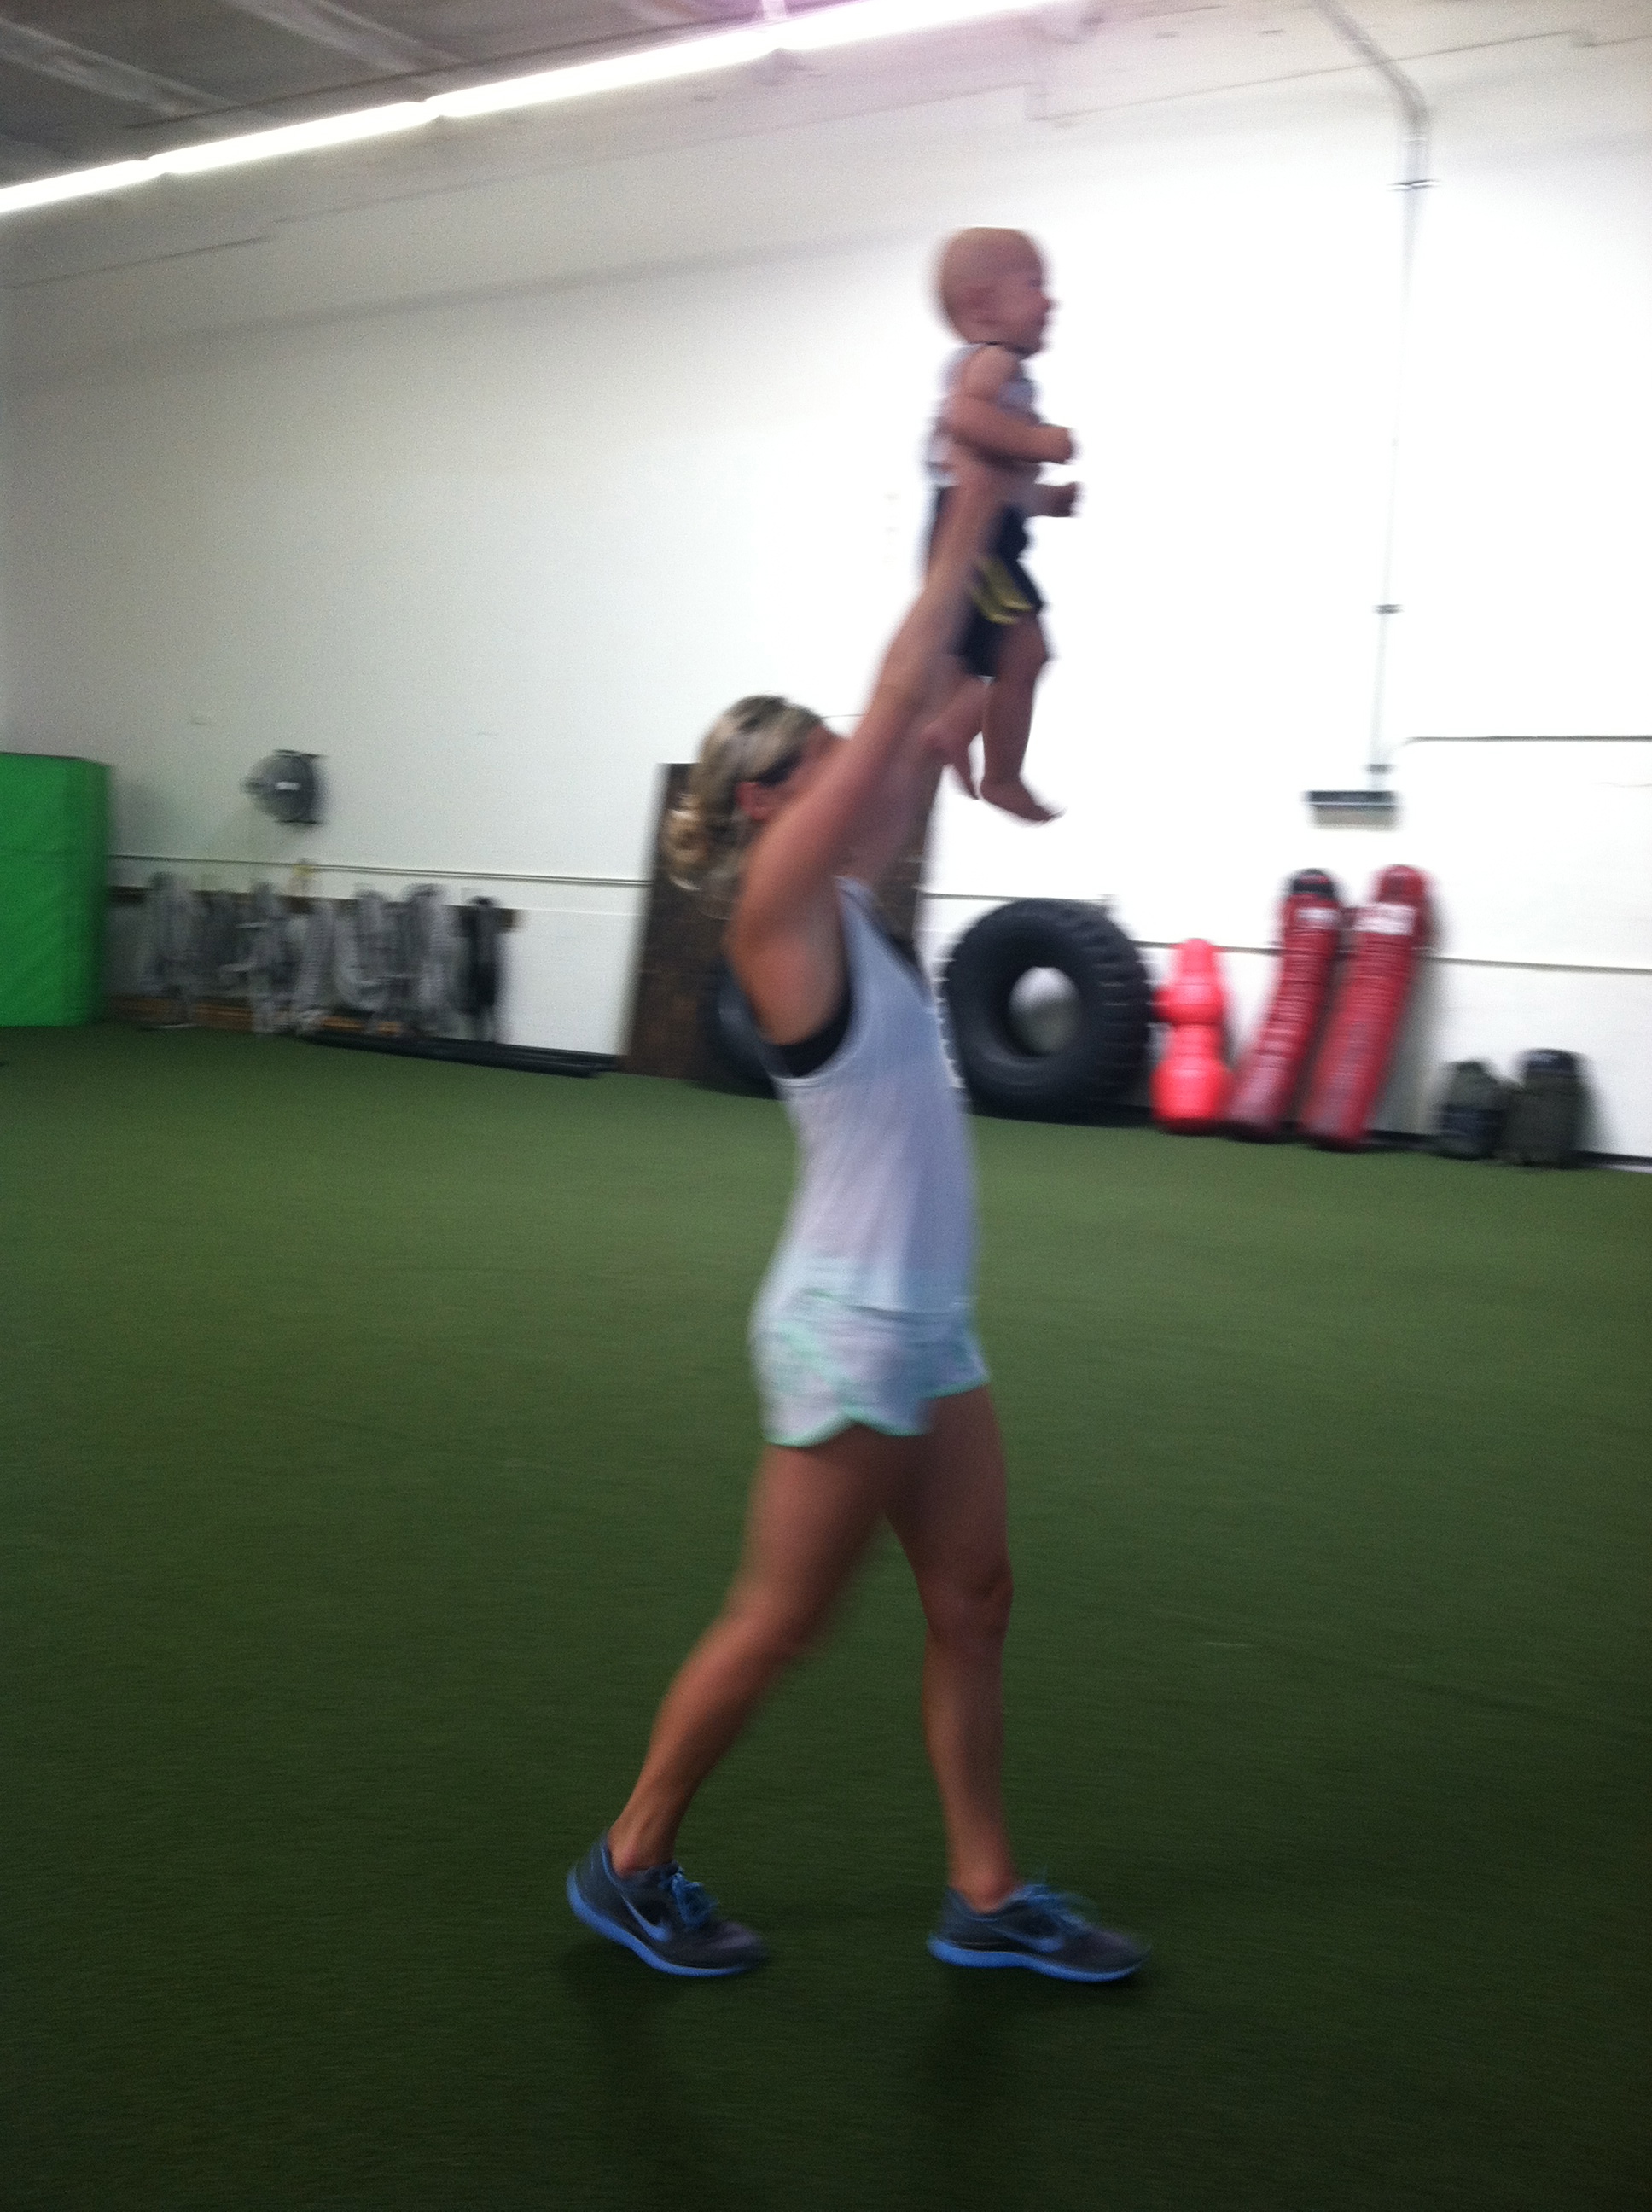
Heck you could even do an overhead baby carry!
However, if you are a beginner or have had shoulder injuries in the past, you may want to be careful with this move. This move requires good shoulder stability and both lat and chest flexibility.
Start slow with this move if you have limited shoulder mobility or have suffered from shoulder injuries. While this can be a good way to re-develop shoulder strength you do not want to force mobility and stabilization that isn’t there yet!
Stop letting your grip strength limit how much you can lift. Your are only as strong as your weakest link! Start using farmer’s walks today to strength your grip and get a full body, FUNCTIONAL workout!
AND…While Farmer’s Walks and Carries are probably the best ways to develop grip strength because they also develop full body FUNCTIONAL strength, there are other exercises you can do to develop grip strength (especially if it is your weakest link!).
Check out these 10 grip strength exercises by Fight Camp Conditioning for more ways to strengthen your grip. And the best part about these 10 exercises is that some of them can be used to create even more farmer’s walk variations (like a farmer’s walk with the pinch or claw grip or even a bottoms up carry!).
Fight Camp Conditioning gives even more carry variations!
Build a Strong Back for Better Posture (And More Pull Ups!)
Because of sitting all day, we tend to hunch forward. Our chest and lats can become tight and often the muscles in our back, especially our lower traps, are weak.
And then on top of that, people spend way more time on their chest shoulders and triceps than they do on their back and biceps. This only adds to the imbalance and creates worse posture.
It can also hinder you from being able to do pull ups! (Which recently I’ve gotten asked a lot about!)
Here are some great stretching and foam rolling moves you should do before beginning your back workouts and using the exercises below. The exercises in the post above can also be great activation moves!
These back exercises will help correct your posture and can also help you improve your pull ups!
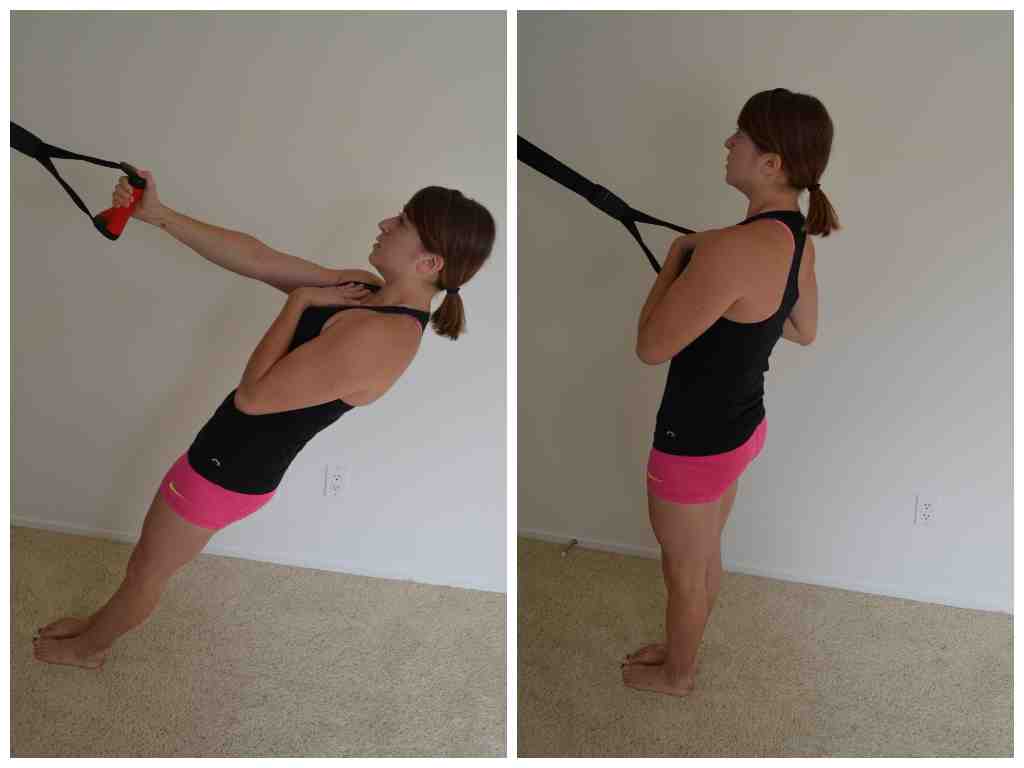
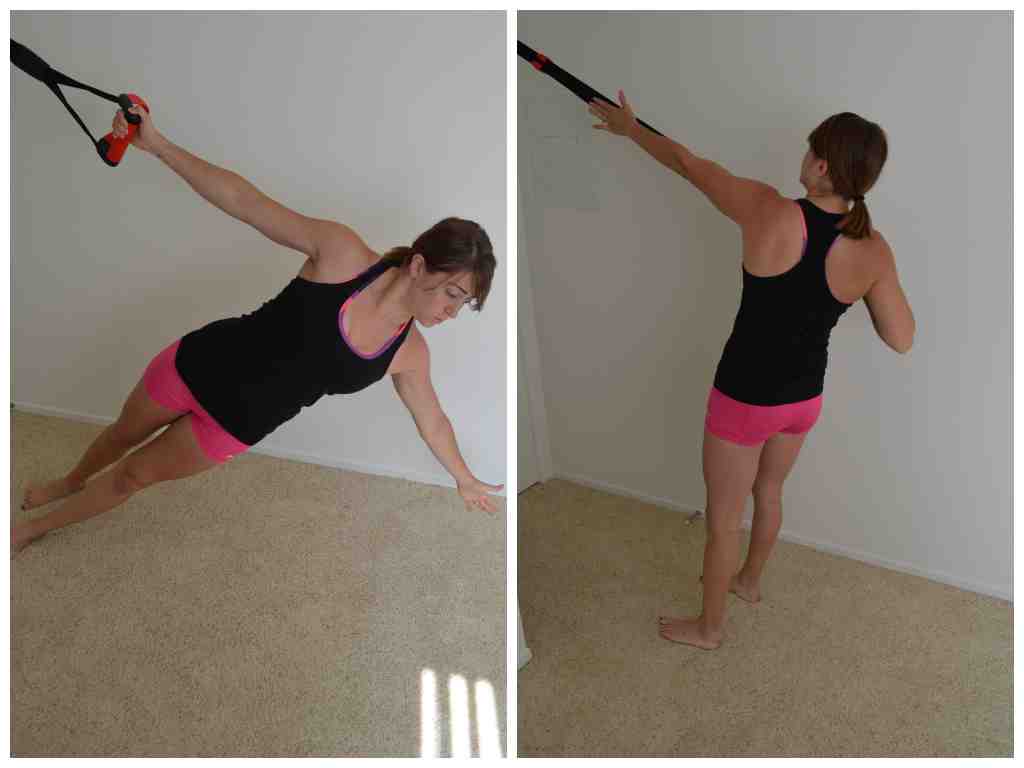
1. Inverted Row variations:
You can perform a two arm inverted row or even a rotational or anti-rotational single arm row. All three develop great back and core strength to improve your posture and build your back strength so that you can work up to a full pull up (or add to the number of pull ups you are currently able to do)!
Make sure with all three that you are keeping your core tight.
For the basic inverted row, you will hold an XT strap in each hand. Walk your feet out so you are leaning back. The closer to parallel to the ground you get, the harder the move will be. Squeeze your core and glutes and press your chest out so there is tension behind your shoulder blades. Then row up, keeping your body in a nice straight line. Row until your chest comes up to the handles and then lower yourself back down. Don’t let your hips sink as you lower back down. Also, keep your chest pressed out the entire time (do not let your low back arch though).

Do do a single arm anti-rotational row, you are going to do basically the exact same thing just with one hand. You want to keep your shoulders even just like you are holding the strap in the other hand. Do not let the shoulder of the arm not holding anything rotate toward the ground. As you row in, also make sure the shoulder of the arm rowing doesn’t shrug up by your ear.
With the rotational row, you are going to open up as if almost doing a hanging side plank. Do not let your hips dip toward the ground. As you row up, keep your core tight and rotate toward the strap, reaching as high up the strap as possible. Then rotate back up and repeat.
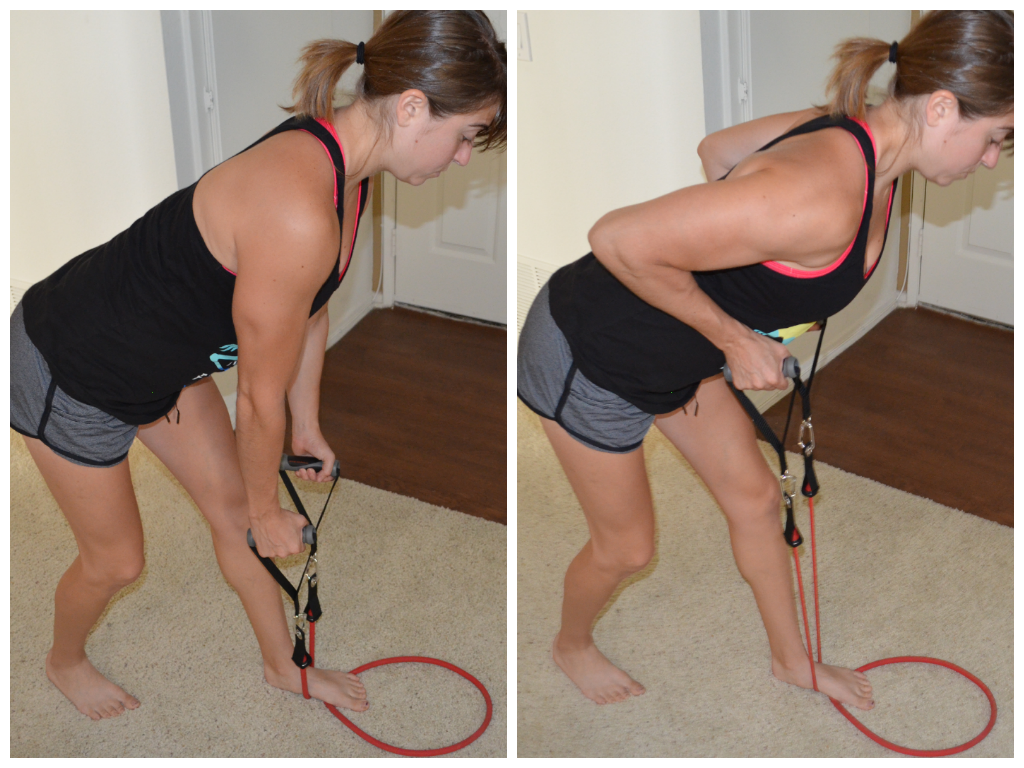
2. Row variations:
You can do a barbell row or a single arm dumbbell row. You can do a row with or without rotation. These are also a great way to develop back strength and improve posture.
Here are two great row variations using a band.
Two-arm Row – Lean forward and loop the band over itself and stand on the point where the band crosses over itself. Make sure there is tension even when you are fully extended if possible. Lean over, creating a nice straight line from the tip of your head all the way down your tailbone. Your chest should be pressed out and shoulder blades pulled down and back. Keeping your arms in by your sides, row up on the bands. Bend your elbows and pull the bands to your chest. Control the bands as you relax back down. Keep your core tight and tension in your back. Do not let your back round as you do this move! You want to make sure you are pressing your butt back and away and creating a nice straight line with your back.
Lawn Mower Row – This is a rotational row, but could also be done without the rotation. I call it the lawn mower row because it kind of looks like someone starting a lawn mower (apparently this is the midwest girl in me as many people I say that to now just kind of stare at me blankly…). Again loop the band and stand on the place where it crosses over. Reach down and then pull the band up toward your chest. As you row up, rotate open toward the band so that you can actually row up past your chest. Then control the band back down to the start and repeat.

3. Scapular Hold variations:
As you all know, I love the scapular wall hold. But there are other variations out there that are great. Basically a scapular hold is just the top hold of a row. You can do it on XT straps by holding at the top. Or you can do it by lying face down on a bench and rowing up and holding at the top. You could even just hold at the top of the two-arm band row.
Scapular holds are great at creating that scapular retraction that we need to be able to do pull ups. They are also great at strengthening our lower traps so that we have less neck and shoulder pain AND BETTER POSTURE.
Honestly, these are one of the few exercises that I have no problem if you almost do them every day. If you are sitting for a long time at your desk, get up and do them. They should be apart of your warm ups when you do deadlifts or back days. Shoot you may even include them on chest days just to get in a little extension in your back since it is so often in flexion!
These are great for injury prevention especially if you’ve had back, neck or shoulder problems!
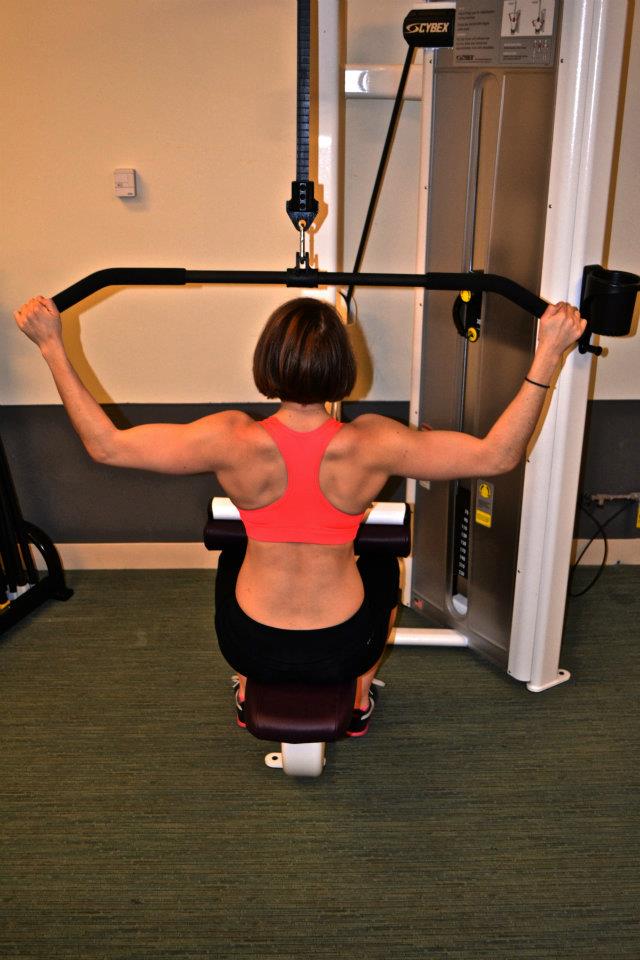
4. Pulldown variations:
These are great subs if you can’t do full pull ups. While I love assisted pull ups, pull up holds and deadhangs, these are also useful in developing strong lats for pull ups.
You definitely want to make sure though that you’ve rolled out your lats and chest before doing these moves.
Bands or even a cable machine can be used for these moves.
Kneeling Pulldown – Kneel on the ground. You can even sit back on your heels. Place a band in a door or looped over something higher off the ground. Hold a handle in each hand and reach your hands up overhead. If the band isn’t straight above you, you will want to slightly lean forward so that your upper body is inline with your extended arms. Then pull the band down toward you. You can do variations with your palms facing toward you (chin up), palms parallel or even palms facing away (pull up). Keep your core tight and your arms in by your body as you pull down. Do not let your elbows flare way out.

On the left is the pivot prone grip and the right is the parallel grip.
One of my favorite variations of this move is the Pivot Prone Pull shown by Nick Tumminello. It really works on lower trap strength.
Straight Arm Pulldown – While I don’t use this move that often, it can be another great way to strengthen your core and lats.
You can use a cable machine or a band for this exercise. Anchor the band or cable above your head so that there is a little tension when you hold your arms out straight at shoulder height. Keep your core tight and your arms straight as you press the band down toward the ground and then back toward your legs. Keep your chest up nice and tall and do not round forward. Feel your back and lats engage as you press down. Control the band back up to shoulder height.
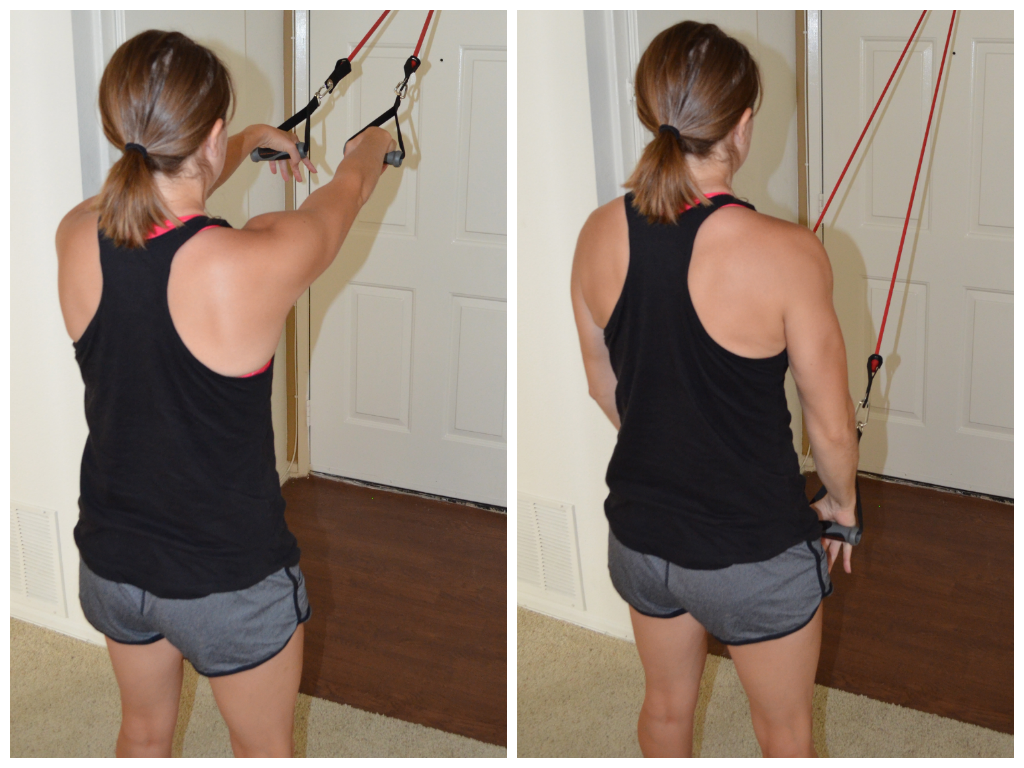
If pull ups really are your focus, this is a great move to use.
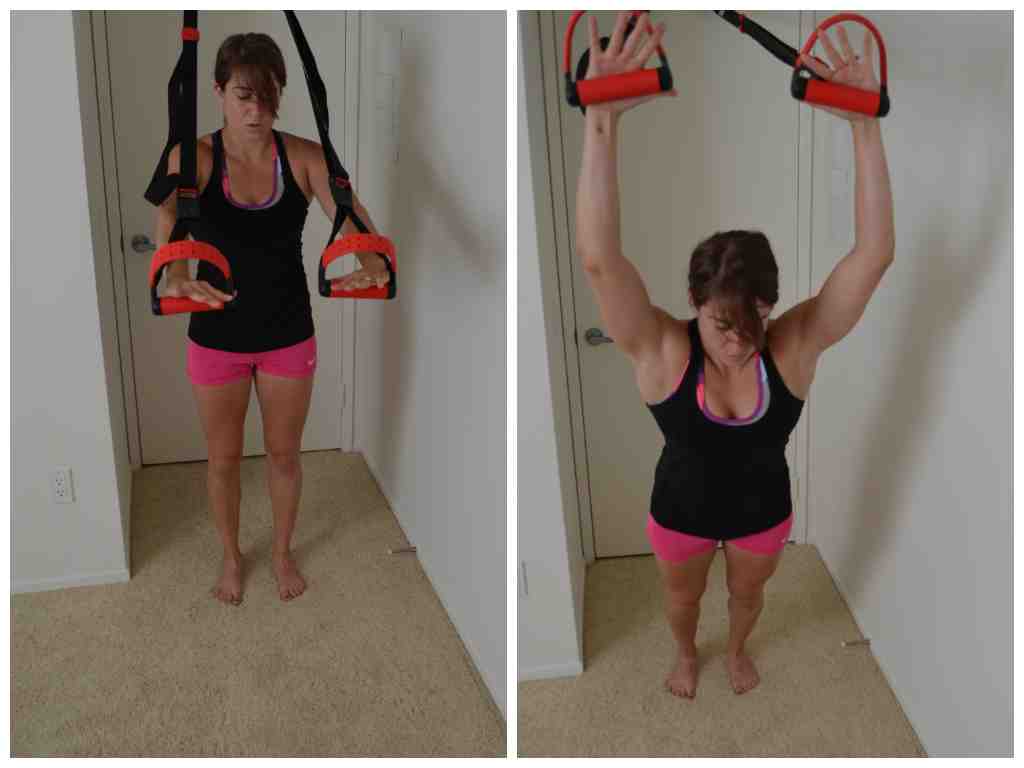
5. Pullover variations
Pullovers are also a great move to use to strengthen your lats.
You can do these with a weight or on the XT straps. This move is very core intensive. Do not let your low back arch!
Weighted Pullover – Lie on a bench or table. Set up so only your upper back in on the bench and your feet are on the ground. Bridge up and extend the weight up over your chest with your arms out straight. Keeping the elbows slightly bent, reach the weight back and overhead, extending back as far as possible. Keep the hips high and the core tight. Then pull the weight back over so that it is above your chest and repeat.

XT Pullover – Face away from the XT strap anchor point with one strap in each hand. The closer to parallel you get to the ground, the harder the move will be. Extend your arms out at about shoulder height. Slowly let your hands extend overhead, keeping your arms pretty straight. Keep your body in a nice straight line. Do not let your hips go up in the air or sag toward the ground. Then press down on the straps and bring your arms back down to about shoulder height.
All of these moves are great to improve your posture and build a stronger back so that you can do more pull ups.
HOWEVER, in your desire to do more pull ups, do not do a back workout every day. Muscles get stronger when they have time to rebuild…AKA you need rest days! If you constantly break your back down, you won’t get any stronger. So DON’T do these exercises every day!
Forced Reps – Getting that little bit extra out of your workout
All too often we give up at the first sign of fatigue or shake-age (that is my very technical term for when a muscle starts to fatigue and it gets hard to press /pull/squat/whatever the weight).
If we want results, we have to push. And that doesn’t mean working out for a lot longer or doing a ton more.
But it does mean forcing ourselves to push just a little bit harder.
It does mean forcing out those couple of reps that we really don’t want to do because they hurt.
Forced reps can be done in a variety of ways, but the point of doing them is to “force” a couple of reps that our body really doesn’t want to do so that we cause growth and change.
We aren’t going to get stronger and fitter if we just continue to do the same comfortable weight for the same comfortable amount of reps.
You need to push yourself.
Most likely your “discomfort” is more mental than it really is physical. And pushing yourself to do an extra few reps will not only push your body, but also your mind.
If you push your mind, in the future you will be able to work harder, which will lead to even more progress.
This doesn’t always mean going to failure or even past failure although going to failure isn’t a bad thing.
It just means doing a couple more than your body THINKS it can do.
So how can you force out those extra couple of reps?
Well for one, you can just do them. Sometimes by just telling yourself, “I’m going to do 8 this week because I could only do 6 last week” will be enough to make you do the extra reps.
But sometimes we really feel like we can’t eek out any more.
This is when you can use a couple of different options. Below are three techniques I like to use to make my body do just those couple of reps past discomfort.
1. Drop Sets – Drop sets are great if your goal is muscle hypertrophy. Drop sets, where you complete reps with one weight and then drop to another weight and force out more reps, really helps you recruit more muscle fibers so that you cause more muscle gains.
Let’s say you can only do 8 single arm rows with a 40lbs dumbbell. You could either choose to stop there or you could force out extra reps by quickly dropping the weight and doing more reps with that lighter weight.
With drop sets, you do reps with a certain weight and then lower the weight and do more reps and continue to do reps and lower the weight until you’ve either completed the allotted sets or you’ve hit failure.

Start heavier and get lighter. You may find that five pounds feel like 100 by the end haha
You can either do bigger drops in weight and try to increase the reps you do with each round OR you can only slightly decrease the weight, which means your reps will actually go down with each round.
With drop sets, do not rest between rounds. Try to quickly drop the weight and go right back into the exercise. The lack of rest is key to complete fatigue of the muscle.
You will probably not do more than one set of a drop set with an exercise since it will take you basically to failure. Make sure that the weight you start with is heavy for about 6-12 reps.
2. Rest-Pause – So I actually just learned the technical name for these kinds of sets after reading an article about Rest-Pause Technique by Colin over at Uber Beast Mode.
Rest-pause technique means that basically you bust out as many reps as possible, take a short little break and then go back and bust out as many more as possible until the number of reps or sets you set out to complete are done (or you’ve hit complete failure).
There are a number of ways to do the rest-pause technique.
In his article, Colin mentions one way to do it:
…[O]ne example of a rest-pause set would be to pick a weight you can do 6 times. Perform the exercise as many times as you can, (6 seems like the most likely number here don’t you think?) then set the weight down and rest for 15-20 seconds. Lift as many as you can again and repeat this process until you can no longer lift the weight. Now you can work to failure here, but let’s be smart people. You don’t want to go to actual failure on lifts where you can end up with weight on top of you unless you have a spotter. Although that is another benefit of rest-pause training. If you don’t have a spotter this is how you can get those extra reps you couldn’t safely do before as the brief rest periods will give you enough stamina to do more.
As Colin states, not needing a spotter to go near failure is definitely an upside to the rest pause technique.
Two other variations I love are:
- Do as many rounds as needed to complete a certain amount of reps. So say your goal is 30 reps on squat. Pick a weight you can do for no more than 10 reps the first time. Perform as many squats as you can with that weight and then rest. Rest no longer than 30 seconds, then pick the weight up again and perform as many more reps as you can. Continue resting and performing reps until all 30 are completed with a weight that you technically could only do for 10 reps!
- 10-7-3-1. For this rest-pause set, you will pick a weight that is challenging for 10 reps. You will perform 10 reps then rest for 10 seconds before performing 7 reps. After seven reps, you will rest for 7 seconds before performing 3 reps. After three reps, rest for 3 seconds before performing 1 rep. Then rest for a couple of minutes before performing another 1-3 sets.
3. Assisted Reps – So this one is only doable if you happen to workout with someone or there is someone there who can assist you.
But basically how assisted reps work, is that you complete as many reps as possible without assistance and then when you’re about to hit failure or can’t do any more on your own without resting, your partner jumps in and assists you with the lift.
This can be done with almost anything – squats, bench…Probably not deadlift…But the point is that someone else helps you raise a weight you couldn’t get up on your own.
One of my new “favorite” ways to use it is on push ups (Jeff at my work showed me this one…It is a combination drop set and assisted reps technique).
To do this on push ups, perform as many as you can from your toes aka go to failure from your toes and then instantly drop to your knees and keep going. When you can’t do any more from your knees, have someone then assist you with push ups from your knees until you can’t do any more without them basically having to do all the work.

Assisted push ups
OUCH!
All three of these techniques will help you get more out of your workouts without necessarily spending more time in the gym. They will also push your muscles to work harder in the time allotted so that you get great results more efficiently.
The great part about the techniques above is that they can be combined to mix things up or force yourself to work even harder.
You can do rest-pause drop sets. Or drop sets with assisted reps.
Anyway, whatever technique you chose to use, the point is to bust out those couple of extra reps that your mind and body are telling you that you can’t do.
What is your favorite way to get yourself to do those extra couple of reps?
One Exercise For The Rest of Your Life
A while back I did a post about what I thought were the five foundational exercises for health.
I said, “Deadlift, Squat, Push Up, Pull Up and Sprints.”

An oldie but goodie photo…Ah deadlift….I love you…
I started thinking about this list after the wealth of new information I’ve learned over the last year since writing that post.
What would I change about that list now that I’ve experienced so much more and learned so many new exercises?
The crazy part is….
Nothing.
Those to me still hit everything.
Although the Turkish Get Up was a tempting one. Super functional. A great way to get total body strength. A great way to help older adults strengthen their core and create a stronger mind-body connection. A GREAT move. Probably the closest one to making the list. But would it make the list…No…It would be #6.
Same goes for the hip thruster or glute bridges. While the hip thruster is arguably the BEST glute exercise out there and glute bridges are great for glute activation, which is essential, they just wouldn’t make the list. They just aren’t as complete to me as the five moves I chose.
Honestly, deadlift, pull up, push up, squat and sprints hit EVERYTHING. Almost all the moves work the entire body. And they are functional. They are also movement patterns that I think everyone should be able to do.
I guess the only thing that made me hesitate about committing to the list above is the fact that all of them are sagittal plane movements and I really do believe it is important to move in every direction. I guess for that reason the only thing I might at some point do is switch out squats for lunges…but at this place and time, that just isn’t happening.
So if you every wanted to know what I think the five best foundational moves are:
Deadlift
Squat
Pull Ups
Push Ups
Sprints
Every workout progression should include some variation of these moves, if not these moves in their purest form.
Now the only other comment I would make about this list, is that BEGINNERS may have VARIATIONS of these moves to start. BUT the intent and purpose of those moves would be to get them to these five.
NOW….
Last night while we were doing a glute workout, I got asked, “If you could only do one move for the rest of your life, what would it be?
I didn’t even have to think…Actually it was easier than picking five moves…

I liked this picture and thought it really hit the basics of form.
Why do I think the deadlift is the queen/king of exercise moves?
Because it hits everything down the entire back side of your body, which honestly is generally highly underactive in a society that sits all day hunched over a computer.
It works a ton of big muscle groups. It strengthens areas that are weak on post people, their back, their core, their glutes…
And it is functional. Think about how many times a day you have to freaking pick things up off the ground.
People tell you, “You need to squat down to pick stuff up!”
But actually you DON’T need to squat down!
You need to DEADLIFT!
The deadlift is not a squat. Your chest does not stay back. You HINGE forward. And when you pick something up, you generally ned to lean forward to get it.
And on top of all that, DEADLIFTS ARE EMPOWERING.
I’m sorry, but there is nothing like picking something super heavy off the ground to make you feel strong and confident.
For me conquering any other task, even the 300ft on the Versa Climber which made me want to throw up 12 hours later and made me want to cry for my mommy, didn’t feel near as empowering. It didn’t make me feel near as strong. (Actually it just made me feel sick and like I never wanted to step on the Versa Climber again….)
To me deadlift is queen…or king….end of story. I could list a bazillion more reasons, but those should give you the gist of why I think that.
So my question to you is, “What do you think are the five foundational exercises?” And if you could only pick one, “What do you consider to be the best of the best?”
There are no right or wrong answers. Every list has great points and every list has flaws. I even showed you what I thought were a couple of the flaws in mine. (The great part/bad part about fitness is that there really are no right and wrong answers…Ok…maybe there are a few wrong answers…But those are generally when people do stupid things with bad form….)
Anyway, looking forward to reading some other lists! Hope you share yours!
Redefining Strength – Empowerment through exercise
So over the last year, I’ve thought a lot about what Man Bicep stood for in my life and the life of my clients.
It wasn’t about powerlifting. It most definitely wasn’t about running. And it wasn’t even about a specific diet.
It was about doing something….anything…that made you feel healthy and strong. It was about working out to feel empowered.
It was about taking on new challenges and feeling like you COULD do anything.
It was about redefining what strong really means.
And so I started considering what could really make us feel more empowered. And I began developing workout programs based around this principle.
I believe that working out can be an outlet, a release. I believe it can help us build confidence in a way few other things can. Overcoming physical challenges – lifting more or running further than we thought possible – is just about the most empowering thing you can do.
So I created “Redefining Strength.”
Right now the site has a few products that I’m giving away. I spent a lot of time considering what would be most helpful and supplement everything that I post here, on Man Bicep.
If you go over and subscribe, you will get 4 different reports. One is bodyweight exercises that can be done by beginners and advanced a like. They are basically exercises you can do anywhere and get a full body workout.

Handstand progression…I show you ways to progress up to one!
You will also get a list of 10 Simple Diet Changes. Be you vegetarian or Atkins dieter, there are tips on there that EVERYONE needs to follow.
I also spent a lot of time creating a foam rolling video library and cheat sheet. I believe that foam rolling is one of the most important things when it comes to moving well and feeling great. I even included some foam rolling videos that show you how to roll out even if you don’t have any of the fancy trigger point equipment.
And last, but not least, you will get a goal setting sheet. I debated about putting this one in since many of you will skip it. But honestly, goal setting is one of the best things you can do for yourself.
I know it’s cheesy. I know it’s boring and seems stupid. But trust me it’s worth the time if you really set goals that MATTER.
Goals that MATTER are what keep you committed even through the roughest of times. Goals CAN be motivating and keep us on course.
You just have to set goals in a way that don’t allow them to fall by the wayside like most people’s New Years resolutions!
So head over to Redefining Strength and check out those four guides and the video library. I hope it gets you as excited as I am for the programs launching in August!
As always, if you have any questions, feel free to email me at manbiceps@gmail.com.
Does size matter?
So I’m definitely a bit perverse because when I thought of calling this post “Does size matter” I made myself giggle.
Anyway…..
Yesterday Ryan and I moved…again…
I’ve literally moved at least every year for the past seven years and I must say, I’m pretty sick of it! (Although I must admit that every time I move I am inspired to write a post about something that happened, like IKEA last year…and this time is no different.)
Every time I move, I think about how grateful I am that I lift heavy on a regular basis because carrying awkward and heavy pieces of furniture up and down flights of stairs is by no means easy or fun.
Like yesterday carrying our gigantic TV stand, which takes up a whole wall and looks amazing, but is a pain in the butt to move.
The stand is taller than I am and most definitely weighs more. It is also extremely long so that it doesn’t easily maneuver through doorways or around corners. Ryan and I were even afraid that it wouldn’t fit through the front door of the place because of the stairs and a very tight turn at the top.
But we also didn’t really want to take it apart before we moved because then we would have to put the bazillion Ikea pieces back together.
So we risked it.
We managed to get it out of our first place and into the truck fine. We also didn’t even struggle with a few other big (and cumbersome) pieces that we feared might not make it down the stairs.
So of course we were super worried that the stand would be impossible to move at the next place since the walk from the truck to the apartment was double the length and up two long flights of stairs (and we’d had such great luck already that something had to go wrong….right?)
When we get to the new place, we first remove all of the boxes and lighter furniture…up and down the stairs.
There is no workout that exactly compares to carrying awkward and heavy things up and down stairs…

This is what the stairs looked and felt like when moving yesterday.
And then we got to the TV stand.
Ryan and I had debated on who should walk backwards up the stairs and who should push from the bottom.
I’ve heard before that the stronger person should go in the back and push up the stairs…So of course, I went to the back to push…
Just kidding.
But I actually DID end up on the back-end after we experimented with the desk, but not because I was stronger.
I found that being a bit weaker and shorter than Ryan, I struggled to lift as well in the very awkward position of walking backwards up the stairs.
My strength and height served me much better when I was in the less awkward position pushing up on the heavy furniture from the back.
Which got me to thinking about SIZE when it comes to lifting.
People often try to say that they CAN’T do something because of their size – They are too tall or too short. Their arms are too long. Or they are too heavy.
And while I usually get annoyed by those comments because really they are just simply excuses, there is something to SIZE.
How you are built can positively or negatively affect certain lifts and exercises.
That doesn’t mean you have an excuse not to be able to do a pull up just because you have long arms. Or that I have an excuse to not lift heavy awkward furniture just because I’m shorter.
But it does mean that I can’t compare myself to someone else more easily lifting the small box that I just struggled and dripped sweat over the minute before.
And that right there is exactly my point.
We can’t compare ourselves to anyone else because everyone truly is different. We are all different shapes and sizes and that does factor in to our workouts.
So stop comparing yourself to the woman next to you lifting. Stop comparing yourself to how fast she is running.
Start focusing on your own goals and what you CAN DO.
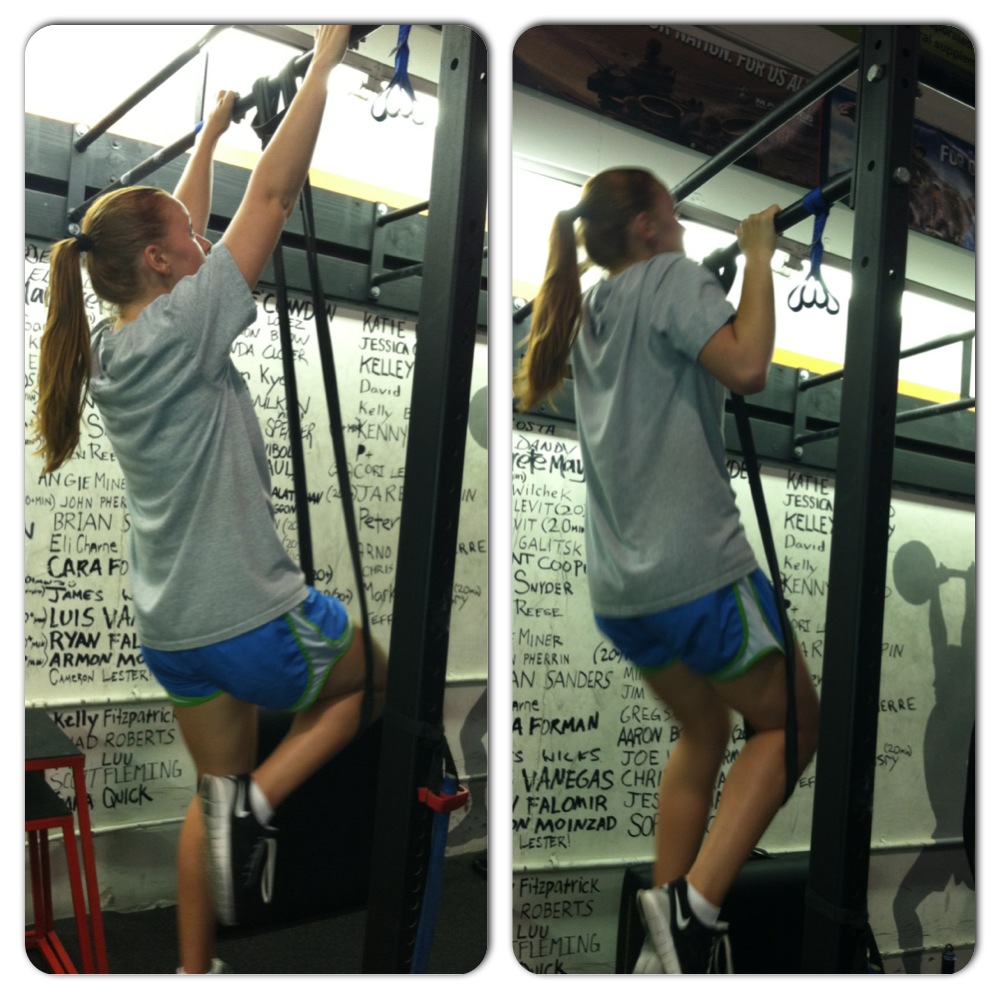
Ladies…Do you want to learn how to do a pull up?
So we did testing the other day at the gym and one of the tests was a pull up test.
You probably aren’t surprised to hear the following statement, but we only had a couple of women who could do legitimate pull ups (by legitimate I mean no kipping…I have nothing against kipping, but it isn’t a TRUE pull up even if it does have its own benefits).
When I then asked all the women that didn’t do a pull up if they would like to be able to do one, most did say YES. Actually all said YES.
So then…why weren’t more women able to do one!?!
My theory is that most of the time, it isn’t that we don’t want to be able to do something, it is just that we don’t know where to begin so we don’t even start. Or we are intimidated by the move and don’t believe we can do it (again because we don’t know how to get there). Or we jump into something we think might help with no way to track our progress and then we fall off when we aren’t able to do a pull up within a few short workouts.
So below are some great tips to help you be able to do a full pull up!
Three great activation moves I like to use to warm up for a pull up workouts are:
- Scapular Wall holds – You’ve probably guessed by now that I LOVE these. They are great to improve posture and activate your upper back muscles. If you want to be able to do a proper pull up, you need to make sure that your lats activate and that you use the big muscles in your back. This move will help you do that.
- Scapular Push ups – This move does the same sort of thing that the wall holds do – It helps you get that scapular retraction that is necessary to do pull ups.
- Dead hangs – So at the beginning, I want you to just hang from the bar and get a feel for holding your body weight. Focus on tightening your core and even maybe tighten your back as if you are going to pull up. Then once you’ve done a few straight hangs, you will progress to a hang with a scapular retraction. You then want to press your chest out and pulling your shoulder blades down and together while you hang from the bar. If you can’t hold for long at the beginning, start with reps of retracting and then relaxing.
All three of these moves make you activate the muscles used to do a pull up and help you warm up your core!
Many people who can’t do pull ups will then turn to the lat pulldown machine and even simulate pull ups with bands for their “pull up” workouts. And while these moves are great to strengthen many of the muscles used by pull ups, they still aren’t the same as actually doing pull ups. They can be great supplementary moves, but if you want to be able to do pull ups…You’ve got to actually do variations of the pull up!
I haven’t used this machine now in over a year and some and guess what!?! By doing negatives and holds my pull ups have gotten WAY BETTER than they ever were doing lat pulldowns!
So once you’ve done the activation moves, try one of these assisted pull up variations and progress toward harder and harder variations until you can do one unassisted! If you have an assisted pull up machine, you can use that as well, but I personally like these better because they give you more control over the exact amount of assistance!
With both of the assisted variations below you can do three different things to progress or regress the move. You can do holds, negatives and full range of motion pull ups/chin ups.
- Holds – You can hold at the top, middle and/or bottom of the move. Each will work on strengthening the muscles at each piece of the motion. You can jump or push yourself into position and then hold once there for as long as possible.
- Negatives – With negatives, you work the eccentric part of the motion. To perform a negative, you will set yourself at the top of the pull up and then lower yourself down as slowly as possible.
- Full pull up – You will use assistance to perform a FULL pull up, which means chin above the bar to arms straight at the bottom.
The two different ways you can get assistance to do these three variations are:
- Foot assisted pull up – Hang from a bar or use TRX/Jungle Gym straps. Place your feet on the ground underneath you. The more firmly planted your feet are, the easier the move will be. Your goal is to use your feet as little as possible. Your feet will assist only as much as you so that you can perform a hold, negative or full pull up.

Thanks Carla for demoing!
- Band assisted pull up – Hang from a bar with a band around your knee or knees (putting the band under both knees makes the move easier). The band will add assistance as you perform the move. The skinner the band, the harder the move. The more you control the move and don’t swing, the less the band will propel you up.

Thanks again Carla!

If you don’t need assistance to hold a pull up or chin up or to perform a slow negative, then you may move to the bar without assistance. Don’t use assistance if you can perform 10 3-5 count negatives (and not a fast count) or 30 second holds without assistance. Make sure you can perform the move correctly before advancing. But also make sure that you are always checking your progress to see if you can perform the moves without assistance.
Remember, your goal is to lower assistance as you master each move. Don’t just waste time on the lat pulldown machine trying to get stronger or by doing assisted pull ups on the machine. Work on each piece of the pull up and ween yourself off of the assistance!
So do you want to be able to do a pull up? What are you doing to get better at them?
Here is also a great workout to strengthen your back and biceps to help you get stronger so you can do a pull up.
NOTE: In this post I didn’t really go into grip variations. The easiest grips to do are usually the neutral or chin up (palms facing you) grips. The pull up grip and wide grip variations are generally more difficult.


