Blog Archives
Work On Your Push Ups By Doing More Push Ups
Sometimes push ups are their own best supplemental exercise.
Want to strengthen your basic standard push up?
Then you need to strengthen your weak points AND you need to do more push ups.
Why not strengthen your weak points and do more push ups simply by using a couple different push up variations instead of a ton of different supplemental exercises?
So how do you use push ups to make your push ups better?

Pick variations that target your weaker areas!
Home Workouts – Keep It Simple Stupid
The other week I was contacted by the OC Register about participating in a column they were writing throughout the year about workout moves you could do at home. They were talking to a few different trainers in the area and getting each of them to demo about 8-10 exercises. (My first move will be featured on the 25th…AHHHHHHH!)
You could use equipment. It just had to be something that could easily be stored.
I was super pumped to participate and instantly started writing out a list of things I could do. I debated about a kettlebell or sandbag.
But decided against using any equipment except for something someone would easily have lying around the house.
I’ve become extremely interested in finding and creating great and challenging home workout moves you can do with limited space and no equipment and I wanted to highlight some of those moves.
And when the reporter asked me why I picked the moves I did when there are so many crazy cool new pieces of equipment out there that could be stored easily at home….
I said, “Because you don’t NEED any of those!”
Equipment can be fun. It can keep you interested and add variety to a routine that is getting stale.
But it isn’t NECESSARY.
Equipment doesn’t mean you are going to get a more challenging workout. Heck sometimes it even means getting away from truly functional moves that will truly have the most benefit.
Equipment is a TOY. It isn’t necessary even though people have become convinced that they can only get in a great workout if they have the latest and greatest TOY.
Basically, I explained to him that I wanted to make a point that you don’t really need ANYTHING to get in a great workout at home! That there are a ton of tweaks you can make to traditional moves to make them more challenging and keep your workout interesting.
Yea I love equipment, but sometimes it just takes us away from what is important. Sometimes it distracts us from focusing on what will actually help us achieve our goals.
Sometimes equipment just complicates moves unnecessarily.
Sometimes we would get more out of a workout if we just KEPT IT SIMPLE and stuck to basic moves and movements!
Pull, push, squat and hinge. Those four basic movements are all you need.
Push Ups, pull ups (or rows), squats and lunges. These are examples of each of the four movements above.
Those four moves work your entire body. And those four moves can be made challenging without any equipment. There are also a ton of variations you can do without anything fancy so you never get bored.
Push ups can be done on an incline. Or you can do them on a decline to advance them. You can do handstand push ups. Or set up some books and do a shuffle push up over them. You can also do a push up to side plank or a fly to push up on a towel. (For more push up variations, here are some ideas. You can do all of these at home even the push up to dip.)
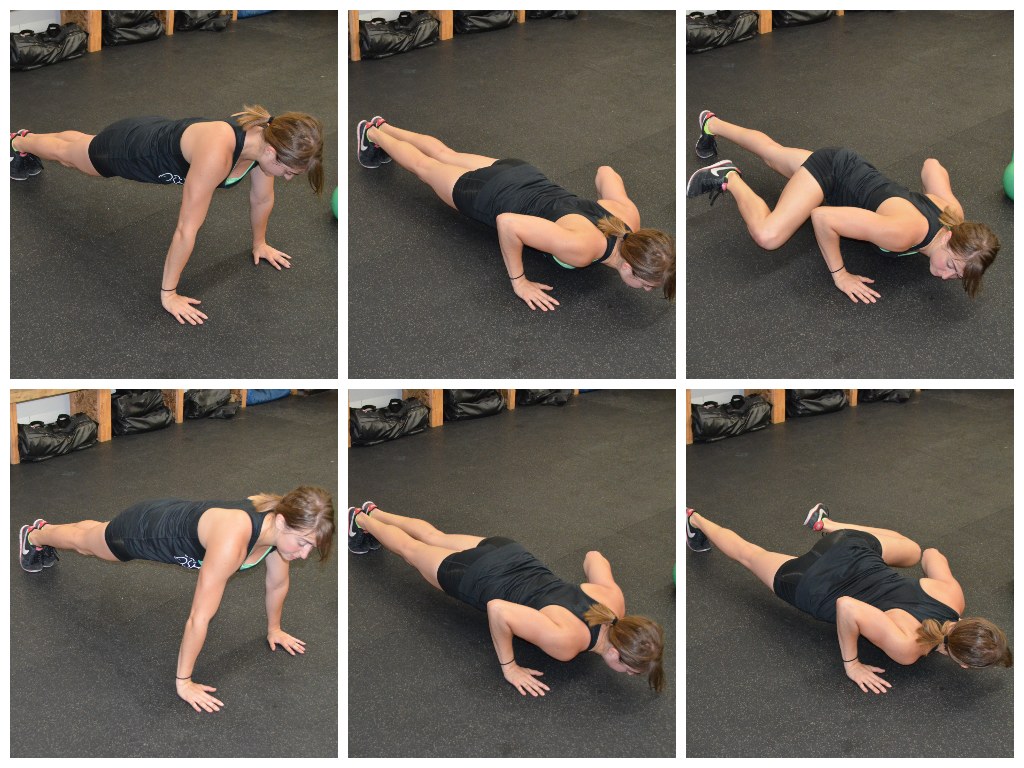
There is always the spiderman push up too….
All these moves are simple. None of them require anything you don’t have at home. And all just are slight variations on the traditional push up.
We aren’t reinventing the wheel here.
We are just tweaking it slightly to make it harder or easier. We are adjusting it to focus on slightly different parts of our body.
Same goes for the pull ups or rows, squats and lunges.
Especially the lunges.
People think of lunges and they think forward and backward lunges….maybe they even include side lunges. But what about curtsy lunges? What about lunges in EVERY DIRECTION? You can do angled lunges. Rotational lunges…You can literally lunge in every direction to hit different aspects of your leg.
You can lunge in EVERY direction!
And on top of that you can add a towel to one foot to increase the intensity of the lunges. Or you can even do a balance lunge with your foot up on a couch/chair/table to make the basic split squat even more difficult.
You can do lunges where the weight is on the leg moving out. Or you can do a lunge where the leg working is more static. For example: On a side lunge, you can either step out into the lunge and sink into the leg that has stepped out OR you can sink into the standing leg and then just reach the other leg out straight to tap the toe out to the side.
Both work the leg in very different ways!
But you don’t need any fancy equipment to make the moves hard or even add variety! You can work your legs from every angle just by doing a LUNGE.
Keep it simple stupid.
Don’t worry about the latest and greatest equipment. Stick with the basics and you will get results!
What are your favorite variations of the push up, pull ups (or rows), squats and lunges? Do you find that you get caught up always looking for the next new piece of equipment? Do you even skip workouts at home because you don’t have “equipment?”
P.S. Who likes working out with a friend or a spouse? Interested in some great partner moves? Check back tomorrow!!!
Home Workouts – 10 Moves You Can Do With An Ikea Table
So yesterday when Ryan and I were doing some foam rolling stuff, I used a table for a couple of the moves.
It was just our little $10 Ikea table, but it was amazingly sturdy considering I put it together…Although that may be better than if Ryan put it together…Sorry Ryan…But it’s true…
Anyway, when I used the table, Ryan said to me, “I wonder if you could do a full body workout with just that table?”
My answer, “You totally could!”
Here are 10 moves you can do with just a cheap little Ikea side table! Love you Ikea! 🙂 (The moves are in no particular order)
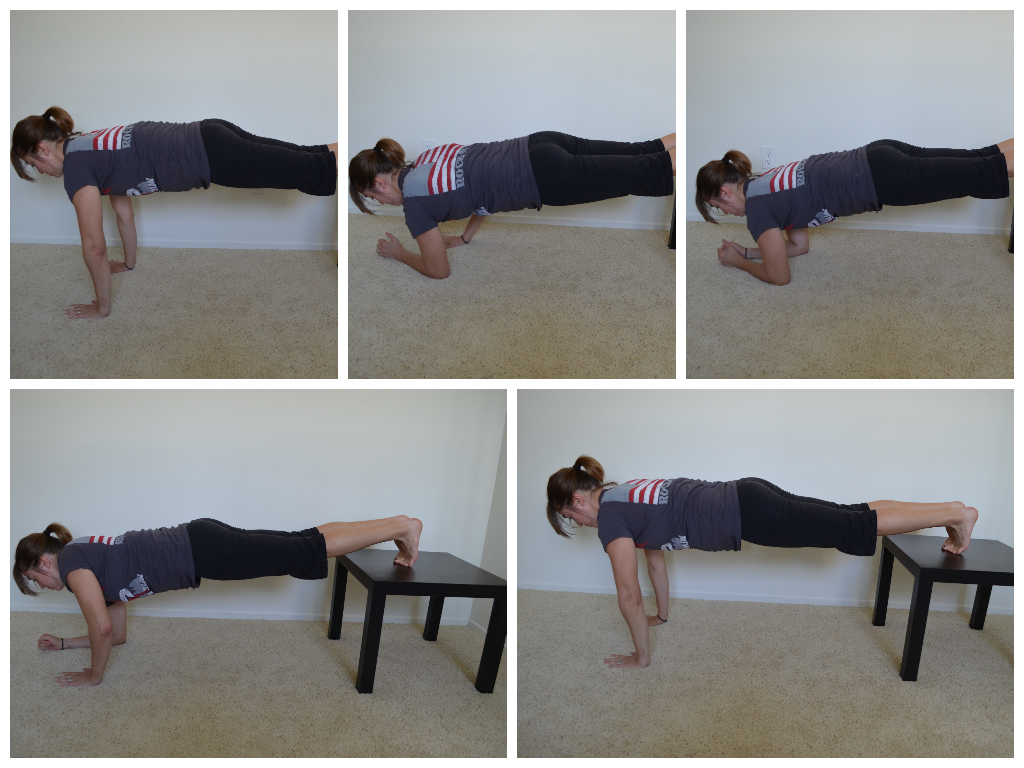
1. Decline or Incline Push ups – You can make the push up easier or more advanced using the table. To make the push up easier, put your hands on the table and then perform the push up from your knees or toes. Doing the push up from your knees will make it easier than from your toes. To advance the push up, put your toes on top of the table.
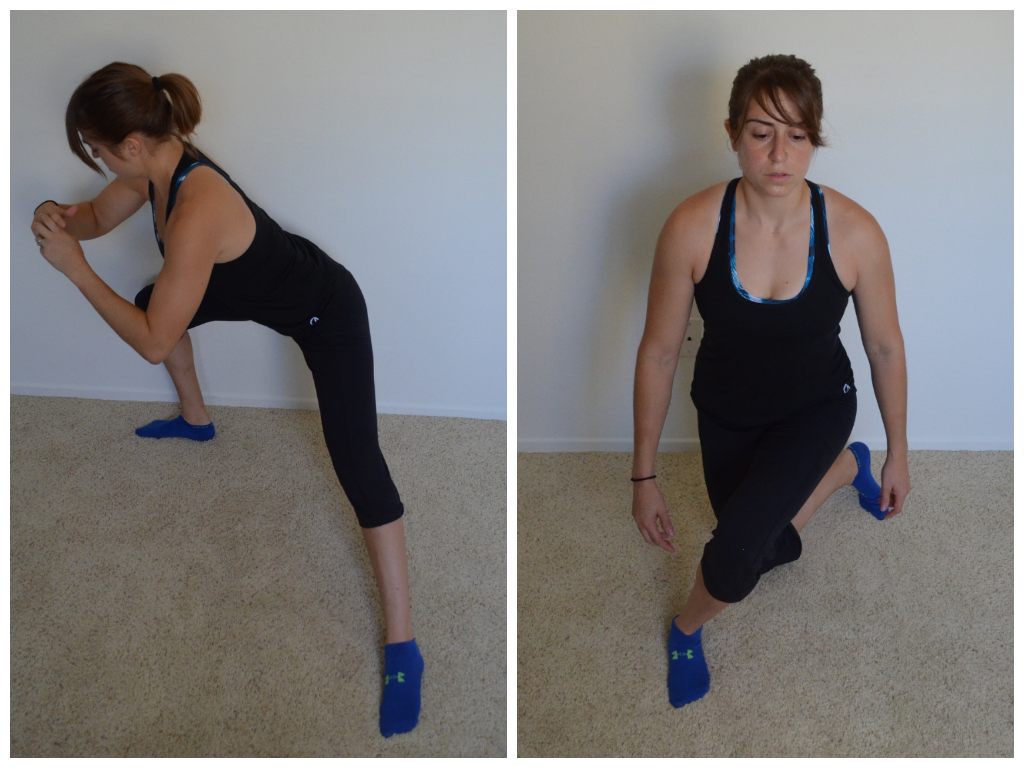
2. Balance Lunges – The balance lunge is a great leg move to do if you don’t have weights. Place your back foot up on the table and hop your front foot out so you are in a nice wide stance. Then lunge down, dropping your back knee toward the ground. Really sit back into the lunge. Make sure you aren’t going forward and that your front knee is not going past your toe. You should feel a nice stretch in the front of the leg that is back when doing this move.

3. Single Leg Squats – This table is a great way for beginners especially to start working on their pistol squats. It is also a great way to really correct imbalances since you are working legs individually. If the table is too low for you at the beginning, start with a two-leg squat to bench. Then progress to one leg. Beginners can completely sit down on the table. As you advance, try to only barely tap the table with your butt before standing up. Do not rely on sitting on the bench to stand back up.

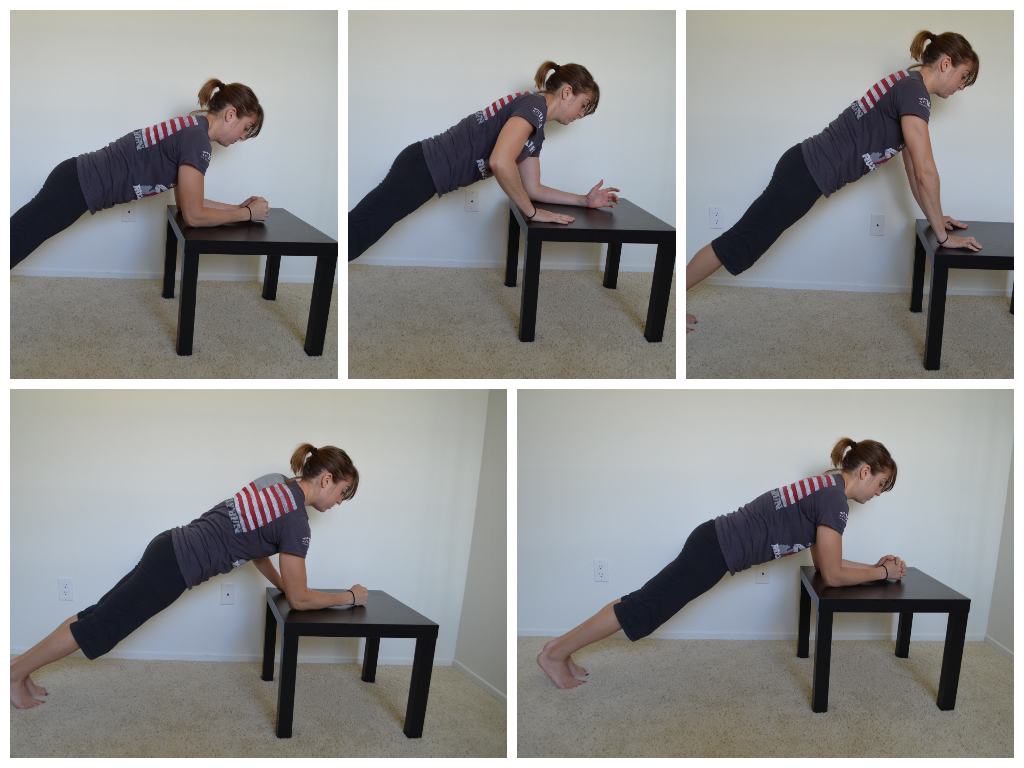
4. Incline or Decline Climbers – These aren’t mountain climbers. With climbers you are working your shoulders and triceps. Beginners should start in a plank position with their forearms on the table. Next climb up one hand at a time until you are at the top of a push up position. Then climb back down to complete the rep. Advanced exercisers should do this move with their feet elevated on the table instead.
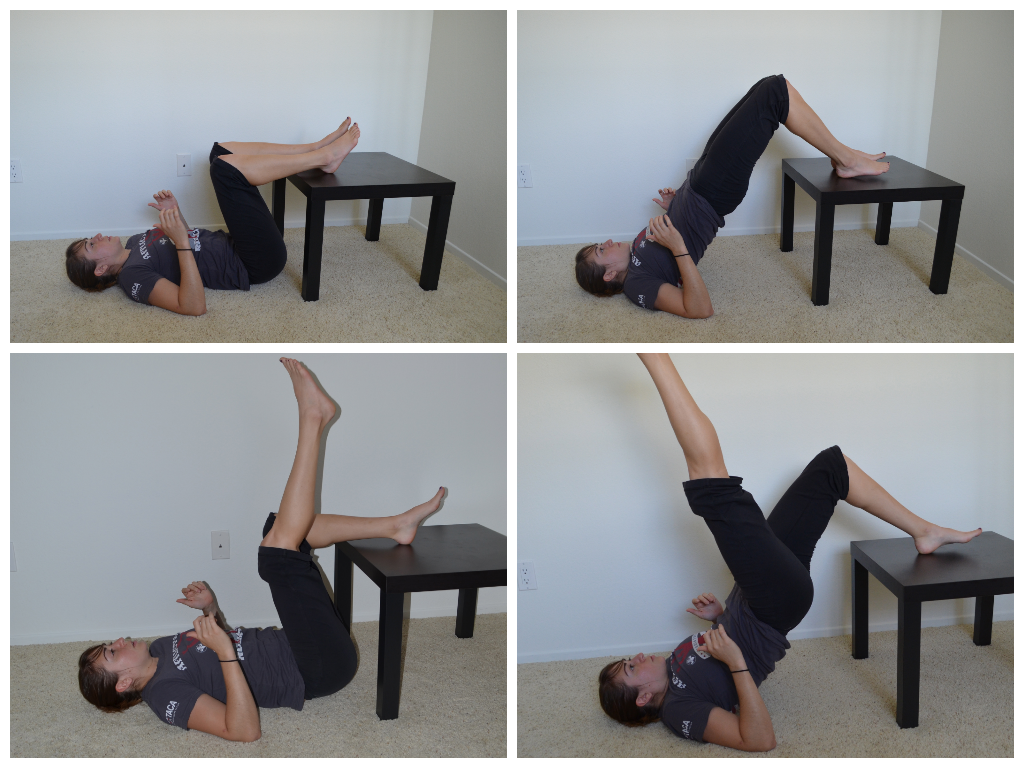
5. Glute Bridge off table – A great way to advance the glute bridge is by putting your feet up on the table. You can do either a double leg glute bridge, which is a bit easier, or a single leg bridge, which is a bit more difficult. Start by lying on the ground with your heels on the table. Your butt should be close to the table. Arms are bent to 90 with elbows driving into the ground. Squeeze the glutes and drive through the heels, lifting your hips as high as you can in the air. Keep your core tight and glutes squeezed. You should not feel this in your low back. To make the move even more beneficial, hold each rep at the top for 2-5 seconds.
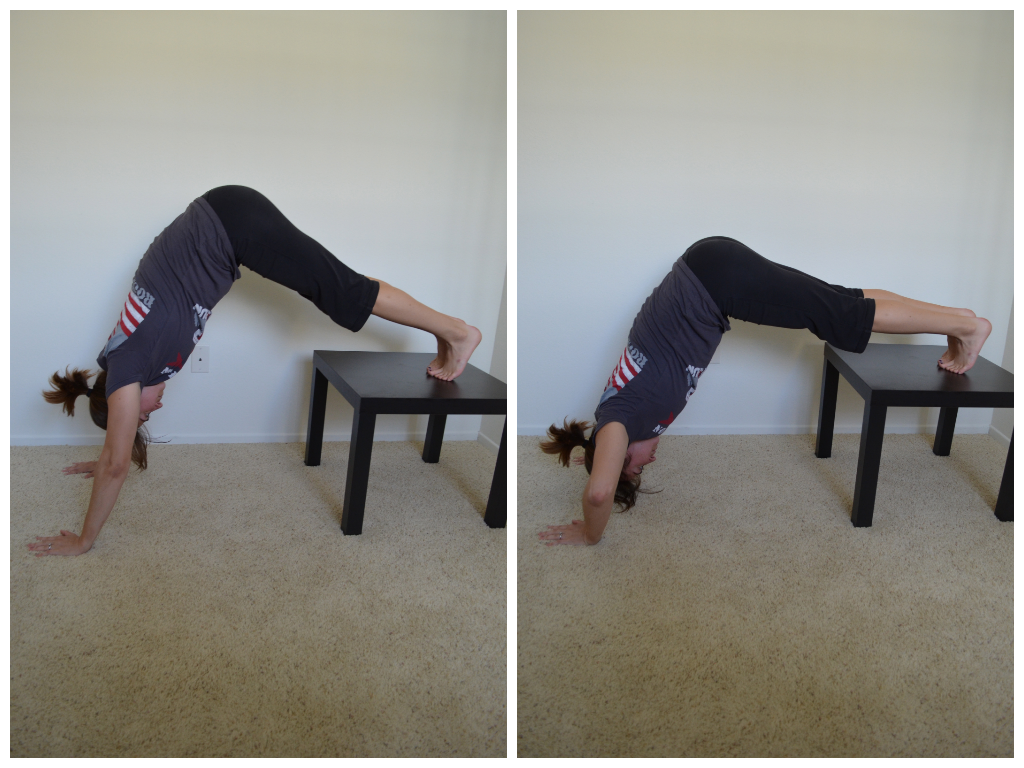
6. Handstands – Handstands are a great upper body move. Using the table you can either do a beginner handstand hold or you can make the move more advanced by adding in a push up. To do the hold, place your feet on top of the table. Walk your hands back a bit and push your butt up towards the ceiling. Push off your toes to get as vertical as possible, creating a nice straight line from your hands, up your arms and core to your tailbone. If this is easy, add the push up in while holding this position. Drop your head down to the ground and then lift back up.
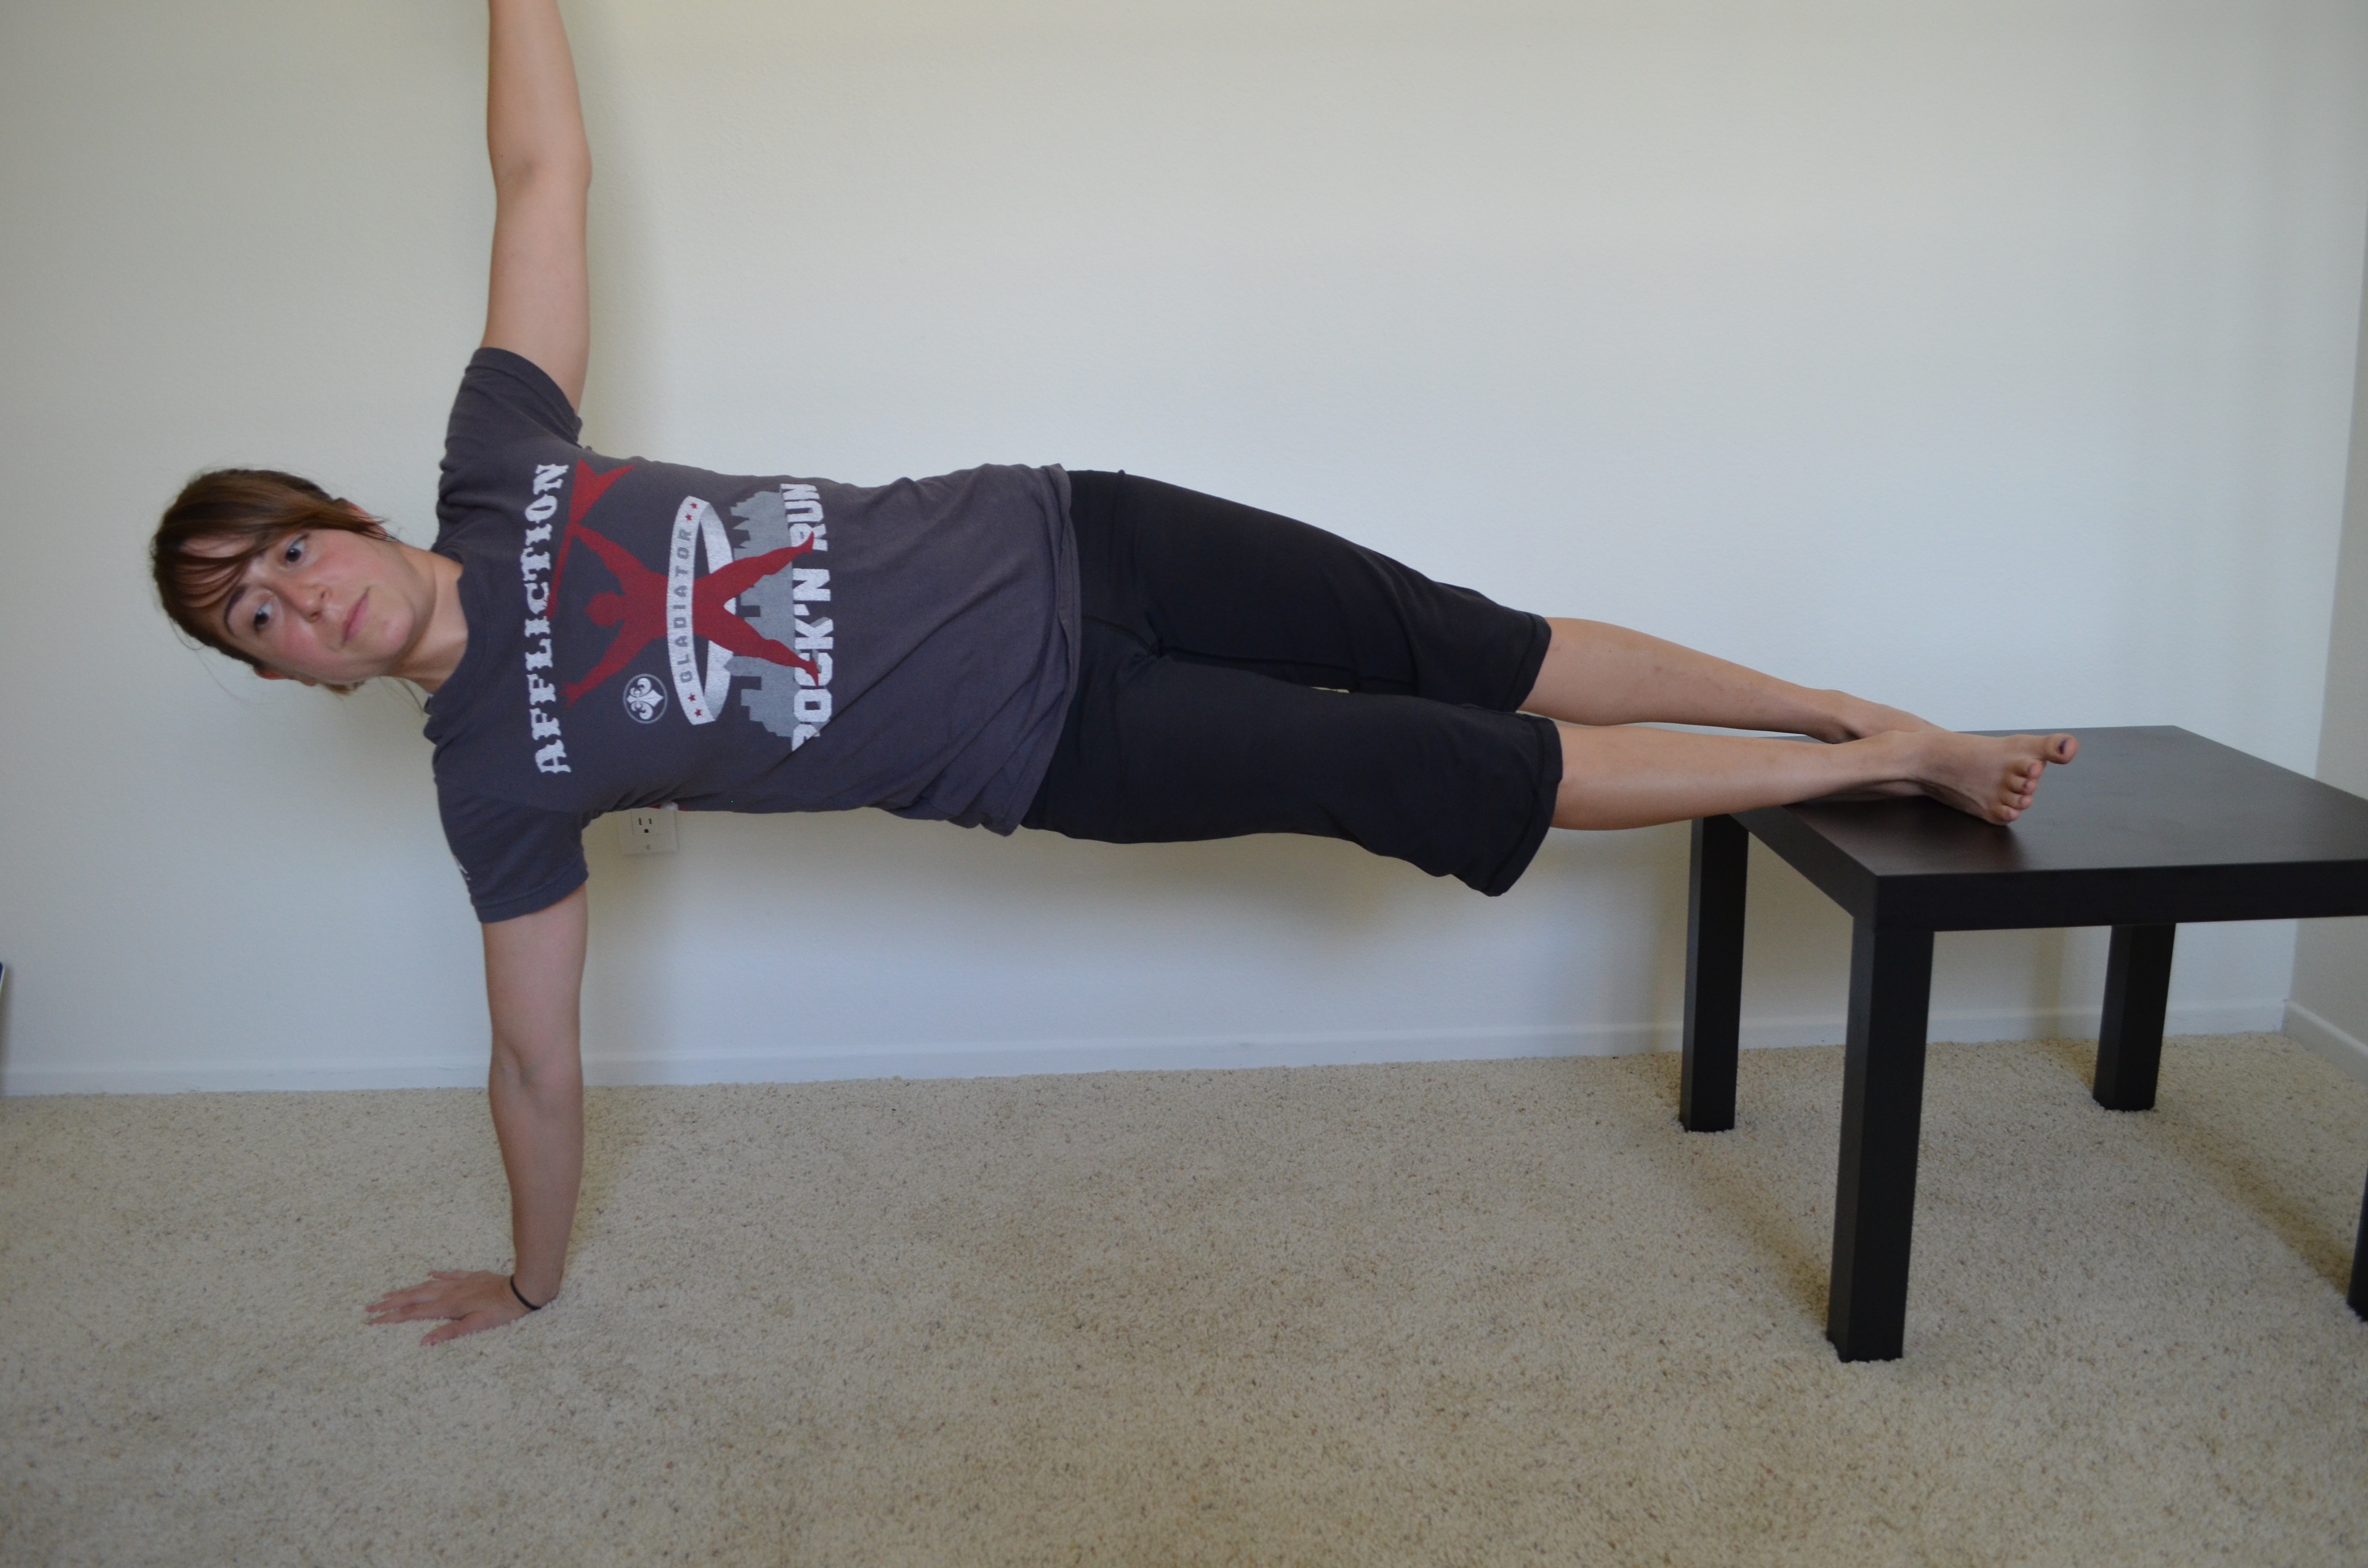
7. Plank Holds – Plank holds are a great overall core move and the table can be used to make the move easier and more difficult. Beginners can hold front and side planks with their hands on the table and feet on the ground while advanced lifters can have their feet on the table and hands on the ground.
8. Lying Bat Wings – One of my favorite moves is scapular wall holds. When playing with the table, I realized you could do the same hold while lying face down on the table. Lie down with your chest on the table. Bend your arms to 90 degrees and then pinch your shoulder blades down and back. Try to bring them together you are pinching back so hard. Hold that move. Beginners can hold for 30 seconds. Advanced can hold for up to a minute. If you want to make it even more challenging, you could add weight to each hand…even if it is just in the form of a book.

9. Reverse Hypers – A great move for the glutes and hamstrings and most easily done with a piece of equipment; HOWEVER, using a table is a PERFECT way to do reverse hypers at home. Lie face down on the table. Make sure your hips are right at the edge. Squeeze your legs together and lift your legs to basically parallel to the ground. Hold for 2-5 seconds and lower. You can do reverse hypers with either bent or straight legs. Both have their benefits. You should not feel either though in your low back. Keep the core tight and really squeeze the glutes.

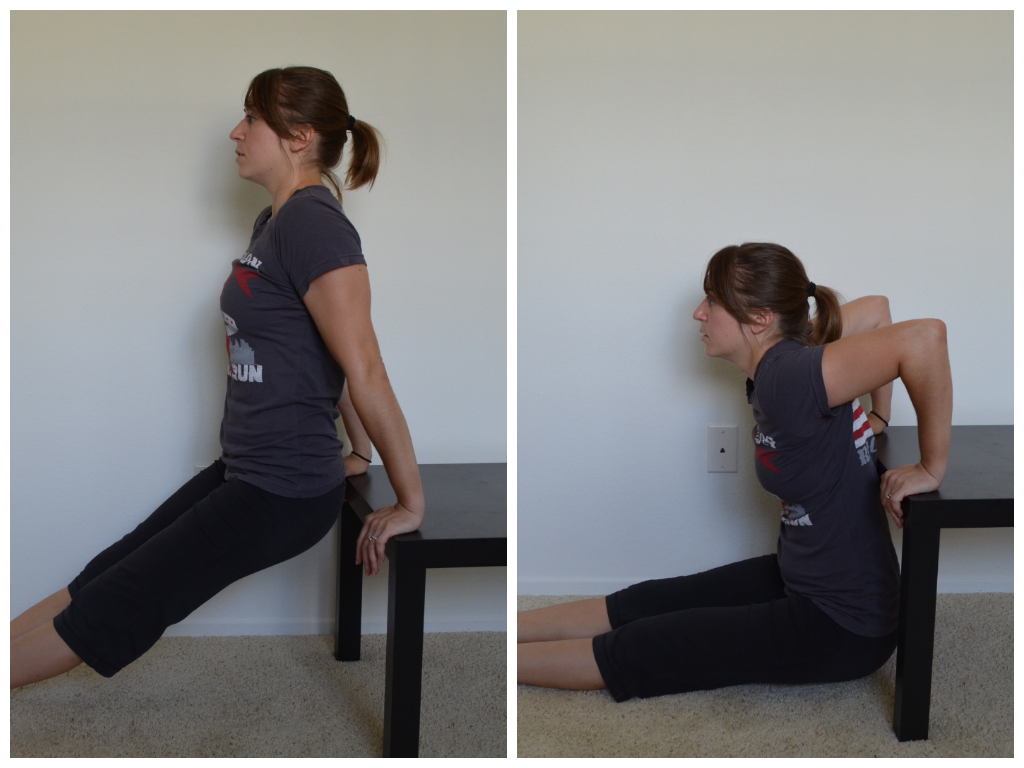
10. Dips – One of the most common home exercise moves, dips can’t be ignored. Place your hands behind you on the table with finger tips hanging over the side. Beginners can bend their legs while more advanced exercisers can keep their legs straight. Drop your butt as close to the ground as possible, bending your arms to 90 degrees and keeping your back and butt close to the table. You could even make the dips harder by doing two push ups followed by two dips for 3-5 rounds. Talk about a way to smoke your triceps….
If you like these moves and have enjoyed other Man Bicep posts, I suggest you head over to my new site Redefining Strength for a sneak peek and a few great workout freebies, including a COMPLETE FOAM ROLLING VIDEO LIBRARY!
P.S. Thank you Ryan for an amazing post idea!
How to do a perfect push up
In my opinion two of the hardest bodyweight moves, especially for women, are pull ups and push ups.
These are also, in my opinion, two moves that EVERYONE should be able to do!
The other week, I outlined some tips and progressions to help you build toward a full pull up and today I want to address the push up.
A few things I usually see when clients do “push ups:”
- They don’t go all the way down. They bend their elbows maybe an inch. (Guys do the opposite of this where they don’t actually lock out at the end of the push up)
- Their head juts forward as if they are looking towards their toes.
- Their shoulder blades are jutting out.
- Their elbows flare out way up by their ears and their fingers are rotated in toward their chest.
- They do THE WORM!
Here is a photo of some pretty ugly form….doing a number of the bad things above.
So if you do one….or maybe all…of these things, how do you do a perfect push up?
Perfect push ups form:
- Your body is in line from your heels to the tip of your head. Your finger tips should be pointing forwards and your hands should be right outside your chest. Your feet are together not shoulder or hip width apart.
- At the top of your push up, your arms are locked out and your legs are straight. You are squeezing your butt cheeks and are drawing your belly button in toward your spine. You are in a straight line. Hips aren’t dropping to the ground. Head is jutting forward. Back is not excessively arched.
- As you lower down, you lower your chest directly between your hands, keeping a nice straight line. Your elbows shouldn’t flare out from your body. Your elbows should almost make an arrow with your body. Like –> Your shoulders, elbows and wrists should all be in a straight line.
- Your chest should touch the ground when you lower. Your body should move together. Hips shouldn’t move back up first. Everything should lift as one. Don’t let the hips sag or the elbows flare out as you lift.
- You should then return to the exact same position you started with.

Now that you know the form for a great push up that doesn’t mean you are going to be able to perform one perfectly.
First you have to address the issues you are having with your form.
While a full range of motion is something that you have to practice and developing strength in your chest, shoulders and triceps is always beneficial, there are some other issues you have to address first.
Below I address areas you should foam roll, stretch and strengthen if you are having some of the problems I listed above. If you don’t know if your form is breaking down, have a friend or a trainer watch you perform a push up!
Problems and some fixes:
- Head jutting forward and/or chin tucked to chest – Roll out and stretch your upper traps and neck.
- Scapular winging (aka if your shoulder blades are really popping out) – Roll out and stretch your chest. Strengthen your mid and lower traps with the scapular wall hold. You can also strengthen your traps and your serratus anterior (the muscles sort of on your ribs under your armpit and down the side) with this great exercise, the push up plus or scapular push up.
- Shoulders are up by your ears – If your shoulders are up by your ears, roll out and stretch your traps and your neck. You are also going to want to do a ton of scapular wall holds to strengthen your mid and lower traps! When doing the push up, focus on engaging the muscles between your shoulder blades.
- Elbows flare out – Many people are taught to do a push up like a T, but that puts a ton of strain on the rotator cuff. Make sure to roll out and stretch your chest. Also, having your elbows in closer will require you to strengthen your triceps since having your elbows in closer engages your triceps more. Also to help you remember to do this, start the push up with your hands right outside your chest. As your hands get wider, it becomes easier to revert back to the T form.
- Hands turn in – Make sure to keep the finger tips pointing straight ahead. Pretend your hands are both on a piece of paper. Try pressing down and apart as if you are trying to rip the piece of paper in half. This will help you keep your hands straight and will help you engage your lats and keep your body tight overall.
- Low back sags and hips go toward the ground – Start by rolling out and stretching your low back and your hips. You will then also want to strengthen your core and your glutes. When I say “strengthen your core,” I don’t mean do a trillion crunches. You want to work on “bracing” your core – you want to work on contracting your abs and drawing your belly button in toward you spine. You can practice this by laying on your back with your knees bent and your feet flat on the ground. Draw your belly button in toward your spine and press your low back into the ground. Hold that position. That is how you want to brace your core during a push up. When doing a push up, to keep your hips from sagging, squeeze your glutes and draw in your belly button!
- Butt goes way up in the air – If this happens you are also going to need to work on core strength. Planks are a great way to build up the core stabilization needed for a push up…Because let’s face it…A push up is basically a moving plank. Also, use the drawing in maneuver I went over above to teach yourself to engage your core! Also, if you squeeze your glutes during the push up, it is going to be extremely difficult to have your butt up in the air!
Once you begin to address those issues, you can start to work on building up toward that perfect push up.
Today, I don’t want to get into all the supplemental moves you can do to strengthen your chest, shoulders, triceps and core, but I do want to discuss how you can regress the push up so that you can do it no matter what level you are starting from.
The first push up regress is NOT from your knees.
The wall push up is the first step. Step about a foot or two away from the wall and place your arms out toward the wall right outside your chest. Your finger tips should point straight up toward the ceiling. As you lower your body toward the wall, your hands should be outside your chest. Go as close to the wall as you can (do not smack your face into the wall). Make sure you keep your elbows in super close to your body. This is a great time to really work the triceps and keep your arms against your body. Your wrists, elbows and shoulders should all be in one straight line. Your body should remain in a straight line with your core and glutes engaged. Don’t worry about keeping your heels on the ground.
If you can perform 3 rounds of 20 wall push ups with perfect form easily, it is time to use a lower incline. Squat racks (if no one is using them because people definitely don’t like you doing anything put squatting in them) and Smith machines are great places to help you work on your push ups. I hate Smith machines so this is about the only time I would use one.
Smith machine push ups allow you to control the incline. As you progress, you can lower the bar until you are basically parallel to the ground. You want to keep the same form as the wall push up.
Since we don’t have a Smith machine at the gym (and since we just moved and our jungle gym for squats isn’t set up) I demonstrated these from a bench…which is also another tool you can use if the incline is appropriate.
And if you only have a bench, but the incline is just a bit too low, you can do push ups off the bench two different ways. You can do them from your toes or from your knees.
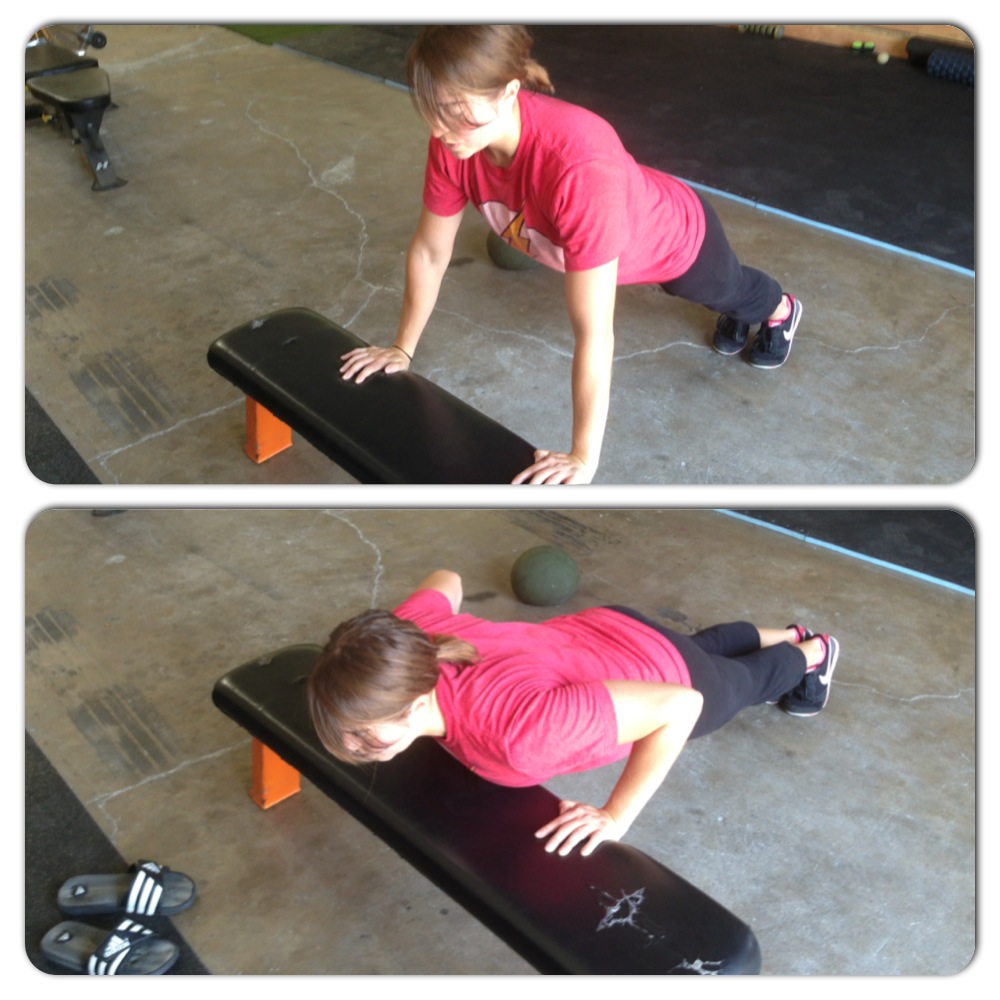
Doing push ups from your knees can allow you to decrease the incline as you progress down toward the ground.
Once you’ve mastered the incline push up and have gotten down to at least the height of a bench (from your toes), you can start to try push ups from your knees on the ground.
If you aren’t completing full reps and your form is breaking down, don’t keep progressing!
You’ve got to EARN the next level!

Then once you can perform perfect push ups from your knees, start to add in one or two push ups from your toes until you can do 5, 10, 15….100 from your toes!
Doing even one perfect push up doesn’t happen overnight. Take your time! Quality is important if you want to get the most out of each and every push up!
Once you’ve mastered the perfect push up, it is then time to start playing around with decline push ups (feet up on bench or such) and other fun variations…Like my favorite the push up to dip!
But remember…YOU’VE GOT TO EARN THE PROGRESSIONS!
Do you love push ups?
Crawl, Walk, Run
So I’ve encountered a lot of people recently who are doing exercises and weights way beyond their current abilities.
And they feel entitled to do the workout moves even though they really aren’t doing them correctly.
They feel entitled because they believe they are in shape. Because they’ve been doing intense stuff for years. Because another trainer let them do it.
Well, I’m sorry, but you don’t just get to do an exercise, you have to earn it.
I mean think about it right now…Do you actually do a full push up? Is your push up perfect?
Is your body in a perfectly straight line? Do you touch your chest to the ground and then completely lock out at the top?
Or does your chin jut forward? Are you’re arms at 90 degrees from your body? Do your hips sag toward the ground or is your butt up in the air?

Be honest with yourself because I can tell you now after hours of watching push ups that 95% of the people out there can’t do a push up worth SHIT.
Sorry to curse, but seriously I am just fed up. I saw all these men and women deciding that they deserved to do the toughest push up progression when they honestly weren’t even near ready.
Is it pride or bragging rights or just that we want to be “bad-ass” that make people stupid enough to do something truly beyond their level?
Or do people really just not realize how bad their form is? Do they not equate their nagging injuries to the fact that they are trying to run when they haven’t even learned to crawl properly yet?
And the funniest part is that I don’t consider myself a stickler on form. I believe that there is a scale of “acceptable” form aka form that is good enough that the person won’t get injured, BUT that as the person gets stronger will be worked to be improved.
However, the form I’ve seen is just completely unacceptable especially since people keep pushing to do something harder than they should.
Why does everyone believe they are above progression!?!
SLOW DOWN PEOPLE!
FORM is important to the extent that it PREVENTS INJURIES! And usually correct form means that you are doing something in the most efficient and functional way possible – the way that will truly give you the most power and STRENGTH.
So why waste your time on incorrect form and just keep pushing ahead when you won’t get near as much out of the move as you could if you just slowed down and took the time to properly engage the correct muscles?
Maybe you never thought of it that way…huh?
Stop trying to run before you can walk and walk before you can crawl. If you take the necessary time at each stage, you are going to find that not only will your lifts be stronger but that you will also suffer from fewer injuries!
So try a push up. Before you do that hard variation you saw in the magazine, ask yourself if you can really even do more than one round of 20 perfect push ups in all of the levels leading up to that new variation.
If you can’t, spend some time EARNING that new variation! It may be a great way to motivate yourself to work hard over the next few weeks or months!
Check back soon for a post about how to do a perfect push up…And in the meantime learn how to do a pull up!
Top 10 Exercises for Outdoor Workouts
So with all of this wonderful summer weather, all I can think about is working out outside. And while I love hiking and biking and sprinting and stand up paddling as my outdoor “workouts,” I also do enjoy doing more “traditional” workouts outside.
And while basically any bodyweight move can be done outside, here are my 10 favorite moves to do because they are super challenging with only body weight. Some do require a bit of “equipment”…aka playgrounds or possibly stairs…or comfy grass…but all don’t require any additional weights.
Outdoor Workout Moves:
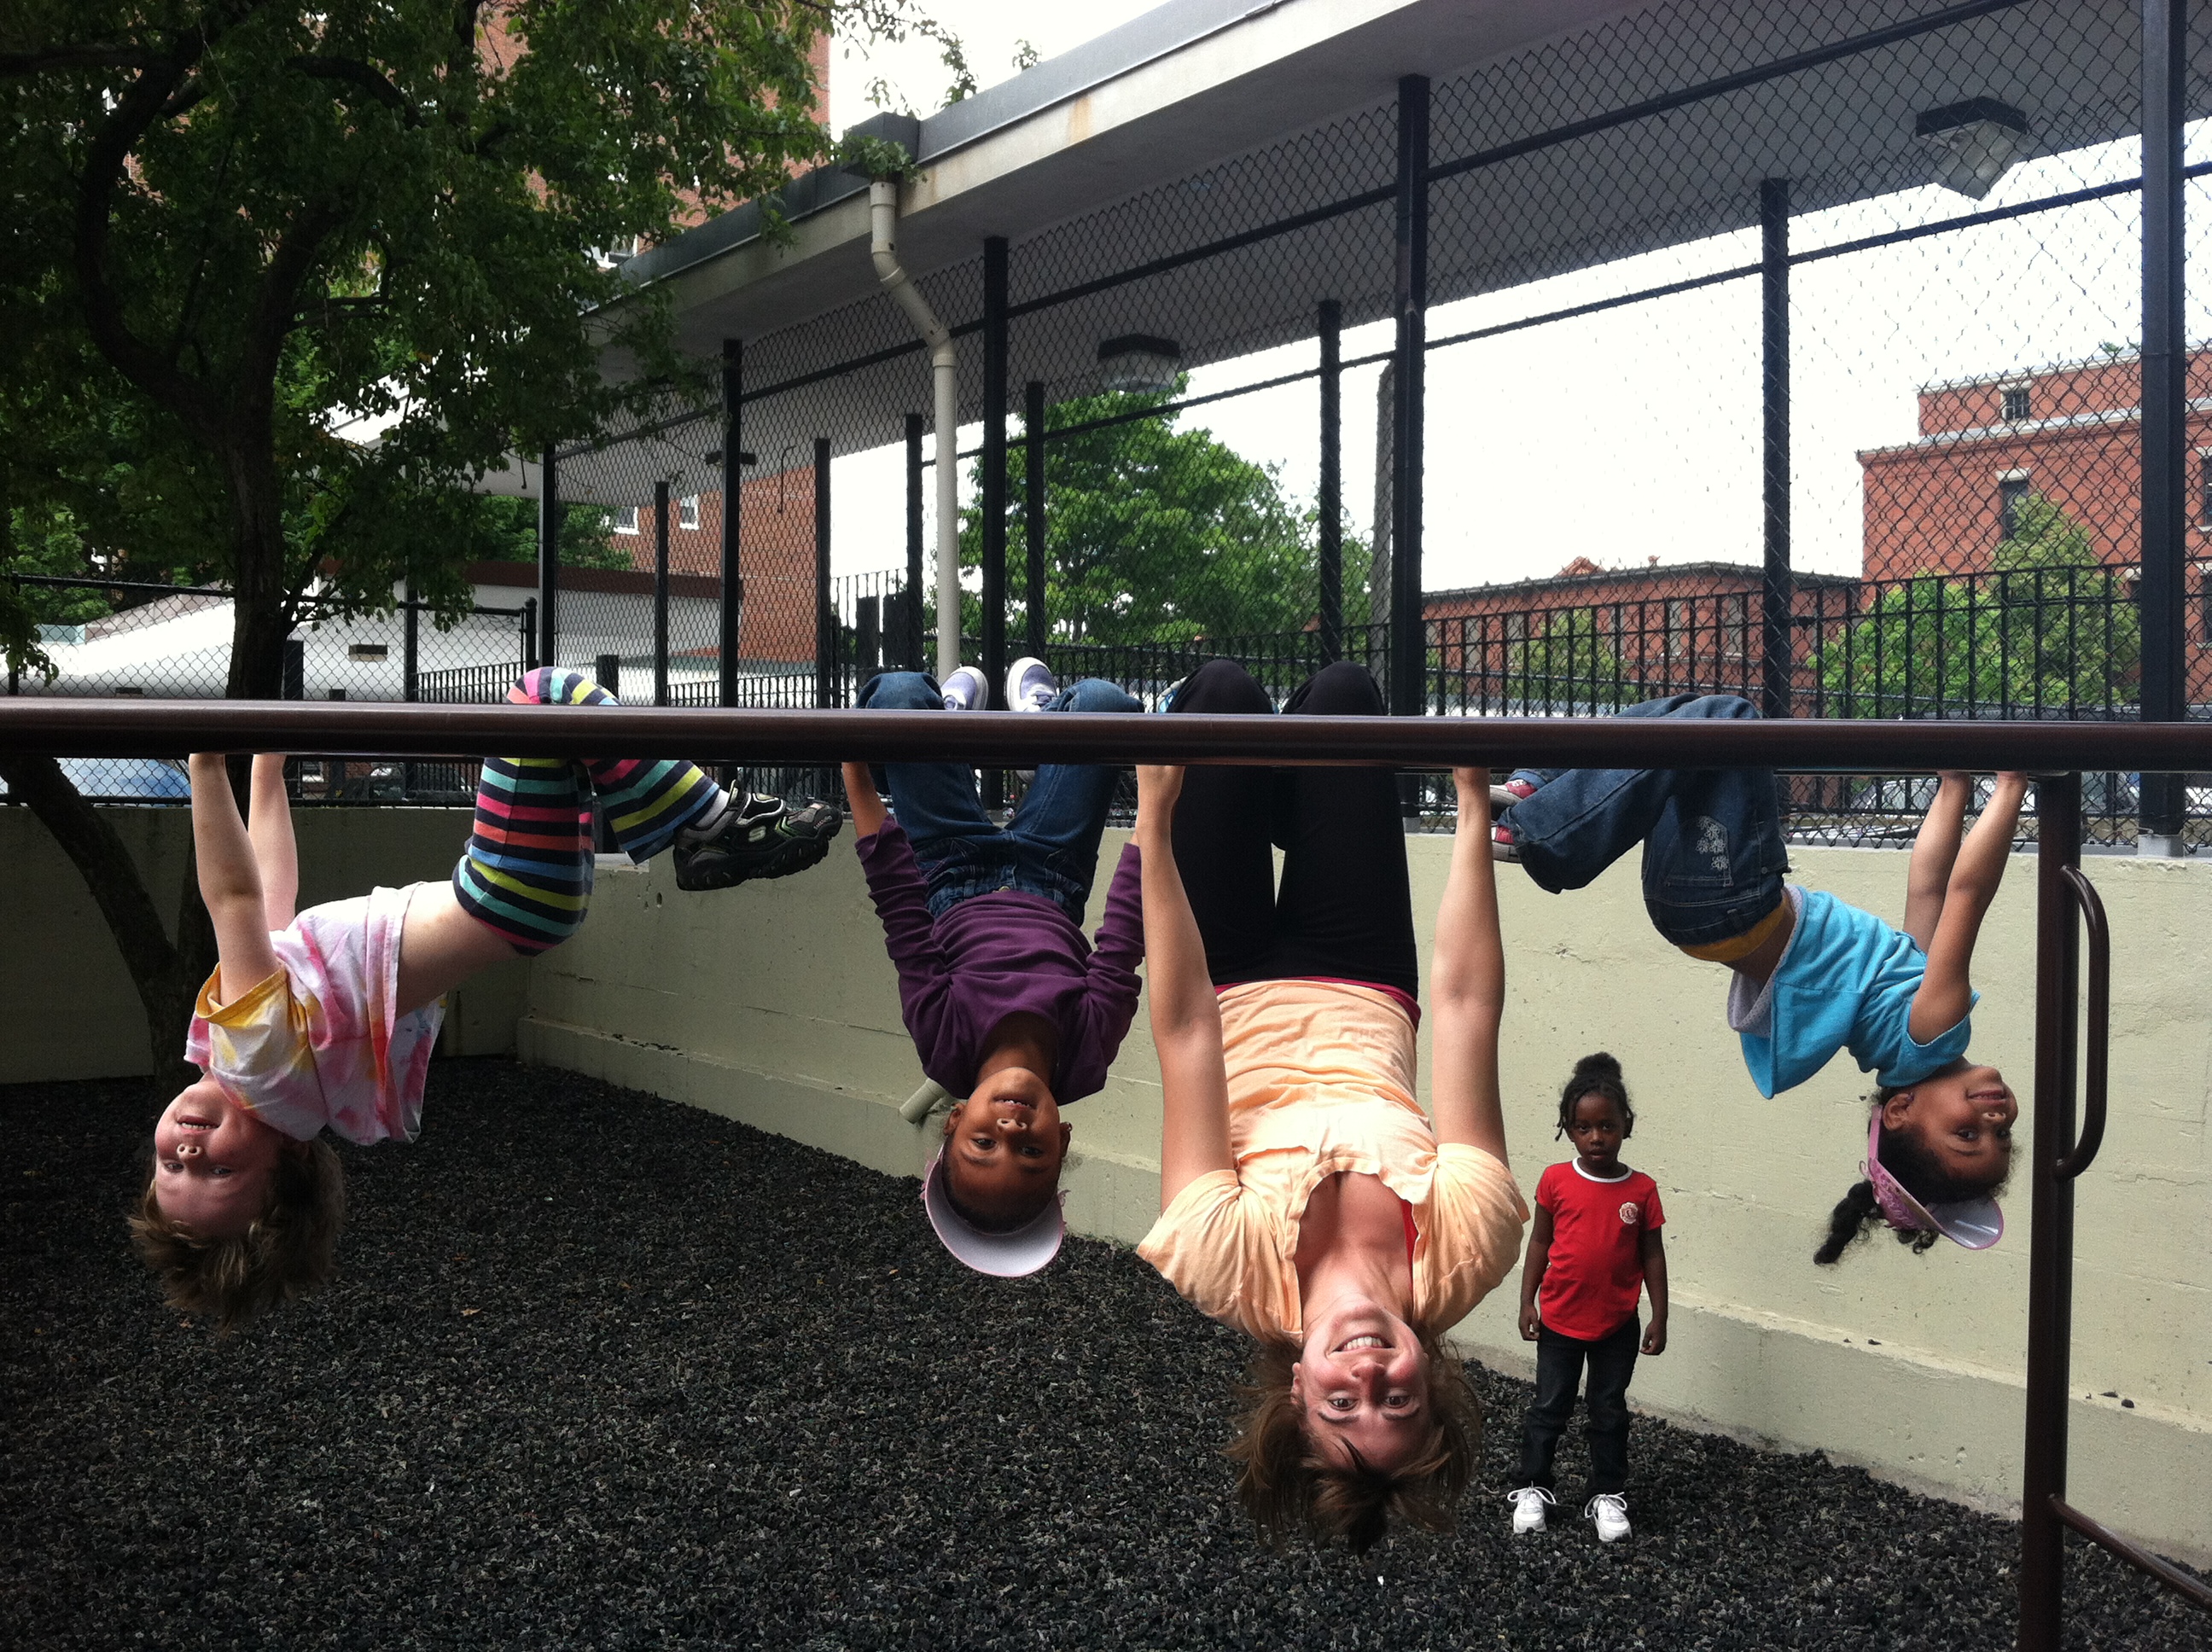
- Monkey Bars – So the monkey bars aren’t a move really, but they are a wonderful tool for any outdoor workout. I love to do pull ups off of them or even just swing across them. You can even do a pull up hold on them. (We have numerous different ways to use the Monkey Bars in the video below.)

Swinging on the monkey bars
- Knees to elbows or Skin the Cats – A great way to work your core, grip strength and upper body. You even work your quads and hips doing either knees to elbows or Skin the Cats. With these two moves, you hang from the monkey bars. With knees to elbows, you simply tuck your knees up to your elbows. You will need to pull up a bit with your arms and lean back to truly get your knees and elbows to connect. With Skin the Cats, you will actually bring your legs up and through your hands. You will then straighten your legs and reach your toes to the ground before coming back and up through your arms to return to the starting position.
- Crawling – So many people are embarrassed to crawl, but it truly is one of the freaking best moves out there for full body strength. Plus it is a great way to get in a bit of cardio. You can crawl forwards and backwards. Or side to side. Or even in circles. You can do bear crawls, table top crawls, crab crawls or even my new favorite…GORILLA crawls!
- Push ups – So outdoors you can do incline push ups off a bench (so hands on the bench) if you can’t do a full push up yet. Or you can do them from your knees. Or flat on the ground. Or you can even make them harder by elevating your feet to do a decline variation. Check out the video below with for some different push up variations!
- Stair sprints – Climbing stairs sucks in general. But if you want climbing stairs even harder, do it quickly. Sprint up the stairs or try even taking them to at a time. There is nothing worse/better than running stadiums! (And if you don’t have stairs but instead have a really big hill…Well that will do too! Hill sprints or even sprints in the sand are another way to up the intensity of your sprints. And each have different added benefits! Like extra glute work…)
- Bench jumps – So if you are a beginner, you may want to start with bodyweight squats or even jump squats. But if you done some jumping, you can make the move harder by jumping up onto a bench or piece of playground equipment. You can do forward jumps, lateral jumps or even rotational jumps up to the bench! To make them easier, step down after jumping up. To make them harder, perform them as quickly as possible!
- Bench step ups – Step ups are another great way to work the booty without any weight and without laying on the grass to perform glute bridges (I get a bit too itchy when I lay on the grass when I’m super sweaty so prefer to save my glute bridges for inside). You can use a bench or steps or anything that is a challenging height. The higher it is the more challenging it will be. Make sure though that you aren’t compensating as you step up by pressing down on your other leg with your hands or by pushing yourself up with the foot planted on the ground instead of just using the foot on top of the box. To make this move harder, you can also make it plyometric. So instead of just stepping up, powerfully step up so that you actually jump up a bit off of the box. You can either stay on one side with this move or alternate legs. You can also perform both variations of the step ups laterally!
- Swing/Bench balance lunge – So set up in a lunge position with your back foot up on a bench or a swing (the swing will be tougher). Lunge down toward the ground and return to the starting position. Make sure that as you lunge, your front knee is not going over your front toe and that your front foot stays firmly planted on the ground with the heel down. Keep your chest up tall and don’t lean forward. You actually almost want to “sit back” while performing this move. You should also feel a nice stretch in the hip and down the quad of the back leg
- Swing knee tucks – So set up in a push up position, with your feet up in the swing. You are then going to tuck your knees into your chest, controlling your legs in and out. This is a more advanced move. If you find it to challenging and feel it in your low back, start with mountain climbers on the ground. You can also progress this move by doing a pike tuck (bring your feet in toward your head keeping your legs straight) instead of bending your knees to bring them into your chest.
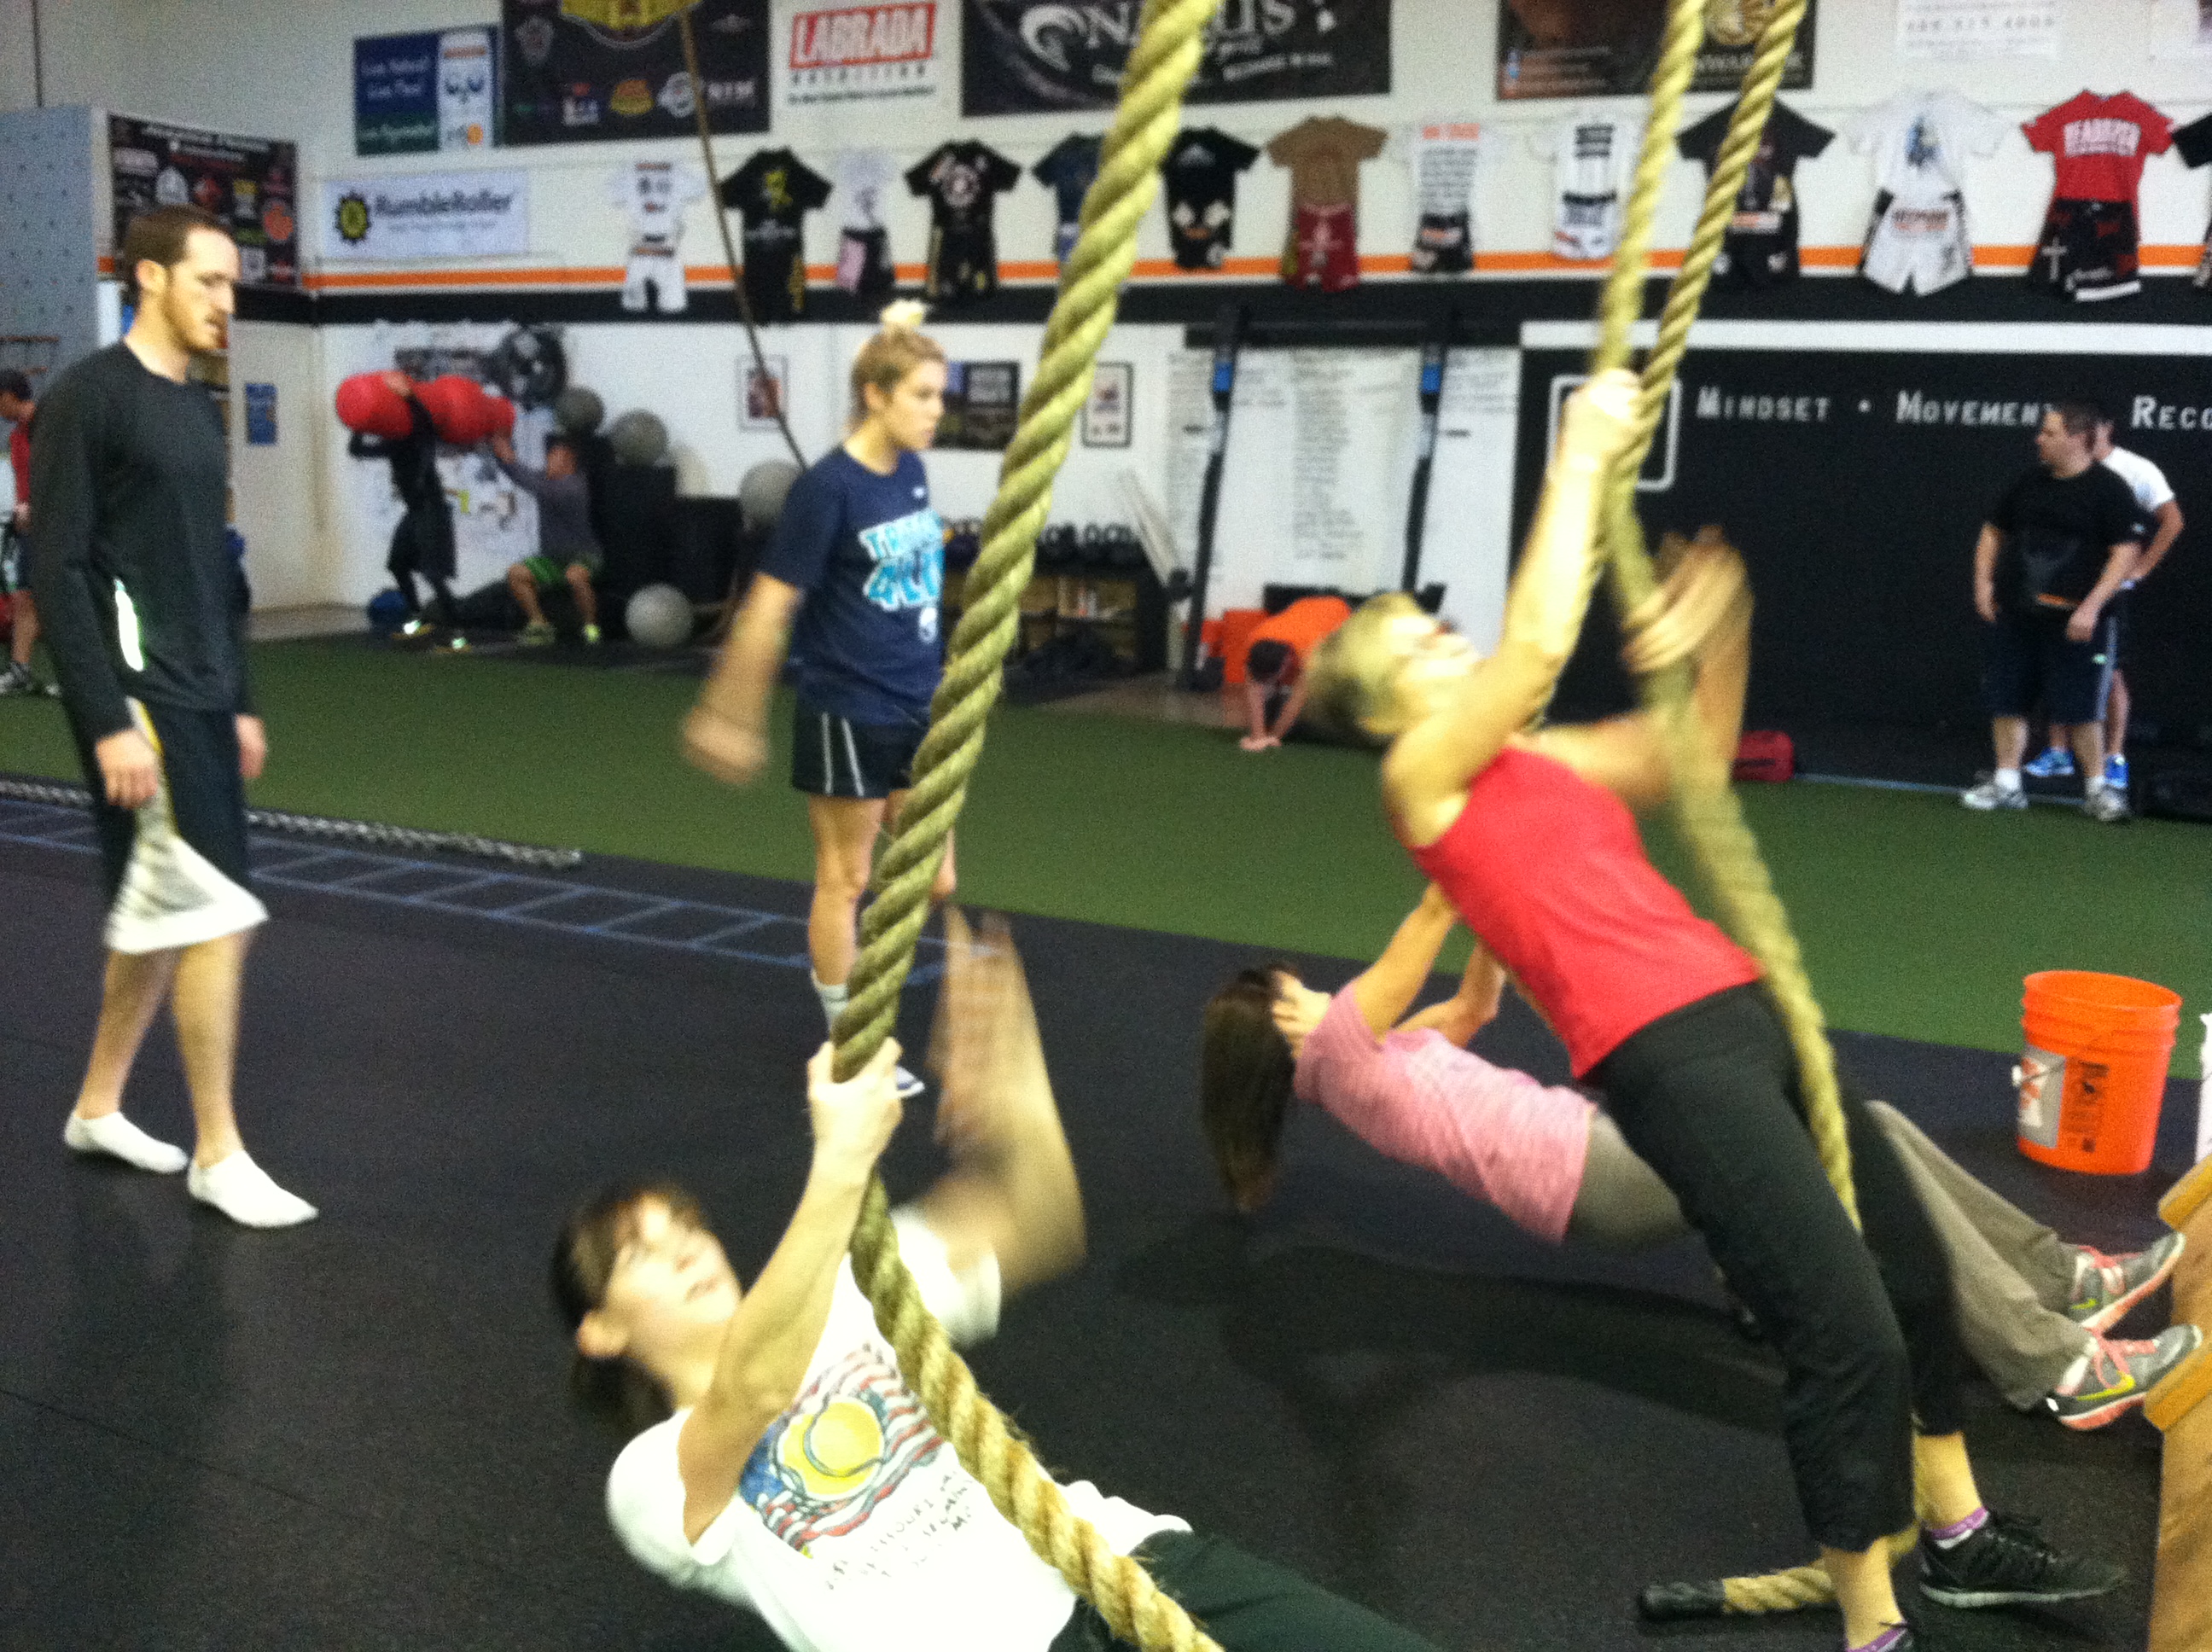
- Pole/Rope/Swing Climb – So this move can be made into either a vertical or horizontal pull. To do a horizontal pull, you can set up on the pole, rope or swing chain like you are planning to do an inverted row. You will then walk hand over hand to pull your chest up to the pole, swing or rope before lowering yourself back down. Or you can kneel at the bottom with your hands on the pole or rope or swing chain. You can then climb up to the top of the pole before sliding back down. Either way you do it, you are in for a challenge!

Rope inverted rows…not outside but you get the point.
Runners up: So while there are a ton of other bodyweight moves I love, like split squat jumps and sit thrus…the only other move I was tempted to put on here was jump rope…I love jumping rope. I feel like a little kid again when I do it!
Anyway, here are some other great moves that Ryan and I did a few summers ago on the playground to help get you motivated to workout outdoors this summer!
Progressing toward the elusive perfect push up and pull up

I have many women and even some men tell me that they want to be able to do perfect full push ups and push ups.
And I say “OK!”
Because there is a way to get there! Consistent hard work and a well thought out progression based on what you need to work on will get you there!
So this really applies to any exercise that you want to be able to do, but honestly two of the exercises that most people can’t do, but should be able to do are the push up and pull up (also, most people recently have been telling me they want to be able to do these two moves so I figured I would focus on them).
First, consider all of the muscles used in the move.
For push ups, you use your pecs, shoulders, triceps, core and even your quads and legs. Most often though, people need to focus on core strength and either shoulder or tricep strength.
For pull ups, core and back strength are essential. The grip you use will also determine how much bicep is involved.
Once you identify the muscles used, you can work on those muscles. That doesn’t mean you have to start doing tricep extensions and bicep curls.
You can still do compound movements.
So to work on improving your push up, first assess where you are. Can you do a push up with your hands on an incline? Can you do a push up from your knees? And when I say “Do a push up.” I mean a PERFECT form push up from that position.
Same goes for pull ups. Can you do jumping pull ups? Can you do pull ups where you jump up and slowly lower yourself down? Can you do a pull up and hold? Or can you do a chin up but not a full pull up yet?
Get a clear picture of where you are starting from. If you know exactly where you are at, you can design a program that will get you to where you want to be.
If you don’t have a clear starting point, how the heck are you going to outline a clear progression!?! You won’t know how long it will take you to get somewhere if you don’t even know where you are starting from!!
So once you know what muscles are involved and where you are starting from, you must create workouts that strengthen your weak areas and progress you toward you end goal.
While you will want to do lots of push ups and pull ups during your progression they shouldn’t be the only thing that you are doing.
For push ups, do some core strengthening exercises. Do some crawling that targets your shoulders, core and quads. Do some form of dips, be they full dips or dips off a bench. I mean even get creative with it. Try some chest flies on the slider. Do some ab roller to work your arms and core. Battling ropes can be good. Medball chest passes are a good explosive way to work your upper body.
There are lots of ways to work. Pick exercises that target your weak points!
For pull ups, battling ropes again can be good. Working on different variations of pull ups can help. Try some medball slams into the ground. You can do ones straight ahead or rainbow slams where you slam it down on each side. Do some inverted rows. Some pivot prone pulldowns. Work on your grip strength. Heck even just playing on the monkey bars will definitely help!
And the good part about some of the things that you can do to work on both of these moves is that they will improve your overall posture and strength not JUST progress you toward a perfect pull up or push up.
There are even moves that can benefit both exercises in some way such as the parallel bar press. Just hold your body straight up off of parallel bars or a dip machine. Don’t be a “turtle” aka keep your shoulder blades pull back and down and your spine long. Your neck should be long and not tucked back into your shoulders like a turtle pulling its head into its shell. Just hold. Keep your abs engaged and your shoulder blades retracted. You will feel this in your back and your arms and even your core.
Anyway, there are a bazillion ways to strengthen your body to progress toward a pull up or push up. Don’t just flounder blindly and HOPE you will get there. SET UP A PROGRESSION!
If you need help or want some exercises to help you strengthen your weak points, let me know! 🙂
A slight change in programming

I’m constantly looking to learn, grow and improve upon what I’m currently doing. And I encourage everyone else to do the same.
So for the moment my heavy barbell lifting will be put on hold as I learn how to master all of the other equipment at the new gym I work at.
Does this mean that I will no longer be lifting heavy weights?
HECK NO!
The only thing that will change is what types of heavy weights I will be lifting.
But my training is always constantly changing.
Honestly, if you are still doing the same training that you were doing 6 months ago, you should be embarrassed.
Things change. Workout programs get stagnant and stale.
AND if you want to be truly fit….if you want to be that Renaissance fitness person, you constantly have to be learning, trying and perfecting new skills!
So over the next few months, you not be hearing much about the traditional deadlift (although I do love you barbell deadlift and will miss you greatly!).
Instead you will be hearing more about Olympic lifting, kettlebells, tire flipping, plyometrics, sled pushes, battling ropes, kickboxing (not the classes without gloves), and Brazilian Jui Jitsu. You will still continue to hear about all of the wonderful bodyweight exercises I love, 1 leg squats, push ups and pull ups, in all sorts of variations.
Are you excited?!?!
I AM!
So get ready for the next phase in Man Bicep Training! Time to learn and grow and become stronger, fitter and happier!
Side note: There is no revision currently to my dieting beliefs. Simply put they are still “Eat whole natural foods and avoid processed crap and refined or empty carbs.” However, I will be discussing different foods and how I feel about them over the next couple of weeks since there have been some common questions arising.
Getting our Vitamin D
It has been nice outside the past few days so Ryan and I have gone outside to workout. A great way to get our Vitamin D for the day! (More about the importance of Vitamin D later!)
Our favorite outdoor workout spot is down by the Charles River. There is a little outdoor workout area with pull up bars and places to do abs, push ups, inverted rows, plyometrics and more.
Last year we did the Murph down there.
This year our first outdoor workout was:
1 round as fast as you can:
50 Pull ups
50 Push Ups
50 Inverted Rows
50 Dips
50 Burpees
50 Sit ups
The 1.5 mile walk down to the river felt good, but the 1.5 mile walk back wasn’t near as fun. The workout was definitely a bit harder because we aren’t yet used to the heat and humidity.
What made the walk back more rewarding was a nice BBQ meal with some delicious Cider Sangria.
We grilled up some delicious Grass-fed Buffalo Flank Steak courtesy of The Meat House!

No sauce needed! Just seasoned with cumin, smoked paprika, salt and pepper!
SOOOO GOOD!


