Category Archives: Man Bicep Form Bible
Do you ask yourself “Where do I feel this?”
I think one of the most important questions we can ask ourselves when doing exercises is – “Where do I feel this?”
Because even if we have perfect form, we may not be activating the correct muscles.
Activation requires us sometimes to actually concentrate on getting the muscles working.
So when you do glute bridges, don’t just go through the motions….Think about squeezing your glutes and make sure to concentrate extra hard on getting them to work.
This focus on the muscles working improves our mind-body connection and makes sure we get the most out of the movement and don’t just go through the motions.
And not only does asking ourselves, “Where do I feel this” get us to make sure the correct muscles are activating, but it also allows us to know if we are doing a movement correctly.
If you don’t have a mirror to check your form, but you feel the correct muscles working, you are most likely doing the movement correctly.
So by asking yourself where you feel the move, you are making sure your form is correct and that the correct muscles are working.
You may even find that sometimes, even though you have the correct form, the correct muscles AREN’T actually working.
For example, glute bridges…Bridge up off the ground extending your hips. This could look correct, but that doesn’t mean your butt is actually activating. It could look right, but you could actually be loading only your hamstrings or low back.
The question is what are you working? Where do you feel it? When is the last time you thought about it? Or do you just usually think about bridging up as high as you can?
Height doesn’t matter. Feeling it in your glutes and consciously squeezing them as hard as possible is what matters.
So right now, try the glute bridge. Where do you feel it? Are you actually working the correct muscles?
No? Maybe adjust where your feet are. Try not to bridge up as high. Concentrate on squeezing your glutes. FEEL the move in the correct muscles!
By asking yourself where you feel it, you will get more out of your workouts.
And all of you trainers out there…You need to not only ask yourself this question so you can better coach moves, but you also need to ask your clients where they feel movements.
It will improve their mind-body connection and allow them to know if they are doing moves correctly when you aren’t there. It will get them even better results and improve their coordination.
FEELING THE MOVES HELPS YOU GET MORE OUT OF YOUR WORKOUTS!
So stop going through the motions and concentrate on where you feel movements. It will improve your body awareness and make your stronger and more coordinated!
P.S. If you are doing the glute challenge, you may want to try these 20 Glute Bridge Variations!

More Posts….
So just to catch you up on some of the posts from Redefining Strength….
1. Burpees – We all love to hate them, but they are a great full-body cardio exercise you can do anywhere. Here are 10 Burpee Variations to try. And if you need a really quick workout option, try to do 50 burpees as fast as you can. Now there is a great workout in under 5 minutes!

2. Travel Workouts – Staying in shape while traveling can be difficult, especially when you are busy and don’t have access to the equipment you usually use. That is why it is important to have equipment you can easily bring with you and use in your hotel room. Here are three great tools, 30 exercises and a quick 15-minute workout to help you stay in shape while traveling!

3. The Kettlebell Swing – Crossfit has made the American Swing super popular. But personal I HATE the American Swing. I think it is pointless and dangerous and I will never teach it. Sorry Crossfit. You have many good points but the American Swing is not one of them.

So if you want a beneficial kettlebell swing exercise to truly target your glutes, you need to learn the traditional swing. This hip hinge movement is one of the best to get your glutes activated and help you develop strength and power. Check out this post on how to do the kettlebell swing and basic variations.
4. WORK YOUR CORE – And no…I don’t mean do crunches. I wrote two different posts on core exercises using two different pieces of equipment – the suspension trainer and the sandbag – because working your core is important to become stronger, faster and prevent/alleviate pain and injury.
However, working your core isn’t as simple as doing crunches – it means working everything from your shoulders to your knees down your frontside AND your backside.
That is why these exercises are so wonderful.


What are your favorite burpee variations and core exercises? Are you a fan of the American Swing? How do you stay in shape while traveling?
Bodyweight Exercises To Challenge Your Entire Body
I used to think that my strength was measured by the amount I could lift on the barbell.
But the weight you can lift on a barbell isn’t the only measure of strength…nor is it necessarily the best measure of strength.
I mean…What strength is great than the strength to be able to control your own body and be able to perform ANY move you want to!?!
There are so many bodyweight exercises out there that are challenging enough for even the advanced exercisers without adding weight.
Yet often the only ones I see people using are the pull up, push up and single leg squat.
Here are some great, more untraditional, bodyweight exercises everyone should be doing – 10 Untraditional Bodyweight Exercises You Need To Do.

And below are a variety of other articles about bodyweight exercises. Some are great for beginners while others will challenge even the most advanced exercisers.
What should truly be our goal?
While many people come in with weight loss goals or even performance goal, the true goal of a workout program is to make you FEEL better.
Your workouts should help you prevent injury. They should help you feel stronger, more coordinated and ready to take on daily life.
They should help your body stay young so that at 80 you still feel free to move around and chase after grandkids.
Last week I discussed the importance of agility and balance training to improve our mind-body connection and help us move WELL.
Today I want I just want to harp on the importance of ACTIVATION exercises.
Any good program needs to start with mobility work. But many people are now starting to recognize this.
However, all too often exercise routines are still devoid of activation exercises.
Activation exercises are important because they get the CORRECT muscle groups working.
Muscles that aren’t always active because we sit at a desk 9 hours a day hunched over a computer.
Our poor hunched-over-a-desk-all-day posture causes us to sometimes overuse smaller muscle that shouldn’t be doing the brunt of the work…And this leads to injury.
So to truly feel good, prevent injury and get the most out of your workouts, you’ve got to get those big muscle groups active and working.
And since many people have also said they want to be able to do a pull up this year…..
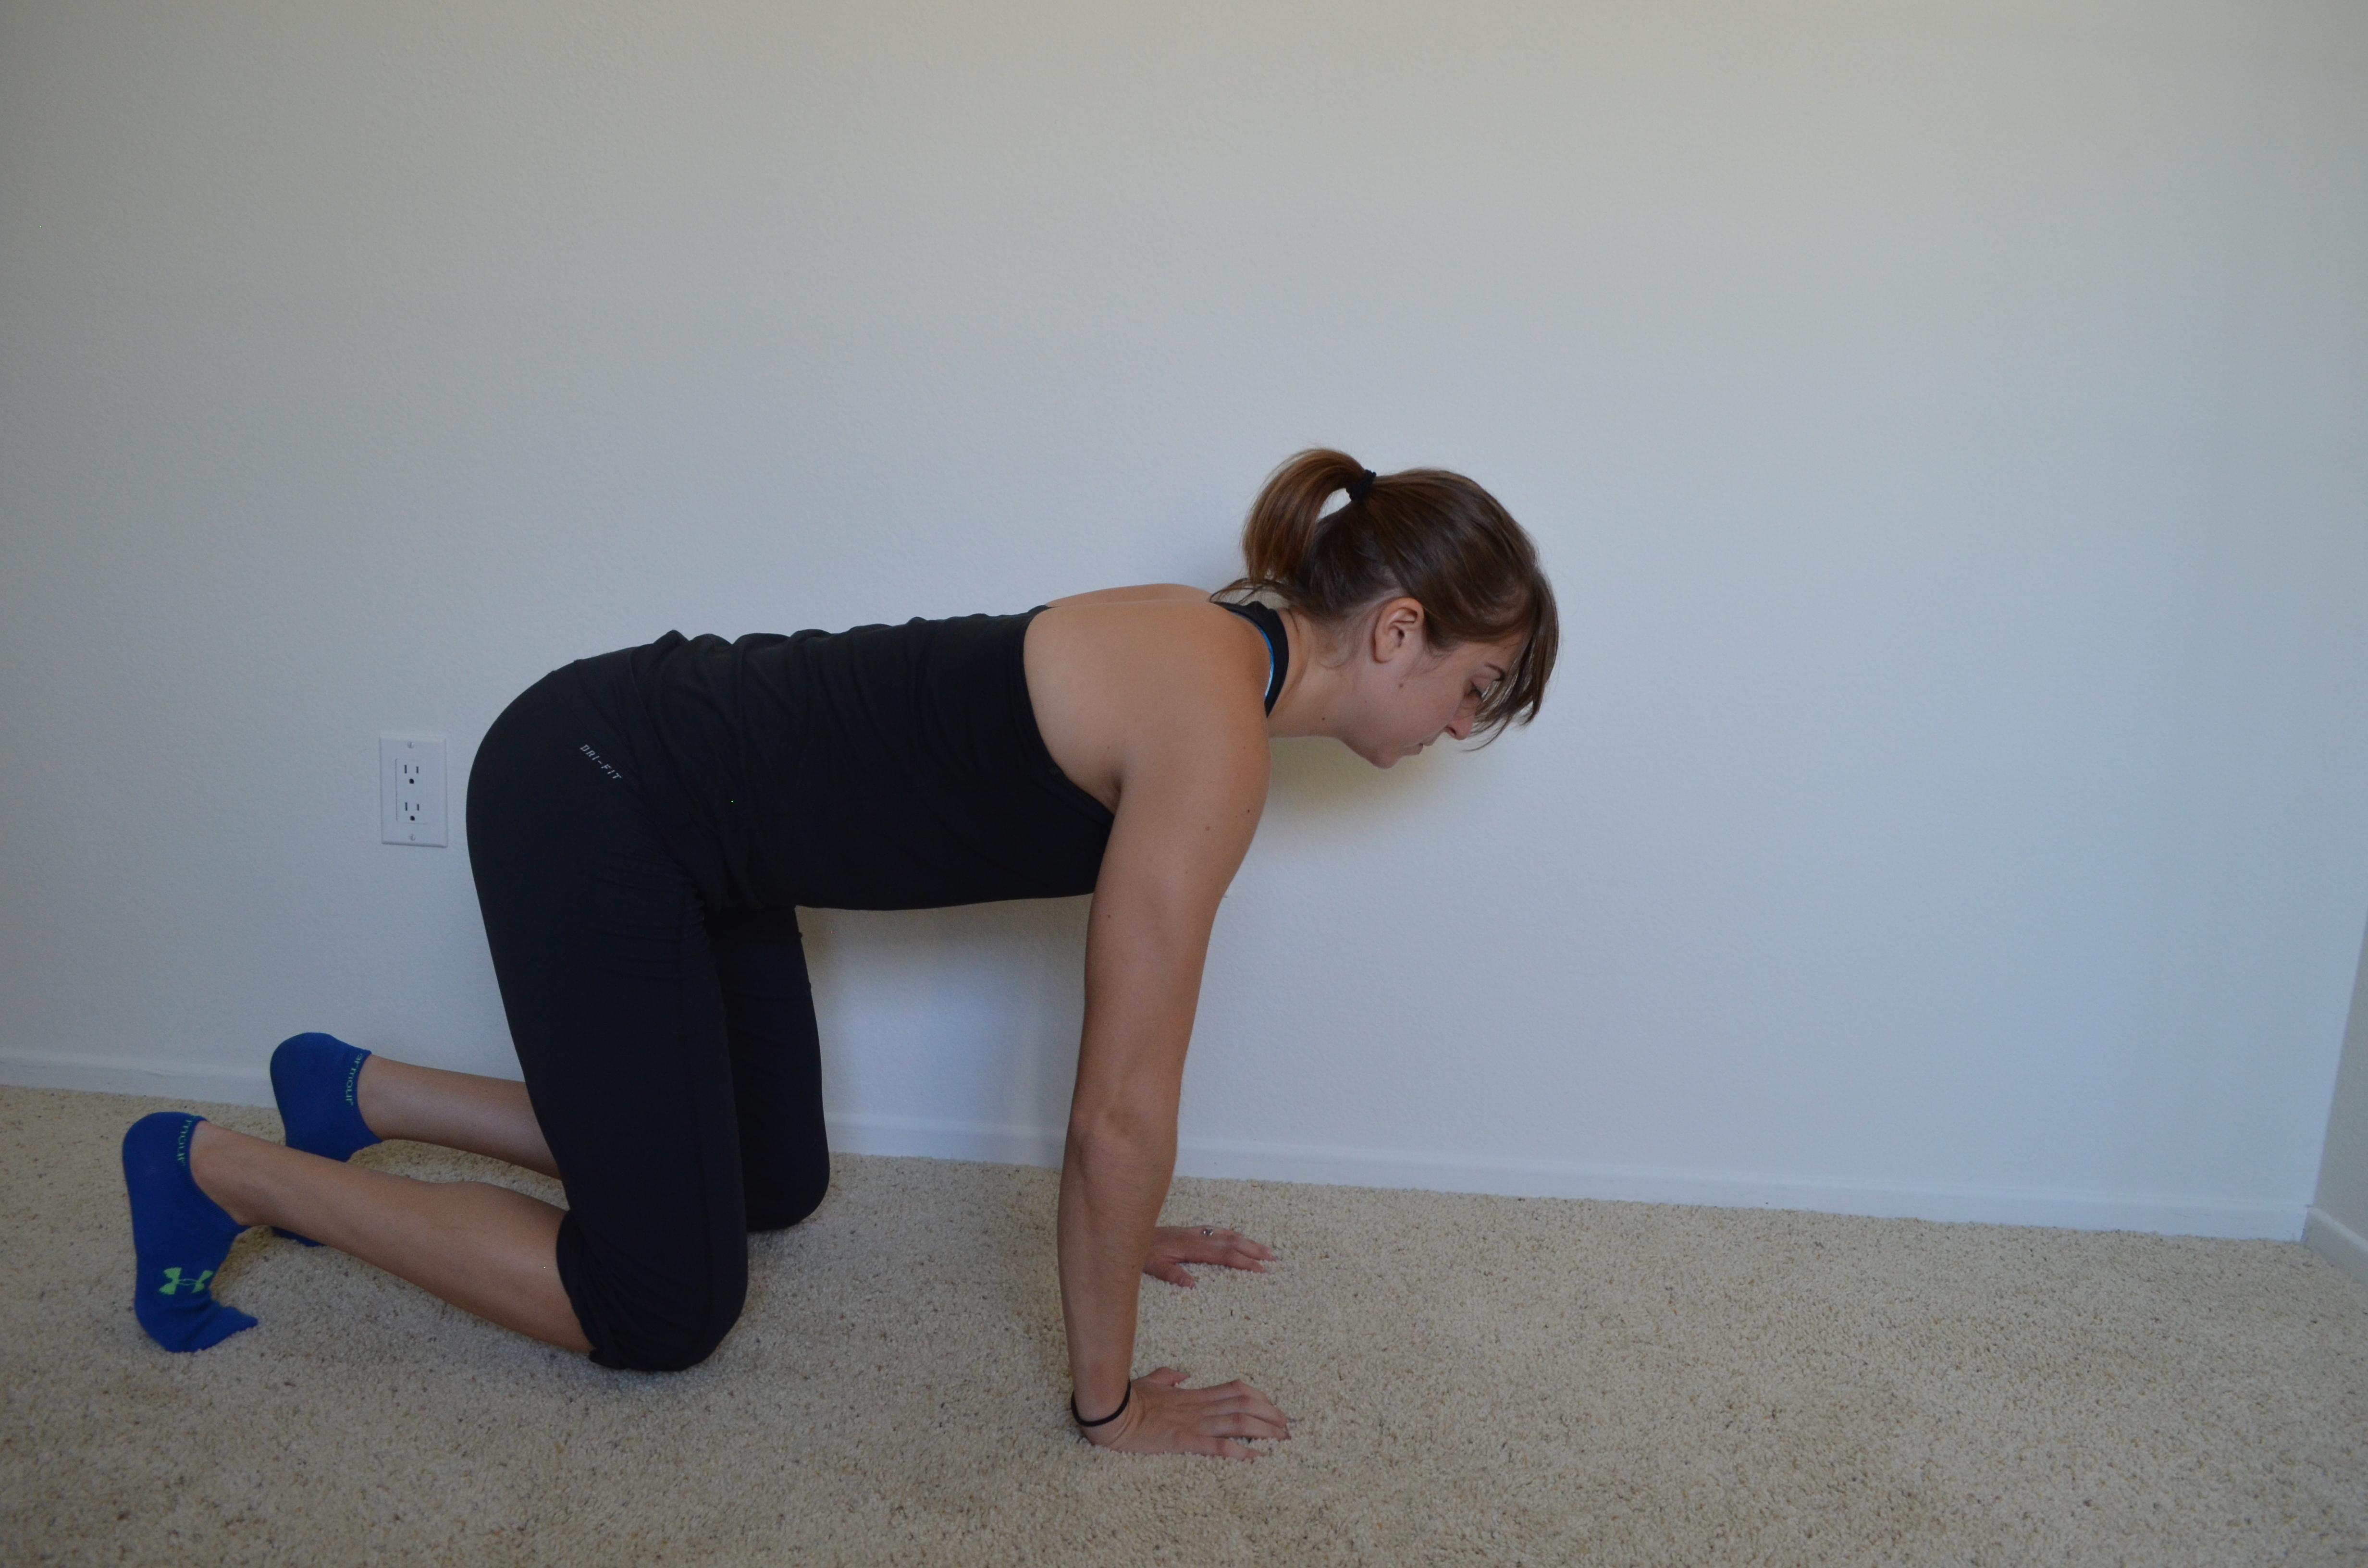
Here is an ESSENTIAL activation move we all need to be doing – THE SCAPULAR WALL HOLD!
This move will help alleviate neck and shoulder pain. It will get your lats and your mid and lower traps activated and working.
It will help you have better posture AND do more pull ups!
For a breakdown of the Scapular Wall Hold and a few other scapular hold variations, click here!

The Turkish Get Up
The Turkish Get Up is one great full body move to work on stability AND strength. It is also a great move because it forces the body to stabilize in more than one plane of motion.
It is also one of the moves I see most often messed up.
People like to skip steps and turn it into a sit up/roll up instead of the step by step move it is.
And honestly, the whole point of the Turkish Get Up is all of the steps and DOING them all in the correct order. That is how you truly reap the benefits of the Turkish Get Up.
Below is a breakdown on the Turkish Get Up. It can be done without weight by just balancing something on your hand or with a kettlebell press up toward the ceiling. It can also be done with a sandbag held on the shoulder.
Each has benefits and are great to strengthen your entire core and improve your coordination.
Breaking Down The Turkish Get Up:

- Start by lying on your back on the ground with your legs out straight.
- Then drive your right arm up straight and have your fist pointing up toward the ceiling. Bend your right knee and place your foot flat on the ground. Straighten your left arm out to the side (not straight out at shoulder height, but not right by your body). Keep your right arm straight up and pointed toward the ceiling at all times (it can even help to balance something on your knuckles to remind you of this while you are learning).
- Then roll up on to your left forearm. Prop yourself up nice and tall on your left forearm. Press through your right foot on the ground. Do not let your right knee cave in and keep your left leg out straight on the ground.
- Once up on your forearm, press up onto your left hand with your left arm going straight. Sit up nice and tall. Do not shrug your shoulders. And remember, your right arm is always straight and pointing straight toward the ceiling.
- Then from the seated position you are going to bridge up, lifting your hips up as high as you can. You will press down through your left hand as well as your left heel and right foot. Keep your right foot flat on the ground and your left leg out straight. Do not let your right heel come up.
- From the bridge position, slide your left leg back and under you so that you are in a kneeling position with your hand on the ground. Make sure you swing your leg back enough so you are in a strong supported kneeling position that will allow you to lift your left hand off the ground.
- Staying nice and tall, lift your left hand and come to a kneeling position. Do not lean forward of slouch forward as you lift your hand up off the ground.
- With your right arm still pointing up at the ceiling, stomp your right foot into the ground and come up to standing, bringing your left foot forward to be even with your right foot.
- Once standing, you will reverse the steps until you are again lying on your back.
- You will first go back to kneeling, stepping your left foot back.
- You will then place your left hand down on the ground out to the side and just a little back from your left knee.
- You will then bridge up and swing your left leg through so it is out straight in front of you. As you bridge, keep your right heel firmly planted on the ground.
- From there, you will return to a seated position supported by your left hand.
- Then you will relax down to your forearm and finally roll on to your back. Do not slouch as you move back down.
- Keep a nice tall posture throughout the entire move.
- You can also do this move with either a sandbag over your shoulder or a kettlbell or dumbbell in the raised hand. Beginners may just want to start by balancing something on their knuckles.

Here is a great workout that breaks down and works on each part of the get up.
Here are also some great workouts using the Turkish Get Up.
Tips To Help You Master The Pull Up
The other day I asked clients and my Facebook followers, “What move would you like to master in the New Year?”
It seems that the pull up is the tough move that everyone would love to master.
But it isn’t like bench press or squats or deadlifts where you just start with a lighter weight and work your way up.
Heck, even simply doing assisted pull ups doesn’t always even get you there.
But where there is a will, there is a way. Just like with any other fitness goal you have, you have to TRAIN to be able to do the pull up.
So here are some great strengthening moves to add into your training routine that will help you to master that elusive pull up in this coming year!
HOWEVER, you must be consistent in your training for these moves to work. You can’t simply do them a couple of times one week and then expect to be there!
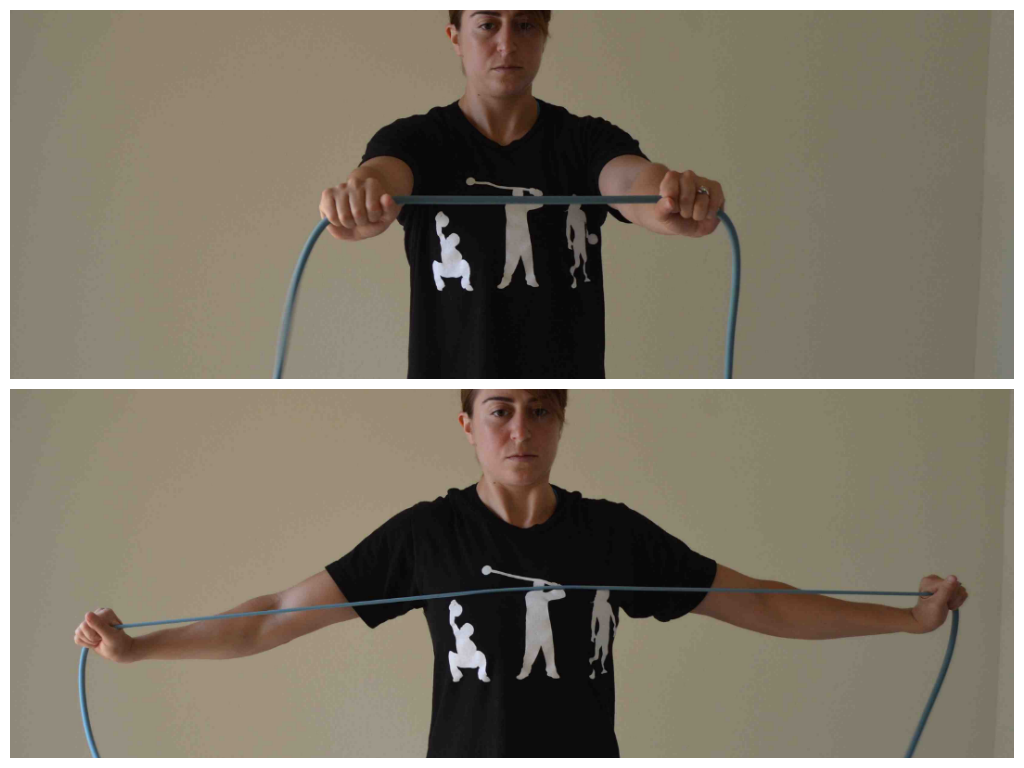
1. Work on your scapular retraction.
Here are three moves to help. You can add these into your warm up routines any time you do an upper body workout. They are also great rehab moves if you’ve suffered from any neck or shoulder injuries. These moves also help you activate the correct muscles so you can use all those strong back muscles to help you do the pull up!
Scapular Band Flyes – Hold the resistance band with your hands about shoulder-width apart. Arms should be straight out in front of you at about shoulder height or right below. Keeping your arms straight, open your arms out to the side. Pinch your shoulder blades together as you open. Do not let your shoulders shrug up. Then once you open the band to your chest with your arms straight, bring your arms back together so your arms are about shoulder-width apart again and there is no slack in the band. Repeat.
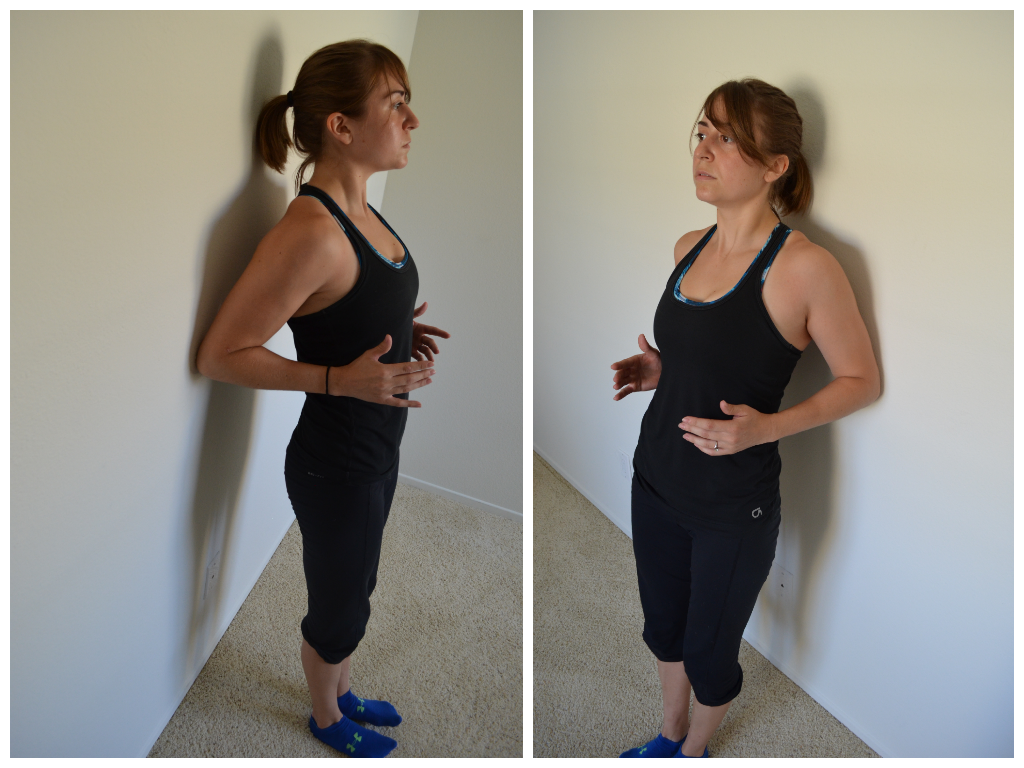
Scapular Wall Hold – Stand with your back to the wall. Step a couple of inches away and bend your arms to 90 degrees. Keep your elbows in by your sides and drive them back toward the wall. Lean onto your elbows on the wall. Do not let your upper arms or back touch the wall. Relax your head back. Pinch your shoulder blades down and back while keeping your core tight as you lean into the wall. You should feel this move low between your shoulder blades. To advance the move, move your feet a bit further from the wall.
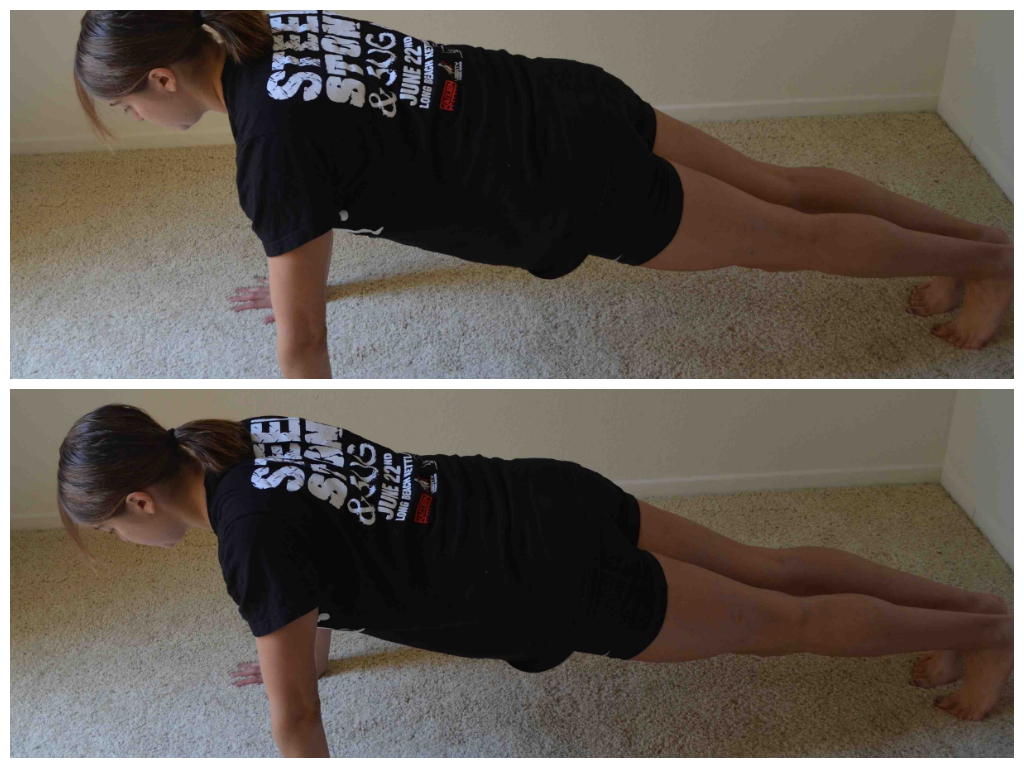
Scapular Push Ups – This move has only a very small range of motion. Set up in a push up position from your knees or toes. Create a nice straight line with your body. Then pinch your shoulder blades back and together and press your chest out. Then relax. It is really only a few inches of motion. DO NOT ALLOW YOUR CORE TO MOVE. Do not bend your elbows or allow your hips to sag. All you are doing is pinching your shoulder blades back and together. Also, do not let your shoulders shrug up by your ears.
2. Use isometric holds to strengthen your pull up.
Isometrics are a great way to strengthen the muscles used during pull ups without you having to be able to do a pull up. Here are three isometric holds that I love to use to work on each part of the pull up. The dead hang is an isometric at the bottom of a pull up and the pull up hold is at the top. The mid-pull up hold is exactly what it sounds like – a hold in the middle of a pull up.
Dead Hang – Hold on to a pull up bar or suspension trainer and hang from the bar. Your hands can be facing toward you or away from you. As you hang, do not let your shoulders shrug up. Keep your chest pressed out and your core tight. Your legs should hang down toward the ground. Do not tuck your knees up toward your chest.
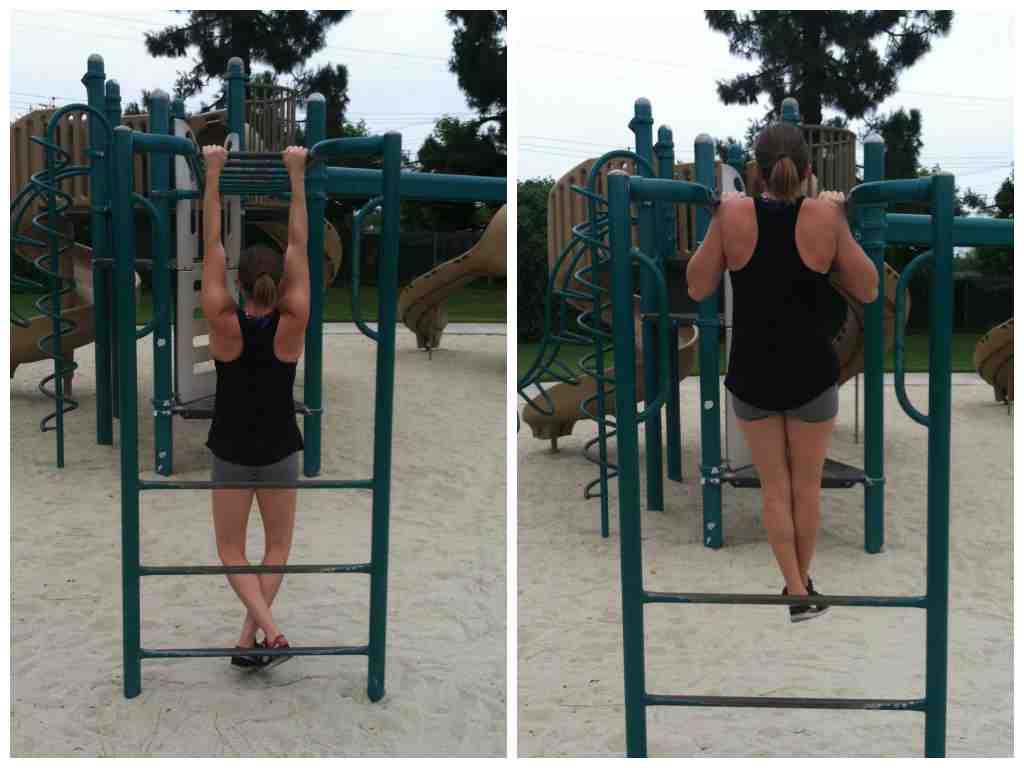
The first is a dead hang. The second is a pull up hold.
Pull Up Hold – You can do this as a chin up or pull up. You can do it off a bar, off a peg board and/or off of XT/TRX straps. Whichever you use pull to the top of a pull up or chin up and HOLD. The less stable the appliance, the harder this move will be. Keep your legs straight down toward the ground and your chin above the bar. Keep your chest should be pressed out and your shoulder blades should be down and back. Squeeze your belly button in toward your spine and keep your glutes tight. Hold there until time is up.
Mid-Pull Up Hold – Hold on to a pull up bar or suspension trainer. Your hands can be facing toward you or away from you. You can either jump or pull yourself so that you are half way up a pull up. If the bar is low enough, you can simply set yourself a mid-pull up then hang from there. You arms won’t quite be bent to 90 degrees. As you hang, do not let your shoulders shrug up. Keep your chest pressed out and your core tight. Your legs should hang down toward the ground. Do not tuck your knees up toward your chest. Try to keep your arms bent as if you are halfway up or down the pull up and do not let them lengthen.

3. Strengthen the muscles of your back.
Once you’ve got everything activated (and before that even you will want to roll out your chest and traps to make sure no overactive muscles are trying to take over), you will want to work on making the big muscles even stronger.
Inverted rows are a great move to help you work toward the pull up because they also force you to work on grip strength and lifting your own bodyweight.
Inverted Rows – Hold a suspension trainer strap in each hand. Walk your feet out so you are leaning back. The closer to parallel to the ground you get, the harder the move will be. Squeeze your core and glutes and press your chest out so there is tension between your shoulder blades. Then row up, keeping your body in a nice straight line. Row until your chest comes up to the handles and then lower yourself back down. Don’t let your hips sink as you lower back down. Also, keep your chest pressed out the entire time (do not let your low back arch though).If there is no bar or XT/TRX on which to do rows, do scapular push ups or corner rows.

One arm weighted rows and T-Bar Rows are also great options. When you do any weighted row, really focus on not rotating or using your legs to help you lift the weight. Focus on keeping a nice flat back and not rotating. You want your back to have to really work to row the weight up.
Doing pull ups are another great way to strengthen your back, but we will get into those with the next point….
4. Use different pull up variations to work on your weak points.
I’ve found that people get super stuck on one pull up variation and never mix it up.
Here are some ways to vary your pull ups to strengthen all the muscles needed to do an unassisted pull up:
- Mix up the grip you use. Don’t always hold with a pull up or chin up grip. Also try a neutral grip (palms facing each other and hands parallel). You can also place your hands wider or closer together. Each grip activates/uses the muscles in slightly different ways. For instance, a chin up engages a slight bit more bicep while a wide grip pull up uses a lot of lat!
- Do assisted variations. The key word there is VARIATIONS. Don’t just always hop on that assisted pull up machine. Try doing a pull up assisted by a jump. Or set up a bar so that your feet can help you push up by pushing off the ground. Or use a band. Vary the assistance you use to force your body to work in a few different ways. Also make sure you are always using as little assistance as possible. Just because something is hard doesn’t mean you can’t try using just a little less assistance. Find your point of failure and then move backward until you can just barely do one or two. Don’t just allow the move to be easy and depend on the assistance.
- Use tempo to strengthen your pull up. Slowing down the tempo of your pull up or down also helps strengthen your pull up. Do an assisted pull up, but pull up for a 3-5 count instead of pulling up as quickly as possible. OR jump to the top of the pull up, hold for a second then lower down as slowly as you can. All of these strengthen muscles in different ways to help you build toward the full pull up.
All of these moves and tips will help you master the pull up. While you need to be consistent in using them, you don’t have to use every single one every time you do an upper body workout. Mix a few in a couple of times a week.
Maybe during your metabolic use a pull up hold or even jumping pull ups. Or the next time you do a strength circuit do a weighted row and maybe some assisted pull ups.
Mix up the techniques you use, focusing on the moves that strengthen your weakest points. There is always a limiting factor to the weights or amount of reps we can do. Find that limiting factor, that weak link, and strengthen it.
And in case you aren’t sure what your weak link is, feel free to comment below and I can help you incorporate these tips into your training!
ALSO, while I didn’t discuss foam rolling above, make sure to roll out and do dynamic stretches before any strength training routine. A huge part of mastering these killer moves is getting the overactive muscles loosen and the correct muscles ready to work!
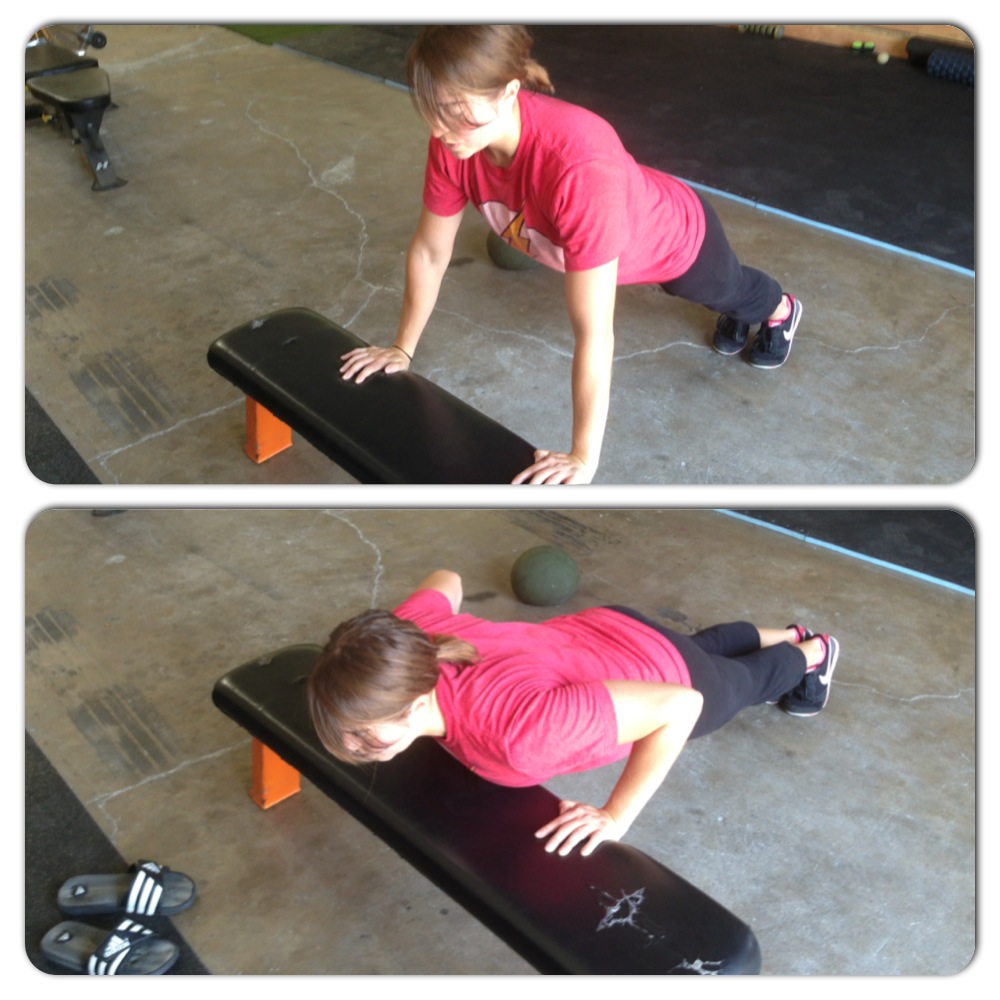
Where do you feel it?
When you do an exercise, do you just go through the motions? Or do you actually think about where you should be and actually are feeling the move?
Hopefully you are thinking about where you are feeling the move because that will not only make sure you are doing it correctly but will also allow you to figure out if certain muscles are tight or overactive or underactive.
AND it will build that very important mind-body connection.
One of the first questions I always ask clients when they do a new move is “Where do you feel it?”
It really makes you focus on the move and really makes your mind have to connect and think about your body and the movement.
I also prefer asking that to even telling them where they should feel it because then they have no notion of where they “should” feel it and instead truly consider where they DO feel it.
Because when we consider where we are feeling the move instead of just going through the motions, we may realize we actually aren’t feeling the correct muscles working.
Like when squatting down…if we feel the squat a lot in our low back it may be because our abs aren’t engaged or our hips and even calves are tight. It also probably means our glutes aren’t engaged and firing.
And yes that means we need to do some core engagement exercises and roll out and stretch our calves and hips. And yes, it also even means we need to do some glute activation exercises.
But more importantly it means we need to THINK about the move and focus on engaging the proper muscles to make sure we feel the exercise working the correct muscles.
We can do all the proper activation exercises and learn how to activate and engage the muscles in isolation, but still not have that translate to compound moves IF we don’t focus on doing it during the movement.
Here are some quick tips address some of the most common form problems people have with a few common exercises. These tips help build that mind-body connection along with proper stretching, rolling and activation exercises. These exercise variations and adjustments help you learn to what it feels like to do the movements correctly so your mind knows how to focus on activating the correct muscles so that when you do any variation of the exercise and are asked “Where do you feel it?”, you will feel it in the correct places.
Squats:
- You feel it in your low back – Try a bear hug squat with a sandbag. By hugging the sandbag to your chest, you will force your abs to engage throughout the squat movement. A good next progression from this is even a light front squat with a kettlebell (aka a goblet squat) since front squats require more core engagement. Then you can move into heavier back squats once you’ve learned to focus on engaging your core during the movement.
- You lean forward and feel it in your low back – Stand in front of a wall and perform the squat. Sometimes we may have done enough to loosen up muscles so that we should have proper form yet still repeat the same bad movement patterns because they are so engrained and our mind doesn’t stay focused on controlling our body. The best way to make the new movements muscle memory and get that mind-body connection is by sometimes giving our body no way to compensate. If you lean forward during your squats, stand in front of a wall close enough that you can lean forward and instead have to sink your butt to get closer to the ground. Make sure, however, that you don’t compensate by coming up onto your toes!
- Your heels come up – Many people actually don’t realize their heels come up or that they are coming forward in the squat and that is why they only feel the squat in their quads and not at all in their butt. A great way to correct this is by doing a squat to a box or bench. Stand enough in front of the box that you have to REACH your butt back to sit down on the bench. This will force you to sit back on your heels and then drive up through your heels, engaging your glutes and keep you from injuring your knees and coming up on your toes.

While this is a single leg squat, it shows you that a box forces you to sit back.
Deadlift variations
- Your back rounds as you hinge over – The most common one and often one of the hardest to focus on and correct since so many people are so used to rounding forward over their desks. A great way to ingrain the correct movement pattern is by starting your hinge with a pole or stick down your back. Keep the stick in contact with your head, upper back and butt at all times throughout the exercise. This insures that you have a flat back and do not round. Next move to just keeping your hands behind your back. The hands behind the back reminds you to keep your chest open which in turn keeps your back flat.
- You don’t feel your glutes working – I’ve found a great way to train the hinge motion and driving up through the glutes is by standing 2 or 3 inches from a wall, facing away from the wall. Lean forward and reach the butt back toward the wall. If you only lean forward and put all the work in your back, your butt will not move closer to the wall.But if you only lean forward to counterbalance your butt reaching back, you will feel a stretch down your hamstrings and you will feel your butt touching the wall. If you are working on a straight-leg hinge, you will not bend your knees as much. If you are working toward a conventional deadlift, stand a bit farther away and allow your knees to bend as you reach your butt back and lean forward (keeping your back flat) to counterbalance your butt reaching back to touch the wall. This move should make you aware of how it feels to sit back and the “stretch” you will feel if you are doing the move correctly. Advance to using a band around your hips while trying to reach your butt back to a pole or wall.
- Your low back is feeling it – Doing a light weight front-loaded good morning is a great way to get the core really activated while hinging. Too often when we are holding a barbell or kettlebells while lifting we are more focused on the hinge and keeping our back flat than our core engaged. But a front loaded move like the good morning is a great chance to really focus on the core. Hold a dumbbell, sandbag or kettlebell at your chest. Perform a straight two-leg deadlift, sitting your butt back and hinging forward. Because of the weight in front you will really need to focus on engaging the core so your low back doesn’t feel it. If you just rush through this move, you can easily irritate your low back. BUT I like to use it because it does really seem to make people more aware of how engaged their core should be.

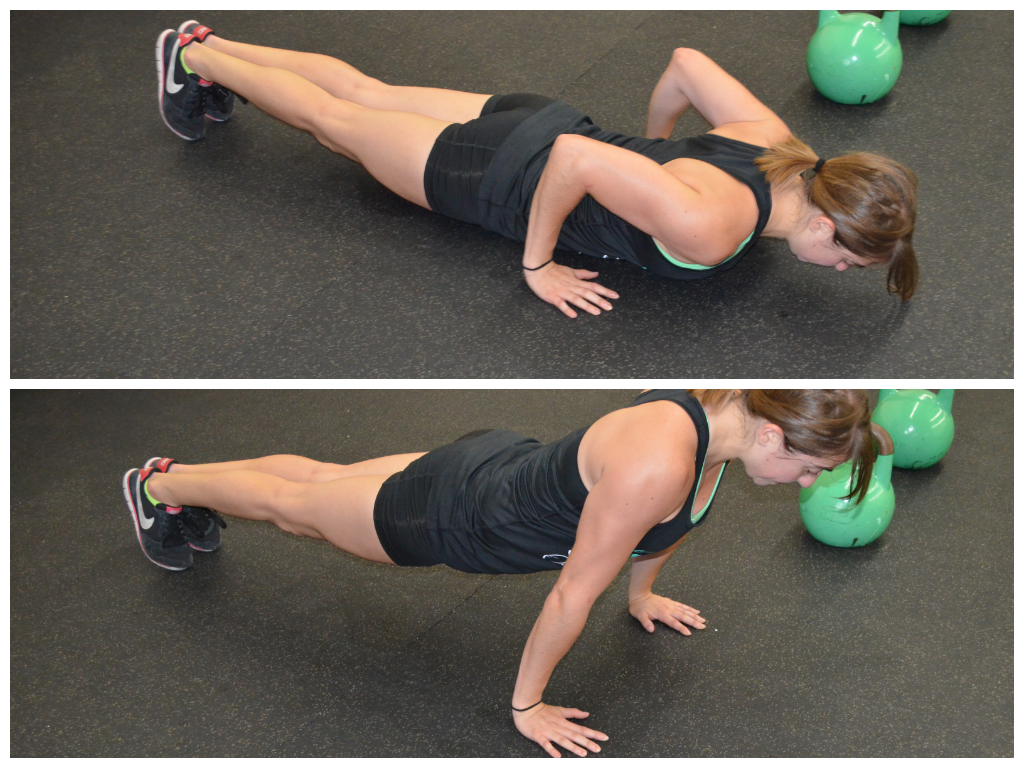
Push Up
- Push ups are one exercise everyone thinks they can do and hardly anyone actually does correctly. One of the best ways to train correct push ups is to make them as easy as possible to start with. INCLINE PUSH UPS should be done to start. Heck use a wall and do almost completely standing up straight push ups if you need to. By making it super easy, you allow yourself to focus on correct movement patterns….Like everything moving together and you not tucking your chin and your elbows not flaring out toward you head….
- You feel it in your low back – This means your core isn’t engaged. Try placing yoga blocks under your body. Make sure everything hits the yoga blocks at the same time. If your hips hit it before your chest then your hips are sagging and your core isn’t engaged…aka you are going to feel it in your low back! This may just make you aware enough to correct it or you may need to do some pelvic tilts and plank holds!
- You feel it in your traps and neck – You are shrugging your shoulders and not engaging your lower traps or lats. A great way to train yourself to keep your shoulders down is by doing a push up with your hands low down like toward your hips. Because this is a difficult push up, you may need to do a modified push up or even an incline variation.
Row
- You feel it in your neck and traps – I find this is super common especially during inverted rows. It means you aren’t activating your lower traps. It is also easily corrected by focusing on pressing the chest out and by rowing LOWER on your chest. So instead of even focusing on engaging a muscle, focus on just rowing the strap or bar to lower on your chest…like below the nipple at least.
- Your back is rounded – Just like with the deadlift, a pole or rod can be used down your back to keep your spine in alignment. Make sure your head, upper back and butt all maintain contact with the pole throughout the move. This will also prevent you from rotating so that you actually feel the move in your lower traps and lats! (This isn’t great for keeping a straight line during the inverted row but during the bent over row or even a row supported on a bench.)
- You only feel it in your biceps – While any back exercise does work your grip and your biceps, you should feel the move in your back. Focus on driving your elbows up toward the ceiling and not letting your forearms curl toward your chest when you row. To learn this, it actually works best to stand up straight. Stand with your back to a wall. The wall should be only a few inches away. Standing up nice and tall, drive your elbows back to touch the wall. If you “curl” instead of “row,” your elbows won’t touch the wall. But if you pinch your shoulder blades down and back and row, your elbows will touch the wall. This is the exact motion you will use when performing an actual row and rowing your elbows up to the ceiling!

Row low on the chest. Do not let your forearms curl toward your chest.
These are only some very basic cues and variations to help you develop that mind-body connection. But if you use them they will help you become more AWARE of your body so that you can keep the correct muscles engaged and working even during other variations.
Now ask yourself, “Where do you feel the (insert exercise here)?” Are you using the correct muscles or just going through the motions?
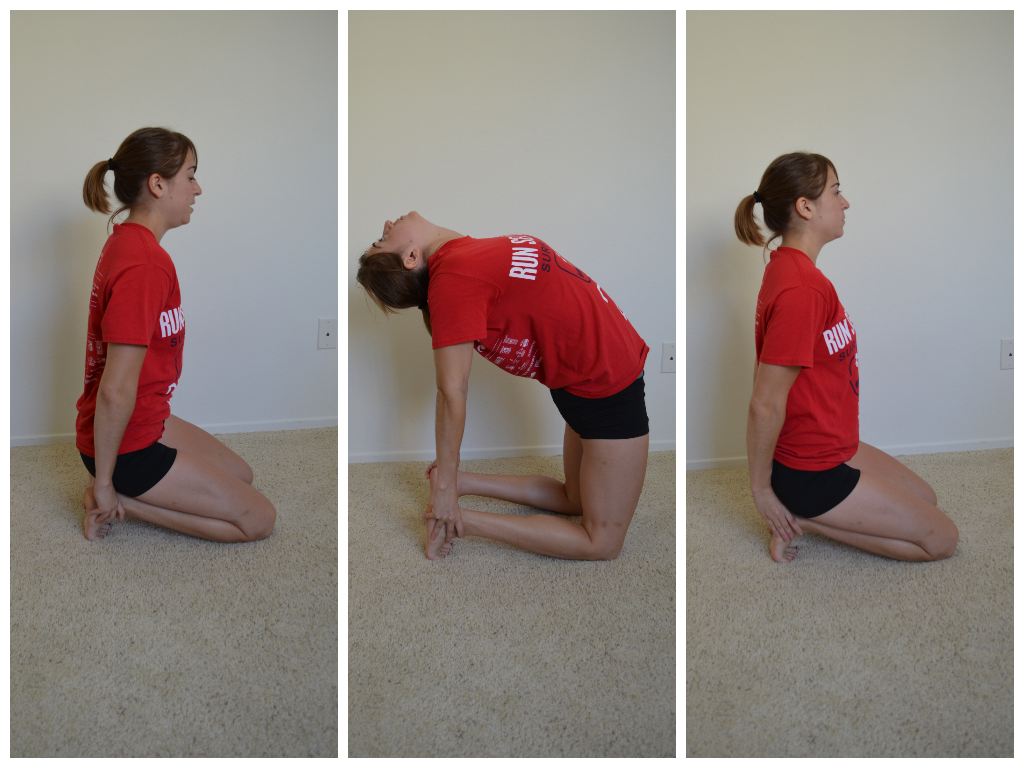
10 Plank Variations to Strengthen Your Core
I’ve had sort of a love-hate relationship with planks over the years.
At points I’ve felt they didn’t give you that much bang for your buck, but I’ve started to realize they really are essential to developing stability and therefore preventing injury.
Here are my favorite plank variations. Some are isometrics while others are dynamic moves. Some even make great warm up moves.
1. Front Plank – The basic front plank variation is done from your forearms. You should rest on your forearms with your elbows right below your shoulders. Beginners can start on their forearms and knees while more advanced exercisers will perform the plank from their forearms and toes.
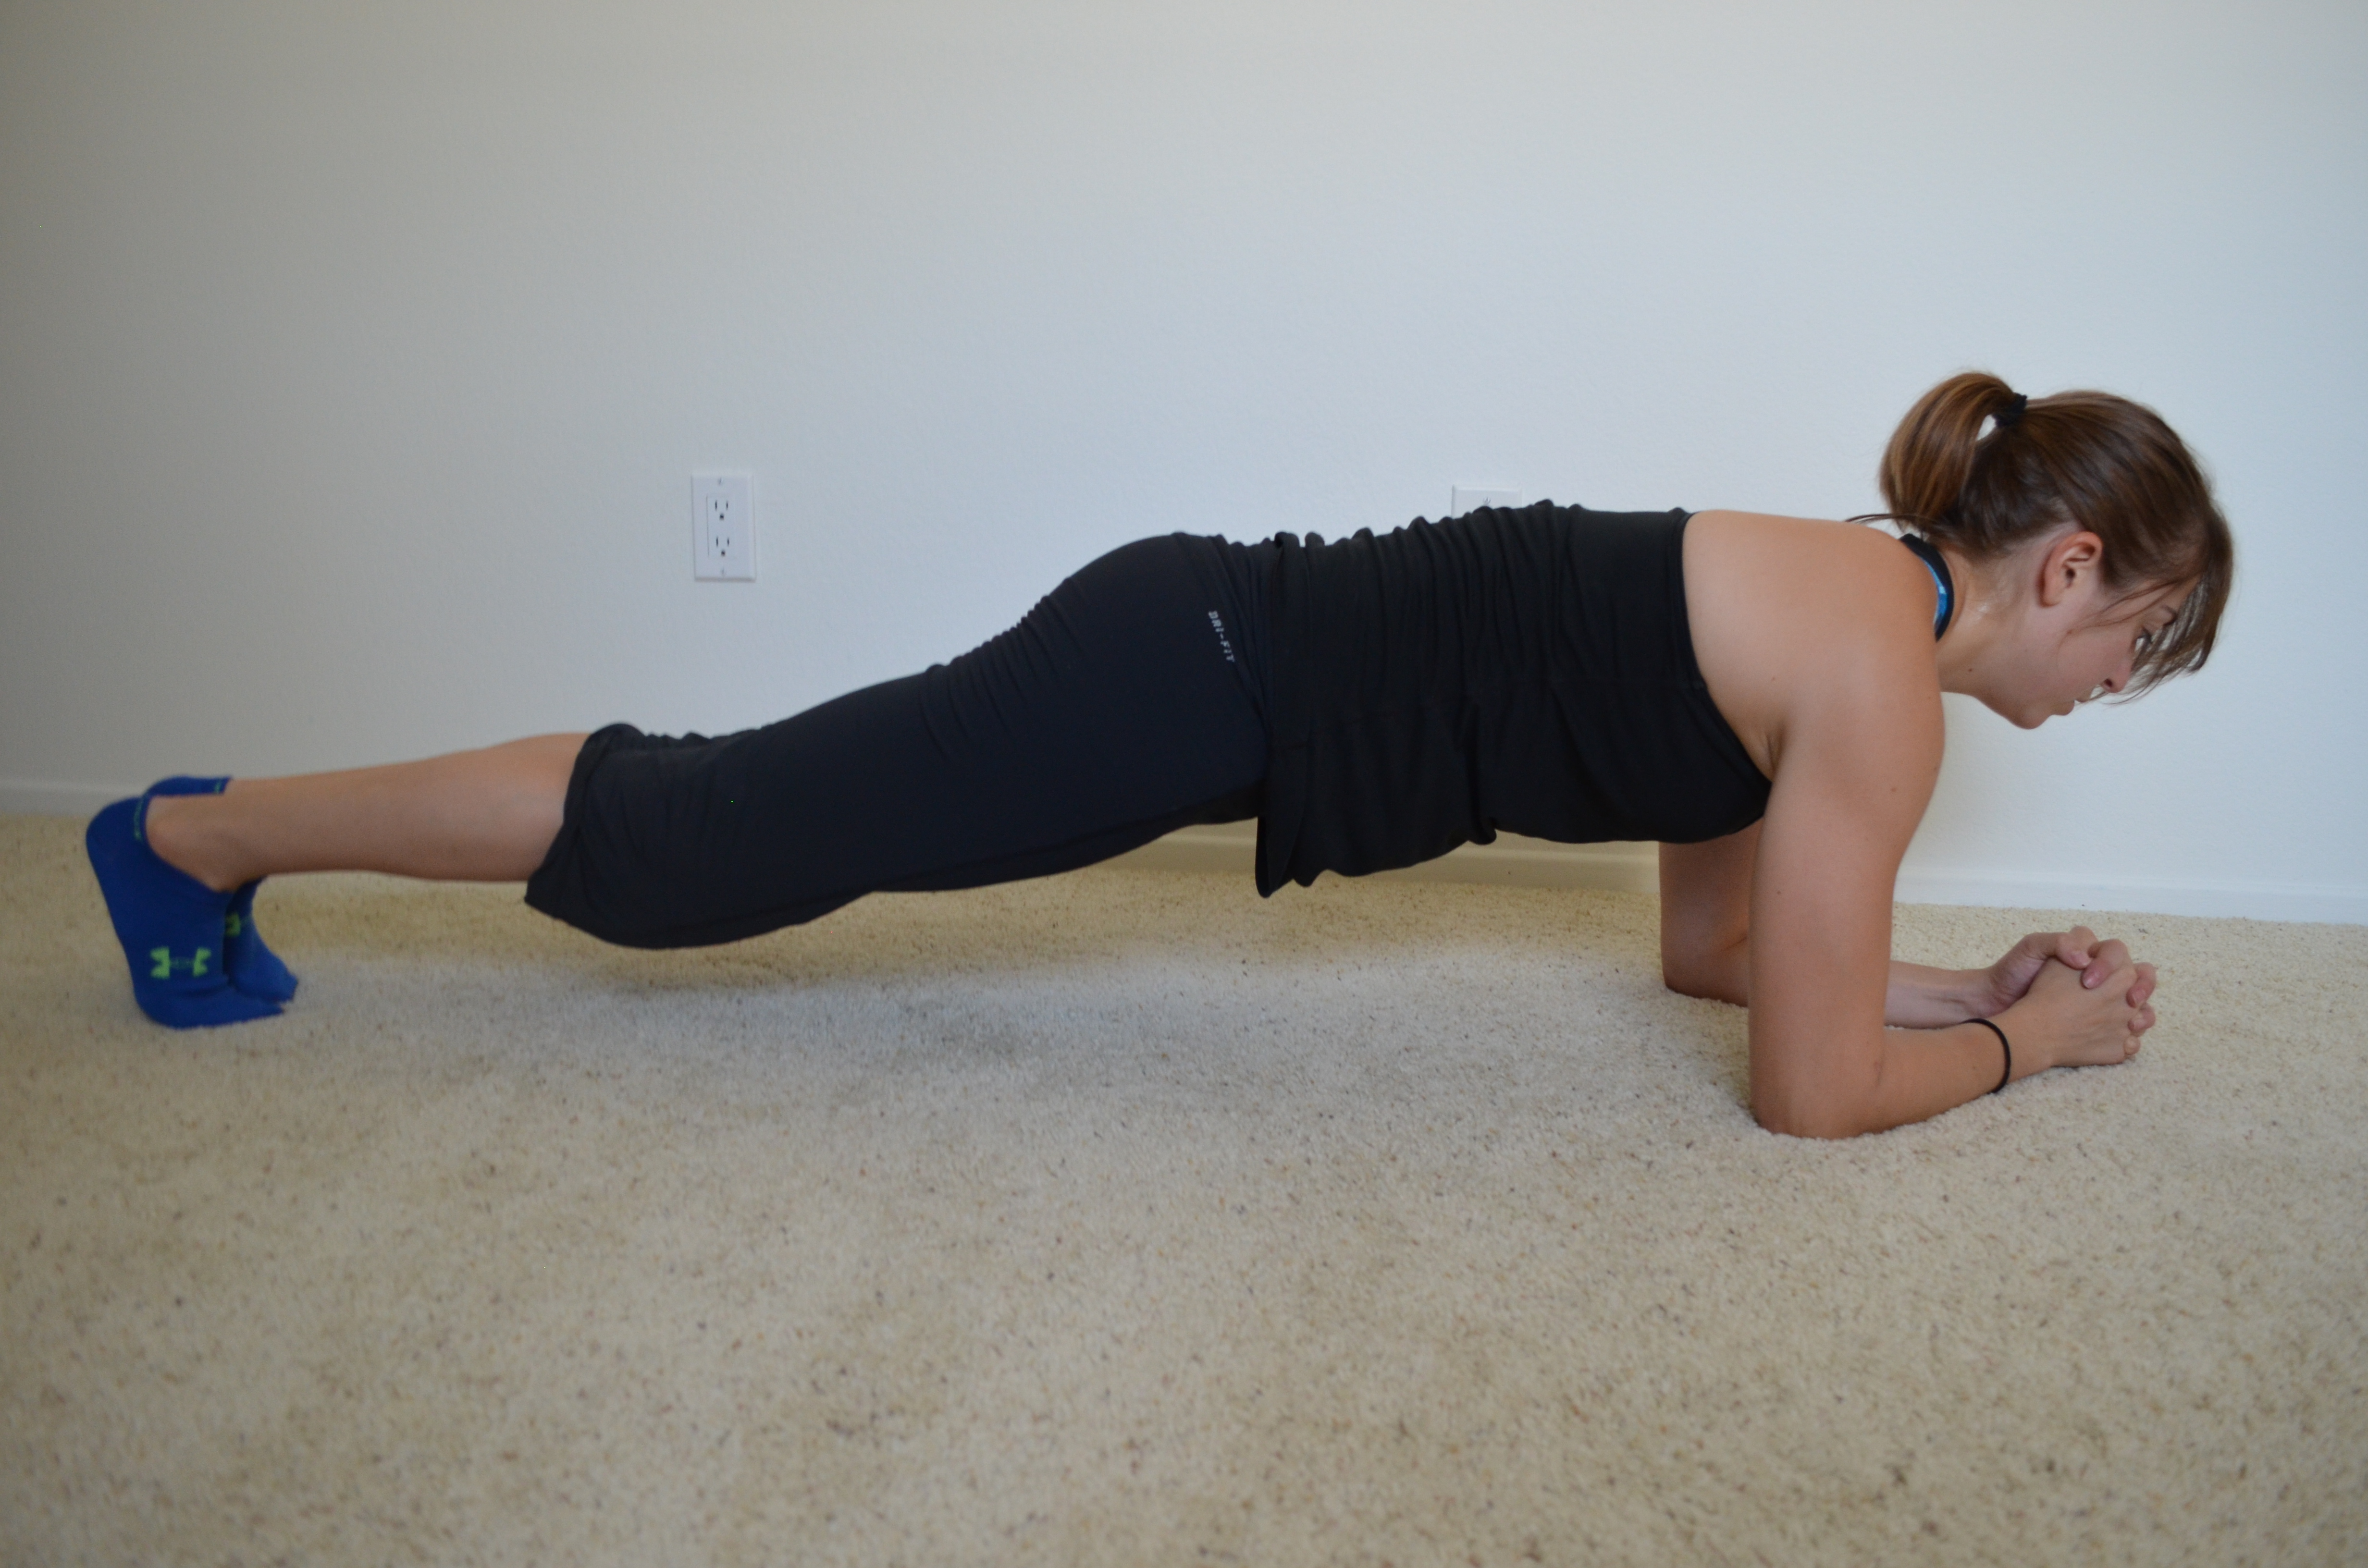
The longer you hold, the harder the move will be. To advance the move further, try lifting one leg and holding it off the ground. Make sure to draw the belly button in toward your spine, tuck your hips under and keep your body in a nice straight line. Feet should be together and adductors, glutes and quads engaged. Do not let your upper back round as you hold. Breathe as you hold and don’t let your hips drop toward the ground or raise up toward the ceiling.
You can also do the front plank from your hands.
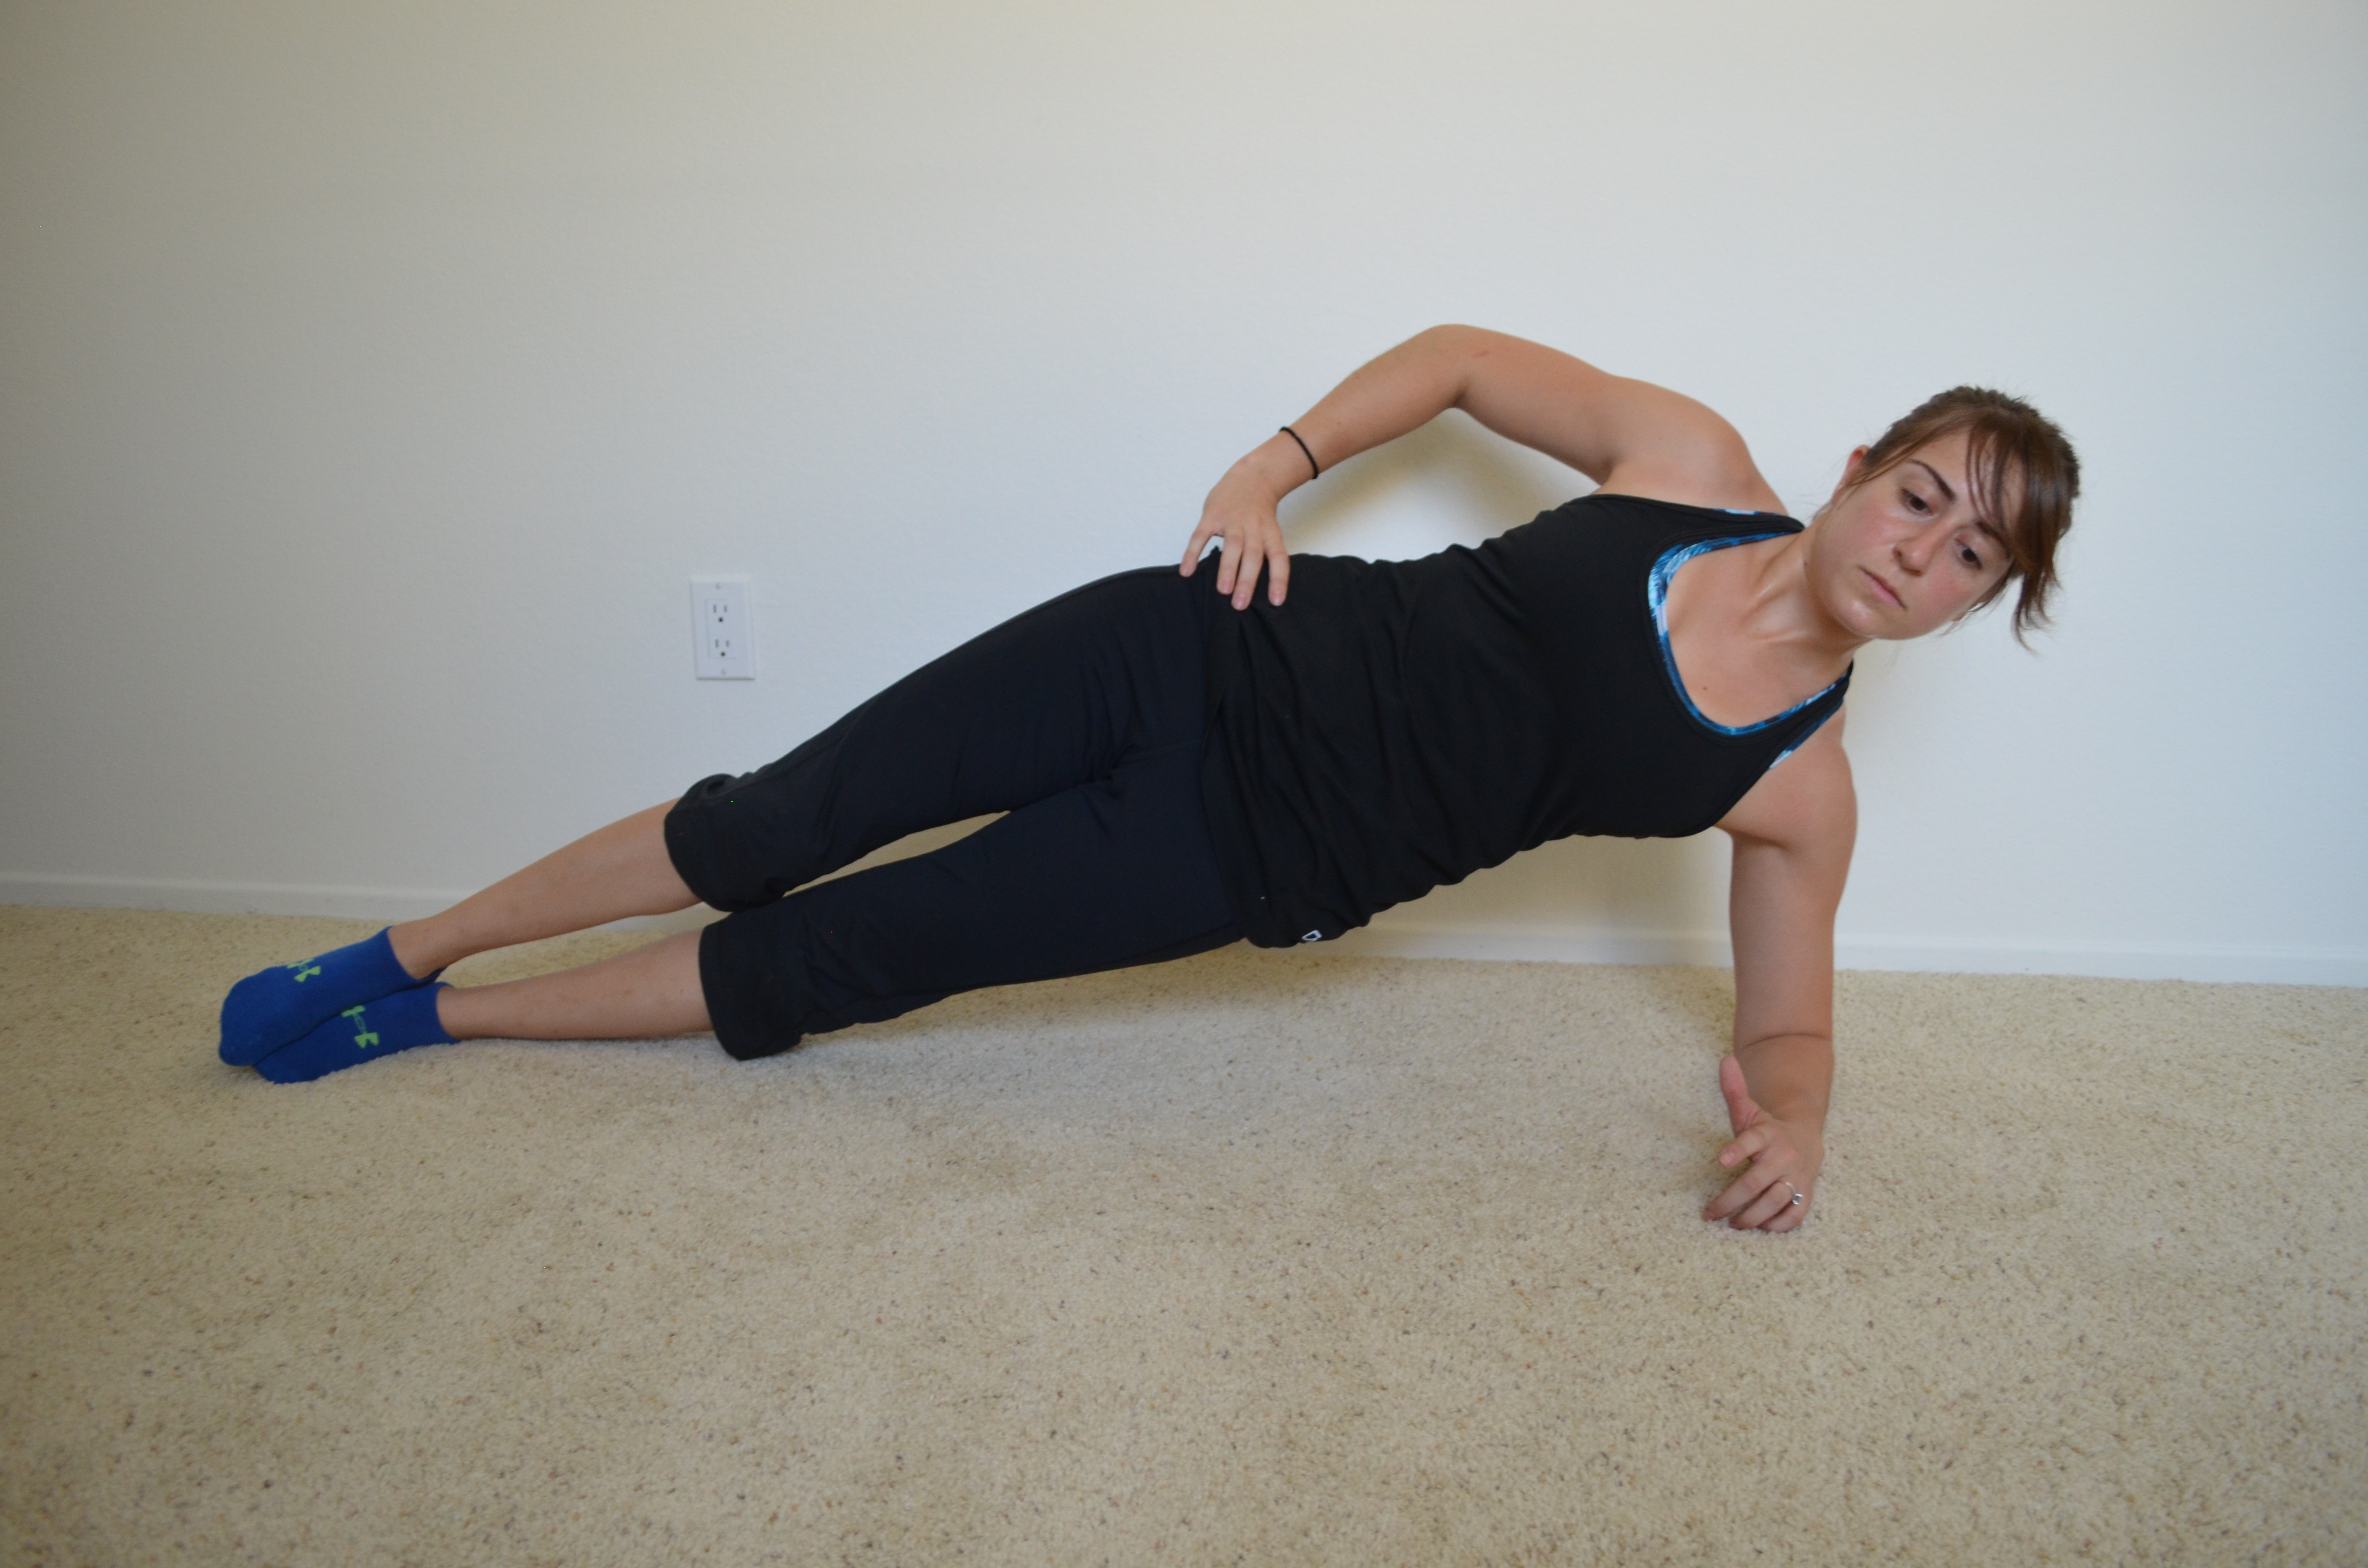
2. Side Plank – The basic side plank variation is done on one forearm. Your elbow should be right below your shoulder.
Beginners may do this from their knees. A modified plank can also be done with just the bottom knee down and the top leg straight.
To advance the move, straighten both legs and rest on the side of your feet and your forearm. (Feet may be stacked or one may be in front of the other.)
If that isn’t challenging enough, raise the top leg. You can also do the side plank from your hand.
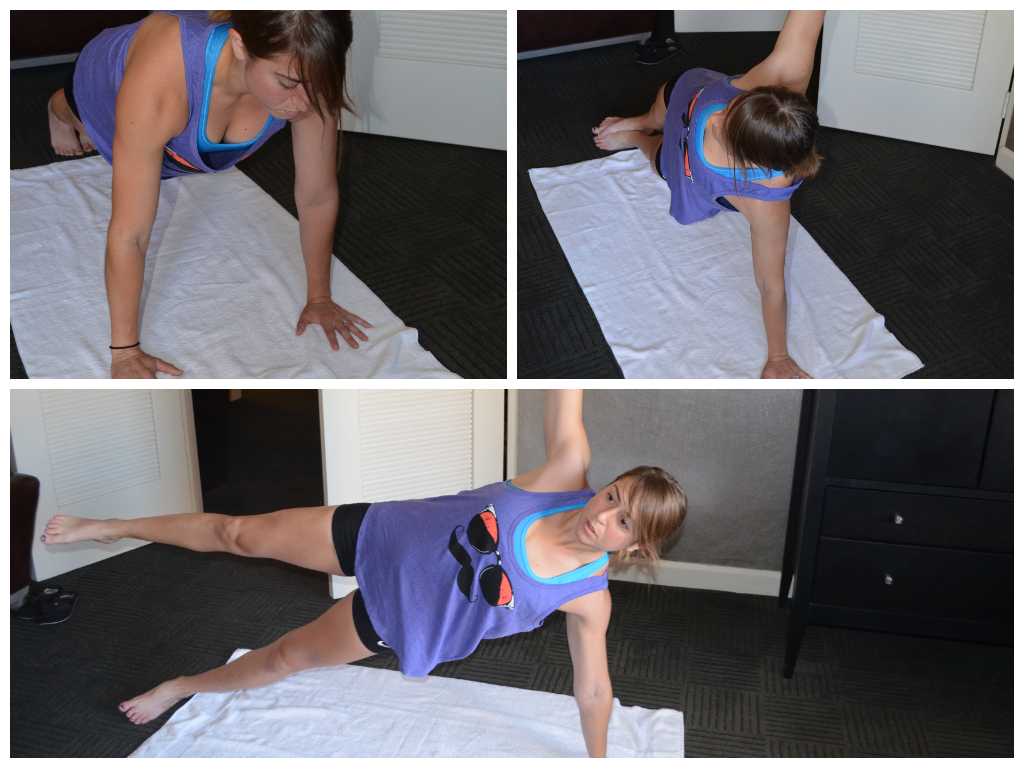
High front plank and two side plank variations
Your top arm can rest on your hip or reach up toward the ceiling. Make sure to keep your body in a nice straight line. Squeeze your glutes and make sure your chest doesn’t rotate toward the ground. Drive your bottom hip up nice and high. Do not let your hip sag toward the ground.
3. Planks with Hip Dips – There are two variations of plank hip dips that I love to use. One is a front plank with hip dips and the other is a side plank with hip dip.
To do the front plank with hip dip, set up on your forearms and knees or toes. Keep your core engaged and your belly button pulled in toward your spine. Then drop the side of your right hip down toward the ground. Come back to center and then drop the side of the left hip down toward the ground. Alternate hip dips while keeping the core tight. Do not let the hips sag or raise up toward the ceiling.
To do the side plank with hip dip, set up on one forearm and either your knees or the sides of your feet. Start in a basic side plank. Then keeping your body straight and your chest open (aka not rotated toward the ground), drop your hip toward the ground and then press it back up as high as you can. Repeat making sure your body doesn’t collapse forward. Your top hand can be raised toward the ceiling or on your hip. Complete all reps then switch to the other side.
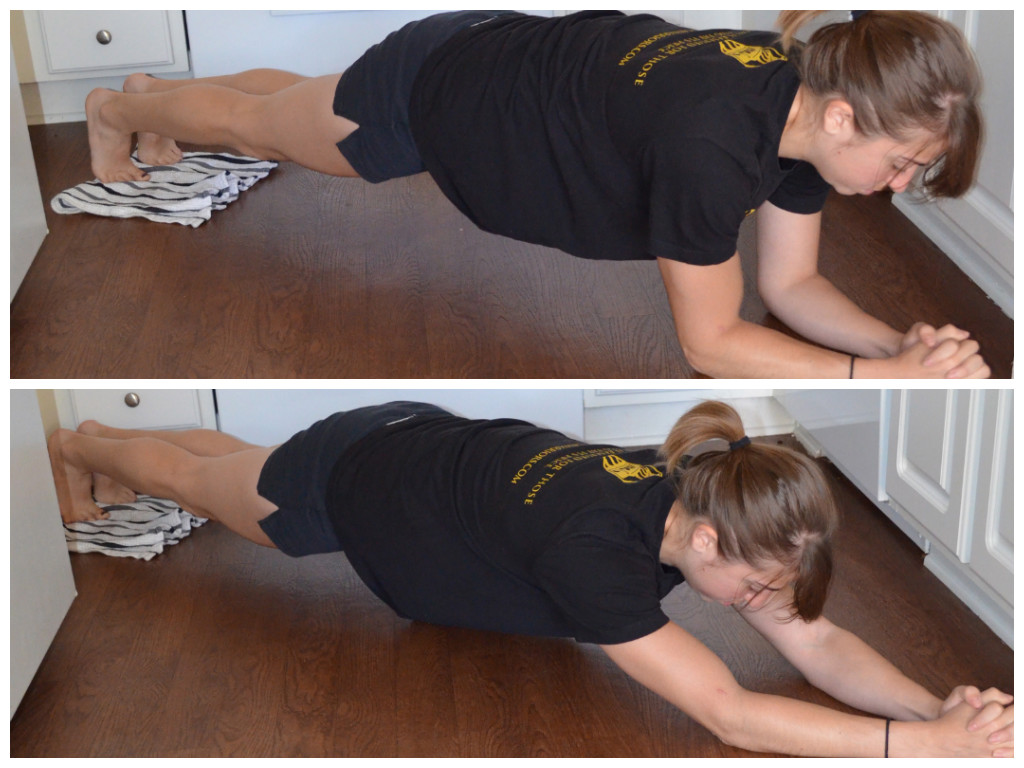
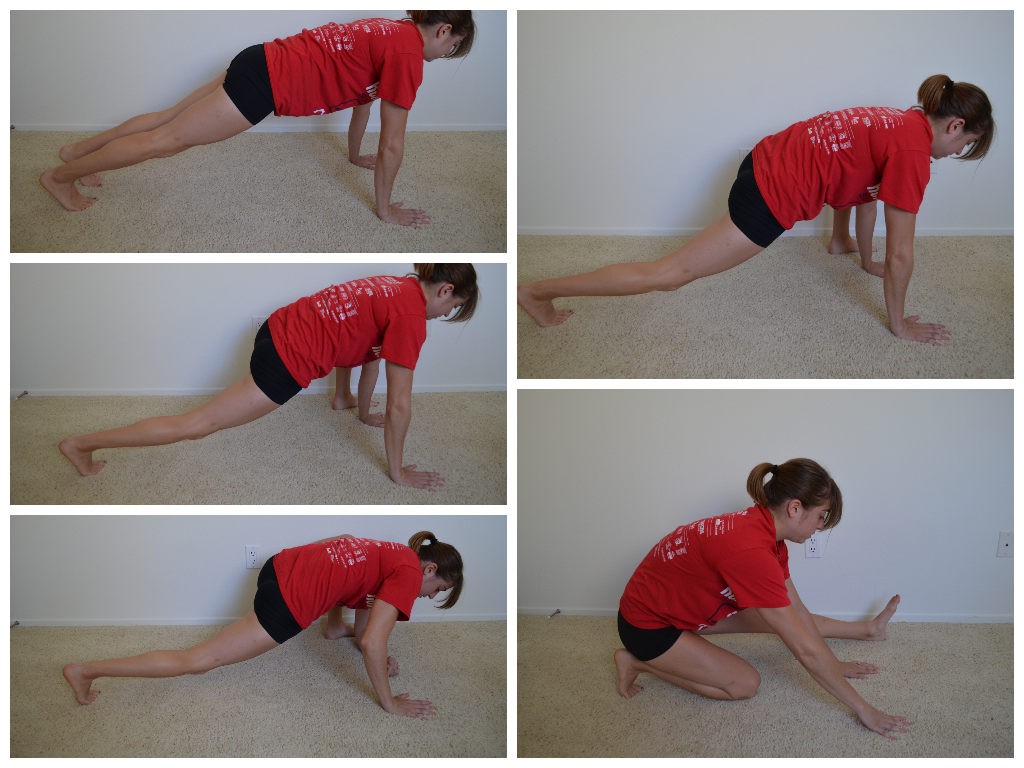
4. Plank with Reach Out and Back – A great glute activation move and tough on the core. This move is done from the hands and either your knees (beginner) or toes (advanced). To do this move from your knee, set up in the top of a push up with your hands under your shoulders and your body in a nice straight line down to your knees. Then sit back on your heels into a “child’s pose” position, reaching one hand back between your legs. Move forward back to the top of the push up as you reach the hand from between your legs out toward the wall beyond your head. You may even extend your hips more toward the ground. Just make sure to keep your abs engaged so that you don’t feel the extension out in your low back. Complete all reps on that side before switching to the other arm.

To do the plank with reach out and back from your toes, start at the top of a push up with your hands under your shoulders and your body in a nice straight line to your toes. Your feet should be between hip-width and shoulder-width apart. Lift one hand and hike your hips up as you reach back and across to the opposite ankle. Then reach back forward, reaching beyond your head as you lower your hips back down into the plank position. Extend your hips forward toward the ground, squeezing your glutes while keeping your abs engaged so that you don’t feel it in your low back. Complete all reps on that side before switching to the other arm.
5. Plank with Reach Thru – Set up in the high plank position on your hands and knees (beginner) or toes (advanced). Then reach one hand under your armpit and toward the far wall. You don’t just want to reach under your armpit to pat yourself on the back. Make sure your hips stay down as you reach through. Then pivot open, rotating into a side plank. You will reach the hand that reached under your armpit up toward the ceiling while rotating onto the sides of your feet or knees. Then reach the hand back down and under the armpit. Move back into a high plank position. Complete all reps on that side before switching and reaching the other way.

6. Bull Dog – To perform a bull dog hold, start on your hands and knees with your knees under your hips and your hands under your shoulders. Flex your feet and push up onto your toes and hands while your knees stay bent under your hips. Hold your knees an inch or two off the ground, keeping the core tight and the belly button pulled in toward your spine. Do not let your upper back arch as you hold. This move you almost feel more in your quads and shoulders than your core.
7. Body Saw – This is a very advanced plank variation…even at its most regressed. You can do this on a towel or sliders or regress it to a simple plank from your toes on the ground. Set up on your forearms and toes in a basic front plank. If you aren’t using sliders or a towel, you are going to walk your feet backward, lengthening your body through your triceps. Keep your body in a nice straight line. Do not let your low back arch. Walk your feet back as far as you can while maintaining good form and then walk back forward into the front plank.
If you use sliders or a towel, you will slide your feet back instead of walking them back. Make sure your lengthen through your arms. It is tempting to “pike” instead of truly lengthening, but to challenge your core, you need to lengthen your body out. You should not feel it in your low back. Keep the belly button pulled in and your glutes engaged. Don’t let your hips hike up or sag toward the ground. Slide out and back in and repeat.
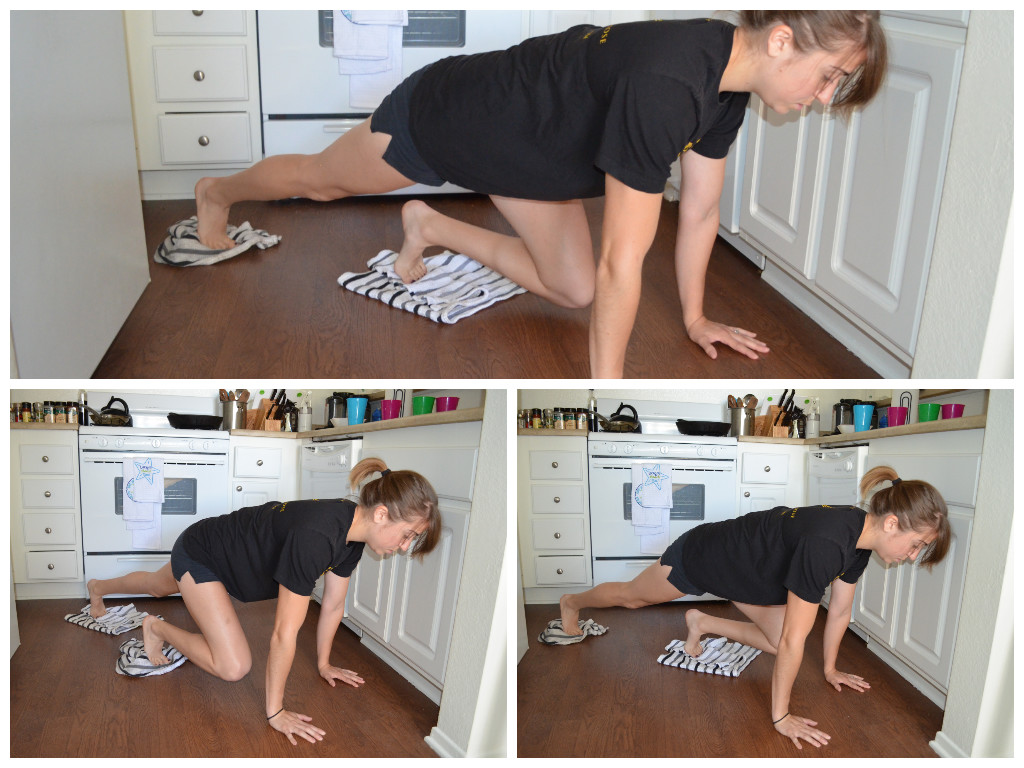
8. Bird Dog – The basic bird dog is done from your hand and knee. Place your hands underneath your shoulders and your knees underneath your hips. Flex your feet. Kick one leg out straight as if kicking it into the wall behind you while you reach the other arm out straight toward the wall in front of your head. Don’t worry about lifting your leg or arm up high. Really try to drive your arm and leg toward opposite walls. Squeeze your glutes and keep your belly button pulled in toward your spine. As you lower your arm and leg, bend them and bring them together under your body. Try to touch your knee to your elbow before extending back out. Repeat all reps on one side before switching to the other side. All reps should be done in a slow and controlled manner. You should even hold for a second or two at the top of the move.

To advance this move, set up in a high plank position from your toes and hands. Now lift the opposite arm and leg up toward the ceiling, keeping both straight. Still try to reach both toward the far walls instead of just getting them up as high as possible. Keep your core tight and glutes engaged. Do not let the hip of the raised leg rotate open toward the ceiling. Squeeze the butt to hold the leg up then lower the arm and the leg and repeat the arm and leg raise on the same side.
Both bird dog variations can also be done as holds at the top instead of for reps.
9. High Plank Hold with Knee Drives – Set up in the high plank position on your hands and toes. You are then going to raise one leg off the ground and drive that knee toward your chest. You can drive the knee straight in. Or you can drive it to the outside of the same elbow (so right knee to the outside of the right elbow). You can also do a cross-body drive, bringing the right knee under and across the body to the left elbow.
Whichever drive you do, hold the knee in and the foot off the ground. Hold for 30 seconds to a minute before returning the foot back down to the ground and moving back into the high plank position.
If you want to make the move more cardio, you can turn it into a “mountain climber” by running the knees in and alternating knee drives instead of holding the drive.
You can even make the climbers harder by adding a towel or slider.
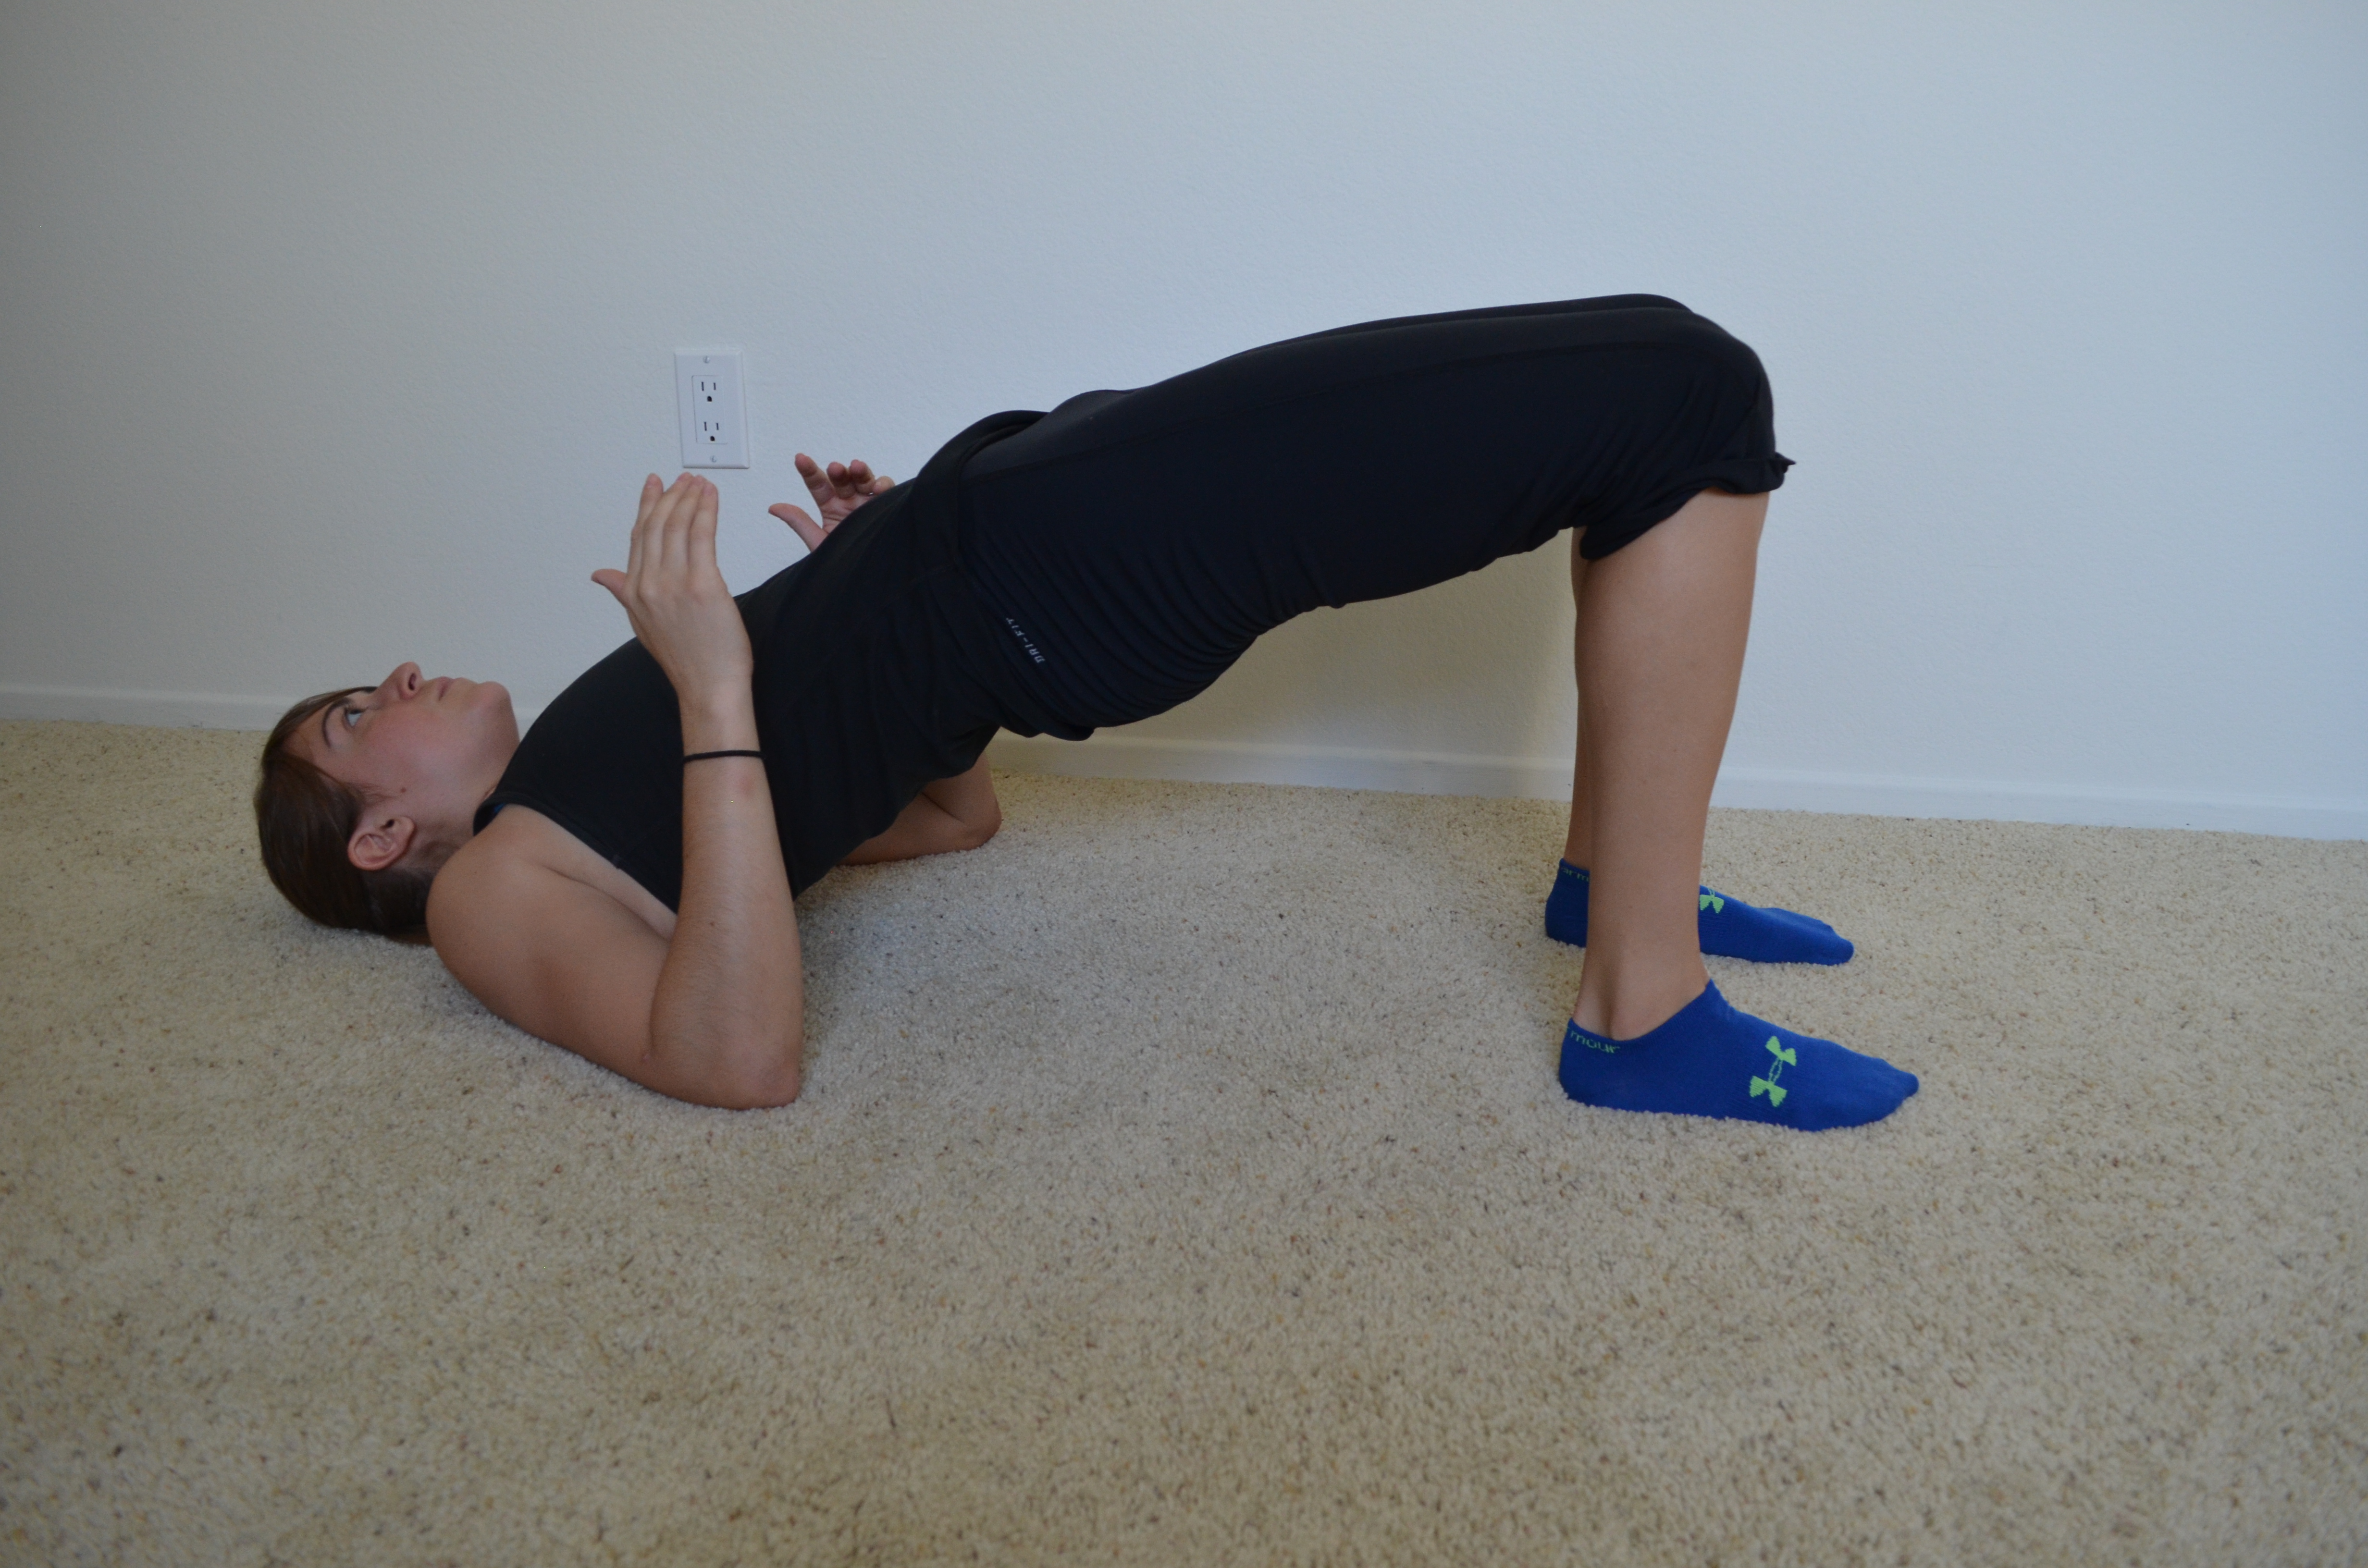
10. Reverse Plank – I’ve talked about this move before…It is the one that always reminds me of Flash Dance (also called the Posterior Plank). Start seated on the ground with your legs out straight and your hands on the ground behind your butt. Your finger tips should be pointing toward your butt. Drive through your hands and heels and raise your hips up off the ground toward the ceiling. Press your chest up and out as you raise your hips. Keep your legs straight as you bridge up and relax your head back. You can either perform a Reverse Plank hold by holding at the top or you can perform reps, dropping your hips back down and raising them back up.
To make the move easier, you can bend your knees slightly. To make the move more advanced, you can perform a single leg Reverse Plank.
Here are some other amazing plank variations (some of which overlap the ones I’ve discussed above).
Tips to Relieve Low Back Pain
Low back pain is one of the most common complaints I get from new clients who have a desk job.
And honestly, I’m not surprised. They sit hunched over a computer all day, which causes bad posture and muscle imbalances that can easily lead to injury and pain.
That bad posture contributes to low back pain because it causes tight hip flexors, hamstrings and even calves. It can also cause tight lats and poor thoracic extension.
Those tight muscles and poor extension cause imbalances. They cause you to overuse the low back. And the tight hip flexors and hamstrings especially inhibit the glutes and prevent them from activating, placing more pressure on your low back.
Because muscles aren’t working that should be working, your low back takes over when it shouldn’t, which causes further pain and injury.
Below are some great trigger point, stretching and glute activation techniques to help you relieve that low back pain and get more out of your workouts!
TRIGGER POINT RELEASE
For videos showing all of these trigger point release moves, sign up for the Redefining Strength video library!
1. Calves – I love using either a rumble roller or a ball on a block (or books if you don’t have a block). I find it easier to really dig into knots using one of those tools. To roll out your calves, place one calf over the trigger point tool. Cross the other leg on top to apply more pressure. Rock the leg side to side to dig in more. You can also make circles with the foot and flex and relax the foot to apply more pressure and help release the trigger point. Move the ball or roller up and down the back of your lower leg, spending time on any tight spots you find.
2. Hamstrings – The best way to hit your hamstrings is using a ball or roller, but while seated on a chair, bench or table. You really can’t apply enough pressure while seated on the ground. Place the ball or roller right below your butt at the top of your hamstring and sit down on it. Roll it from side to side, holding on any tender spots. You can work your way down the length of your hamstring to right above the back of your knee. Do not roll out behind your knee.
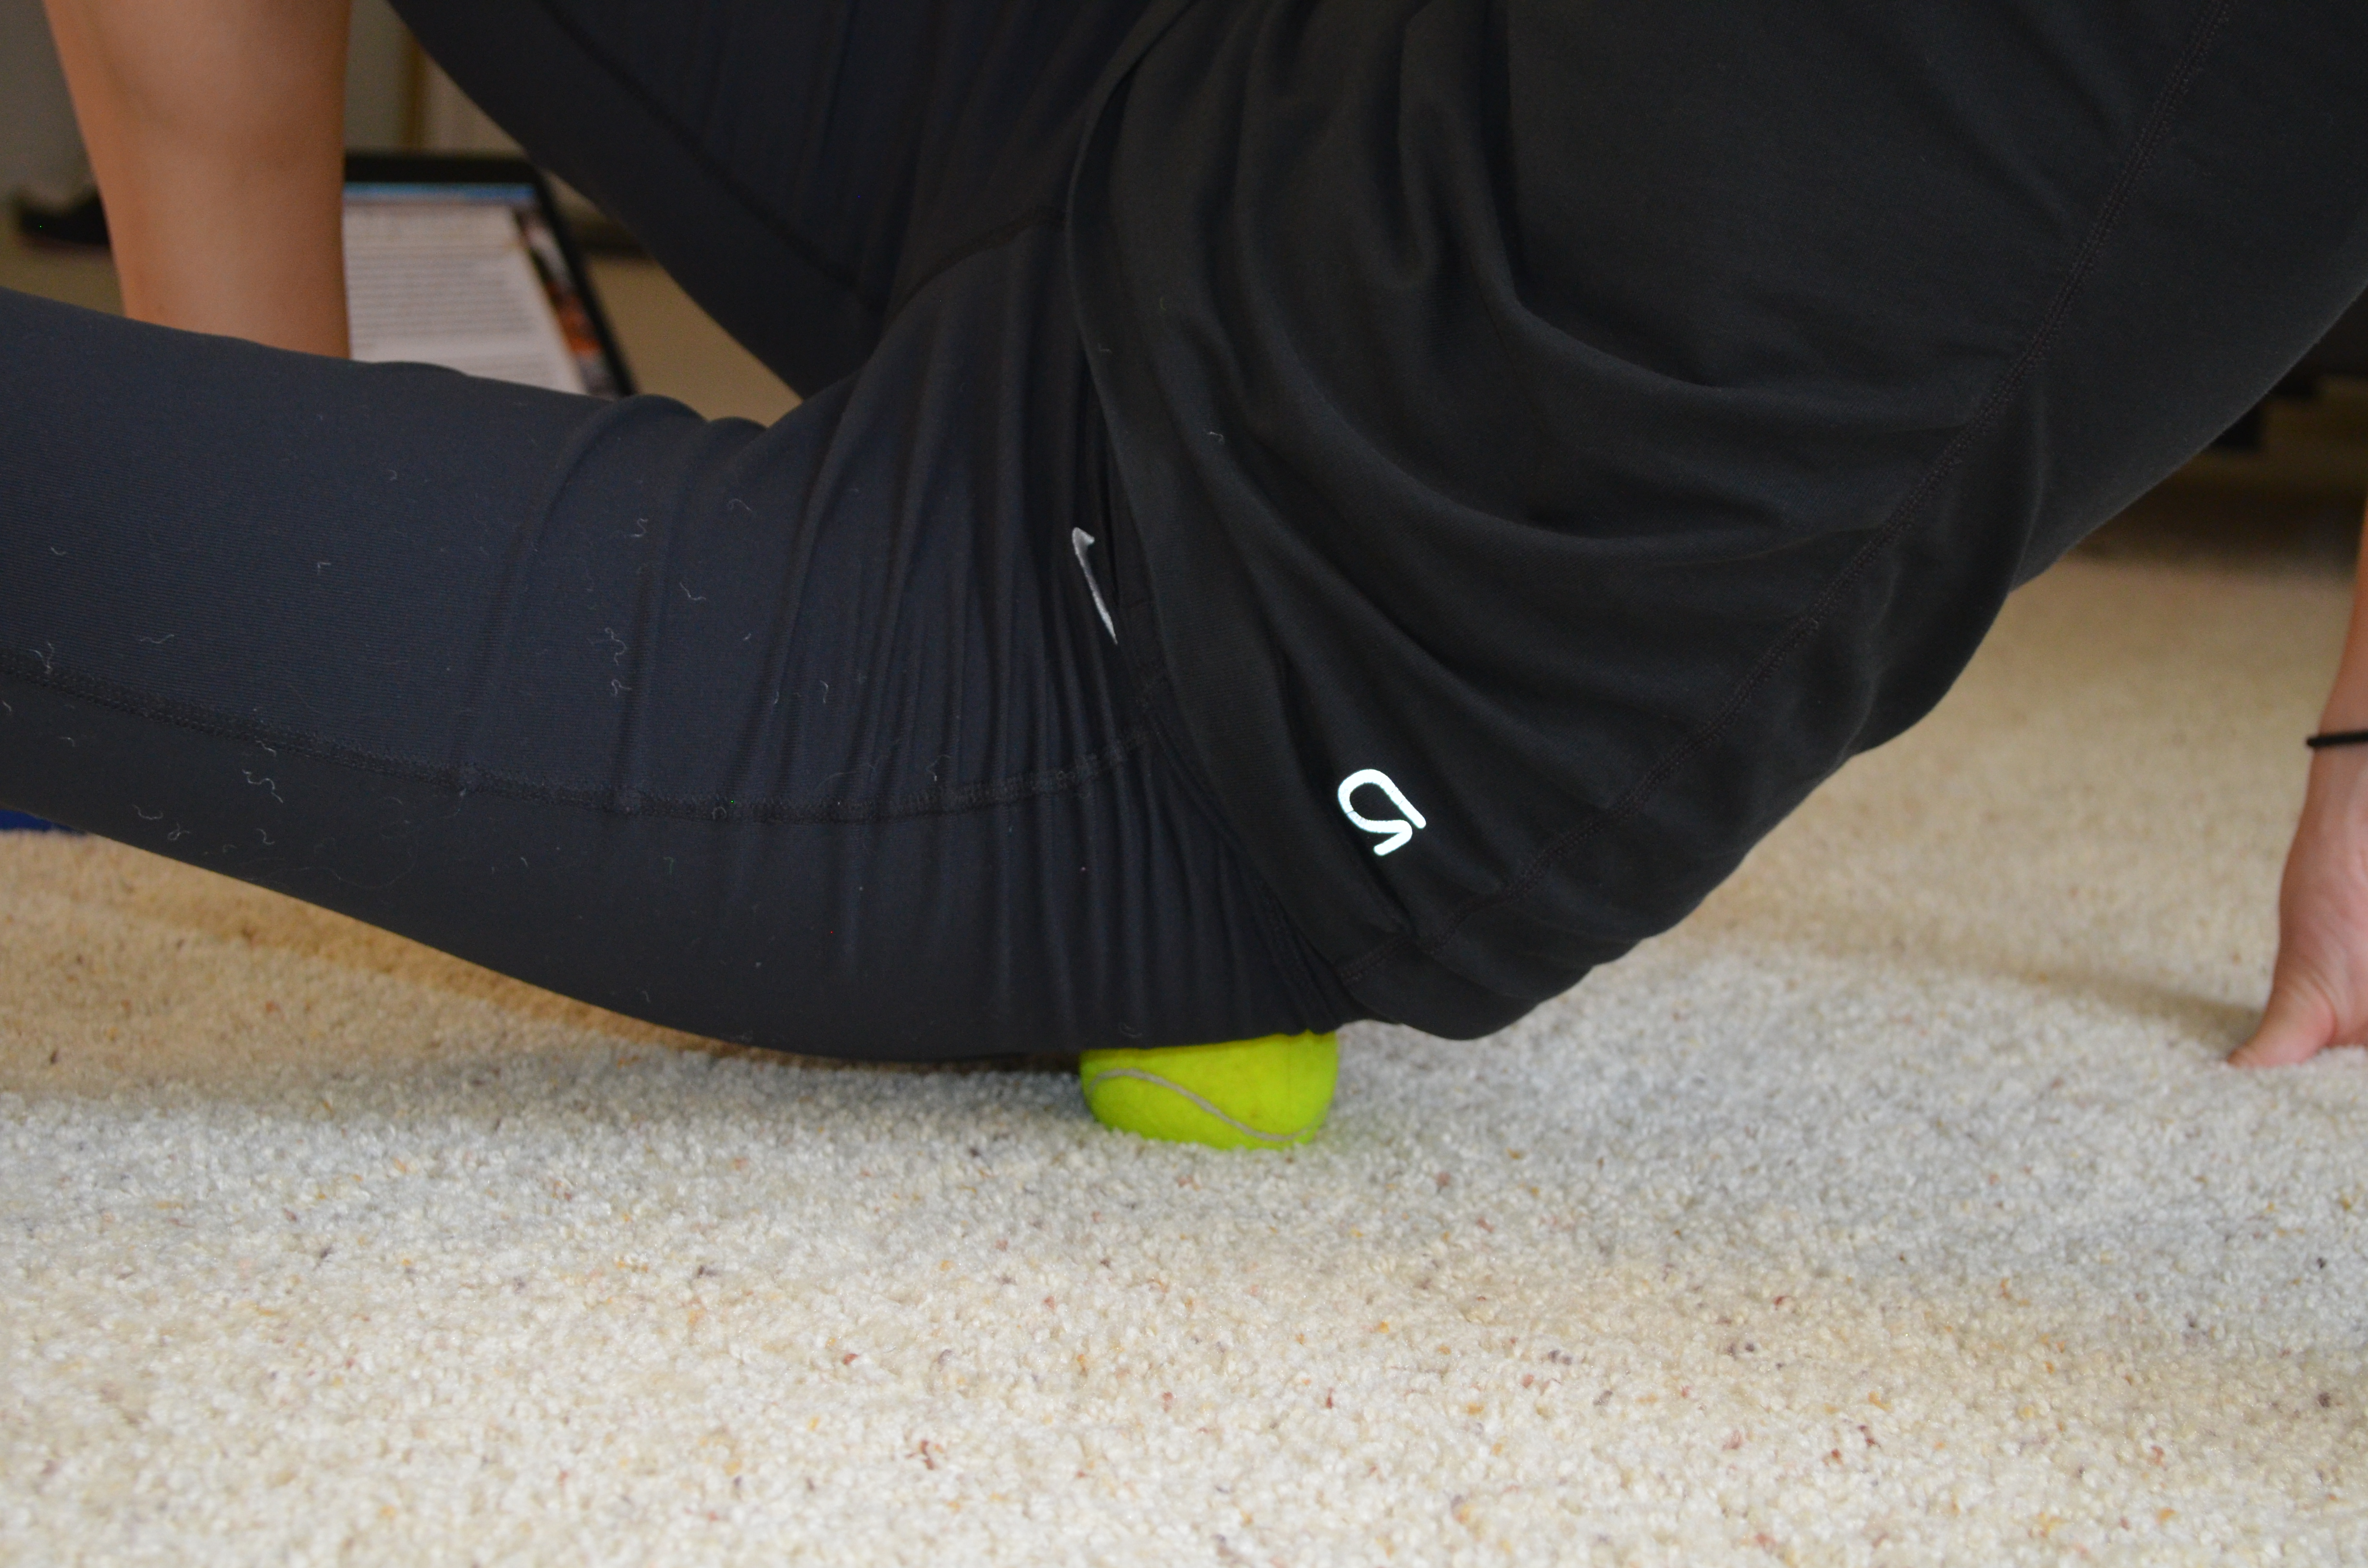
3. Hips/Glutes – The best way to target your hips and glutes is with a ball. The smaller and harder the ball, the more you will really be able to dig in. Start by lying face down on the ground with the ball at the top of one quad. Roll the ball toward your groin and then back toward your hip bone. Move it slightly up and down the top of your quad. Hold on any tight spots. After working out the front of your hip, move the ball around the side and to the back of the hip bone. Roll out the top of your glute, staying right below your low back. Hold on any tight spots. As you work your way down your butt, as you hold on any tight spots, lift and lower your leg. Also draw your knee in toward your chest and then straighten the leg back out. Those two moves will help you apply more pressure to any trigger points. Spend more time on the areas in your hips and glutes that are tight. If a spot doesn’t hurt, don’t spend time there!
4. Ab Release – This is best done with a larger ball although it can be done with a small ball on some books or a block. Lie face down on the ground with the ball under your belly. It should be to one side of your belly button and right beside/above your hip. So basically in one side of your abs. Relax over the ball, letting your body sink into the ground. This will help release your hips as well. You can also move the ball up higher to right below your rib cage to help release your abs. Our abs can be tight and shortened because we sit hunched over all day so we can’t forget to roll them out as well!
5. Peanut – The peanut (two balls tapped together) can be used to work all the way up your back along your spine. It is personally one of my favorite tools. Lie on your back with the peanut right above your butt and a ball on either side of your spine. Relax your upper back onto the ground and lift both knees into your chest. Repeat that movement a few times then move the peanut up higher on your back and repeat. Once the peanut is at about the middle of your back and you don’t feel like tucking your knees is applying more pressure, start performing an upper body crunch instead. Perform a few slow crunches and continue working the peanut up your back until you reach the top of your shoulder blades. Spend more time on any tight areas.

5. Lats – You can use a roller or a larger ball to roll out your lats. I prefer the roller because I feel like it is easier to work all the way up and down your side. Lie on your side with the roller under your armpit. Rock forward and backward then move the roller lower down your side. Continue to rock slightly forward and backward to dig in further to any trigger points. Work down the side of your back until you hit the bottom of your rib cage. Spend more time on the areas that are tight.

7. Thoracic Spine – You can use a peanut or a ball to work out your upper back. One of my favorite ways to roll out my upper back, and work on thoracic extension, is with the roller. Bend your knees and place your feet flat on the ground with the roller in the middle of your back. Keep your butt on the ground and extend your back over the roller, letting your head relax back over toward the ground. Move the roller up higher on your back and repeat. Every time you extend back over the roller, make sure to breathe and keep your butt on the ground. Work all the way up to almost the top of your shoulder blades. You can also simple roll up and down without the extension, but I love to add the extension in there as well.
STRETCHES
1. Bear Squat – Start kneeling on the ground. Place your hands down on the ground in front of you. The closer you place your hands to your knees, the harder the stretch will be. Press your butt up into the air, driving your heels to the ground. Feel a nice stretch down your calves and hamstrings. Hold for 1-2 seconds and then drop back down to your knees. If your feet feel locked up, you can do the bear squat with foot stretch.
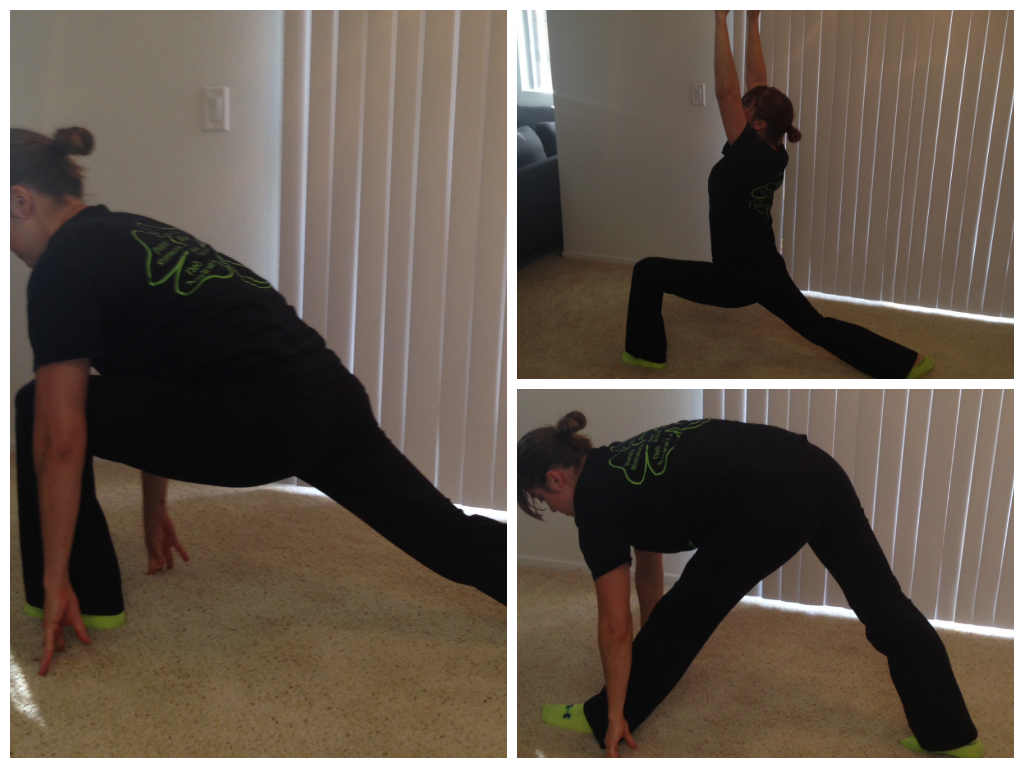
2. World’s Best Stretch with Hamstring – Start in a high plank position with your hands under your shoulders and feet together. Your body should start in a nice straight line. Step your right foot outside your right hand. Drop the right elbow down into the instep of your right foot. Then rotate open facing your right leg, stretching your right arm up toward the ceiling. Bring the right hand back down to the ground. Sit back on your left heel and straighten your right leg. Feel a stretch down your hamstring. Then bend the right leg and move back into the plank position with the foot outside the hand. Again drop the elbow and repeat the move on your right side. Complete all reps and then switch and do the stretch on the other side.
3. Lunge with Reach to Hamstring Stretch – This move kind of reminds me of crescent pose and a triangle pose in yoga…Not exactly but that is what it reminds me of. Start in a high plank position. Step one foot up between your hands. Lift your hands up off the ground and reach them back and overhead as you stay in a low lunge. Feel a nice stretch down the hip and quad of the back leg. Then bring the hands back down to the ground and hike your hips up to straighten your front leg. Feel a stretch down the hamstring of the front leg. Sink back into the lunge and reach up and back overhead again to stretch the hip and quad before repeating the hamstring stretch. Complete all reps on one side before moving back into the plank and switching to the other side.
4. Frog Stretch with Rotation – One of the best groin and hip stretches out there in my opinion. Kneel on the ground and spread your knees as wide as possible. Lower yourself down to your forearms. Keep your feet in line with your lower leg and knees. Do not let your feet come together behind your butt. Sit your butt back between your knees as much as possible. As you come back forward, lower your body down to the ground and rotate your lower leg up and forward. Sit back again and then pivot the other hip. Keep alternating sides until all reps are complete.
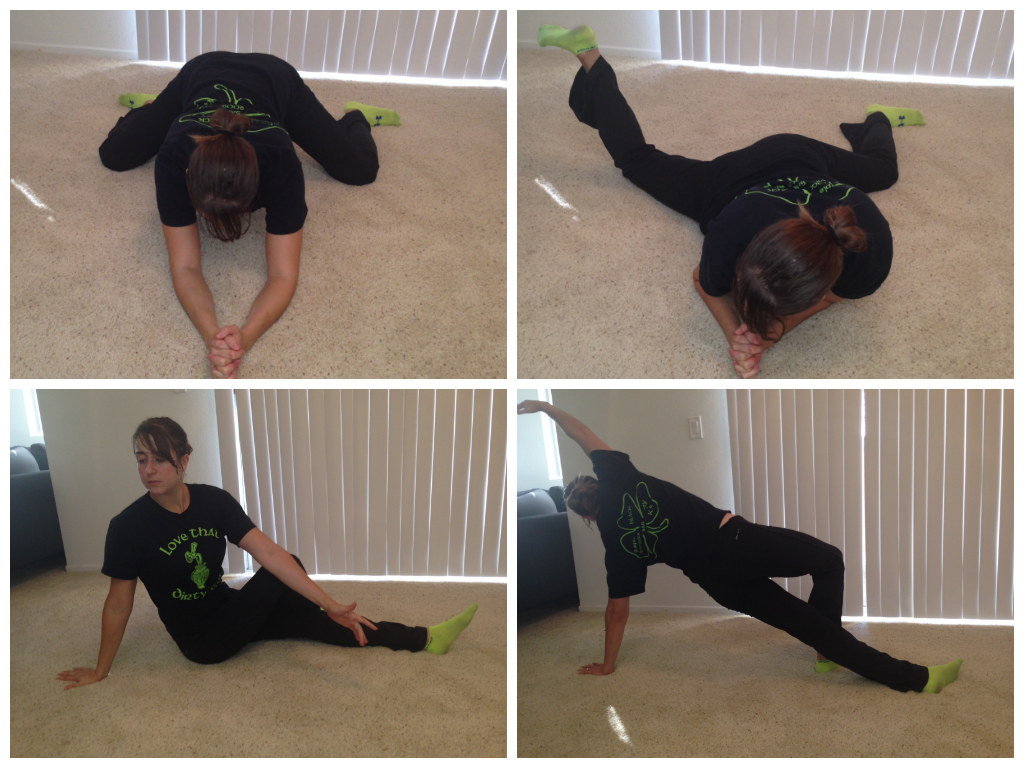
Top is frog stretch with rotation and the bottom is the seated rotation to plank reach
5. Seated Rotation with Plank Reach – Sit on the ground with both legs out straight. Bend your right knee and cross your right foot over your left leg and place it on the ground by your knee. Place your right hand on the ground behind you. Take your left arm and place your left elbow on the right side of your right knee. Press through your left arm and rotate your body to the right, keeping your chest up nice and tall. Do not slouch. Then rotate back around and place your left hand on the ground behind you. Press up into a side plank, driving through your right foot and the side of your left foot. Reach your right hand back and overhead. Then sit back down on the ground and rotate back to the right and repeat the whole stretch. Complete all reps on the right side before switching.
6. Child’s Pose with Lat Stretch – Kneel on the ground with your toes pointed. Sit back on your heels reaching your arms out on the ground overhead. Walk your hands out as far as possible. You can also walk your hands to the right and left to get more of a stretch down each side of your back. You should feel this stretch down your arms and the sides of your back. You should also feel the stretch in your low back if you are relaxing back onto your heels.

7. Standing Wall Lat Stretch – Most easily done in a corner, but can be done on a flat wall. Reach your arm up the wall and press your side as close to the wall as possible. You can also bend your elbow and relax your hand down your back. Breathe and relax into the wall as much as possible.
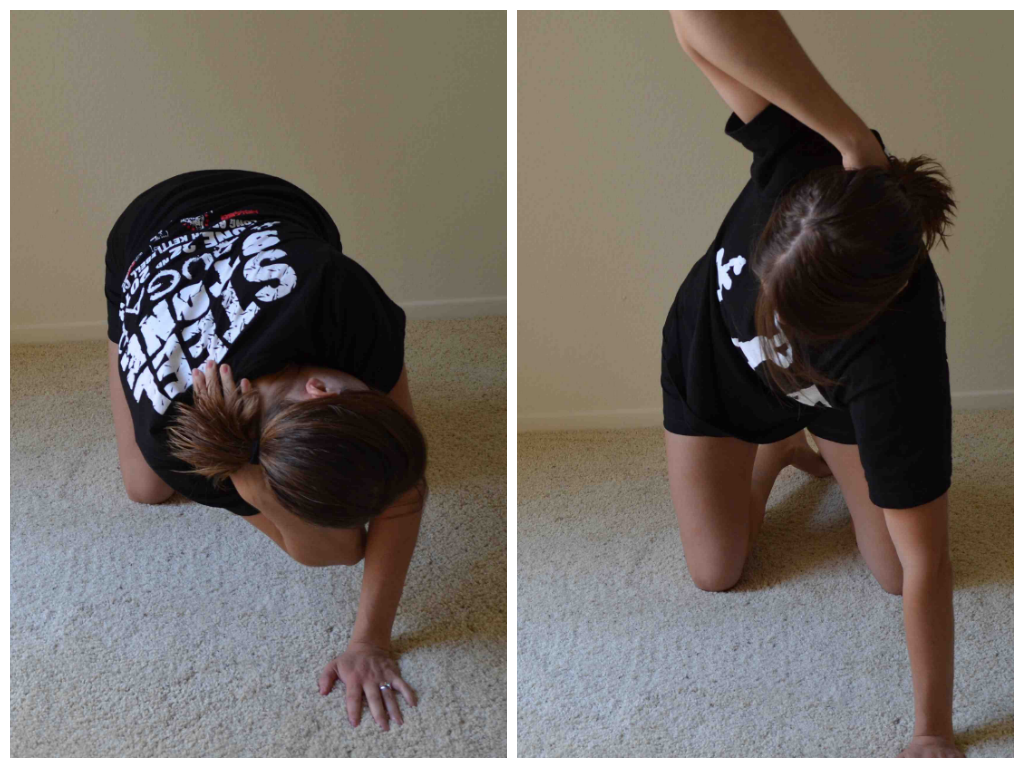
8. Kneeling Thoracic Extension – On your hands and knees, reach one hand down your neck and spine. Fingertips should be pointing down your back toward your butt. Then rotate your core so that your elbow goes under your arm on the ground. Then rotate open driving the elbow up toward the ceiling. Try to focus on just opening up your back and not really shifting your weight in your lower body. Then rotate back closed and repeat. For more Thoracic stretches, check out an earlier post on Neck and Upper Back Pain.
9. Cobra – Lie on your belly with your legs out straight. Prop yourself up on your forearms with your elbows under your shoulders. You can stop there or you can press up further. You can push yourself up higher and lift up onto your hands if the stretch from your forearms isn’t enough.
NOTE: To help correct upper body imbalances, you may also need to address tight pecs, which will improve your posture and can in turn even help reduce your low back pain!
BONUS move….Kneeling Bridge. This is a great move to stretch out those pecs, work on thoracic extension and stretch your hips and quads! It is basically exactly the opposite of how your body is positioned while sitting all day. The only downside is many people struggle with the flexibility to truly do this move. You can always use a chair or bench and place your hands on top of that instead of your heels if you can’t reach your heels.
One of my favorite stretches to stretch everything made tight by sitting. A great one for days when you do front squats.
ACTIVATION
To reduce low back pain, you want to focus on activating your abs and your glutes.
1. Glute bridge – Lie on your back with your feet about hip-width apart. You should basically be able to touch your heels with your finger tips. Then bend your elbows to 90 degrees. Drive your elbows, shoulders and heels into the ground as you drive your hips up. Make sure your knees do not fall apart. Actively squeeze your butt as you drive your hips up. If you only feel your hamstrings working, make sure that you aren’t driving off your heels backwards. You shouldn’t feel like you are driving back into your shoulders. You want to actual feel like you are driving your knees forward over your toes even though you are driving through your heels. Drive your hips straight up. You can either do a glute bridge hold and hold at the top or you can perform reps by lowering down and lifting your hips again.
2. Reverse Hypers – Lie face down on the ground to perform a Reverse Hyper or perform an IKEA table Reverse Hyper if you have a table that will support you. To do the hyper from the ground, lie face down with your legs out straight and squeezed together. Relax your upper body and squeeze your glutes to lift your legs up off the ground. Keep your legs straight and together as you lift. Hold for a second or two at the top and then lower back down. Make sure to squeeze your glutes tight so you don’t feel it in your low back.
3. Fire Hydrants – Place your hands underneath your shoulders and your knees underneath your hips. Flex your feet. Then raise one leg out to the side, keeping the knee at 90 degrees. Try to not let the foot get higher than the knee or the knee get higher than the foot. Really squeeze the butt cheek as you lift. Repeat all reps on one side before moving on to the other side.
4. Bird Dog – A great move to activate both your core and your glutes. Place your hands underneath your shoulders and your knees underneath your hips. Flex your feet. Kick one leg out straight as if kicking it into the wall behind you while you reach the other arm out straight toward the wall in front of your head. Don’t worry about lifting your leg or arm up high. Really try to drive your arm and leg toward opposite walls. Squeeze your glutes and keep your belly button pulled in toward your spine. As you lower your arm and leg, bend them and bring them together under your body. Try to touch your knee to your elbow before extending back out. Repeat all reps on one side before switching to the other side. All reps should be done in a slow and controlled manner. You should even hold for a second or two at the top of the move.
5. Pelvic Tilt – The best core engagement move. Lie flat on your back with your knees bent and your feet flat on the ground. There will be a space between your low back and the ground. Draw your belly button in toward your spine and press that space away. Hold your core tight for 5 to 10 seconds and then release. Feel the space again between your low back and the ground when you relax. There are progressions to the Pelvic Tilt, including marching and leg lowers. Check back soon for a post about ab engagement and pelvic tilt progressions on Redefining Strength’s blog.
6. Plank Series – Later this week, I will be posting a variety of plank variations. But here is a quick description of how to perform the basic forearm front and side plank.
To perform a front forearm plank, you should rest on your forearms with your elbows right below your shoulders. Beginners can start on their forearms and knees while more advanced exercisers will perform the plank from their forearms and toes. The longer you hold, the harder the move will be. Make sure to draw your belly button in toward your spine, tuck your hips under and keep your body in a nice straight line. Feet should be together and adductors, glutes and quads engaged. Do not let your upper back round as you hold. Breathe as you hold and don’t let your hips drop toward the ground or raise up toward the ceiling.
The forearm side plank variation is done on one forearm. Your elbow should be right below your shoulder. Beginners may do this from their knees. A modified plank can also be done with just the bottom knee down and the top leg straight.To advance the move, straighten both legs and rest on the side of your feet and your forearm. (Feet may be stacked or one may be in front of the other.) If that isn’t challenging enough, raise the top leg. Your top arm can rest on your hip or reach up toward the ceiling. Make sure to keep your body in a nice straight line. Squeeze your glutes and make sure your chest doesn’t rotate toward the ground. Drive your bottom hip up nice and high. Do not let your hip sag toward the ground.
7. Band Stability Press (anti-rotational) – Anchor a band in a door, around a pole or even use a cable-pulley machine. Step away from the anchor point as far as you can without allowing your body to rotate toward the anchor. You should be facing perpendicular to the band. Start with the handle at your chest. Push the band straight out from the center of your chest until your arms are straight. Do not let your arms rotate open and go back toward the anchor. Then slowly bring your arms back in. This move looks easy, but when you try it, you realize how much your entire body fights rotating back toward the band hook!
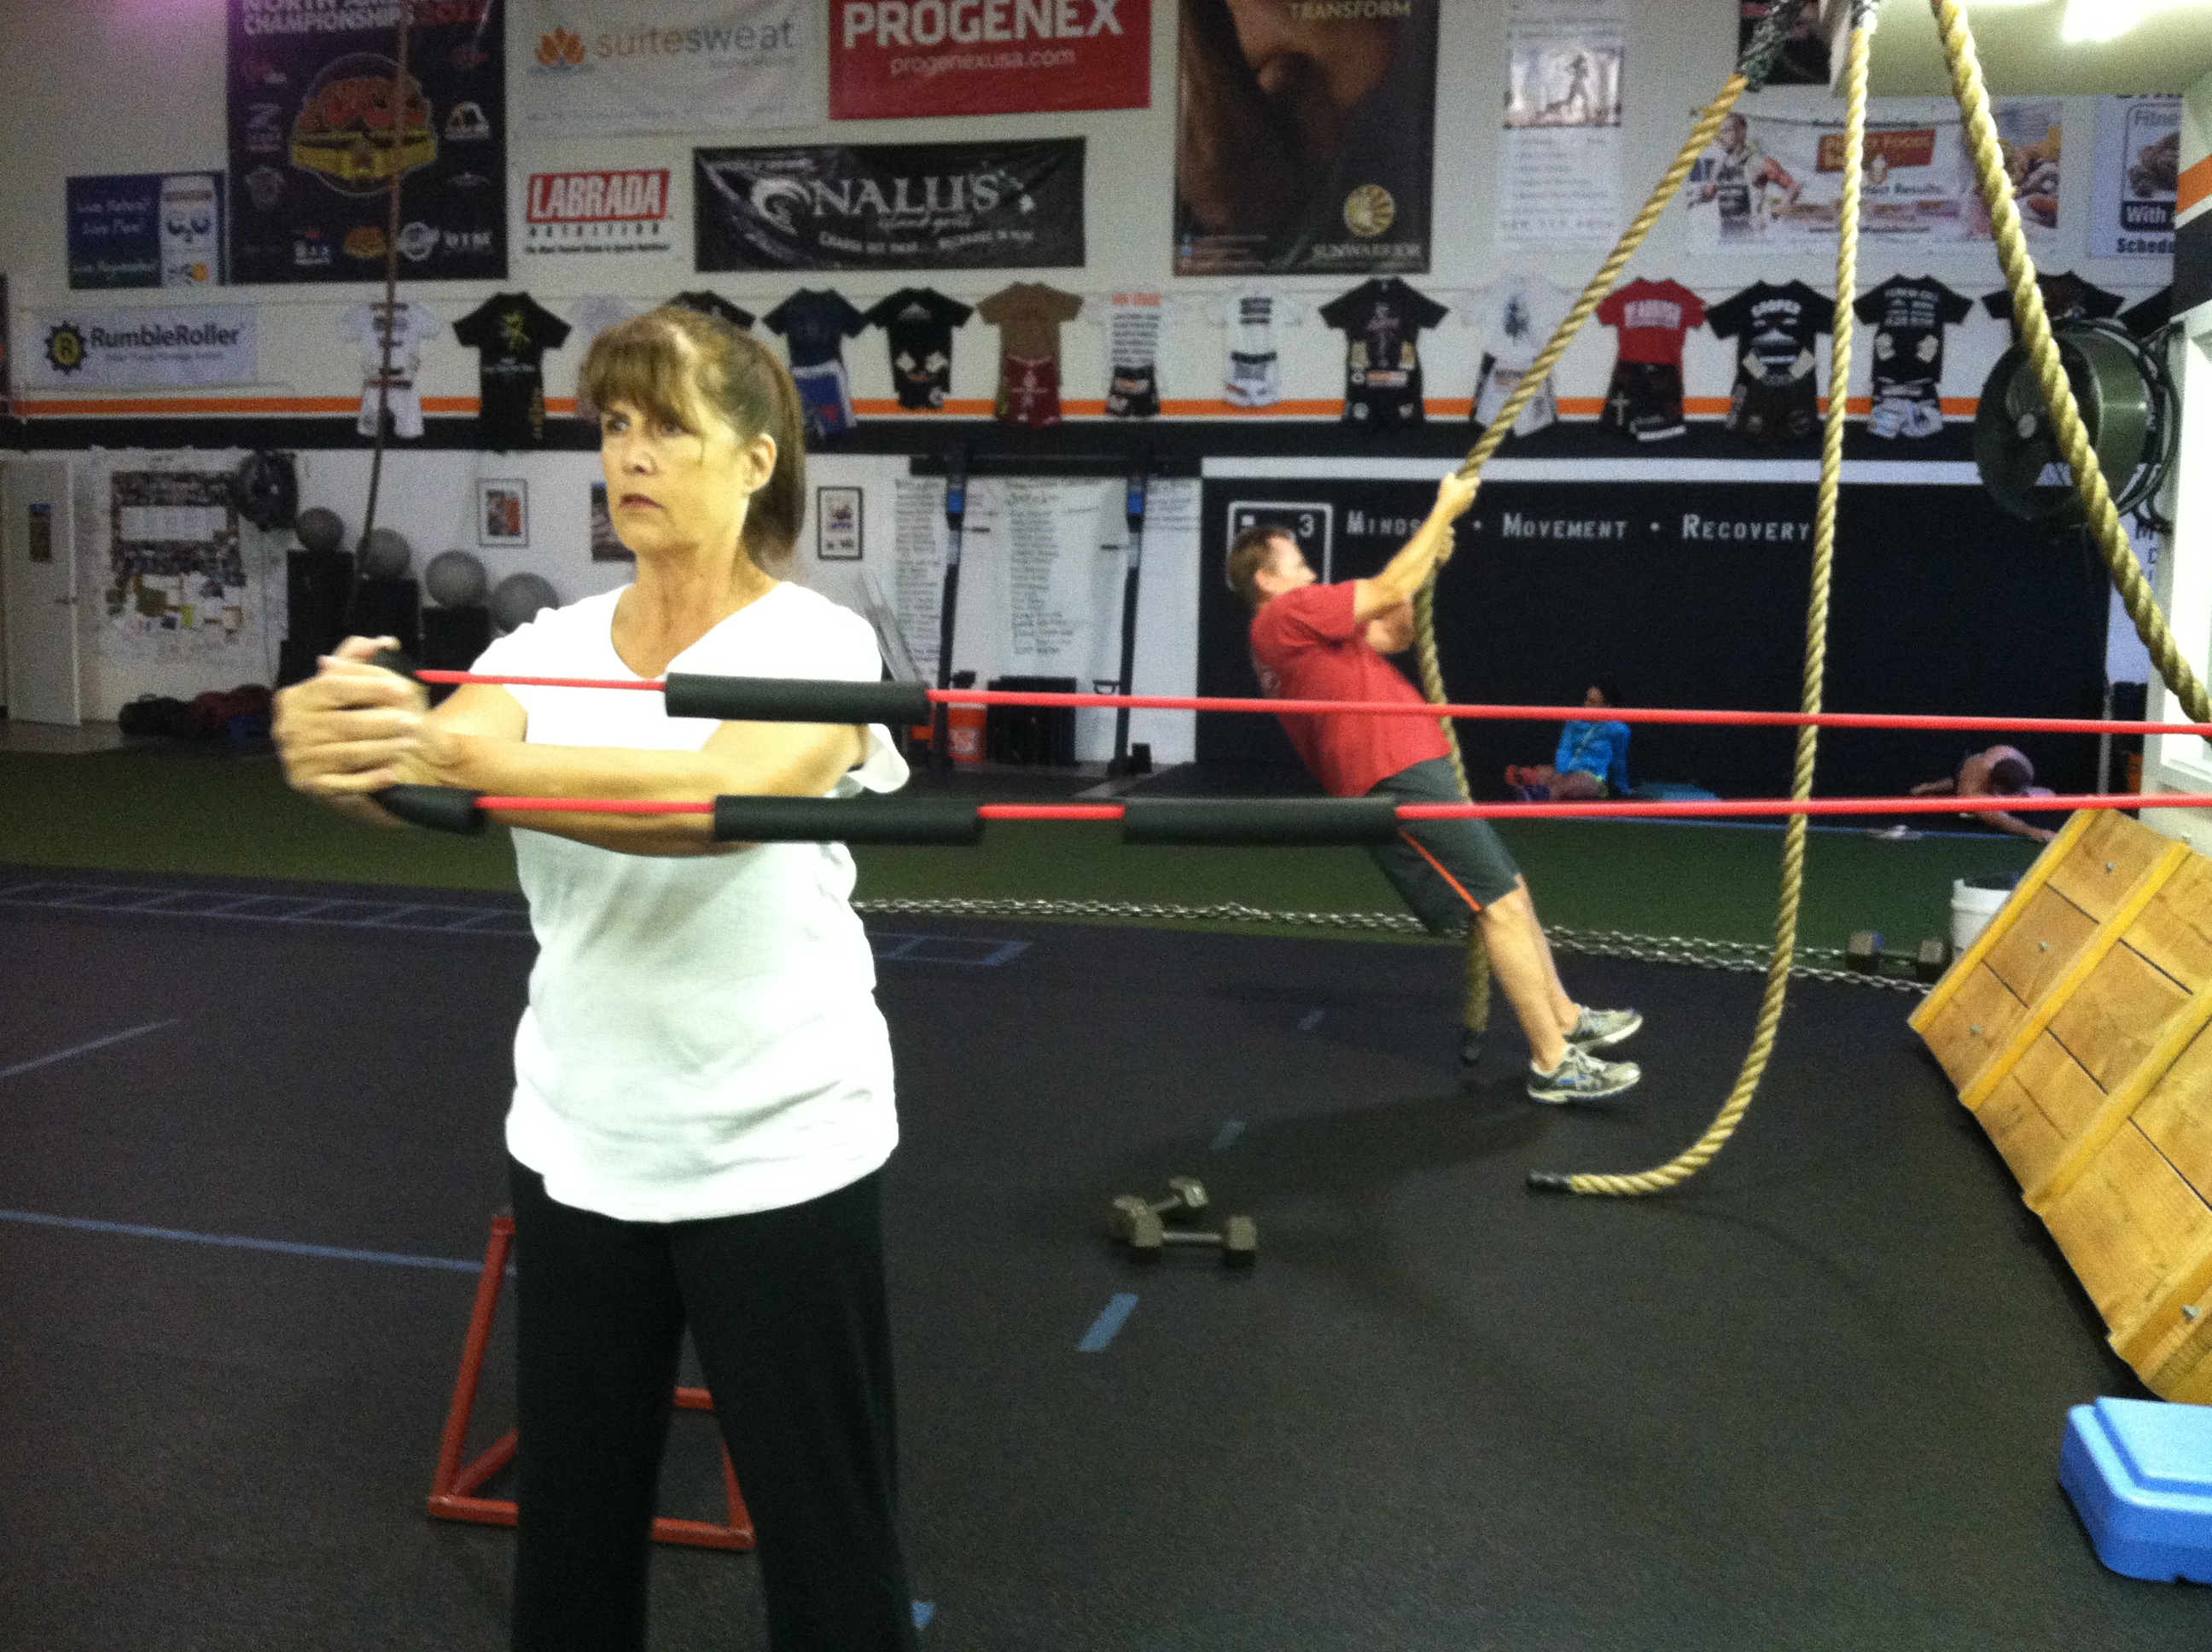
Joan demoing the stability press.
For more glute activation exercises, check out Part 3 of the Bootilicious series. And check back later this week for more great plank variations to help you engage your core.
Use the moves above to find the specific spots that are tight and inactive on you and then loosen and activate them! Just because you have low back pain doesn’t mean you will need to use all of the moves above.
You may find you only have trigger points around the front of your hips and that your hamstrings are fine. Don’t spend time on areas that are ok. Target areas of tightness or inactivity!
If your back pain is due to trauma, please consult a doctor.
Stop accepting chronic back pain and start doing something about it!
Grip Strength – Farmer’s Walk
If you can’t hold the weight, you can’t use the weight so as obvious as it sounds…We are only as strong as our weakest link.
Often we ignore grip training in favor of lifts that are more fun and that, we feel, give us more bang for our buck.
But there really is no better full-body, functional lift than the farmer’s walk.
You could actually argue this is the MOST functional exercise. I mean just think about how often you need to hold something and walk with it!
And guess what!?!
IT REALLY WORKS YOUR GRIP! Along with your arms, back, shoulders, core and legs…So just about EVERYTHING!
Basic Farmer’s Walk Variations:
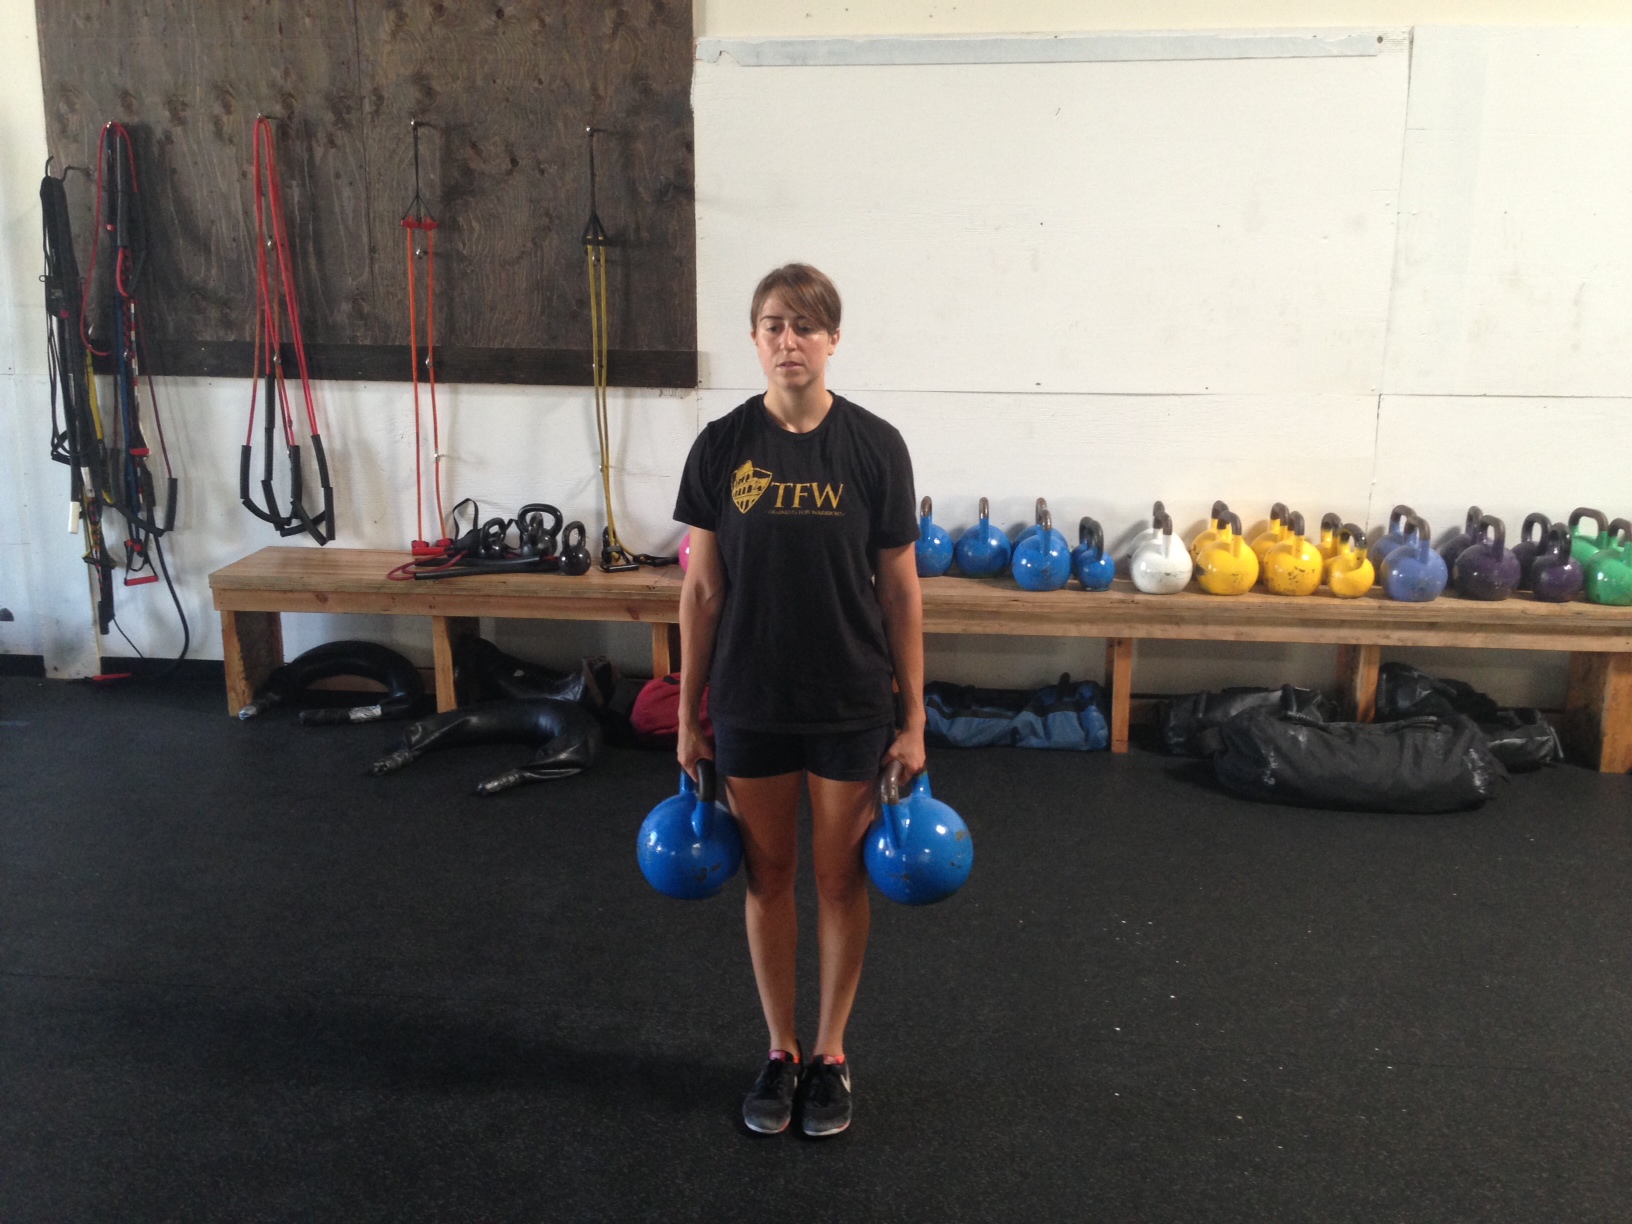
Nice tall posture and walk holding the weights down by your side but don’t let them rest on your legs.
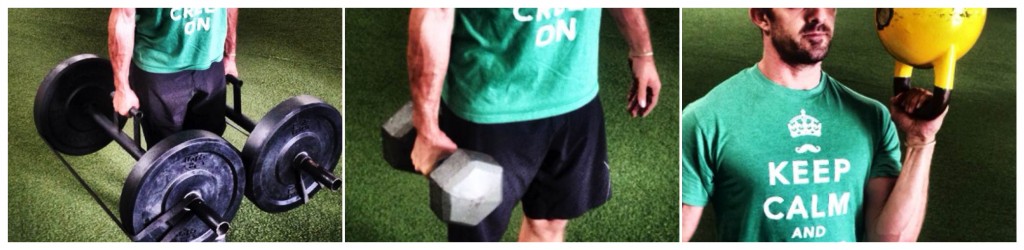
1. Two-handed Dumbbell or Barbell Farmer’s Walk:
Basically, you hold heavy weights in each hand and you walk to set points or for a set amount of time, maintaining perfect posture. You want to use weights that CHALLENGE YOU and make you want to drop them just before your round is done.
Do not let your head jut forward or your shoulders round forward.
Do not let the weights rest on your legs. Hold them just a teeny bit away from your body or at least so they aren’t RESTING on your body.
Keep your core tight and walk with your shoulders down and back and your head up.
2. Two-handed Fat Grip (or Kettlebell) Carry:
This is the exact same as the two-handed Farmer’s Walk except you are challenging your grip even more by making the grip itself BIGGER.
Fat grips are a great way to challenge your grip because they make the handle bigger and more awkward to hold. The more awkward an object is to grip, the more it challenges your strength!
When you do carries with dumbbells that have fat grips on them, really focus on not letting the dumbbell slant forward or backward toward the ground. Make sure you carry the dumbbell so that it is level with the ground.
I also use competition kettlebells instead of dumbbells to challenge my grip more because their handles are bigger than the handles of dumbbells. This can be a great option if you don’t have fat grips.
Kettlebells are also great for carries because the bell wants to hug your legs and you have to lift them out a bit more from your body, which challenges your upper body and core even more.
The point though is…THE LARGER, MORE AWKWARD, THE GRIP THE MORE YOUR FOREARM AND HAND STRENGTH WILL BE CHALLENGED!
3. Unilateral Carry (with or without fat grips):
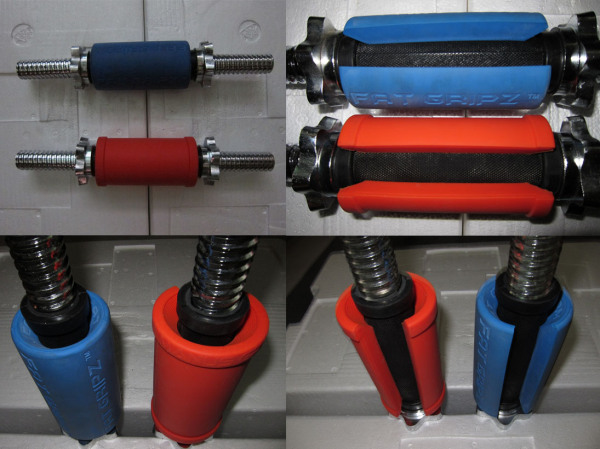
Fat grips can be placed on any dumbbell…or even a kettlebell….
Whenever you load down one side, your core is forced to work harder to stabilize. Plus I just love unilateral exercises because they force each side to work individually and help you correct any imbalances.
When doing a unilateral carry or farmer’s walk, you are going to hold a weight on one side. The more awkward the weight, the harder the move will be.
You are then going to walk forward. Do not allow yourself to either lean away from the side with the weight or toward the side with the weight.
The challenge is to PREVENT ROTATION. This is an anti-rotational move. You want to walk as if you have either no weight or at least equal weight in both hands even though you are only weighted down on the one side.
Keep a nice tall posture and make sure your shoulders stay level and you don’t lean. Keep the weight off of your leg as well. You do not want to rest it on your hip or thigh.
4. Uneven Farmer’s Walk:
I find that I’m often carrying something in both hands; however, those two items are usually different weights.
One of the most functional farmer’s walks, in my opinion, is the uneven carry.
To do this move, carry a lighter weight in one hand and a heavier weight in the other. Make the difference noticeable.
Just like with the unilateral carry, the challenge is to not rotate and to act as if the weights in each hand are even. Keep a nice tall posture and your core tight. The weights should not be resting on your legs and you should not be leaning to one side. Your shoulders should be level and your head should be held high, not looking toward the ground or jutting forward.
5. Overhead Carry (unilateral or two-handed):
While this farmer’s walk (I think it is also known as a waiter’s walk) is not as grip intensive, it is a really REALLY great stabilization exercise and is super core intensive.
This move can be done carrying a weight in both hands or as a unilateral movement.
The goal of both moves is to press the weight straight overhead and keep your core tight and your low back from arching. Try to get your bicep by your ear and your arm(s) locked out straight with the weight overhead. Try to relax your shoulders down and back as you carry and not shrug too much.
REALLY REALLY focus on keeping your core tight.
If you do a unilateral overhead carry, remember to not rotate or compensate for the fact that you have a weight only on one side. You want to walk as if you have an even weight in both hands.
Slosh pipes or awkward weights are great for overhead carries IF you’ve developed the shoulder and core stability. These unstable weights, or uneven weights, can be a great way to progress the overhead carry.
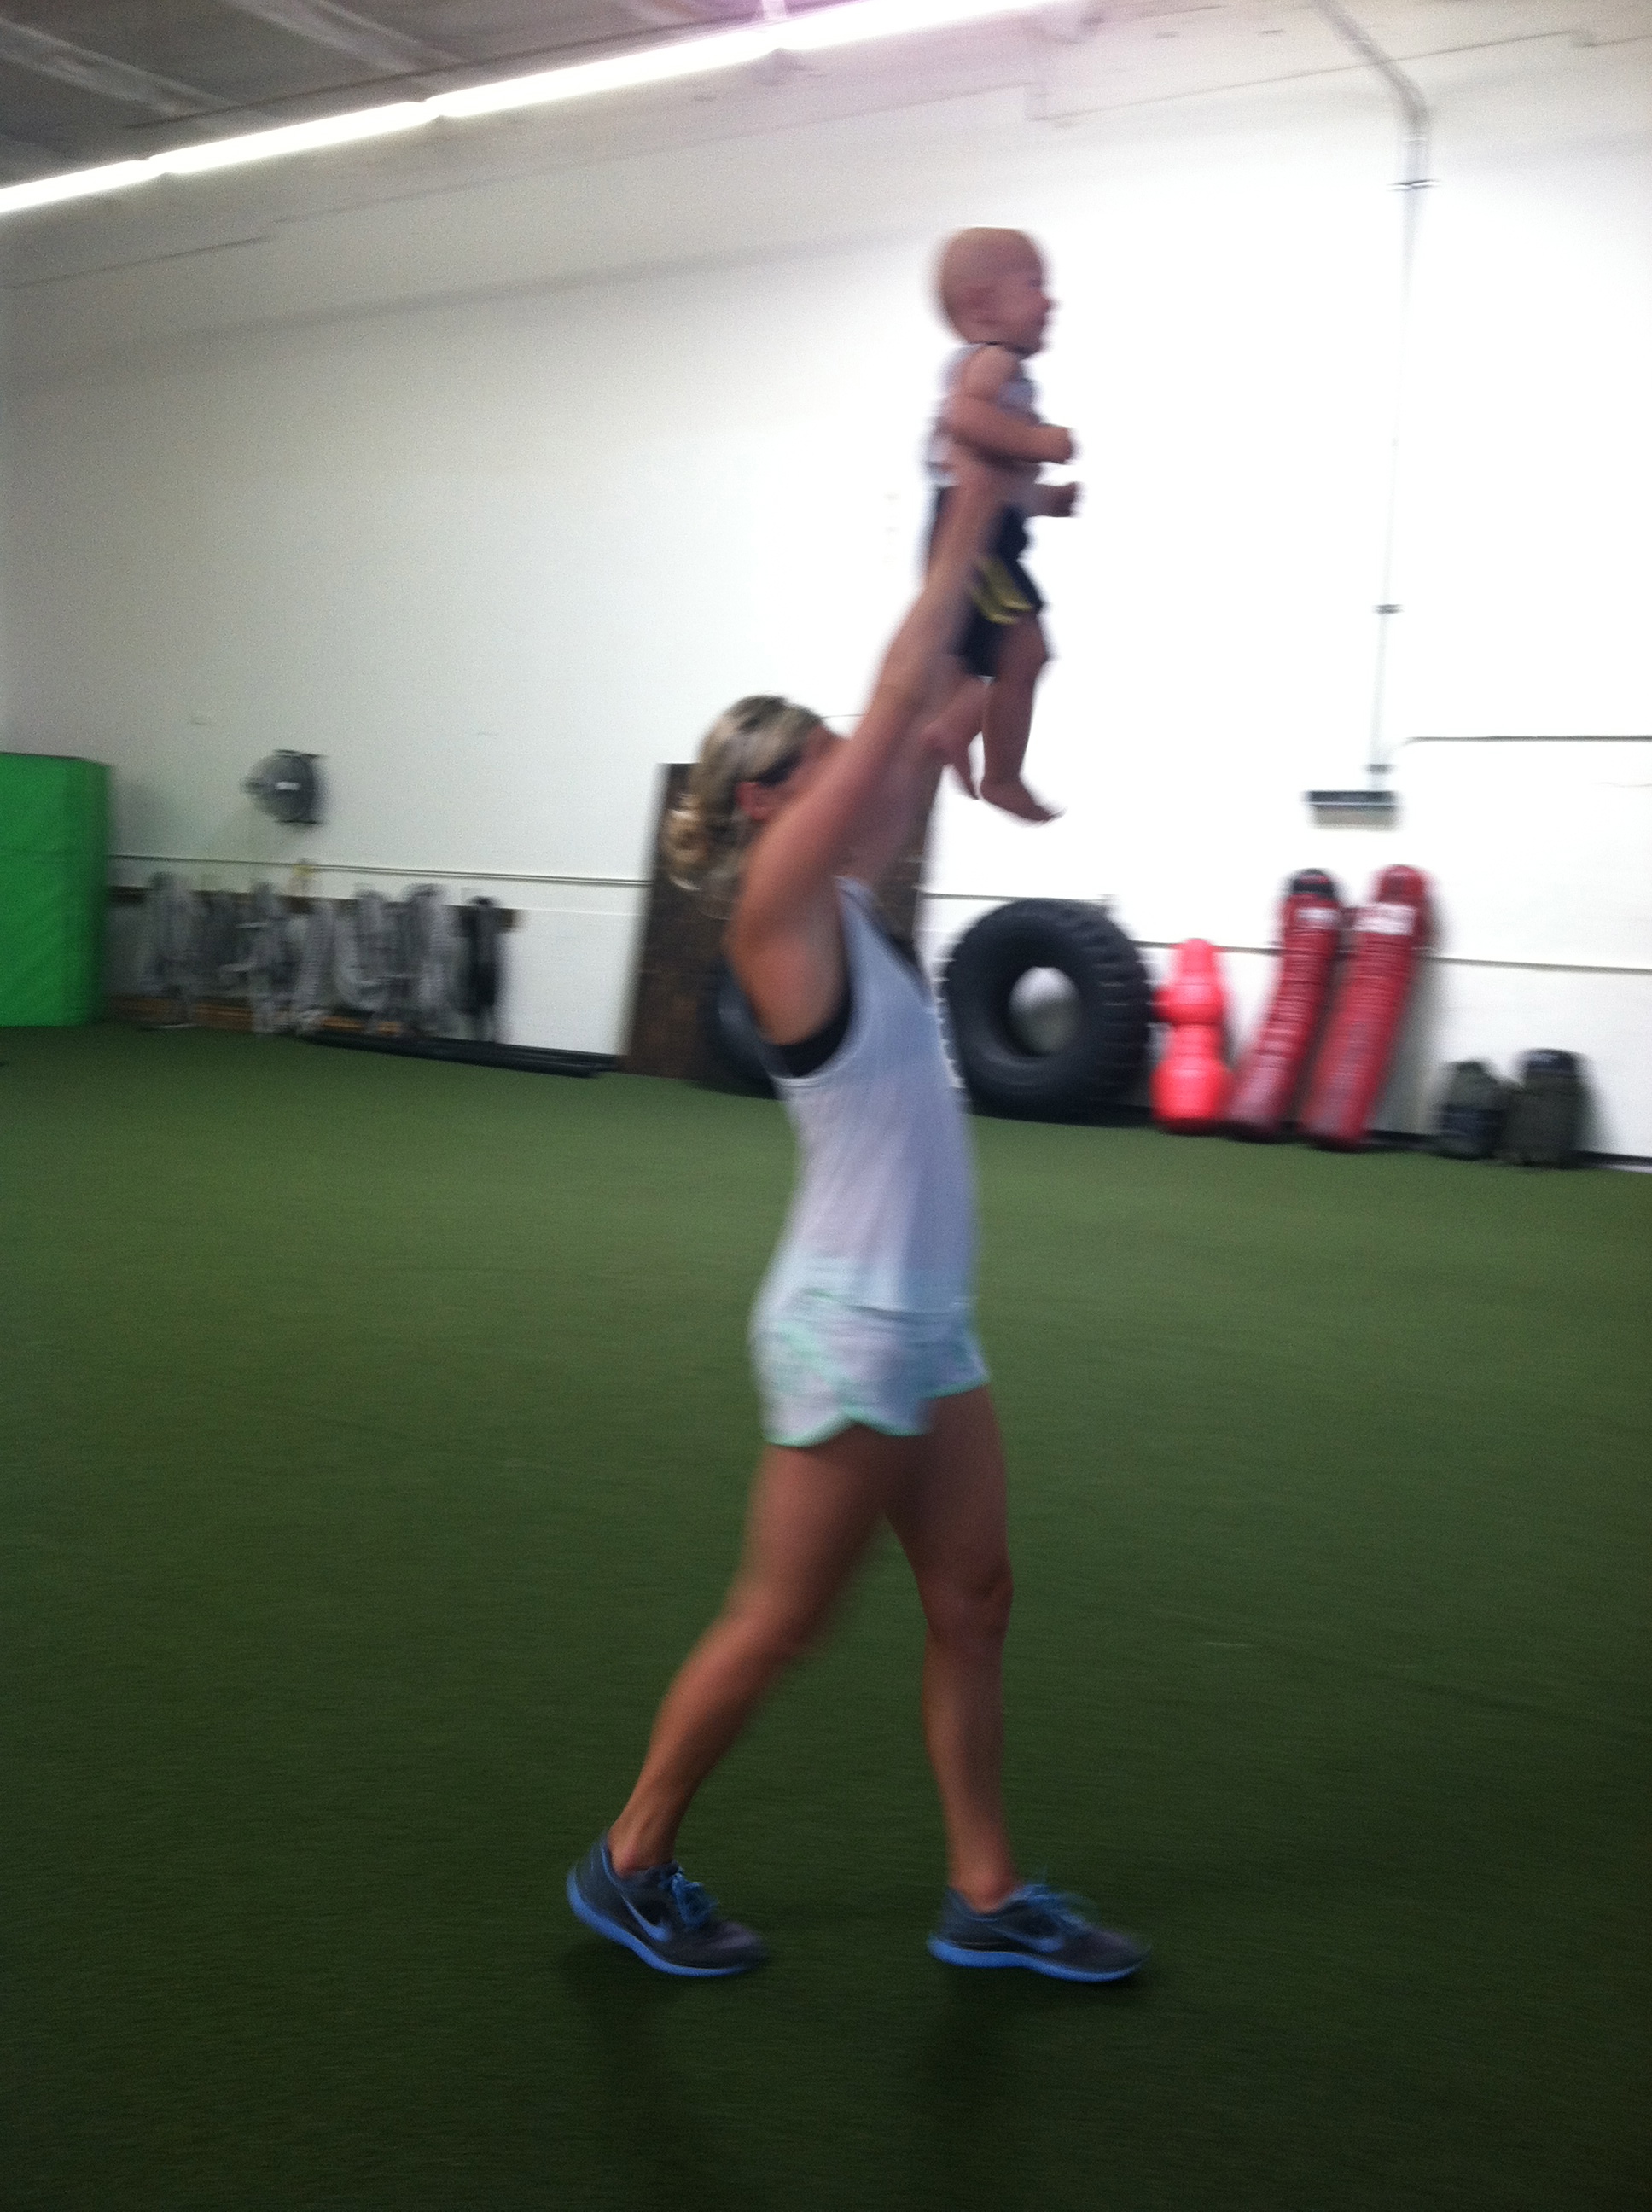
Heck you could even do an overhead baby carry!
However, if you are a beginner or have had shoulder injuries in the past, you may want to be careful with this move. This move requires good shoulder stability and both lat and chest flexibility.
Start slow with this move if you have limited shoulder mobility or have suffered from shoulder injuries. While this can be a good way to re-develop shoulder strength you do not want to force mobility and stabilization that isn’t there yet!
Stop letting your grip strength limit how much you can lift. Your are only as strong as your weakest link! Start using farmer’s walks today to strength your grip and get a full body, FUNCTIONAL workout!
AND…While Farmer’s Walks and Carries are probably the best ways to develop grip strength because they also develop full body FUNCTIONAL strength, there are other exercises you can do to develop grip strength (especially if it is your weakest link!).
Check out these 10 grip strength exercises by Fight Camp Conditioning for more ways to strengthen your grip. And the best part about these 10 exercises is that some of them can be used to create even more farmer’s walk variations (like a farmer’s walk with the pinch or claw grip or even a bottoms up carry!).
Fight Camp Conditioning gives even more carry variations!


