Category Archives: Workout
Ladies…Do you want to learn how to do a pull up?
So we did testing the other day at the gym and one of the tests was a pull up test.
You probably aren’t surprised to hear the following statement, but we only had a couple of women who could do legitimate pull ups (by legitimate I mean no kipping…I have nothing against kipping, but it isn’t a TRUE pull up even if it does have its own benefits).
When I then asked all the women that didn’t do a pull up if they would like to be able to do one, most did say YES. Actually all said YES.
So then…why weren’t more women able to do one!?!
My theory is that most of the time, it isn’t that we don’t want to be able to do something, it is just that we don’t know where to begin so we don’t even start. Or we are intimidated by the move and don’t believe we can do it (again because we don’t know how to get there). Or we jump into something we think might help with no way to track our progress and then we fall off when we aren’t able to do a pull up within a few short workouts.
So below are some great tips to help you be able to do a full pull up!
Three great activation moves I like to use to warm up for a pull up workouts are:
- Scapular Wall holds – You’ve probably guessed by now that I LOVE these. They are great to improve posture and activate your upper back muscles. If you want to be able to do a proper pull up, you need to make sure that your lats activate and that you use the big muscles in your back. This move will help you do that.
- Scapular Push ups – This move does the same sort of thing that the wall holds do – It helps you get that scapular retraction that is necessary to do pull ups.
- Dead hangs – So at the beginning, I want you to just hang from the bar and get a feel for holding your body weight. Focus on tightening your core and even maybe tighten your back as if you are going to pull up. Then once you’ve done a few straight hangs, you will progress to a hang with a scapular retraction. You then want to press your chest out and pulling your shoulder blades down and together while you hang from the bar. If you can’t hold for long at the beginning, start with reps of retracting and then relaxing.
All three of these moves make you activate the muscles used to do a pull up and help you warm up your core!
Many people who can’t do pull ups will then turn to the lat pulldown machine and even simulate pull ups with bands for their “pull up” workouts. And while these moves are great to strengthen many of the muscles used by pull ups, they still aren’t the same as actually doing pull ups. They can be great supplementary moves, but if you want to be able to do pull ups…You’ve got to actually do variations of the pull up!
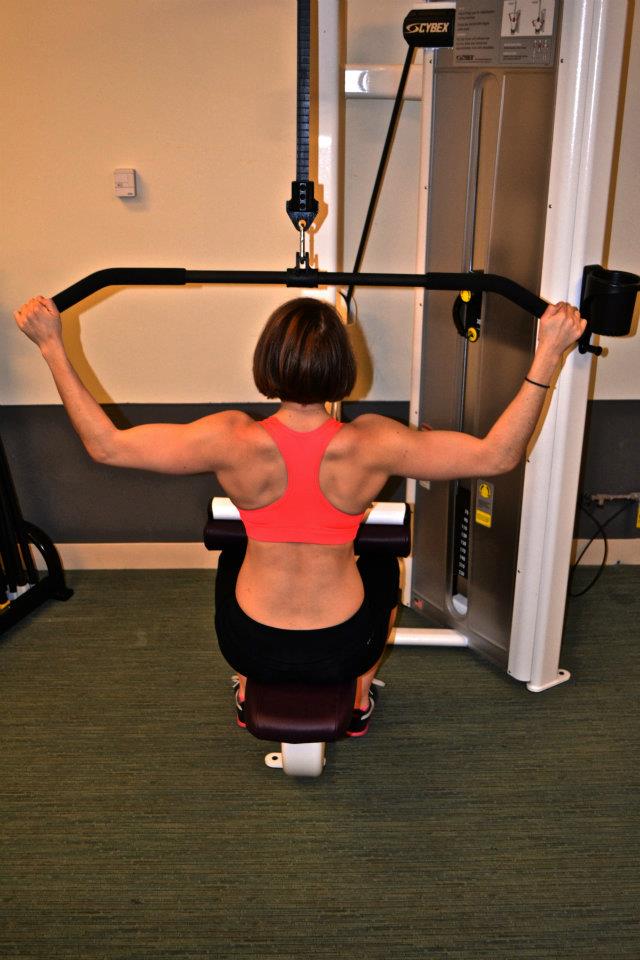
I haven’t used this machine now in over a year and some and guess what!?! By doing negatives and holds my pull ups have gotten WAY BETTER than they ever were doing lat pulldowns!
So once you’ve done the activation moves, try one of these assisted pull up variations and progress toward harder and harder variations until you can do one unassisted! If you have an assisted pull up machine, you can use that as well, but I personally like these better because they give you more control over the exact amount of assistance!
With both of the assisted variations below you can do three different things to progress or regress the move. You can do holds, negatives and full range of motion pull ups/chin ups.
- Holds – You can hold at the top, middle and/or bottom of the move. Each will work on strengthening the muscles at each piece of the motion. You can jump or push yourself into position and then hold once there for as long as possible.
- Negatives – With negatives, you work the eccentric part of the motion. To perform a negative, you will set yourself at the top of the pull up and then lower yourself down as slowly as possible.
- Full pull up – You will use assistance to perform a FULL pull up, which means chin above the bar to arms straight at the bottom.
The two different ways you can get assistance to do these three variations are:
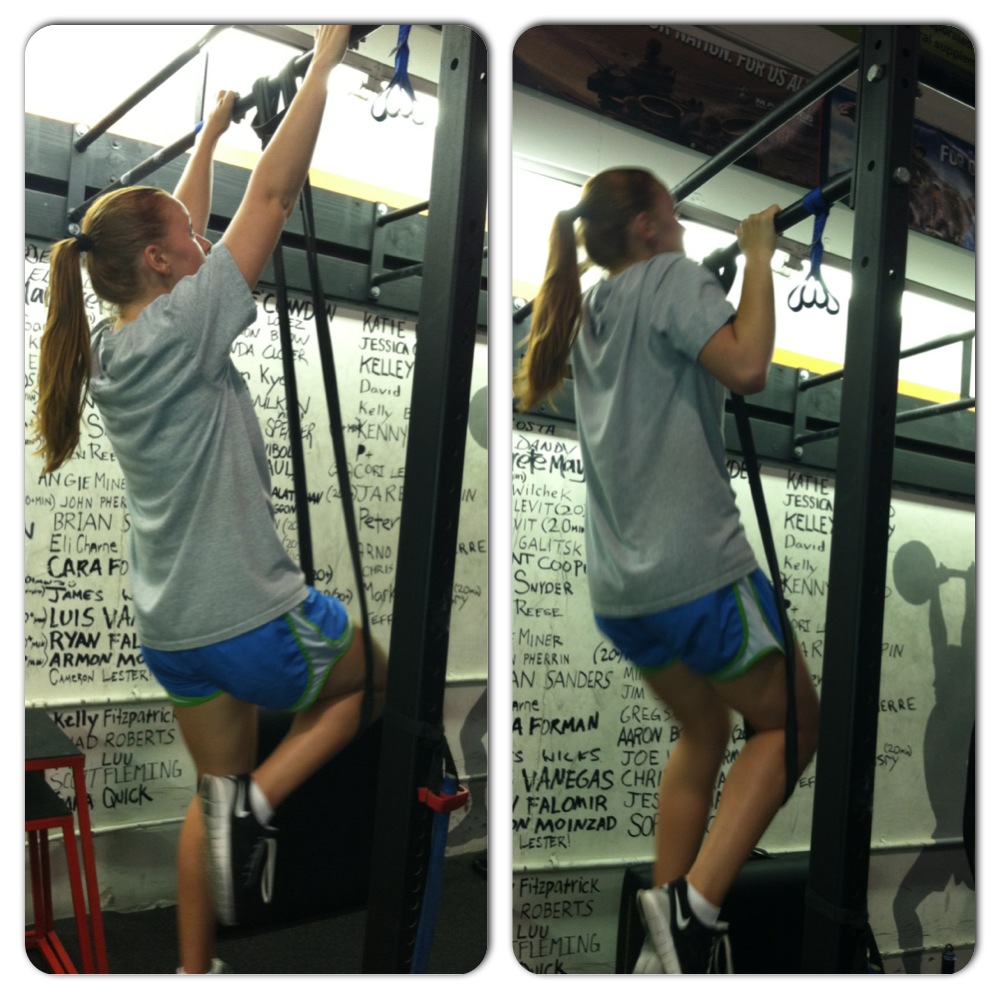
- Foot assisted pull up – Hang from a bar or use TRX/Jungle Gym straps. Place your feet on the ground underneath you. The more firmly planted your feet are, the easier the move will be. Your goal is to use your feet as little as possible. Your feet will assist only as much as you so that you can perform a hold, negative or full pull up.

Thanks Carla for demoing!
- Band assisted pull up – Hang from a bar with a band around your knee or knees (putting the band under both knees makes the move easier). The band will add assistance as you perform the move. The skinner the band, the harder the move. The more you control the move and don’t swing, the less the band will propel you up.

Thanks again Carla!

If you don’t need assistance to hold a pull up or chin up or to perform a slow negative, then you may move to the bar without assistance. Don’t use assistance if you can perform 10 3-5 count negatives (and not a fast count) or 30 second holds without assistance. Make sure you can perform the move correctly before advancing. But also make sure that you are always checking your progress to see if you can perform the moves without assistance.
Remember, your goal is to lower assistance as you master each move. Don’t just waste time on the lat pulldown machine trying to get stronger or by doing assisted pull ups on the machine. Work on each piece of the pull up and ween yourself off of the assistance!
So do you want to be able to do a pull up? What are you doing to get better at them?
Here is also a great workout to strengthen your back and biceps to help you get stronger so you can do a pull up.
NOTE: In this post I didn’t really go into grip variations. The easiest grips to do are usually the neutral or chin up (palms facing you) grips. The pull up grip and wide grip variations are generally more difficult.
Recovery Workout
So on days where I don’t feel like doing yoga and my body isn’t really ready to do a full workout, I will do a “Recovery workout.”
These workouts are usually hard but focus more on postural strength and balance then on developing maximal strength or burning a ton of fat. They work on activating all the correct muscles as you work on perfecting form.
These workouts are the prep that most people need to do so that they can move well and really get the most out of their metabolic or strength training workouts.
The recovery workout below can be done on its own or shortened into a warm up for a full body workout day.
The good part about the workout too is that you can easily do it at home with no equipment even when you don’t have much time!
Workout
3-5 rounds of all the exercises below. Perform a 1 minute hold of each exercise. Try not to rest between each exercise. Try only to rest after each round is complete.
Balance on toes (So literally stand up on your toes and hold. If this is easy, balance on your toes on one foot for 30 seconds and then switch to the other foot. Stay as high on your toes as you can and don’t rock to the outside of your foot.)
Squat Hold (Squat down to parallel, not below, and hold. Focus on keeping your chest up and not leaning forward. Push the butt back and really sit into your heels. This is a great time to really assess and work on your squat form.)
Scapular Hold (So you will “lean” back against the wall with only your elbows touching the wall. The further out you walk your feet away from the wall, the harder the move will be. As you lean back with only your elbows against the wall, you really want to press your chest out and pull your shoulder blades down and together.)
High Plank Hold (So hold at the top of the push up from your hands and toes if possible. You can make this easier by doing it from your knees. Make sure to brace your abs by pulling your belly button into your spine and tucking your hips under. Don’t arch your low back or round your upper back. Keep the shoulder blades retracted and everything tight from your shoulders to your core, butt and quads.)
Glute Bridge (Lie on your back with your knees bent and feet flat on the ground. Lift your hips up as high as you can and squeeze your butt cheeks. You shouldn’t feel this in your low back. You should feel it in your glutes and a bit in your hamstrings.)
With all of these moves, you should struggle within the first 20 seconds if you are really challenging yourself. Fight to squeeze as hard as you can as you hold the moves!
15 Minute Workouts
So I stumbled across this 15 minute workout article by Charlotte Andersen because I saw that Mark’s Daily Apple was included in the list.
It is a whole list of workouts that work your body in under 15 minutes. Some I really like…others not so much.
But the point is…You CAN get in a GREAT WORKOUT even if you only have 15 MINUTES! Sometimes you even get more out of a short workout then you do out of spending hours in the gym…actually I would say more often than not keeping it short and sweet is the way to go! (Definitely not always 15 minutes short, but still…)
Which got me to thinking about some of my favorite 15 minute workouts….or well short workouts at least.
Below I’ve included two different ones both under 30 minutes although I’m not sure exactly how long.
One is a pretty full body cardio blast that is based off of the Training For Warriors Hurricane and the other is a strength training workout that is sure to burn out your legs!
“Hurricane” (This is what the volleyball girls have to suffer through for cardio sometimes)
So below are three different circuits. You will complete three rounds of each circuit before moving on to the next circuit. Your rest between each round of the circuit should be short and no more than the time it took you to complete the round. In between each circuit, take a slightly longer break of about a minute or two.
Circuit 1 x 3 rounds (If doing with a partner alternate who goes.)
Shuttle Run (or Suicide Run…takes about 15-30 seconds to complete)
Forward/Backwards Crawls (length of the longest suicide or shuttle sprint)
Sit Thrus x 10 each side
Circuit 2 x 3 rounds
Shuttle Run
Lateral Crawls (length of the longest suicide or shuttle sprint)
Mt. Climbers x 25 each side
Circuit 3 x 3 rounds
Shuttle Run
Circle Crawls x 5 each way
Single Leg V-ups x 15 each side (So one leg is straight up toward the ceiling while the other is straight out an inch or two off the ground. Crunch up and reach for the toe that is up then lower the upper body down and switch which leg is up and crunch up again with the upper body. Repeat alternating legs until all reps are complete.)
NOTE: Crawls are all table top crawls. When doing circle crawls, pretend your belly button is attached by a string to the ground and you are moving around that point with your hands and your legs.
15 minute Quad focused Blast
Set a timer for 15 minutes and do as many rounds as possible!
Single Leg Squats 8-12 reps each side
Split Squat Jumps 8-12 reps each side
Reverse Sled Drag 50 ft (HEAVY) (If you don’t have a sled back pedal up a hill or back pedal pulling anything heavy!)
To work my quads I prefer to use these compound movements. While they will work other muscles besides my quads, they really are super quad focused and your quads will be toasted by the end of the 15 minutes!
Try to rest only enough so that you can continue completing all of the exercises with good form.
Metabolic Monday
So today is a “metabolic” workout day – aka…MY TYPE OF CARDIO!
A metabolic workout is a high-intensity workout where you do compound movements back to back with as little rest as possible between them.
That doesn’t mean stringing together the hardest exercises you know of and just doing them back to back to back for an hour only resting when you feel like you either can’t function or are going to puke.
The point of a metabolic workout isn’t just to destroy you – it is to raise your metabolic rate both during and AFTER the workout so that you can burn some serious calories and more importantly some serious FAT.
It is also super good for athletic performance since it can improve your cardiovascular capacity. It can help improve your lactic threshold and VO2 max.
Yup…If you want to be able to run faster for longer or do well in any endurance sports, you may want to incorporate metabolic training into your workout routine!
So how do you design a metabolic workout?

My mom and sister in town for a metabolic workout around the holidays!
Well..there are a ton of different ways. The key points to consider are…
- Include compound moves – aka work the BIG muscles groups…Bicep curls and such are pointless moves to include.
- Use some resistance. You don’t need to use the max weight you can handle, but you do want to incorporate challenging weights to make your muscles work to their max!
- Add in rest – The key here is to teach your body to recover as quickly as possible. HOWEVER, if you don’t include any rest in your workout, you AREN’T going to be working at a max effort the entire time. To really get some of those cardiovascular capacity benefits, you need to be working near a maximal effort as much as possible, which means you NEED to rest and recover! When you start, you may want to rest 3 to 5 times the time you work. As your fitness level improves, cut the rest until you even hit a ratio of 5 times the work to rest.
- Keep the intervals short – When you get into the 2 minutes and above range, you start to work the aerobic energy system. If you really want to focus on improving your lactic threshold, keep your intervals of work between about 30 seconds and a minute thirty. Honestly, I even prefer keeping the work between 30 seconds and a minute.
- Don’t throw in the kitchen sink! – Don’t just combine 30 hard exercises and do them each once. Balance what you are working. If you pair up exercises, or even go through a circuit, make sure that you vary what you are working. Think about movement patterns (push vs. pull) as well as hemispheres (upper vs. lower body). If you vary how and what you work, you will find that you are more able to work to your full potential each round EVEN if you feel a bit fatigued and out of breath.
Below is a sample Metabolic Workout. While we love using sleds and ropes and sandbags, I do realize that not every gym or household contains those things so I tried to stick with bodyweight or more traditional equipment. (If you don’t have any medicine balls you could mimic with a dumbbell or even a cable machine with a double-handed overhead chop down toward the ground. Make sure though to use your lats for the pull over as well as your abs and legs!)
Metabolic Workout
WARM UP (make sure to do dynamic stretches, foam rolling and activation. Very important to be WARM!)
40 seconds of work, 20 seconds of rest between each exercise. Rest for 1-2 minutes after each round of all 5 exercises.
Repeat anywhere from 3-5 times depending on your fitness level.
Front Squats (add dumbbells or kettlebells in a front rack…light but challenging)
Medball Overhead Slams (Bring the medball back overhead and then slam it straight into the ground)
Crawling (Table top position..Forwards and backwards)
Lateral Hops (aka Skater hops…So hop as far as you can to the side off of one foot onto the other)
Russian Twist (Hold a weight plate and rotate side to side as QUICK as possible)
If you are a beginner, you may want to start with less work and more rest…Even say 20 seconds of work, 40 seconds of rest and work your way up to 40 seconds of work and 20 seconds of rest. For lateral hops, you can also sub side shuffles as long as you stay LOW and move quickly!
Yay! Metabolic workouts…what a great way to start the week!
Part 5: Bootilicious – The Kettlebell Swing
So the swing that I would like to discuss is the one that is best for your butt – the Russian swing.
The Russian kettlebell swing is a hip hinge just like a glute bridge or deadlift. The main muscle working in the hip hinge is the glutes with help from the hamstrings (and of course other stabilizer muscles).
And while you see everyone and their mother’s uncle attempting some sort of hinge exercise, most people don’t do it correctly – People either turn the hinge into a reach with their back (aka back rounding) or a squat.
It’s interesting…the hip hinge should be an easy movement for us to do but it is actually the one that most people have trouble with.
So how do you teach this easy but hard movement?
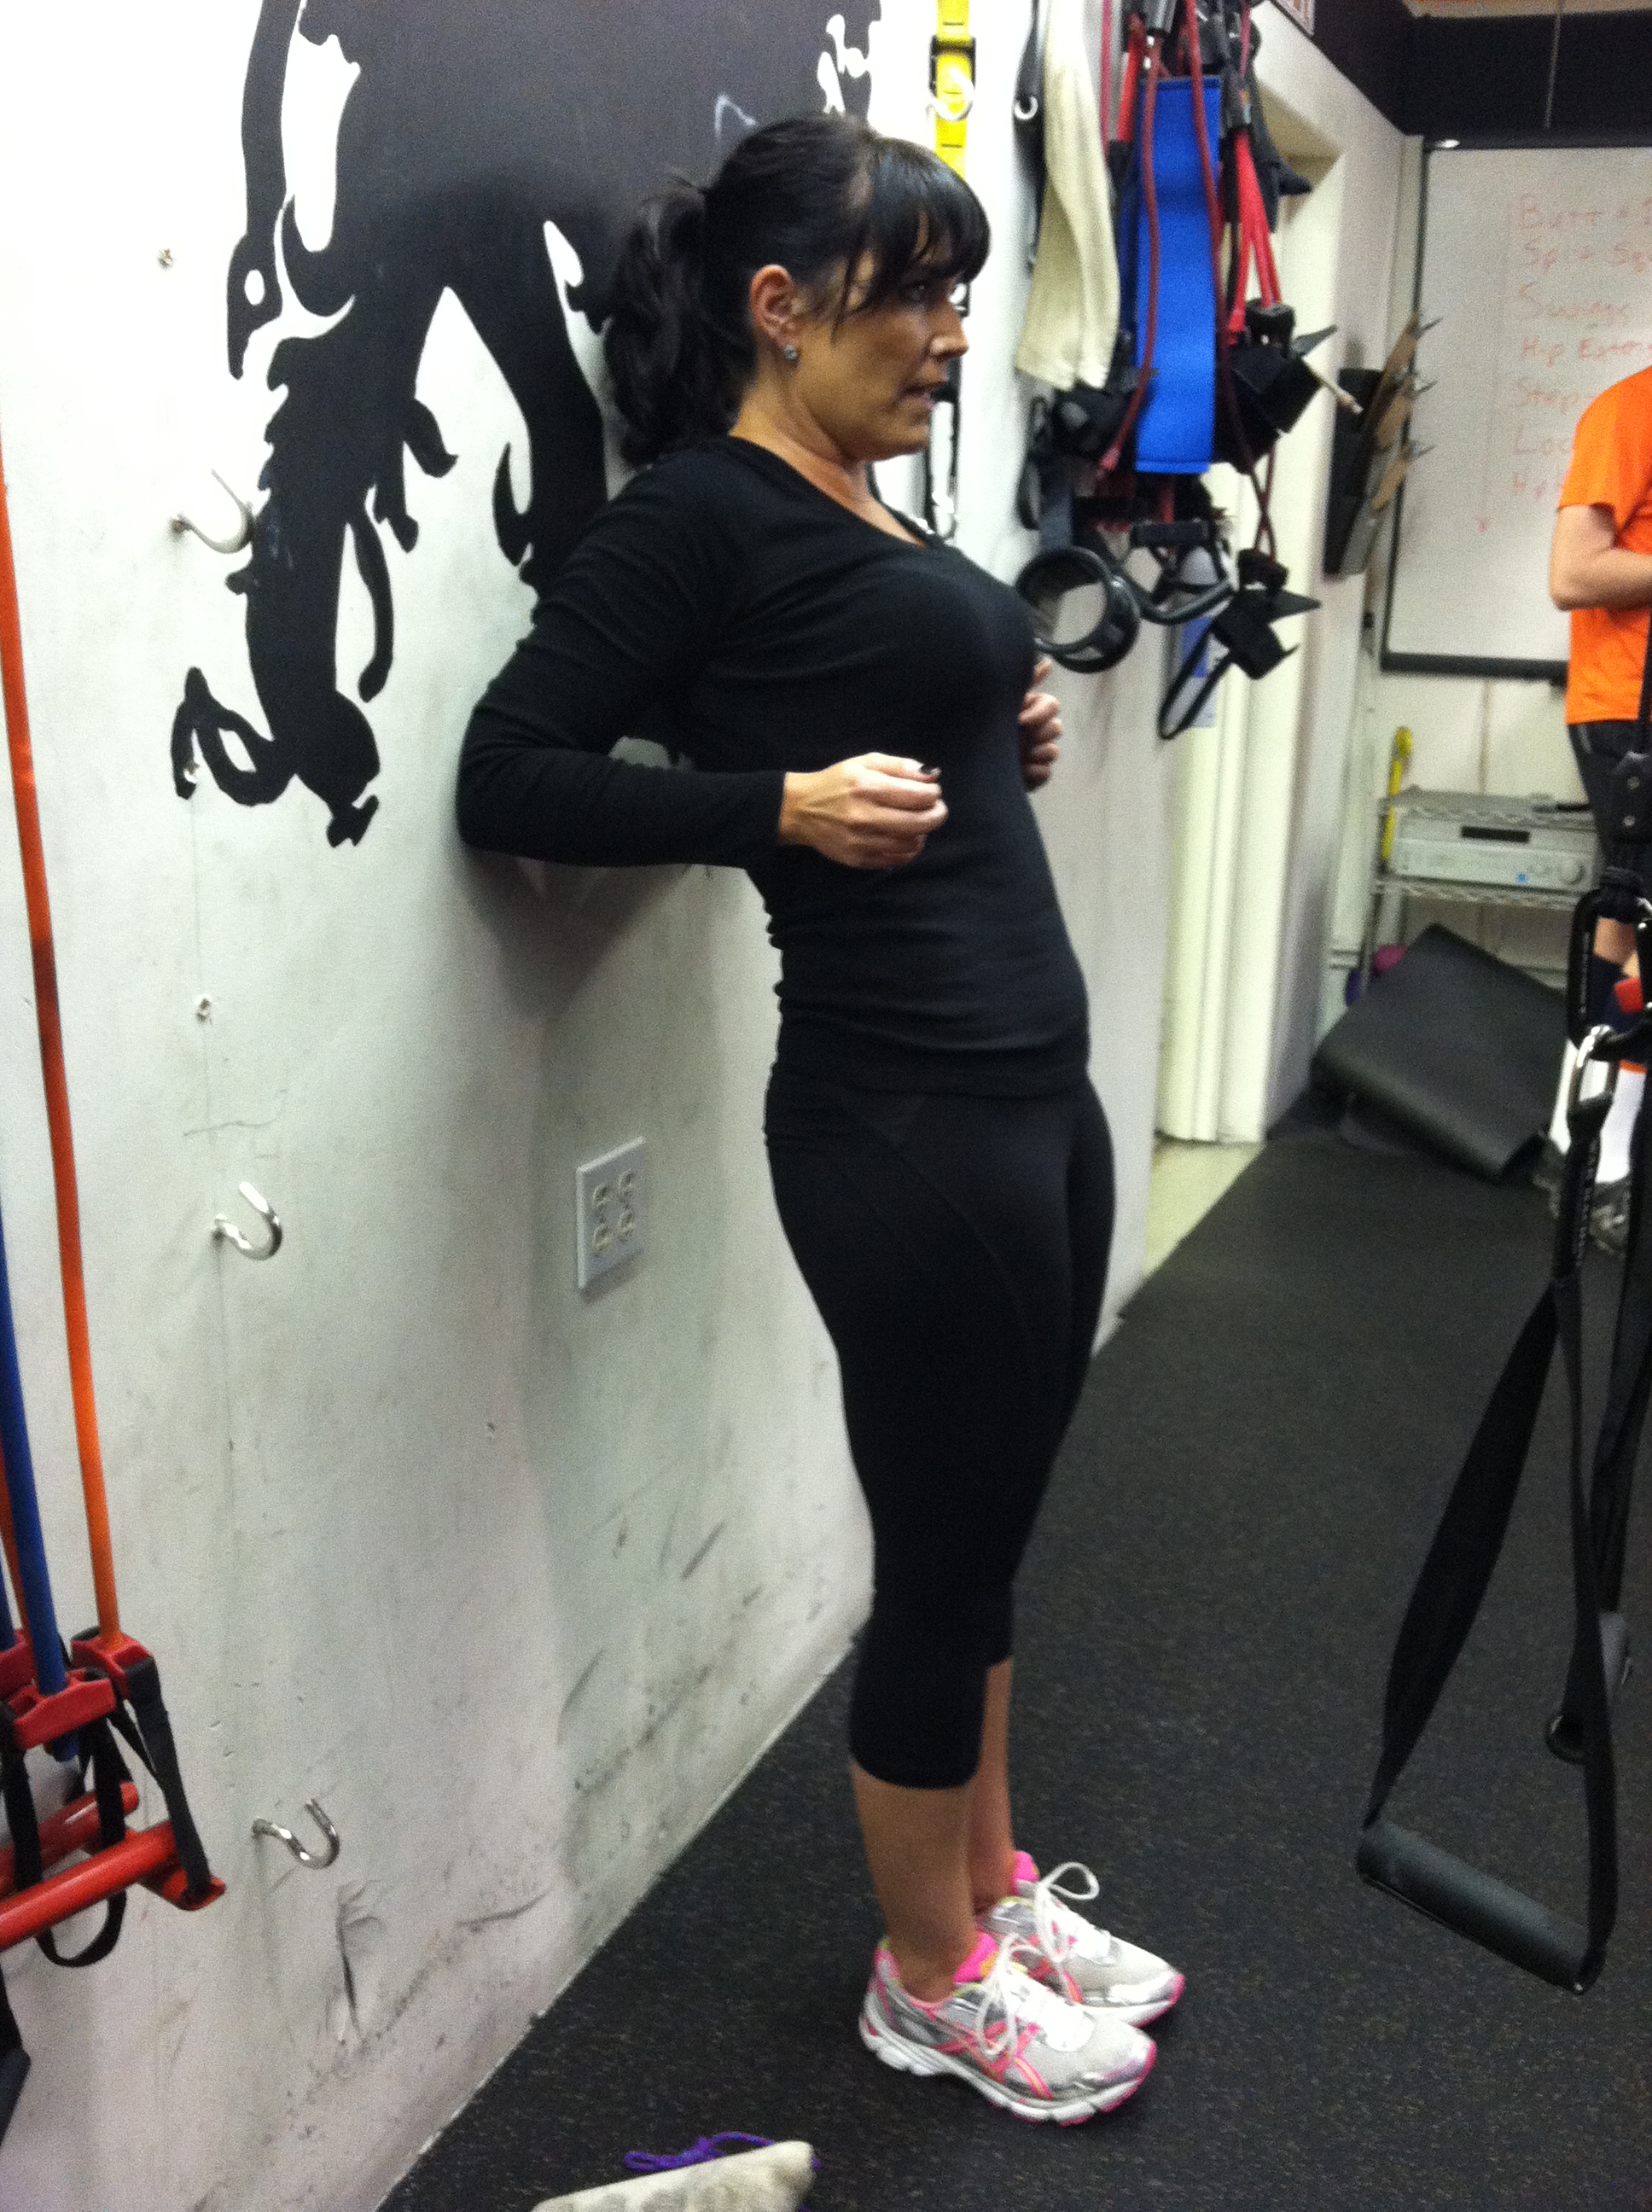
I start most people out with glute bridges. Once they have mastered the two leg, bodyweight glute bridge, I move them to a standing hip hinge near a wall.
The key with the standing hip hinge near the wall is to use the wall as a guide. You want to make sure that they keep their back flat and reach their butt toward the wall.
If they have trouble keeping their back flat, you can have them hold some sort of dowel down their back and make sure that the dowel doesn’t come off their head and butt because their back rounds or really separates from their back because they over arch.

If they seem to have trouble getting their butt closer to the wall (or even to touching it…I sometimes start them close enough so that if they do it correctly their butt will actually touch) and they aren’t rounding their back, then they are most likely squatting.
Use the wall or pole or something behind them to teach them to stick their butt back and hinge at the hip-joint. If they perform the movement correctly their butt should either touch or at least get closer to the object behind them!
After they master the bodyweight standing hip hinge near the wall, I will add a resistance band around their hips to teach them to be explosive with the movement.
With this move you face away from the wall with the resistance band attached to something behind you. You wrap the resistance band around your hips and step as far away as you can.
Then you hinge over and explosively come back to standing, squeezing the butt cheeks and driving the hips forward.
For this move, you will need to assume a more athletic stance (so knees slightly bent through the entire motion) than you would necessarily for the standing hinge by the wall.
The resistance band is an especially great way to teach the kettlebell swing because the band mimics the weight of the bell.
Your hips go backwards and you hinge over because the weight drives you backwards and you want to absorb the load. You then squeeze your glutes and drive your hips forward to propel the weight forward.
Once you have managed this you are ready to start on the actual swing. Start with the two-handed, single bell swing.
Starting with the kettlebell on the ground, you will hike it backwards like a football to start the swing. It doesn’t matter how high you get the kettlebell to go…and actually it really shouldn’t ever get above your shoulders!
You are powering each swing with your hip hinge. As you swing the kettlebell forward, you will have a slight lean back at the top and a slight posterior tilt to your hips because you are squeezing your butt cheeks. You arms aren’t working at all to lift the kettlebell…it is swinging because of the power from your glutes.
You then leave your hips out long enough to catch your forearms with the kettlebell descending. You don’t want to be hinging over while the kettlebell is away from your body. You hinge over only to slow the kettlebell down and absorb the momentum.
The connection between your forearms and hips is very important and is key to making sure this movement is powered by your glutes and not your low back!
Your forearms then maintain a connection with your hips as you hinge over leaning forward with your chest to counteract the weight of the kettlebell between your legs.
The kettlebell should go back smoothly and shouldn’t really swing up and hit you in the bottom. If it does, you are actually using too much power for the weight and can probably even go up in weight.
This video actual shows a great swing.
In this swing, his spine is in line from the tip of his head right to his tailbone. At the top of the swing, he is standing up straight with only a slight lean back and he hinges back over when the kettlebell drives his hips back. There isn’t a gap between his forearms and hips as he goes back into the hinge. Everything is connected and moves TOGETHER. As he hinges over, his butt goes back. He doesn’t squat and his back doesn’t round.
If your swing looks like this and you can feel that forearm/hip connection, you are doing the move correctly and can start upping the weight or playing around with variations.
Another variation of the swing, the single arm swing, can also be a great way to learn the swing movement as it can sometimes force people to maintain that forearm to hip connection. BUT this variation is more challenging on the core and may be more challenging on the grip.
To progress the swing move, try a double bell swing, but when you do this make sure you have a really really good handle on the other two variations first.
While the kettlebell swing can be a more frustrating move to truly master, it really is a great way to develop glute strength and improve your power. It can be a great way to get over a deadlifting plateau if you find yourself struggling!
Shoot some people even argue that heavy kettlebell swings are even better than deadlifts….and, while I love my deadlifts, kettlebell swings are definitely pretty freaking good.
So work on your swings today. If you aren’t confident in your hip hinge (if you round or squat), start with a beginning move like the glute bridge and progress from there. Don’t just jump right into swings and end up hurting your low back!
And….P.S. Speaking of progression yesterday…this article is basically one to do the kettlebell swing!
Flexibility – How important is it?
So yesterday I had a new client that I was assessing, lay on her back and raise one leg straight up toward the ceiling. I wasn’t looking at hamstring flexibility, I was looking for asymmetry between her two sides. Asymmetry puts people at greater risk for injury and means that there are some imbalances that need to be taken care of.
When I had her raise her leg, she said to me, “Oh I’m not very flexible.”
I told her it was ok…that I wasn’t looking at flexibility.
She said, “Ok, but still…it is embarrassing!”
I smiled and thought…It’s crazy that people worry so much about their flexibility, especially when there are really bigger fish to fry!
How important is being flexible really? I mean is it really important that you are able to touch your toes?
I am not very flexible…At points I have worked on it just for the sake of being able to do certain moves…but usually…I just worry about mobility!
Honestly, being able to touch your toes really isn’t that important, BUT that doesn’t mean you should be locked up and immobile.
Mobility is WAY more important than flexibility. Mobility means how well we are able to MOVE..to squat, jump, push, pull.
Being able to touch the ground with your head while standing with straight legs doesn’t mean you are going to be able to move well. In fact, it could mean that you have potential imbalances that are actually inhibiting you from moving well.
So while being able to do the splits is cool and something that you may decide you want to master, being that flexible really isn’t essential to being able to move well.
What is essential to being able to move well is mobility of the joints.
And to have mobile joints means much more than having crazy flexibility. Flexibility can mean different things for different people.
You are flexible enough to be mobile if you take care of all shortened and tight muscles. So if you sit a lot, you need to make sure that your hips, which have been tightened and shortened by sitting all day, have been stretched and loosened so that proper length-tension relationships have been developed between all muscles around your hip.
And on top of needing good length-tension relationship between all the muscles around a joint, to be mobile you must also make sure that all the correct muscles are activated. That means that if you expect to have good hip mobility, you can’t have shortened and tight hip flexors and UNDER ACTIVE glutes.
So you must make sure that on top of making sure tight muscles are loosened and lengthened that overactive muscles are relaxed and under active muscles are ACTIVATED.
If you want to be mobile, stretching or flexibility is just a piece of the puzzle. You also need to do SMR (self-myofascial release aka foam rolling) and activation exercises.
While stretching is GOOD it isn’t near as important as most people make it out to be. You don’t need to be able to touch your toes….It may be something you want to do, but it isn’t necessary.
And even when people do spend a lot of time stretching, they usually stretch muscles they LIKE to stretch, not the muscles that are necessarily tight from sitting or doing repetitive movements day in and day out.
So instead of spending a ton of time stretching each day, focus on only stretching the tight muscles and use the rest of that time to do SMR and activation exercises! You will become more mobile and therefore GET MORE OUT OF YOUR WORKOUTS!
Functional Lifts – Awkward Weights
For months now I haven’t really touched a dumbbell or a barbell, BUT I’ve still been lifting heavy.
And while I still LOVE barbell lifts, I have become very fascinated by lifting with awkward weights.
In every day life, we rarely have to lift something that is perfectly balanced and easy to grip. So even though in the gym we may be able to deadlift 500lbs on the barbell, it may be impossible for us to lift even 100lbs in the form of an awkward box on the floor.
And which is more important to be able to do?
While I love deadlifting, I must admit I really really really get frustrated when I can lift or move something on my own.
I don’t like struggling to lift, carry and move things. And I most definitely HATE when I have to ask for help.
So while I’ve always considered a deadlift a functional lift, it might not really be that functional when you add weight in the perfect form of a barbell.
It was actually incredibly humbling to find out just how not functionally strong the barbell deadlift had made was when I did my first strongman atlas stone lift on Saturday (which is probably one of the most functional lifts out there).
The baby stone is 125lbs.
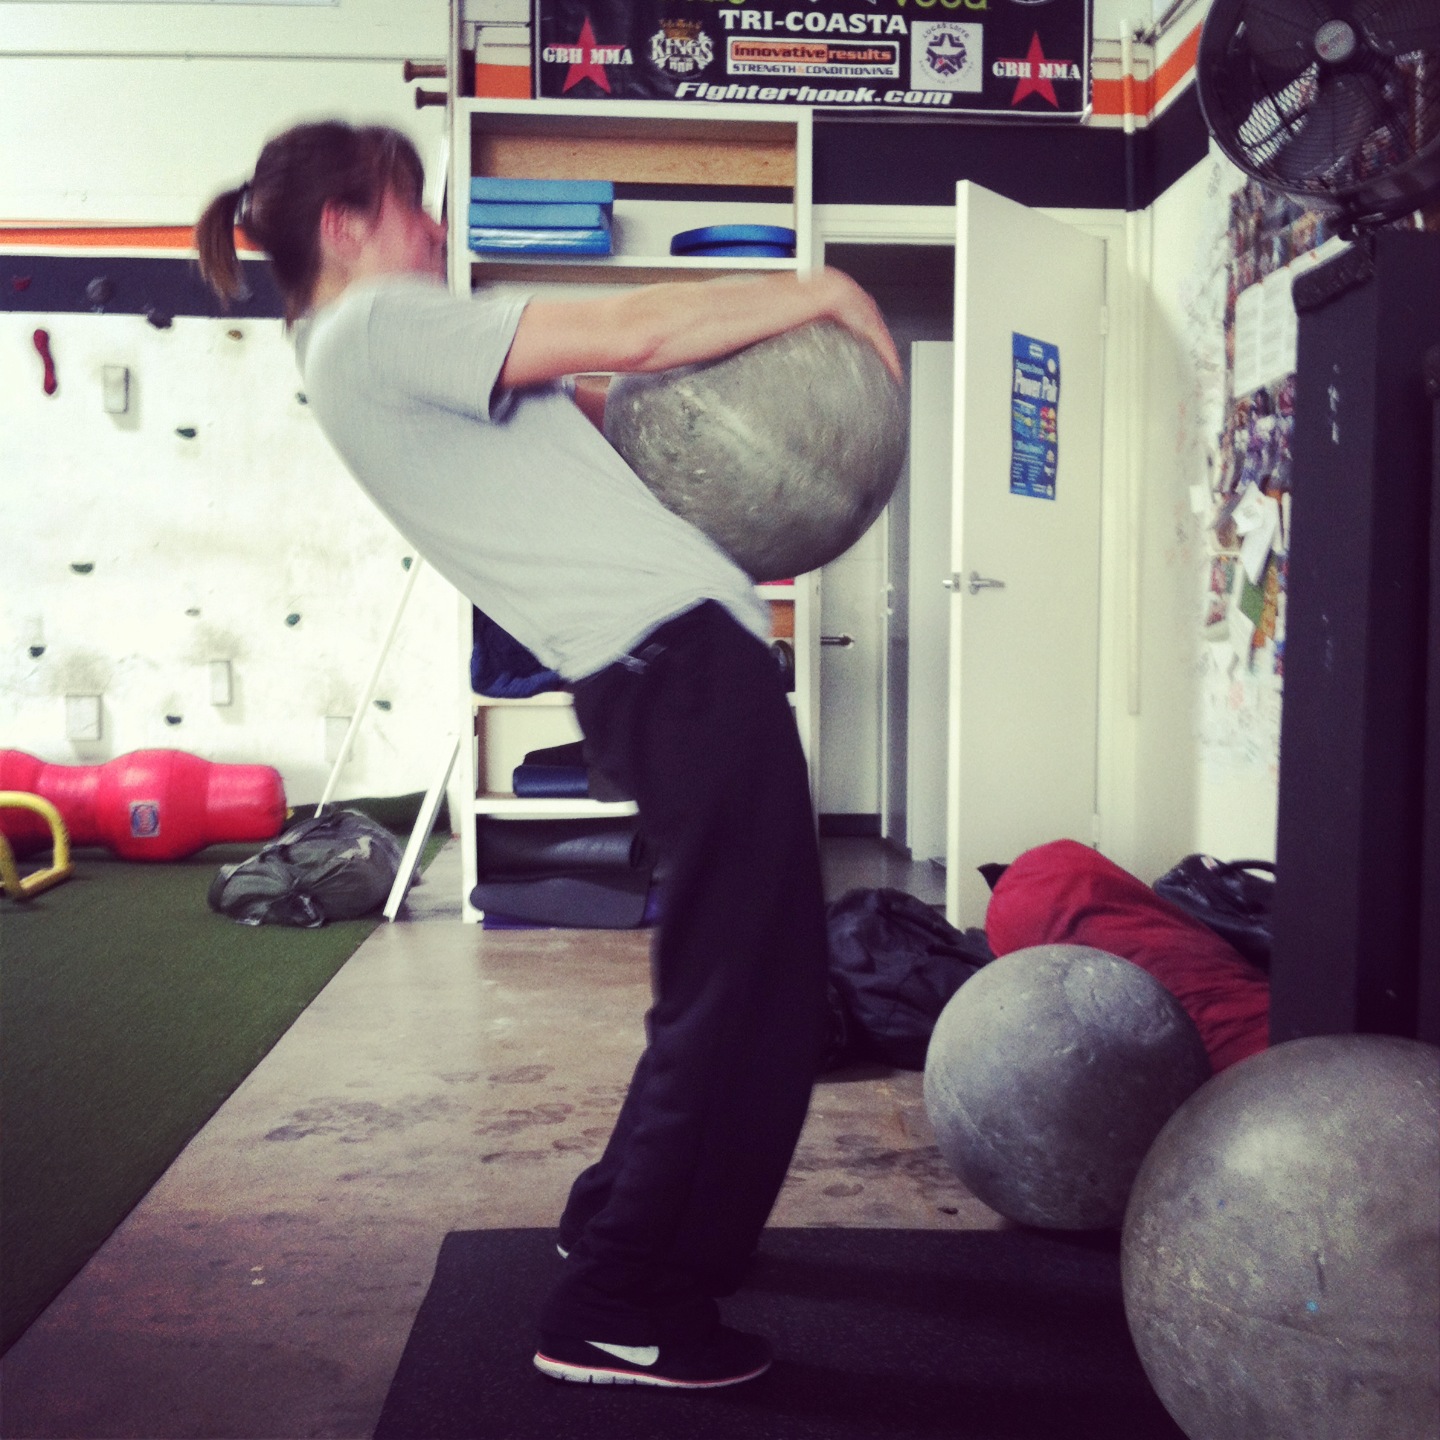
I was told to start with that one. It looked small enough and I figured I wouldn’t have any trouble. I could easily deadlift 125lbs!
Shoot…I even thought I might be able to attempt the next one up!
Uhm…lifting a round concert 125lb ball is WAY different than lifting 100 more pounds on a barbell.
The first time I attempted to lift it, I couldn’t even move it off the ground.
I couldn’t budge 125lbs!?! WHAT!?!
It was awkward and hard to grip. There was nothing to hold on to! You just had to squeeze the ball with every inch of your hand and arm. You even needed to use your back to grip the dang thing otherwise you were going to drop it.
And on top of that, it wasn’t just one smooth lift up like the barbell lift. It was a lift to your thighs before you needed to re-grip so that you could really use your glutes to power the ball up.
It was honestly exactly the move you realistically have to do when you move super heavy awkward things in everyday life.
I can name a few times when I’ve moved that I can remember attempting that exact same move to lift a heavy box (and actually failed to get it off the ground even though I was lifting super heavy with dumbbells and barbells)….SO FRUSTRATING!
There is nothing more frustrating than not being able to move something!
So it really got me to thinking about all of the time I spent doing the traditional lifts – doing traditional exercise moves.
While I love them, they may just be more functionally beneficial when done with AWKWARD weights.
You don’t need to give up deadlifts, push ups or any of the other meat head moves (that I most definitely love).
But maybe you can just make them better by adding in some awkward elements.
Like pull ups for example…
I can do pull ups off a bar…but pull ups holding on to some awkward rock climbing grip things? OUCHIE!
Or overhead presses…Instead of using a barbell, what about a slosh pipe? WAY more core engagement when you lift that pipe only half filled with water overhead (actually it kind of reminds me of a squirming child, which there is a great chance that sometime in your lifetime you will be lifting up overhead!).
You don’t have to go crazy making the moves overly awkward. Actually you SHOULDN’T try to add in too many strange elements. Awkward is good..Super awkward is crazy.
But anyway, after being humbled by the stone, I would DEFINITELY recommend that if you are training to be strong in life that you add in some more functional variables like awkward weights or grips! You don’t necessarily need to find a gym with an atlas stone, but sandbags and other uneven or awkward weights can be good! (And if you don’t already…get ready to add in some grip training…but that is a post for another day!)
Cardio using a towel – The Towel Taz
So today our metabolic workout included, among many tortuous things, the Towel Taz.
The Towel Taz has become one of my favorite aerobic conditioning moves. While not necessarily hard if you do it for 10 or even 20 seconds, it becomes brutal at about 30 seconds and completely destroys you if you do it for a couple of minutes.
So what is the Towel Taz?

It sort of looks like this, especially when you get tired and start to grimace.
Basically it is you shaking a towel as powerfully and quickly as you can up and down while moving quickly around from side to side, in a circle, forwards, backwards and every which way. (Just like the Tasmanian devil above, you are basically moving around as fast as you can in a whirlwind!)
Trust me…It is harder than it sounds. That towel that at one point seemed light (although the moving blankets we use don’t exactly feel light even to begin with) gets pretty heavy, pretty quickly. And your legs get amazingly fatigued moving around quickly.
BUT I also like this move because it is something that anyone at any level can do.
AND you can easily do this move even at home…or well…anywhere for that matter! All you need is a towel or blanket. Even a freaking bath towel will work! You don’t even need a lot of room to do this move (just make sure there isn’t anything around that you could knock over with the towel!).
So the next time you want to do a little aerobic conditioning, but don’t feel like going for a run or you don’t have a piece of equipment like a treadmill, bike, VersaClimber or elliptical handy, grab a towel!
Start with 3 two-minute rounds of Towel Tazes. Try to decrease your rest from 2 minutes in between each round to only 30 seconds between each round. BUT if you decrease rest, make sure that you aren’t doing it at the expense of working hard the next round. It is better to rest for 2 minutes and work just as hard the second and third rounds than it is to rest for only 30 seconds and be super sloppy the last couple of rounds.
Once that feels easy try 5 rounds or even up the time that you do the Towel Taz.
OR if you are looking for a great metabolic circuit, try the one I did today!
WORKOUT:
3-4 Rounds of the following 9 exercises, with one minute rest between rounds.
Each exercise is done for 40 seconds, followed by 20 seconds of rest to change to the next exercise.
Towel Taz
Sled “Fight” (Push, pull, rotate the sled every direction within a small amount of space.)
Power Ropes battling waves with shuffle (So alternate arm waves while shuffling side to side.)
Push against Wall (So if you don’t push yourself on this one it isn’t hard, but what you do is literally push against a wall as if you want to move it!)
Lateral Shuffle, Sprawl, Sit Thru (So shuffling in a semi-circle, at random points drop to the ground and perform a sit thru, which is an ab move where you lift your left hand and bring your right foot up to replace your hand and literally “sit through.”)
Bag Carry (Take a heavy bag, sandbag or any other awkward heavy bag and bear hug it and walk around quickly.)
Sidewinders (Using a two-inch, 50 ft rope, stretched out all the way, rotate side to side creating waves like a snake moving over the ground. A total ab killer!)
Woodchop Sit ups (Hold a weight with both hands over your right shoulder. Knees bent, sit up and drive the weight across down to your right hip. Then lay back down and repeat)
Glute bridge with twist and reach (In a glute bridge reach your right hand as far back over your head on your left side as you can. Then come back center and reach your left hand across your body and as far overhead to your right as you can.)
Super good! AND lots of different ways to move!
Anyone else have any random exercises that they love that look kind of stupid and not that hard but are actually KILLER?
Conditioning – What energy system are you working?
So as you all know…I don’t like cardio very much.
Yea….yea…I know I’ve told you this a bazillion times before.
However, cardio conditioning IS an ESSENTIAL part of your workout program.
Put that doesn’t mean you should just throw in some jogging for a few minutes before or after your strength.
It doesn’t mean you should go out and run a bazillion sprints.
It doesn’t mean you should spend hours on the treadmill!
It means you should lay out a plan and make sure that you properly progress yourself through all three energy systems. (Starting to see a theme here?…Maybe a PLANNING or PROGRESSION theme!?!)
You may now be asking yourself…”Three energy systems?”
YEP! There are three different energy systems that you want to work when you do cardio conditioning and each has a separate, but equally valuable, part to play.
By varying which energy zone you use during your conditioning, you can vary the intensity of your workouts to prevent yourself from overtraining.
Ok…so to start, let’s discuss all three energy zones – the aerobic, lactic anaerobic and alactic anaerobic.
The zone all beginners need to start in and the zone that all athletes need to return to keep from overtraining and to keep their base strong is the aerobic zone.
The aerobic zone is our more steady state cardio conditioning (consistent activity for about 2 minutes +). When working in this energy zone, your heart rate should be between about 65%-75% of your max heart rate.
In this zone, you work on improving the strength of your heart and your body’s oxygen delivery systems so that your cells can work to their full capacity.
You don’t need to run for hours to improve your aerobic conditioning.
For example, at the end of your workout, you could do two minutes of battling ropes with less than two minutes of rest between rounds for 5 rounds.
You could do constant locomotion (jogging, shuffling, high knees, skipping) for five minutes. (Trust me your heart rate gets up.)
Or if you do want to dedicate a whole day to conditioning, maybe you do jog, bike or walk slowly for 30 minutes to one hour. It can even be a leisure activity that you use as active rest.
However you decide though to get in your aerobic conditioning make sure that you do in fact do it. Too often people skip this step and go straight to the sprints.
And while I personally prefer sprints and such to longer bouts of cardio, those longer bouts of cardio ARE super important for athletes at all levels.
The next energy system is where we encounter the lactic threshold and start to tap into our anaerobic energy systems. It is called the lactic anaerobic.
Anaerobic energy systems supply us with energy for only short bouts of high intensity activity. Our anaerobic systems supply us with energy through chemical reactions that don’t require oxygen whereas the aerobic system does require oxygen.
This energy system, in which our heart rate is between 80-85% of our max, is best worked when we do a more intense bout of cardio for about 30 seconds to 90 seconds.
It is believed that if you have a higher lactic threshold, you can continue at a higher intensity for longer before tiring, which can be super important for athletes in high intensity endurance sports.
But even if you aren’t an athlete, it is important to include conditioning for this system because it improves our work capacity. The harder and longer we can work before enough lactic acid builds up to fatigue our muscles the more we can get out of some of our very intense workouts!
The third system, the alactic system, is also an anaerobic system.
When working our alactic system our heart rate should be between 86-90% of our max heart rate. To work this system it is best to do any activity that is high intensity and can fatigue you in about 8-12 seconds.
We use tsunamis, sprints and Versa Climber a lot when doing conditioning for this energy zone.
The key here is to pick something that truly fatigues you in 8-12 seconds.
And this zone…well you need to EARN this zone. If you are a beginner, don’t start with this.
Beginners or even athletes who have taken time off may want to spend at least a month doing only aerobic conditioning on top of their strength training.
Once you’ve built up your aerobic base, then move into some lactic anaerobic conditioning. After a few weeks to even a couple of months of training in both, then add in alactic training.
You need to make yourself EARN the next stage of training. You also need to make sure that all systems are strong. If you only do 30-90 second conditioning, you really aren’t making yourself as fit or as strong as you could be.
You need to do all three levels of conditioning if you want to reach your full potential.
NEXT you need to figure in on which days you are going to include what type of training. If you train only three times a week, at the end of your strength training you may want to add one day of level one or aerobic conditioning, one day at level 2 (lactic) and one day at level 3 (alactic).
If you train five days a week, you don’t want to include more than two days of level 3 conditioning and you want to make sure to vary the days so that after a hard day of conditioning you get an easier day of conditioning.
Don’t make yourself train at the same intensity day in and day out! It won’t get you near the results that fluctuations in training intensities will!
And on top of planning out on which days you are going to do what level of conditioning, you must also consider REST intervals.
Each energy system’s requirements are slightly different, but to simplify….
Aerobic – Beginners can have about equal rest to work. Advanced try to make there be as little rest as possible
Anaerobic Systems (lactic and alactic) – Beginners can have about 3 to 5 times rest to work. So if you are a beginner and work for one minute (lactic), you will need between 3-5 minutes of rest. You want to try to be close to fully recovered when you go again. As you become more advanced you can cut your rest down. You may do something like 10 seconds of work (alactic), 20 seconds of rest as you become more advanced.
Make sure that you plan out how much rest you are giving yourself because rest can be a great way to PROGRESS yourself. It is another option not as frequently used as upping the number of rounds that you do. (But it actually may be even MORE beneficial in many cases!)
So even though I don’t love cardio, I do in fact include conditioning in my workouts and I DO make sure to work all three systems.
Now the question is…Do you? What do you consider when planning out your cardio conditioning?
Part 4: Bootilicious – The Glute Bridge
So the glute bridge is one of my favorite moves. It can be a good part of any warm up or a great strength exercise by itself.
It is also a great way to mix up your hip hinge workouts from vertical to horizontal! It is also incredibly hard for many people to keep their core tight enough so that they don’t feel this in their low backs, but instead feel it in their butts.
Really really focus on drawing your belly button in toward your spine when doing this move so you DON’T feel it in your low back!
So the basic glute bridge is done on the ground. You should place your feet about hip width apart and bend your knees bringing your heels in close enough that you can touch them with your finger tips.
You then squeeze your butt cheeks and raise your hips as high up as you can. You should basically be on your shoulders and heels when you drive up. You should actively squeeze your belly button in toward your spine and squeeze your glutes.
Make sure that you aren’t just simply pushing back into your shoulders off of your heels. You actually want to drive straight up and while you are pushing through your heels you want to actually think about driving your shins forward.
You should feel this move in your glutes and a bit in your hamstrings NOT in your low back.

You can also do this move with one leg raised. I like to do it with one leg off the ground with the knee bent to 90 degrees and the foot flexed. I focus on getting my hips up just as high as they were with two legs. Try to also not let your hips rotate!
Another variation that I like of the basic glute bridge is the bridge on the power wheel.

Basically the same as the glute bridge on the ground EXCEPT you have to really drive your feet straight down into the ground and squeeze your butt and core or you are going to wobble over or the wheel will run off.
Many people also feel this move a lot more in their hamstrings.
This variation is a great way to advance the traditional glute bridge and make it into a great part of your workout.
To make this move harder, you can actually roll the wheel out and then back in toward your butt. The key though is to NOT drop your hips even as your roll out.
A great intermediate move if the power wheel is just a bit too hard especially moving it in and out is the glute bridge on the sliders.
Put your heels on the sliders and raise up into a glute bridge. Just like with the power wheel, straighten the legs out keeping the hips high and then bring the heels back in so that you are in the basic glute bridge position. Repeat slowly and make sure to keep your core tight so that your low back doesn’t feel this move.
The last glute bridge variation that I really like to use is a great strength move. A beginner can do this with only their back on the bench and feet on the ground. To make it more advanced, you can do it with your back on a bench and your feet up on a bench as well (or your back on the ground and feet up). To make that harder, do it with only one leg.
The hardest variation actually returns you to the position with your back on the bench and feet on the ground. You can add weight to this position by laying a barbell across your hips.

(I will take a picture but didn’t have time today to set up everything)
Actually you can almost weight down any position to make it harder EXCEPT the power wheel. If you advance from this move, you could weight down the one-leg variation.
But make sure that when you weight down the glute bridge, YOU DON’T FEEL IT IN YOUR LOW BACK.
Focus on really keeping the core tight by “drawing in” your belly button toward your spine!
So if you want a bootilicious (aka perky, toned) butt, try some of these moves. They will also really help up your deadlift numbers if you are looking to get your lift numbers higher!
What’s your favorite glute bridge variation?


