Blog Archives
Happy Friday! It’s Tabata Time!
I feel that often Tabata style workouts are overused. And people string like 20 exercise together using the intervals and overdo it.
HOWEVER, occasionally, I think Tabata can be integrated into your training routine.
For instance, yesterday I added in a Tabata style workout to force failure and burnout.
It was a short quick workout, but boy was it a doozey. Not every workout has to be an hour to get results.
Actually as I’ve said before, often shorter workouts get you way better results than spending hours in the gym.
If you are interested in a full-body burn out Tabata Workout, try the one below!

Tabata Time Workout
Set a timer for 8 rounds of 20 seconds of work, 10 seconds of rest. Complete 8 rounds of those intervals on each exercise before moving on. Rest 1-2 minutes between exercises.
Make sure to complete as many reps in the 20 second intervals as possible. You do not get as much benefit from this workout if you rest during the work intervals. It is better to keep regress the move than to rest. It is all about doing as many repetitions as possible in the time allotted even if all you can do at the end is push ups standing against the wall.
The point is to reach failure and keep going!
EXERCISES:
20 seconds Push Ups
10 seconds Rest
1-2 minutes Rest
20 seconds Jump Squats
10 seconds Rest
1-2 minutes Rest
20 seconds Alternating Overhead Dumbbell Presses
10 seconds Rest
1-2 minutes Rest
20 seconds Rowing
10 seconds Rest
1-2 minutes Rest
20 seconds Balance Crunches
10 seconds Rest
Walk around and roll out and cool down.
As you fatigue, regress each movement so that you can keep moving the entire time. If you stop moving during the 20 second work intervals, you aren’t going to get as much out of the workout!
Recovery Workout
Often when I say a day is a “recovery” day, they think it means easy and worthless.
But recovery doesn’t mean easy and it is ABSOLUTELY NECESSARY! And it doesn’t even mean simply taking the day off.
Recovery can be active!
No recovery workouts may not be the most challenging thing you’ve ever done and no it won’t make you want to pass out and puke, but it may be even more important to your progress than any of your super challenging workouts.
Recovery workouts improve your mobility and stability to help you build a strong base so that you can lift more and work harder during your intense training sessions.
Below is one of our Recovery Workouts to make your body feel better and move better!
Recovery Workout

WARM UP:
Roll out and stretch.
Here are some of our favorite stretches.
WORKOUT
Do both circuits below.
Set a timer for 5 minutes for the first circuit. Work at 60-75% of your maximum effort.
CIRCUIT #1:
Locomotion – Jog, shuffle, carioca, skip, backpedal, butt kickers, crawl…Move around at a steady, consistent pace.
Then grab some water and move on to Circuit #2.
Complete 3-5 rounds of the circuit below. Hold each pose for 30-45 seconds. Rest as needed between rounds.
CIRCUIT:
Warrior III
Scapular Wall Hold
Handstand Hold
Crescent Pose
Table Top Bridge
COOL DOWN:
Roll out and stretch.
Here are our favorite foam rolling moves…Especially if you have a desk job!
What is your favorite active recovery workout? How do you keep your body mobile and healthy?
SIDE NOTE: We love our barrels! Here are some great exercises you can do with this random awkward piece of equipment!
A Full-Body Suspension Trainer Workout
The other day on Redefining Strength I wrote a post about 10 Great Suspension Trainer Exercises. Below is a full-body metabolic workout using some of those moves.
It just takes 30 minutes and will work your entire body! (Of course I recommend a good dynamic warm up with some foam rolling before hand (and after!) so maybe about 35-40 minutes…)

Full-Body Suspension Trainer Workout
WARM UP
Stretch and Foam Roll:
Calves/Shins
Quads
Hamstrings
Adductors
Glutes/Hips
Back/Lats
Chest/Shoulders
WORKOUT
Set a timer for 30 minutes and complete as many rounds of the circuit below as possible. Rest only as needed between exercises and rounds. Pick a variation of each exercise (and a rep number) that you can do without going to failure on any of the exercises. You want to be able to move from one exercise to another quickly. The point of this workout is constant movement.
CIRCUIT:
10-15 reps per side Balance Lunge
10-15 reps Inverted Row
10-15 reps Push Ups
10-15 reps per side Mt. Climbers
COOL DOWN
Stretch and Foam Roll:
Calves/Shins
Quads
Hamstrings
Adductors
Glutes/Hips
Back/Lats
Chest/Shoulders
How many rounds did you get in the 30 minutes? Record your number and try to beat it next week!
Note: Not sure how to do one of the moves above, check out these 10 Suspension Trainer Exercises for descriptions and pictures of each move!
Grip Strength – Farmer’s Walk
If you can’t hold the weight, you can’t use the weight so as obvious as it sounds…We are only as strong as our weakest link.
Often we ignore grip training in favor of lifts that are more fun and that, we feel, give us more bang for our buck.
But there really is no better full-body, functional lift than the farmer’s walk.
You could actually argue this is the MOST functional exercise. I mean just think about how often you need to hold something and walk with it!
And guess what!?!
IT REALLY WORKS YOUR GRIP! Along with your arms, back, shoulders, core and legs…So just about EVERYTHING!
Basic Farmer’s Walk Variations:
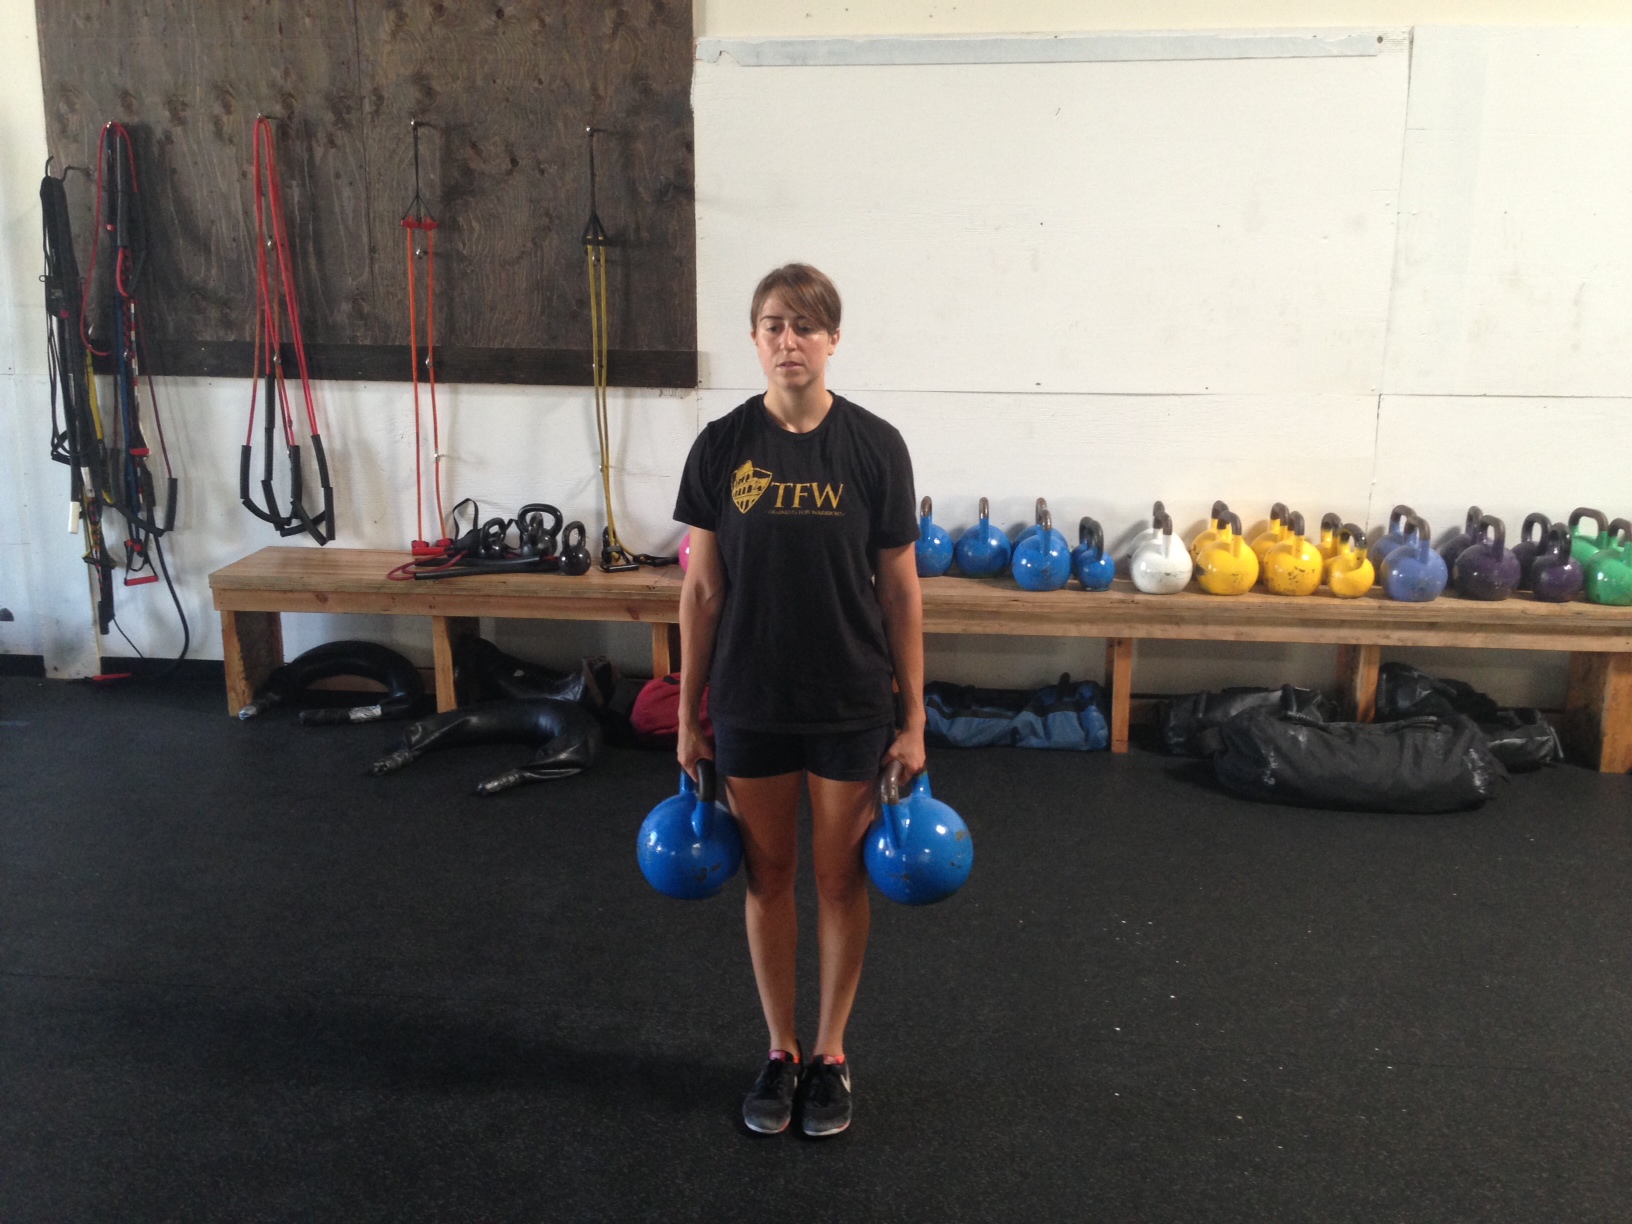
Nice tall posture and walk holding the weights down by your side but don’t let them rest on your legs.
1. Two-handed Dumbbell or Barbell Farmer’s Walk:
Basically, you hold heavy weights in each hand and you walk to set points or for a set amount of time, maintaining perfect posture. You want to use weights that CHALLENGE YOU and make you want to drop them just before your round is done.
Do not let your head jut forward or your shoulders round forward.
Do not let the weights rest on your legs. Hold them just a teeny bit away from your body or at least so they aren’t RESTING on your body.
Keep your core tight and walk with your shoulders down and back and your head up.
2. Two-handed Fat Grip (or Kettlebell) Carry:
This is the exact same as the two-handed Farmer’s Walk except you are challenging your grip even more by making the grip itself BIGGER.
Fat grips are a great way to challenge your grip because they make the handle bigger and more awkward to hold. The more awkward an object is to grip, the more it challenges your strength!
When you do carries with dumbbells that have fat grips on them, really focus on not letting the dumbbell slant forward or backward toward the ground. Make sure you carry the dumbbell so that it is level with the ground.
I also use competition kettlebells instead of dumbbells to challenge my grip more because their handles are bigger than the handles of dumbbells. This can be a great option if you don’t have fat grips.
Kettlebells are also great for carries because the bell wants to hug your legs and you have to lift them out a bit more from your body, which challenges your upper body and core even more.
The point though is…THE LARGER, MORE AWKWARD, THE GRIP THE MORE YOUR FOREARM AND HAND STRENGTH WILL BE CHALLENGED!
3. Unilateral Carry (with or without fat grips):
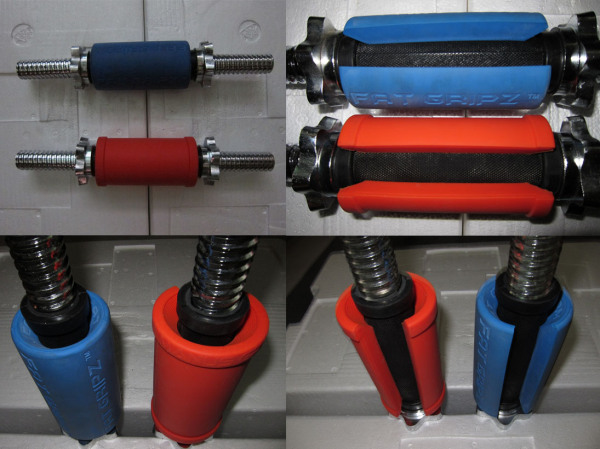
Fat grips can be placed on any dumbbell…or even a kettlebell….
Whenever you load down one side, your core is forced to work harder to stabilize. Plus I just love unilateral exercises because they force each side to work individually and help you correct any imbalances.
When doing a unilateral carry or farmer’s walk, you are going to hold a weight on one side. The more awkward the weight, the harder the move will be.
You are then going to walk forward. Do not allow yourself to either lean away from the side with the weight or toward the side with the weight.
The challenge is to PREVENT ROTATION. This is an anti-rotational move. You want to walk as if you have either no weight or at least equal weight in both hands even though you are only weighted down on the one side.
Keep a nice tall posture and make sure your shoulders stay level and you don’t lean. Keep the weight off of your leg as well. You do not want to rest it on your hip or thigh.
4. Uneven Farmer’s Walk:
I find that I’m often carrying something in both hands; however, those two items are usually different weights.
One of the most functional farmer’s walks, in my opinion, is the uneven carry.
To do this move, carry a lighter weight in one hand and a heavier weight in the other. Make the difference noticeable.
Just like with the unilateral carry, the challenge is to not rotate and to act as if the weights in each hand are even. Keep a nice tall posture and your core tight. The weights should not be resting on your legs and you should not be leaning to one side. Your shoulders should be level and your head should be held high, not looking toward the ground or jutting forward.
5. Overhead Carry (unilateral or two-handed):
While this farmer’s walk (I think it is also known as a waiter’s walk) is not as grip intensive, it is a really REALLY great stabilization exercise and is super core intensive.
This move can be done carrying a weight in both hands or as a unilateral movement.
The goal of both moves is to press the weight straight overhead and keep your core tight and your low back from arching. Try to get your bicep by your ear and your arm(s) locked out straight with the weight overhead. Try to relax your shoulders down and back as you carry and not shrug too much.
REALLY REALLY focus on keeping your core tight.
If you do a unilateral overhead carry, remember to not rotate or compensate for the fact that you have a weight only on one side. You want to walk as if you have an even weight in both hands.
Slosh pipes or awkward weights are great for overhead carries IF you’ve developed the shoulder and core stability. These unstable weights, or uneven weights, can be a great way to progress the overhead carry.
Heck you could even do an overhead baby carry!
However, if you are a beginner or have had shoulder injuries in the past, you may want to be careful with this move. This move requires good shoulder stability and both lat and chest flexibility.
Start slow with this move if you have limited shoulder mobility or have suffered from shoulder injuries. While this can be a good way to re-develop shoulder strength you do not want to force mobility and stabilization that isn’t there yet!
Stop letting your grip strength limit how much you can lift. Your are only as strong as your weakest link! Start using farmer’s walks today to strength your grip and get a full body, FUNCTIONAL workout!
AND…While Farmer’s Walks and Carries are probably the best ways to develop grip strength because they also develop full body FUNCTIONAL strength, there are other exercises you can do to develop grip strength (especially if it is your weakest link!).
Check out these 10 grip strength exercises by Fight Camp Conditioning for more ways to strengthen your grip. And the best part about these 10 exercises is that some of them can be used to create even more farmer’s walk variations (like a farmer’s walk with the pinch or claw grip or even a bottoms up carry!).
Fight Camp Conditioning gives even more carry variations!
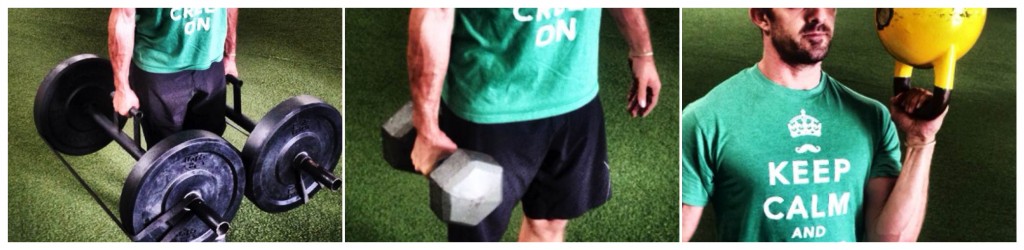
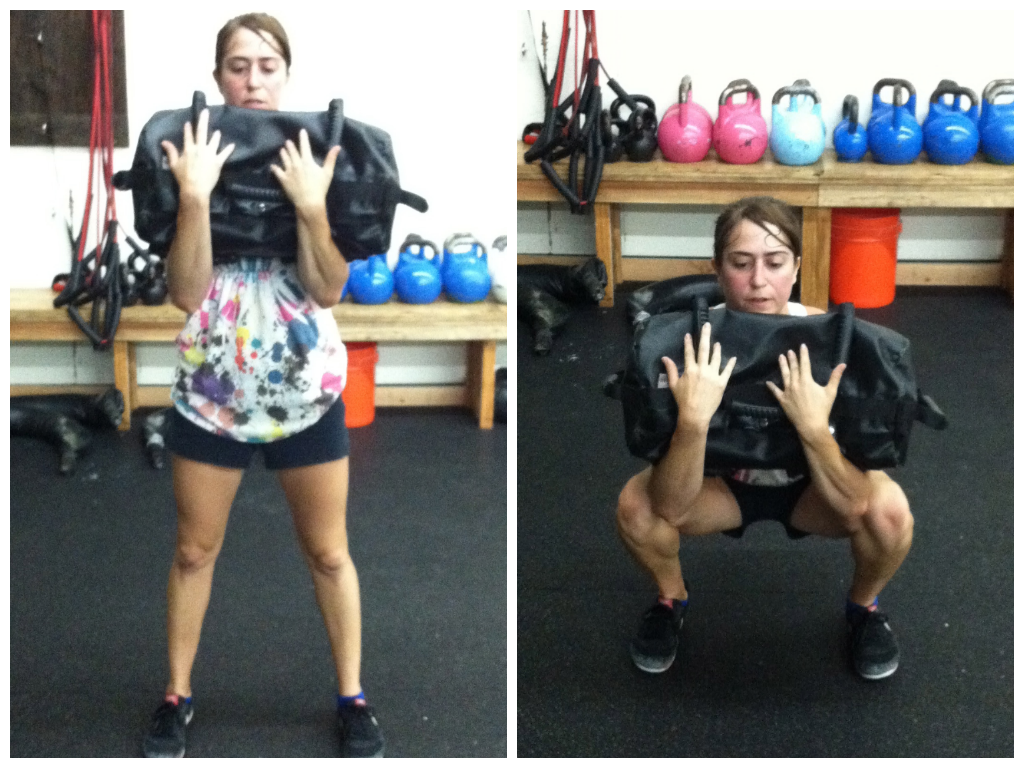
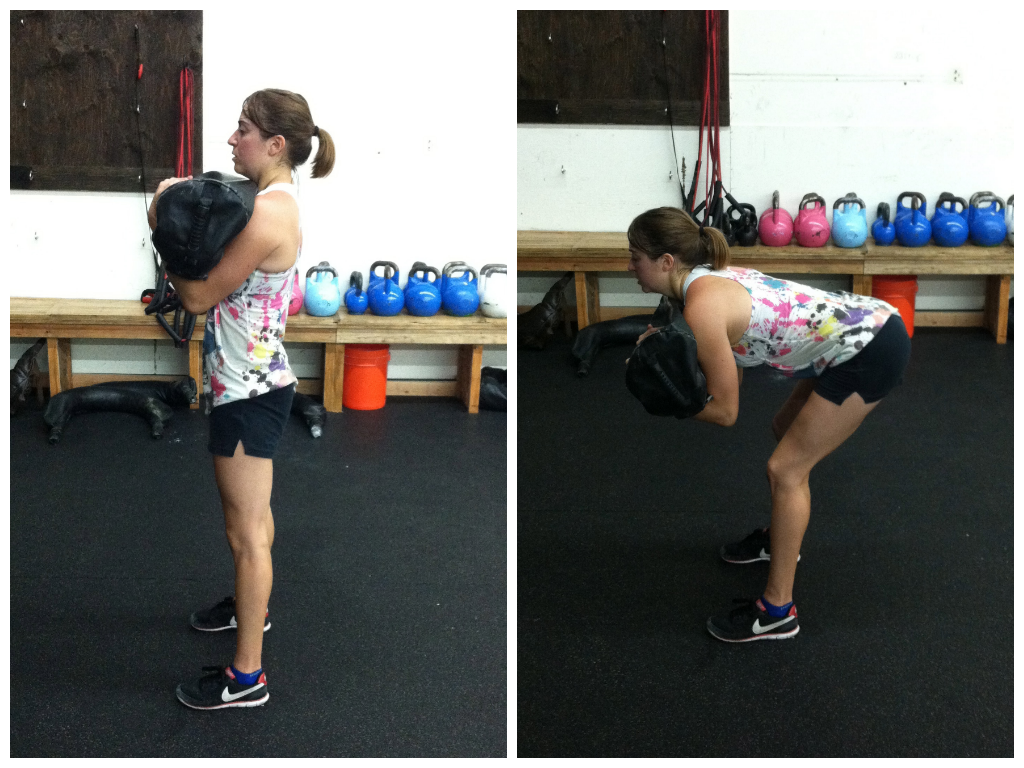
Sandbag Workout
So Sarah over at Shh…Fit Happens wrote a post about working out with sandbags the other day and it got me to thinking about all the exercises that I use sandbags for.
Sandbags are a great way to add weight to any move because the weight is AWKWARD. They aren’t like barbells and dumbbells. They aren’t easy to grip and the weight can shift from side to side as you lift it. They are super functional and force your core to really engage to stabilize.
They are a great way to add variety to the same basic moves that you are already doing. Like I mentioned in my post Sunday…Mix up your resistance to make moves more challenging.
So below is a great Sandbag Workout:
WARM UP
Dynamic stretches and locomotion to get the entire body warm. Don’t forget to foam roll any tight areas!
STRENGTH:
3-5 rounds of each superset. Complete all rounds of each superset before moving on to the next one.
Reps: 5 for maximal strength (advanced lifters), 8-12 for hypertrophy (advanced and intermediate), 15-20 strength endurance (beginners, recovery week or just working on strength endurance)
1.
Squat (Do not round forward with the front loaded weight!)
Overhead Press (Do not arch your low back)

2.
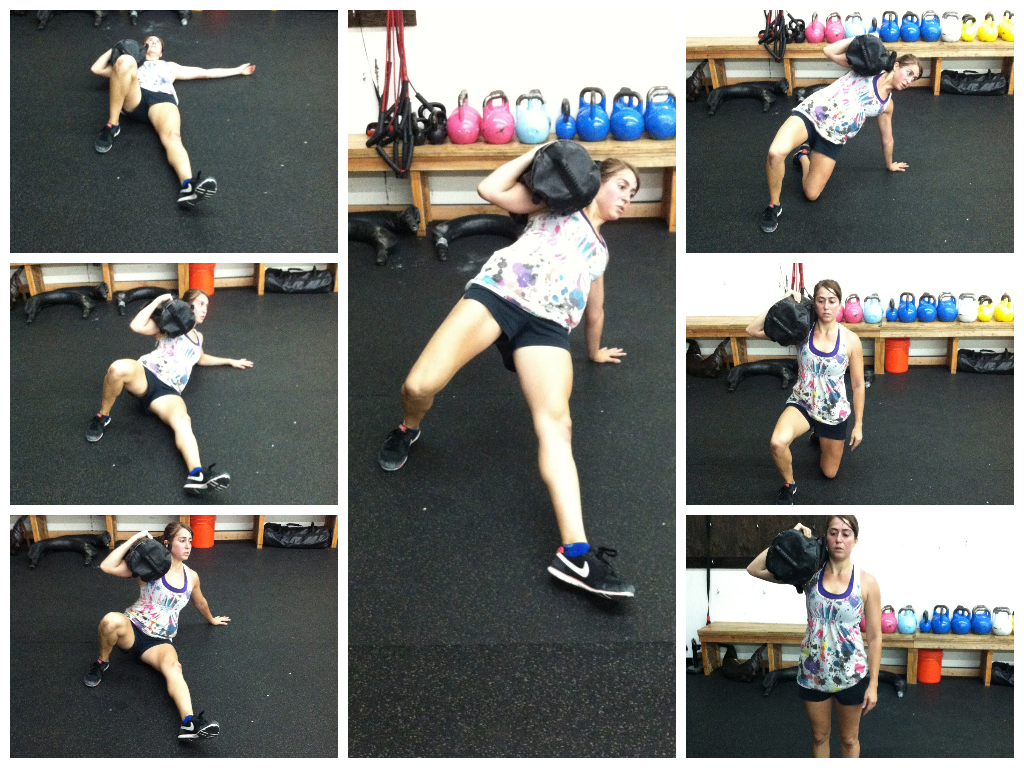
Lunge with Rotation (Do not let the sandbag go back too far on each side or it will catch and do not ROUND forward. Start on one side step the back foot forward and swing the bag to the other side as you lunge back.)

Row (Nice flat back. Knees soft.)

3.
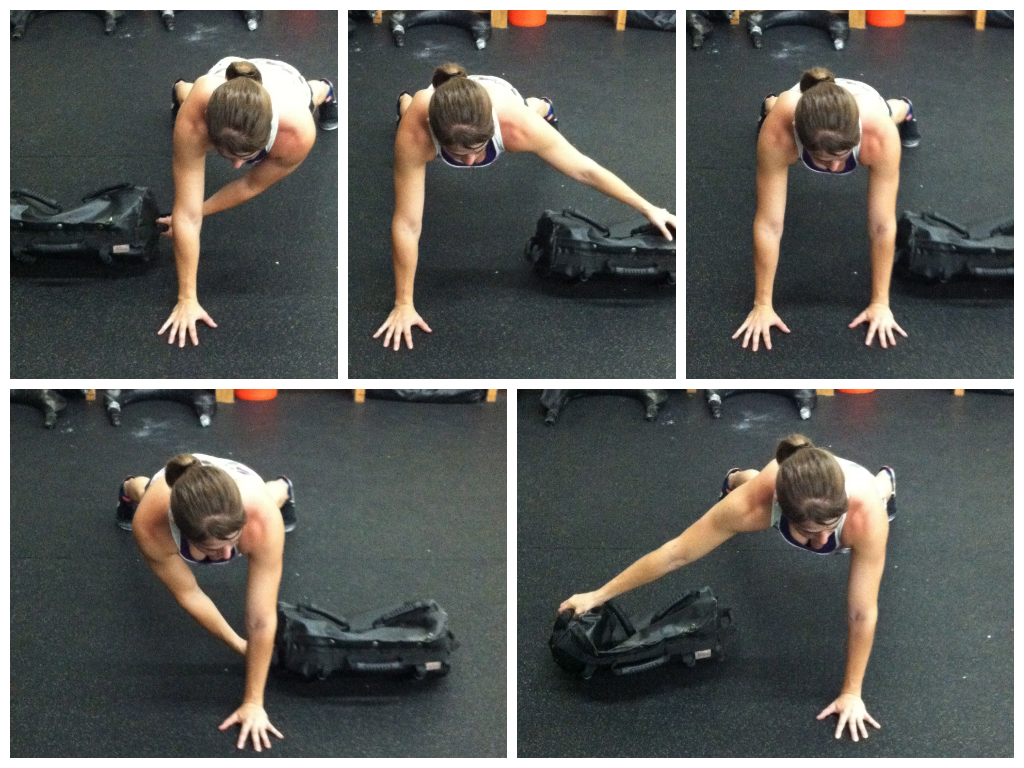
Sandbag Get Up (Will want to do 1-5 reps per side for everyone. The Get Up is doing all the steps to stand up and then following all the same steps to go back down.)
Plank with Pull Thrus (Keep hips from rotating or going up or down)
COOL DOWN
Stretch and foam roll all tight areas!
Bonus Moves:
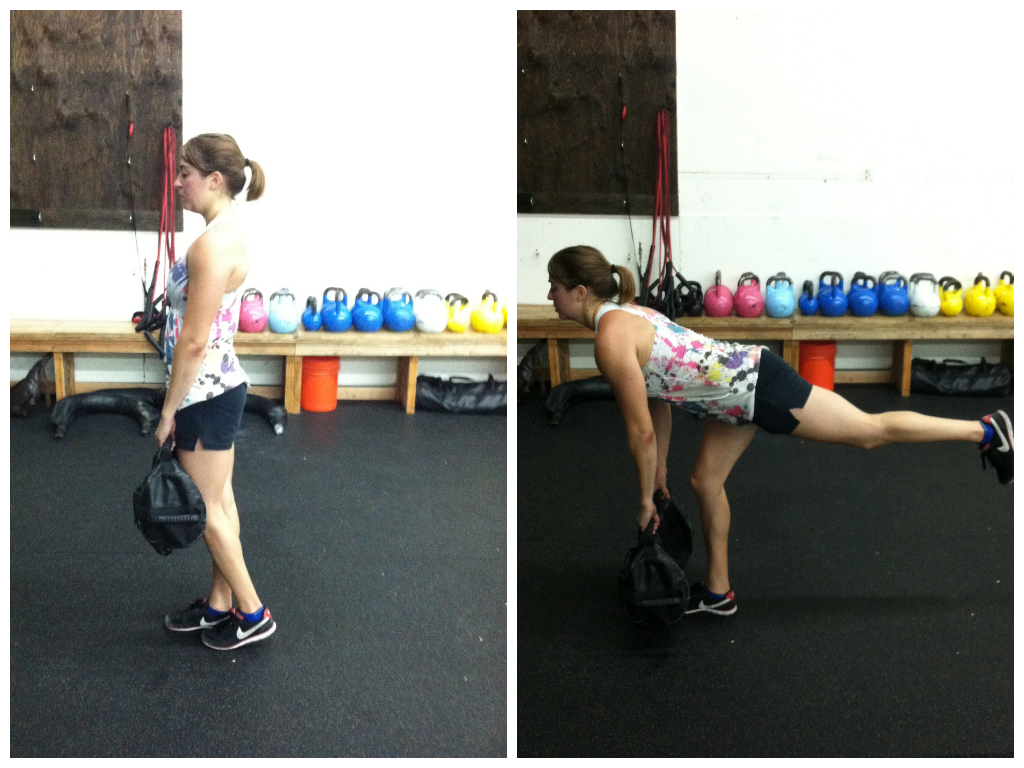
Single Leg Deadlift (Keep the standing leg soft and your back flat)
Goodmorning (Keep a flat back)
Crawling with Sandbag Pull (Sit back into your heels and perform a hip hinge to drive the sandbag forward. Don’t just pull with your arm.)

I also want to note that I’ve only demonstrated one variation of these moves. Squats can be done with the sandbag held the long ways up and down (Bear Hug) or even on one shoulder. Loading on one shoulder forces the core to engage even more (which as I mentioned on Sunday, asymmetrical loading is a great way to keep your workouts challenging!).
Deadlifts can also be done in a “suitcase” style where you hold it on one side. This is a great way to progress the single leg move (again ASYMMETRICAL LOADING!).
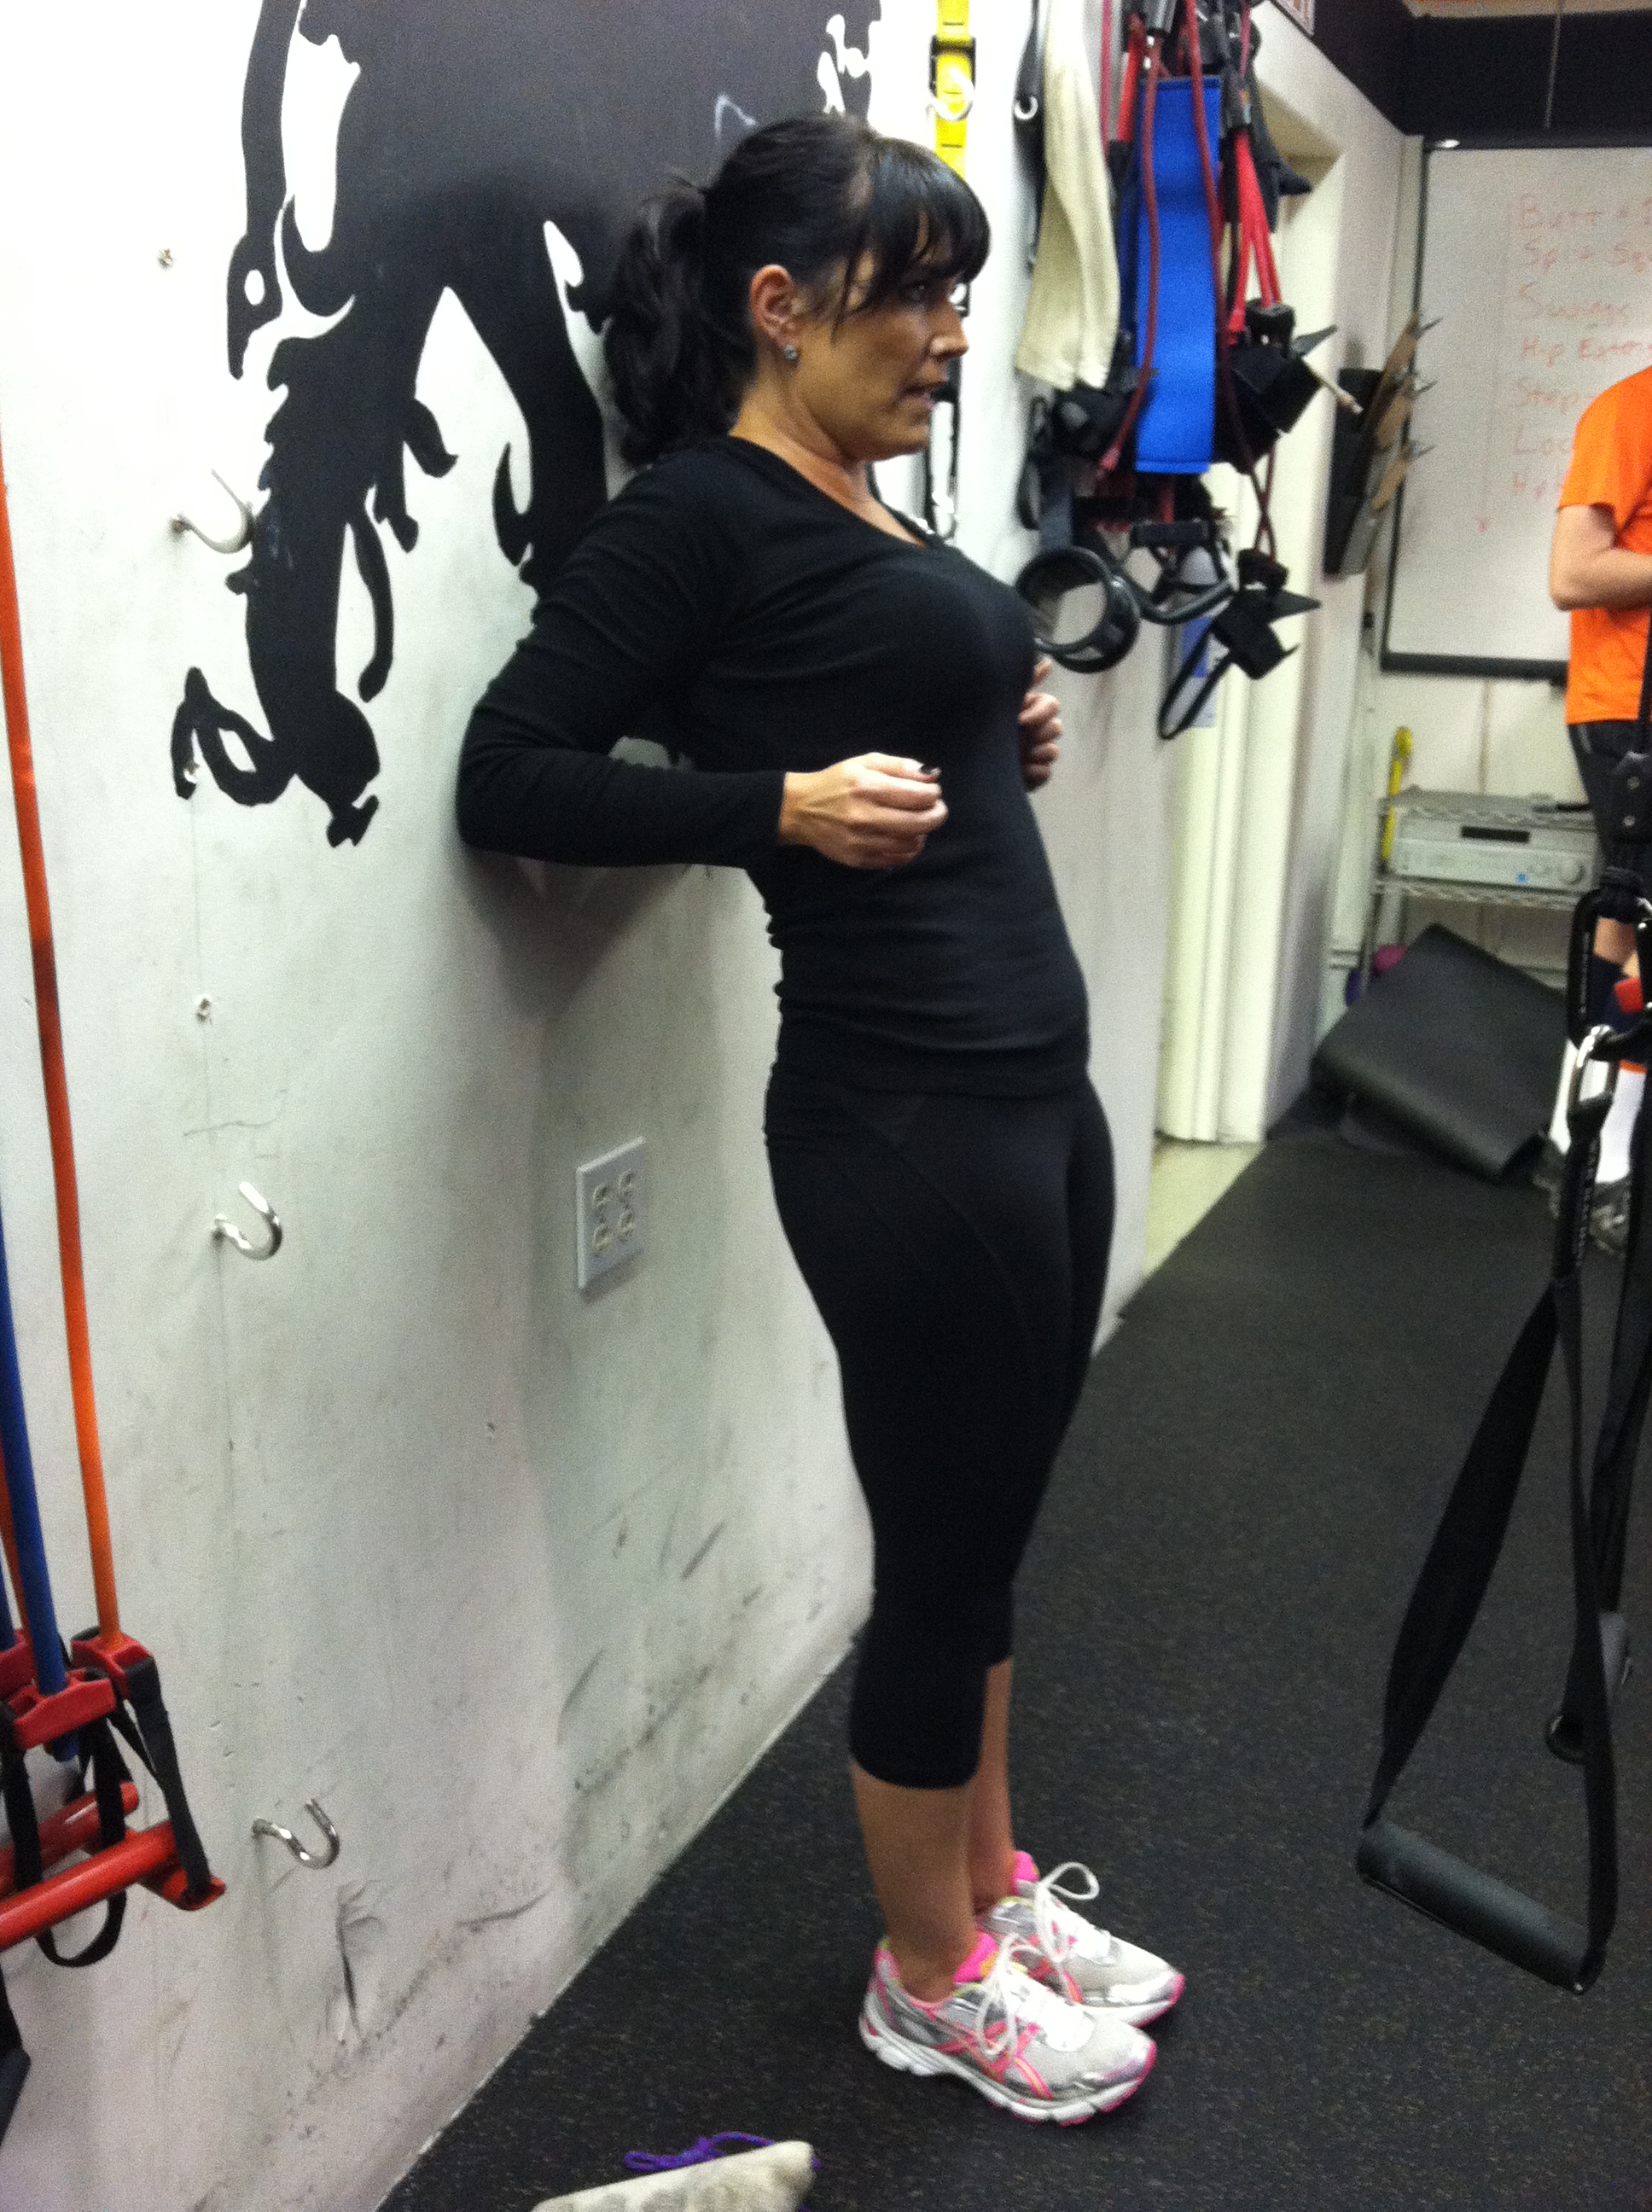
Note: Sorry for the pictures. I do not “glow” or “glitter” when I workout….I SWEAT!
BONUS WORKOUT:

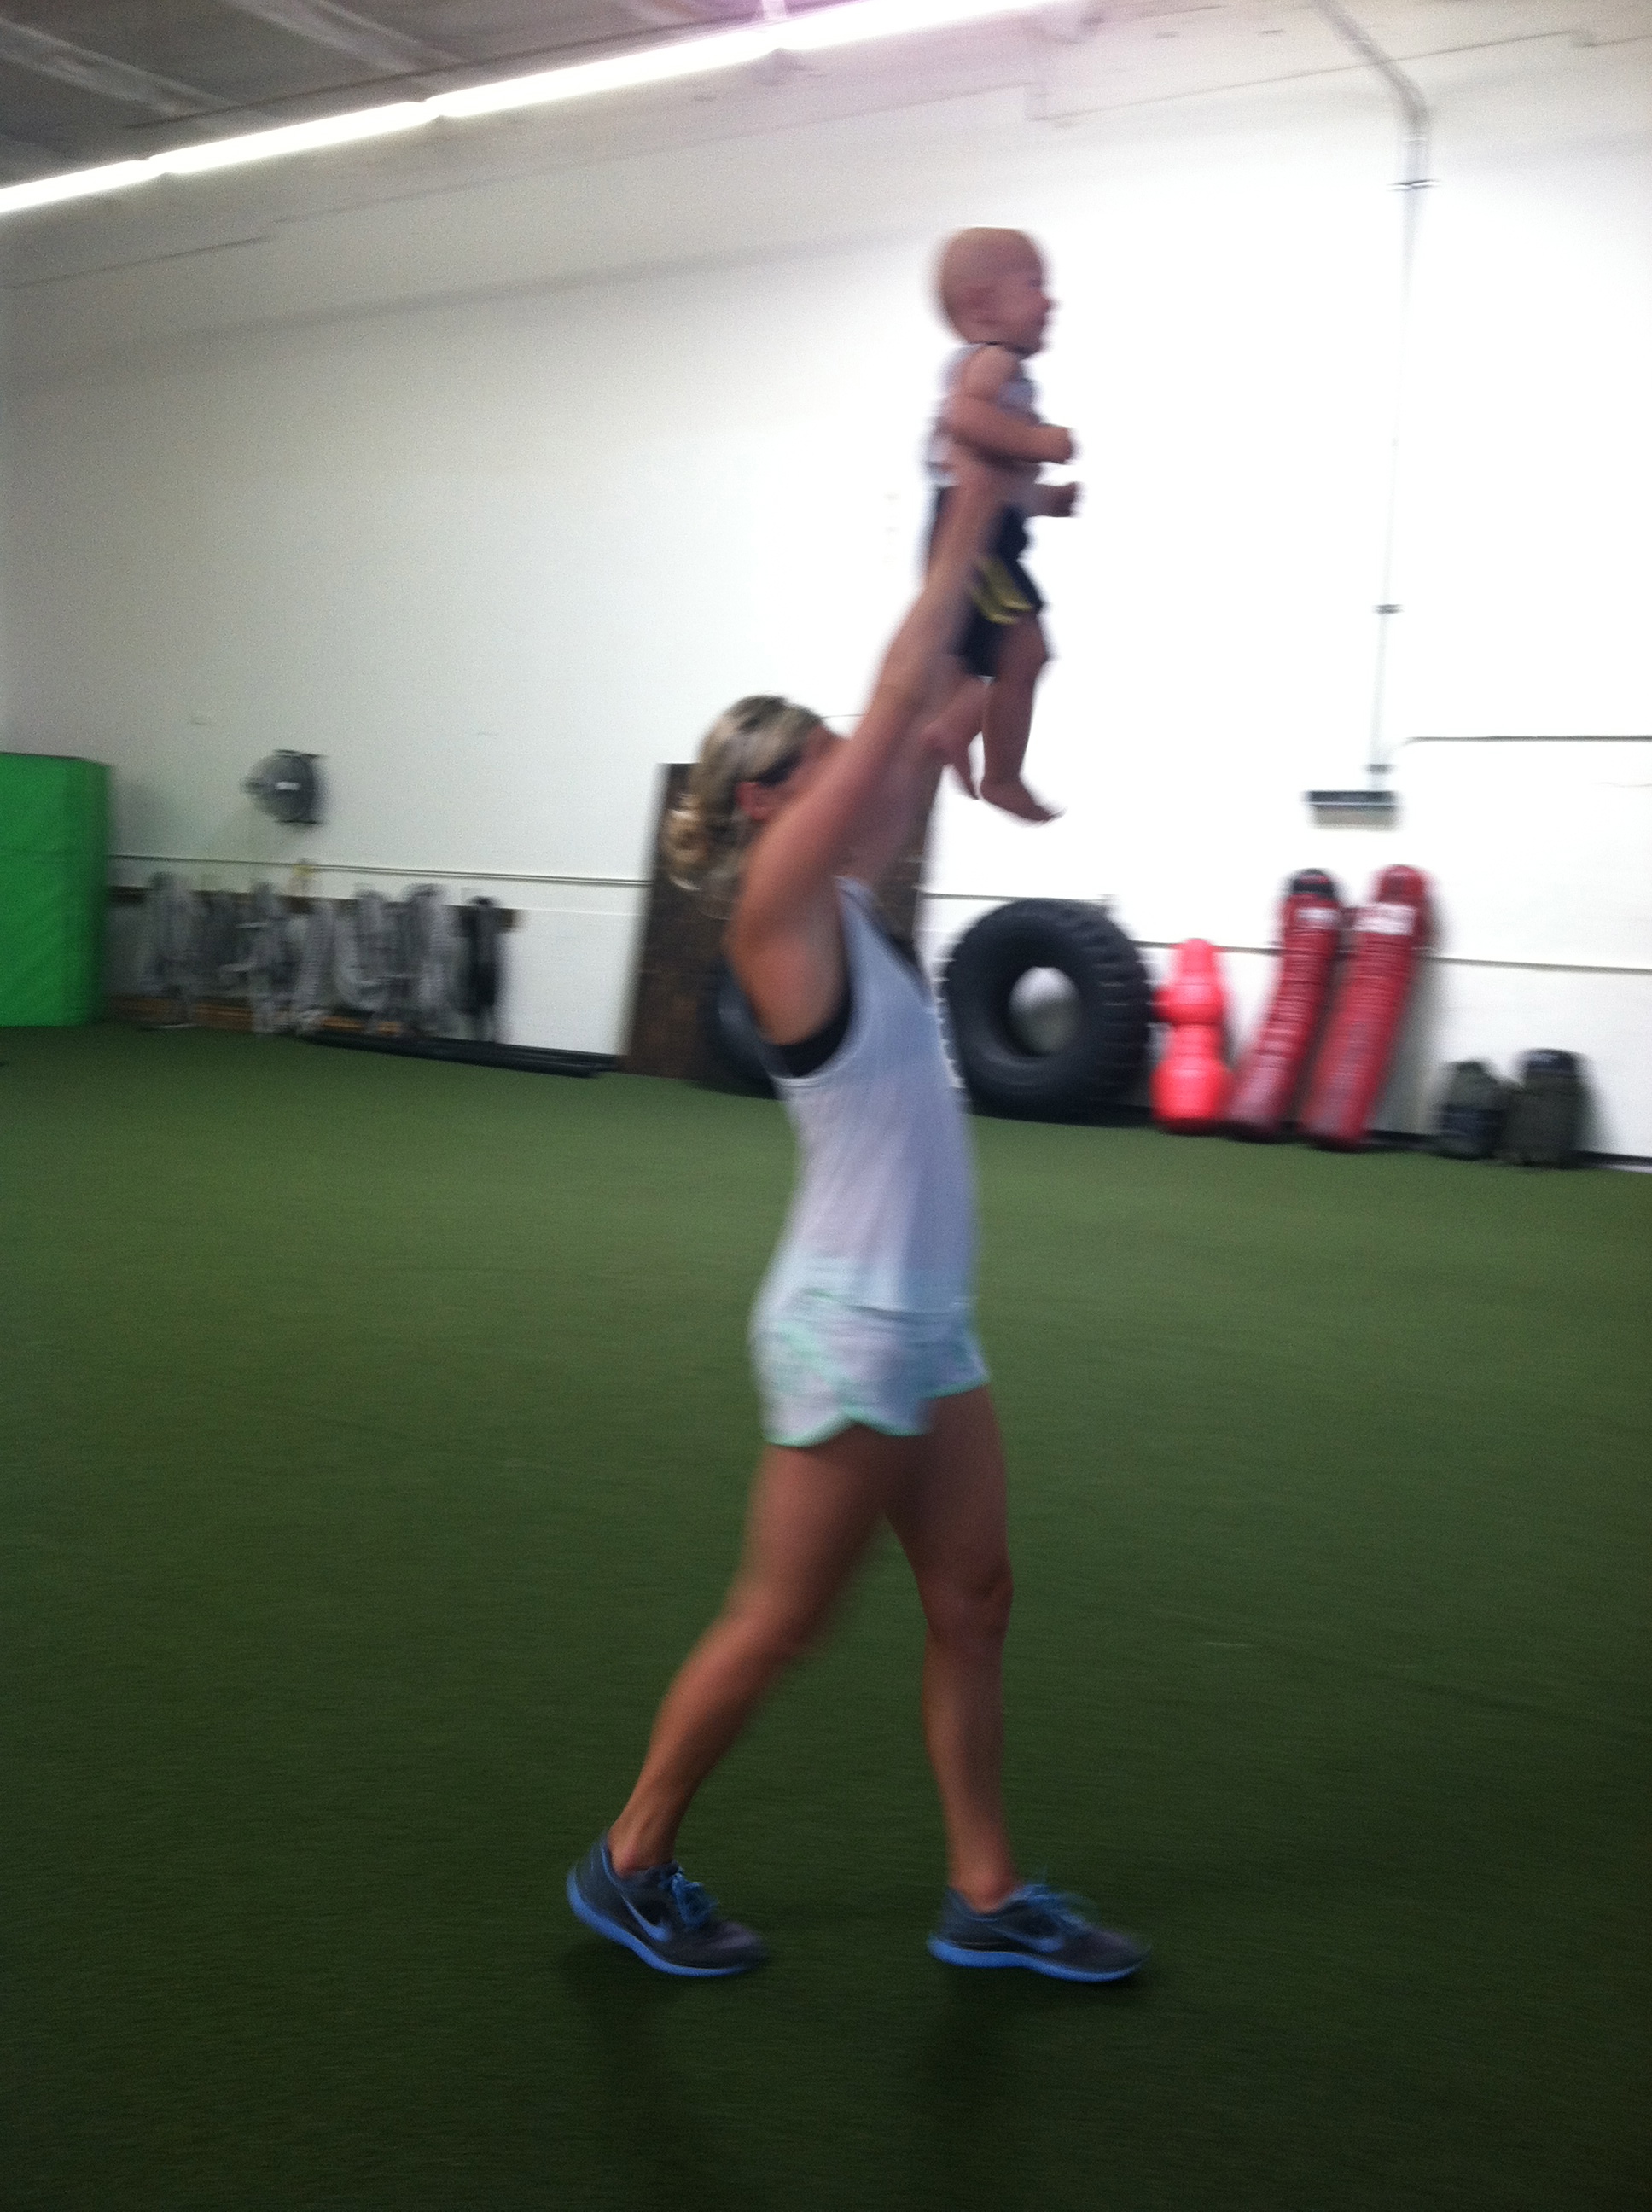
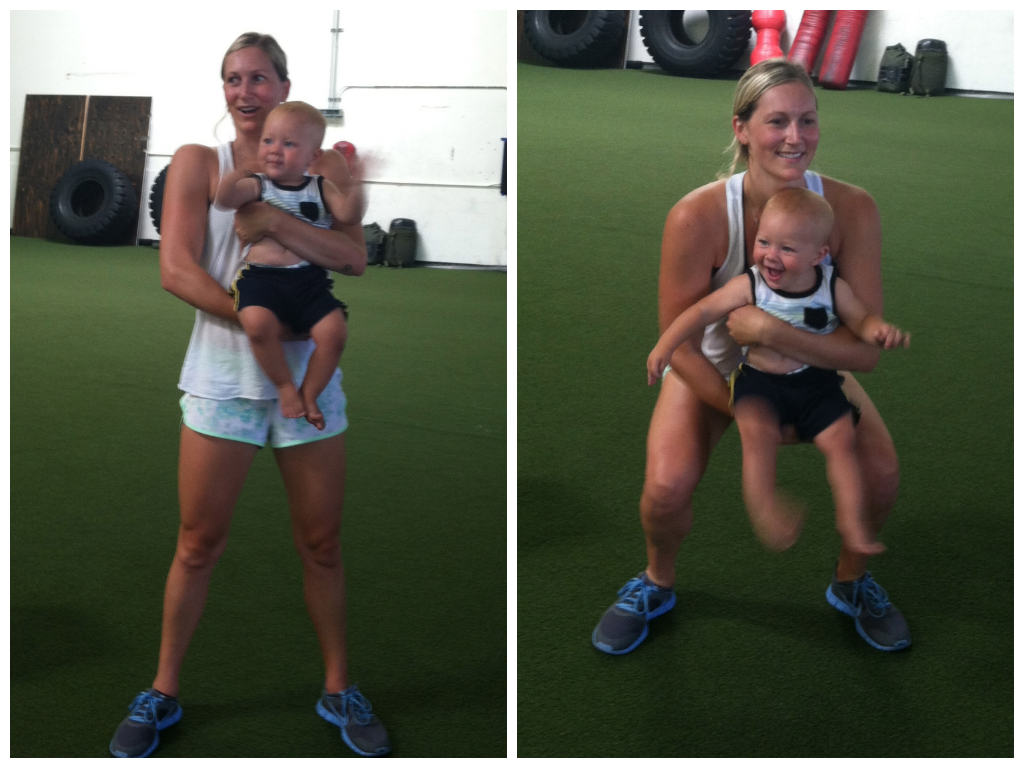
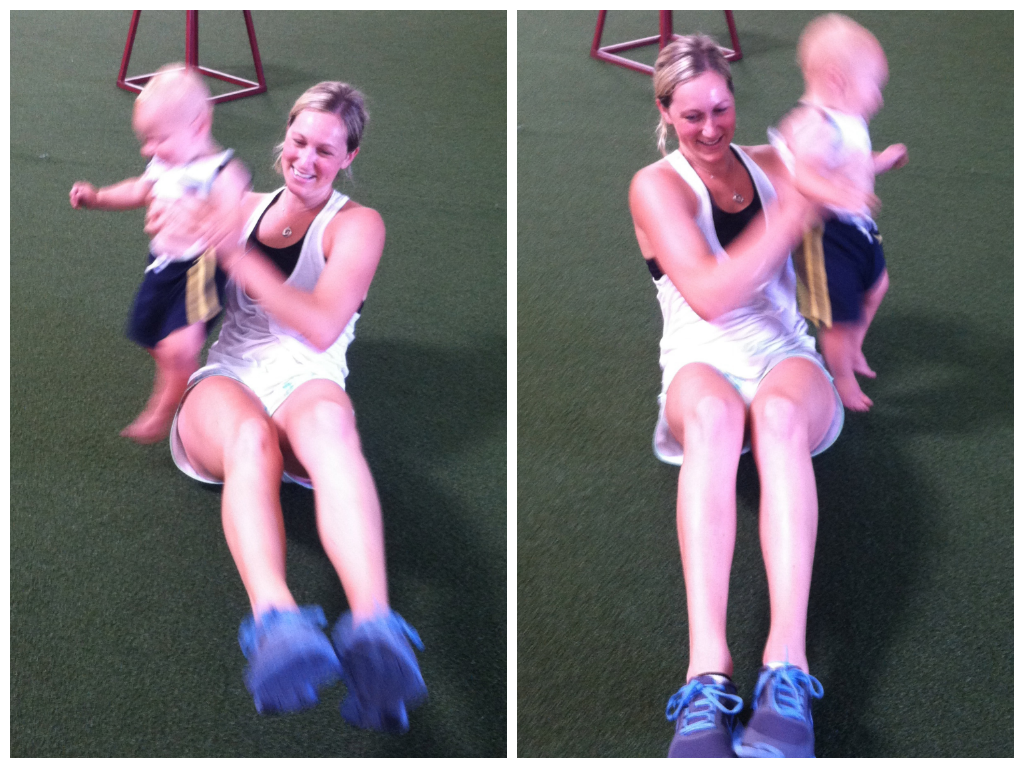
Mommy and Me Workout
Happy Friday!
Yesterday, one of my beautiful soon to be sister in laws, Jamie, and her baby, my nephew Cooper, came in to workout.
Cooper seriously loves the gym.
He sees it as one big playroom. He is obsessed with balls and we have balls in every shape, size and color all around the gym.
The last time Jamie brought him in when she worked out, I carried him around as I coached so that she could workout undistracted. (Actually I grabbed him up and ran off with him before Jamie even had a chance to put him down….)
Today though she joined me during my workout with a group so I didn’t really have the chance to watch him.
And, of course, she couldn’t just put him down and allow him to crawl around because then he wouldn’t literally get into everything. And trust me…he is one fast bear crawler!
So because babies get into everything and Mommies need a chance to workout, here are some great Mommy and Me exercises demonstrated by the beautiful Jamie and Cooper! (I think Cooper had even more fun than Jamie did!)
Mommy and Me Workout:
Make sure to first roll out any tight areas and stretch and warm up. Then get ready to have some fun!
Strength:
3-5 Rounds:
10 reps each side Baby-weight Step Ups

30 seconds Baby-weight Overhead Carry
Walk and hold overhead
15 reps Baby Front Squats
15 reps Baby-weight Lying Chest Press

10 reps Baby-weight Squat to Press
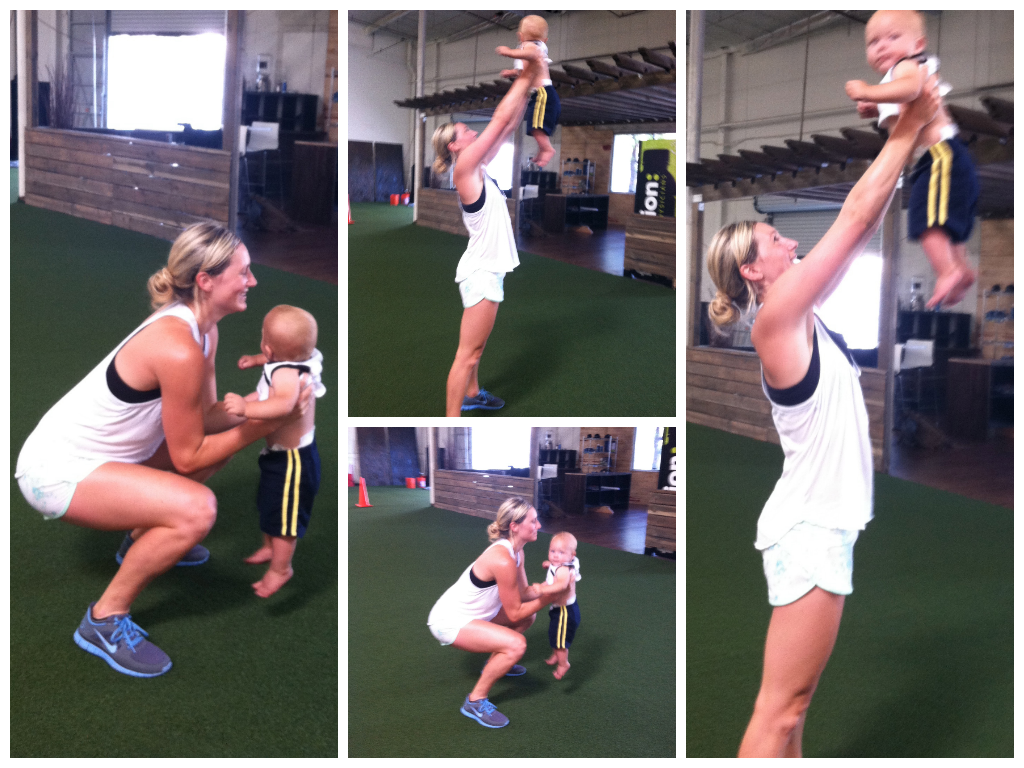
10 reps each side Baby Russian Twists
Conditioning:
3-5 Rounds:
20 seconds Bear Crawl Race
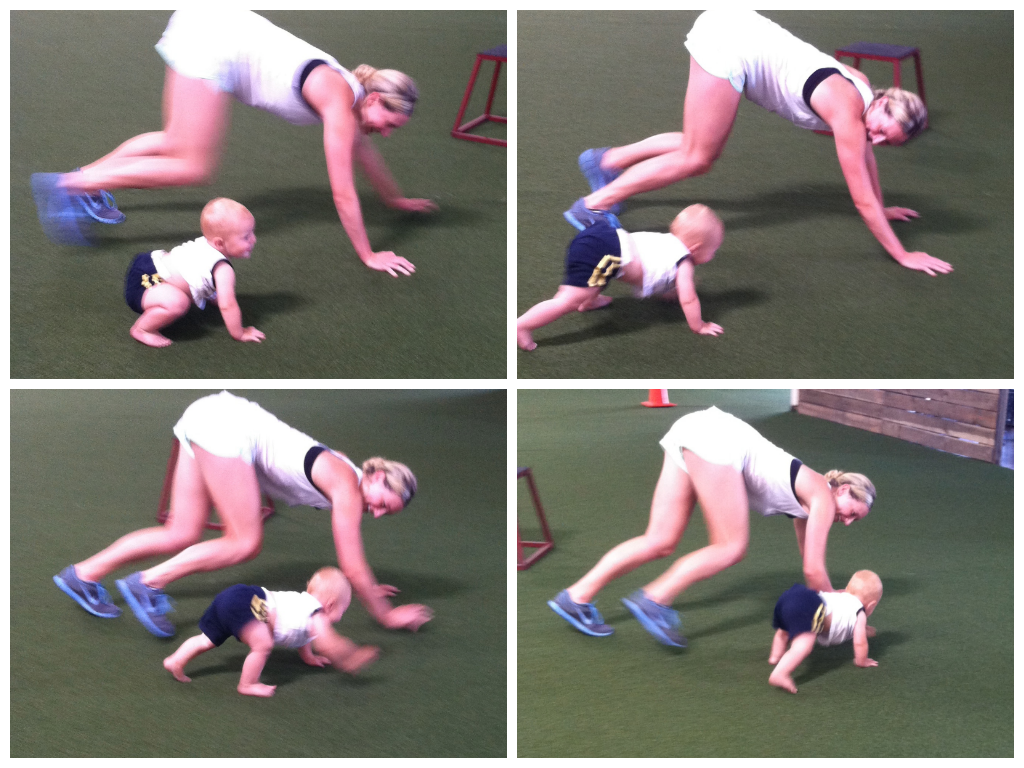
10 seconds rest
20 second Baby-weight KB Swings
10 seconds rest
A seriously fun workout. And probably the best part of all was that Cooper just learned how to clap so he kept cheering Jamie on!
Redefining Strength – Empowerment through exercise
So over the last year, I’ve thought a lot about what Man Bicep stood for in my life and the life of my clients.
It wasn’t about powerlifting. It most definitely wasn’t about running. And it wasn’t even about a specific diet.
It was about doing something….anything…that made you feel healthy and strong. It was about working out to feel empowered.
It was about taking on new challenges and feeling like you COULD do anything.
It was about redefining what strong really means.
And so I started considering what could really make us feel more empowered. And I began developing workout programs based around this principle.
I believe that working out can be an outlet, a release. I believe it can help us build confidence in a way few other things can. Overcoming physical challenges – lifting more or running further than we thought possible – is just about the most empowering thing you can do.
So I created “Redefining Strength.”
Right now the site has a few products that I’m giving away. I spent a lot of time considering what would be most helpful and supplement everything that I post here, on Man Bicep.
If you go over and subscribe, you will get 4 different reports. One is bodyweight exercises that can be done by beginners and advanced a like. They are basically exercises you can do anywhere and get a full body workout.

Handstand progression…I show you ways to progress up to one!
You will also get a list of 10 Simple Diet Changes. Be you vegetarian or Atkins dieter, there are tips on there that EVERYONE needs to follow.
I also spent a lot of time creating a foam rolling video library and cheat sheet. I believe that foam rolling is one of the most important things when it comes to moving well and feeling great. I even included some foam rolling videos that show you how to roll out even if you don’t have any of the fancy trigger point equipment.
And last, but not least, you will get a goal setting sheet. I debated about putting this one in since many of you will skip it. But honestly, goal setting is one of the best things you can do for yourself.
I know it’s cheesy. I know it’s boring and seems stupid. But trust me it’s worth the time if you really set goals that MATTER.
Goals that MATTER are what keep you committed even through the roughest of times. Goals CAN be motivating and keep us on course.
You just have to set goals in a way that don’t allow them to fall by the wayside like most people’s New Years resolutions!
So head over to Redefining Strength and check out those four guides and the video library. I hope it gets you as excited as I am for the programs launching in August!
As always, if you have any questions, feel free to email me at manbiceps@gmail.com.
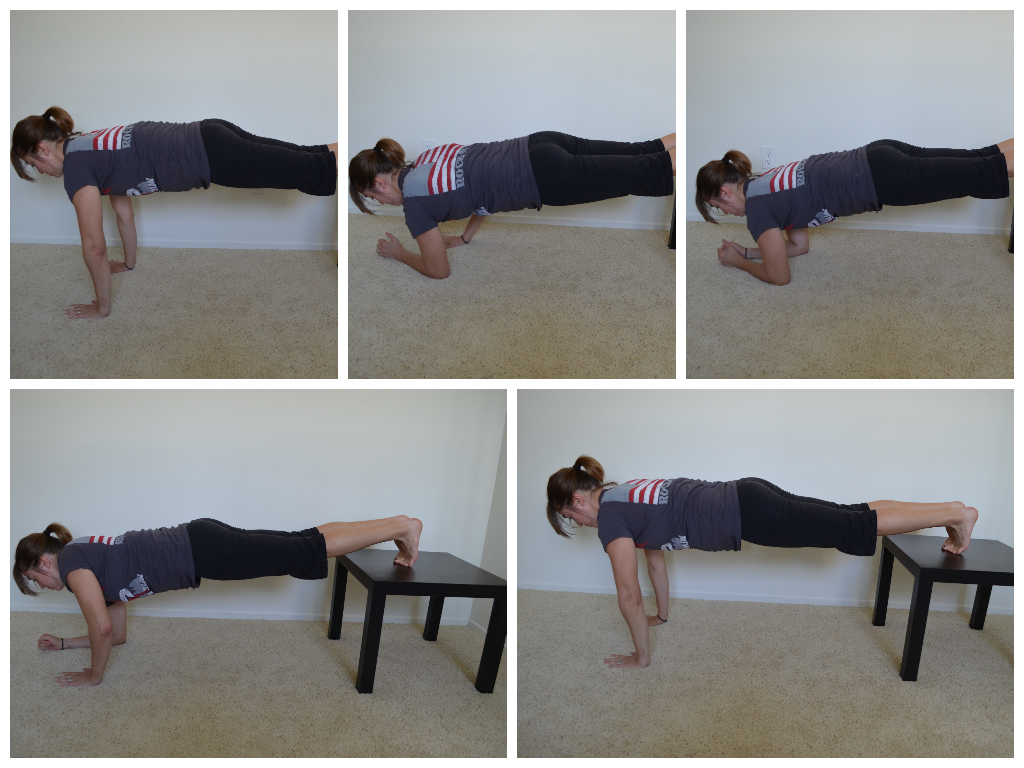
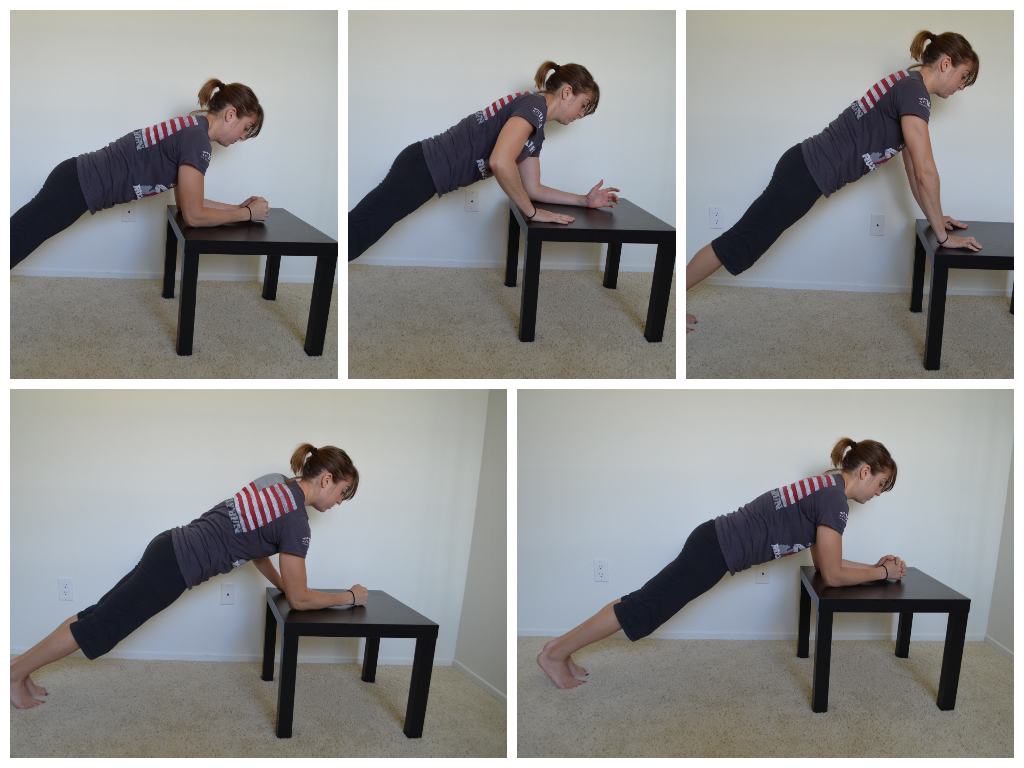
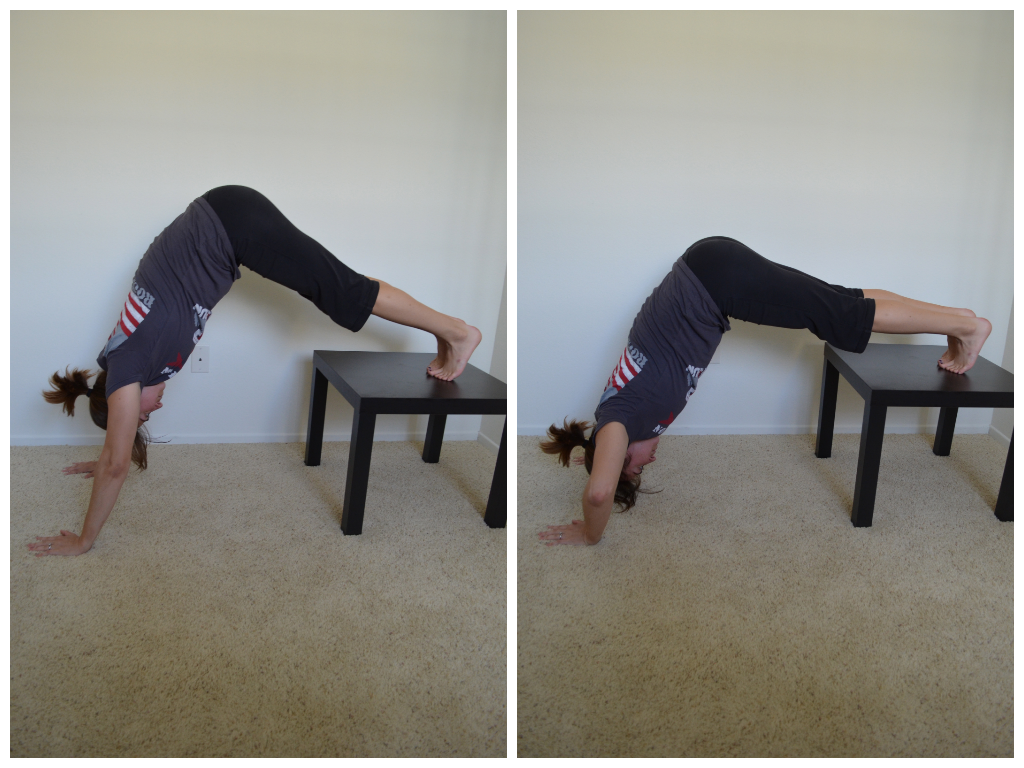
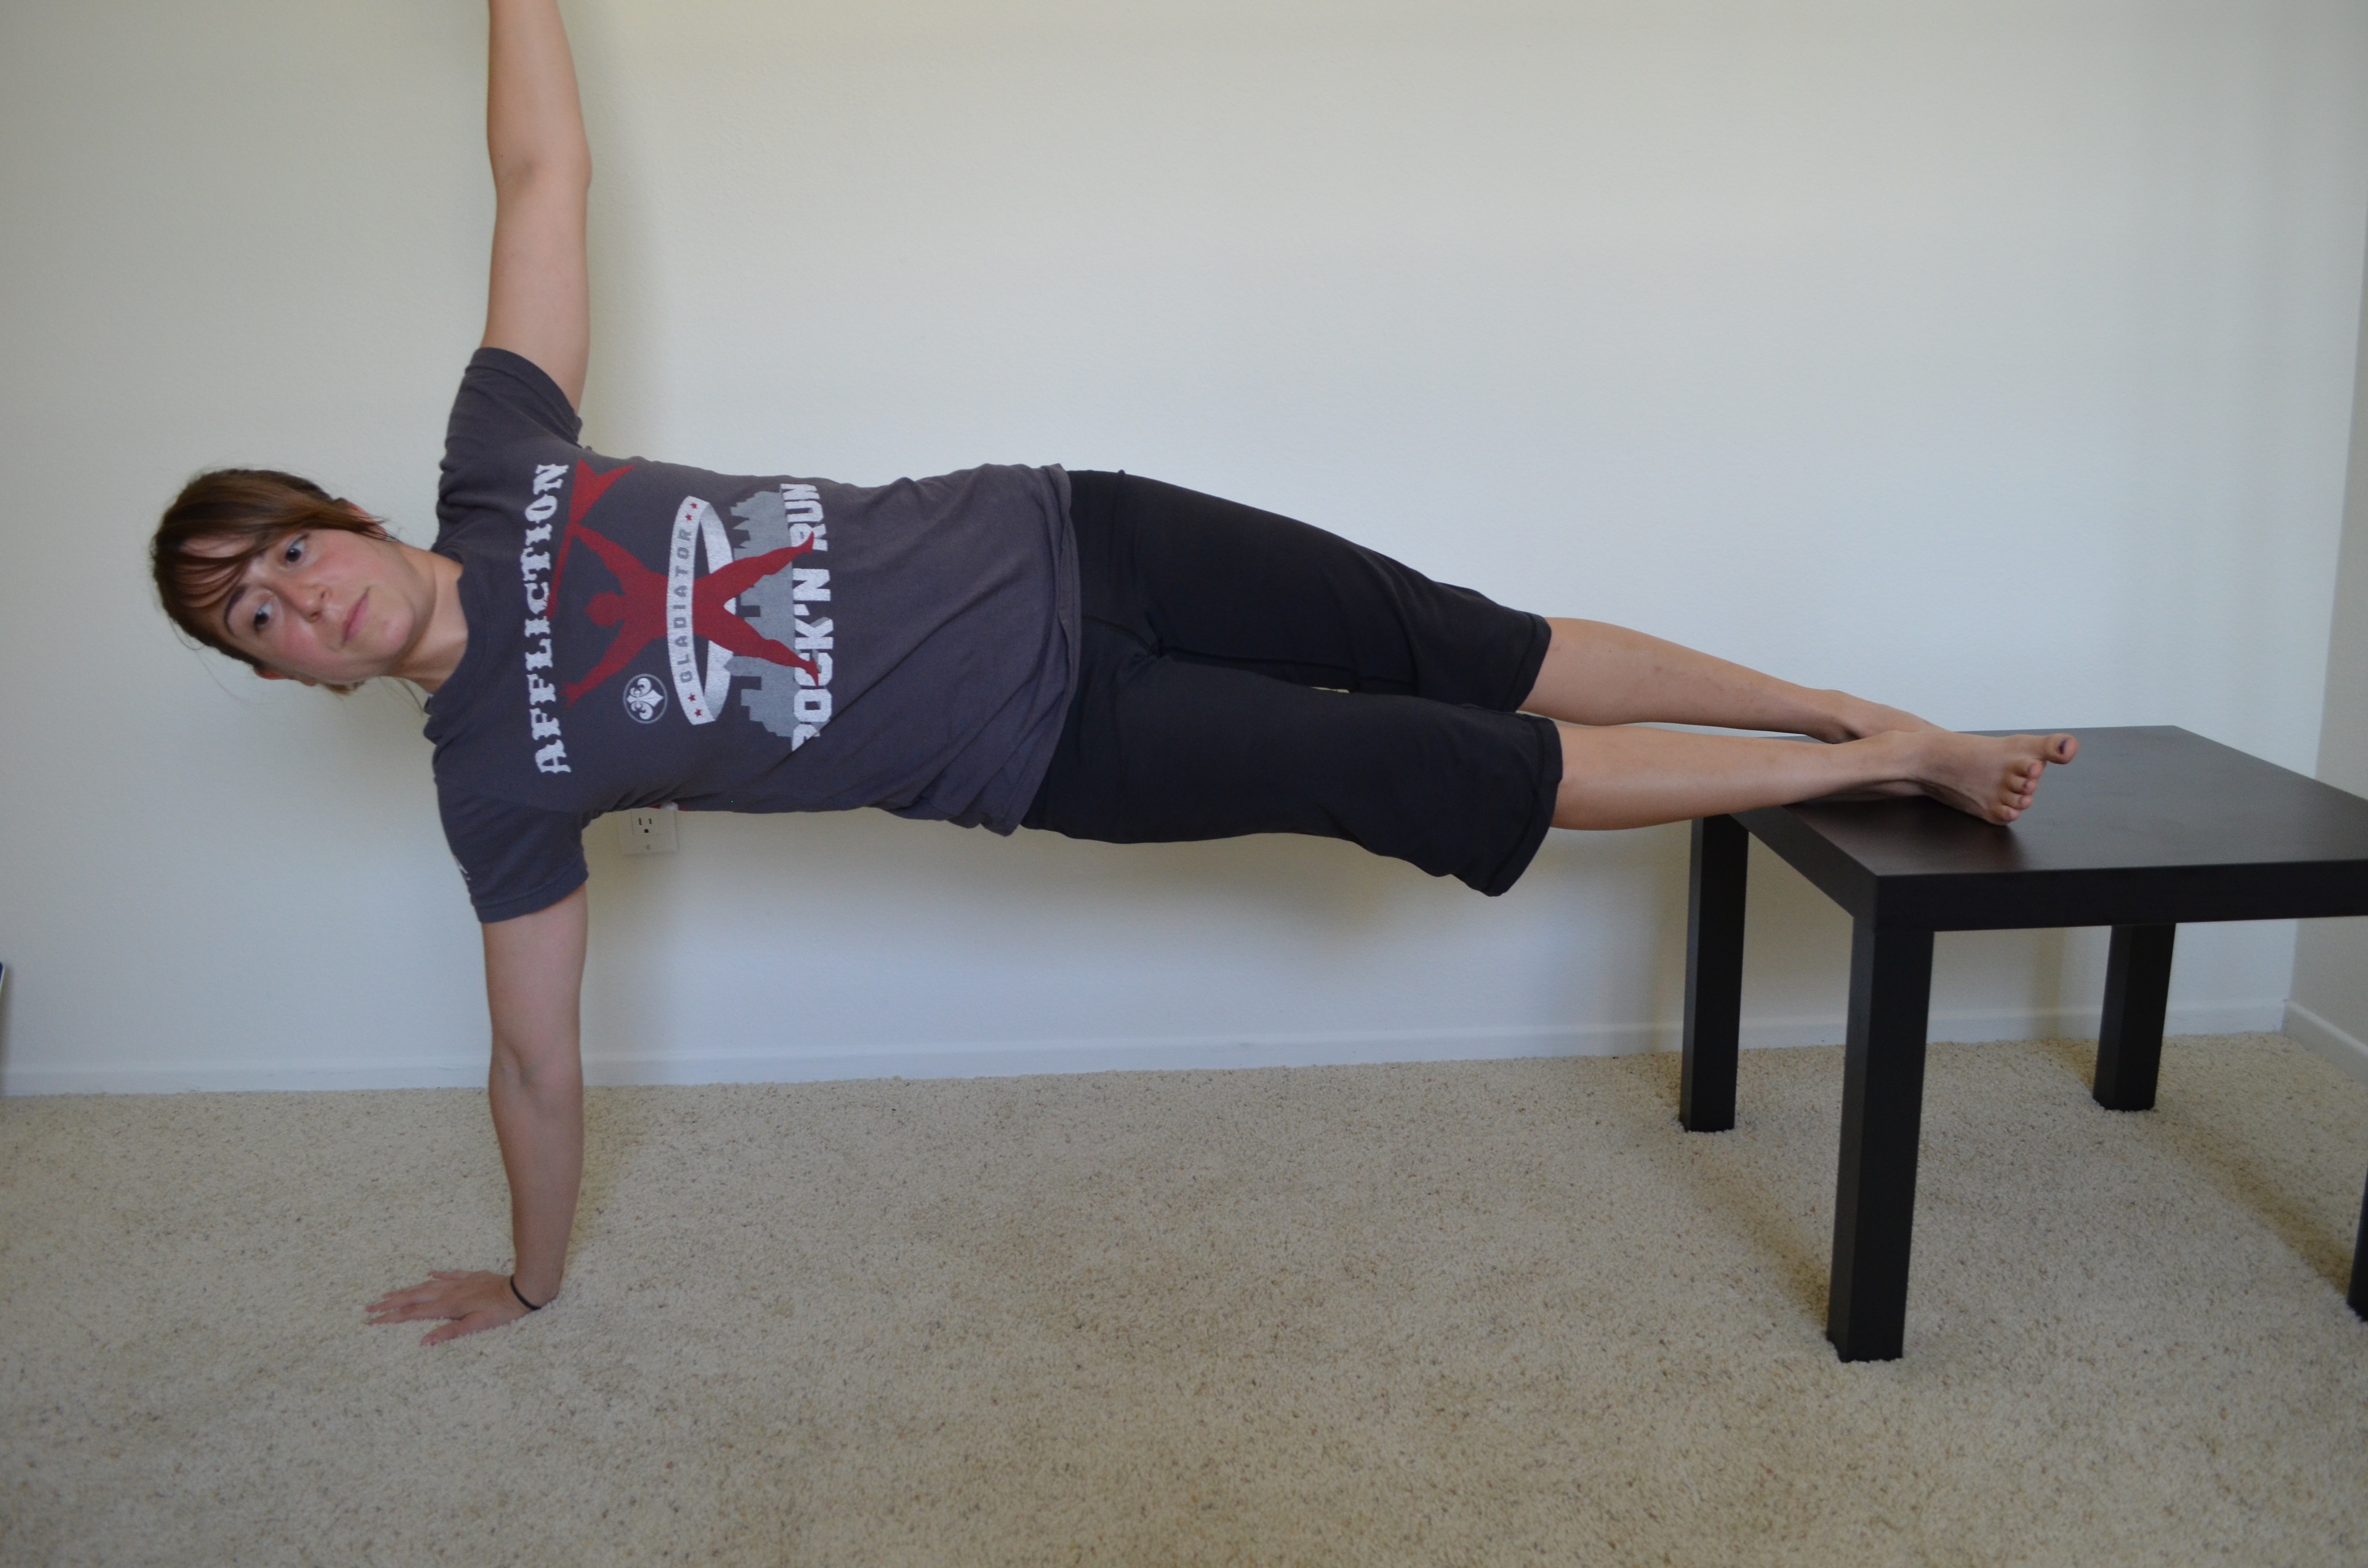
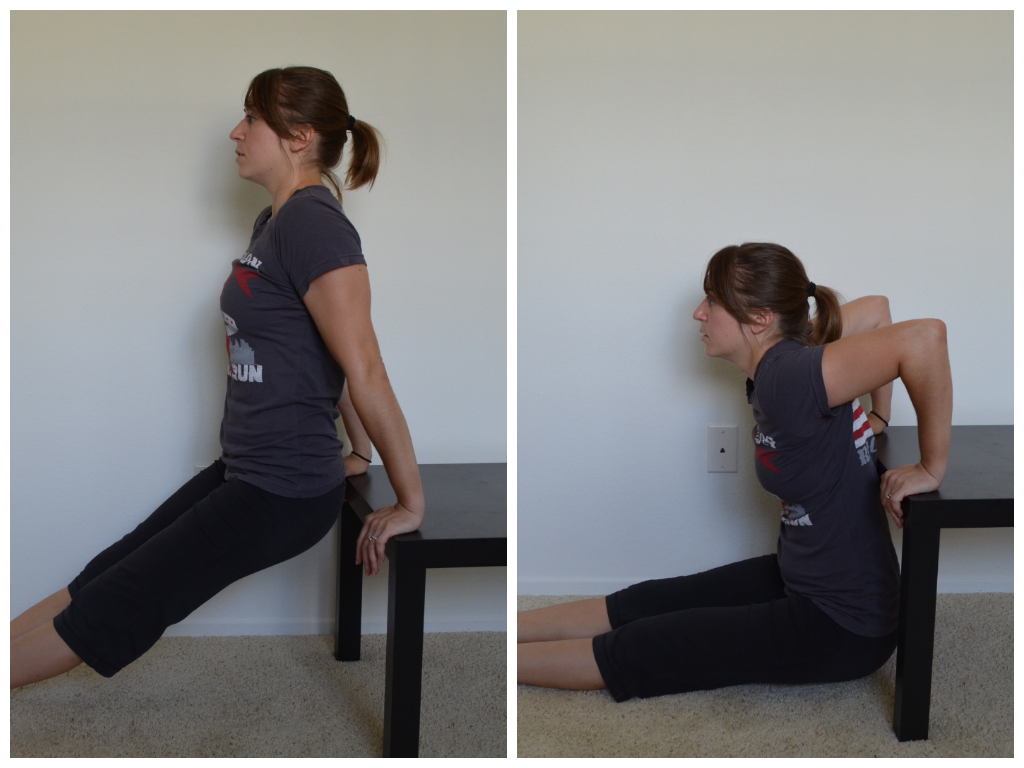
Home Workouts – 10 Moves You Can Do With An Ikea Table
So yesterday when Ryan and I were doing some foam rolling stuff, I used a table for a couple of the moves.
It was just our little $10 Ikea table, but it was amazingly sturdy considering I put it together…Although that may be better than if Ryan put it together…Sorry Ryan…But it’s true…
Anyway, when I used the table, Ryan said to me, “I wonder if you could do a full body workout with just that table?”
My answer, “You totally could!”
Here are 10 moves you can do with just a cheap little Ikea side table! Love you Ikea! 🙂 (The moves are in no particular order)
1. Decline or Incline Push ups – You can make the push up easier or more advanced using the table. To make the push up easier, put your hands on the table and then perform the push up from your knees or toes. Doing the push up from your knees will make it easier than from your toes. To advance the push up, put your toes on top of the table.
2. Balance Lunges – The balance lunge is a great leg move to do if you don’t have weights. Place your back foot up on the table and hop your front foot out so you are in a nice wide stance. Then lunge down, dropping your back knee toward the ground. Really sit back into the lunge. Make sure you aren’t going forward and that your front knee is not going past your toe. You should feel a nice stretch in the front of the leg that is back when doing this move.

3. Single Leg Squats – This table is a great way for beginners especially to start working on their pistol squats. It is also a great way to really correct imbalances since you are working legs individually. If the table is too low for you at the beginning, start with a two-leg squat to bench. Then progress to one leg. Beginners can completely sit down on the table. As you advance, try to only barely tap the table with your butt before standing up. Do not rely on sitting on the bench to stand back up.

4. Incline or Decline Climbers – These aren’t mountain climbers. With climbers you are working your shoulders and triceps. Beginners should start in a plank position with their forearms on the table. Next climb up one hand at a time until you are at the top of a push up position. Then climb back down to complete the rep. Advanced exercisers should do this move with their feet elevated on the table instead.
5. Glute Bridge off table – A great way to advance the glute bridge is by putting your feet up on the table. You can do either a double leg glute bridge, which is a bit easier, or a single leg bridge, which is a bit more difficult. Start by lying on the ground with your heels on the table. Your butt should be close to the table. Arms are bent to 90 with elbows driving into the ground. Squeeze the glutes and drive through the heels, lifting your hips as high as you can in the air. Keep your core tight and glutes squeezed. You should not feel this in your low back. To make the move even more beneficial, hold each rep at the top for 2-5 seconds.
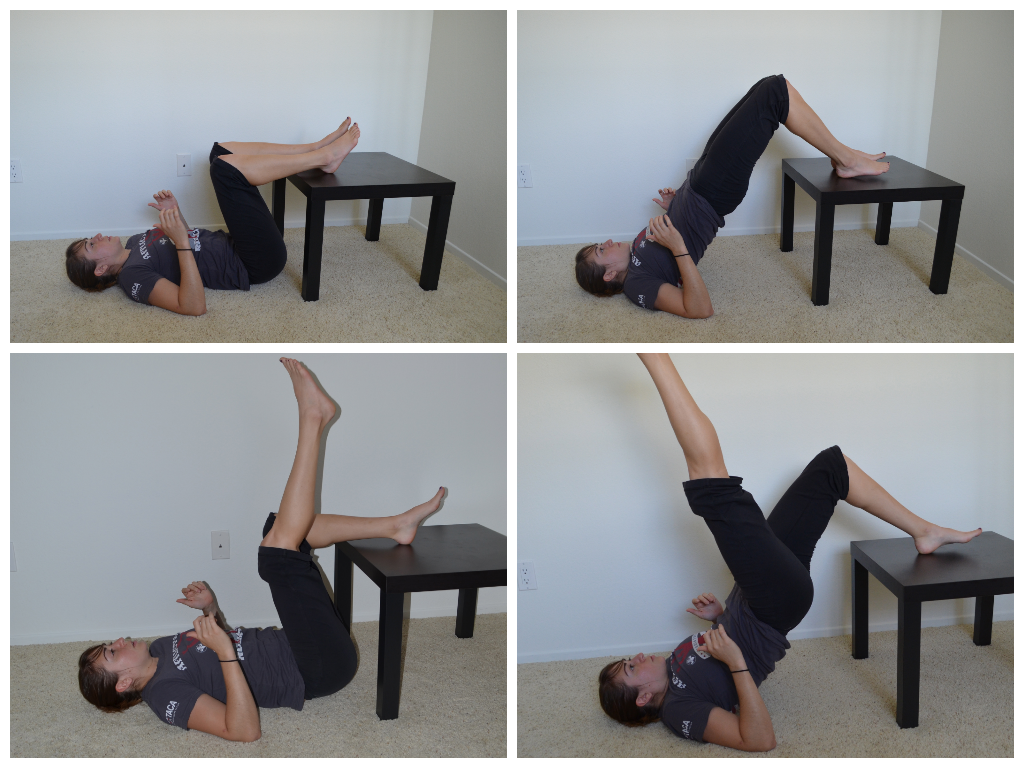
6. Handstands – Handstands are a great upper body move. Using the table you can either do a beginner handstand hold or you can make the move more advanced by adding in a push up. To do the hold, place your feet on top of the table. Walk your hands back a bit and push your butt up towards the ceiling. Push off your toes to get as vertical as possible, creating a nice straight line from your hands, up your arms and core to your tailbone. If this is easy, add the push up in while holding this position. Drop your head down to the ground and then lift back up.
7. Plank Holds – Plank holds are a great overall core move and the table can be used to make the move easier and more difficult. Beginners can hold front and side planks with their hands on the table and feet on the ground while advanced lifters can have their feet on the table and hands on the ground.
8. Lying Bat Wings – One of my favorite moves is scapular wall holds. When playing with the table, I realized you could do the same hold while lying face down on the table. Lie down with your chest on the table. Bend your arms to 90 degrees and then pinch your shoulder blades down and back. Try to bring them together you are pinching back so hard. Hold that move. Beginners can hold for 30 seconds. Advanced can hold for up to a minute. If you want to make it even more challenging, you could add weight to each hand…even if it is just in the form of a book.

9. Reverse Hypers – A great move for the glutes and hamstrings and most easily done with a piece of equipment; HOWEVER, using a table is a PERFECT way to do reverse hypers at home. Lie face down on the table. Make sure your hips are right at the edge. Squeeze your legs together and lift your legs to basically parallel to the ground. Hold for 2-5 seconds and lower. You can do reverse hypers with either bent or straight legs. Both have their benefits. You should not feel either though in your low back. Keep the core tight and really squeeze the glutes.

10. Dips – One of the most common home exercise moves, dips can’t be ignored. Place your hands behind you on the table with finger tips hanging over the side. Beginners can bend their legs while more advanced exercisers can keep their legs straight. Drop your butt as close to the ground as possible, bending your arms to 90 degrees and keeping your back and butt close to the table. You could even make the dips harder by doing two push ups followed by two dips for 3-5 rounds. Talk about a way to smoke your triceps….
If you like these moves and have enjoyed other Man Bicep posts, I suggest you head over to my new site Redefining Strength for a sneak peek and a few great workout freebies, including a COMPLETE FOAM ROLLING VIDEO LIBRARY!
P.S. Thank you Ryan for an amazing post idea!
Recovery Workout
So on days where I don’t feel like doing yoga and my body isn’t really ready to do a full workout, I will do a “Recovery workout.”
These workouts are usually hard but focus more on postural strength and balance then on developing maximal strength or burning a ton of fat. They work on activating all the correct muscles as you work on perfecting form.
These workouts are the prep that most people need to do so that they can move well and really get the most out of their metabolic or strength training workouts.
The recovery workout below can be done on its own or shortened into a warm up for a full body workout day.
The good part about the workout too is that you can easily do it at home with no equipment even when you don’t have much time!
Workout
3-5 rounds of all the exercises below. Perform a 1 minute hold of each exercise. Try not to rest between each exercise. Try only to rest after each round is complete.
Balance on toes (So literally stand up on your toes and hold. If this is easy, balance on your toes on one foot for 30 seconds and then switch to the other foot. Stay as high on your toes as you can and don’t rock to the outside of your foot.)
Squat Hold (Squat down to parallel, not below, and hold. Focus on keeping your chest up and not leaning forward. Push the butt back and really sit into your heels. This is a great time to really assess and work on your squat form.)
Scapular Hold (So you will “lean” back against the wall with only your elbows touching the wall. The further out you walk your feet away from the wall, the harder the move will be. As you lean back with only your elbows against the wall, you really want to press your chest out and pull your shoulder blades down and together.)
High Plank Hold (So hold at the top of the push up from your hands and toes if possible. You can make this easier by doing it from your knees. Make sure to brace your abs by pulling your belly button into your spine and tucking your hips under. Don’t arch your low back or round your upper back. Keep the shoulder blades retracted and everything tight from your shoulders to your core, butt and quads.)
Glute Bridge (Lie on your back with your knees bent and feet flat on the ground. Lift your hips up as high as you can and squeeze your butt cheeks. You shouldn’t feel this in your low back. You should feel it in your glutes and a bit in your hamstrings.)
With all of these moves, you should struggle within the first 20 seconds if you are really challenging yourself. Fight to squeeze as hard as you can as you hold the moves!
Battling Ropes

Ingrid is the awesome woman in this photo who lead most of our course. So RAD! (Had to throw in some California slang!)
Yesterday I attended a Level 1 Battling Ropes Certification course.
It was AWESOME!
Honestly, it is one of THE BEST THINGS that most people AREN’T INCLUDING in their program.
Who can do battling ropes?
That is the best part…EVERYONE!
It was one of the few workouts we can all do that really has no risk of injury AND doesn’t need a lot of practice to get the “form” correct.
When we are teaching someone to deadlift, it is a slow and long process. Their joints and connective tissues have to be ready to lift the weight before they can bump up the resistance. So even if they have the muscular strength to do a weight, their body might not truly be ready to handle it. AND form is an important part of the deadlift. You have to learn the form before you can increase the weight you are using.
But that isn’t the case with the Battling Ropes. With Battling Ropes, a beginner or a professional athletes can use the same 50ft, 1.5 inch rope and get a killer workout.
Everyone’s connective tissues can handle the weight of the ropes. AND everyone can DEVELOP correct form as they do the ropes more. At the beginning your body may compensate, but as you get tired your entire body has to work together correctly to produce the force necessary to make waves all the way down the rope. Imbalances will reveal themselves AND correct themselves as people do the ropes more and more.
All of the PROBLEMS that develop or can hinder progress with traditional weight lifting can be corrected using the ropes.
And on top of that, THEY AREN’T EASY!
I can bench press, do tons of push ups, deadlift and squat heavy weights, but one minute on the Battling Ropes and my body is says, “OUCH!”
I just love it!
Battling Ropes help increase your work capacity, teach you how to use your entire body to move EFFICIENTLY and increase your power and strength. They do everything basically AND everyone can do them.
You just start by making the waves go as far down the rope as you can. That may be two feet or all the way down. As your body learns how to move efficiently and becomes stronger, you will get the waves further and further down the ropes and increase the speed at which you can produce the waves.
Start with just a minute. Each time try to go longer! Right now I have two challenges that I want to take down. Five minutes straight of the alternating arm waves (after that I’ll try 10 minutes) and then the 1 mile rope pull. Wish me luck!
If you want to learn more about Battling Ropes and the exercises you can do with them (hopefully I will have some of my own videos soon!), check out these videos by John and his crew. John’s website also has some great info on it! Our gym also has some great videos that I will link to as soon as our site is back up!
Next we will discuss some more natural movements for our body, CRAWLING. Not only forwards, but also backwards. It is crazy how hard the backwards because we never train that movement pattern YET it should be something we train since we have to do it naturally!
P.S. I thought one of the most interesting things about using Battling Ropes is that you don’t get SORE from a workout with them. Because of the constant motion and the use of only concentric and isometric contractions, you don’t get sore the next day. Fatigued, yes, but sore, no.


