Blog Archives
The Posterior Chain Pyramid
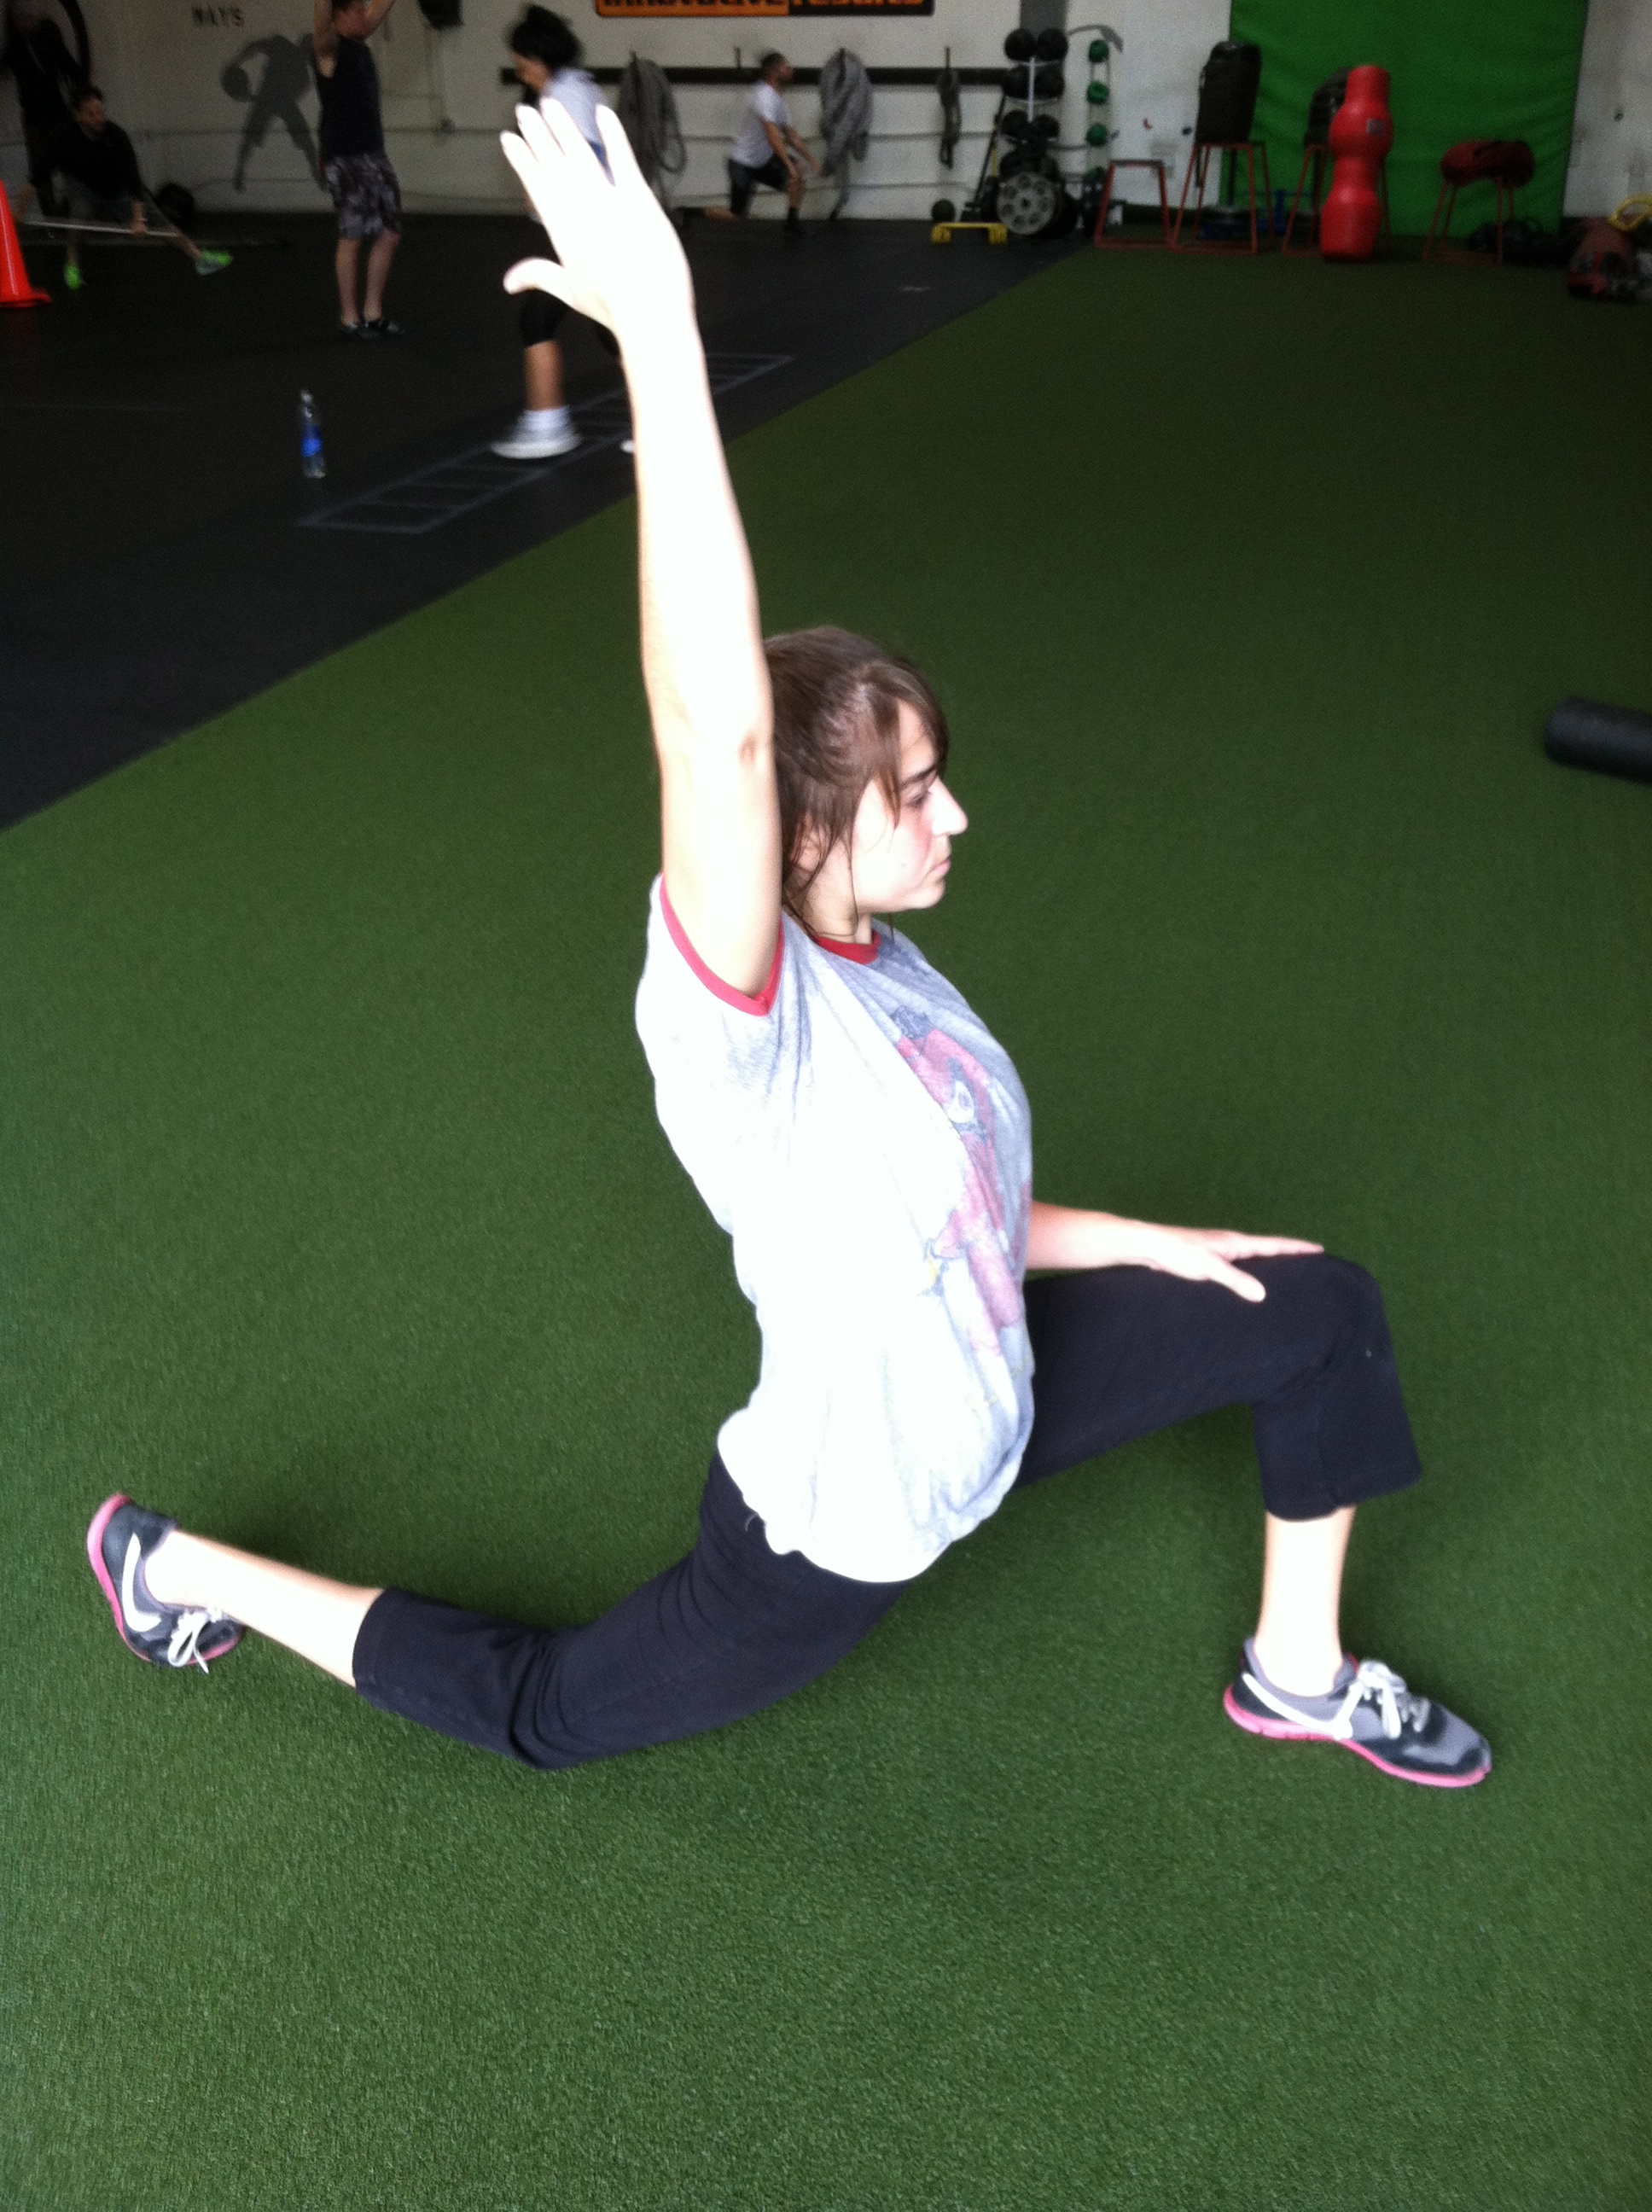
Did this workout the other day and I must say…It was fabulous!
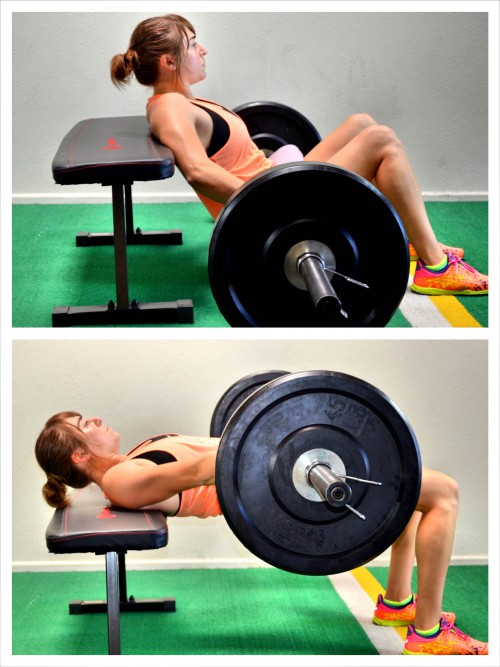
It uses one of my favorite moves the Barbell Hip Thruster. One tip though before you do thrusters…WRAP THE BAR WITH LOTS OF PADDING! haha
The Posterior Chain Pyramid
WARM UP
Roll out and stretch:
Hips
Quads
Glutes
Hamstrings
Back
ACTIVATION
Band walks or any quadruped moves, but make sure your glutes are feeling warm before you start the workout.
WORKOUT
Start with one rep of each exercise. The next round you do 2 reps…then 3…then 4…Up to 10 of each and then back down to 1. That means you are doing 100 reps of each exercise by the end of the workout. Use a challenging weight, knowing you will be doing 100 reps in total…That is LOTS of volume.
Also, rest only as needed but keep trying to move from one exercise to the next.
CIRCUIT:
Barbell Hip Thrusters
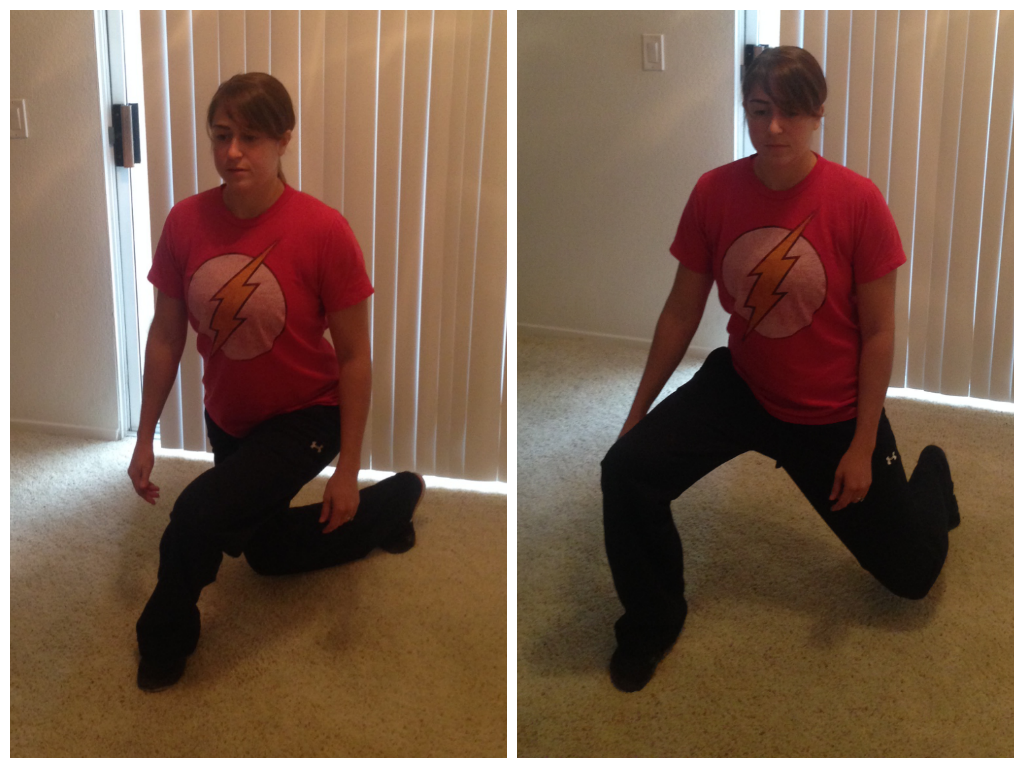
Airborne Lunges
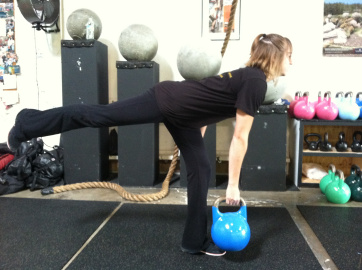
Reverse Hypers
Cherry Bombs
COOL DOWN
Roll out and stretch:
Hips
Quads
Glutes
Hamstrings
Back
This is serious glute destruction. If you haven’t done high volume workouts before, don’t go as heavy. Pick a variation and weight that forces you to work but not have to spend lots of time resting.
You can either choose to finish the pyramid no matter how long it takes you or you can set a timer for 45 minutes and see how far you get in that time and try to improve from week to week.
If you feel your low back working and not your glutes, regress the moves and perform a core and/or glute activation exercise. You may also want to roll out.
Your low back shouldn’t be taking over when doing these moves.
What’s your favorite glute workout? Do you enjoy pyramids?
A Great Glute Workout
I LOVE glute workouts. And I think that glute training is an ESSENTIAL part of any good workout routine, which is why I love writing about glute training every other day it seems.
Below are a couple of articles about glute training and a great glute workout.
Mini Bands are a one of my favorite tools to use to activate your glutes. They are cheap, easy to use anywhere and can work your butt from every angle. Here are 10 Great Mini Band Moves.
I also love glute bridges and all the different bridge variations. Here is a post on the basic glute bridge and another on the bridge and curl.
Below is a great workout using both the mini bands and a couple of my favorite glute bridge variations!
Get Great Glutes Workout
WARM UP (This link is a great leg warm up!)
Roll out and Stretch:
Calves/Shins
Quads
Hamstrings
Glutes/Hips
ACTIVATION
Complete 2 rounds of the circuit below.
CIRCUIT:
10 steps each way Mini Band Side Shuffle
20 steps each way Monster Steps
WORKOUT
Complete 3-5 rounds of the first exercise and then of each following superset. Rest up to 1 minute between rounds and up to 2 minutes between supersets.
EXERCISE #1:
5-15 reps Hip Thruster
SUPERSET #2:
8-12 reps per side Single Leg Deadlifts
15-20 reps Glute Bridge and Curl
SUPERSET #3:
8-12 reps per side Lateral Step Ups
15-20 reps Reverse Hypers
COOL DOWN
Roll out and Stretch:
Calves/Shins
Quads
Hamstrings
Glutes/Hips
EXERCISE DESCRIPTIONS:
Mini Band Side Shuffle and Monster Walks – Click here for a full breakdown of the moves with pictures.

Hip Thruster – Set up a bench so that it won’t move as you bridge up onto it. Take a barbell and put some padding around it. Place your upper back on the bench and sit your butt on the ground with your legs out straight. Place the barbell over your hips and plant your feet firmly on the ground and close to your butt. Drive up through your heels and your upper back on the bench. Squeeze your glutes and press your hips up as high as possible, driving the barbell up and off the ground. Hold a second or two at the top and then lower back down and repeat. Do not hyperextend your back at the top. Keep your belly button pulled in toward your spine and really squeeze your glutes at the top. Beginners will want to progress up to the barbell variation. Beginners may need two boxes to start or even start with a bridge on the ground. To do the two boxes, they will place their upper back on one and their heels on the other. Bring your butt up off the ground, driving through your heels on the box and your upper back. Bridge up into a nice straight line, squeezing your glutes and then lower your butt back down almost to the ground. Repeat, holding just a second or two at the top. To advance that move while still not using a barbell, do a single leg variation. Once you feel comfortable with the single leg variation, attempt a very light weight hip thruster.

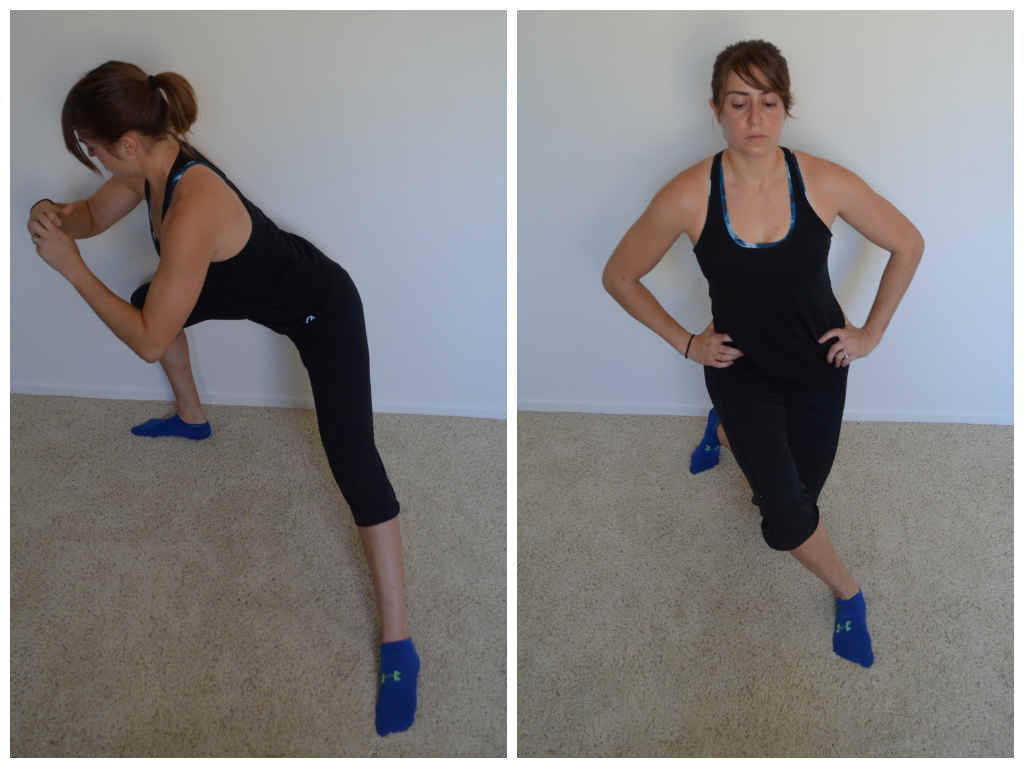
Single Leg Deadlift – Stand on one foot with the knee of that standing leg slightly bent. Hinge over at your hips, sweeping the other leg back toward the wall behind you. Pretend you are driving the heel of that foot straight into the wall behind you. Lean forward with your upper body as you hinge forward, keeping the back nice and flat. Make sure that as you hinge, you are sitting into the heel of your standing leg. Do not lean forward and come up onto your toes. To stand back up, drive through the heel of your standing leg and squeeze your glute at the top. Try not to tap the other foot down at all or at least not till you are fulling standing. Complete all reps on one side before switching to the other leg. To make the move harder, do a 3-5 count lower down toward the ground. Take 3-5 seconds to hinge over and then push straight back up. If that is still easy, then add a little bit of weight.

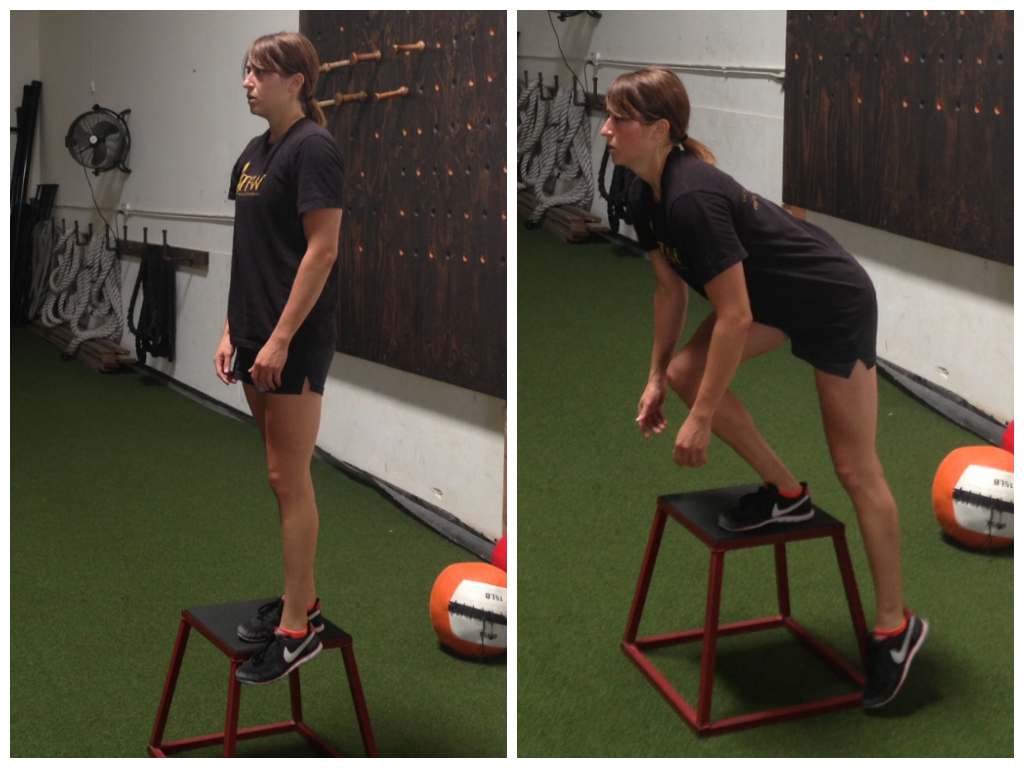
Lateral Step Ups – The higher the bench or box you use, the harder this move will be. Do not use a box that is too high. If you have to push off the foot on the ground or if you really lean forward to propel yourself up, the box is too high. Stand with the box next to your right side. Place your right foot on top of it without rotating toward the box. Drive up through the heel of the foot on the box until you are standing on the box. Drive the left knee up as you lift up onto the box. Then step back down and repeat. Keep your chest up as you drive up. Do not lean forward or let your heel on top of the box come up. Complete all reps on one side before switching. Challenge yourself first with a higher box and then with weight. If one box is too high and the other is too low, you can add weight and use the lower box to make the step ups harder.
Glute Bridge and Curl – For a complete guide to the bridge and curl, click here.

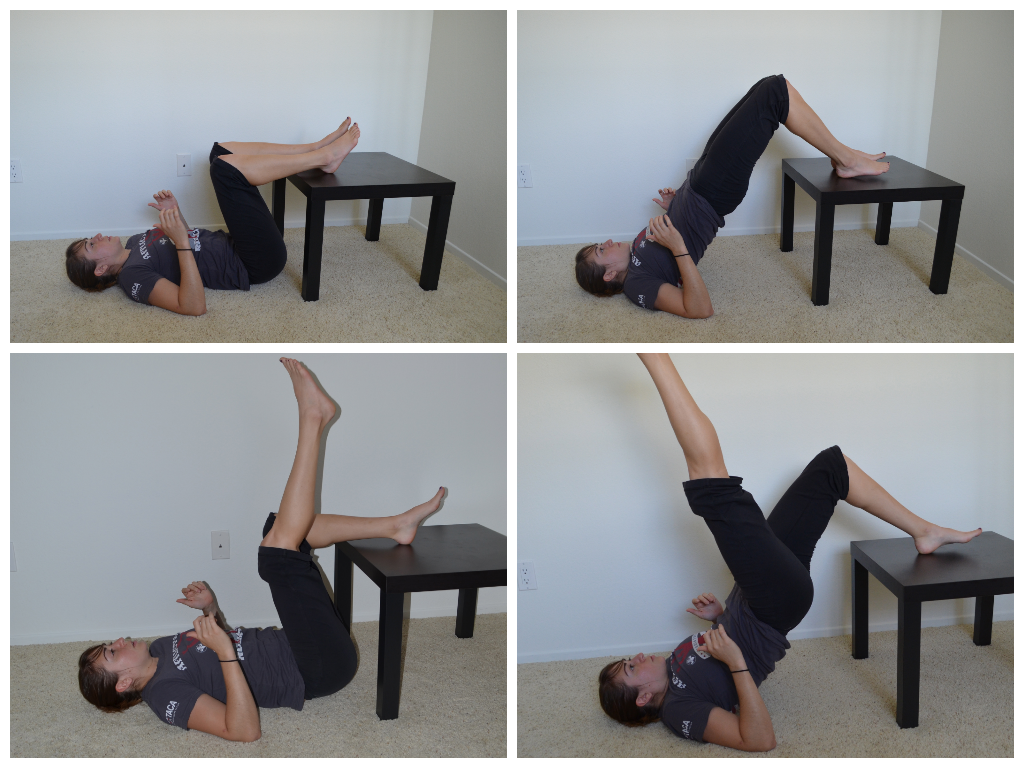
Reverse Hypers – Lie face down on a table, bench or box. Make sure your hips are right at the edge. Hold on to something in front of you if you want. Keep your upper body relaxed. Squeeze your legs together and point your toes out. Lift your legs to basically parallel to the ground, keeping your legs straight. Do not hyperextend your back and lift way higher than parallel. You do not want to feel this in your low back. Hold for 2-5 seconds and then lower down. Keep your core tight and really squeeze your glutes as you lift.

Bodyweight Home Exercises – Best Lower Body Moves
A bit ago I did a post with the 10 Best Bodyweight Upper Body Moves and today I wanted to take a second and go over 10 of the best lower body moves.
Bodyweight exercises are great to have on hand this time of year – when we are traveling, busy with family and the holidays and generally a little bit lazier about going outside on the weekends because it is cold.
The 10 Bodyweight Lower Body Exercises below don’t require much space and can easily be done in the comfort of your own home! (Shoot…they could even easily be used to create a home workout that the whole family can do together while gathered around for the holidays!)
1. Single Leg Deadlift (with slow eccentric) – Stand on one foot with the knee of that standing leg slightly bent. Hinge over at your hips, sweeping the other leg back toward the wall behind you. Pretend you are driving the heel of that foot straight into the wall behind you. Lean forward with your upper body as you hinge forward, keeping the back nice and flat. Make sure that as you hinge, you are sitting into the heel of your standing leg. Do not lean forward and come up onto your toes. To stand back up, drive through the heel of your standing leg and squeeze your glute at the top. Try not to tap the other foot down at all or at least not till you are fulling standing. Complete all reps on one side before switching to the other leg. To make the move harder, slow down your hinge over. Take 3-5 seconds to hinge over before you quickly stand back up. You can even slow down the stand back up or hold for a second or two while hinged over.
2. Single Leg Deadlift Hop – Stand on one leg. Hinge over, pushing your butt back and leaning your chest forward. Swing the leg off the ground back toward the wall behind you. Keep your back flat as you hinge over. Hinge over quickly, bending the standing leg just a little. Then quickly drive back up to standing, bringing your chest up nice and tall. As you drive up, explode up off the ground and drive the back leg forward, bringing the knee up. Then land back on the same leg and hinge back over before jumping back up. As you hinge over and drive up, you may want to swing your arms as if running with the opposite arm and leg working together. Make sure that as you hinge over your weight is in the heel of your standing leg. You want to also drive off that heel to really power your hop up.
3. Balance Lunge – Place your back foot up on a table, bench, chair or box. Hop your front foot out so you are in a nice wide stance with your back foot up on the bench or table. Then sink down, dropping your back knee toward the ground. Really sit back into the lunge. Make sure you aren’t going forward and that your weight is in your front heel and your front knee is not going past your toe. You should feel a nice stretch in the front of the leg that is back when doing this move. Beginners may want to use a super low box or do the move from the ground as a split squat.

4. Single Leg Squat – Choose a variation of the single leg squat that is right for you. Beginners may use a table or chair while more advanced lifters may use a doorway or a super low table or chair. If you can do a full pistol squat or use a plate weight to counter balance you, do that variation. Choose as hard a variation as you can do. To perform the basic single leg squat to a table, you will start by standing on one leg. Hold the other leg straight out in front of you. Lower yourself down until you are sitting on the table. Then driving off the heel on the ground, stand back up. Do not lean way forward or touch your raised foot to the ground. If you use a table, the more you allow yourself to sit down, the easier the move will be. The more you just lightly touch the table and come right back up, the harder the move will be. Also the lower the table you use or the lower down you go on any variation, the harder the move will be.

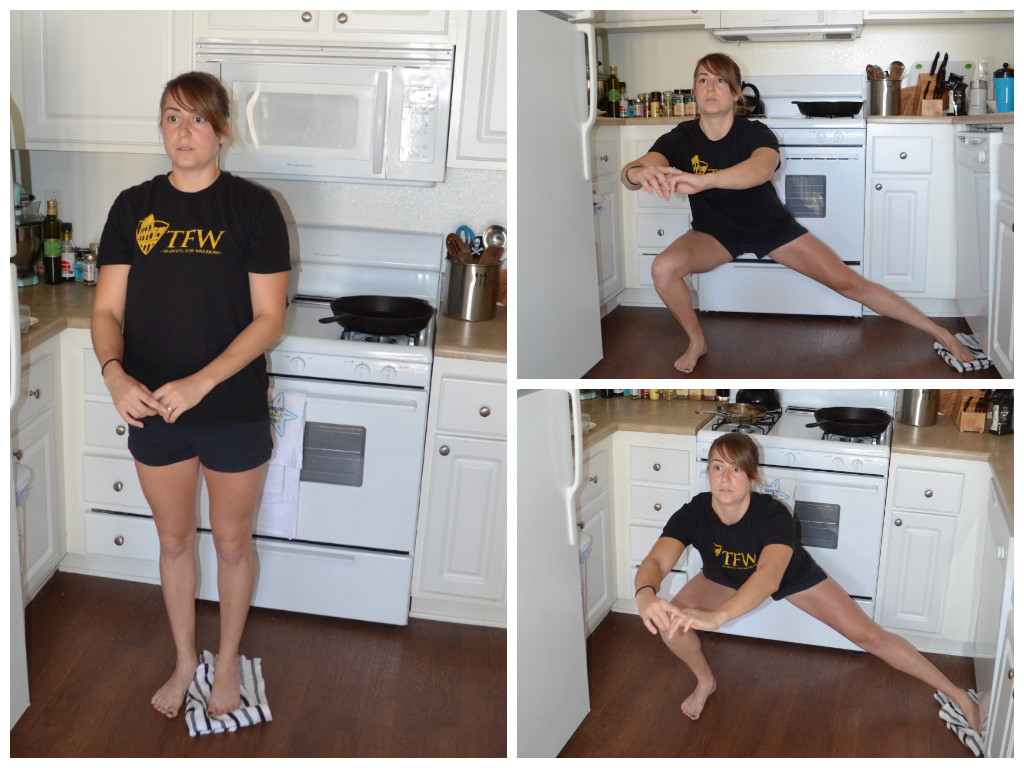
5. Towel Lunges – Side Lunges, Reverse Lunges, Curtsy Lunges…All can be made more difficult by putting a towel under the foo that is moving. For more details about the towel lunges, click here (and some other great towel exercises!).
6. Skater Series – You can do a hold, side touches or even backward touches. For the hold, place your feet no more than a couple of inches apart. Sink down as low as you can, sitting your butt back while keeping your chest up. This squat is very similar to the chair pose in yoga. Do not let your back round and try to sink as low as possible, getting as close to parallel as possible. Hold in that low squat. To do the touches, once you sink down as low as possible with your chest up, you are then going to tap one toe at a time out to the side. You should stay low in the squat and not shift your weight. Keep your weight centered over the standing leg. Straighten the other leg out to tap the toe to the side. Do not let your weight shift as you touch. All your weight is in the standing leg. Alternate toe touches to each side until the time is up. For the backward touches, you are then going to tap one toe at a time backward. You should stay low in the squat and not shift your weight backwards as you lunge back. Keep your weight centered over the standing leg. Straighten the other leg back and just tap the toe. Do not let your weight shift into the foot touching back as you touch. All your weight is in the standing leg as if you are holding the isometric squat still. Do not come out of the squat as you touch back.
7. Glute Bridge (Off Table/Chair) – Beginners should do a single leg bridge from the ground or even a two leg bridge if they can’t get their hips up as high with the single leg bridge. Intermediate exercisers may want to do a two leg glute bridge with their heels up on the table. The single leg glute bridge off the table is an advanced progression. To do the glute bridge off the table, place your heels up on the table. Your butt should be right against the edge of the table. Bend your arms to 90 degrees with just your upper arm on the ground. Lift one leg up and point the toe toward the ceiling. Do not bend that leg or use it to help you bridge up. Drive through the heel on the table and press your hips up as high as you can. Squeeze your glutes and keep your core tight as you bridge up. Hold for a second or two and then lower down. Complete all reps on one side before switching.
8. Kneeling with Jump to Squat – This is an advanced move. It may be a challenge for many beginners to even do a step up from kneeling. To do the kneeling jump to squat, start on your knees with your knees about hip-width apart. Flex your feet. Sit your butt back and swing your arms back a bit so you are slightly hinged over. Hinge back and launch yourself from your knees up onto your feet in a low squat. Then stand all the way up. Once you are standing tall, step one foot back and come back to kneeling. As soon as you are kneeling again, hinge a little and jump back up to your feet. If you have a nice mat, you can jump back to kneeling, but this is not recommended unless you have a really nice mat.
9. Reverse Hypers – Lie face down on a table. Make sure your hips are right at the edge. Hold on to something in front of you if you want. Keep your upper body relaxed. Squeeze your legs together and point your toes out. Lift your legs to basically parallel to the ground, keeping your legs straight. Do not hyperextend your back and lift way higher than parallel. You do not want to feel this in your low back. Hold for 2-5 seconds and then lower down. Keep your core tight and really squeeze your glutes as you lift. If you don’t have a table to lie on, you can do this from the ground. Lie on the ground and relax your upper body. With your legs straight and heels together, lift your legs up as high as you can. Squeeze your glutes and get your quads off the ground.

10. Lunge Matrix (or part of it) – The lunge matrix basically tells you that you can lunge in every direction – forward, forward at an angle, to the side, back at an angle, straight back, back and crossed behind and even forward and crossed in front. If you think as yourself as lunging on a clock, you can literally lunge all the way around the clock. Sometimes I like to combine two or three lunges in a sequence. Or you can do a 360 lunge series, combining all seven and lunging around the clock!
This is a backward angled lunge and a front lunge across.
This is a curtsy lunge and front angled lunge. Two other lunges in the matrix
Bonus Moves:
Of course any jumping moves are also great options to help you challenge yourself without any weight. Squat jumps, skater hops, split squat jumps, tuck jumps are all also great options!
What are your favorite lower body moves to do at home?
Challenge Yourself With VOLUME
There are so many ways to challenge yourself with your workouts.
But all too often people only focus on lifting more weight.
You can do longer or shorter workouts. You can change up the intensity. You can change up the exercises and the equipment you use. You can vary your rest. You can change up your repetition tempo.
You can also vary the VOLUME that you do.
And by “volume,” I mean changing up the number of reps and sets you do during your workout. HOWEVER, increasing your workout volume doesn’t have to mean longer workouts.
It does, however, mean you won’t be able to lift the heaviest weight you’ve ever used.
That being said though, you do want to use a challenging weight that won’t cause you to go to failure, but will create muscle shake-age (that is my very technical term for feeling your muscles start to fatigue as you lift).
You want to challenge yourself while allowing yourself to move from one exercise to the next with little to no rest between.
And even though you aren’t going to failure or using the heaviest weight you can handle, the sheer volume of work you are doing will create muscle gains.
Using heavy weights and low reps isn’t the only way to develop strength and gain lean muscle mass!
Higher volume with slighter lighter weights can also cause great gains.
For example, the forced reps variations I discussed a few months ago can be a great way to increase your workout volume, challenge yourself and help you progress toward your fitness goals WITHOUT just focusing on always lifting heavier weights or doing lower rep counts.
Another great way to increase your workout volume is by doing density sets. One of my favorite ways to do density sets is by setting a timer and then trying to do as many rounds of two or three exercises in that allotted time as possible.
During these sets, you will use a lighter weight and stop before reaching failure so that you never really need to rest more than 30 seconds at any time.
These density set workouts can also be a great way to get in a little extra “cardio” and can be a great way to give your body a break from the low rep, heavy lifting while still helping you to move forward! And if you’ve plateaued with your low rep, heavy lifting workouts, a high volume workout may be just what you need to get over your plateau.
(Shoot, I also love these workouts because I can get in a high volume of work done WITHOUT having to do 20 reps at one time…Since for some reason my brain, in general, hates counting up to 20….)
Below is a sample high volume workout to get you going this week!
Glute Density Set Workout
WARM UP
Stretch and Roll Out:
Calves
Hamstrings
Quads
Hips/Glutes
Groin
Back
WORKOUT
Set a timer for 15 minutes for each circuit. Perform as many rounds of each circuit as you can in that 15 minutes. Rest 2-3 minutes between circuits. Try to rest no more than 30 seconds at one time during each circuit if you rest even that long.
Mark down how many rounds of each circuit you get in 15 minutes so next time you have something to compete against and show progress!
CIRCUIT #1:
15 minute timer
8-12 reps each side Single Leg Deadlift
10-25 reps Reverse Hypers
Rest 2-3 minutes
CIRCUIT #2:
15 minute timer
5-10 reps each side Backward Rotational Lunge to Front Lunge Across
8-12 reps each side Single Leg Glute Bridge
COOL DOWN
Stretch and Roll Out:
Calves
Hamstrings
Quads
Hips/Glutes
Groin
Back
EXERCISE DESCRIPTIONS:
Single Leg Deadlift – For this move, you can hold dumbbells or kettlebells, but remember DO NOT GO TO FAILURE. Beginners should start with bodyweight. Stand on one foot with the knee of that standing leg slightly bent. Hinge over at your hips, sweeping the other leg back toward the wall behind you. Pretend you are driving the heel of that foot straight into the wall behind you. Lean forward with your upper body as you hinge forward, keeping the back nice and flat. Make sure that as you hinge, you are sitting into the heel of your standing leg. Do not lean forward and come up onto your toes. To stand back up, drive through the heel of your standing leg and squeeze your glute at the top. Try not to tap the other foot down at all or at least not till you are fulling standing. Complete all reps on one side before switching to the other leg.
Reverse Hypers – Click here for a description and pictures of me using a small side table I have at my house to do the Reverse Hypers. You can also use a box step or do this move from the ground; however, I do prefer the range of motion the table or box step provides.
Backward Rotational Lunge to Front Lunge Across – This move is actually two lunges, which means that 1 rep is actually 2 lunges. On one you rotate back and open and on the other you come forward and across. Start with both feet pointing toward “12” on a clock. Performing the lunge first with the right foot moving, take the right foot and move it back toward “5” on the clock. As you reach your foot back toward “5,” you will pivot that toe so that it is perpendicular to the front foot which is still pointing toward “12.” Lunge down, bending the right knee while keeping the left leg straight. You are sinking your weight back into that right foot. Then drive up off the right heel and come back to standing. Beginners may need to pause in the middle between lunges while more advanced exercisers can go right from the back rotational lunge into the forward cross lunge. After driving the right foot back to center, bring it forward and across the body toward about “10/11” on the clock. Your right foot will again turn so it is perpendicular to your left foot which is pointing toward “12.” Sink down into a lunge, bending both knees and then drive off the right heel to come back to standing. Repeat those two lunges and then switch to the other side. Beginners will want to use bodyweight while more advanced lifter may front load with a kettlebell or dumbbells.
In this I show the backward rotational lunge and the front lunge across but without turning the toe. Not turning the toe on the front lunge can reduce the stress on the knee if you are new to these lunges and/or have knee problems.
Single Leg Glute Bridge – Beginners will perform a single leg glute bridge from the ground (however, if you can’t get your hips up as high as with the two leg glute bridge, stick with the two leg variation for now). More advanced exercisers may put their foot up on a box or advance the move further by putting your back and your foot up on benches/boxes. Remember though, you can’t go to failure during these density sets.
Do you pay attention to the volume of work you are doing?
How do you challenge yourself without just adding more weight?
NOTE: Not every workout should contain a ton of reps and sets. Do not go overboard with volume and/or intensity. Not every workout has to be the hardest thing you’ve ever done. Varying your volume and intensity is key to getting results while preventing overuse and injury. Workout variables need to be manipulated to help you work toward your goal.
Recovery Week Workout
Last week was my Recovery week from all my super heavy lifts and my 10-7-3-1 workouts.
Sometimes my “recovery” workouts aren’t easy at all. Sometimes they are simply DIFFERENT exercises and “lighter loads” than what I’ve been doing.
Sometimes they simply require my body to move in a different way than it’s been moving for the last 3-5 weeks.
I also love doing single limb movements and more bodyweight moves during my recovery workouts. These moves aren’t EASY though. I just find they really force me to work more on activation and correcting imbalances.
Recovery doesn’t always mean time off and it doesn’t always mean EASY.
Here is my far from easy (and actually made me super super sore) recovery Glute Workout from this past week.
Recovery Glute Workout
WARM UP:
Foam roll – lower legs, hamstrings, hips, back
Stretch – Calves, hamstrings, hips
Activate – Glutes with lateral and monster band walks
STRENGTH:
4 rounds:
8-12 reps each side Single Leg Deadlift holding double kettlebells
(Increase weight with each round if possible unless 8 rep max hit. Keep standing leg slightly bent and back flat as you hinge over. Hold one kettlebell in each hand by your side. Do not let your back round as you hinge over.)
8-12 reps each side Single Leg Glute Bridge Off Box
(Heel up on box and bridge up. If you can’t get up as high as with a two leg bridge then stick with a single leg bridge off the ground)
4 rounds:

8-12 reps each side Curtsy Lunge holding double kettlebells
(Increase weight with each round if possible unless 8 rep max hit. Make sure as you lunge back and come to standing that you are in full control of the lunge and driving off the heel of the front leg. Really cross behind and keep your chest up as you lunge. Hold each kettlebell down by your side.)
8-12 reps each side Single Leg Step Down
(Start standing on the box as if doing a lateral step up. Step down to the side of the box, hinging over a bit as you lower down. Lower down slowly. Do not let the foot going down fully touch the ground. Only let the toe lightly graze the ground and then press quickly back up to standing. Only go as low as you can control. DO NOT push back up off the ground!! The higher the box the harder the move.)
Make sure to sink back into the heel on the top of the box. Don’t be afraid to lean forward just keep the core tight.
CONDITIONING:
3 rounds:
40 seconds of work, 20 seconds of rest
Heavy Kettlebell Swings
While these moves didn’t use the heavy loads that many of my lifts have required recently, the loads were still heavy and CHALLENGING for the moves I did.
And the bodyweight bridges and bodyweight step downs were far from easy.
These moves all challenged my glutes to work and stabilize to become stronger for my heavy lifts. Since they were also single limb movements my dominate leg couldn’t take over and compensate. My weaker leg was forced to work equally hard, which helps to correct any imbalance that may exist.
And my butt was sore for days actually and my glutes were definitely shaking a bit during the workout.
My rest periods were also very short during the workout since I wasn’t trying to lift my max, making it a rather quick workout. However, I did rest enough that I could still use CHALLENGING weights and give a good work output each and every round.
The little conditioning blast at the end was also short and sweet. It worked on grip strength and power. It also got my heart rate up a bit while working my glutes that last little bit to utterly fatigue them.
What do your recovery week workouts look like? Do you simply take the week off or do you do workouts to work on your weak points?
Part 4: Bootilicious – The Glute Bridge
So the glute bridge is one of my favorite moves. It can be a good part of any warm up or a great strength exercise by itself.
It is also a great way to mix up your hip hinge workouts from vertical to horizontal! It is also incredibly hard for many people to keep their core tight enough so that they don’t feel this in their low backs, but instead feel it in their butts.
Really really focus on drawing your belly button in toward your spine when doing this move so you DON’T feel it in your low back!
So the basic glute bridge is done on the ground. You should place your feet about hip width apart and bend your knees bringing your heels in close enough that you can touch them with your finger tips.
You then squeeze your butt cheeks and raise your hips as high up as you can. You should basically be on your shoulders and heels when you drive up. You should actively squeeze your belly button in toward your spine and squeeze your glutes.
Make sure that you aren’t just simply pushing back into your shoulders off of your heels. You actually want to drive straight up and while you are pushing through your heels you want to actually think about driving your shins forward.
You should feel this move in your glutes and a bit in your hamstrings NOT in your low back.

You can also do this move with one leg raised. I like to do it with one leg off the ground with the knee bent to 90 degrees and the foot flexed. I focus on getting my hips up just as high as they were with two legs. Try to also not let your hips rotate!
Another variation that I like of the basic glute bridge is the bridge on the power wheel.

Basically the same as the glute bridge on the ground EXCEPT you have to really drive your feet straight down into the ground and squeeze your butt and core or you are going to wobble over or the wheel will run off.
Many people also feel this move a lot more in their hamstrings.
This variation is a great way to advance the traditional glute bridge and make it into a great part of your workout.
To make this move harder, you can actually roll the wheel out and then back in toward your butt. The key though is to NOT drop your hips even as your roll out.
A great intermediate move if the power wheel is just a bit too hard especially moving it in and out is the glute bridge on the sliders.
Put your heels on the sliders and raise up into a glute bridge. Just like with the power wheel, straighten the legs out keeping the hips high and then bring the heels back in so that you are in the basic glute bridge position. Repeat slowly and make sure to keep your core tight so that your low back doesn’t feel this move.
The last glute bridge variation that I really like to use is a great strength move. A beginner can do this with only their back on the bench and feet on the ground. To make it more advanced, you can do it with your back on a bench and your feet up on a bench as well (or your back on the ground and feet up). To make that harder, do it with only one leg.
The hardest variation actually returns you to the position with your back on the bench and feet on the ground. You can add weight to this position by laying a barbell across your hips.

(I will take a picture but didn’t have time today to set up everything)
Actually you can almost weight down any position to make it harder EXCEPT the power wheel. If you advance from this move, you could weight down the one-leg variation.
But make sure that when you weight down the glute bridge, YOU DON’T FEEL IT IN YOUR LOW BACK.
Focus on really keeping the core tight by “drawing in” your belly button toward your spine!
So if you want a bootilicious (aka perky, toned) butt, try some of these moves. They will also really help up your deadlift numbers if you are looking to get your lift numbers higher!
What’s your favorite glute bridge variation?
Part 2: Being Bootilicious – Inhibition
So this post should actually have been post number one because what you need to start with is inhibiting and lengthening the tight, overactive muscles!
If you want to work your butt, the first thing you have to do is relax the tight muscles.
You aren’t going to feel butt exercises in the correct places if the right muscles aren’t activated!!! And you won’t activate the right muscles if other muscles are overactive and tight!
SO what do you do?
The first thing I do before I workout is roll out.
And if I really want my butt to work, I’ve got to make sure that everything around my hips is loose.
While I’m fortunate enough to not be confined to a desk all day, I sit enough that my hips are flexed for a good portion of the day.
That means they are tight. And tight hips can lead to low back pain. They can also restrict your glutes from really activating during exercise.
If your glutes don’t activate during leg movements, you are going to use your low back, have inefficient movement patterns, not lift as much AND risk injury. You are also going to miss out on working one of the biggest muscles in your body!
SO roll our your hips before you begin!
While a foam roller is great, I find any sort of ball to be WAY better at getting into those trigger points around your hips.
I prefer a tennis ball, trigger point ball or lacrosse ball. I find the golf ball to be too small.
If you are just starting out, you may want to invest in one of the foam blue balls that are a little bigger and a little softer. The smaller and harder the ball you use, the more you are really going to dig in.
Ok so to roll out your “hips,” and I use this term a bit loosely, my three favorite moves are:
- The Hip U – So in this move you start by digging out the fleshy part of your butt. Literally sit on the ball with it under one butt cheek. Roll it around until you find a sore spot. Hold it on that sore spot and remember to breathe. You can also lift and lower the leg to help get deeper into the muscle. As you roll out your butt cheek, move the ball up to your low back. Find any trigger points there and hold for a bit. Then make an arc over the hip bone once you dig out your butt and low back. Hit your side butt, or glute medius. This is usually very tight on people. Again hold as you find trigger points. Then roll the ball to the front of your hip. Dig out the TFL and all the muscles right around that hip bone. Remember to HOLD if you find a sore spot…also remember to breathe! So that is the U over the hip
- Ab release – So most of the time we go for the exact spot where we “feel” pain. So we roll out our low backs if we feel pain when the cause of the pain may actually be somewhere else…like our tight hip flexors! BUT that being said that doesn’t mean we need to target the muscles that insert right below our hips. A hip flexor muscles actually connects up at a point in our spine! Which can mean that by placing a ball in your abs by your belly button and relaxing over it, you can actually help release your hip flexors! So try it…get a ball (and if you have a small ball you may need to put it on a trigger point block to really get it to dig in, but lay over the ball and relax. The ball should be to the side of your belly button and above the hip.
- The peanut – So one of my absolute favorite foam rolling tools is what I call the peanut. It is two tennis balls tapped together. They are perfect to use on the area around your spine. I like to hit my lower (and upper back for that matter) with these two balls. You can really get in and around your SI joint and then up into your low and mid-back. You can even target the spot where you psoas connect up in your spine.
So while these aren’t the only moves to use and you may also want to hit your adductors, calves and chest (other common tight muscle groups) these three moves are a great place to start!
After foam rolling, you will then want to do some dynamic stretches for these muscles before you begin your workout.
Notice I said DYNAMIC. Save the static stretching till afterwards!
A dynamic stretch is a stretch that you don’t hold for a long period of time, but actually move through (not bouncing though). A static stretch is one you hold for about 30 seconds or so. A static stretch is great for flexibility BUT has been show to reduce power during the workout.
So in an effort to increase mobility without any strength or power lost, we will use only dynamic stretches BEFORE exercise.
Here are some great moves I use to open up my hip area:
- Leg swings – You can do these swinging your legs forward or back or side to side. Both ways open up your hips. Try to increase the range of your swing without leaning your upper body forward and back. It is best to hold a wall when doing these.
- Hurdles – These are a variation of the leg swing. You can do these going forward or backwards (or BOTH!). What you do is bend your knee and swing your hip as if stepping over a hurdle. Alternate sides. Do about 10 per side.
- Simple kneeling hip stretch – So the basic stretch for your hip and even your quad is the kneeling hip stretch. Kneel on your right knee with your left leg bent to 90 degrees in front. You can make this dynamic by stretch by pushing the hip forward and then relaxing back. You can also add in a reach overhead and across. So if your left knee is forward, your right arm is going to lift up overhead and across. Then you will relax back down. You can also do a rotational stretch, so rotating over the front knee. To increase this stretch down your quad, you can also pull in the foot of the knee that is down and then release. By pulling the foot of the knee that is down up toward your butt, you will bring the stretch lower in your quad.
- Lying glute stretch – Lay on your back with your right knee bent and foot flat on the ground. Cross the left ankle over the right knee. Then grab behind either your right hamstring or in front of your right shin. Pull the right leg with the left foot across it unto your chest and then release. You should feel that in your glute. This stretch will make sure you are loose all around the hip joint! (I love doing the pigeon pose after my workouts as my static stretch!)
- Spider stretch – So this stretch is great to open up the hips. It can get your groin and your hamstrings and even calves too! So to do this stretch step one leg forward in a lunge. If this is too much you can put your knee on the ground. So if you lunge your right leg forward, you will then drop your right elbow right into your instep. Then rock back and sit on your other heal and straighten that forward leg to stretch the hamstring. Then rock back forward and drop your elbow again. Do about 10 each side moving smoothly through the movement.
- 360 Lunges – One of my favorite dynamic moves to warm up the hips is the lunge. BUT I don’t just use the forward lunge…I lunge in a few different angles. One lunge out front. Maybe one front at an angle. One out to the side. One opening up back. I do those four lunges on each side to create a 360 circle!
Glute Stretch
Kneeling hip stretch variation
These stretches and even the foam rolling moves aren’t the only ones you can do. I didn’t even really get into static stretching…BUT the point is these are good ones to start with and are very efficient ways to target all the muscles in and around the hips.
So between the foam rolling and stretches, your hips should be loose and ready to let your butt be activated!
Check back for Part 3 when we discuss glute activation exercises to use in your warm up!
P.S. I will add more photos! Sorry for these few that I managed to quickly take a few weeks ago after a workout!


