A healthy lifestyle is 24/7

While I understand the point of this fitspo…To inspire you to believe that you do actually have the TIME…It bothers me because becoming healthier, fitter, happier takes more than one hour a day a few times a week.
Being healthy and feeling good is a lifestyle…AKA it is a 24/7 deal.
It does take lots of time to be healthy. It ISN’T easy to fit in working out and cooking and being active with a busy schedule especially if you are stressed.
It also isn’t easy to stay dedicated day in and day out when results are slow to build. We all want to see instant progress, which is why the first question many people ask me when they are considering joining is….
“How long will it take me to reach my goals?”
I often ask them…”How hard are you willing to work? How much time are you planning to dedicate to making changes?”
Their minds always first go to how many times a week they can come in to train.
And I would love to tell them that their few training sessions with me each week are enough.
But that simply isn’t the case.
If you want results from all of the hard work you put in at the gym, you need to make smart, healthy choices the other 23 hours of the day.
Especially if you want those results quickly.
Quick results mean lots of time and energy spent CONSISTENTLY day in and day out to reach your goal.
Most people know this. Most people know that they can’t out exercise a bad diet.
Yet all too many people try to. And then they still expect to lose weight/get stronger/feel better/be healthier after really only committing to their goals the three hours a week they come to the gym!
So all I’m saying is, if you want results, you have to commit to your goals all day, every day. That doesn’t mean a little slip up or a cheat day is going to make you fail.
It just means that reaching your goals is a lot of hard work…AND VERY TIME CONSUMING.
Don’t delude yourself. It is.
But if you truly want something, isn’t it worth dedicating the time to get it?
Remember a workout may be 4% of your day, but your dreams, your goals, deserve your attention 24/7!
Home Cardio Workout
I’ve said before I hate cardio…But that really isn’t completely true.
I just hate long, slow cardio. SO BORING.
And it also kind of makes me mad that everyone thinks that they either need to go for a jog or hop on a piece of cardio equipment to get their cardio in.
Because you don’t.
You can easily do a super tough and fat burning cardio workout at home with very little space!
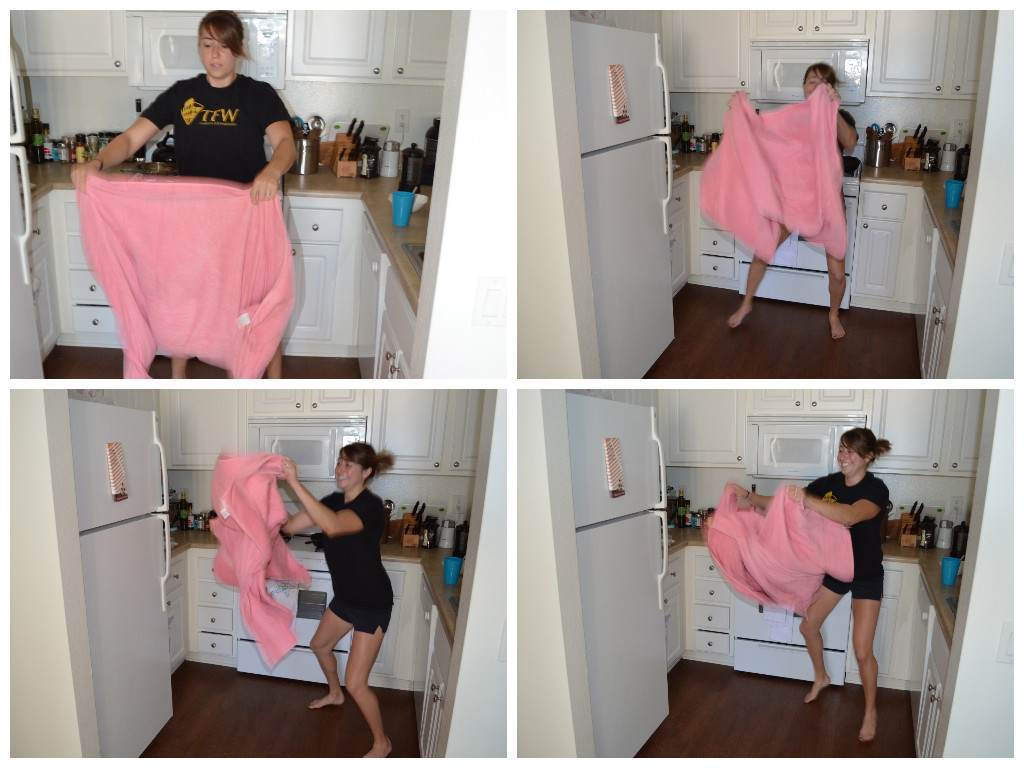
For example you can do the towel taz….
The other day I actually did one a great at home cardio workout although I didn’t do the towel taz.
I didn’t feel like going in to the gym, but I wanted to workout. I also didn’t feel like doing a long workout since I had a lot to do.
AND on top of those things, I didn’t have a lot of space to work with and had to do it outside the kitchen since Ryan was holed up in the office doing work.
And this is what I did:
Home Cardio Workout
Stretch and roll out all tight spots (hips, calves, quads, upper back, lats were my targets)
CIRCUIT #1:
3-5 rounds:
20 seconds each exercise
20 seconds rest between rounds (beginners may need more rest take up to 1 minute between rounds)
Burpees
Sit Thrus
Super Crunch

super crunch
2-3 minutes rest between circuits
CIRCUIT #2:
3-5 rounds:
20 seconds each exercise
20 seconds rest between rounds
Skater Hops
Mt. Climbers (can use a towel or sliders if you have them)
Cherry Bombs
2-3 minutes rest between circuits
CIRCUIT #3:
3-5 rounds:
20 seconds each exercise
20 seconds rest between rounds
Split Squat Jumps
Plank Hip Dips
Circle Crawls
split squat jumps
2-3 minutes rest between circuits
Stretch and roll out anything that is tight when done.
Now this is cardio I like.
What’s your favorite home cardio workout?
10 Plank Variations to Strengthen Your Core
I’ve had sort of a love-hate relationship with planks over the years.
At points I’ve felt they didn’t give you that much bang for your buck, but I’ve started to realize they really are essential to developing stability and therefore preventing injury.
Here are my favorite plank variations. Some are isometrics while others are dynamic moves. Some even make great warm up moves.
1. Front Plank – The basic front plank variation is done from your forearms. You should rest on your forearms with your elbows right below your shoulders. Beginners can start on their forearms and knees while more advanced exercisers will perform the plank from their forearms and toes.
The longer you hold, the harder the move will be. To advance the move further, try lifting one leg and holding it off the ground. Make sure to draw the belly button in toward your spine, tuck your hips under and keep your body in a nice straight line. Feet should be together and adductors, glutes and quads engaged. Do not let your upper back round as you hold. Breathe as you hold and don’t let your hips drop toward the ground or raise up toward the ceiling.
You can also do the front plank from your hands.
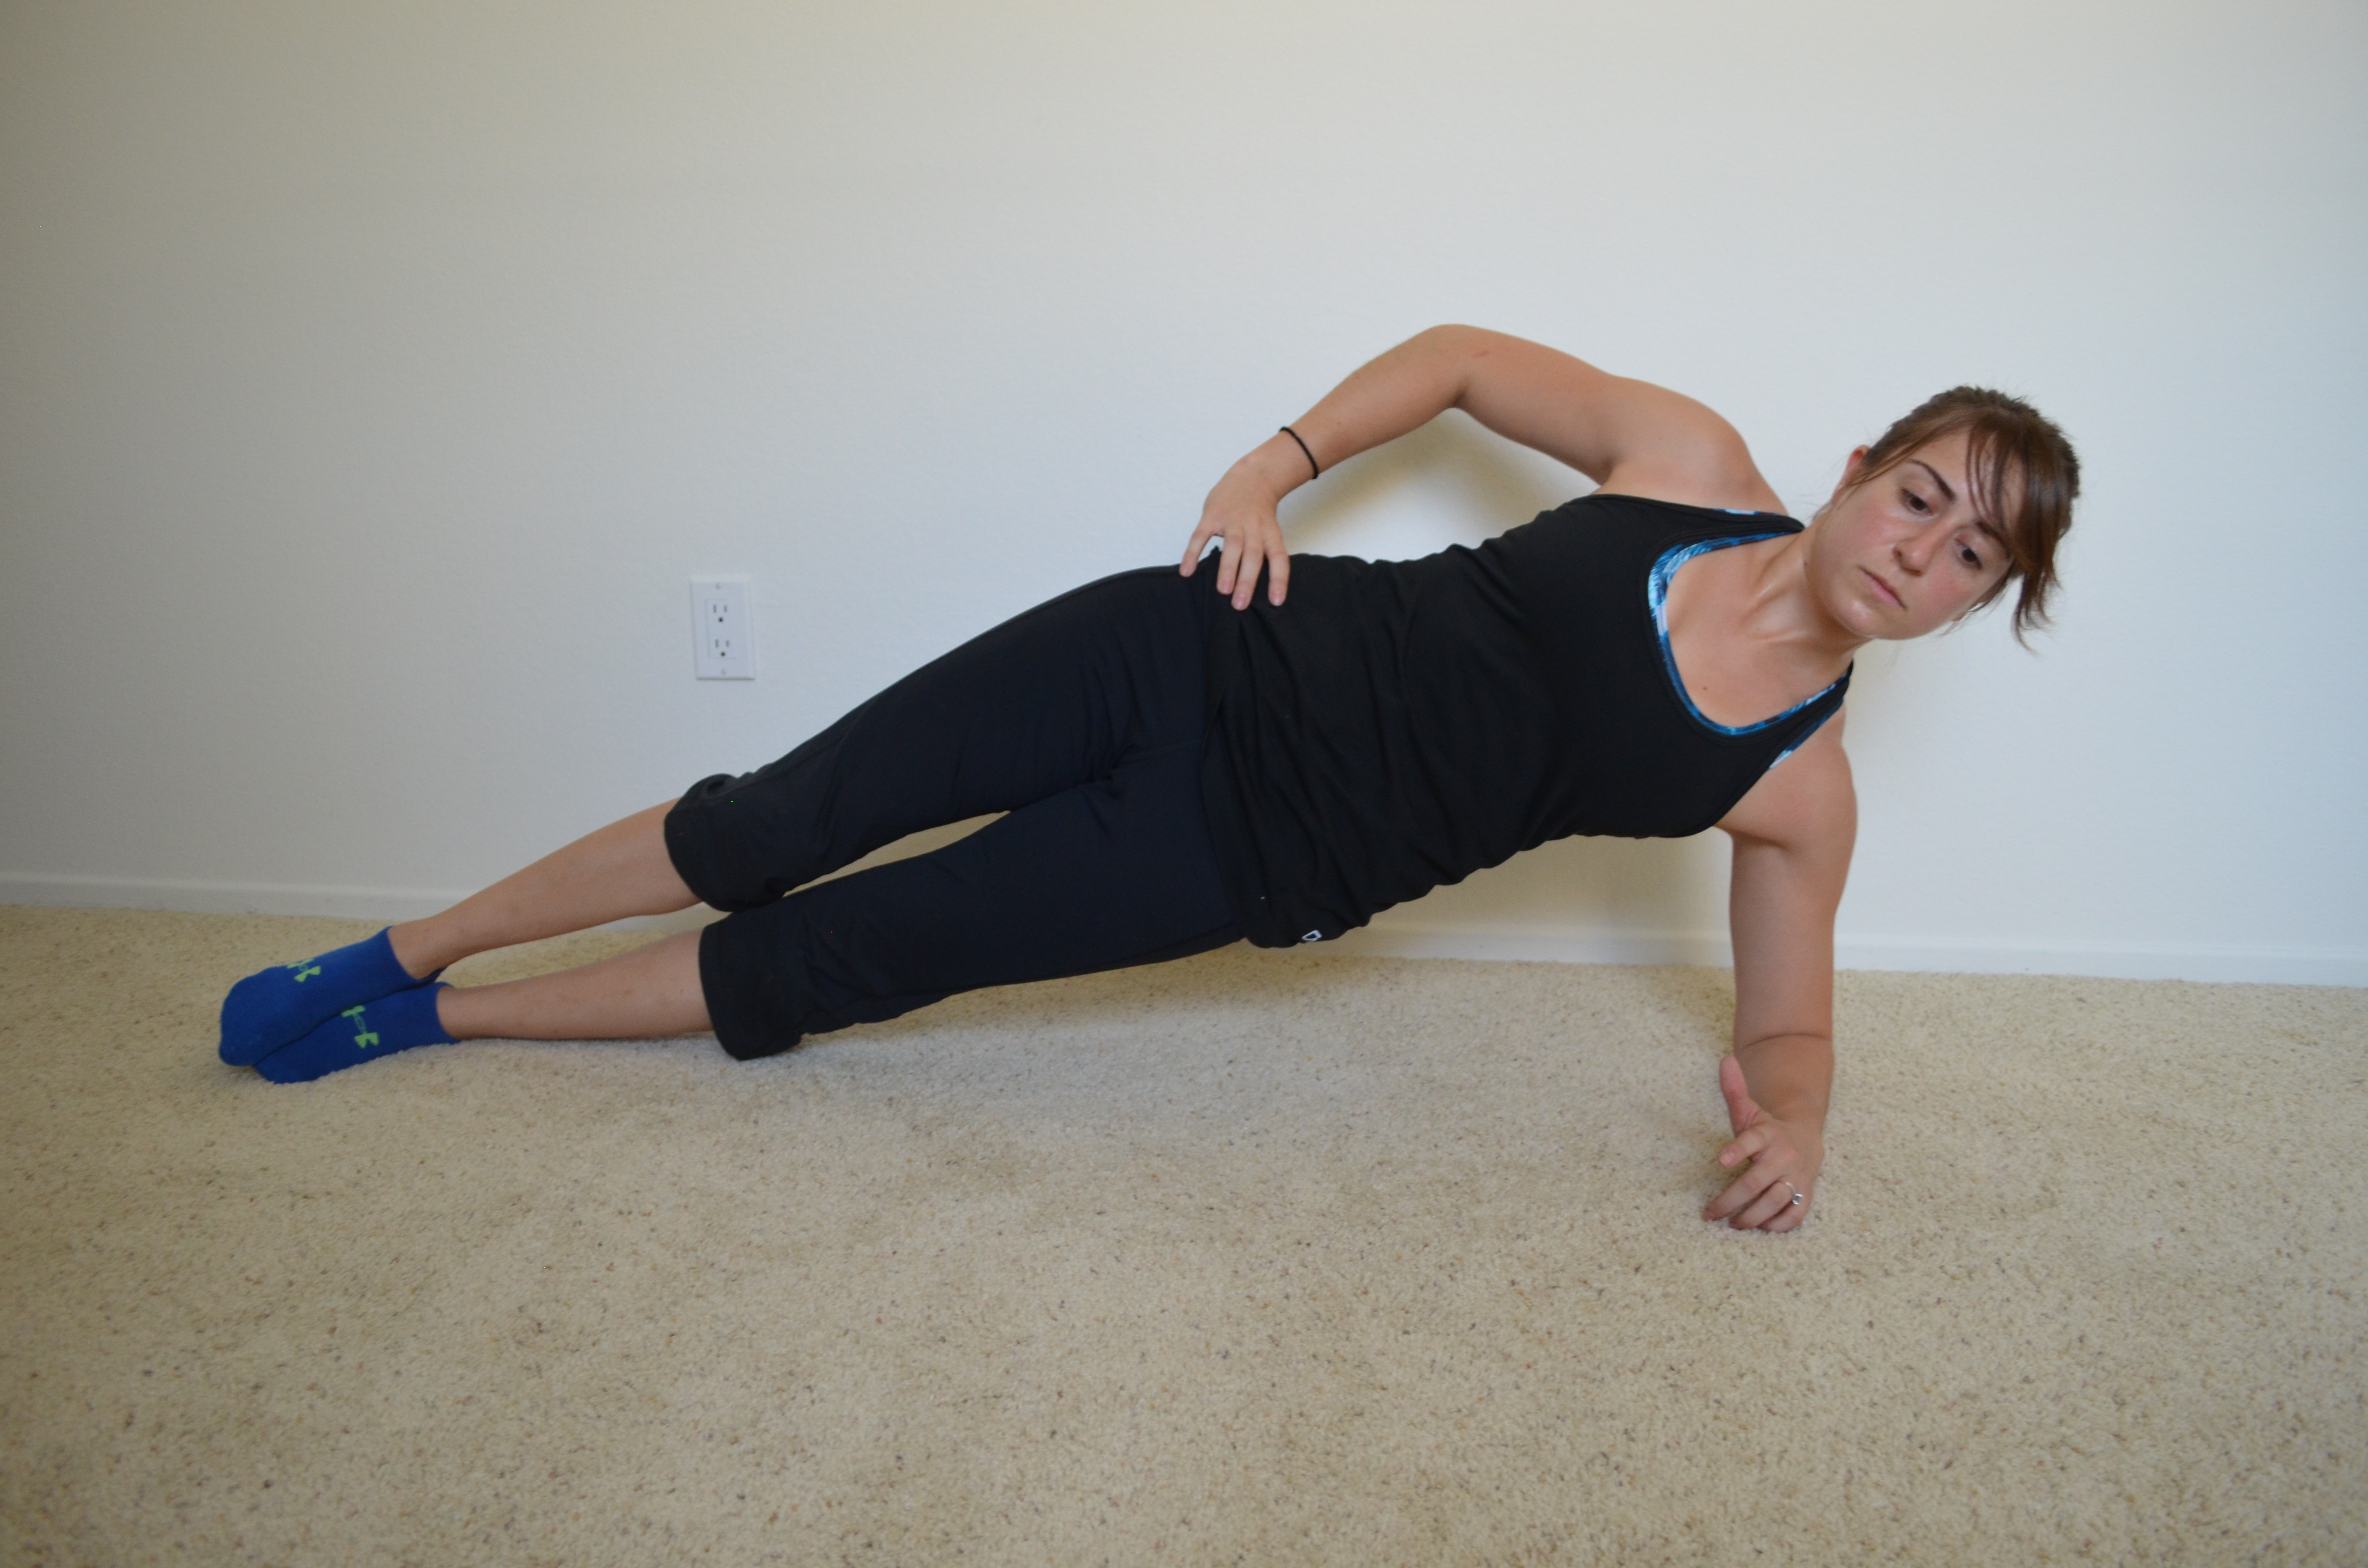
2. Side Plank – The basic side plank variation is done on one forearm. Your elbow should be right below your shoulder.
Beginners may do this from their knees. A modified plank can also be done with just the bottom knee down and the top leg straight.
To advance the move, straighten both legs and rest on the side of your feet and your forearm. (Feet may be stacked or one may be in front of the other.)
If that isn’t challenging enough, raise the top leg. You can also do the side plank from your hand.
High front plank and two side plank variations
Your top arm can rest on your hip or reach up toward the ceiling. Make sure to keep your body in a nice straight line. Squeeze your glutes and make sure your chest doesn’t rotate toward the ground. Drive your bottom hip up nice and high. Do not let your hip sag toward the ground.
3. Planks with Hip Dips – There are two variations of plank hip dips that I love to use. One is a front plank with hip dips and the other is a side plank with hip dip.
To do the front plank with hip dip, set up on your forearms and knees or toes. Keep your core engaged and your belly button pulled in toward your spine. Then drop the side of your right hip down toward the ground. Come back to center and then drop the side of the left hip down toward the ground. Alternate hip dips while keeping the core tight. Do not let the hips sag or raise up toward the ceiling.
To do the side plank with hip dip, set up on one forearm and either your knees or the sides of your feet. Start in a basic side plank. Then keeping your body straight and your chest open (aka not rotated toward the ground), drop your hip toward the ground and then press it back up as high as you can. Repeat making sure your body doesn’t collapse forward. Your top hand can be raised toward the ceiling or on your hip. Complete all reps then switch to the other side.
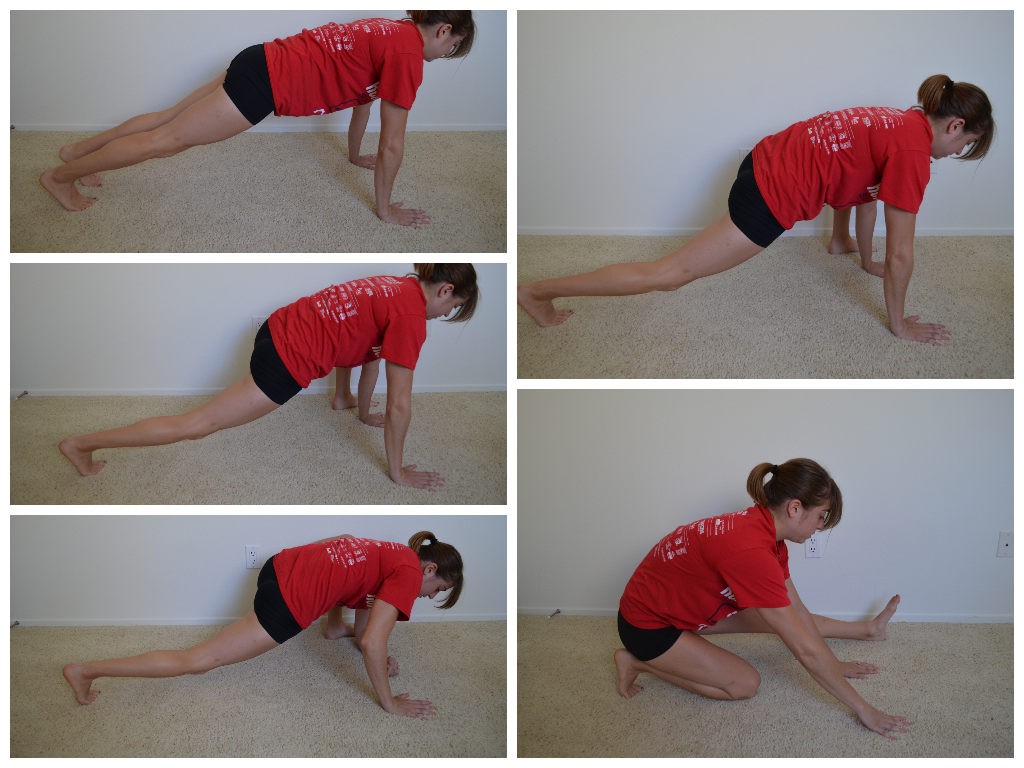
4. Plank with Reach Out and Back – A great glute activation move and tough on the core. This move is done from the hands and either your knees (beginner) or toes (advanced). To do this move from your knee, set up in the top of a push up with your hands under your shoulders and your body in a nice straight line down to your knees. Then sit back on your heels into a “child’s pose” position, reaching one hand back between your legs. Move forward back to the top of the push up as you reach the hand from between your legs out toward the wall beyond your head. You may even extend your hips more toward the ground. Just make sure to keep your abs engaged so that you don’t feel the extension out in your low back. Complete all reps on that side before switching to the other arm.

To do the plank with reach out and back from your toes, start at the top of a push up with your hands under your shoulders and your body in a nice straight line to your toes. Your feet should be between hip-width and shoulder-width apart. Lift one hand and hike your hips up as you reach back and across to the opposite ankle. Then reach back forward, reaching beyond your head as you lower your hips back down into the plank position. Extend your hips forward toward the ground, squeezing your glutes while keeping your abs engaged so that you don’t feel it in your low back. Complete all reps on that side before switching to the other arm.
5. Plank with Reach Thru – Set up in the high plank position on your hands and knees (beginner) or toes (advanced). Then reach one hand under your armpit and toward the far wall. You don’t just want to reach under your armpit to pat yourself on the back. Make sure your hips stay down as you reach through. Then pivot open, rotating into a side plank. You will reach the hand that reached under your armpit up toward the ceiling while rotating onto the sides of your feet or knees. Then reach the hand back down and under the armpit. Move back into a high plank position. Complete all reps on that side before switching and reaching the other way.

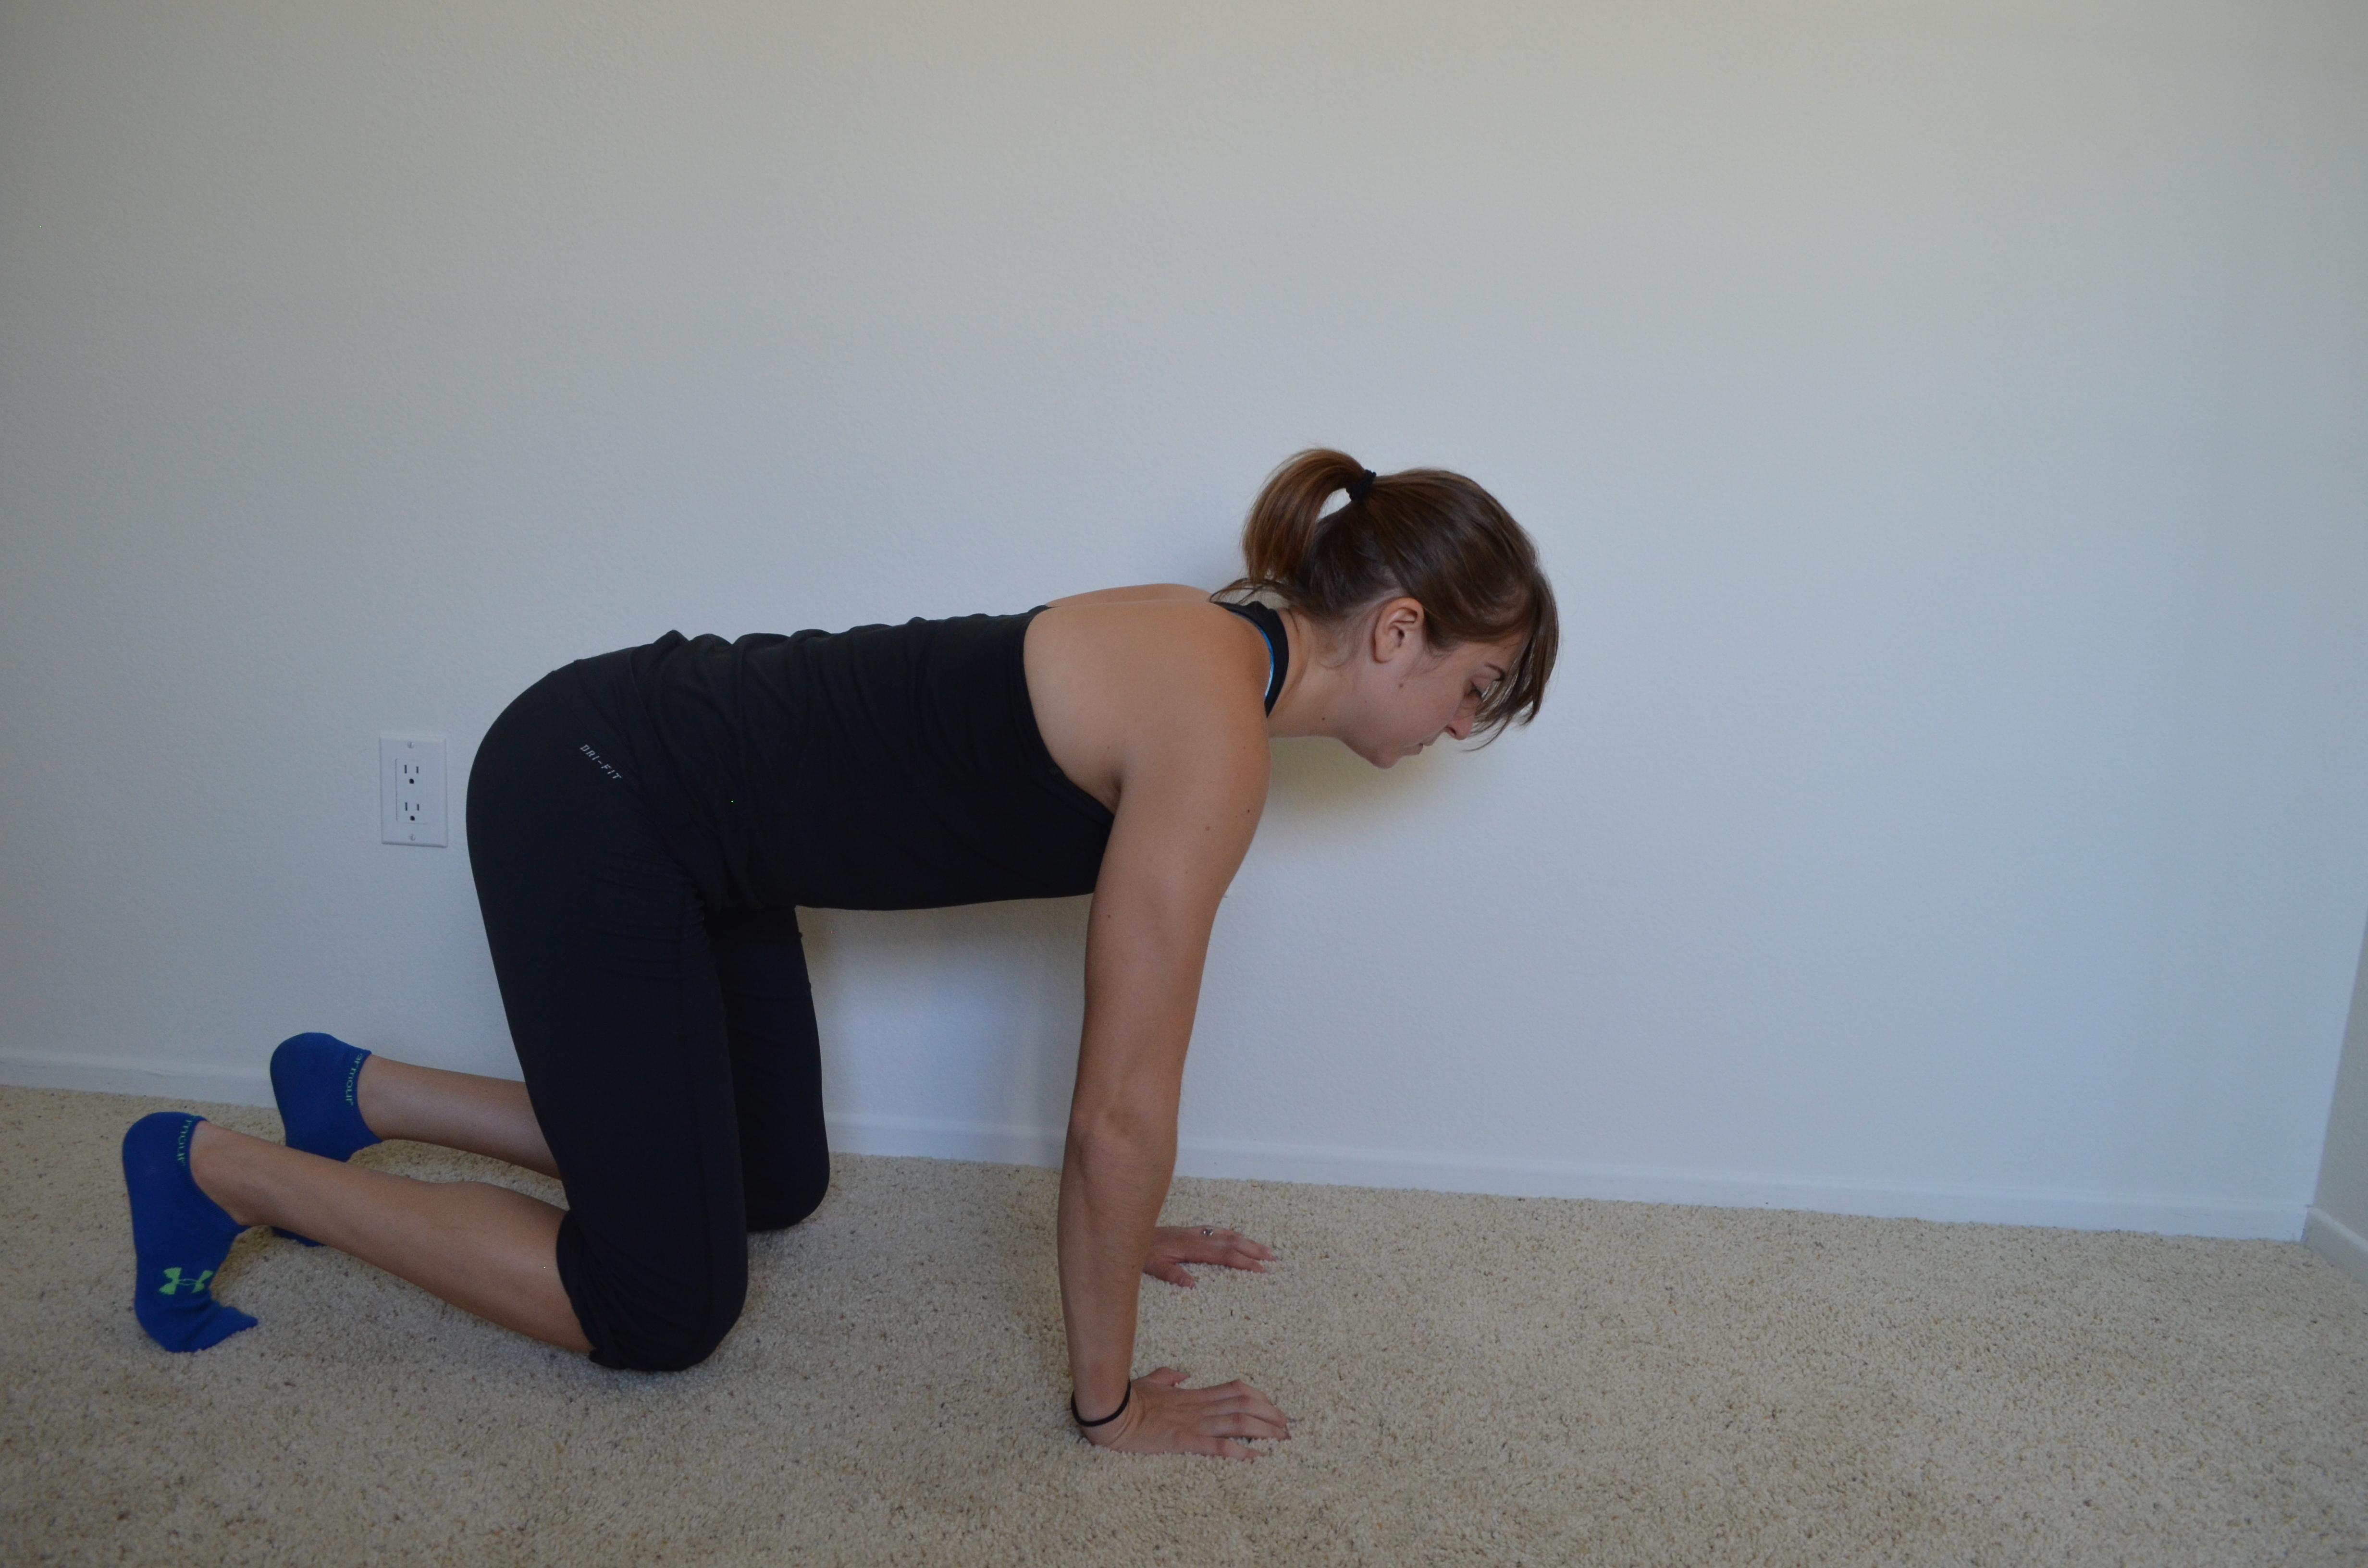
6. Bull Dog – To perform a bull dog hold, start on your hands and knees with your knees under your hips and your hands under your shoulders. Flex your feet and push up onto your toes and hands while your knees stay bent under your hips. Hold your knees an inch or two off the ground, keeping the core tight and the belly button pulled in toward your spine. Do not let your upper back arch as you hold. This move you almost feel more in your quads and shoulders than your core.
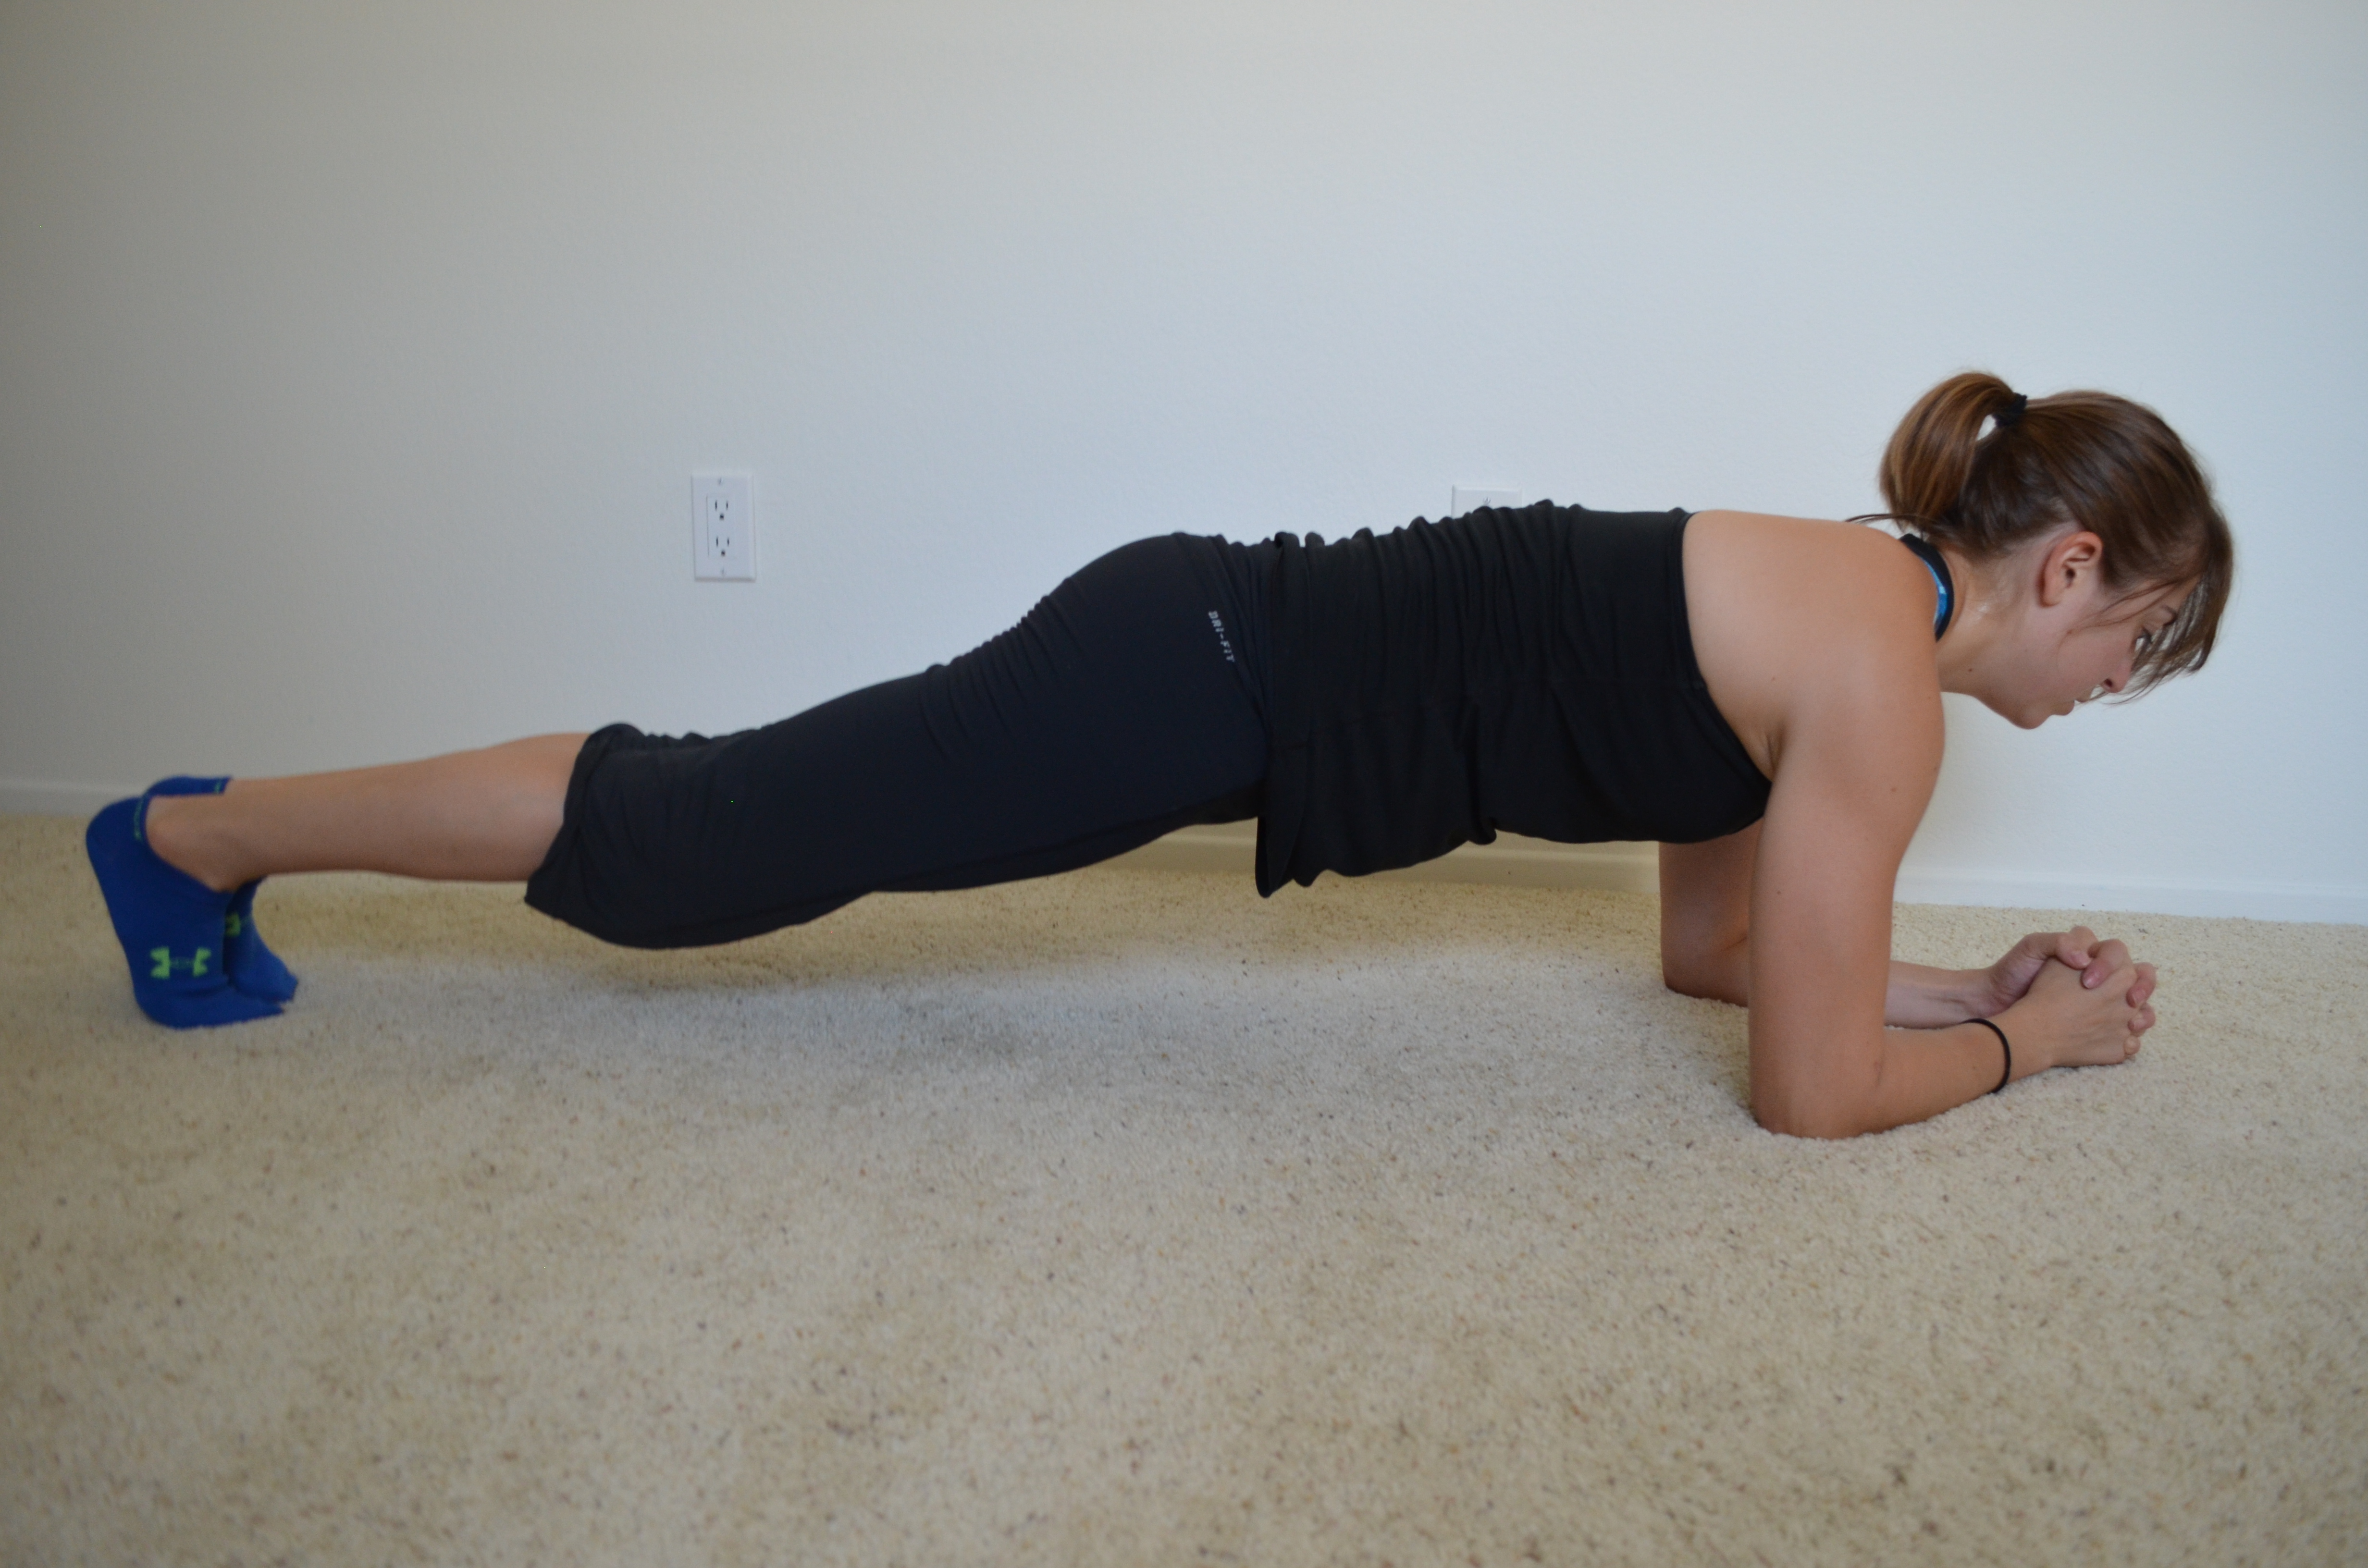
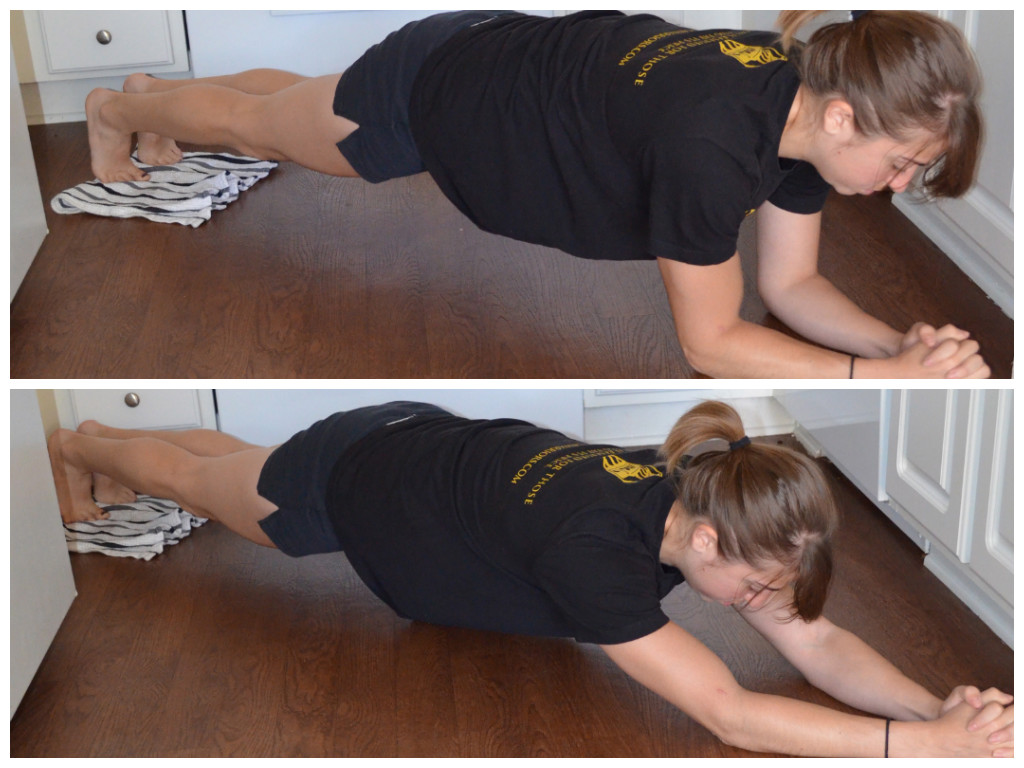
7. Body Saw – This is a very advanced plank variation…even at its most regressed. You can do this on a towel or sliders or regress it to a simple plank from your toes on the ground. Set up on your forearms and toes in a basic front plank. If you aren’t using sliders or a towel, you are going to walk your feet backward, lengthening your body through your triceps. Keep your body in a nice straight line. Do not let your low back arch. Walk your feet back as far as you can while maintaining good form and then walk back forward into the front plank.
If you use sliders or a towel, you will slide your feet back instead of walking them back. Make sure your lengthen through your arms. It is tempting to “pike” instead of truly lengthening, but to challenge your core, you need to lengthen your body out. You should not feel it in your low back. Keep the belly button pulled in and your glutes engaged. Don’t let your hips hike up or sag toward the ground. Slide out and back in and repeat.
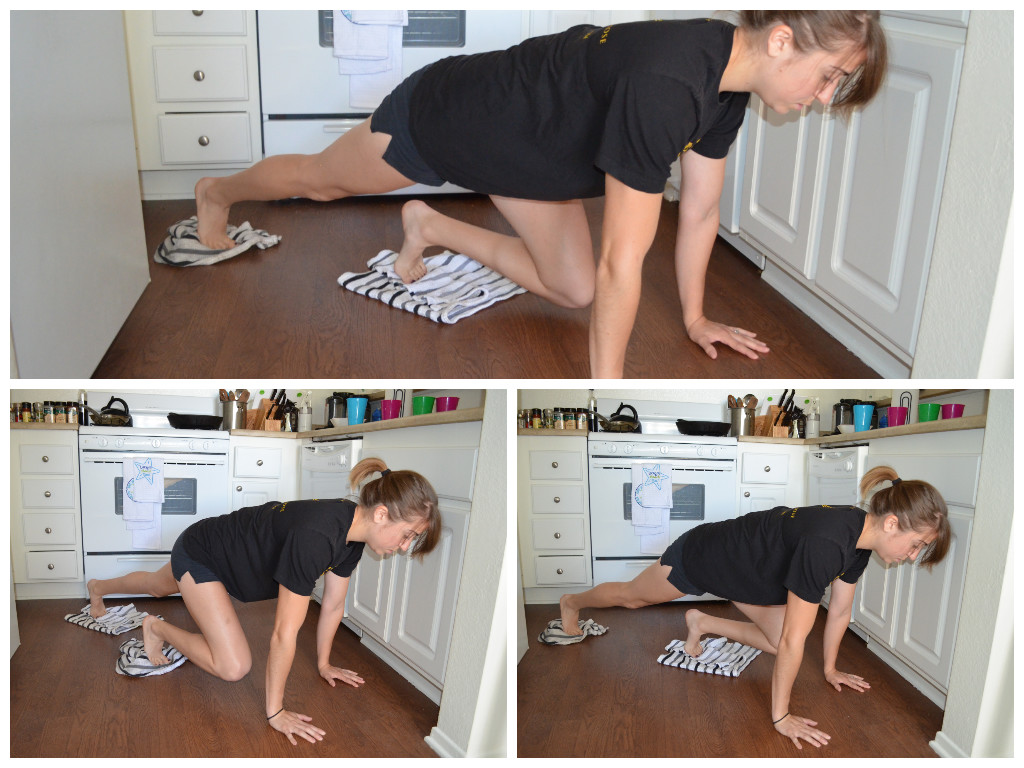
8. Bird Dog – The basic bird dog is done from your hand and knee. Place your hands underneath your shoulders and your knees underneath your hips. Flex your feet. Kick one leg out straight as if kicking it into the wall behind you while you reach the other arm out straight toward the wall in front of your head. Don’t worry about lifting your leg or arm up high. Really try to drive your arm and leg toward opposite walls. Squeeze your glutes and keep your belly button pulled in toward your spine. As you lower your arm and leg, bend them and bring them together under your body. Try to touch your knee to your elbow before extending back out. Repeat all reps on one side before switching to the other side. All reps should be done in a slow and controlled manner. You should even hold for a second or two at the top of the move.

To advance this move, set up in a high plank position from your toes and hands. Now lift the opposite arm and leg up toward the ceiling, keeping both straight. Still try to reach both toward the far walls instead of just getting them up as high as possible. Keep your core tight and glutes engaged. Do not let the hip of the raised leg rotate open toward the ceiling. Squeeze the butt to hold the leg up then lower the arm and the leg and repeat the arm and leg raise on the same side.
Both bird dog variations can also be done as holds at the top instead of for reps.
9. High Plank Hold with Knee Drives – Set up in the high plank position on your hands and toes. You are then going to raise one leg off the ground and drive that knee toward your chest. You can drive the knee straight in. Or you can drive it to the outside of the same elbow (so right knee to the outside of the right elbow). You can also do a cross-body drive, bringing the right knee under and across the body to the left elbow.
Whichever drive you do, hold the knee in and the foot off the ground. Hold for 30 seconds to a minute before returning the foot back down to the ground and moving back into the high plank position.
If you want to make the move more cardio, you can turn it into a “mountain climber” by running the knees in and alternating knee drives instead of holding the drive.
You can even make the climbers harder by adding a towel or slider.
10. Reverse Plank – I’ve talked about this move before…It is the one that always reminds me of Flash Dance (also called the Posterior Plank). Start seated on the ground with your legs out straight and your hands on the ground behind your butt. Your finger tips should be pointing toward your butt. Drive through your hands and heels and raise your hips up off the ground toward the ceiling. Press your chest up and out as you raise your hips. Keep your legs straight as you bridge up and relax your head back. You can either perform a Reverse Plank hold by holding at the top or you can perform reps, dropping your hips back down and raising them back up.
To make the move easier, you can bend your knees slightly. To make the move more advanced, you can perform a single leg Reverse Plank.
Here are some other amazing plank variations (some of which overlap the ones I’ve discussed above).
Salted Chocolate Macadamia Nut Butter Recipe
While I’ve been enjoying an assortment of nut butters from Ingr-EAT-ients, I couldn’t help but want to try to make some of my own again.
Ever since I made the macadamia nut butter about a month ago, I’ve been wanting to try a nut butter variation of one of my favorite healthy desserts – Salted Dark Chocolate Macadamia Nut Bark.
Which when I tried making it the other day, along with a plain Macadamia Nut Butter and a Vanilla Honey Cashew Butter (which reminded me of cookie dough), ended up sort of tasting a little like Nutella. Not exactly like Nutella, although I’m sure you could make something even closer using hazelnuts, but enough that it really really REALLY tasted like a treat!
Although I could simply eat the chocolate macadamia nut butter by the spoonful, it was also great on an apple. And I can’t wait to try it in the Yonanas later this week…Just image….Salted Chocolate Macadamia Nut Banana Ice Cream….DROOL….
Anyway, here is the Salted Chocolate Macadamia Nut Butter recipe!
Salted Chocolate Macadamia Nut Butter
Ingredients:
10 oz Unsalted Roasted Macadamia Nuts
About 1/2 cup Dark Chocolate chunks
1 tsp Sea Salt (can use less or more to taste)
1 tsp Coconut Oil
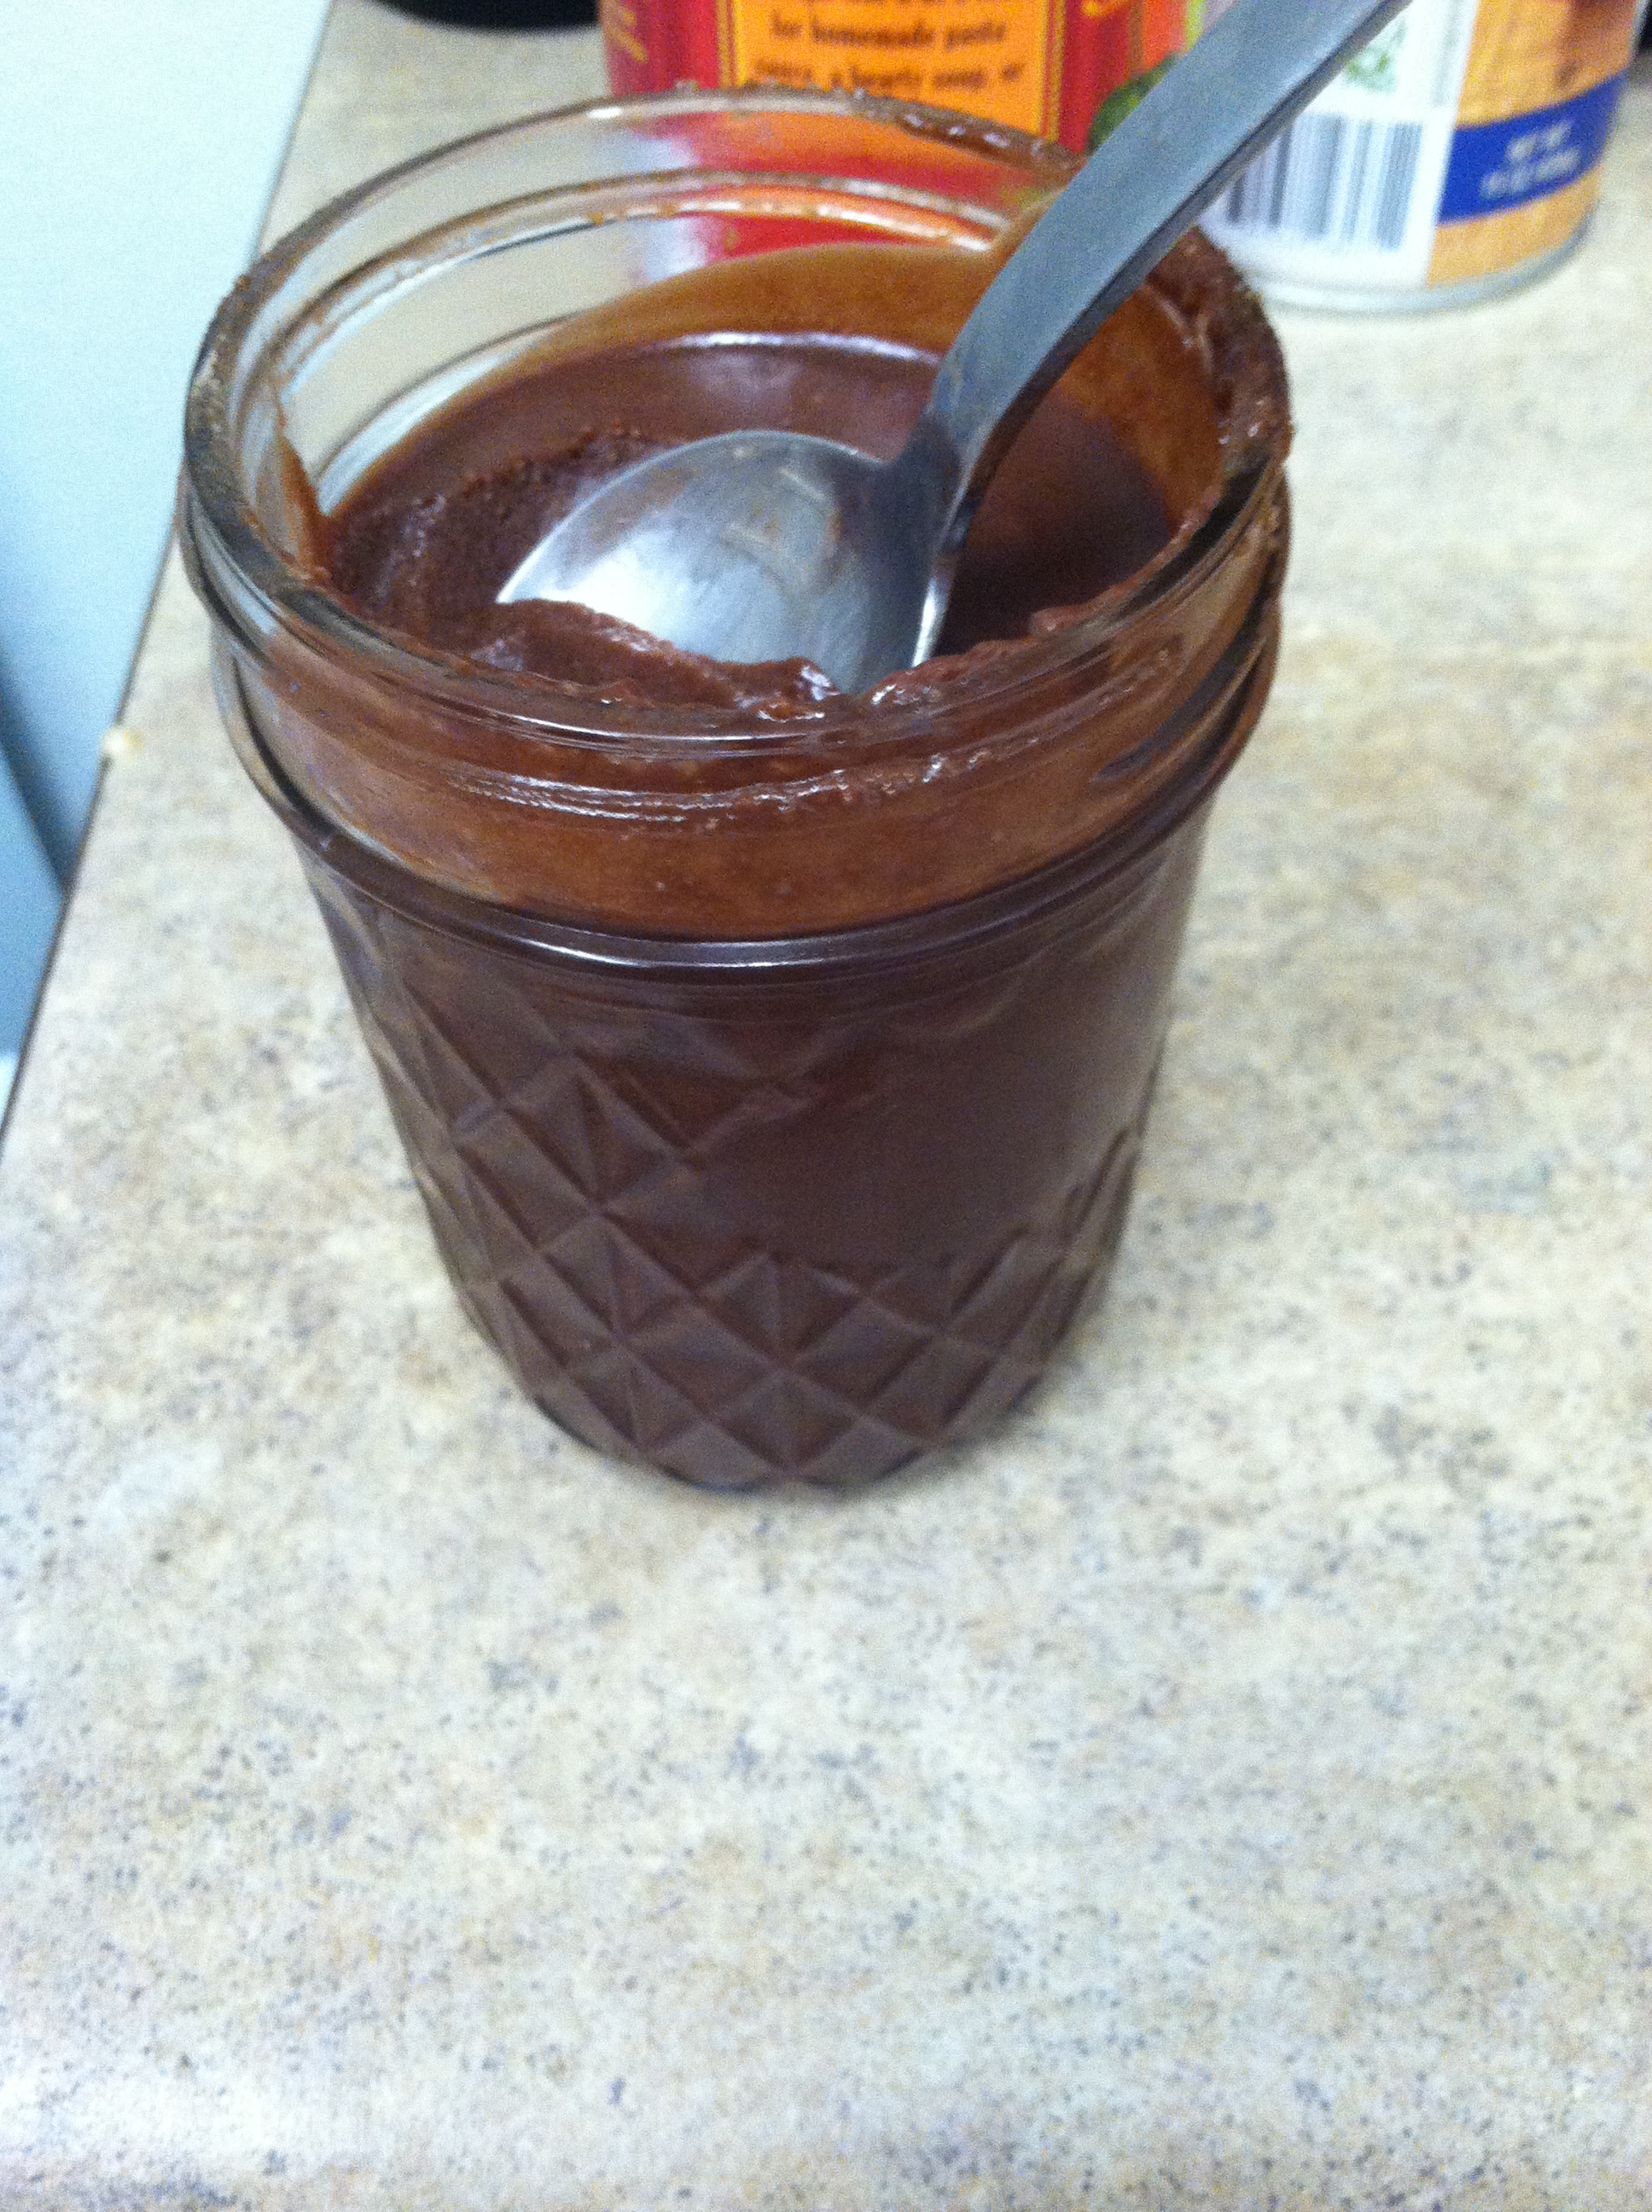
Place nuts in a food processor. Process until a fine powder. Add in chocolate, salt and oil. Continue to process until smooth. This will take only a minute or two.
If you would like it to be chunky, put in a few nuts at the very end and blend for only a second or two.
Have you ever made a chocolate nut butter at home? What would you eat the Salted Chocolate Macadamia Nut Butter on?
Tips to Relieve Low Back Pain
Low back pain is one of the most common complaints I get from new clients who have a desk job.
And honestly, I’m not surprised. They sit hunched over a computer all day, which causes bad posture and muscle imbalances that can easily lead to injury and pain.
That bad posture contributes to low back pain because it causes tight hip flexors, hamstrings and even calves. It can also cause tight lats and poor thoracic extension.
Those tight muscles and poor extension cause imbalances. They cause you to overuse the low back. And the tight hip flexors and hamstrings especially inhibit the glutes and prevent them from activating, placing more pressure on your low back.
Because muscles aren’t working that should be working, your low back takes over when it shouldn’t, which causes further pain and injury.
Below are some great trigger point, stretching and glute activation techniques to help you relieve that low back pain and get more out of your workouts!
TRIGGER POINT RELEASE
For videos showing all of these trigger point release moves, sign up for the Redefining Strength video library!
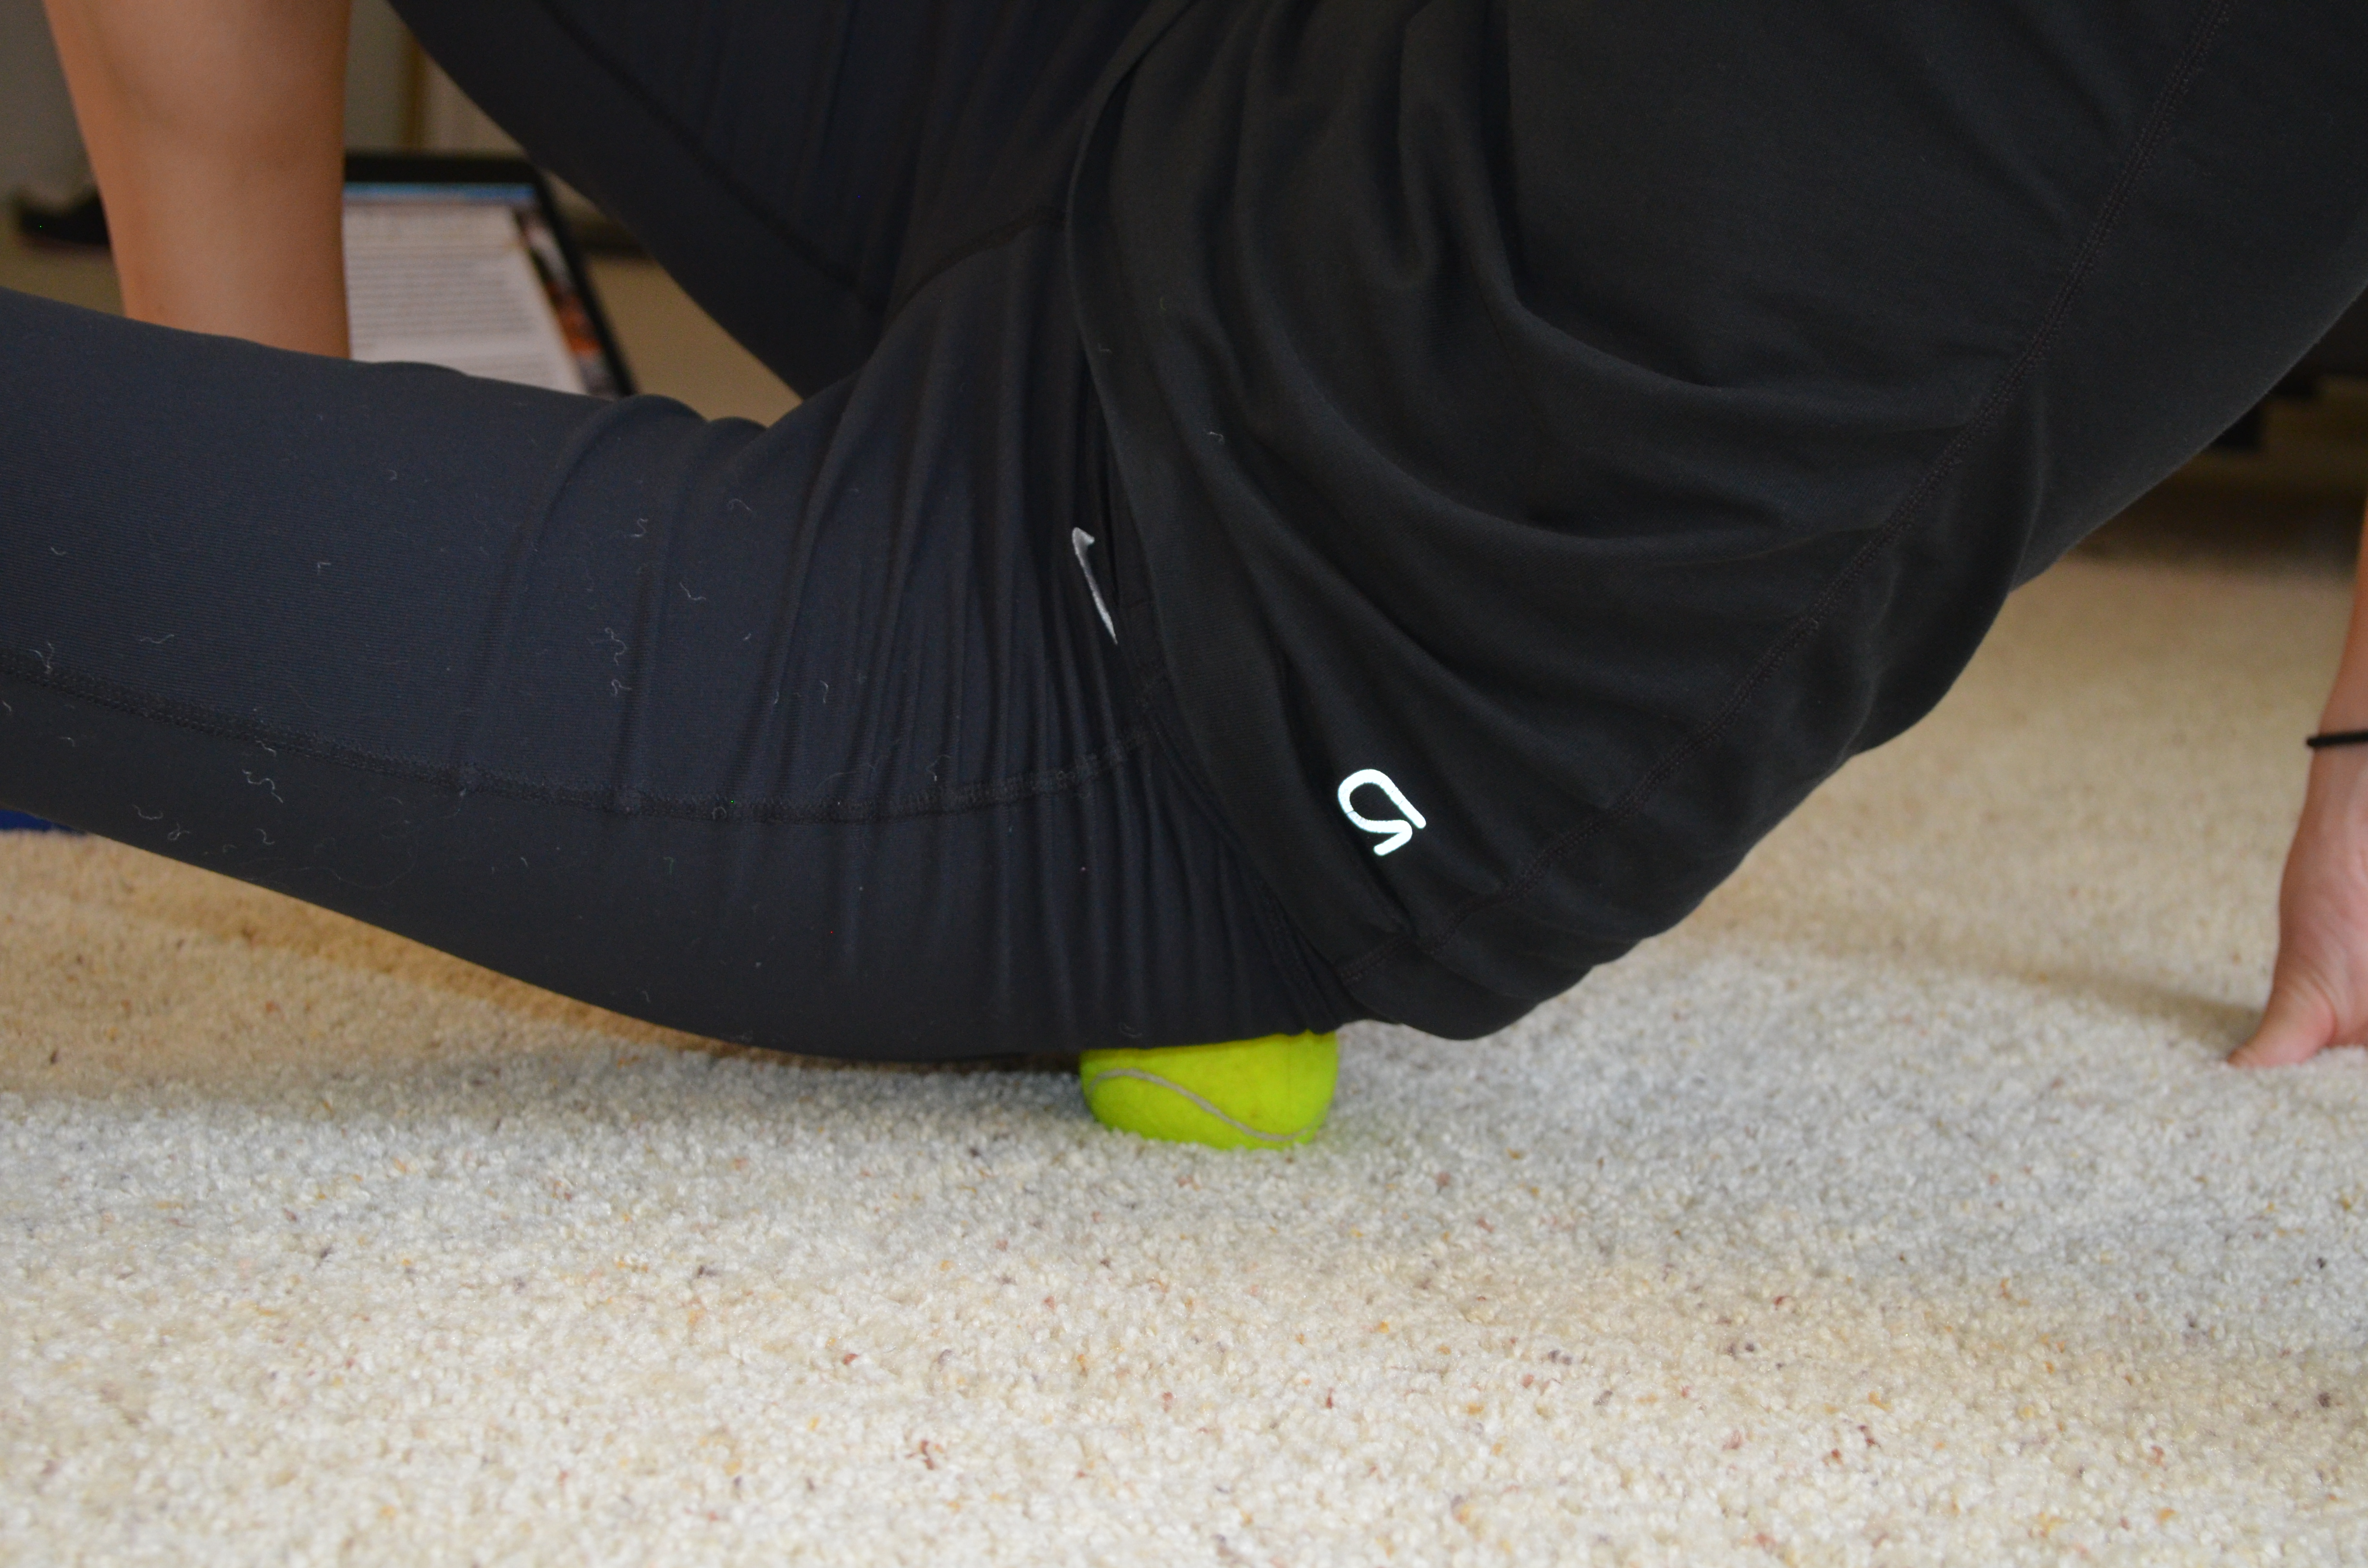
1. Calves – I love using either a rumble roller or a ball on a block (or books if you don’t have a block). I find it easier to really dig into knots using one of those tools. To roll out your calves, place one calf over the trigger point tool. Cross the other leg on top to apply more pressure. Rock the leg side to side to dig in more. You can also make circles with the foot and flex and relax the foot to apply more pressure and help release the trigger point. Move the ball or roller up and down the back of your lower leg, spending time on any tight spots you find.
2. Hamstrings – The best way to hit your hamstrings is using a ball or roller, but while seated on a chair, bench or table. You really can’t apply enough pressure while seated on the ground. Place the ball or roller right below your butt at the top of your hamstring and sit down on it. Roll it from side to side, holding on any tender spots. You can work your way down the length of your hamstring to right above the back of your knee. Do not roll out behind your knee.
3. Hips/Glutes – The best way to target your hips and glutes is with a ball. The smaller and harder the ball, the more you will really be able to dig in. Start by lying face down on the ground with the ball at the top of one quad. Roll the ball toward your groin and then back toward your hip bone. Move it slightly up and down the top of your quad. Hold on any tight spots. After working out the front of your hip, move the ball around the side and to the back of the hip bone. Roll out the top of your glute, staying right below your low back. Hold on any tight spots. As you work your way down your butt, as you hold on any tight spots, lift and lower your leg. Also draw your knee in toward your chest and then straighten the leg back out. Those two moves will help you apply more pressure to any trigger points. Spend more time on the areas in your hips and glutes that are tight. If a spot doesn’t hurt, don’t spend time there!
4. Ab Release – This is best done with a larger ball although it can be done with a small ball on some books or a block. Lie face down on the ground with the ball under your belly. It should be to one side of your belly button and right beside/above your hip. So basically in one side of your abs. Relax over the ball, letting your body sink into the ground. This will help release your hips as well. You can also move the ball up higher to right below your rib cage to help release your abs. Our abs can be tight and shortened because we sit hunched over all day so we can’t forget to roll them out as well!
5. Peanut – The peanut (two balls tapped together) can be used to work all the way up your back along your spine. It is personally one of my favorite tools. Lie on your back with the peanut right above your butt and a ball on either side of your spine. Relax your upper back onto the ground and lift both knees into your chest. Repeat that movement a few times then move the peanut up higher on your back and repeat. Once the peanut is at about the middle of your back and you don’t feel like tucking your knees is applying more pressure, start performing an upper body crunch instead. Perform a few slow crunches and continue working the peanut up your back until you reach the top of your shoulder blades. Spend more time on any tight areas.

5. Lats – You can use a roller or a larger ball to roll out your lats. I prefer the roller because I feel like it is easier to work all the way up and down your side. Lie on your side with the roller under your armpit. Rock forward and backward then move the roller lower down your side. Continue to rock slightly forward and backward to dig in further to any trigger points. Work down the side of your back until you hit the bottom of your rib cage. Spend more time on the areas that are tight.

7. Thoracic Spine – You can use a peanut or a ball to work out your upper back. One of my favorite ways to roll out my upper back, and work on thoracic extension, is with the roller. Bend your knees and place your feet flat on the ground with the roller in the middle of your back. Keep your butt on the ground and extend your back over the roller, letting your head relax back over toward the ground. Move the roller up higher on your back and repeat. Every time you extend back over the roller, make sure to breathe and keep your butt on the ground. Work all the way up to almost the top of your shoulder blades. You can also simple roll up and down without the extension, but I love to add the extension in there as well.
STRETCHES
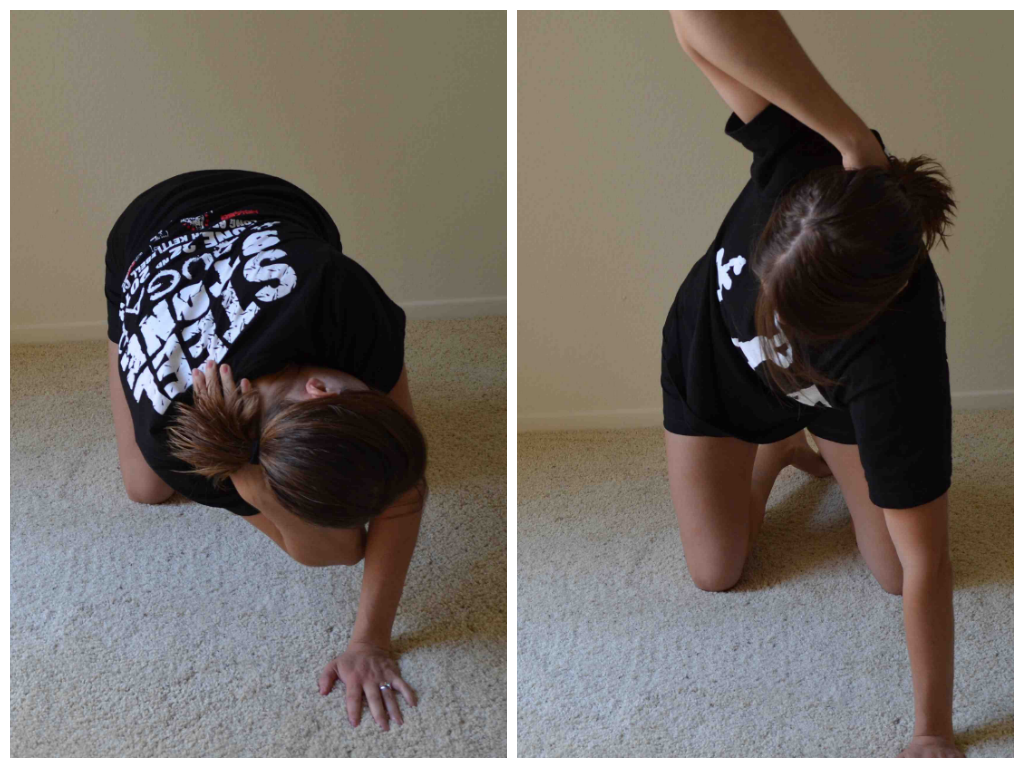
1. Bear Squat – Start kneeling on the ground. Place your hands down on the ground in front of you. The closer you place your hands to your knees, the harder the stretch will be. Press your butt up into the air, driving your heels to the ground. Feel a nice stretch down your calves and hamstrings. Hold for 1-2 seconds and then drop back down to your knees. If your feet feel locked up, you can do the bear squat with foot stretch.
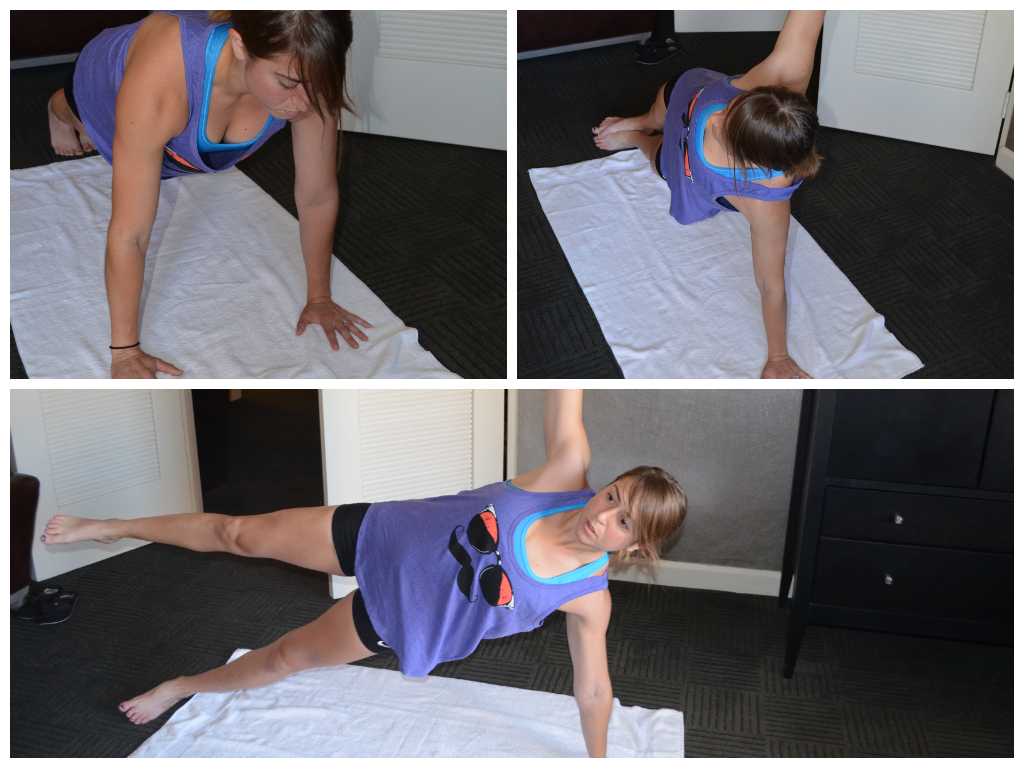
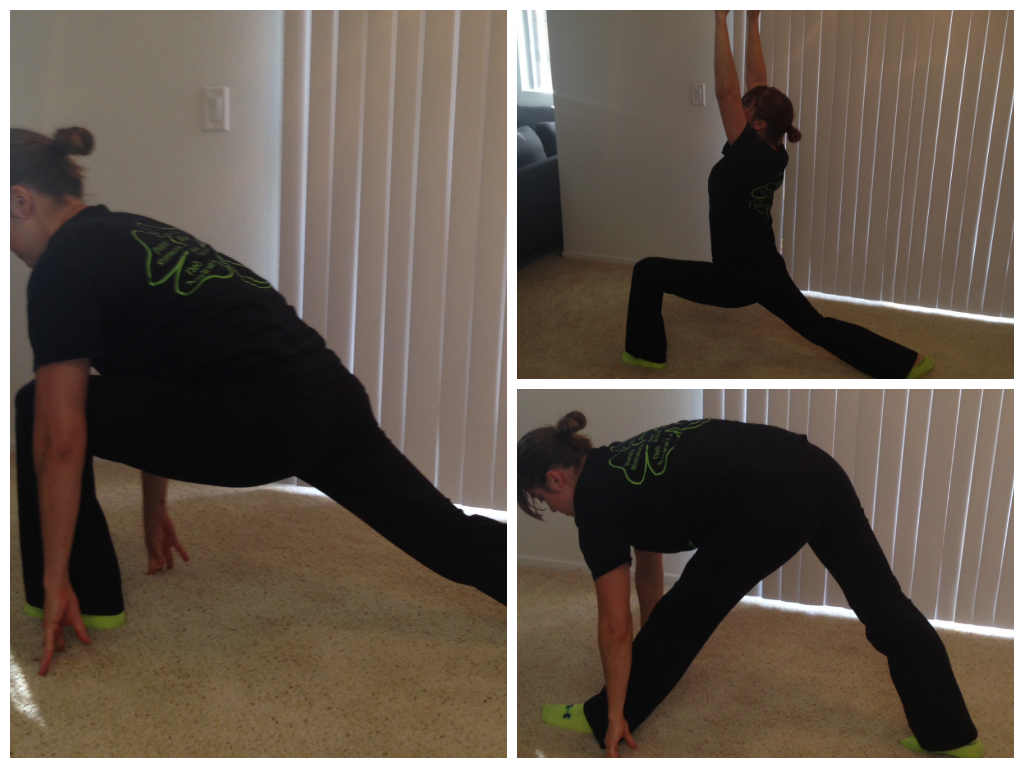
2. World’s Best Stretch with Hamstring – Start in a high plank position with your hands under your shoulders and feet together. Your body should start in a nice straight line. Step your right foot outside your right hand. Drop the right elbow down into the instep of your right foot. Then rotate open facing your right leg, stretching your right arm up toward the ceiling. Bring the right hand back down to the ground. Sit back on your left heel and straighten your right leg. Feel a stretch down your hamstring. Then bend the right leg and move back into the plank position with the foot outside the hand. Again drop the elbow and repeat the move on your right side. Complete all reps and then switch and do the stretch on the other side.
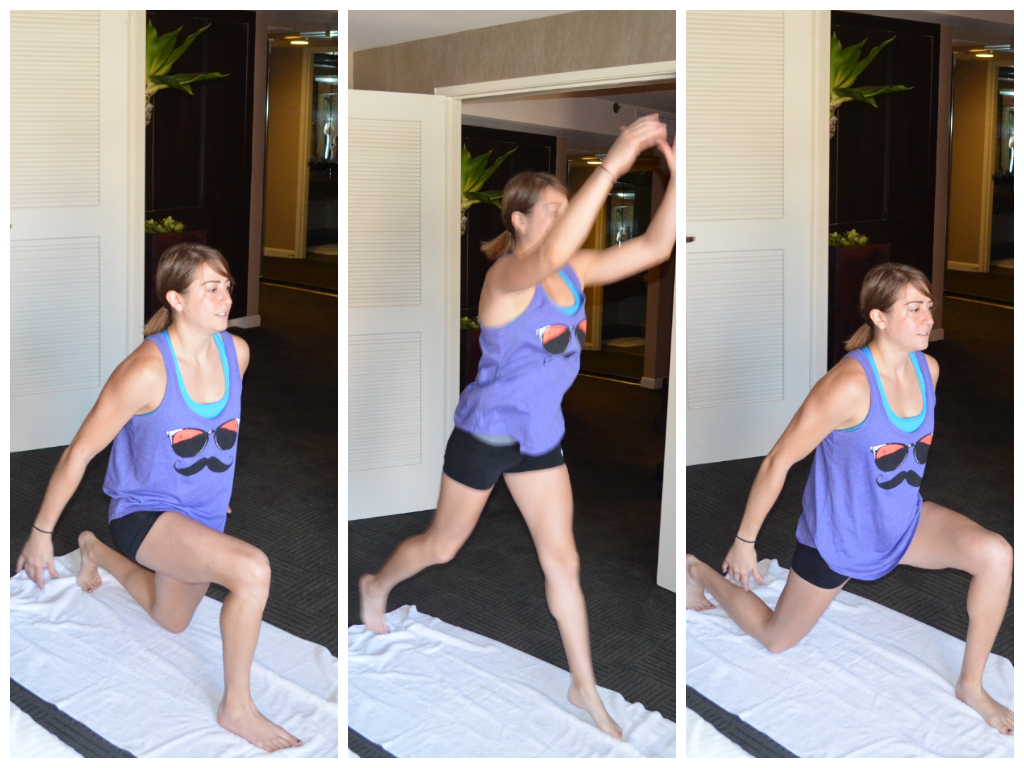
3. Lunge with Reach to Hamstring Stretch – This move kind of reminds me of crescent pose and a triangle pose in yoga…Not exactly but that is what it reminds me of. Start in a high plank position. Step one foot up between your hands. Lift your hands up off the ground and reach them back and overhead as you stay in a low lunge. Feel a nice stretch down the hip and quad of the back leg. Then bring the hands back down to the ground and hike your hips up to straighten your front leg. Feel a stretch down the hamstring of the front leg. Sink back into the lunge and reach up and back overhead again to stretch the hip and quad before repeating the hamstring stretch. Complete all reps on one side before moving back into the plank and switching to the other side.
4. Frog Stretch with Rotation – One of the best groin and hip stretches out there in my opinion. Kneel on the ground and spread your knees as wide as possible. Lower yourself down to your forearms. Keep your feet in line with your lower leg and knees. Do not let your feet come together behind your butt. Sit your butt back between your knees as much as possible. As you come back forward, lower your body down to the ground and rotate your lower leg up and forward. Sit back again and then pivot the other hip. Keep alternating sides until all reps are complete.
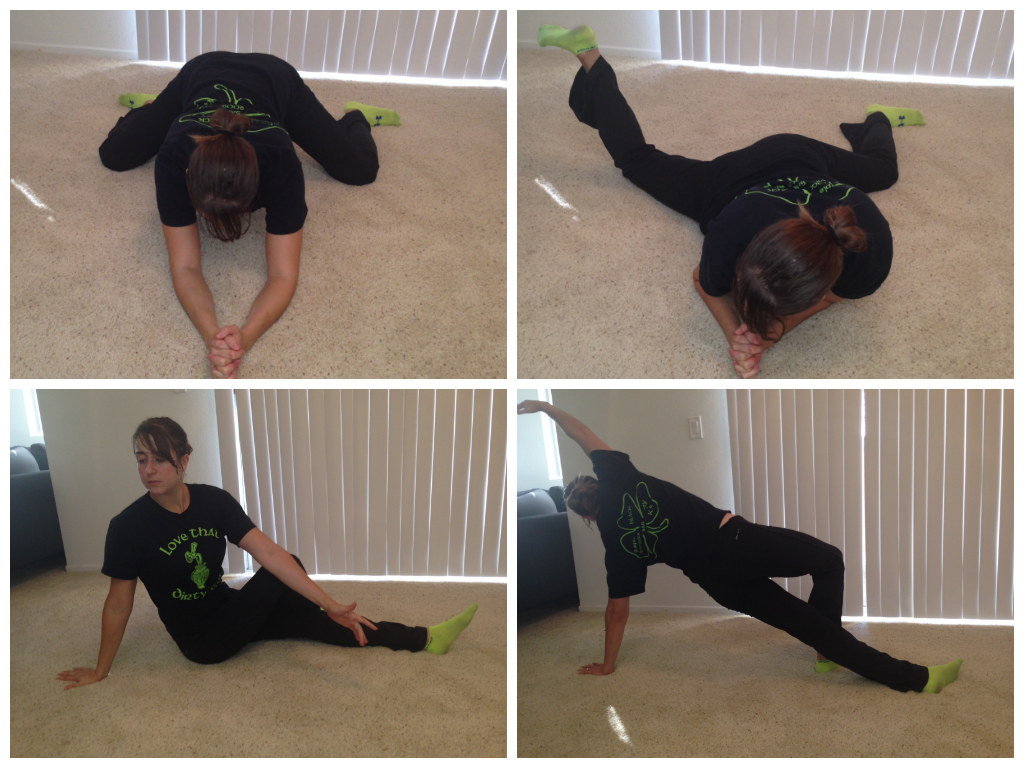
Top is frog stretch with rotation and the bottom is the seated rotation to plank reach
5. Seated Rotation with Plank Reach – Sit on the ground with both legs out straight. Bend your right knee and cross your right foot over your left leg and place it on the ground by your knee. Place your right hand on the ground behind you. Take your left arm and place your left elbow on the right side of your right knee. Press through your left arm and rotate your body to the right, keeping your chest up nice and tall. Do not slouch. Then rotate back around and place your left hand on the ground behind you. Press up into a side plank, driving through your right foot and the side of your left foot. Reach your right hand back and overhead. Then sit back down on the ground and rotate back to the right and repeat the whole stretch. Complete all reps on the right side before switching.
6. Child’s Pose with Lat Stretch – Kneel on the ground with your toes pointed. Sit back on your heels reaching your arms out on the ground overhead. Walk your hands out as far as possible. You can also walk your hands to the right and left to get more of a stretch down each side of your back. You should feel this stretch down your arms and the sides of your back. You should also feel the stretch in your low back if you are relaxing back onto your heels.

7. Standing Wall Lat Stretch – Most easily done in a corner, but can be done on a flat wall. Reach your arm up the wall and press your side as close to the wall as possible. You can also bend your elbow and relax your hand down your back. Breathe and relax into the wall as much as possible.
8. Kneeling Thoracic Extension – On your hands and knees, reach one hand down your neck and spine. Fingertips should be pointing down your back toward your butt. Then rotate your core so that your elbow goes under your arm on the ground. Then rotate open driving the elbow up toward the ceiling. Try to focus on just opening up your back and not really shifting your weight in your lower body. Then rotate back closed and repeat. For more Thoracic stretches, check out an earlier post on Neck and Upper Back Pain.
9. Cobra – Lie on your belly with your legs out straight. Prop yourself up on your forearms with your elbows under your shoulders. You can stop there or you can press up further. You can push yourself up higher and lift up onto your hands if the stretch from your forearms isn’t enough.
NOTE: To help correct upper body imbalances, you may also need to address tight pecs, which will improve your posture and can in turn even help reduce your low back pain!
BONUS move….Kneeling Bridge. This is a great move to stretch out those pecs, work on thoracic extension and stretch your hips and quads! It is basically exactly the opposite of how your body is positioned while sitting all day. The only downside is many people struggle with the flexibility to truly do this move. You can always use a chair or bench and place your hands on top of that instead of your heels if you can’t reach your heels.
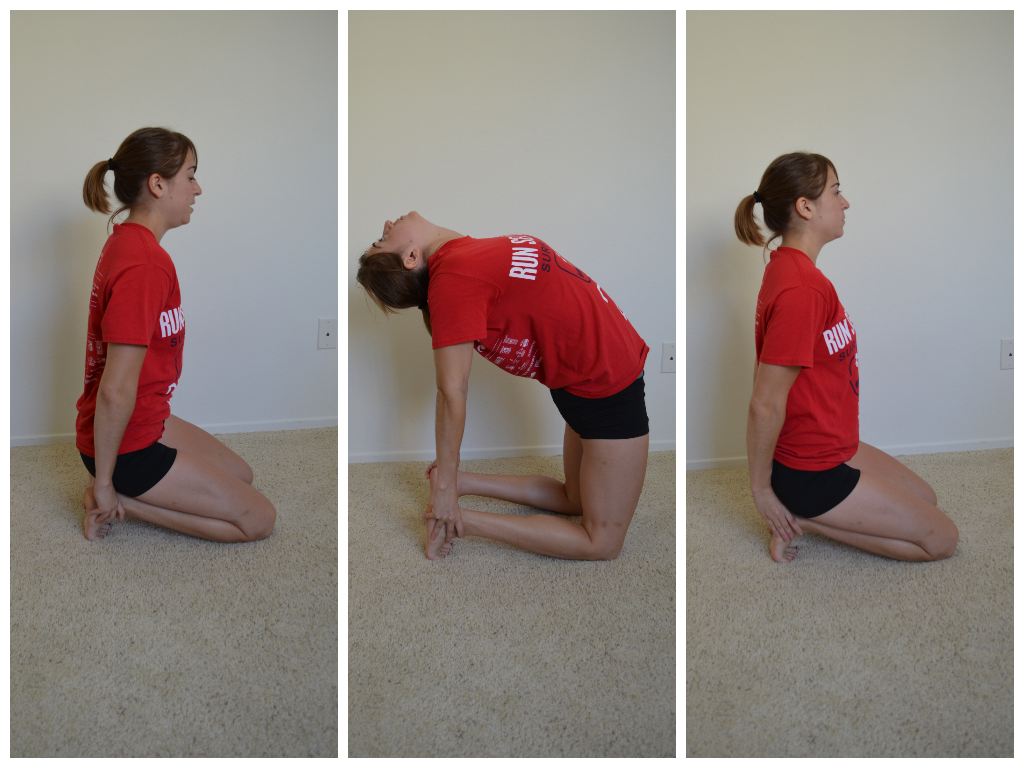
One of my favorite stretches to stretch everything made tight by sitting. A great one for days when you do front squats.
ACTIVATION
To reduce low back pain, you want to focus on activating your abs and your glutes.
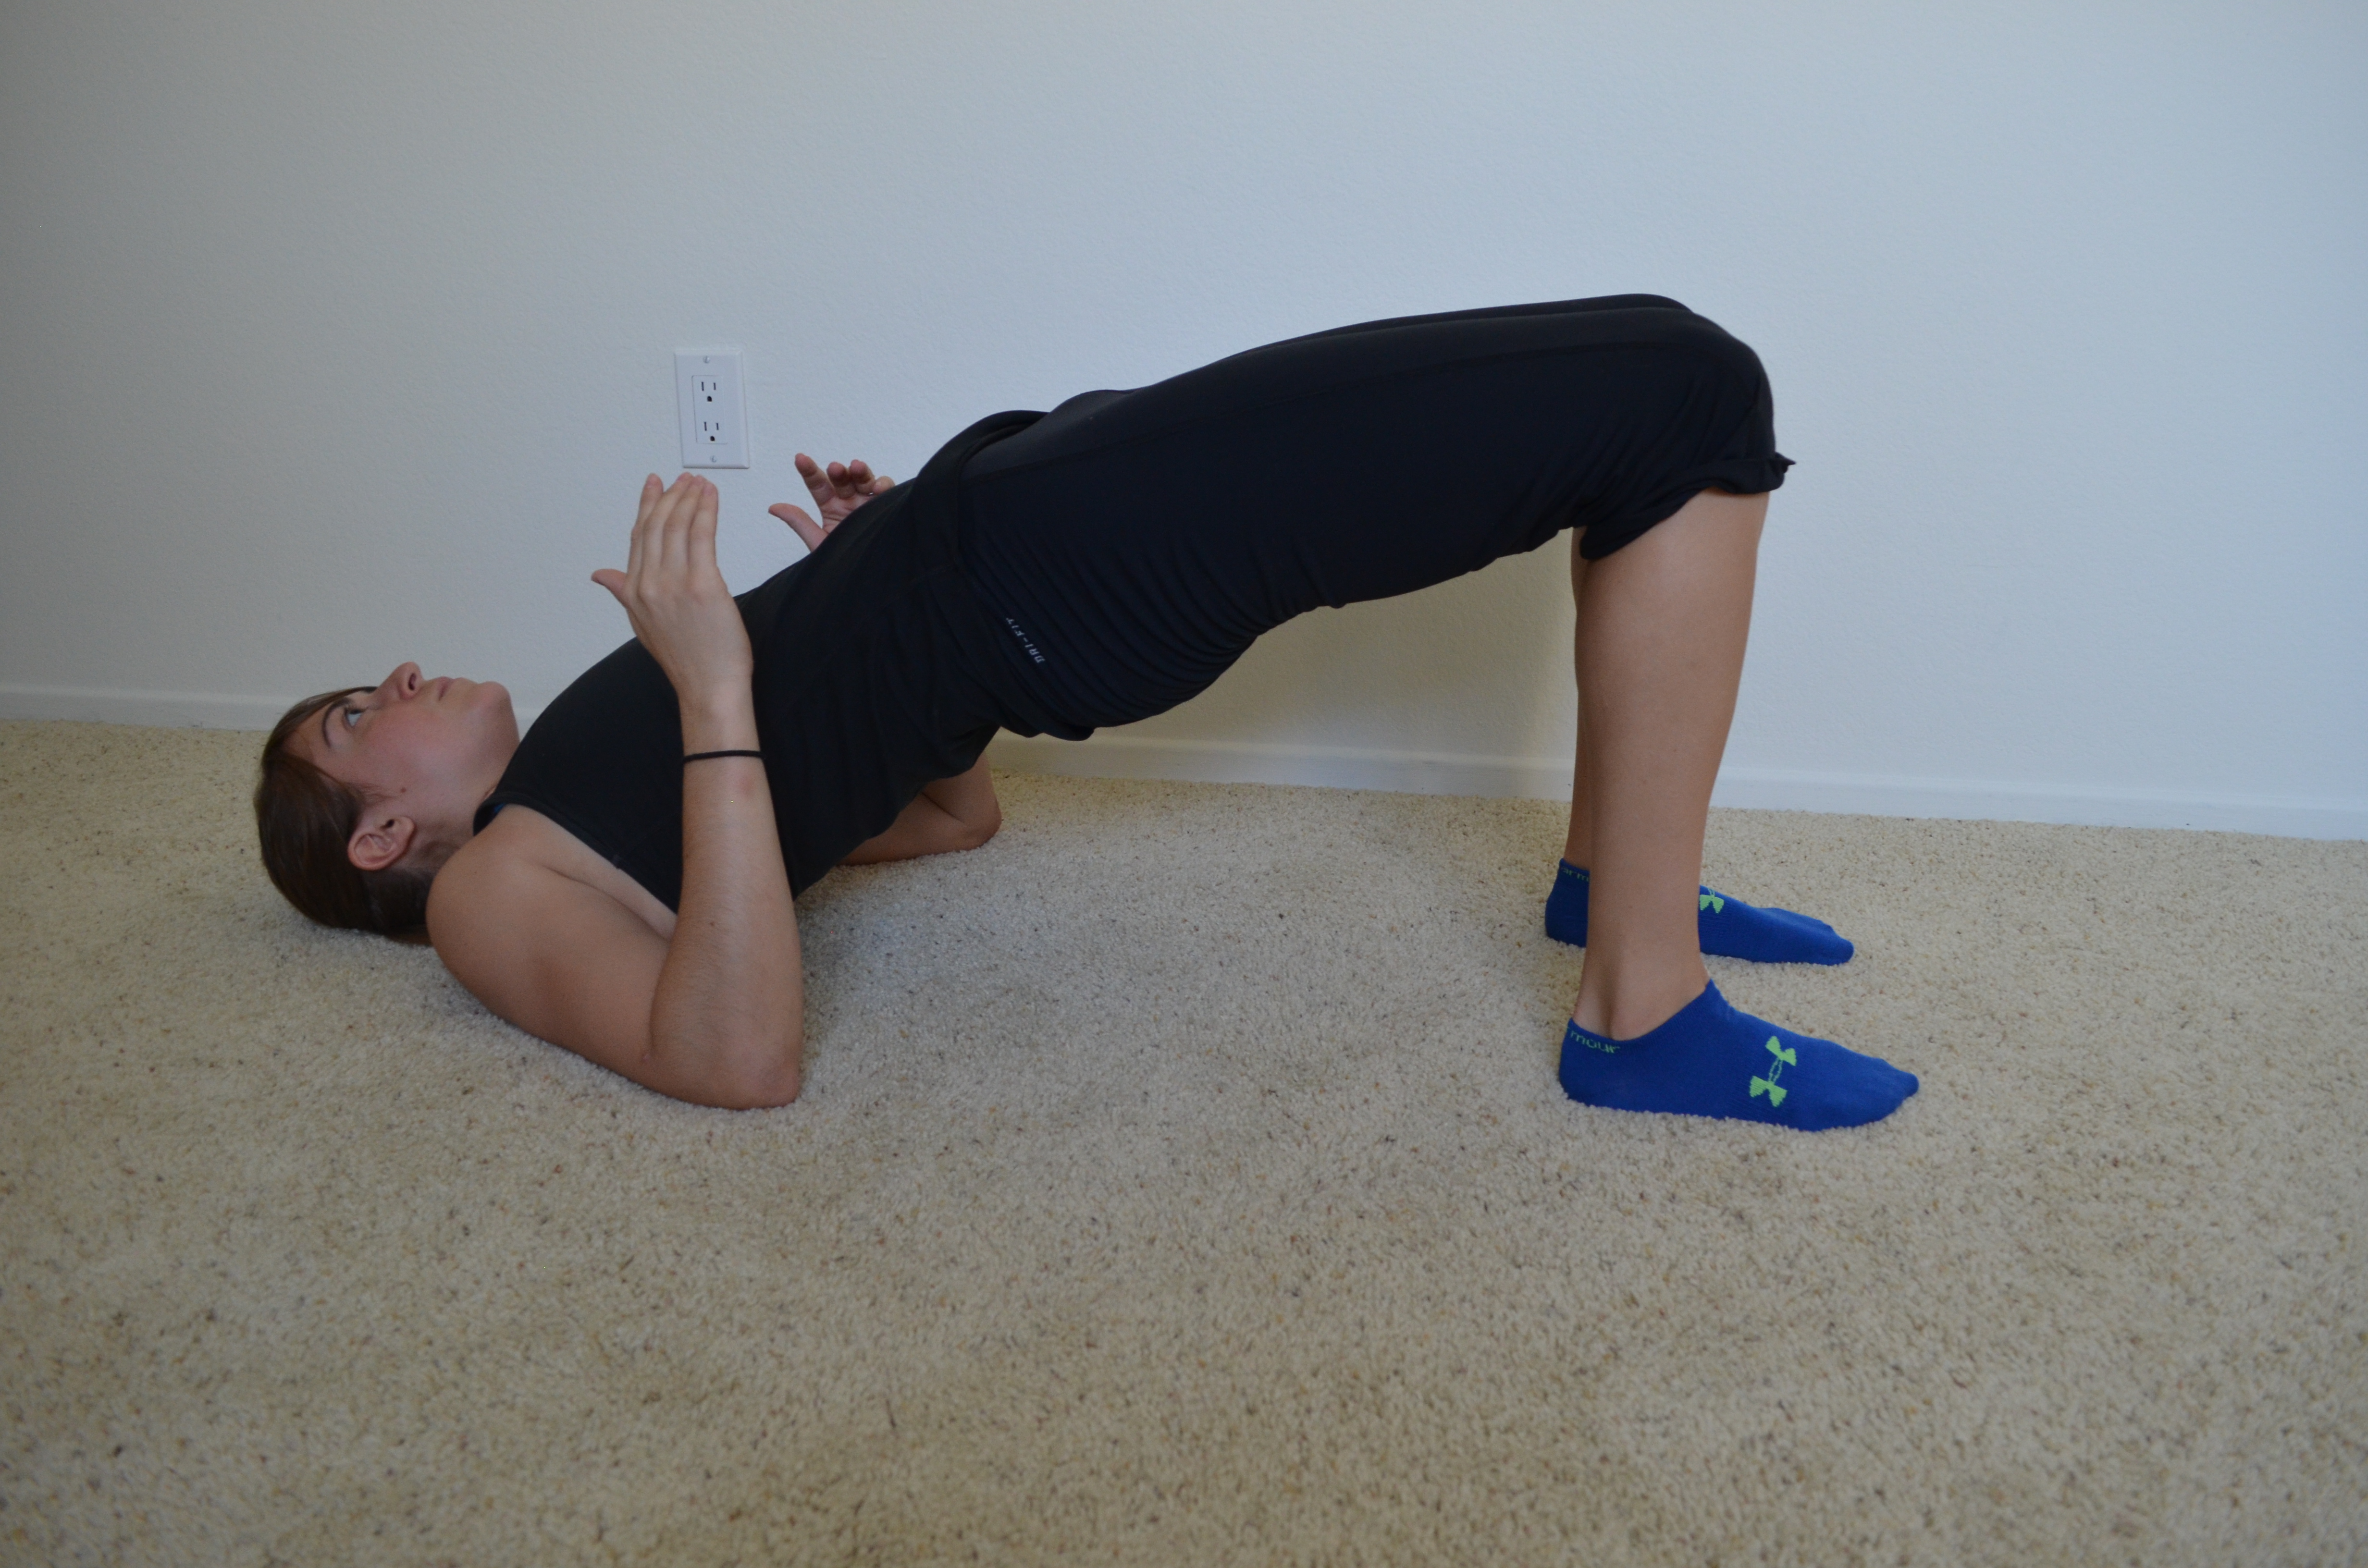
1. Glute bridge – Lie on your back with your feet about hip-width apart. You should basically be able to touch your heels with your finger tips. Then bend your elbows to 90 degrees. Drive your elbows, shoulders and heels into the ground as you drive your hips up. Make sure your knees do not fall apart. Actively squeeze your butt as you drive your hips up. If you only feel your hamstrings working, make sure that you aren’t driving off your heels backwards. You shouldn’t feel like you are driving back into your shoulders. You want to actual feel like you are driving your knees forward over your toes even though you are driving through your heels. Drive your hips straight up. You can either do a glute bridge hold and hold at the top or you can perform reps by lowering down and lifting your hips again.
2. Reverse Hypers – Lie face down on the ground to perform a Reverse Hyper or perform an IKEA table Reverse Hyper if you have a table that will support you. To do the hyper from the ground, lie face down with your legs out straight and squeezed together. Relax your upper body and squeeze your glutes to lift your legs up off the ground. Keep your legs straight and together as you lift. Hold for a second or two at the top and then lower back down. Make sure to squeeze your glutes tight so you don’t feel it in your low back.
3. Fire Hydrants – Place your hands underneath your shoulders and your knees underneath your hips. Flex your feet. Then raise one leg out to the side, keeping the knee at 90 degrees. Try to not let the foot get higher than the knee or the knee get higher than the foot. Really squeeze the butt cheek as you lift. Repeat all reps on one side before moving on to the other side.
4. Bird Dog – A great move to activate both your core and your glutes. Place your hands underneath your shoulders and your knees underneath your hips. Flex your feet. Kick one leg out straight as if kicking it into the wall behind you while you reach the other arm out straight toward the wall in front of your head. Don’t worry about lifting your leg or arm up high. Really try to drive your arm and leg toward opposite walls. Squeeze your glutes and keep your belly button pulled in toward your spine. As you lower your arm and leg, bend them and bring them together under your body. Try to touch your knee to your elbow before extending back out. Repeat all reps on one side before switching to the other side. All reps should be done in a slow and controlled manner. You should even hold for a second or two at the top of the move.
5. Pelvic Tilt – The best core engagement move. Lie flat on your back with your knees bent and your feet flat on the ground. There will be a space between your low back and the ground. Draw your belly button in toward your spine and press that space away. Hold your core tight for 5 to 10 seconds and then release. Feel the space again between your low back and the ground when you relax. There are progressions to the Pelvic Tilt, including marching and leg lowers. Check back soon for a post about ab engagement and pelvic tilt progressions on Redefining Strength’s blog.
6. Plank Series – Later this week, I will be posting a variety of plank variations. But here is a quick description of how to perform the basic forearm front and side plank.
To perform a front forearm plank, you should rest on your forearms with your elbows right below your shoulders. Beginners can start on their forearms and knees while more advanced exercisers will perform the plank from their forearms and toes. The longer you hold, the harder the move will be. Make sure to draw your belly button in toward your spine, tuck your hips under and keep your body in a nice straight line. Feet should be together and adductors, glutes and quads engaged. Do not let your upper back round as you hold. Breathe as you hold and don’t let your hips drop toward the ground or raise up toward the ceiling.
The forearm side plank variation is done on one forearm. Your elbow should be right below your shoulder. Beginners may do this from their knees. A modified plank can also be done with just the bottom knee down and the top leg straight.To advance the move, straighten both legs and rest on the side of your feet and your forearm. (Feet may be stacked or one may be in front of the other.) If that isn’t challenging enough, raise the top leg. Your top arm can rest on your hip or reach up toward the ceiling. Make sure to keep your body in a nice straight line. Squeeze your glutes and make sure your chest doesn’t rotate toward the ground. Drive your bottom hip up nice and high. Do not let your hip sag toward the ground.
7. Band Stability Press (anti-rotational) – Anchor a band in a door, around a pole or even use a cable-pulley machine. Step away from the anchor point as far as you can without allowing your body to rotate toward the anchor. You should be facing perpendicular to the band. Start with the handle at your chest. Push the band straight out from the center of your chest until your arms are straight. Do not let your arms rotate open and go back toward the anchor. Then slowly bring your arms back in. This move looks easy, but when you try it, you realize how much your entire body fights rotating back toward the band hook!
Joan demoing the stability press.
For more glute activation exercises, check out Part 3 of the Bootilicious series. And check back later this week for more great plank variations to help you engage your core.
Use the moves above to find the specific spots that are tight and inactive on you and then loosen and activate them! Just because you have low back pain doesn’t mean you will need to use all of the moves above.
You may find you only have trigger points around the front of your hips and that your hamstrings are fine. Don’t spend time on areas that are ok. Target areas of tightness or inactivity!
If your back pain is due to trauma, please consult a doctor.
Stop accepting chronic back pain and start doing something about it!
Healthy Comfort Foods: Recreating Foods From Your Childhood
There are certain comfort foods, certain meals, from my childhood that I crave when I get stressed.
However, some of them don’t fit the way I like to eat on a regular basis…which means that if I really want them, I have to find a way to make them healthy.
So the other day when I was craving one of my favorite meals growing up, “Green Olive Pasta,” I had to find a way to make a healthy, gluten-free, variation of it. (I think I was a bit obsessed with green olives in general growing up actually…But anyway…)
If you love or crave garlic, olives and pasta, you may just want to try my Healthy Comfort Food Green Olive “Pasta.”
Green Olive “Pasta”

Servings 3-4
Ingredients:
4 cups cooked Spaghetti Squash
3/4lb Chicken Breast
1/4 cup green olives, sliced
1/3 cup cherry tomatoes, sliced
2 large clove garlic
1/4 cup olive oil
1 tbsp+1/2 tbsp oregano
Salt and Pepper to taste
Cut chicken into chunks and sprinkle with 1/2 tbsp oregano, 1 clove garlic and salt and pepper. Cook the chicken in a skillet until browned and cooked through.
While cooking the chicken, slice olives and tomatoes. Dice garlic. Add olives, tomatoes and 1 clove garlic to a bowl with olive oil, 1 tbsp oregano, salt and pepper.
Add cooked spaghetti squash to the mix as well. (To cook spaghetti squash, preheat oven to about 375. Cut in half and spoon out pulp and seeds. Drizzle with olive oil and salt and pepper. Cook for 30 minutes to an hour and a half depending on the size. The squash is done when you can easily scrap out pulp into strands using a fork.)
Add chicken to squash mixture once cooked. You can either serve the dish hot or as a cold “pasta.”
I find that the longer everything sits in the olive oil sauce, the more flavorful the dish becomes even if you choose to reheat it later!
What comfort foods from your childhood do you occasionally miss? Have you found a way to make a healthy variation of them?
Why do weekends sabotage our progress?
It’s Friday and many of us have been dedicated to our healthy lifestyle all week – we’ve eaten well, worked out, and taken care of ourselves.

Yet for some reason the second Friday evening hits, it’s like our healthy habits never existed.
For many of us, weekends seem to completely sabotage all the progress we make during the week.
WHY!?!
What is it about the weekends that makes us lose all control?
Is it because we are home and have easy access to food? Is it because we want to go out and party? Is it because we spend time with friends? Is it the way we unwind and de-stress? Is it because we are sometimes bored and there is food right there? Is it because we mindlessly eat when we watch TV?
Maybe even all of the above?
Whatever the reason, if we want results, we can’t go completely crazy every single weekend.
So how do we help ourselves stay on track during the weekend?
Here’s what I’ve found helps people stay committed to their healthy lifestyle even on the weekends:
- Be active! When we sit around the house, we look for things to fill the time….Like eating anything we have in our cabinets. Yup…We tend to eat out of boredom, especially if it is easily accessible. If we stay active and entertained, for one, food won’t just be right there and two, we won’t be as tempted to eat. Activity keeps us motivated and from eating out of boredom!
- All social engagements don’t have to revolve around food and if they do, PLAN. Over the weekend, we tend to get together with friends and family. And too many get-togethers revolve around food. Try doing something active instead. Go bowling or on a hike. HOWEVER, there will be parties that you can’t avoid that are centered around food. PLAN for those and decide to either use them as a cheat or stay on track. If you plan ahead, you won’t let one party derail all your hard work and send you on a downward spiral the rest of the weekend!
- Clean out your cabinets. If you find you eat badly when you have bad food around, it may be best to clean out your cabinets and not keep the foods that tempt you in the house. When you get bored, you won’t have anything to reach to and you may find you look for something to DO instead. It will also keep you from mindlessly eating as you watch TV. Sometime the best way to stop yourself from doing something, is to not even give yourself the option to do it.
- Make some healthy snacks. Kale chips, carrot chips, apple and almond butter….Make a healthy snack to munch on as you hang around the house. It will satisfy you without derailing your progress. Plus, it may just cure your boredom to experiment with some healthy snack recipes…And…gasp…cooking may actually be fun! (It could also be a fun FAMILY activity!)
- Be moderate in your alcohol consumption unless you plan to cheat. We tend to make bad eating decisions when we’ve consumed too much alcohol. And some alcoholic beverages also contain a ton of calories themselves. So a great way to stay on track is to be moderate in your alcohol consumption unless you are consciously indulging. While the weekends should be a time to relax and enjoy, it doesn’t mean we have to binge!
- Be prepared and keep yourself motivated! All week long, we do things to motivate ourselves and prepare ourselves. We prep meals. We write out workouts. We cruise the web for motivation. Why not spend an hour or two on the weekends doing the same thing? Many people take the weekends off from working out. Instead maybe take a weekday off and save a workout for the weekends to keep you motivated. Doing a workout on the weekend may make you less likely to cheat because you are reminded of what you are working for and just even spent time working toward it! Just remember to remind yourself of your goals even on the weekends.
I would just like to note that a planned cheat day isn’t sabotaging your weekend EVEN if it means you lose a little ground on your goal. For many, cheat days are a chance to recharge and can actually help keep you on track.
That being said….If cheat days lead to a downward spiral, you may want to avoid them on the weekends until healthy habits are created.
Don’t let this weekend sabotage your progress! Stay on track using these tips.
What else helps you stay on track over the weekend?
Why you need to write out your workouts BEFOREHAND
Contrary to popular belief, there are days when even I don’t feel like working out.
Like since it has started getting darker earlier and a bit chillier in the evening…And all I want to do at 8 p.m. is go home and eat…not workout.
But I’ve gotten myself to stay and workout. Not because I have superhuman self-control. And not because I just love working out more than the average person.
But because I’ve planned out my workouts ahead of time.
Too often people don’t go in with a PLAN. They think, “I’ll just decide what workout to do based on what is sore and what equipment is not in use and how I feel when I get there.”
But not having a plan is the best way to give yourself an excuse to not go to the gym.

For some reason this quote often bugs me, but it actually fits today. Often we let the stress of our day make us want to skip our workouts, when our workouts will not only help us reach our dreams, our goals, but will also make us probably feel more relaxed!
When we plan ahead, we provide ourselves with motivation, with expectations. And it is way easier to let yourself off the hook if you don’t have expectations.
It is way easier to go straight home after work and sit on the couch if you don’t have a plan to do a push up, pull up pyramid. Because who would just decide to do a push up, pull up pyramid spur of the moment after a long day at work!?!
And it is way easier to decide that 15 minutes on a treadmill is enough if we don’t plan out a true metabolic session to help us work toward our goals. Because after a stressful day, who wants to force themselves into a workout that may almost feel puke inducing?
Let’s face it…It is way easier to SLACK if we don’t have a plan because there is nothing pushing us, nothing guiding us to work hard.
At the end of a long/stressful/draining/tiring/boring/insert-adjective-here day there may not be much, if any, internal motivation left to push us to workout.
We may need a little bit of external motivation – and that external motivation can come in the form of a pre-written, planned out workout. Because having a workout clearly outlined and written out in your hand is evidence of what you are SUPPOSED TO DO. And if we don’t do, there will be not only the knowledge, but also clear evidence that we didn’t do it.
It is easy to ignore the idea of a workout. It is easy to just go home and forget about it.
But it isn’t as easy to ignore something pre-planned and written out. Something that we will clearly know we didn’t do because it is staring right back at us.
And not only does that planned workout make us go to the gym, but it also generally pushes us to work hard even when our mind would tell us the warm up was enough.
I find that even when I want to quit, knowing that I laid out a certain routine keeps me going.
Even though no one but me will know….I WILL KNOW that there was something written out that I didn’t do.
If I’d made the workout up on the spot, it wouldn’t be as hard to change it because it wouldn’t feel set in stone – it would feel like I was just adjusting because I didn’t “feel” that good during the workout.
But writing it out ahead of time, even just earlier that morning, makes me realize that when I was motivated, I did feel good enough to do the workout and that now I’m just being lazy and making excuses.
That it is all really just in my head.
Like the other night. I’d set out a workout.
About 15 minutes in, I felt pretty toasted. My mind was telling me, “I’m done.”
And I thought to myself, “I sometimes do workouts like this and just push hard for 15 minutes. I can go home now…I worked really hard!”
But then the workout goals were clearly laid out in front of me. And I knew I was just giving up because I wanted to go home and not because I was truly exhausted.
So I pushed on. Having the plan kept me going past what my mind wanted to do that night, to what my body really should have, and could have, done.
And the best part is, getting yourself over that first hurdle of pushing hard even when you didn’t want to seems to really get the momentum rolling and makes it easier to repeat the action.
Pushing yourself to go to the gym one night even when you are super tired because you have a workout planned out, will make it easier to push yourself to do it again.
It’s almost like doing it once proves that it really isn’t that bad and therefore allows you to be able to repeat the action.
You often hear, “The beginning is always the hardest.”
And it is really true. But a plan, a workout written out before your motivation dwindles, can be just the motivation you need to truly get started!
So stop waiting till you get to the gym to decide your workout. Start planning!

Help yourself take that step by planning it out!
P.S. Not only does planning keep you motivated, but it also allows you to reach your goals more quickly. You can plan out workouts focused on your goals and not just how you are feeling. Plus writing down your workouts allows you to truly track your results and progress so you can determine what is and isn’t working.
Spaghetti Squash and Meat Sauce and Homemade Pistachio Ice Cream
I don’t really ever crave pasta, but there are some days when I WANT carbs even though my body really isn’t asking for them.
On those days I find that carb-like dishes (like cauliflower mash) always more than satisfy me. And since spaghetti squash are in season, they are the perfect food to curb my carb cravings.
If you crave pasta or just want carbs even though your body doesn’t really need them, Spaghetti Squash and Meat Sauce is a great way to satisfy those cravings!
Spaghetti Squash and Meat Sauce

Servings about 4
Ingredients:
1 Medium Spaghetti Squash
1lb Grass-fed Ground Beef
1 can tomato sauce
1-2 clove garlic
1 tbsp Basil
1 tsp Oregano
Salt and Pepper to taste
1 tbsp Olive oil
Heat oven to 350.
Slice the Spaghetti Squash in half and scoop out the seeds. Drizzle with olive oil and add salt and pepper to taste.
Place on a baking sheet with cut side up.
The spaghetti squash will take anywhere from 30 minutes to 1 hour depending on the size.
Once the spaghetti squash is cooked, scoop out the inside with a fork to create long strands.
When the spaghetti squash is close to done, place the grass-fed ground beef in a skillet with a bit of oil.
Have the heat on high to start to brown the meat.
Add chopped garlic, spices and tomato sauce when meat has started to brown.
Cook on high another minute and then lower flame to low. Let simmer another 5-10 minutes at least.
When sauce is done, scoop on top of some spaghetti squash and serve with a sprinkle of raw milk or grass-fed cheddar.
And in case you occasionally crave dessert like I do, a great way to end the day is with a scoop of healthy ice cream.
Honestly never thought I would say “healthy” and “ice cream” in one sentence, but when the ice cream is made of bananas, it is actually healthy.
I’ve been loving the Yonanas and tried out a Banana Pistachio Ice Cream last night, using a pistachio nut butter made by Ingr-EAT-ients.
Pistachio Ice Cream

I gave it a good stir but while it tastes good, the pictures don’t look that appetizing…I need work on my food staging.
Servings about 2
Ingredients:
2 frozen bananas cut into pieces
5 tbsp of pistachio butter (not frozen just refrigerated)
Let the bananas defrost for a minute.
Turn on the Yonanas and place a piece of banana in the machine followed by a tablespoon of nut butter and another piece of banana. Keep alternating till all ingredients are used.
Then give it a quick stir and serve.
(Sorry Jodie…I tried to make it look good, but I’m definitely no food photographer!)
Anyway, a great dinner and dessert that felt like a treat and was exactly what I needed!
What are your favorite recipes when you’re craving a treat?
Are you playing to win or simply not to lose?
A few weeks ago after a tough loss I asked the volleyball girls if they had played to win or played not to lose.
At first a few of them seemed slightly confused by the difference because wasn’t winning NOT losing?
Yes, winning is not losing BUT playing to win or playing not to lose are two completely different things.
When you “play to win,” you play confidently and go for your shots. You move, play and think like you are on top and your body language is upbeat and confident.
You are doing everything you can to CREATE the win.

When you “play not to lose,” you are playing defensively. You are playing like you are hoping the other team just makes a mistake and hands the win to you.
You aren’t GOING FOR IT. You aren’t CONFIDENT.
And unfortunately all too often I see people playing not to lose…and not only in the athletic realm.
If you truly WANT something, be it victory on the playing field, weight loss or even a promotion at work, you’ve got to go for it. You’ve got to give it your all and set yourself up for success.
You can’t just hang in their and hope someone is going to give it to you.
If you want to reach your goal, you’ve got to BELIEVE that you can.
Because when we believe, we train hard. We play hard. We stay focused and confident. We ACT like winners.
And when we act like winners, we do what is necessary to succeed.
That doesn’t mean victory is guaranteed or that it will be a smooth and easy road to success.

But it does mean you will be able to be proud of yourself – proud of how you acted, proud of how you worked – because you will know you did your best.
Because no victory is truly as sweet if you don’t feel like you EARNED IT.
Stop waiting for someone to hand you success. Stop “playing it safe.” Stop playing “not to lose.”
Believe in yourself and go and get the victory.
This past Saturday, the volleyball girls played a team they hadn’t beaten in two years. They’d even lost to the team earlier this year. But this past Saturday, they came back from near defeat to claim victory over the team.
They fought back from NEAR DEFEAT because they started playing to win!
They had the courage to believe they could win even when the odds were stacked against them.
Will you have the same courage and believe you can succeed this week?
Will you play to win!?!


