Category Archives: Top 10
Partner Exercises, Workouts, Isometrics and More
Start your week off right with some new workouts, exercises and tips. Check out these posts:
– Three Fun and Challenging Partner Exercises – Sometimes you need a good laugh as much as you need a workout. Try these partner exercises and have some fun as you get your sweat on!

– Build Up Your Endurance Workout – Building endurance doesn’t have to mean running on a treadmill or elliptical for 30 minutes or more. If you get bored with steady-state cardio, but need to improve your endurance, try this circuit workout!

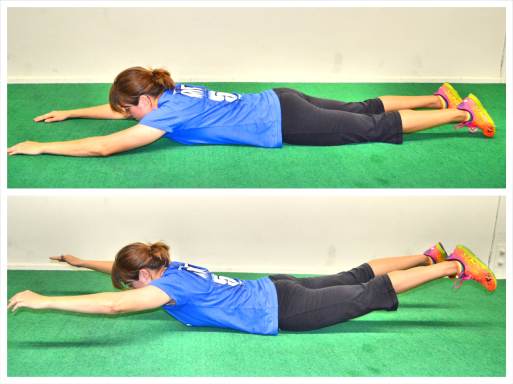
– The Superman Exercise – Often we get very focused on working the front of our core, our abs, because we want a six pack and we ignore our posterior chain. But the Superman exercise is a great way to work our backside and help us prevent and alleviate low back pain! Here’s how to do the move and other variations!
– Circuit Training Workouts – Circuits are workouts where you perform one exercise after another back-to-back. They can help you build strength and burn fat. Check out these great circuit training workouts!

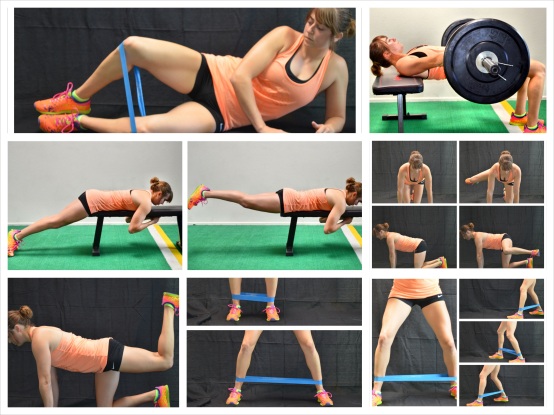
– Best Glute Exercises – I LOVE LOVE LOVE butt workouts. I love when my legs are sore and I especially love when my glutes are sore. Here are some of the best glute exercises…And you may be surprised to find that deadlift isn’t one of them. While I LOVE the deadlift, it doesn’t actually activate as many gluteal fibers as the hip thruster does!
– The Towel Taz – I love cardio exercises you can do anywhere with only very basic equipment. And the Towel Taz is just such a move. It works your entire core and elevates your heart rate. Check out these three basic Towel Taz variations. Grab a big blanket or towel and get moving!

– 20 Isometric Exercises – Isometrics are a great recovery tool to help you improve your mobility and stability and prevent injury. Check out these 20 great isometric exercises and stretches to help you move and feel better!
Have a great week and have some fun!
In case you’ve missed these….
So I’ve done a few posts over at Redefining Strength, which I think are pretty helpful….
In case you didn’t see them (and in case they will help you since I know they answered a number of questions I’ve received recently), I’ve posted them below!
This first post “10 Hanging Core Exercises” is because I get asked for “ab exercises” all the time and honestly crunches really give you very little bang for your buck.
Hanging core exercises on the other hand work on your grip strength, lat strength and core strength. They can help you work toward all sorts of exercises such as pull ups, L-sits and front levers.
They are a compound movement and have some functional benefit…unlike crunches.
For 10 of the Hanging Core Exercises I use most often, check these out!

And while we are discussing core strength, I think it is important that we cover BACK PAIN. One of the best tools to alleviate back, hip, neck and shoulder pain is the PEANUT.
The Peanut is a cheap, homemade tool made out of athletic tape and tennis balls. Here are instructions on how to make and use the Peanut to alleviate your pain! (Can I also just say…It isn’t freaking easy to use spray paint!?!)

And the last two posts I want to point out are on Rotational Exercises and the Dip.
The 10 Rotational Exercises post came up because all too often people are only training in one plane of motion…And then they wonder why they get injured lifting something in everyday life. It is because in everyday life we lift awkward crap in every plane of motion. And if we want to remain injury free, our workouts need to reflect that. (Plus…still on my whole “strengthen your core thing” rotational exercises are great core moves!)

And the Dip post is for all of you women out there asking me how to get sexy arms for tank top, strapless dress and bikini season. The Dip can be a great compound movement to strengthen and tone your entire upper body. Don’t waste your time with isolated movements like the tricep extension! Work numerous muscles at once. And if you are already doing push ups, the Dip is a great vertical push exercise to include in your routines!
And if you can’t do a full dip, the post has some great ways to regress the movement!

Are Crunches Ever Useful?
I very rarely use crunches in my workouts. And when I do include an ab exercise, I find the most full-body move I can.
When I pick out moves for my workouts, I’m looking for moves that give me the most bang for my buck. I’m generally looking for moves that work numerous muscles at once in a functional way to make them stronger.
Therefore, crunches generally don’t make the cut since they don’t work a number of muscle groups all at once in a functional way.
HOWEVER, there are times I find crunches useful and FUN.
For instance, I’ve found crunches can be a fun active rest exercise. Like when I do sprint and crawling workouts. Both of those exercises are super intense, full body moves. So as an active rest piece, I add in a crunch.
It makes the circuit even more fun and allows my legs and arms to rest while I continue to move and work.
Same goes for other cardio workouts. I will choose an upper, lower and then core exercise and generally the core exercise is some crunch variation to give both my upper and lower body a little extra rest.
So as active, fun rest, I find crunches very useful.
Here are a few of my favorite crunch variations. They are a bit more full body and give the legs and upper body a chance to relax while not being “easy.”
1. Super Crunches – Lie on your back with your legs out straight. Crunch your upper body up as you draw your knees in. Come up so that you are sitting on your butt. Reach your hands to outside one knee. Then lie back down. Then crunch up and reach through your knees. Lie back down. Then crunch up and reach outside the other knee. Those 3 crunches equal one rep.

2. Cherry Bombs – Sit on your butt and draw your knees into your chest. Wrap your arms around your shins and lift your feet off the ground. Then open your arms and straighten your legs out wide and let your upper body go back toward the ground. You should almost look like a big X on the ground with arms and legs out and open. Then come back to seated and draw your knees back in. Your feet should stay off the ground the entire time.

3. Bicycles – Lie on your back with your legs out straight in front of you and your hands behind your head. Lift your legs up off the ground. Beginners may need to keep their feet up higher while more advanced exercisers will be able to keep their feet only an inch or two off the ground. Bring your right knee into your chest, keeping the left leg off the ground. As you bring the right knee in, crunch the upper body up and bring the left elbow up and across to touch your right knee. Then straighten you right knee out and bring your left knee in as you rotate your left elbow to the ground and your right elbow to your left knee. Keep rotating and alternating touches until all reps are complete.
4. Russian Twists – Balance on your butt with your knees bent and feet off the ground. Hinge back a little with your upper body, maintaining a nice tall posture. Hold a med ball in both hands. Rotate your upper body and arms from side to side, touching the ball to the ground by each hip. Keep your feet off the ground the entire time and move as quickly as possible.

5. Alternating Leg V-Up (or full v-up or oblique v-up…) – Lie flat on your back with your legs out straight in front of you. Beginners will rest the leg not being raised up on the ground while advanced exercisers will keep both feet off the ground at all times. Lift one leg up toward the ceiling. Crunch the upper body up and reach the opposite arm up toward the toes of the raised leg. Then lower that leg and lower your upper body down. Raise the other leg and the opposite arm to touch it as you crunch up. Keep alternating sides.

Here are two great workouts using crunches as active rest:
Also, I think that lower body crunches can be useful especially as progressions of the pelvic tilt.
Most people jump right into double straight leg lowers and just accept the fact that they have low back pain when doing the move. Or maybe they put their hands behind their low back to help.
But they never really regress the move and focus on strengthening their abs so that they can truly do the move without pain.
The pelvic tilt isn’t really a crunch but many of the lower ab crunches that we do require that you can do the pelvic tilt. (The pelvic tilt is a must-do move for EVERYONE. It strengthens your abs to alleviate low back pain and make you stronger so you can lift more!)
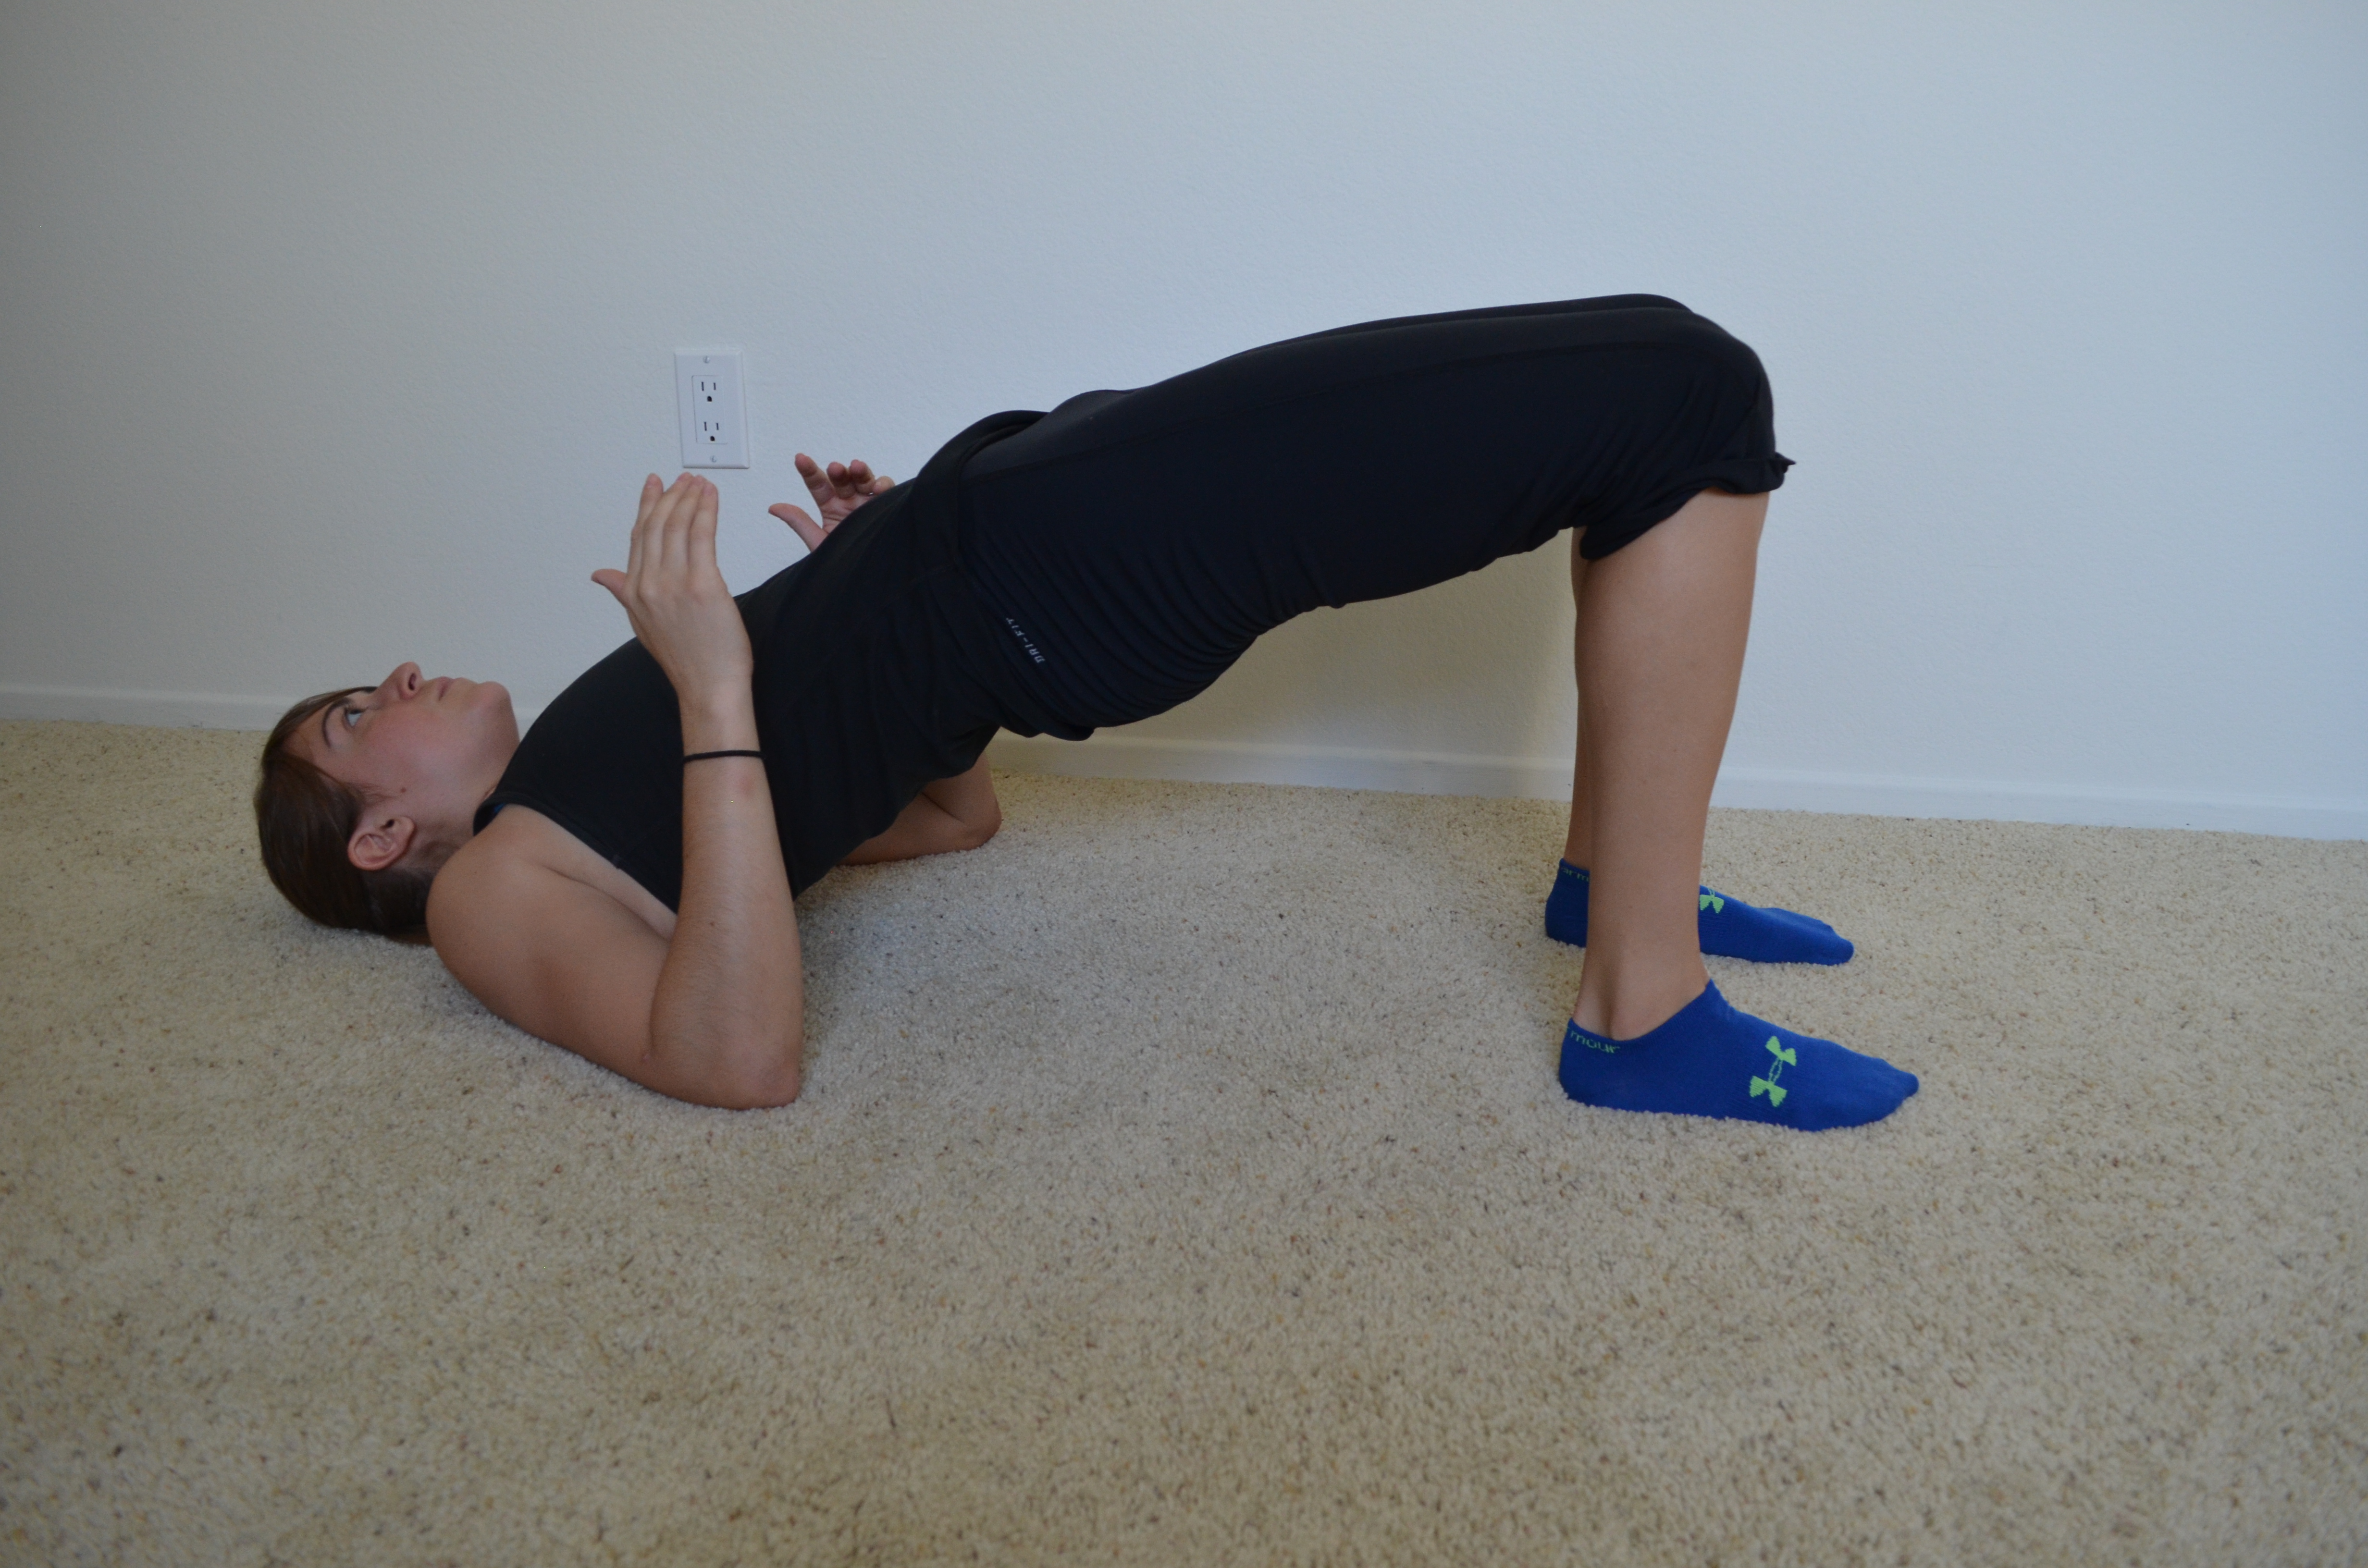
To do the Pelvic Tilt, lie on your back with your knees bent and your feet flat on the ground. You should almost be able to reach your hands down by your sides and touch your heels with your finger tips. Feel the space between your low back and the ground as you lie there. Then draw your belly button in toward your spine and press that space away. You should feel your low back against the ground. Hold there, making sure to not hold your breath.
Once the basic hold becomes easy, you will want to do a bent knee march then a bent knee two leg lift and then finally straight leg lifts. Advance the pelvic tilt slowly. Make sure that as you progress, your low back stays firmly connected with the ground. If you can’t keep your low back against the ground, you aren’t ready for the progression. (These progressions of the pelvic tilt are all lower ab crunch variations!)
These lower ab crunches as a progression of the pelvic tilt are super useful to strengthen your core and learn how to engage your abs. I mainly use them as activation moves before a workout or on a recovery day.
So those are the times I find crunches useful – as active rest and ab activation progressions.
When do you like to use crunches in your workouts? Do you use them as active rest or ab activation exercises?
Bodyweight Exercises To Challenge Your Entire Body
I used to think that my strength was measured by the amount I could lift on the barbell.
But the weight you can lift on a barbell isn’t the only measure of strength…nor is it necessarily the best measure of strength.
I mean…What strength is great than the strength to be able to control your own body and be able to perform ANY move you want to!?!
There are so many bodyweight exercises out there that are challenging enough for even the advanced exercisers without adding weight.
Yet often the only ones I see people using are the pull up, push up and single leg squat.
Here are some great, more untraditional, bodyweight exercises everyone should be doing – 10 Untraditional Bodyweight Exercises You Need To Do.

And below are a variety of other articles about bodyweight exercises. Some are great for beginners while others will challenge even the most advanced exercisers.
Training For A Race? You’ve got to do more than just run!
If you want to run faster, you would think you simply need to practice running more. If you want to be able to run for longer, you would think you just need to push yourself to run further.
But gaining speed and endurance requires that you do more than just run. Staying healthy for your race requires that your training regime isn’t just running.
You must do the proper recovery and strength training as well.
Many people worry that strength training will interfere with their running.
But in reality, a proper strength training regime will actually make their running stronger and keep their body healthy for their training.
No you don’t want to work on your 1 rep max while training for a race, but you do want to lift weights.
And you want to stretch and foam roll.
But you definitely want to lift weights and make your muscles stronger so you can run faster and last longer!
Below are key muscles for runners to roll out and stretch. There are also some great activation moves and then finally, links to workouts I’ve developed for runners.
You can help prevent (or at least alleviate some of the pain of) common running injuries such as plantar fasciitis, shin splints, knee pain, hip pain and even low back pain by using the techniques and exercises below.
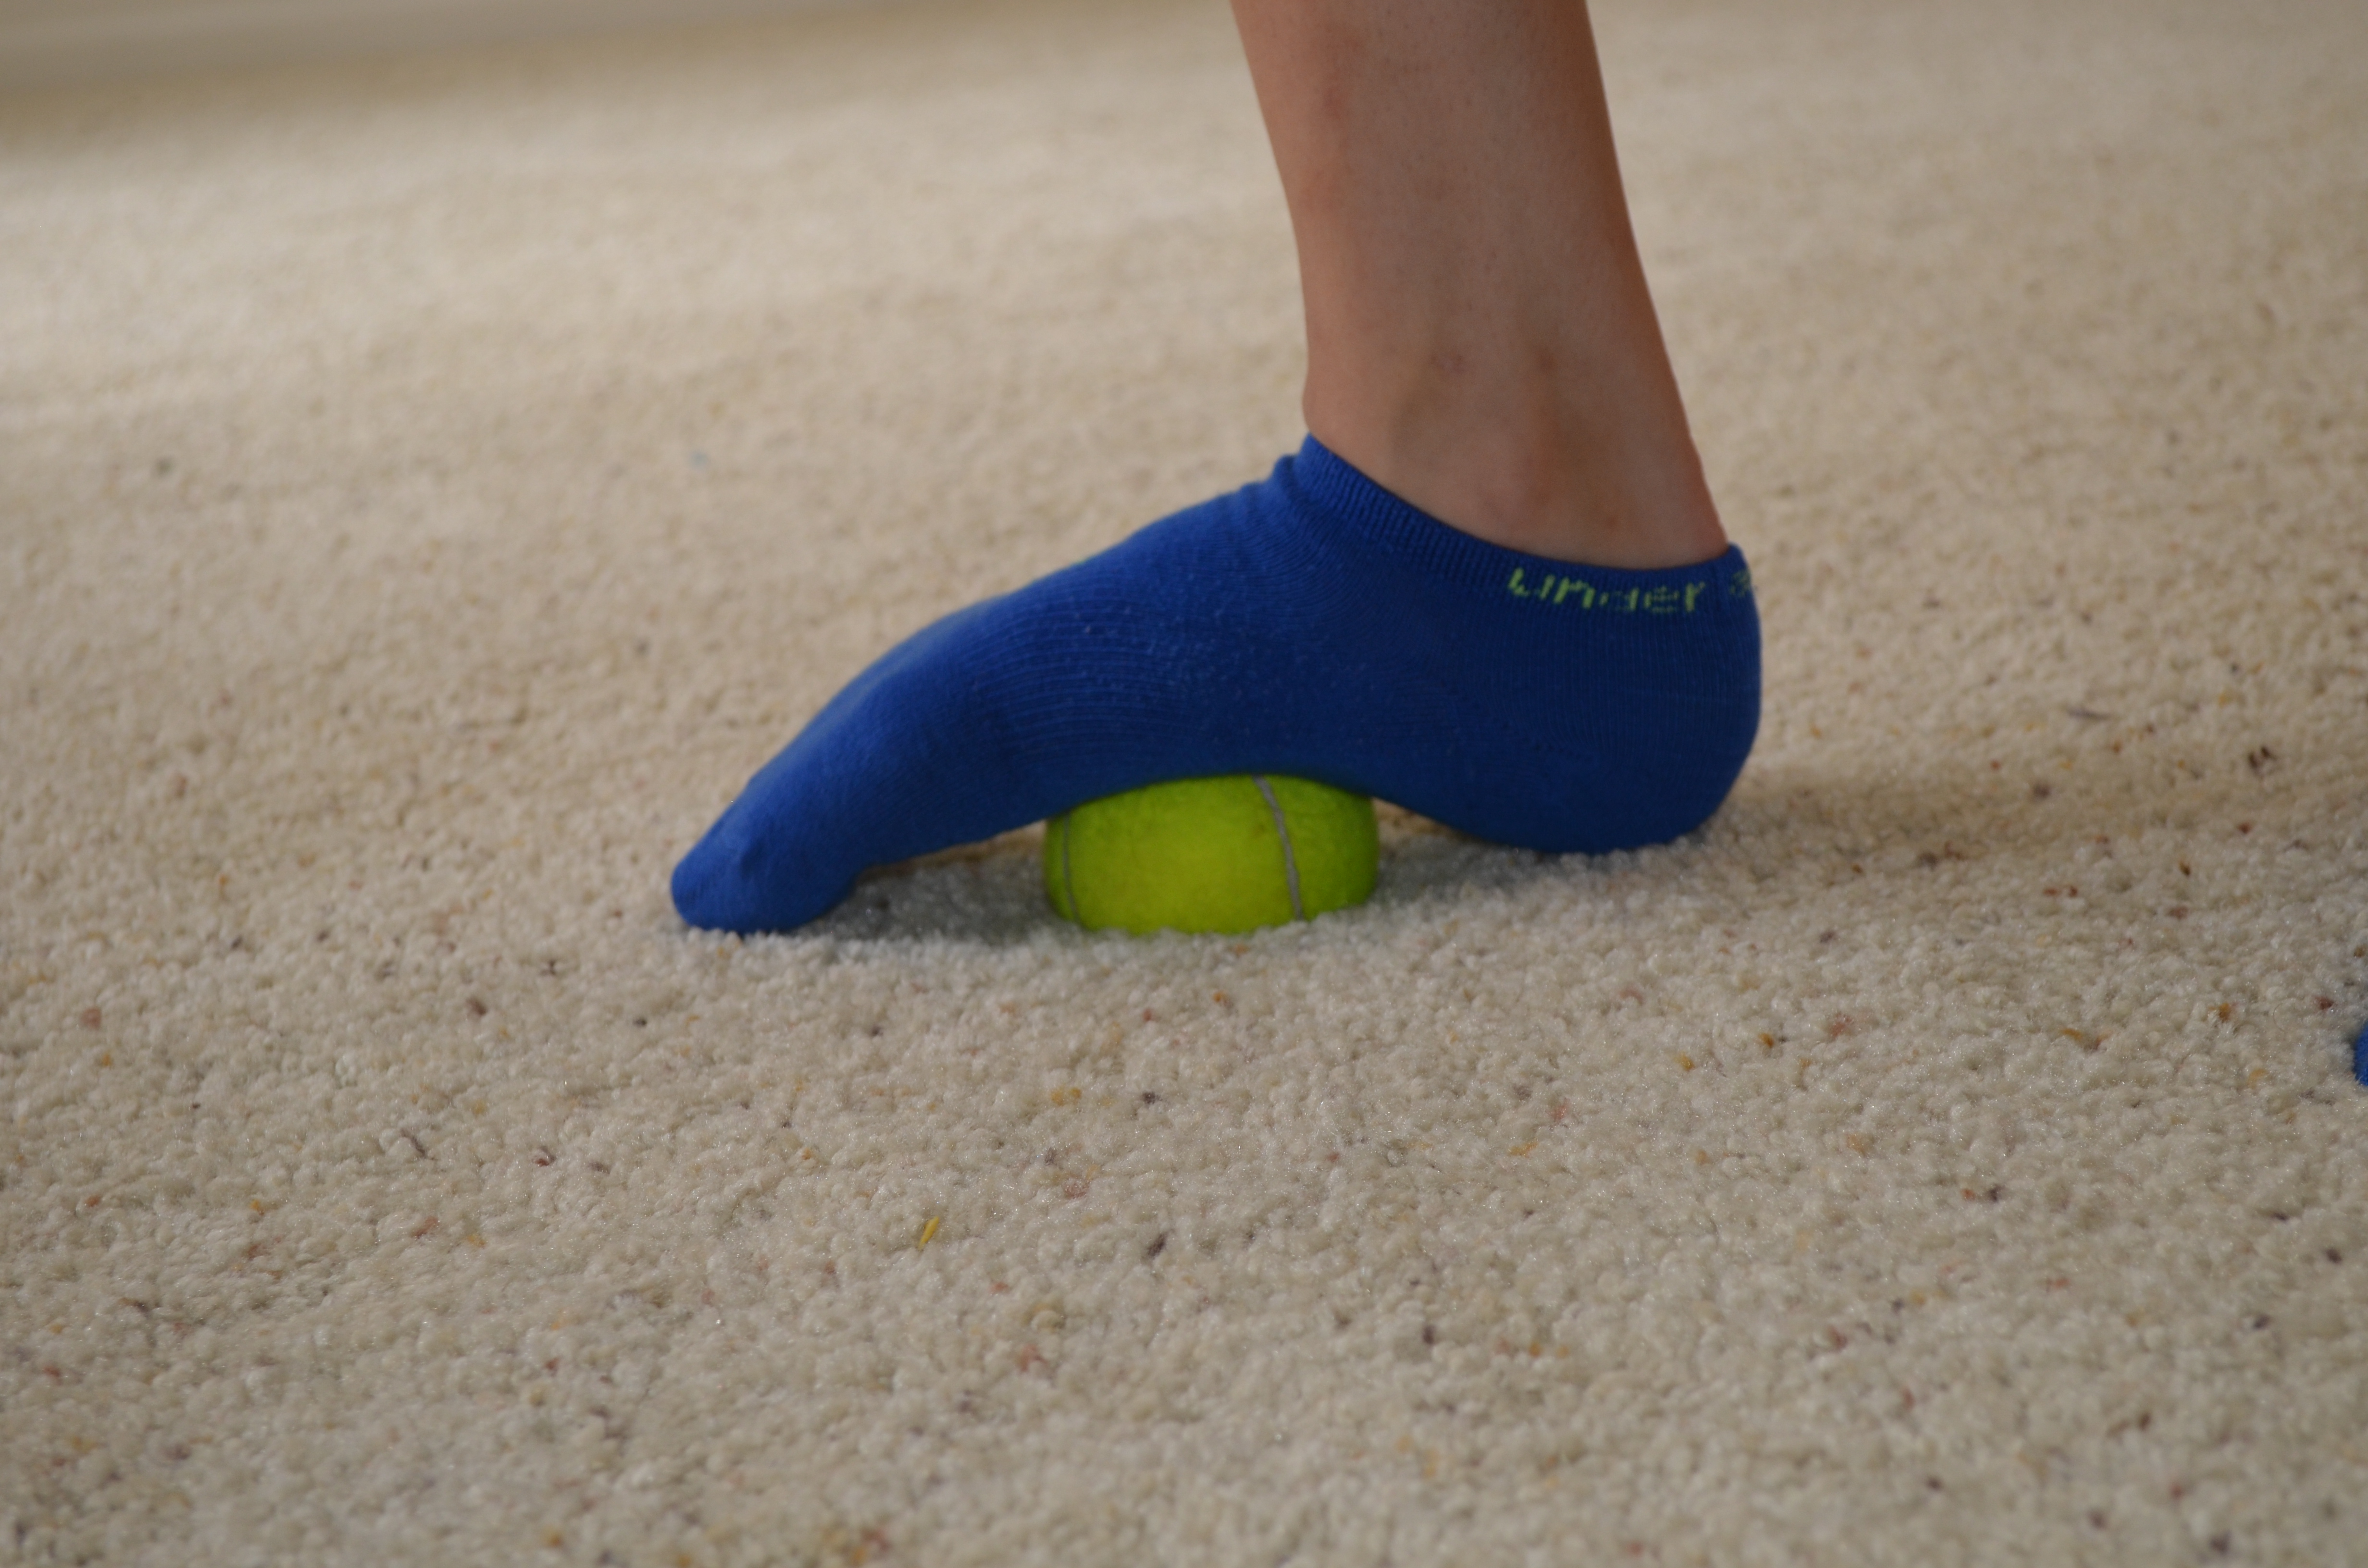
TRIGGER POINT RELEASE
1. Feet – Take a ball, the smaller and harder the ball, the more it will dig in, and place it on the ground. Then, standing, place your foot on top of the ball. Push down into the ball and roll it around under your foot, holding on any tight spots.
2. Shins – Sit on the ground with one knee bent toward the ceiling and the foot flat on the ground. Take a ball in both hands, and press it into the outside of the shin bone. Push the ball into your shin with both hands, making small circles. Then move the ball up or done and repeat, making small circles. Work all the way from your ankle to right below your knee. Hit the front of your shin, not the bone, all the way around the outside and back toward your calf. Make small circles with the ball, pressing it in as hard as you can.
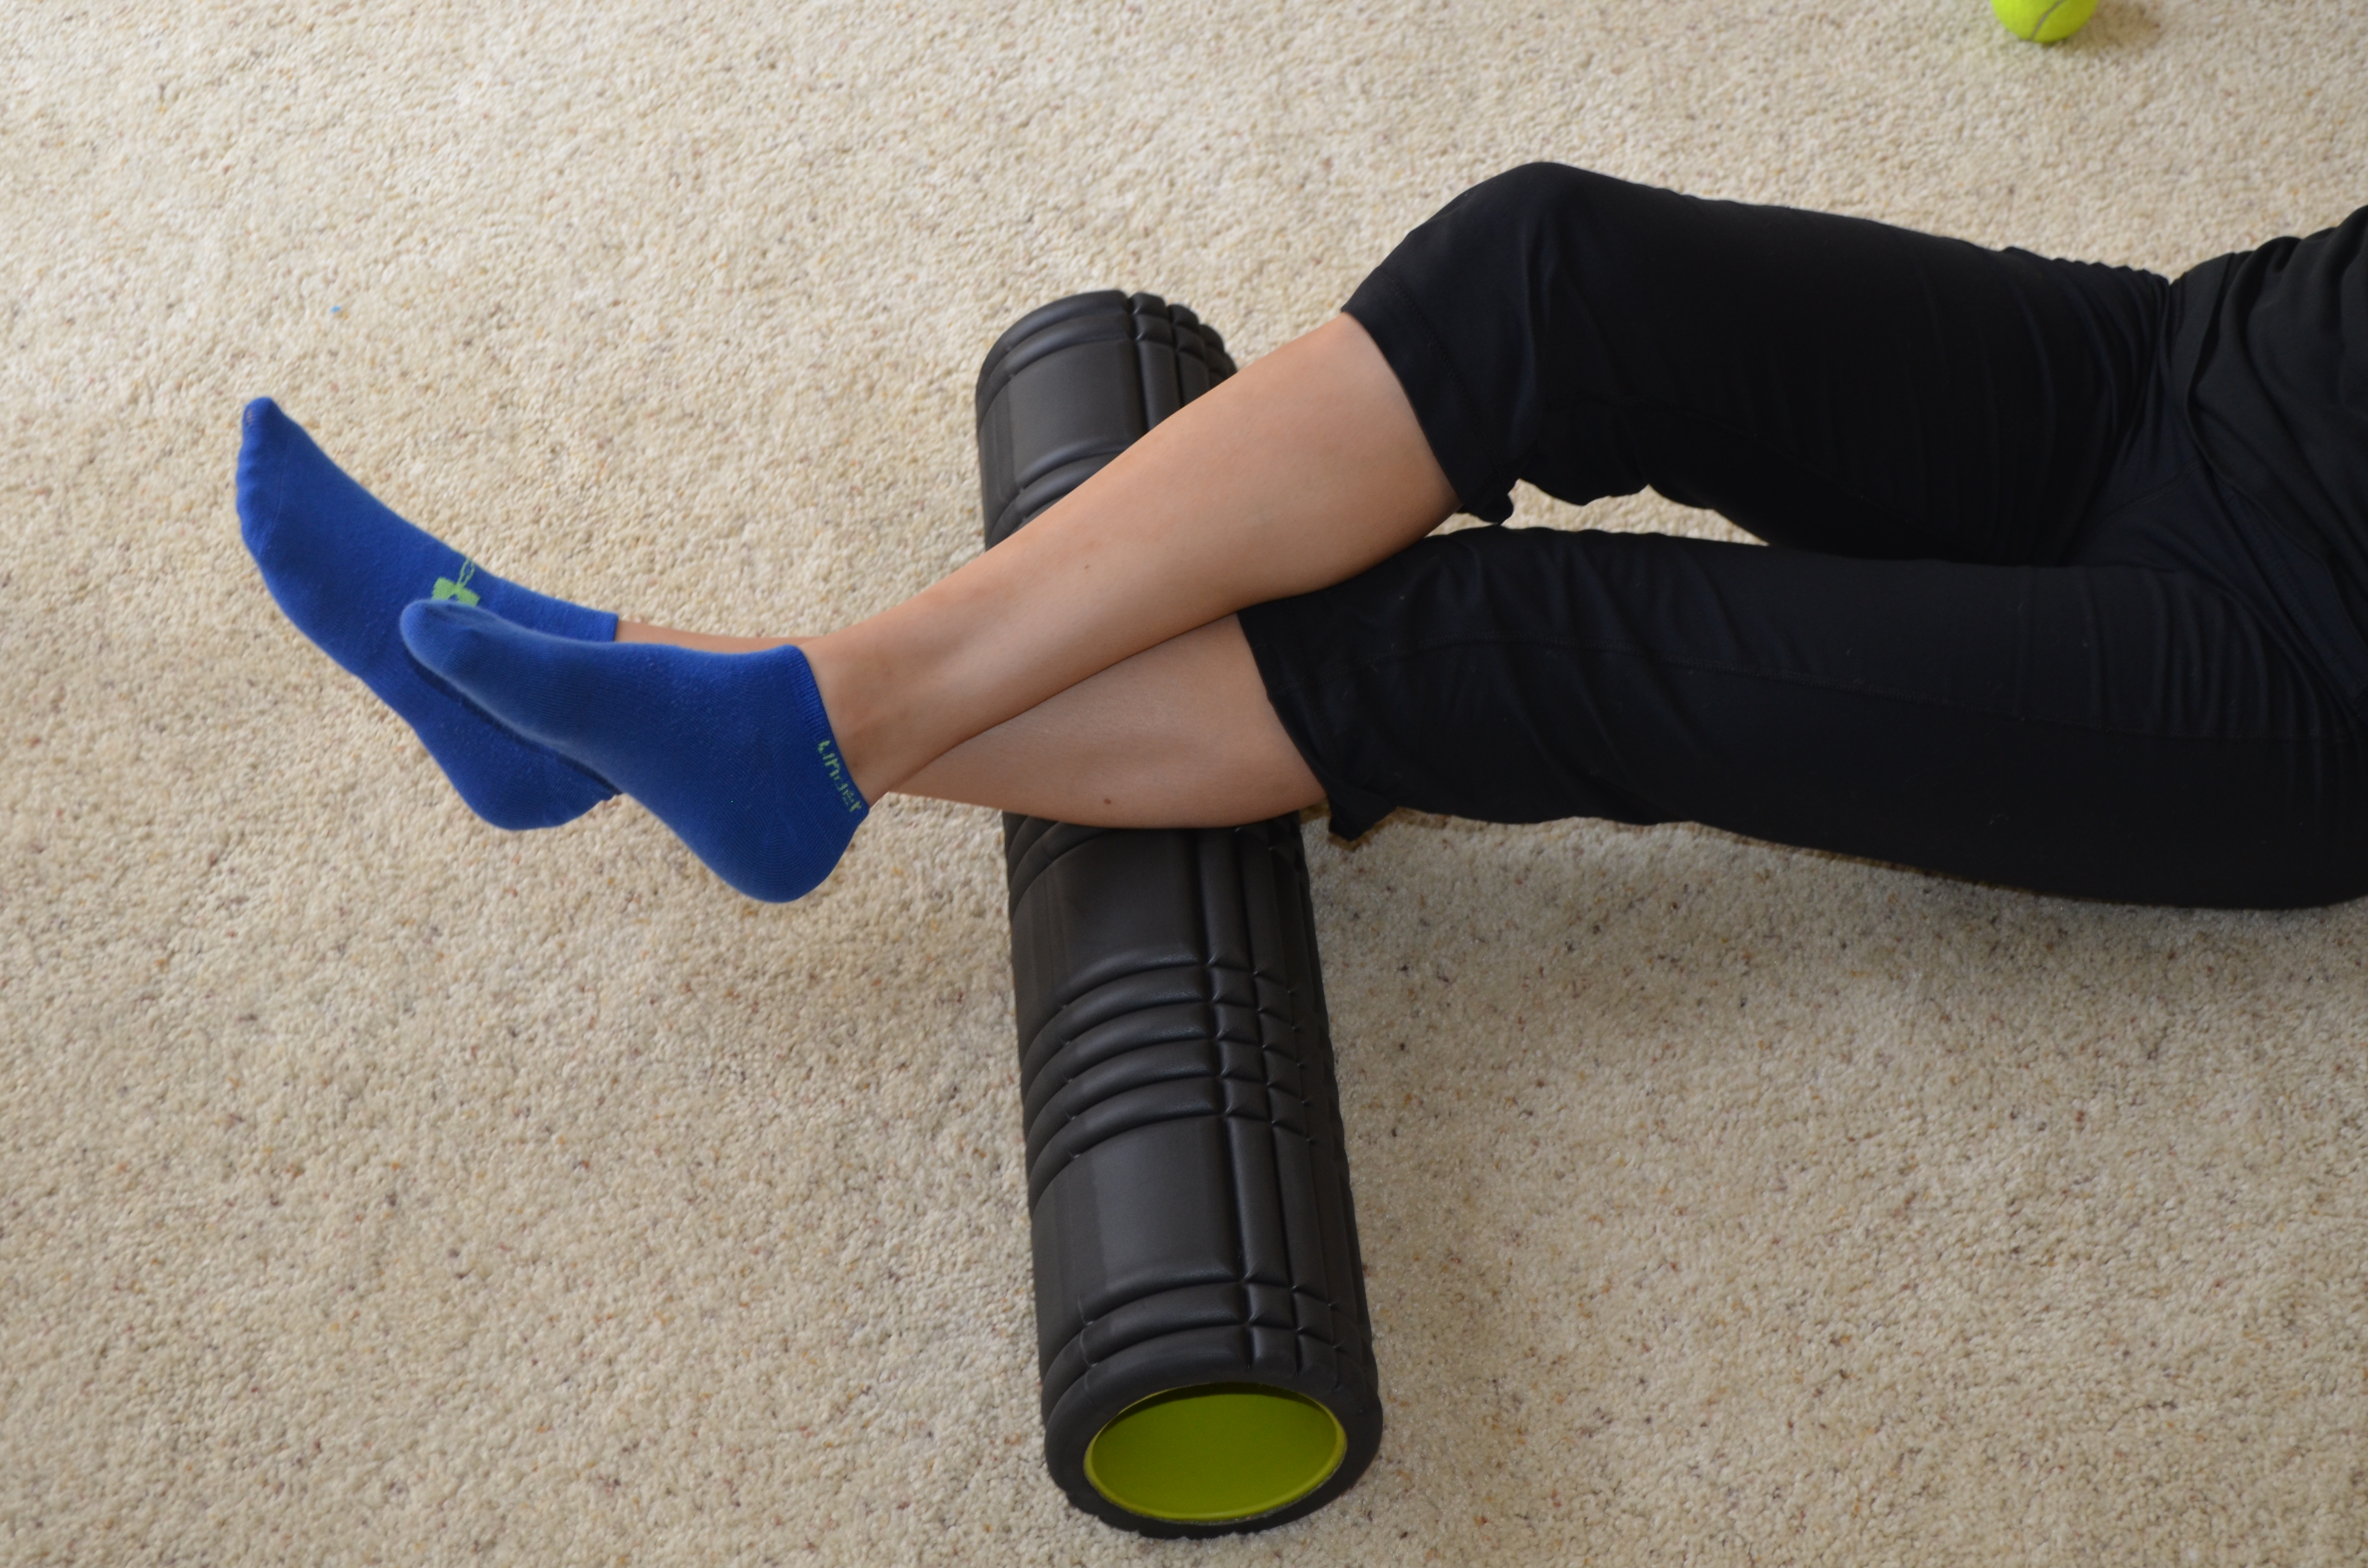
3. Calves – Sit on the ground with one leg out straight. Take a roller or a ball on a book or block and place it under the calf of the leg out straight. Cross the other leg over the top. Rock the leg on the ball side to side. Then move the ball up or down your calf. Again rock the leg side to side. You can also flex and relax your foot or make small circles with your ankle to dig in deeper to any tight spots you find. Work all the way up and down the back of your lower leg.
4. Quads – Take a roller and set up with your with it under the front of your legs. You will be lying face down on the ground with your body supported on your forearms and your legs on the roller. Rock side to side on the roller then move it down or up on your quad and again rock side to side. Work all the way from your hips to the top of your knees. Around the top of your knees and right around your hips, you can also use a ball to dig out the muscles. Around your knees, start the ball on the inside of your leg right above your knee. Work your way across the top of your knee to the outside of your leg. Hold on any tight spots. You can do the same all along your groin and hip.

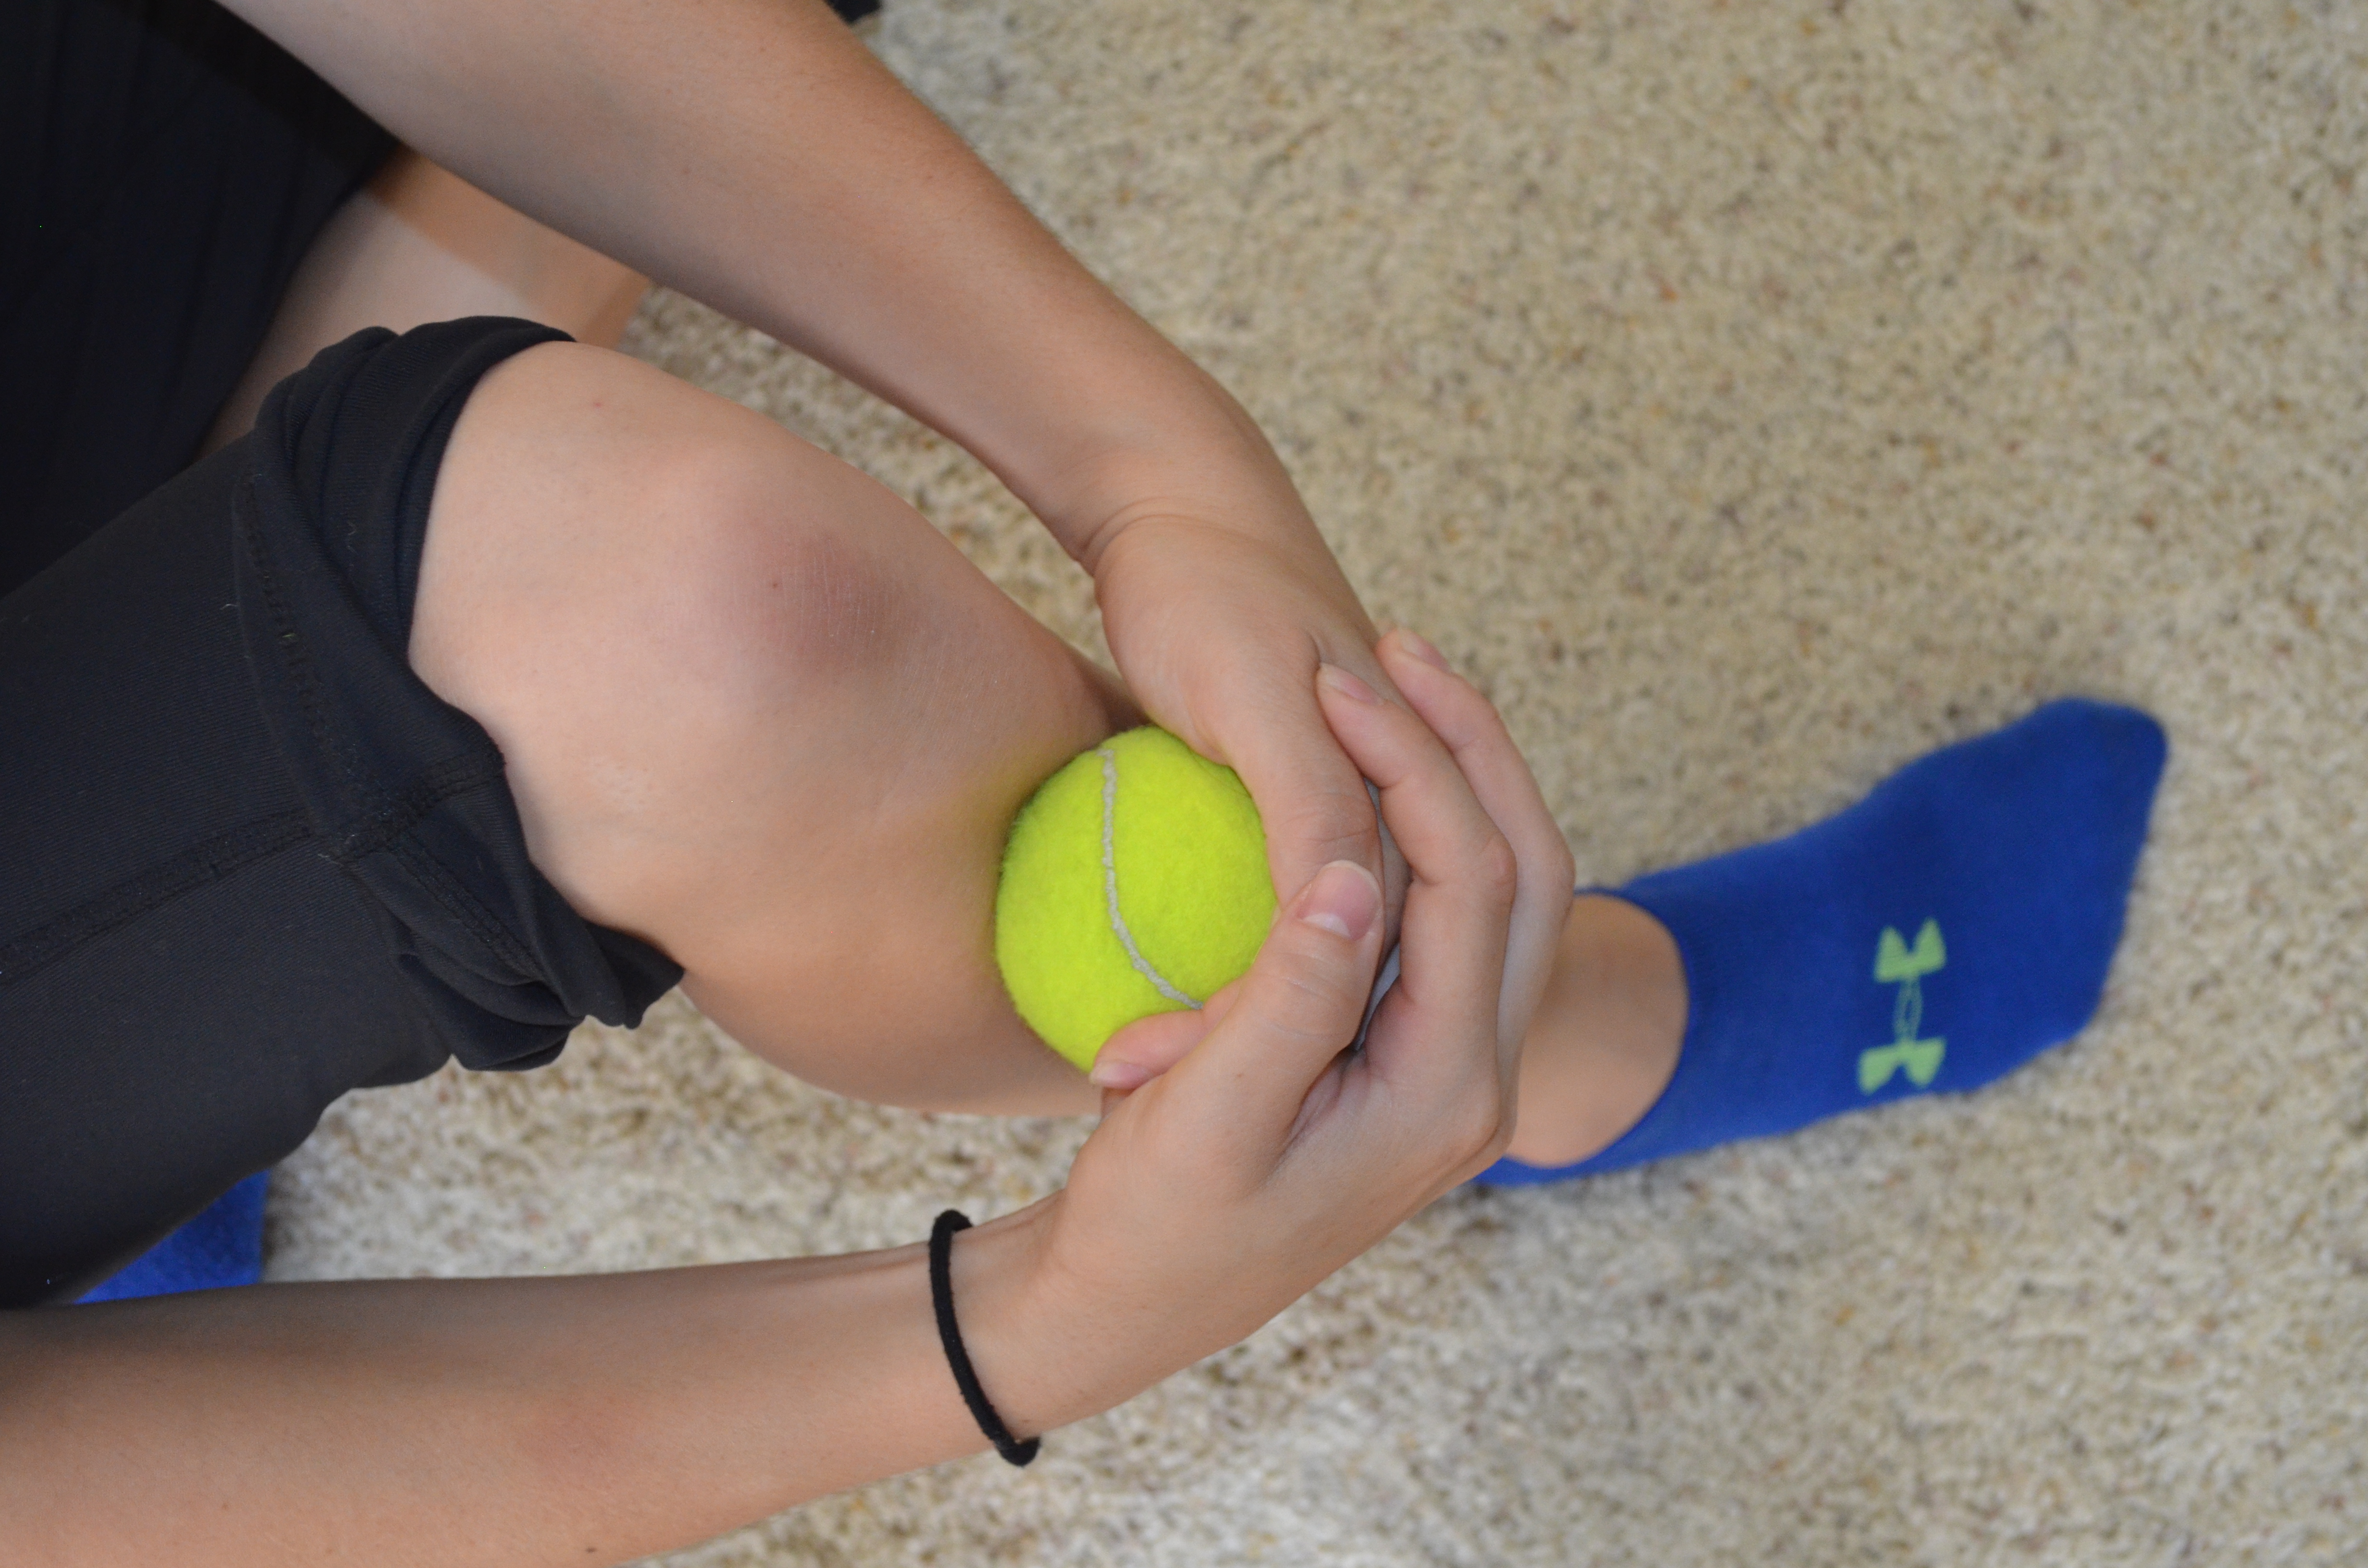
5. Hamstrings – A tennis ball is a great option to really dig out your hamstring, especially the top of your hamstrings right under your butt and the bottom right above your knee. To use a ball, sit on a chair or box. Place the ball under your leg on the box or chair. Roll it side to side and up and down. Hold on any tight spots. Use a box that allows you to really sit all of your weight down onto the ball. You can also do this on a roller on the ground but you won’t be able to dig in as much.

6. Adductors – You can roll out the inside of your leg using a ball or roller. Lie face down with one knee bent out to the side. Place a roller or ball under that leg right above your knee. Rock the leg forward and backward a bit then roll the roller up toward your crotch. Hold on any tight spots as you roll from your knee up toward your groin. Rock toward the front and back of your leg as you move up and down.

7. IT Band – Set up on your side with the roller just under the outside of your hip. You can stack your legs to apply more pressure or bend the top leg in front of you and use it to push off. Rock forward and backward as you move the roller down the outside of your leg. You can work from your hip down to just outside your knee. You can rock slightly forward to work into the front of your leg a bit especially around your hip. This way you can also hit your TFL.

8. Hips/Glutes – Use a ball to roll out your hips and glutes. The smaller and harder the ball, the more you will be able to dig in. Place the ball under one butt cheek. Roll it around your butt from the bottom near your hamstring up to your low back. While you roll under the fleshy part of your butt, you can also lift and lower your leg as well as draw the knee in toward your chest and straighten the leg back out. By moving the leg, you will dig in more with the ball. You can also roll the ball under your hip and around to the front to dig in to your TFL and hip flexors.

STRETCH
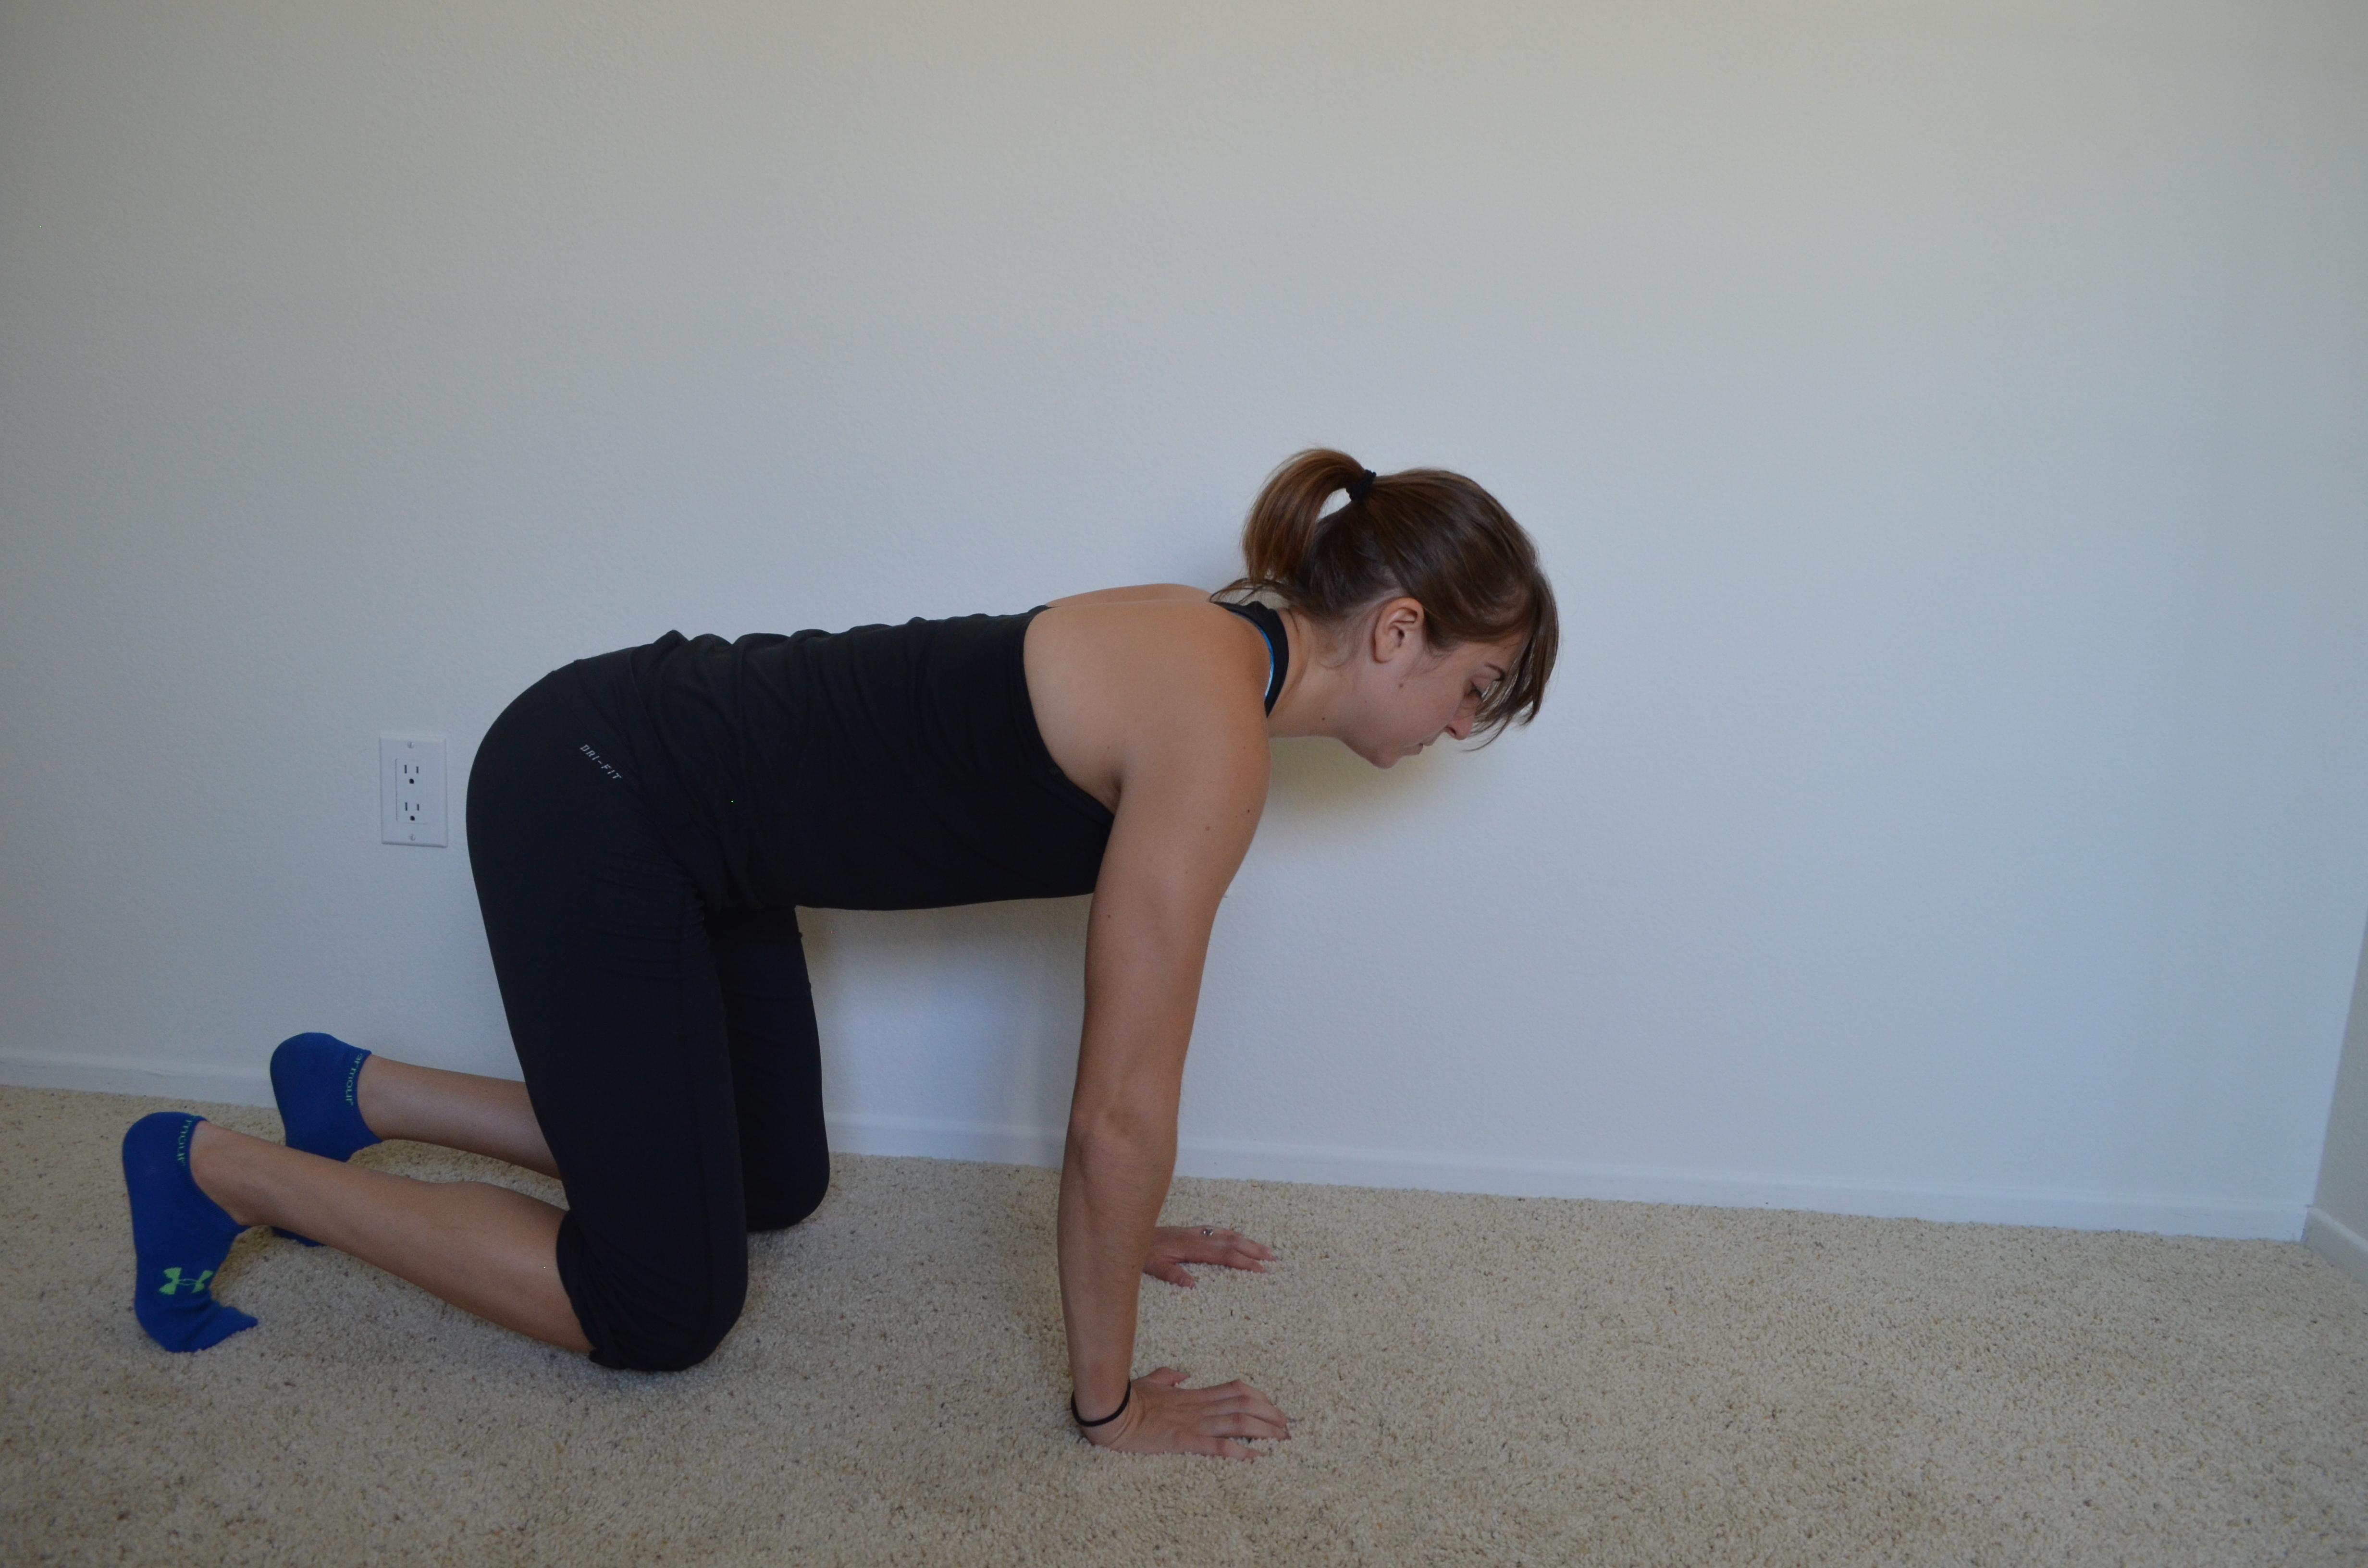
1. Feet, Calves – Bear Squat with Foot Stretch – To do this move, start on your hands and knees as if you were about to crawl. Then drive up off your knees onto your toes and hands. Drive your heels as close to the ground as possible and then return back to kneeling. Then lift your hands and sit back onto your heels. Make sure your feet are flexed when you sit back so you feel a nice stretch down the bottom of your feet into your toes. Then place your hands back down on the ground and repeat the stretch, driving your butt up into the air and heels down into the ground.

2. Shins – Standing 3 Way Shin Stretch – Stand facing the wall with one foot forward and the other leg back. Point your toe and rock onto the top of your foot so that the top of your back foot is facing the ground and you are on the front of your toes. Then bend the back knee and rock forward, feeling a nice stretch up the front of your lower leg. Keep the back toe pointing straight back for 10 reps then point it in and then out for 10 more reps in each spot. Do not worry about the front leg during all of this. Focus on stretching the shin of the back leg.
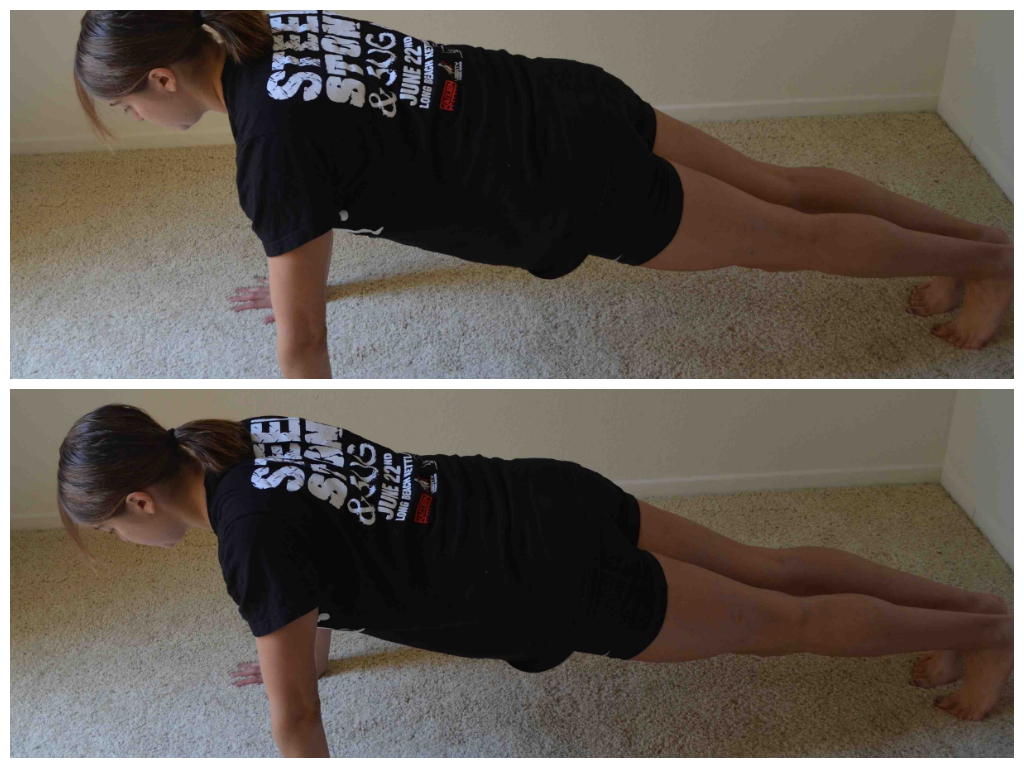
3. Hips, Hamstrings, Back – World’s Greatest Stretch with Hamstring – Start in a high plank position with your hands under your shoulders and feet together. Your body should start in a nice straight line. Step your right foot outside your right hand. Try to get it right outside your hand with the foot flat on the ground. Drop the right elbow down into the instep of your right foot, keeping the foot down. Then rotate open facing your right leg, stretching your right arm up toward the ceiling. Bring the right hand back down to the ground. Sit back on your left heel and straighten your right leg out in front of you. Feel a stretch down your hamstring.You can even hinge over the right leg a bit. Then bend the right leg and move back into the plank position with the foot outside the hand. Again drop the elbow and repeat the move on your right side. Complete all reps and then switch and do the stretch on the other side.

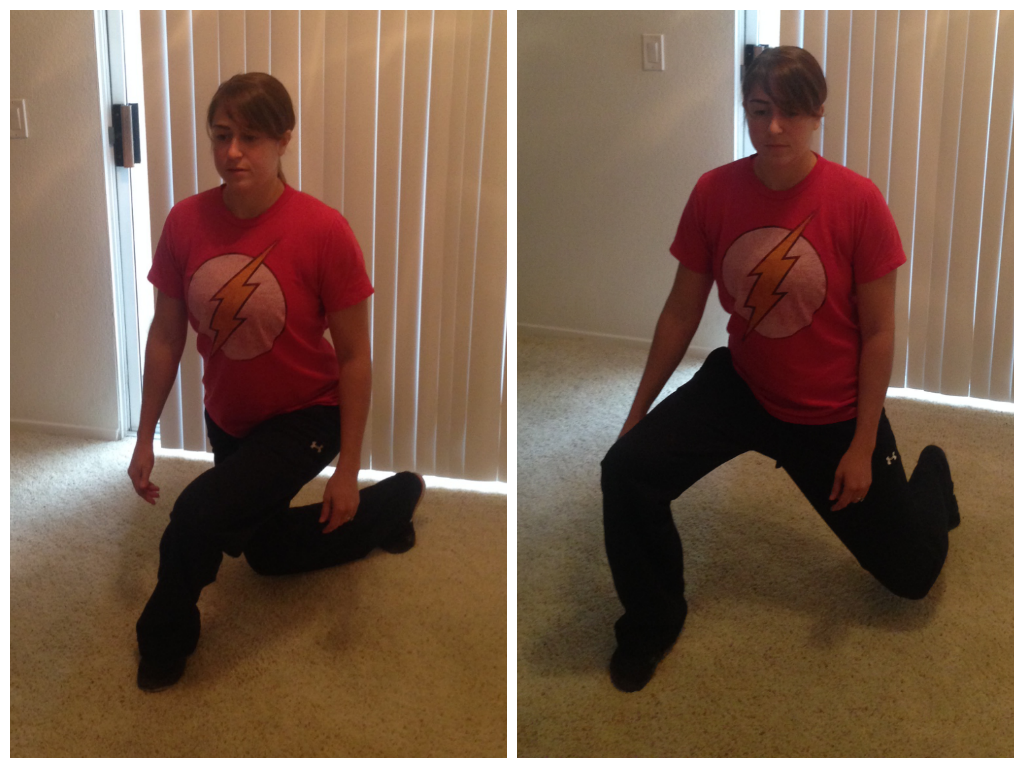
4. Hips/Quads – Kneeling Dynamic Quad Stretch – Set up kneeling on one knee facing a wall or something else you can place your hands on for balance. Make sure your front knee is a few inches away from the wall so you can rock forward. Grab your back foot with the hand on the same side. Pull your heel in toward your butt. Then rock forward, feeling a greater stretch down the front of your back leg. Relax back and repeat.

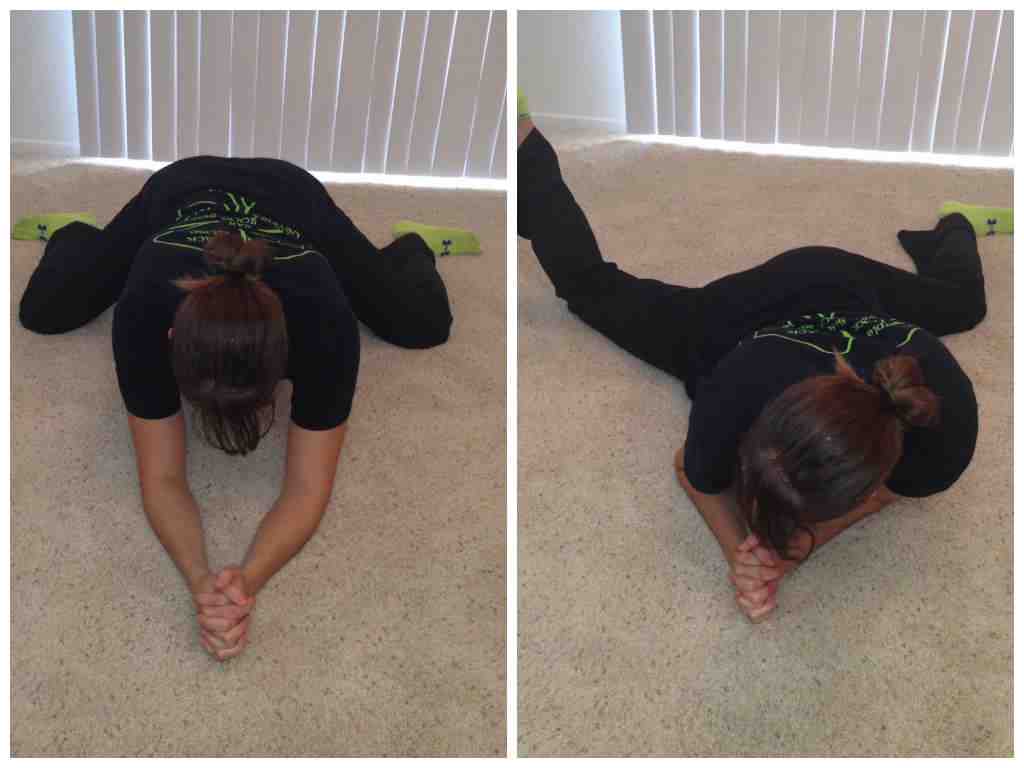
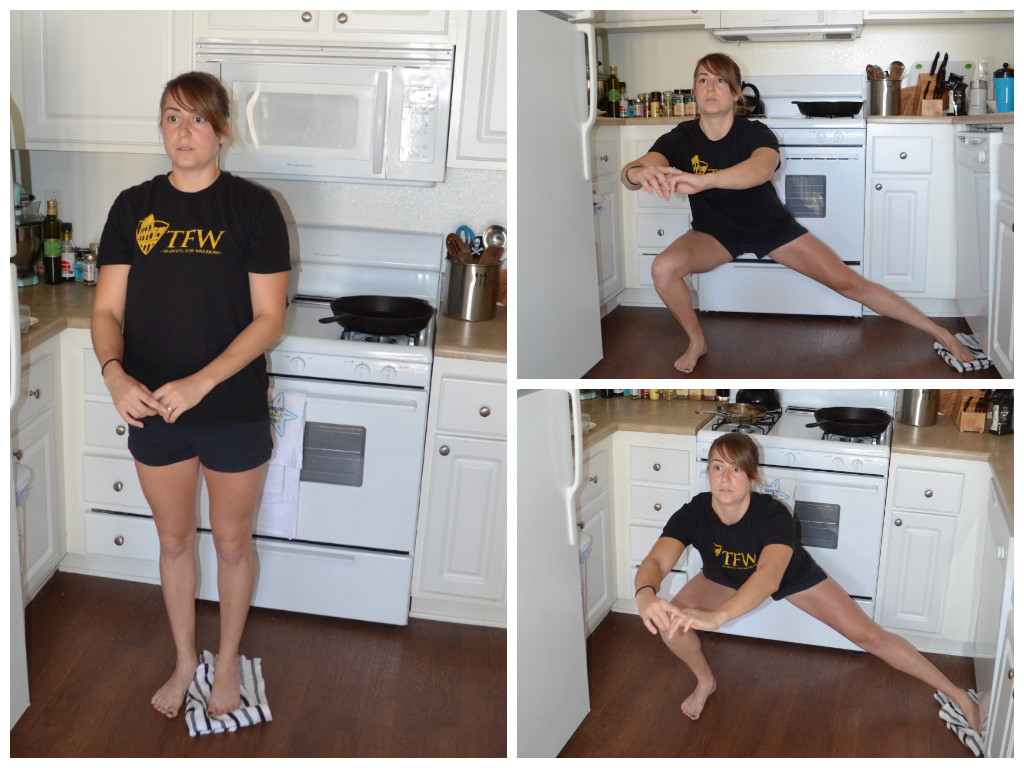
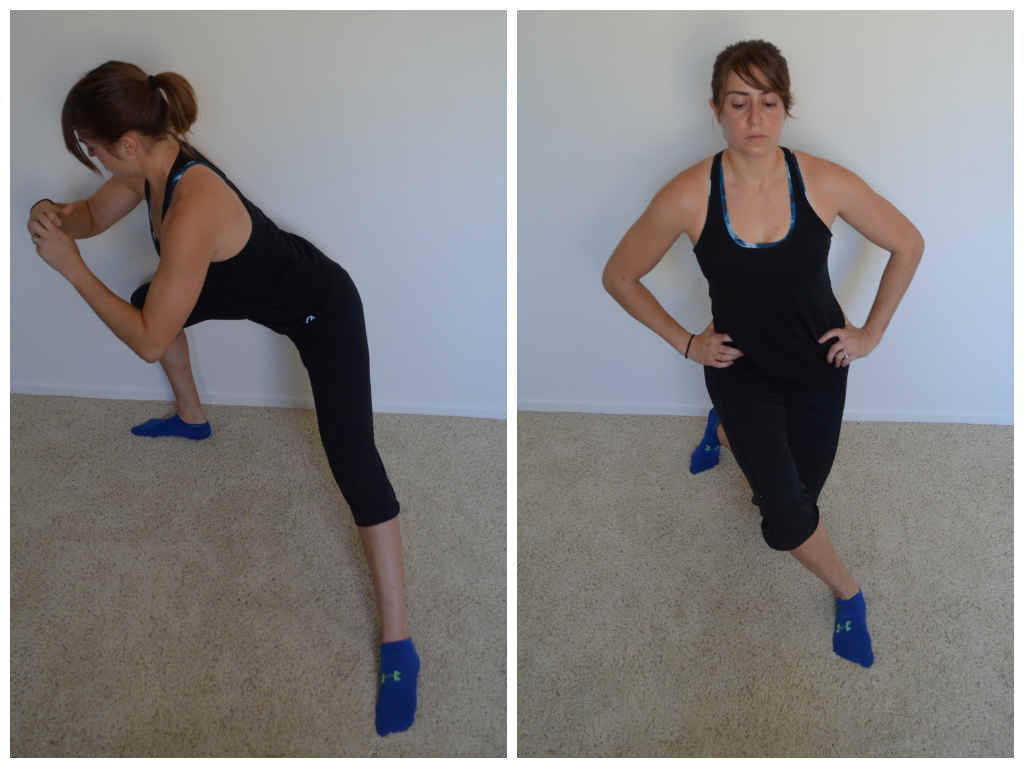
5. IT Band/Hamstrings – Standing IT Band Stretch – Standing tall, cross one foot over in front of the other. PUsh the front foot back enough though that the toes of both feet are even and your back leg is pushed straight. Clasp your hands together and reach up toward the ceiling. Stretch up nice and tall. Then reach your hands down toward the instep of the foot in back. Press your hip out to the side as you reach and keep your legs straight. Then reach back up and uncross your feet. Cross the other foot over and repeat. Keep alternating sides until all reps are complete.

If you reach more straight on like the bottom left picture, you will hit your hamstring more than your IT band. The bottom right shows the IT Band stretch.
6. Hips/Adductors – Frog Stretch with Rotation – Kneel on the ground and spread your knees as wide as possible. Lower yourself down to your forearms. Keep your feet in line with your lower leg and knees. Do not let your feet come together behind your butt and let them relax so the insides of your feet are flat against the ground. Sit your butt back between your knees as much as possible. Then come forward out of the stretch. As you come back forward, lower your body down to the ground and rotate your lower leg up and forward. Sit back again and then pivot the other hip. Keep alternating sides until all reps are complete.
ACTIVATION
1. Fire Hydrants – Set up on your hands and knees with your hands under your shoulders and your knees under your hips. Flex your feet. Keeping your right knee bent to 90 and your foot flexed as you lift the leg out to the side. Squeeze your butt as you lift. Do not bend your arms or lean to the side as you lift. Hold for a second or two at the top and then lower down and repeat.

2. Posterior Plank – Start seated on the ground with your legs out straight and your hands on the ground behind your butt. Your finger tips should be pointing toward your butt. Drive through your hands and heels and raise your hips up off the ground toward the ceiling. Keep your legs straight as you lift. Press your chest up and out as you raise your hips. Relax your head back. Your body should be in a nice straight line at the top. Beginners may need to bend their legs a bit to hold the bridge at the top. Advanced exercisers can do a one leg bridge. Hold at the top for a second or two and then lower down and repeat.

3. Hip Circles – Set up on your hands and knees with your knees under your hips and your hands under your shoulders. Flex your foot and keeping the knee bent, drive it straight back and up. Drive the heel toward the ceiling. Keep your core tight and squeeze your glutes. Do not hyperextend your low back. Hold for a second or two and then bring the leg out to the side as if doing the fire hydrant. Do not set the leg down in between. Hold for a second or two and then drive the knee forward into your elbow. Squeeze your core as you drive the knee forward. Keep the foot off the ground. Then set the knee back down and repeat.
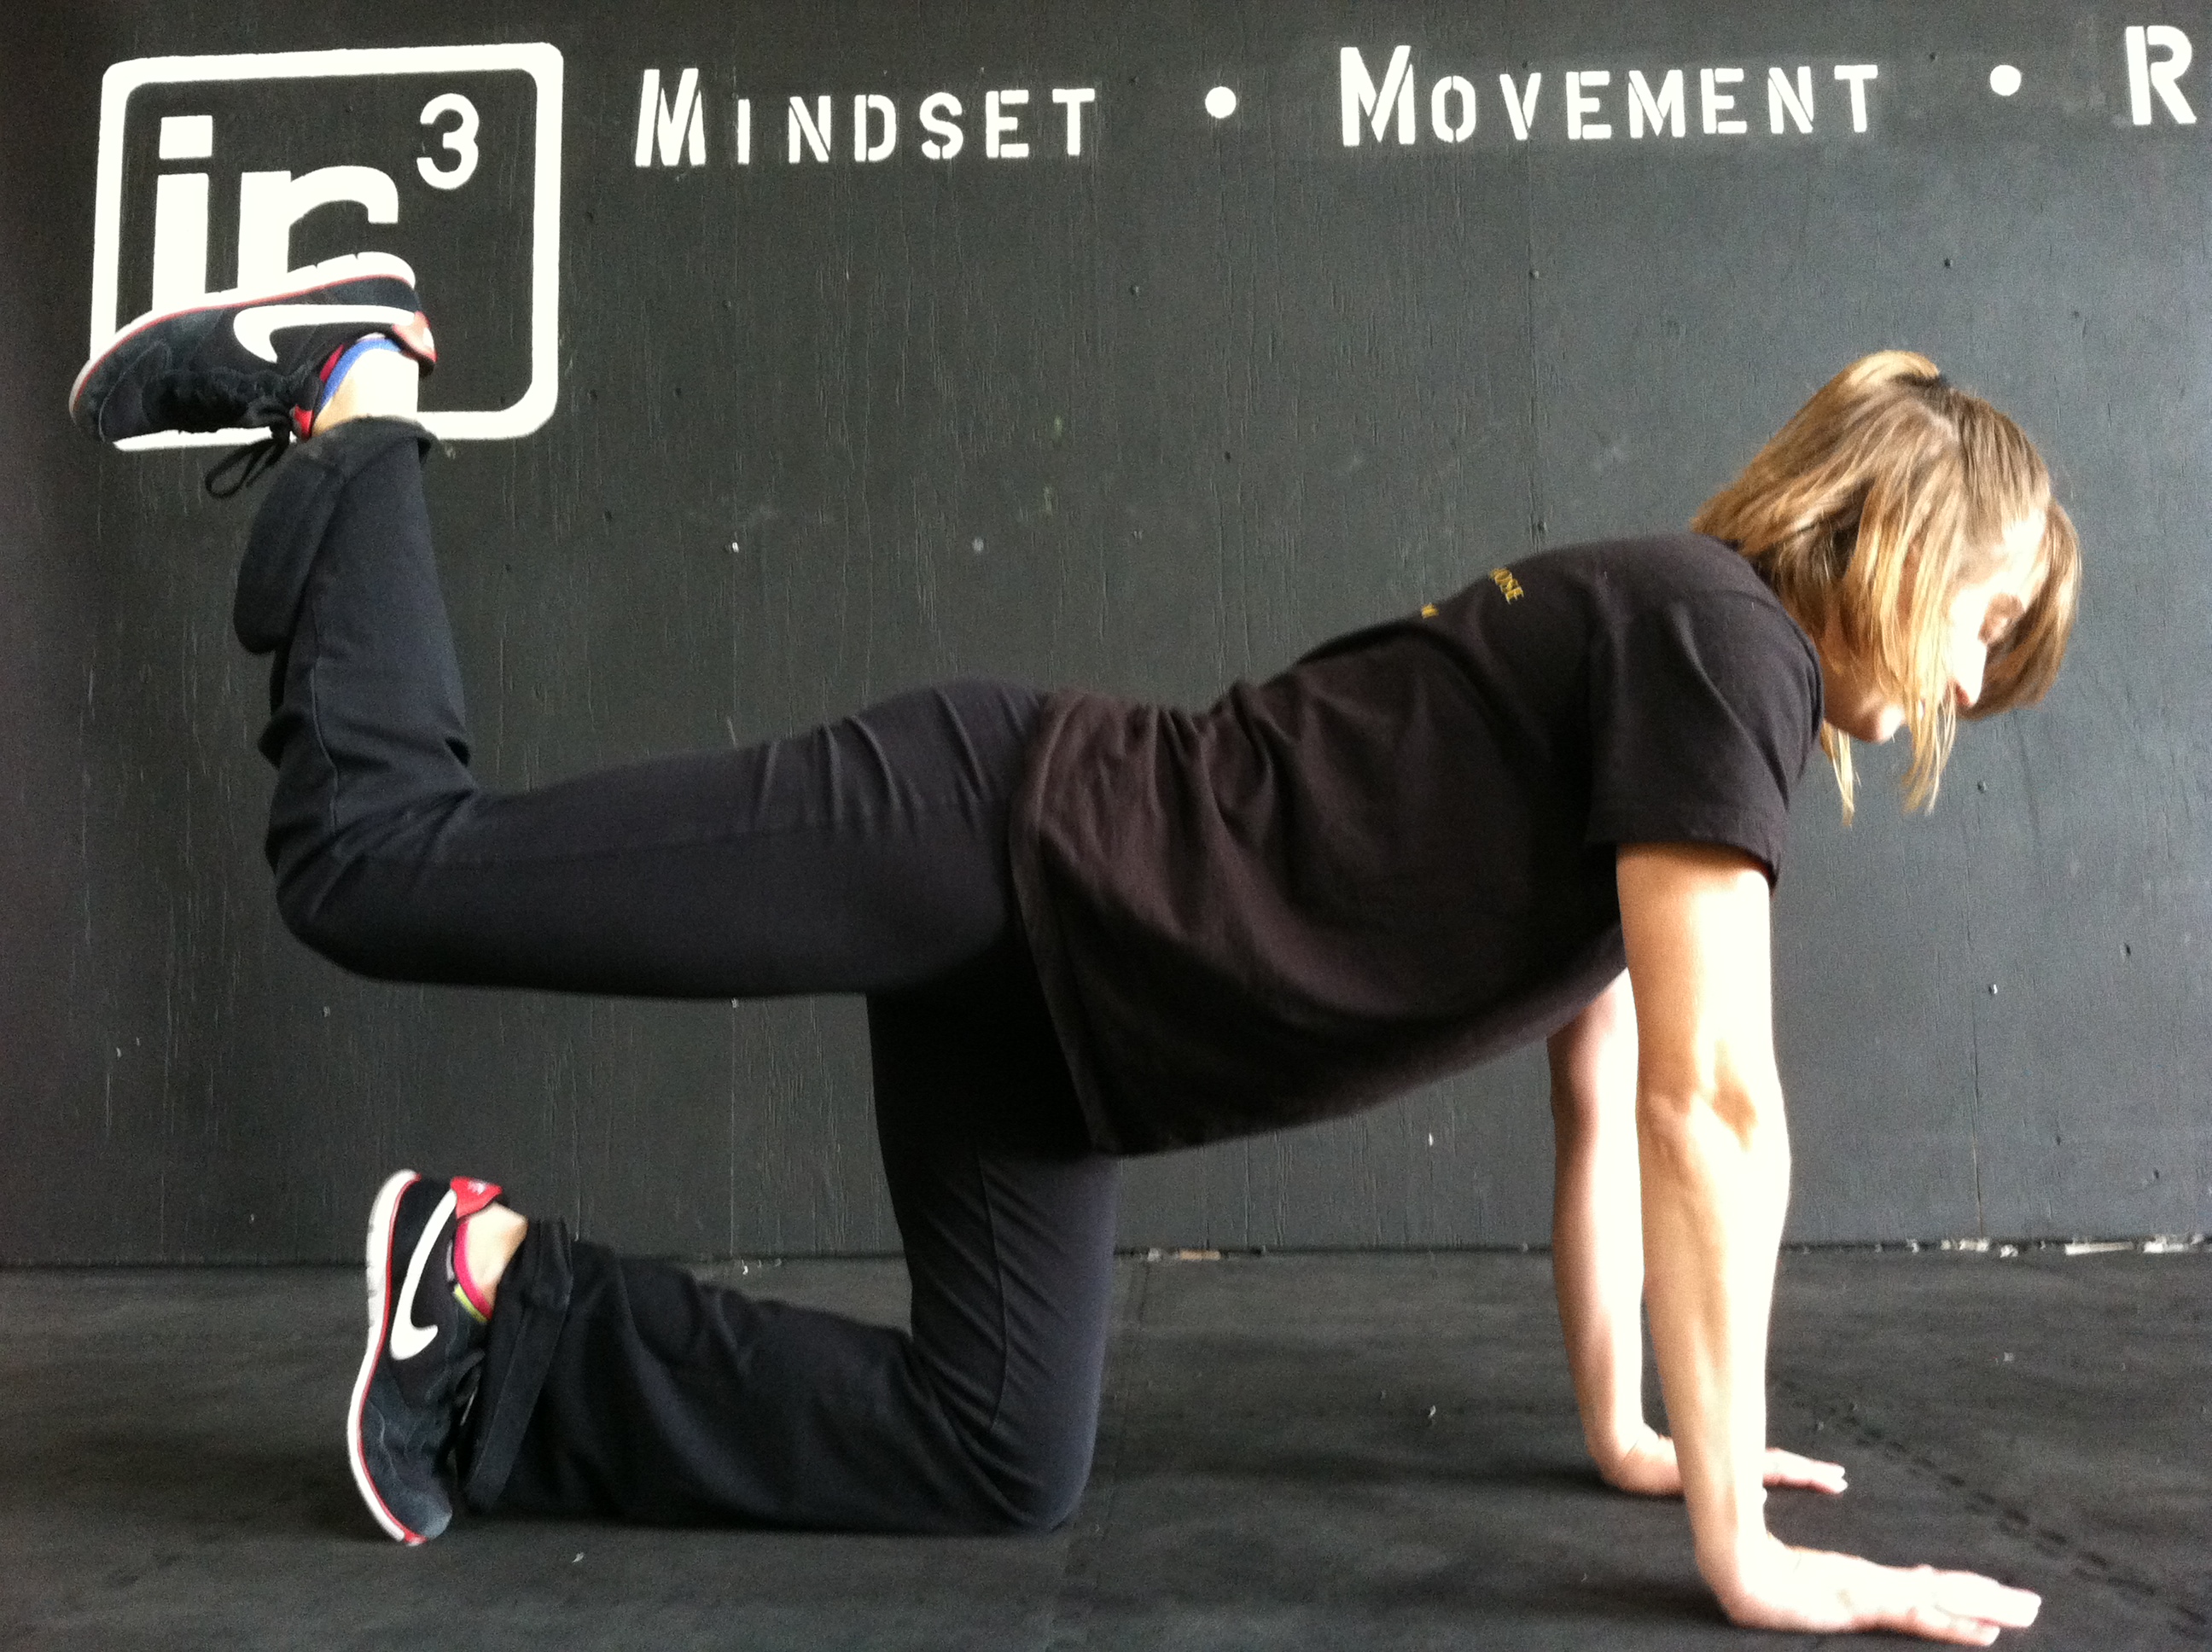
This is the first part of the circle.
4. Glute Bridge – Lie on your back with your knees bent and your feet flat on the ground. Your heels should be about hip-width apart and close enough to your butt that you can reach them with your finger tips when your arms are straight down by your side. Bend your elbows to 90 degrees so that your upper arm is on the ground. Then drive up through your heels, arms and upper back. Squeeze your glutes and lift your hips up as high as you can. Keep your core tight so that you don’t feel this in your low back. Make sure you don’t drive off your heels backward. Also, don’t let your knees fall open. Keep them in line with your hips and ankles. Hold at the top or complete reps by lowering back down and then repeating.
Actually, any glute activation moves you do, would be super beneficial. Here is a list of 10 glute activation moves you can do with a mini band. If your knees cave in when you run, you may want to focus on your external rotators as well (clams, side shuffle, standing external rotation, abductors..)
WORKOUTS
1. Runner’s Recovery Workout – Great bodyweight isometric workout you can do anywhere.
2. Stronger Legs With Knee Pain – A great workout to develop great leg strength for running while being super easy on the knees. The workout will also help you prevent the development of knee pain while upping your mileage to train for your race.
3. The Elite Library – In this library, I’ve also written a great warm up for before your run, a sprint workout to work on speed and core strength and a workout to develop leg strength to help you run further without fatigue.
And if you are preparing for a race this year and want some help organizing your running and strength training, you could win a month of FREE online training here!

Bodyweight Home Exercises – Best Lower Body Moves
A bit ago I did a post with the 10 Best Bodyweight Upper Body Moves and today I wanted to take a second and go over 10 of the best lower body moves.
Bodyweight exercises are great to have on hand this time of year – when we are traveling, busy with family and the holidays and generally a little bit lazier about going outside on the weekends because it is cold.
The 10 Bodyweight Lower Body Exercises below don’t require much space and can easily be done in the comfort of your own home! (Shoot…they could even easily be used to create a home workout that the whole family can do together while gathered around for the holidays!)
1. Single Leg Deadlift (with slow eccentric) – Stand on one foot with the knee of that standing leg slightly bent. Hinge over at your hips, sweeping the other leg back toward the wall behind you. Pretend you are driving the heel of that foot straight into the wall behind you. Lean forward with your upper body as you hinge forward, keeping the back nice and flat. Make sure that as you hinge, you are sitting into the heel of your standing leg. Do not lean forward and come up onto your toes. To stand back up, drive through the heel of your standing leg and squeeze your glute at the top. Try not to tap the other foot down at all or at least not till you are fulling standing. Complete all reps on one side before switching to the other leg. To make the move harder, slow down your hinge over. Take 3-5 seconds to hinge over before you quickly stand back up. You can even slow down the stand back up or hold for a second or two while hinged over.
2. Single Leg Deadlift Hop – Stand on one leg. Hinge over, pushing your butt back and leaning your chest forward. Swing the leg off the ground back toward the wall behind you. Keep your back flat as you hinge over. Hinge over quickly, bending the standing leg just a little. Then quickly drive back up to standing, bringing your chest up nice and tall. As you drive up, explode up off the ground and drive the back leg forward, bringing the knee up. Then land back on the same leg and hinge back over before jumping back up. As you hinge over and drive up, you may want to swing your arms as if running with the opposite arm and leg working together. Make sure that as you hinge over your weight is in the heel of your standing leg. You want to also drive off that heel to really power your hop up.
3. Balance Lunge – Place your back foot up on a table, bench, chair or box. Hop your front foot out so you are in a nice wide stance with your back foot up on the bench or table. Then sink down, dropping your back knee toward the ground. Really sit back into the lunge. Make sure you aren’t going forward and that your weight is in your front heel and your front knee is not going past your toe. You should feel a nice stretch in the front of the leg that is back when doing this move. Beginners may want to use a super low box or do the move from the ground as a split squat.

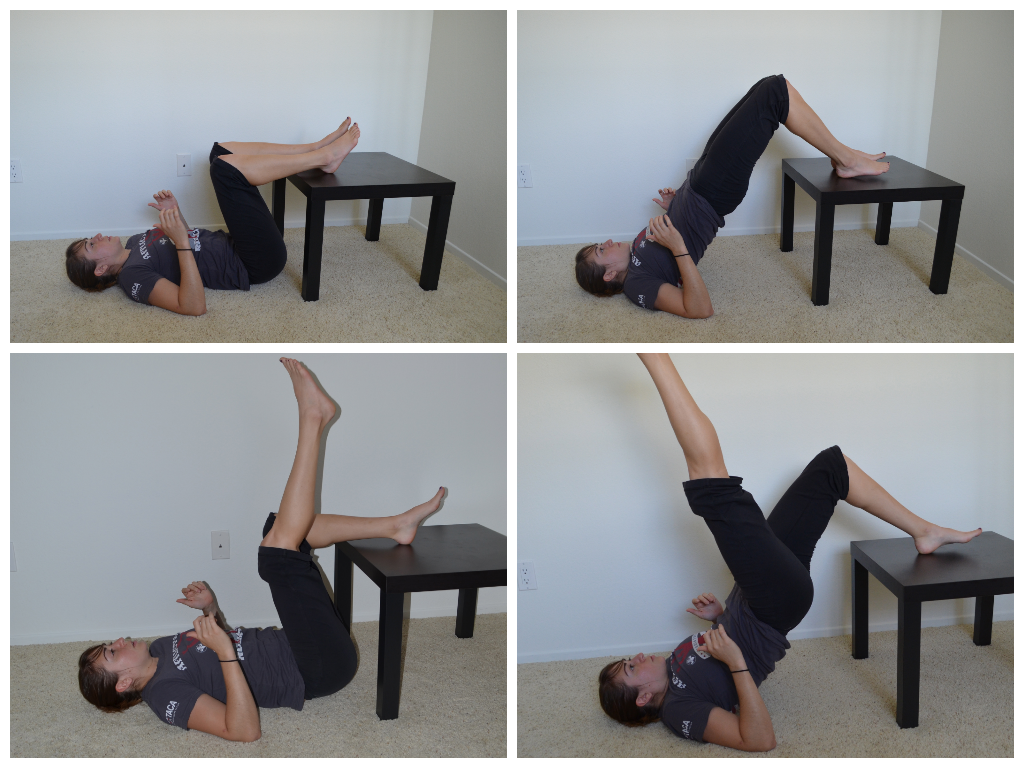
4. Single Leg Squat – Choose a variation of the single leg squat that is right for you. Beginners may use a table or chair while more advanced lifters may use a doorway or a super low table or chair. If you can do a full pistol squat or use a plate weight to counter balance you, do that variation. Choose as hard a variation as you can do. To perform the basic single leg squat to a table, you will start by standing on one leg. Hold the other leg straight out in front of you. Lower yourself down until you are sitting on the table. Then driving off the heel on the ground, stand back up. Do not lean way forward or touch your raised foot to the ground. If you use a table, the more you allow yourself to sit down, the easier the move will be. The more you just lightly touch the table and come right back up, the harder the move will be. Also the lower the table you use or the lower down you go on any variation, the harder the move will be.

5. Towel Lunges – Side Lunges, Reverse Lunges, Curtsy Lunges…All can be made more difficult by putting a towel under the foo that is moving. For more details about the towel lunges, click here (and some other great towel exercises!).
6. Skater Series – You can do a hold, side touches or even backward touches. For the hold, place your feet no more than a couple of inches apart. Sink down as low as you can, sitting your butt back while keeping your chest up. This squat is very similar to the chair pose in yoga. Do not let your back round and try to sink as low as possible, getting as close to parallel as possible. Hold in that low squat. To do the touches, once you sink down as low as possible with your chest up, you are then going to tap one toe at a time out to the side. You should stay low in the squat and not shift your weight. Keep your weight centered over the standing leg. Straighten the other leg out to tap the toe to the side. Do not let your weight shift as you touch. All your weight is in the standing leg. Alternate toe touches to each side until the time is up. For the backward touches, you are then going to tap one toe at a time backward. You should stay low in the squat and not shift your weight backwards as you lunge back. Keep your weight centered over the standing leg. Straighten the other leg back and just tap the toe. Do not let your weight shift into the foot touching back as you touch. All your weight is in the standing leg as if you are holding the isometric squat still. Do not come out of the squat as you touch back.
7. Glute Bridge (Off Table/Chair) – Beginners should do a single leg bridge from the ground or even a two leg bridge if they can’t get their hips up as high with the single leg bridge. Intermediate exercisers may want to do a two leg glute bridge with their heels up on the table. The single leg glute bridge off the table is an advanced progression. To do the glute bridge off the table, place your heels up on the table. Your butt should be right against the edge of the table. Bend your arms to 90 degrees with just your upper arm on the ground. Lift one leg up and point the toe toward the ceiling. Do not bend that leg or use it to help you bridge up. Drive through the heel on the table and press your hips up as high as you can. Squeeze your glutes and keep your core tight as you bridge up. Hold for a second or two and then lower down. Complete all reps on one side before switching.
8. Kneeling with Jump to Squat – This is an advanced move. It may be a challenge for many beginners to even do a step up from kneeling. To do the kneeling jump to squat, start on your knees with your knees about hip-width apart. Flex your feet. Sit your butt back and swing your arms back a bit so you are slightly hinged over. Hinge back and launch yourself from your knees up onto your feet in a low squat. Then stand all the way up. Once you are standing tall, step one foot back and come back to kneeling. As soon as you are kneeling again, hinge a little and jump back up to your feet. If you have a nice mat, you can jump back to kneeling, but this is not recommended unless you have a really nice mat.
9. Reverse Hypers – Lie face down on a table. Make sure your hips are right at the edge. Hold on to something in front of you if you want. Keep your upper body relaxed. Squeeze your legs together and point your toes out. Lift your legs to basically parallel to the ground, keeping your legs straight. Do not hyperextend your back and lift way higher than parallel. You do not want to feel this in your low back. Hold for 2-5 seconds and then lower down. Keep your core tight and really squeeze your glutes as you lift. If you don’t have a table to lie on, you can do this from the ground. Lie on the ground and relax your upper body. With your legs straight and heels together, lift your legs up as high as you can. Squeeze your glutes and get your quads off the ground.

10. Lunge Matrix (or part of it) – The lunge matrix basically tells you that you can lunge in every direction – forward, forward at an angle, to the side, back at an angle, straight back, back and crossed behind and even forward and crossed in front. If you think as yourself as lunging on a clock, you can literally lunge all the way around the clock. Sometimes I like to combine two or three lunges in a sequence. Or you can do a 360 lunge series, combining all seven and lunging around the clock!
This is a backward angled lunge and a front lunge across.
This is a curtsy lunge and front angled lunge. Two other lunges in the matrix
Bonus Moves:
Of course any jumping moves are also great options to help you challenge yourself without any weight. Squat jumps, skater hops, split squat jumps, tuck jumps are all also great options!
What are your favorite lower body moves to do at home?
10 Plank Variations to Strengthen Your Core
I’ve had sort of a love-hate relationship with planks over the years.
At points I’ve felt they didn’t give you that much bang for your buck, but I’ve started to realize they really are essential to developing stability and therefore preventing injury.
Here are my favorite plank variations. Some are isometrics while others are dynamic moves. Some even make great warm up moves.
1. Front Plank – The basic front plank variation is done from your forearms. You should rest on your forearms with your elbows right below your shoulders. Beginners can start on their forearms and knees while more advanced exercisers will perform the plank from their forearms and toes.
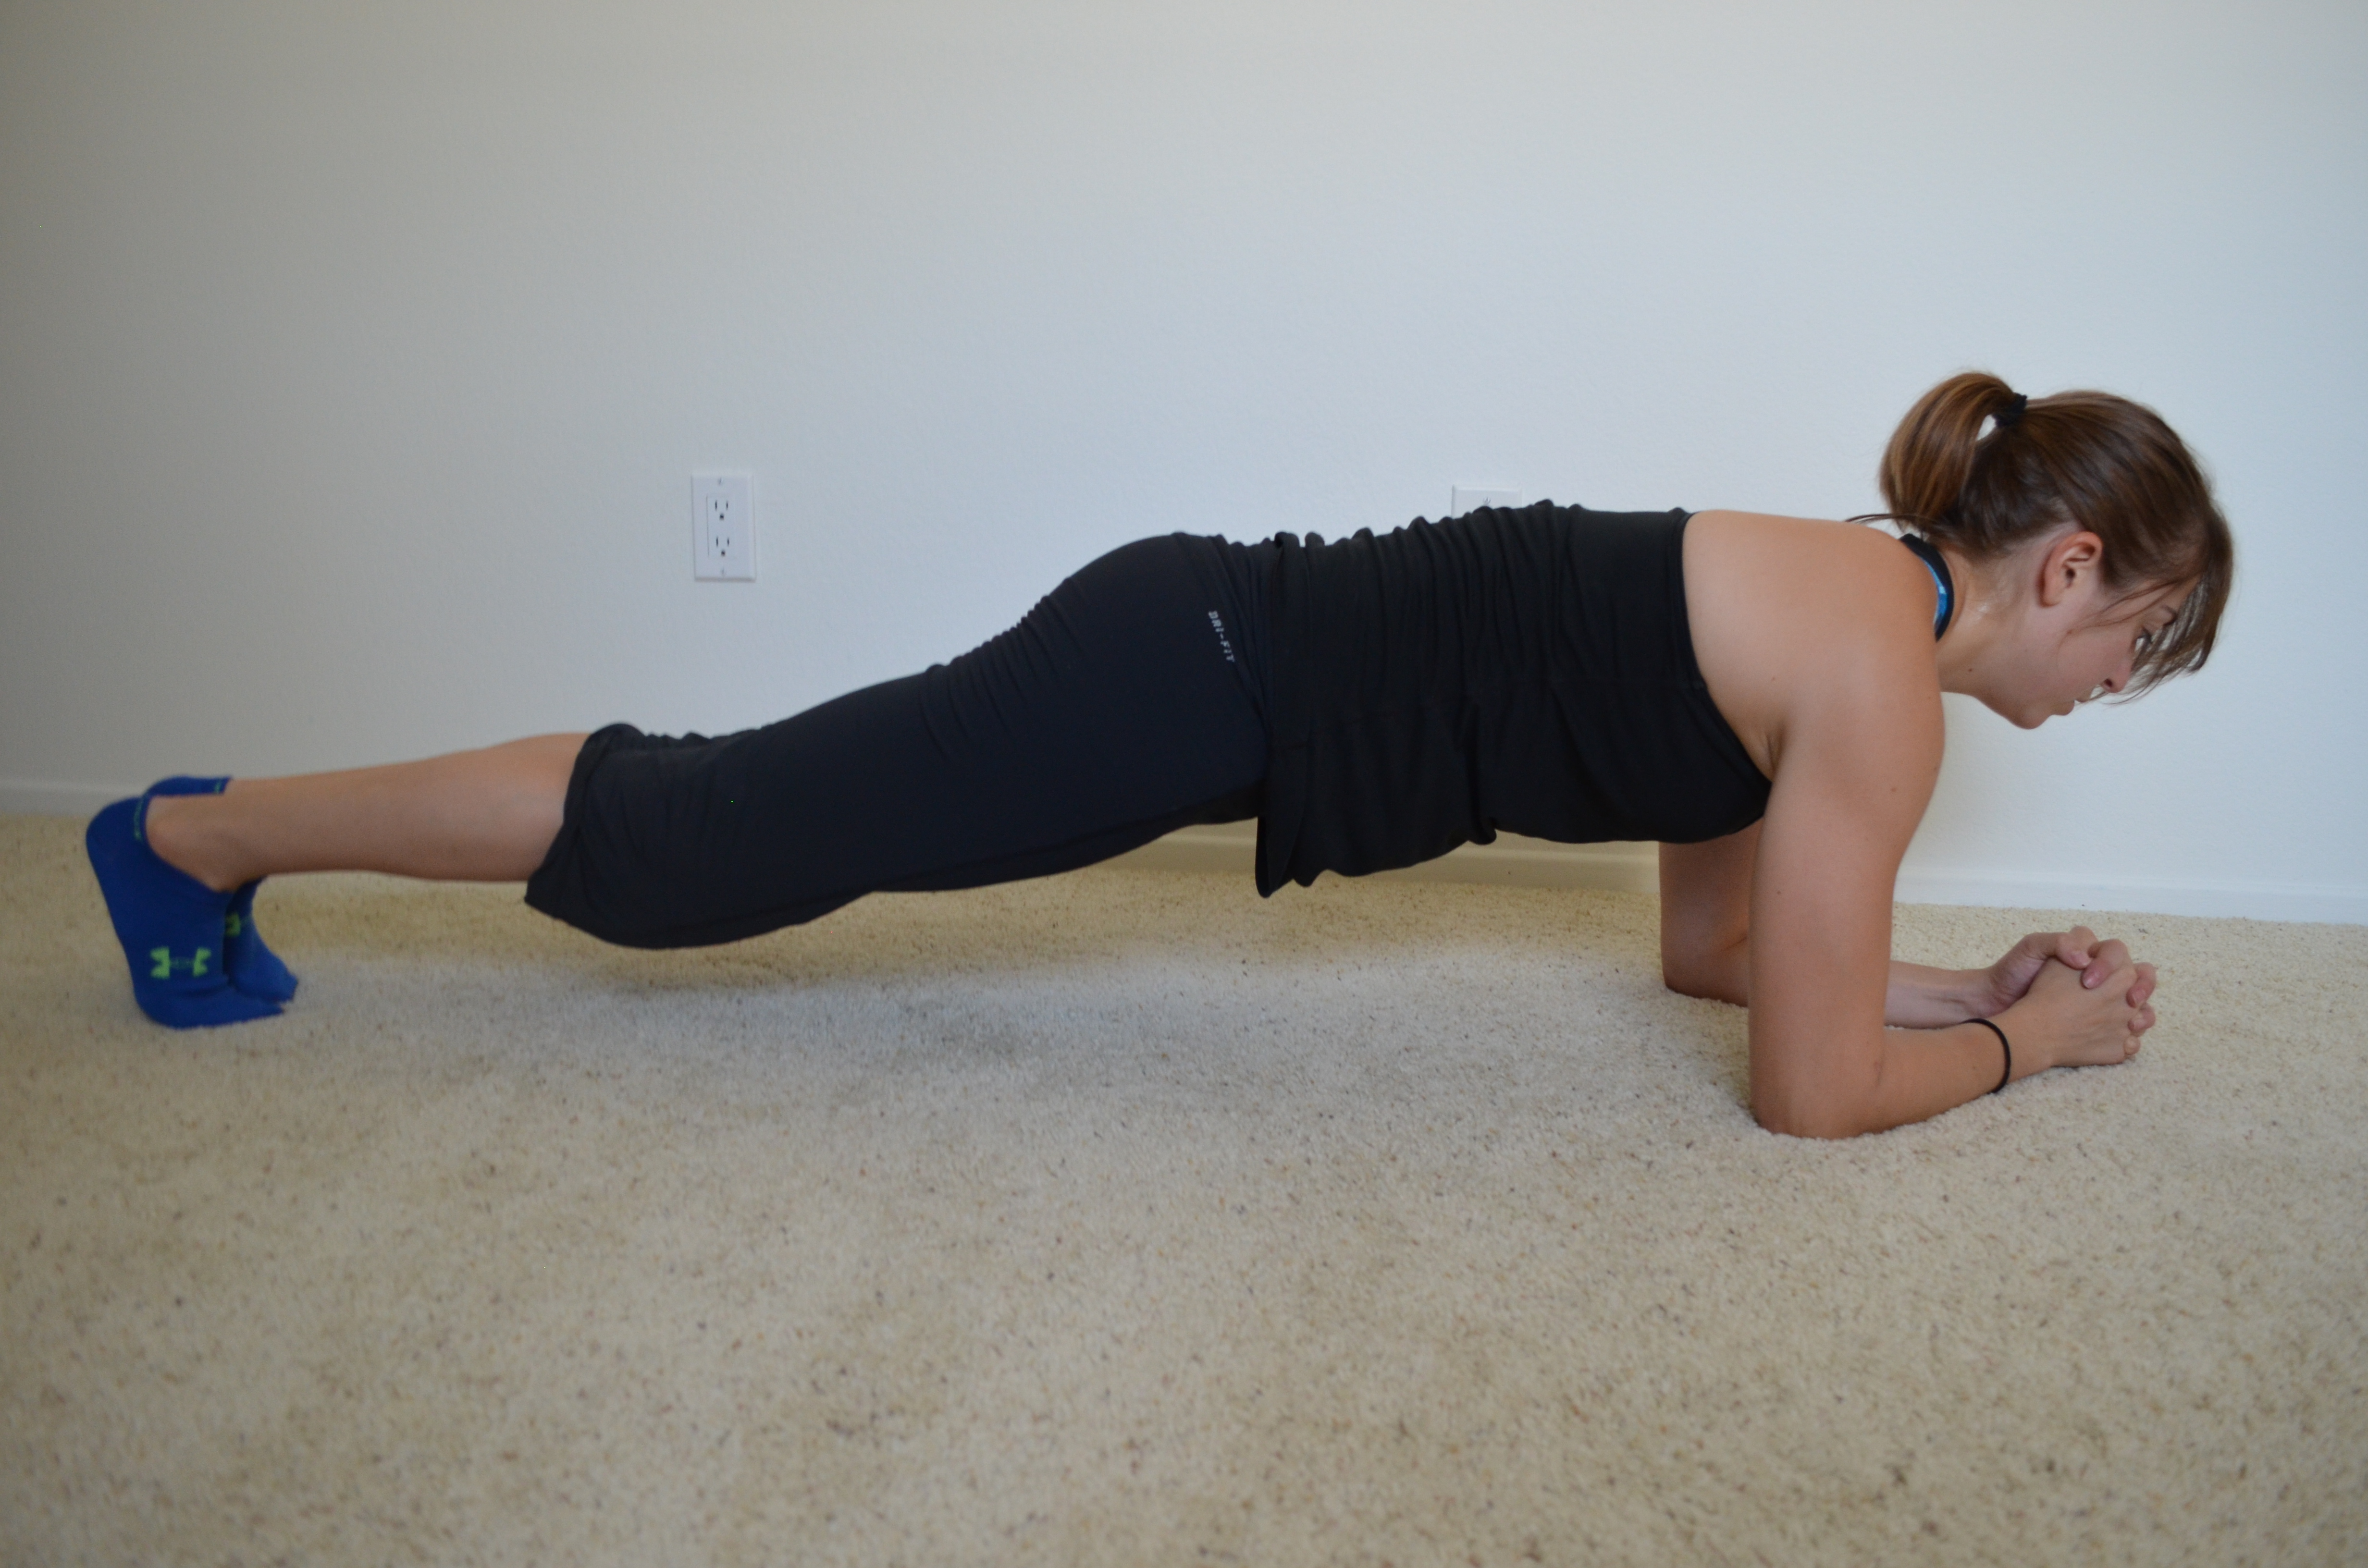
The longer you hold, the harder the move will be. To advance the move further, try lifting one leg and holding it off the ground. Make sure to draw the belly button in toward your spine, tuck your hips under and keep your body in a nice straight line. Feet should be together and adductors, glutes and quads engaged. Do not let your upper back round as you hold. Breathe as you hold and don’t let your hips drop toward the ground or raise up toward the ceiling.
You can also do the front plank from your hands.
2. Side Plank – The basic side plank variation is done on one forearm. Your elbow should be right below your shoulder.
Beginners may do this from their knees. A modified plank can also be done with just the bottom knee down and the top leg straight.
To advance the move, straighten both legs and rest on the side of your feet and your forearm. (Feet may be stacked or one may be in front of the other.)
If that isn’t challenging enough, raise the top leg. You can also do the side plank from your hand.
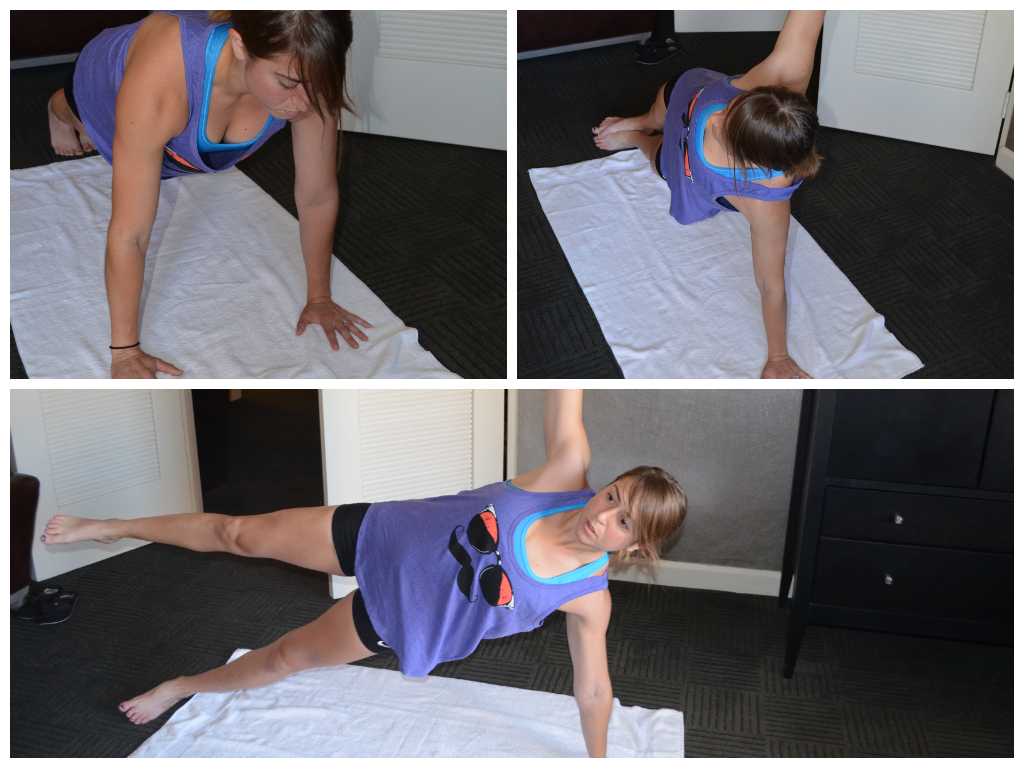
High front plank and two side plank variations
Your top arm can rest on your hip or reach up toward the ceiling. Make sure to keep your body in a nice straight line. Squeeze your glutes and make sure your chest doesn’t rotate toward the ground. Drive your bottom hip up nice and high. Do not let your hip sag toward the ground.
3. Planks with Hip Dips – There are two variations of plank hip dips that I love to use. One is a front plank with hip dips and the other is a side plank with hip dip.
To do the front plank with hip dip, set up on your forearms and knees or toes. Keep your core engaged and your belly button pulled in toward your spine. Then drop the side of your right hip down toward the ground. Come back to center and then drop the side of the left hip down toward the ground. Alternate hip dips while keeping the core tight. Do not let the hips sag or raise up toward the ceiling.
To do the side plank with hip dip, set up on one forearm and either your knees or the sides of your feet. Start in a basic side plank. Then keeping your body straight and your chest open (aka not rotated toward the ground), drop your hip toward the ground and then press it back up as high as you can. Repeat making sure your body doesn’t collapse forward. Your top hand can be raised toward the ceiling or on your hip. Complete all reps then switch to the other side.
4. Plank with Reach Out and Back – A great glute activation move and tough on the core. This move is done from the hands and either your knees (beginner) or toes (advanced). To do this move from your knee, set up in the top of a push up with your hands under your shoulders and your body in a nice straight line down to your knees. Then sit back on your heels into a “child’s pose” position, reaching one hand back between your legs. Move forward back to the top of the push up as you reach the hand from between your legs out toward the wall beyond your head. You may even extend your hips more toward the ground. Just make sure to keep your abs engaged so that you don’t feel the extension out in your low back. Complete all reps on that side before switching to the other arm.

To do the plank with reach out and back from your toes, start at the top of a push up with your hands under your shoulders and your body in a nice straight line to your toes. Your feet should be between hip-width and shoulder-width apart. Lift one hand and hike your hips up as you reach back and across to the opposite ankle. Then reach back forward, reaching beyond your head as you lower your hips back down into the plank position. Extend your hips forward toward the ground, squeezing your glutes while keeping your abs engaged so that you don’t feel it in your low back. Complete all reps on that side before switching to the other arm.
5. Plank with Reach Thru – Set up in the high plank position on your hands and knees (beginner) or toes (advanced). Then reach one hand under your armpit and toward the far wall. You don’t just want to reach under your armpit to pat yourself on the back. Make sure your hips stay down as you reach through. Then pivot open, rotating into a side plank. You will reach the hand that reached under your armpit up toward the ceiling while rotating onto the sides of your feet or knees. Then reach the hand back down and under the armpit. Move back into a high plank position. Complete all reps on that side before switching and reaching the other way.

6. Bull Dog – To perform a bull dog hold, start on your hands and knees with your knees under your hips and your hands under your shoulders. Flex your feet and push up onto your toes and hands while your knees stay bent under your hips. Hold your knees an inch or two off the ground, keeping the core tight and the belly button pulled in toward your spine. Do not let your upper back arch as you hold. This move you almost feel more in your quads and shoulders than your core.
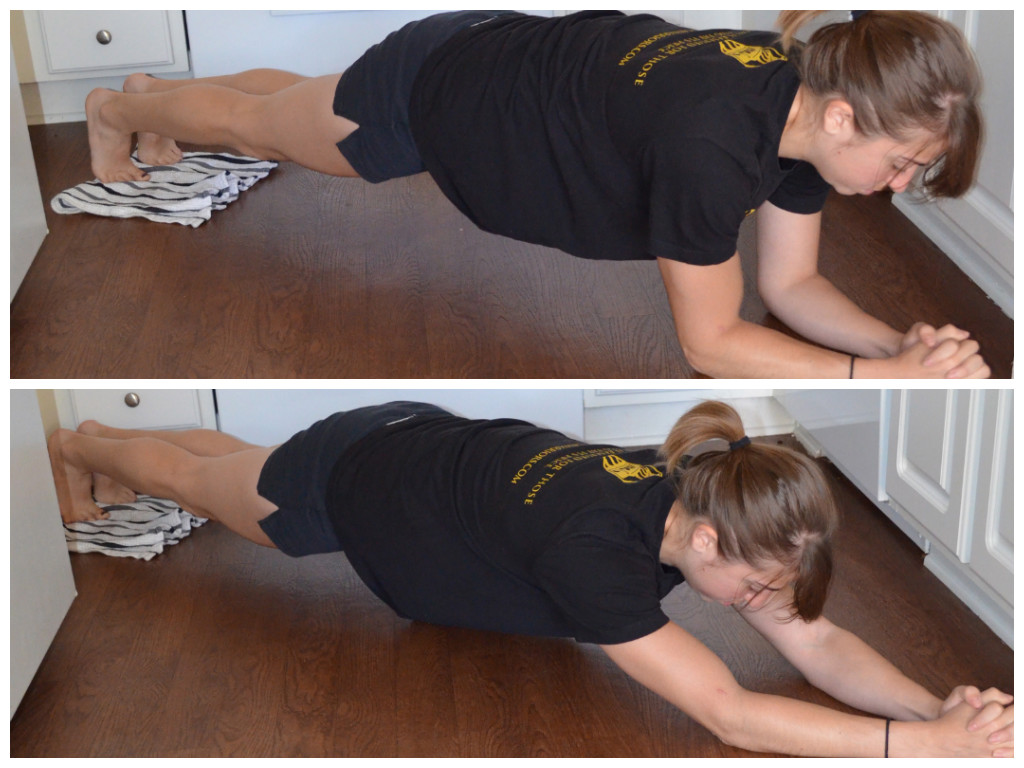
7. Body Saw – This is a very advanced plank variation…even at its most regressed. You can do this on a towel or sliders or regress it to a simple plank from your toes on the ground. Set up on your forearms and toes in a basic front plank. If you aren’t using sliders or a towel, you are going to walk your feet backward, lengthening your body through your triceps. Keep your body in a nice straight line. Do not let your low back arch. Walk your feet back as far as you can while maintaining good form and then walk back forward into the front plank.
If you use sliders or a towel, you will slide your feet back instead of walking them back. Make sure your lengthen through your arms. It is tempting to “pike” instead of truly lengthening, but to challenge your core, you need to lengthen your body out. You should not feel it in your low back. Keep the belly button pulled in and your glutes engaged. Don’t let your hips hike up or sag toward the ground. Slide out and back in and repeat.
8. Bird Dog – The basic bird dog is done from your hand and knee. Place your hands underneath your shoulders and your knees underneath your hips. Flex your feet. Kick one leg out straight as if kicking it into the wall behind you while you reach the other arm out straight toward the wall in front of your head. Don’t worry about lifting your leg or arm up high. Really try to drive your arm and leg toward opposite walls. Squeeze your glutes and keep your belly button pulled in toward your spine. As you lower your arm and leg, bend them and bring them together under your body. Try to touch your knee to your elbow before extending back out. Repeat all reps on one side before switching to the other side. All reps should be done in a slow and controlled manner. You should even hold for a second or two at the top of the move.

To advance this move, set up in a high plank position from your toes and hands. Now lift the opposite arm and leg up toward the ceiling, keeping both straight. Still try to reach both toward the far walls instead of just getting them up as high as possible. Keep your core tight and glutes engaged. Do not let the hip of the raised leg rotate open toward the ceiling. Squeeze the butt to hold the leg up then lower the arm and the leg and repeat the arm and leg raise on the same side.
Both bird dog variations can also be done as holds at the top instead of for reps.
9. High Plank Hold with Knee Drives – Set up in the high plank position on your hands and toes. You are then going to raise one leg off the ground and drive that knee toward your chest. You can drive the knee straight in. Or you can drive it to the outside of the same elbow (so right knee to the outside of the right elbow). You can also do a cross-body drive, bringing the right knee under and across the body to the left elbow.
Whichever drive you do, hold the knee in and the foot off the ground. Hold for 30 seconds to a minute before returning the foot back down to the ground and moving back into the high plank position.
If you want to make the move more cardio, you can turn it into a “mountain climber” by running the knees in and alternating knee drives instead of holding the drive.
You can even make the climbers harder by adding a towel or slider.
10. Reverse Plank – I’ve talked about this move before…It is the one that always reminds me of Flash Dance (also called the Posterior Plank). Start seated on the ground with your legs out straight and your hands on the ground behind your butt. Your finger tips should be pointing toward your butt. Drive through your hands and heels and raise your hips up off the ground toward the ceiling. Press your chest up and out as you raise your hips. Keep your legs straight as you bridge up and relax your head back. You can either perform a Reverse Plank hold by holding at the top or you can perform reps, dropping your hips back down and raising them back up.
To make the move easier, you can bend your knees slightly. To make the move more advanced, you can perform a single leg Reverse Plank.
Here are some other amazing plank variations (some of which overlap the ones I’ve discussed above).
Why do weekends sabotage our progress?
It’s Friday and many of us have been dedicated to our healthy lifestyle all week – we’ve eaten well, worked out, and taken care of ourselves.

Yet for some reason the second Friday evening hits, it’s like our healthy habits never existed.
For many of us, weekends seem to completely sabotage all the progress we make during the week.
WHY!?!
What is it about the weekends that makes us lose all control?
Is it because we are home and have easy access to food? Is it because we want to go out and party? Is it because we spend time with friends? Is it the way we unwind and de-stress? Is it because we are sometimes bored and there is food right there? Is it because we mindlessly eat when we watch TV?
Maybe even all of the above?
Whatever the reason, if we want results, we can’t go completely crazy every single weekend.
So how do we help ourselves stay on track during the weekend?
Here’s what I’ve found helps people stay committed to their healthy lifestyle even on the weekends:
- Be active! When we sit around the house, we look for things to fill the time….Like eating anything we have in our cabinets. Yup…We tend to eat out of boredom, especially if it is easily accessible. If we stay active and entertained, for one, food won’t just be right there and two, we won’t be as tempted to eat. Activity keeps us motivated and from eating out of boredom!
- All social engagements don’t have to revolve around food and if they do, PLAN. Over the weekend, we tend to get together with friends and family. And too many get-togethers revolve around food. Try doing something active instead. Go bowling or on a hike. HOWEVER, there will be parties that you can’t avoid that are centered around food. PLAN for those and decide to either use them as a cheat or stay on track. If you plan ahead, you won’t let one party derail all your hard work and send you on a downward spiral the rest of the weekend!
- Clean out your cabinets. If you find you eat badly when you have bad food around, it may be best to clean out your cabinets and not keep the foods that tempt you in the house. When you get bored, you won’t have anything to reach to and you may find you look for something to DO instead. It will also keep you from mindlessly eating as you watch TV. Sometime the best way to stop yourself from doing something, is to not even give yourself the option to do it.
- Make some healthy snacks. Kale chips, carrot chips, apple and almond butter….Make a healthy snack to munch on as you hang around the house. It will satisfy you without derailing your progress. Plus, it may just cure your boredom to experiment with some healthy snack recipes…And…gasp…cooking may actually be fun! (It could also be a fun FAMILY activity!)
- Be moderate in your alcohol consumption unless you plan to cheat. We tend to make bad eating decisions when we’ve consumed too much alcohol. And some alcoholic beverages also contain a ton of calories themselves. So a great way to stay on track is to be moderate in your alcohol consumption unless you are consciously indulging. While the weekends should be a time to relax and enjoy, it doesn’t mean we have to binge!
- Be prepared and keep yourself motivated! All week long, we do things to motivate ourselves and prepare ourselves. We prep meals. We write out workouts. We cruise the web for motivation. Why not spend an hour or two on the weekends doing the same thing? Many people take the weekends off from working out. Instead maybe take a weekday off and save a workout for the weekends to keep you motivated. Doing a workout on the weekend may make you less likely to cheat because you are reminded of what you are working for and just even spent time working toward it! Just remember to remind yourself of your goals even on the weekends.
I would just like to note that a planned cheat day isn’t sabotaging your weekend EVEN if it means you lose a little ground on your goal. For many, cheat days are a chance to recharge and can actually help keep you on track.
That being said….If cheat days lead to a downward spiral, you may want to avoid them on the weekends until healthy habits are created.
Don’t let this weekend sabotage your progress! Stay on track using these tips.
What else helps you stay on track over the weekend?
Bodyweight Home Exercises – Best Upper Body Moves
Recently I’ve heard too many complaints about people not being able to fit in their workouts.
And when I tell them, “Well just set a timer and do a 15 minute workout AT HOME.” (Because, let’s face it, all of us have 15 minutes we can spend working out especially if we don’t have to waste any time on travel!)
They tell me, “But I don’t have any equipment at home!”
Well that is no excuse! While I’ve written numerous articles with bodyweight exercises you can do at home, today I would like to focus on some of the best UPPER BODY moves you can do.
Many people can think of a ton of lower body moves to do (squats, squat jumps, lunges, chair step ups), they often can’t think of a variety of upper body moves to do.
So here are some great Bodyweight Upper Body Moves that you can easily do at home that will challenge everyone from the beginner to even the most advanced lifter.
There are honestly more than 10 listed here since I think we often forget about all the options out there and skip our workouts because we are bored doing the same 3 moves over and over again.
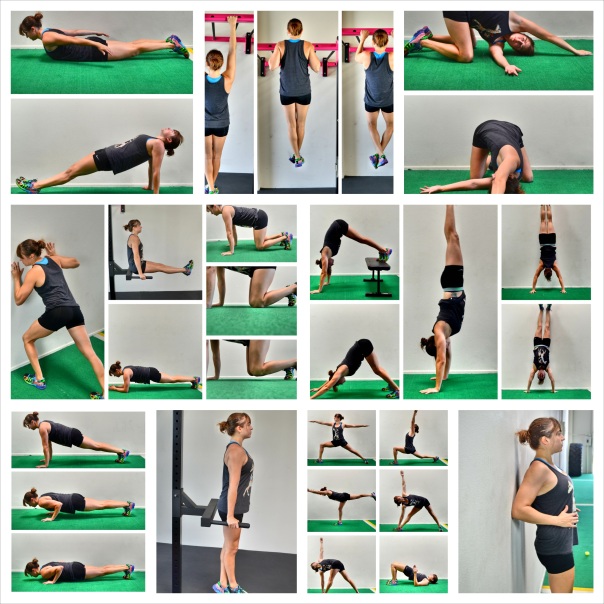
1. Handstands – Whether you are new to handstands and need to start with a modified downward dog or you can hold a handstand without any support, handstands are a GREAT upper body move. They work your shoulders, triceps upper back and core. They are also FUN and can easily be made to challenge any level. Go to Redefining Strength and download the bodyweight guide for more handstand variations!

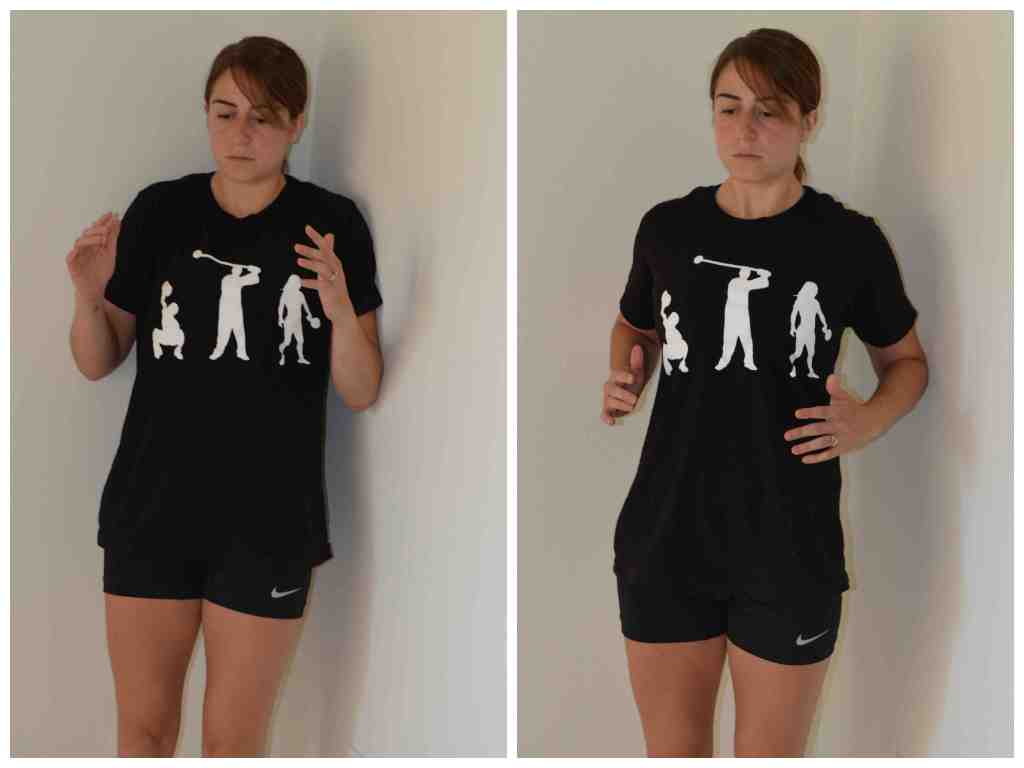
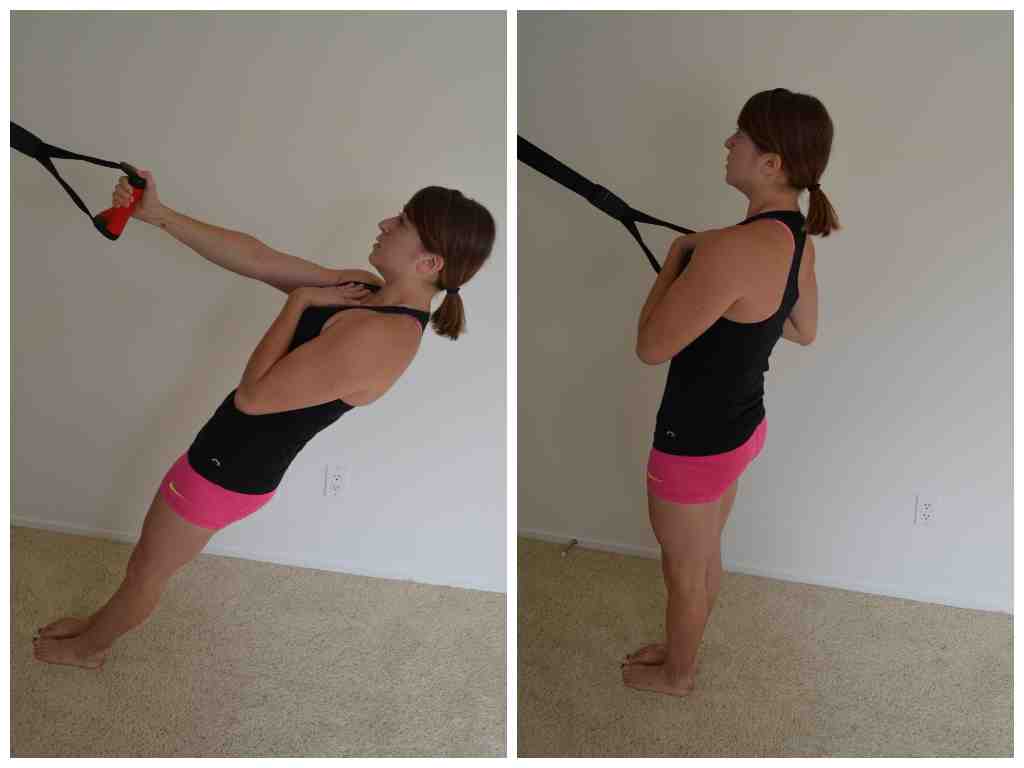
2. Scapular Hold – If you’ve read more than one article on this blog, you know by now that I LOVE scapular holds or Batwings. These are a great way to work your back and improve your posture (and lessen neck and shoulder pain!). The basic variation of scapular holds is done against the wall. You can also do this against the ground if you are really up for a challenge; HOWEVER, progressing down to the ground isn’t really necessary if you really focus on activating the correct muscles while against the wall. The scapular hold can also be made into a dynamic move called the Corner Row. The corner row works the same muscles although I do find it challenges the core a bit more since you must hold your body in a straight line while moving. Both are essential for less pain and better posture!
3. Push Up variations (T-push ups, incline, close grip, wide grip, push up to fly, push up to dip, divebombers…) – Push ups can be made easier for the beginner (incline) or more advanced for the experienced exerciser (decline). They can also be made to focus more on the shoulders, chest or triceps. They are a great move to work your chest, shoulders and triceps as well as your core. Here are even more push up variations if you are bored with the ones you’ve been doing.
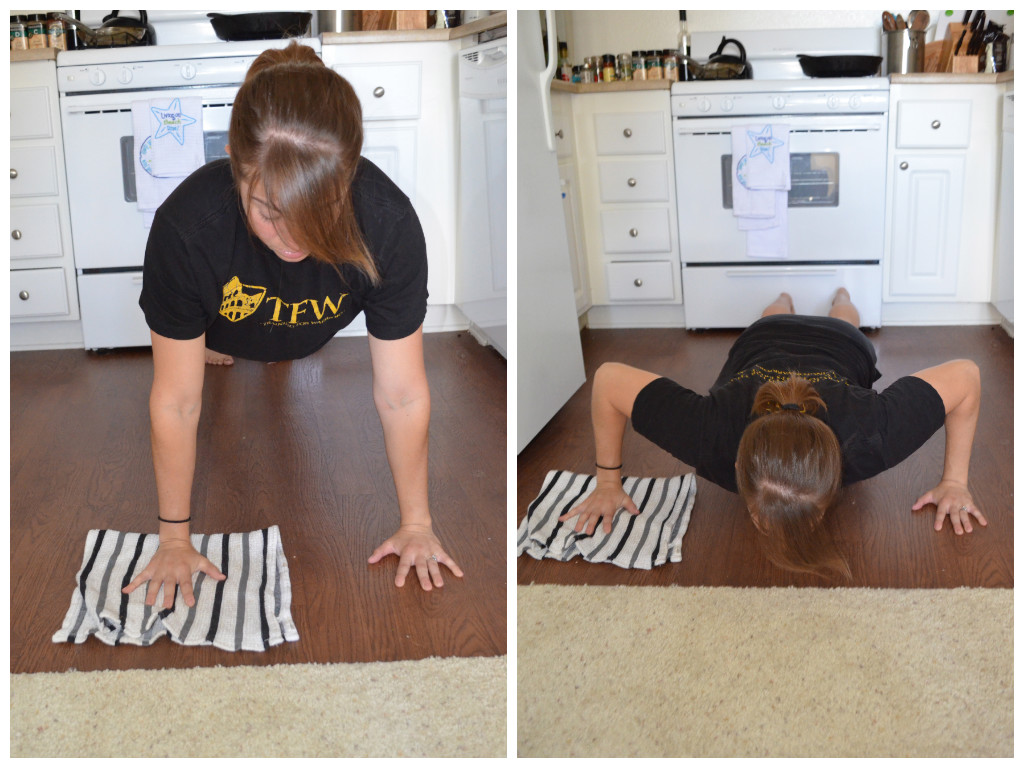
Remember the push up to fly!?!
4. Scapular Push Ups – A great push up variation to work your upper back. While you may only perform an inch or two of movement, this is a hard move that really works the lower traps. Great to improve posture and alleviate neck and shoulder pain! You can make this easier by doing it from your knees. You can also change it up by doing this move from your forearms instead of your hands.
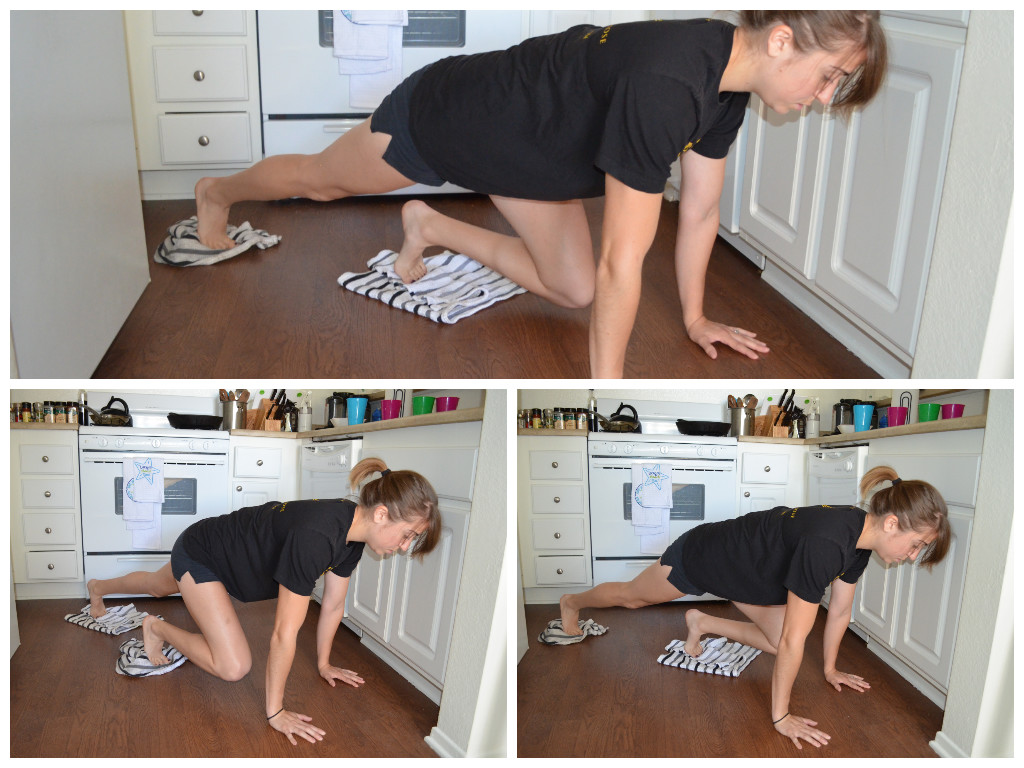
5. Crawls – Forward, backward, sideways, circles… Bear crawls, alligator crawls, crab crawls, gorilla crawls…All these crawls work your shoulders, triceps, core and even your quads. PLUS they are a great way to get in some cardio! With crawls I often hear the excuse that people don’t have enough room to do them, but all you need to be able to do is take a step or two forward and a step or two backward. And you can keep things interesting by mixing up the type of crawl you do. Shoot, sometimes simply doing crawls for your workout is enough!
6. Plank variations (plank with reach through, plank with reach out, plank holds, climbers) – Planks don’t just work your core. They are a great way to develop shoulder stability and work your upper body as well as your abs. Planks are more than the basic isometric hold we see done so often. They can also be a dynamic movement like climbers or plank with reach out.
7. Posterior Plank – A great move for your entire backside, the posterior plank works everything from the back of your shoulders down to your ankles. You can advance this move by doing a single leg variation or you can make it easier by bending your knees a bit instead of having them out straight. Every time I do this move, I can’t help but think of Flash Dance.
8. Towel Lat Pulldown – A great way to work on those pull ups even when at home without a pull up bar (although I do think a doorway pull up bar is a great investment!). This move helps work on scapular retraction and lat activation. It is also great if you have overactive upper traps and suffer from shoulder and neck pain!

9. Towel Taz – One of my favorite cardio moves that also works the shoulders and can be done at home, or in your hotel room, with something we all have…A TOWEL. While you want to make sure you aren’t in a place where you can knock things over, you don’t actually need much room to do the Towel Taz. Flap the towel up and towel or press your arms in and out. Both will work your upper back, shoulders, triceps and core. (Plus if you move around quickly, your legs and cardiovascular system are going to get some great exercise as well!)
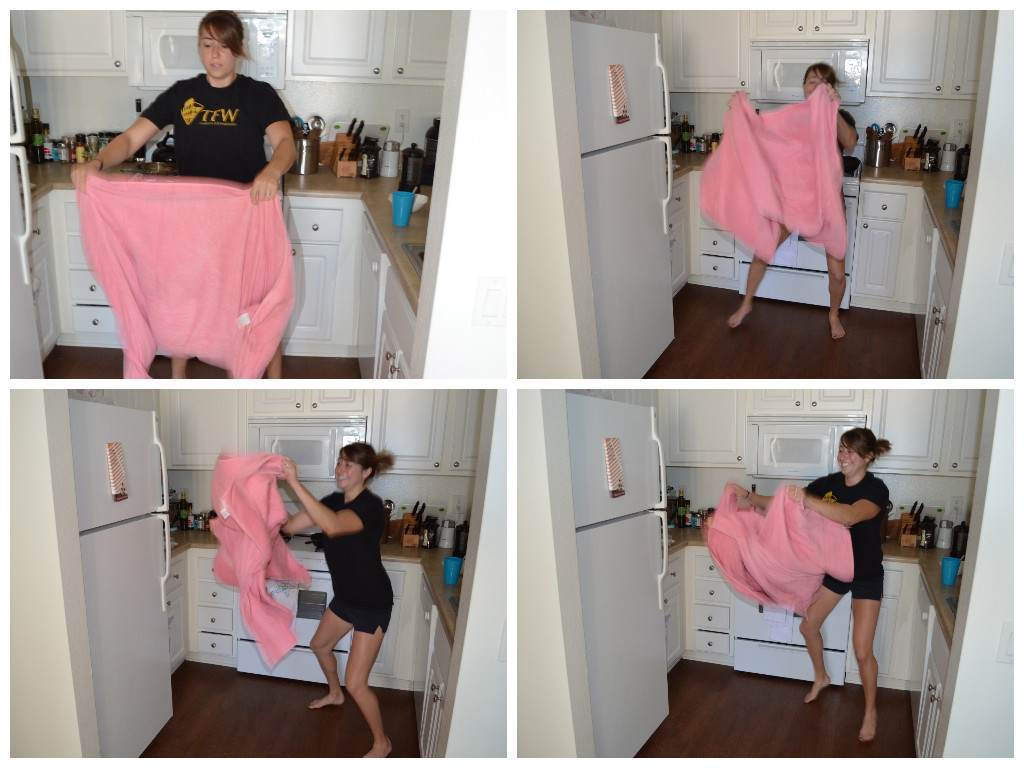
Cardio in your home!
10. Glute Bridge with Reach – This move is a great way to work your back, butt and core as well as get a nice stretch in. It can be a great dynamic warm up and activation move as well as a challenging move to add to your workouts. Since I haven’t really ever mentioned this move before….To do this move, set up in a glute bridge. Drive through your heels and get your hips up as high as you can. Keeping your core and glutes tight, reach one arm across your body and overhead as if you are reaching for something over your shoulder and behind you. You will bridge up onto one shoulder, keeping your hips up. Come back to center, lower the hips down and then bridge back up and reach across and back over the other shoulder. Repeat alternating sides and rotating the core while in the glute bridge.

I will extend my arm a bit more and really bridge up on the one shoulder while keeping the other arm down by my side, but this gives you a basic variation.
So there are at least 10 Upper Body moves you can do at home….Maybe you can even use them today to help you stay on track this weekend….
How many of these had you forgotten about?
Build a Strong Back for Better Posture (And More Pull Ups!)
Because of sitting all day, we tend to hunch forward. Our chest and lats can become tight and often the muscles in our back, especially our lower traps, are weak.
And then on top of that, people spend way more time on their chest shoulders and triceps than they do on their back and biceps. This only adds to the imbalance and creates worse posture.
It can also hinder you from being able to do pull ups! (Which recently I’ve gotten asked a lot about!)
Here are some great stretching and foam rolling moves you should do before beginning your back workouts and using the exercises below. The exercises in the post above can also be great activation moves!
These back exercises will help correct your posture and can also help you improve your pull ups!
1. Inverted Row variations:
You can perform a two arm inverted row or even a rotational or anti-rotational single arm row. All three develop great back and core strength to improve your posture and build your back strength so that you can work up to a full pull up (or add to the number of pull ups you are currently able to do)!
Make sure with all three that you are keeping your core tight.
For the basic inverted row, you will hold an XT strap in each hand. Walk your feet out so you are leaning back. The closer to parallel to the ground you get, the harder the move will be. Squeeze your core and glutes and press your chest out so there is tension behind your shoulder blades. Then row up, keeping your body in a nice straight line. Row until your chest comes up to the handles and then lower yourself back down. Don’t let your hips sink as you lower back down. Also, keep your chest pressed out the entire time (do not let your low back arch though).

Do do a single arm anti-rotational row, you are going to do basically the exact same thing just with one hand. You want to keep your shoulders even just like you are holding the strap in the other hand. Do not let the shoulder of the arm not holding anything rotate toward the ground. As you row in, also make sure the shoulder of the arm rowing doesn’t shrug up by your ear.
With the rotational row, you are going to open up as if almost doing a hanging side plank. Do not let your hips dip toward the ground. As you row up, keep your core tight and rotate toward the strap, reaching as high up the strap as possible. Then rotate back up and repeat.
2. Row variations:
You can do a barbell row or a single arm dumbbell row. You can do a row with or without rotation. These are also a great way to develop back strength and improve posture.
Here are two great row variations using a band.
Two-arm Row – Lean forward and loop the band over itself and stand on the point where the band crosses over itself. Make sure there is tension even when you are fully extended if possible. Lean over, creating a nice straight line from the tip of your head all the way down your tailbone. Your chest should be pressed out and shoulder blades pulled down and back. Keeping your arms in by your sides, row up on the bands. Bend your elbows and pull the bands to your chest. Control the bands as you relax back down. Keep your core tight and tension in your back. Do not let your back round as you do this move! You want to make sure you are pressing your butt back and away and creating a nice straight line with your back.
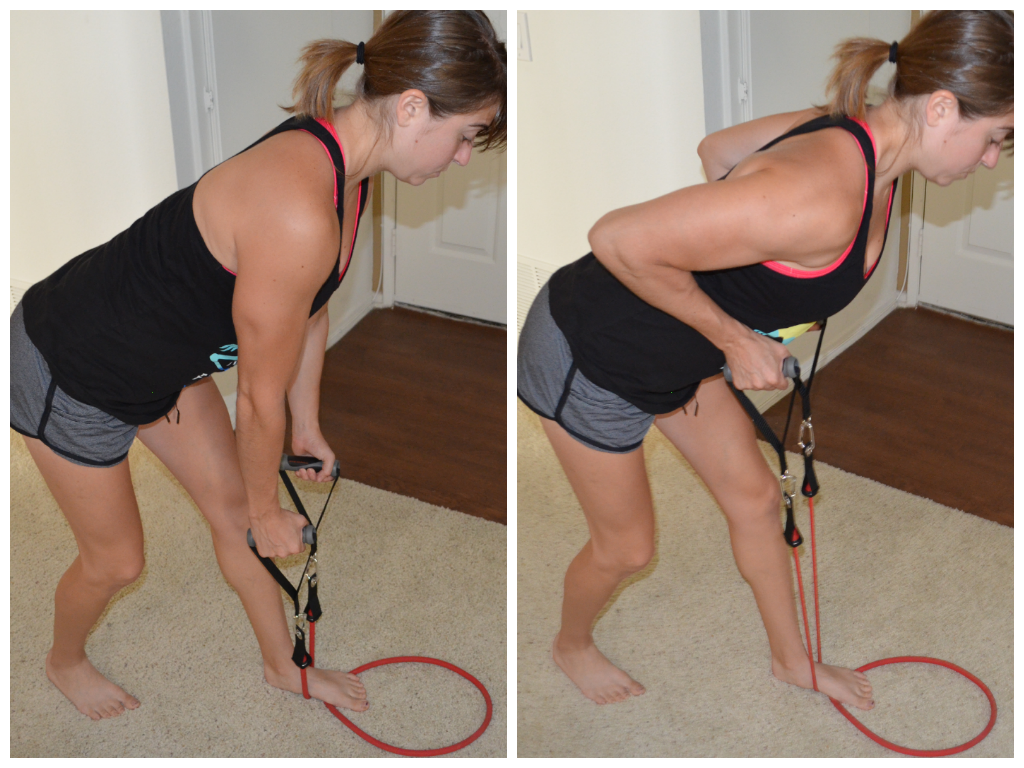
Lawn Mower Row – This is a rotational row, but could also be done without the rotation. I call it the lawn mower row because it kind of looks like someone starting a lawn mower (apparently this is the midwest girl in me as many people I say that to now just kind of stare at me blankly…). Again loop the band and stand on the place where it crosses over. Reach down and then pull the band up toward your chest. As you row up, rotate open toward the band so that you can actually row up past your chest. Then control the band back down to the start and repeat.

3. Scapular Hold variations:
As you all know, I love the scapular wall hold. But there are other variations out there that are great. Basically a scapular hold is just the top hold of a row. You can do it on XT straps by holding at the top. Or you can do it by lying face down on a bench and rowing up and holding at the top. You could even just hold at the top of the two-arm band row.
Scapular holds are great at creating that scapular retraction that we need to be able to do pull ups. They are also great at strengthening our lower traps so that we have less neck and shoulder pain AND BETTER POSTURE.
Honestly, these are one of the few exercises that I have no problem if you almost do them every day. If you are sitting for a long time at your desk, get up and do them. They should be apart of your warm ups when you do deadlifts or back days. Shoot you may even include them on chest days just to get in a little extension in your back since it is so often in flexion!
These are great for injury prevention especially if you’ve had back, neck or shoulder problems!
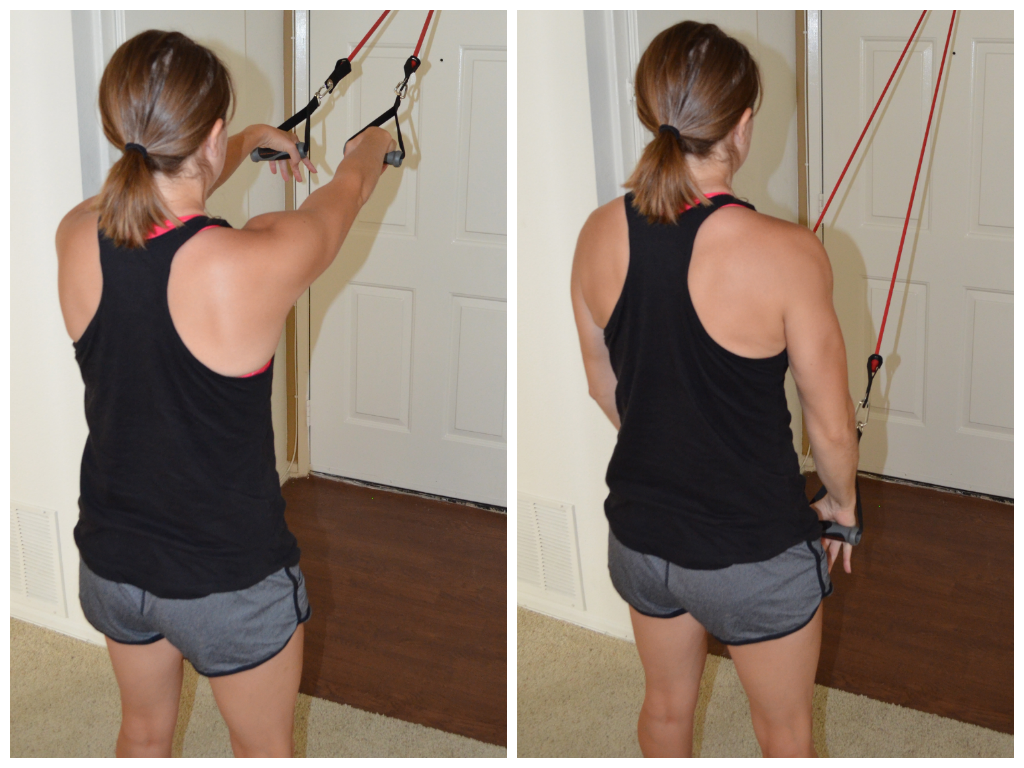
4. Pulldown variations:
These are great subs if you can’t do full pull ups. While I love assisted pull ups, pull up holds and deadhangs, these are also useful in developing strong lats for pull ups.
You definitely want to make sure though that you’ve rolled out your lats and chest before doing these moves.
Bands or even a cable machine can be used for these moves.
Kneeling Pulldown – Kneel on the ground. You can even sit back on your heels. Place a band in a door or looped over something higher off the ground. Hold a handle in each hand and reach your hands up overhead. If the band isn’t straight above you, you will want to slightly lean forward so that your upper body is inline with your extended arms. Then pull the band down toward you. You can do variations with your palms facing toward you (chin up), palms parallel or even palms facing away (pull up). Keep your core tight and your arms in by your body as you pull down. Do not let your elbows flare way out.

On the left is the pivot prone grip and the right is the parallel grip.
One of my favorite variations of this move is the Pivot Prone Pull shown by Nick Tumminello. It really works on lower trap strength.
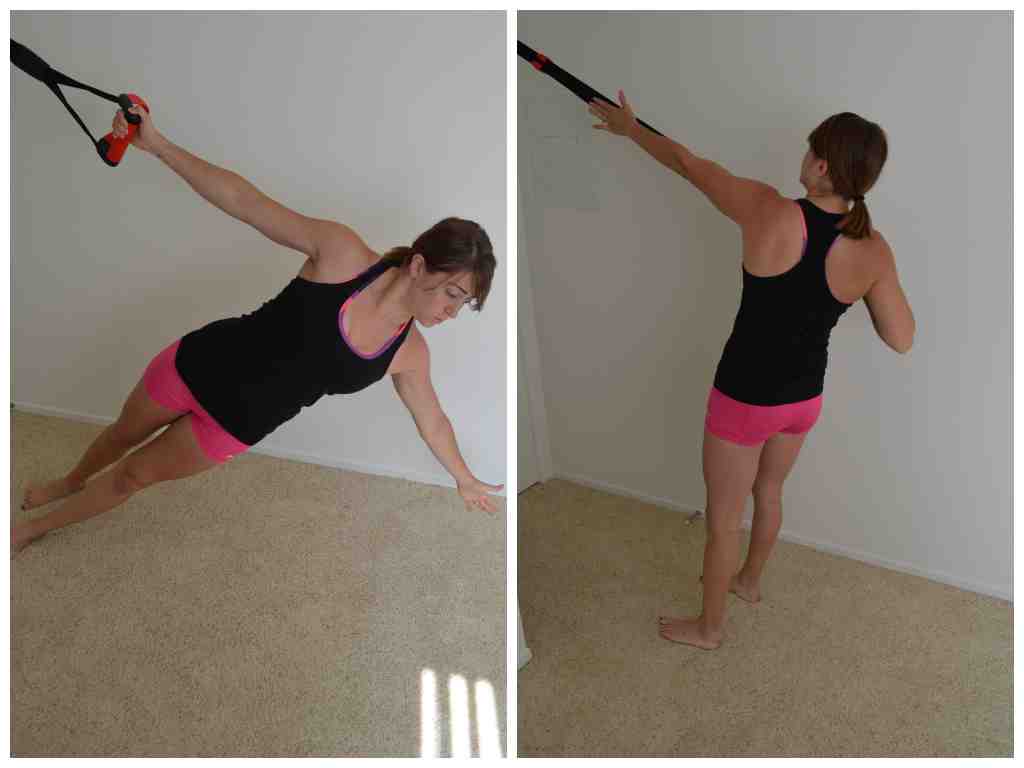
Straight Arm Pulldown – While I don’t use this move that often, it can be another great way to strengthen your core and lats.
You can use a cable machine or a band for this exercise. Anchor the band or cable above your head so that there is a little tension when you hold your arms out straight at shoulder height. Keep your core tight and your arms straight as you press the band down toward the ground and then back toward your legs. Keep your chest up nice and tall and do not round forward. Feel your back and lats engage as you press down. Control the band back up to shoulder height.
If pull ups really are your focus, this is a great move to use.
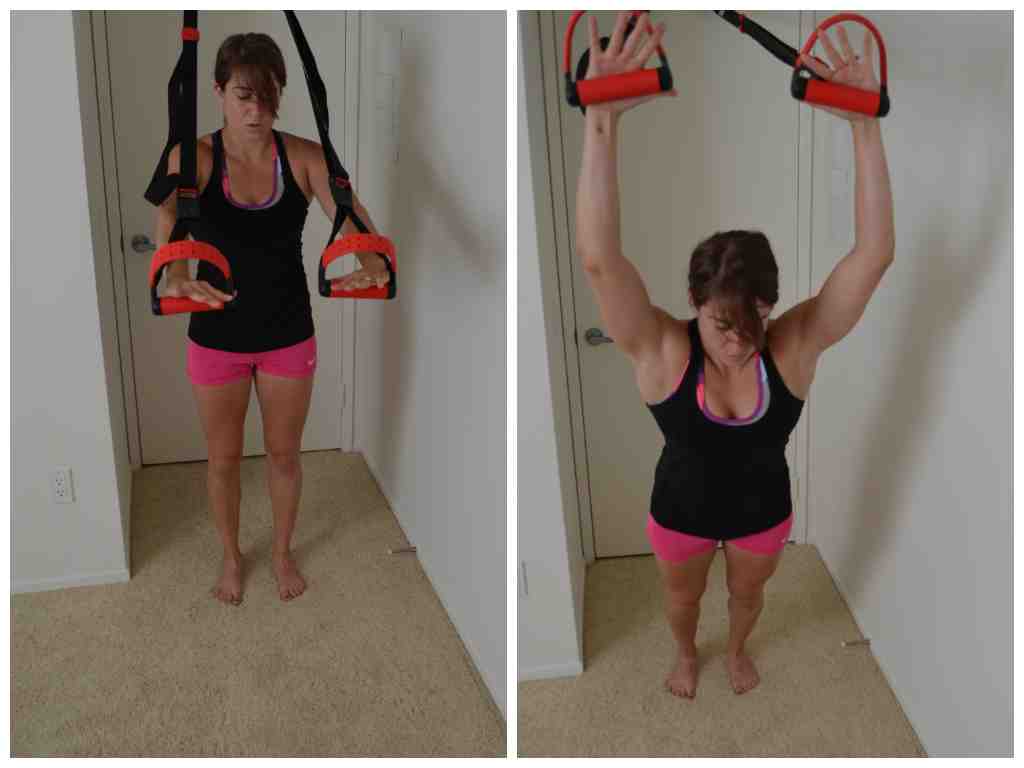
5. Pullover variations
Pullovers are also a great move to use to strengthen your lats.
You can do these with a weight or on the XT straps. This move is very core intensive. Do not let your low back arch!
Weighted Pullover – Lie on a bench or table. Set up so only your upper back in on the bench and your feet are on the ground. Bridge up and extend the weight up over your chest with your arms out straight. Keeping the elbows slightly bent, reach the weight back and overhead, extending back as far as possible. Keep the hips high and the core tight. Then pull the weight back over so that it is above your chest and repeat.

XT Pullover – Face away from the XT strap anchor point with one strap in each hand. The closer to parallel you get to the ground, the harder the move will be. Extend your arms out at about shoulder height. Slowly let your hands extend overhead, keeping your arms pretty straight. Keep your body in a nice straight line. Do not let your hips go up in the air or sag toward the ground. Then press down on the straps and bring your arms back down to about shoulder height.
All of these moves are great to improve your posture and build a stronger back so that you can do more pull ups.
HOWEVER, in your desire to do more pull ups, do not do a back workout every day. Muscles get stronger when they have time to rebuild…AKA you need rest days! If you constantly break your back down, you won’t get any stronger. So DON’T do these exercises every day!


