Category Archives: Man Biceps
Desk Job Aches And Pains? Try these stretches!
Sitting hunched over a computer all day can leave you feeling stiff, sore and in pain.
Muscles get tight from our hunched-over seated posture, which not only causes us pain, but can also cause us to get injured during our workouts.
If we want to live injury free AND get the most out of our workouts, we need to take time to roll out and stretch those tight muscles.
Below are some great stretches to help you alleviate those desk job aches and pains.
10 Essential Stretches For Anyone With A Desk Job
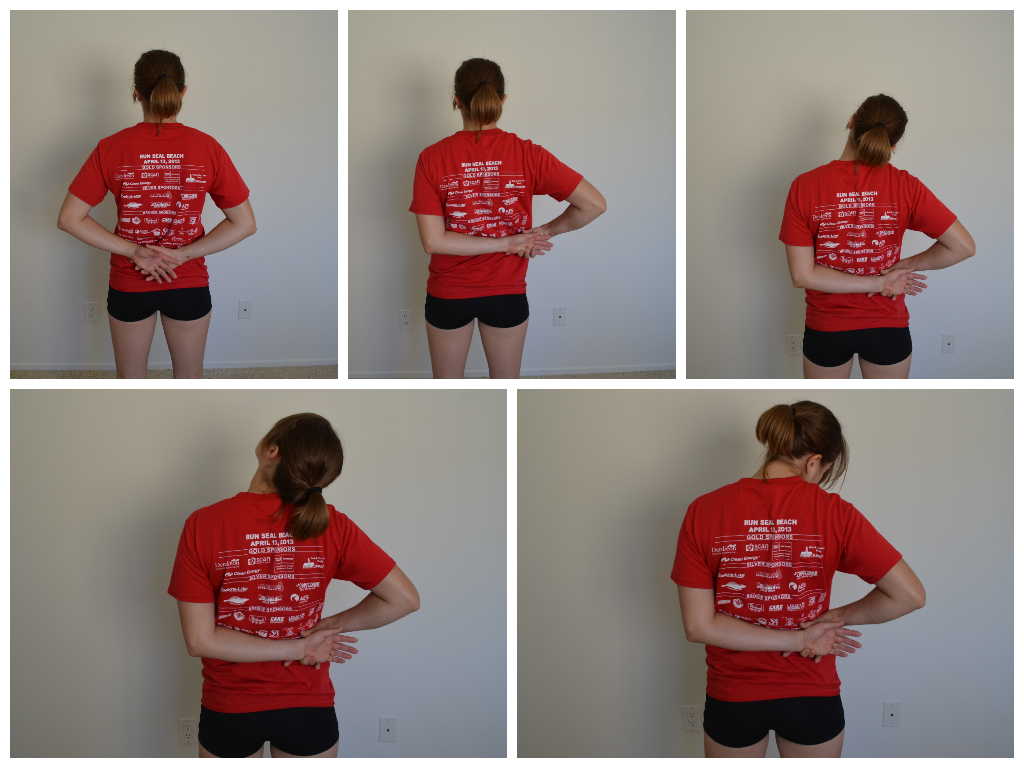
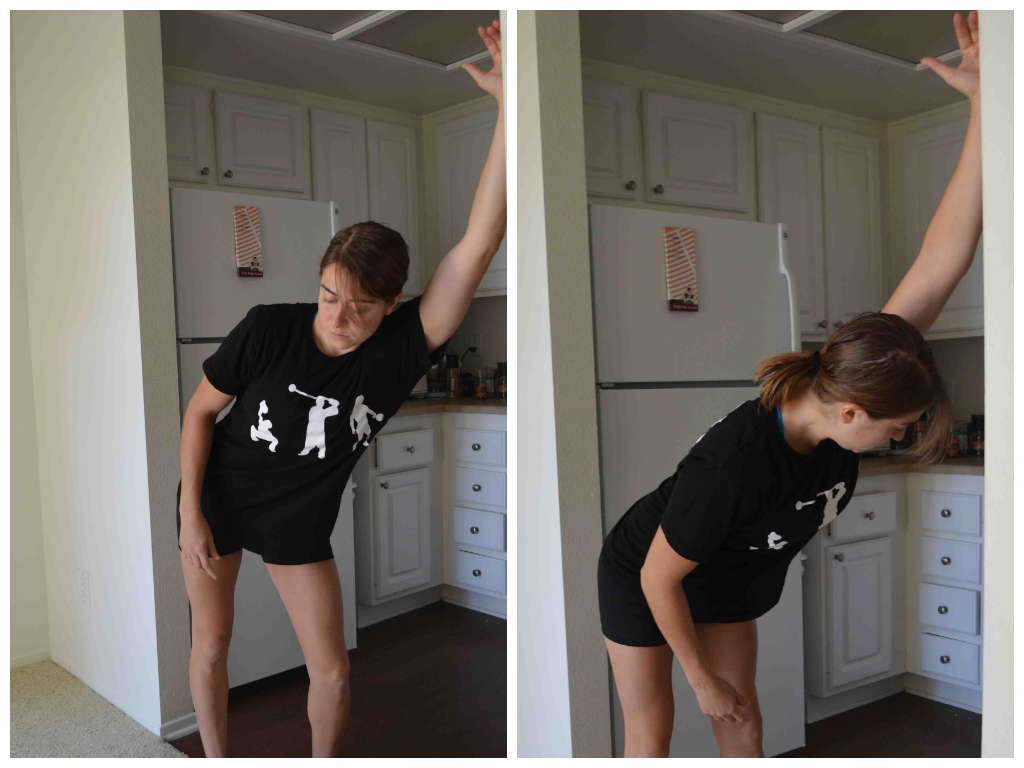
1. 3 Way Neck Stretch – Bend your elbow and reach one hand behind your back. Then grab that wrist with the other hand. Pull the arm behind your back toward the opposite side. You want to create a “chicken wing” with the arm that is pulling. Then lean your head to the side you are pulling to. Do not tense your shoulders and bring them up toward you ears. Relax into the stretch. Start by looking straight ahead. Then look up and hold for a second or two. Then look back straight ahead. And then look down. Move your chin as you look and not just your eyes. Changing the direction of where you look, will change exactly which muscles in your neck and upper back that you stretch.
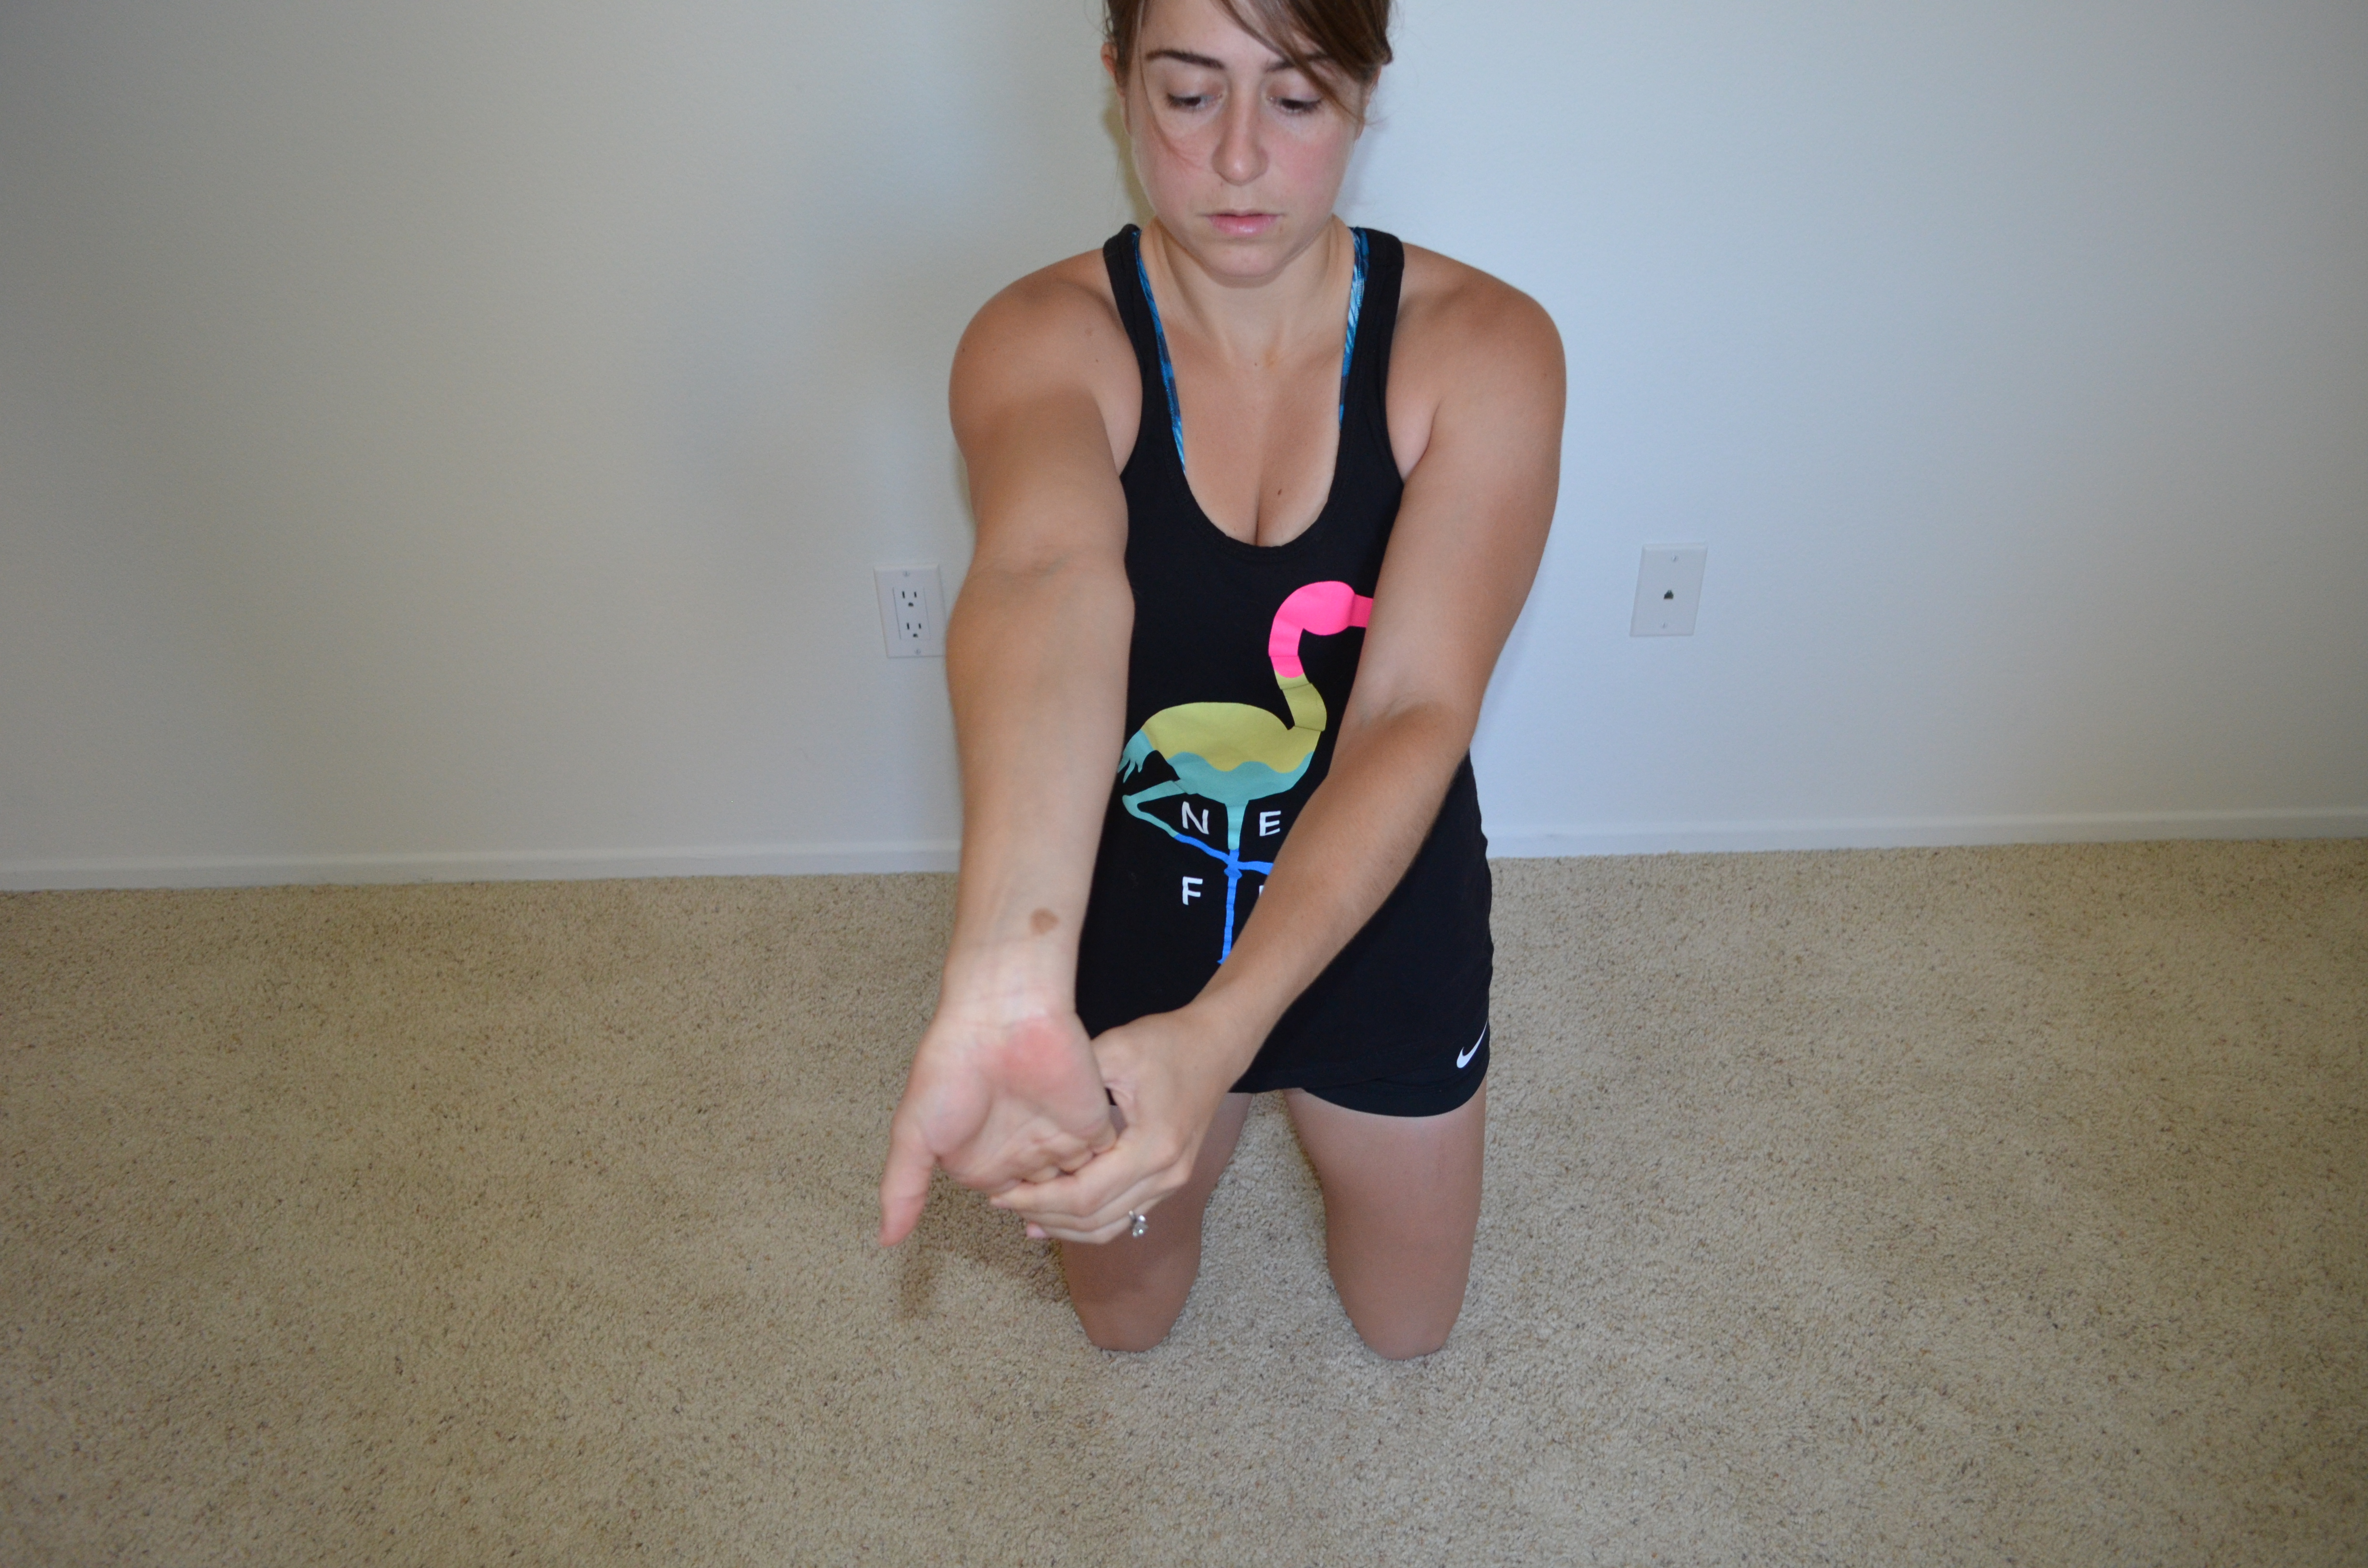
2. Forearm, Wrist and Bicep Stretch – Stretch one arm straight out in front of you. Point your finger tips down toward the ground. You can do one stretch with your palm facing away and one with your palm facing toward you. Take the other hand and press down on the fingertips, pushing them back toward your body As you press down, you should straighten your arm more so you feel a stretch down your forearm and up into your bicep.
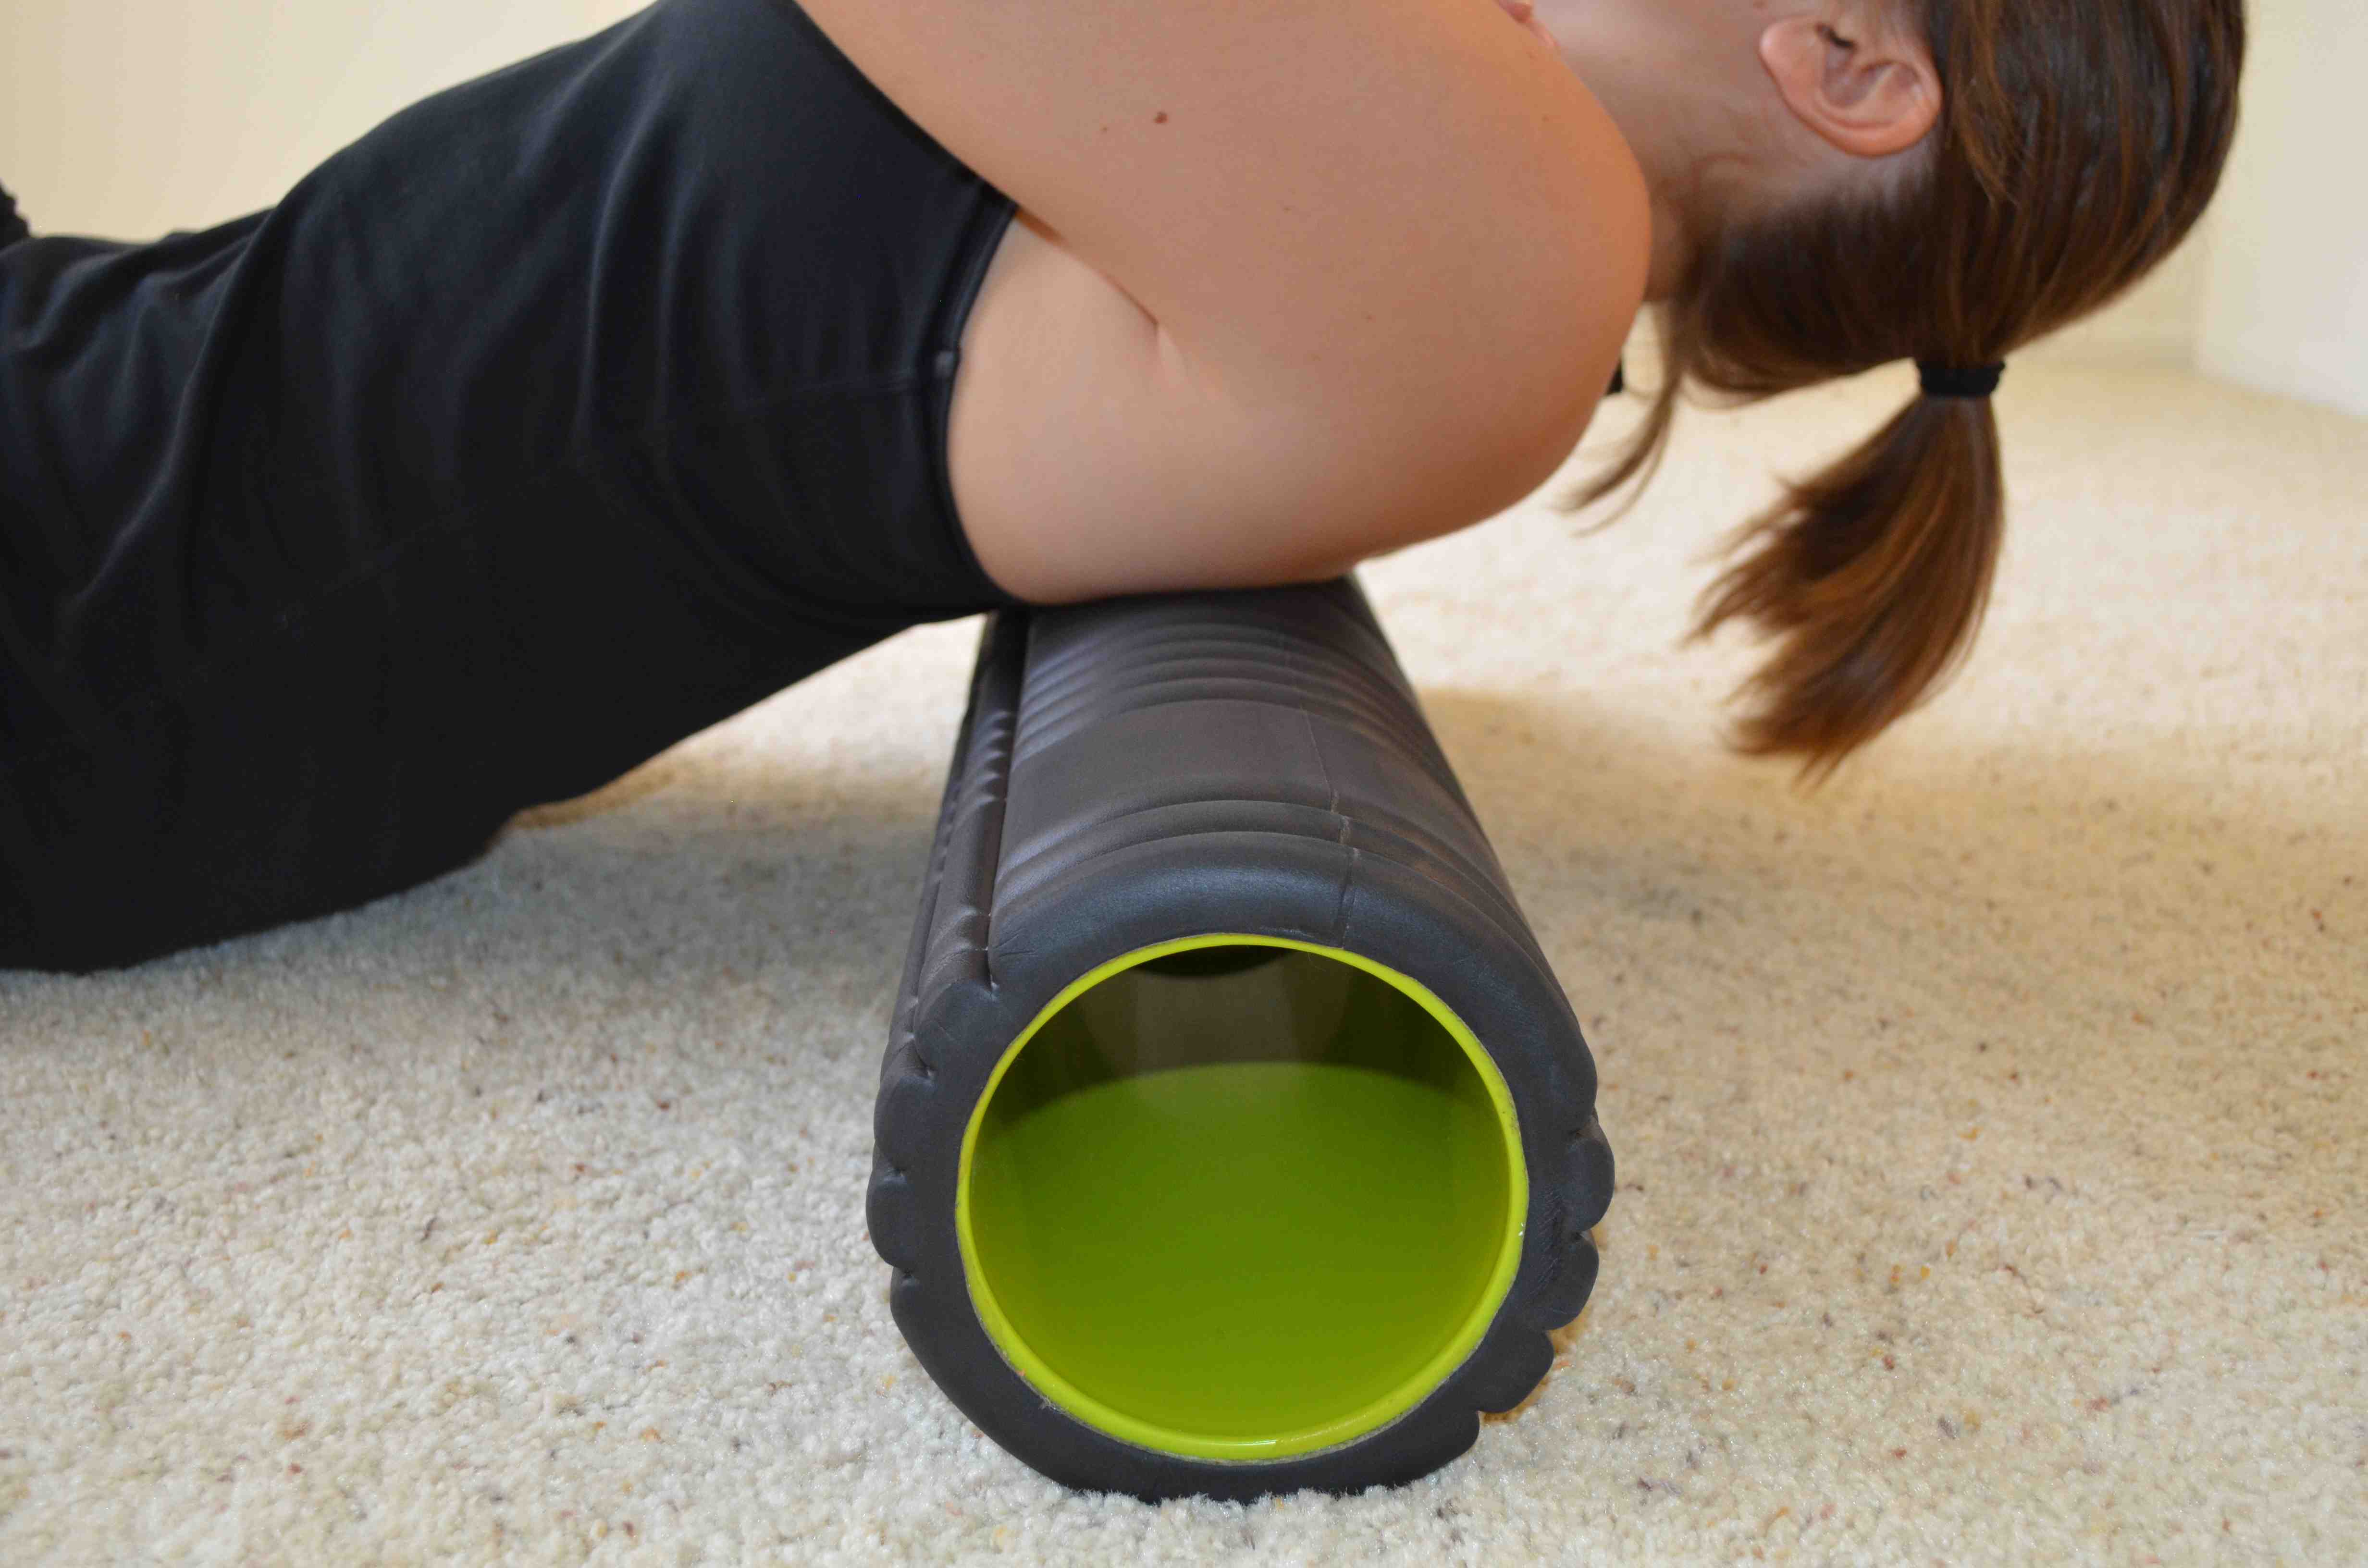
3. Thoracic Extension on a Roller – Lie on your back with the roller at the bottom of your upper back. Bend your knees and place your feet flat on the ground. Drop your butt down to the ground and then lean back over the roller, trying to drop your head to the ground behind you. Move the roller up higher on your upper back and then drop your butt to the ground and extend back over again. Work all the way up and down your upper back. Extend back over the roller and breathe deeply while keeping your butt on the ground.
4. Scorpions – Lie on your belly with your arms out straight at shoulder height. Your legs should be out straight behind you. The swing one leg up and kick it behind you. As you kick it back over your body, bend the knee and reach your toe over and behind you back a bit toward your head.. Kick your leg back over your body, trying to touch your toe back behind you. Tap it down then bring that leg back down and then reach the other leg over your back. Alternate reaches, bringing your toe back over your body and toward your head.
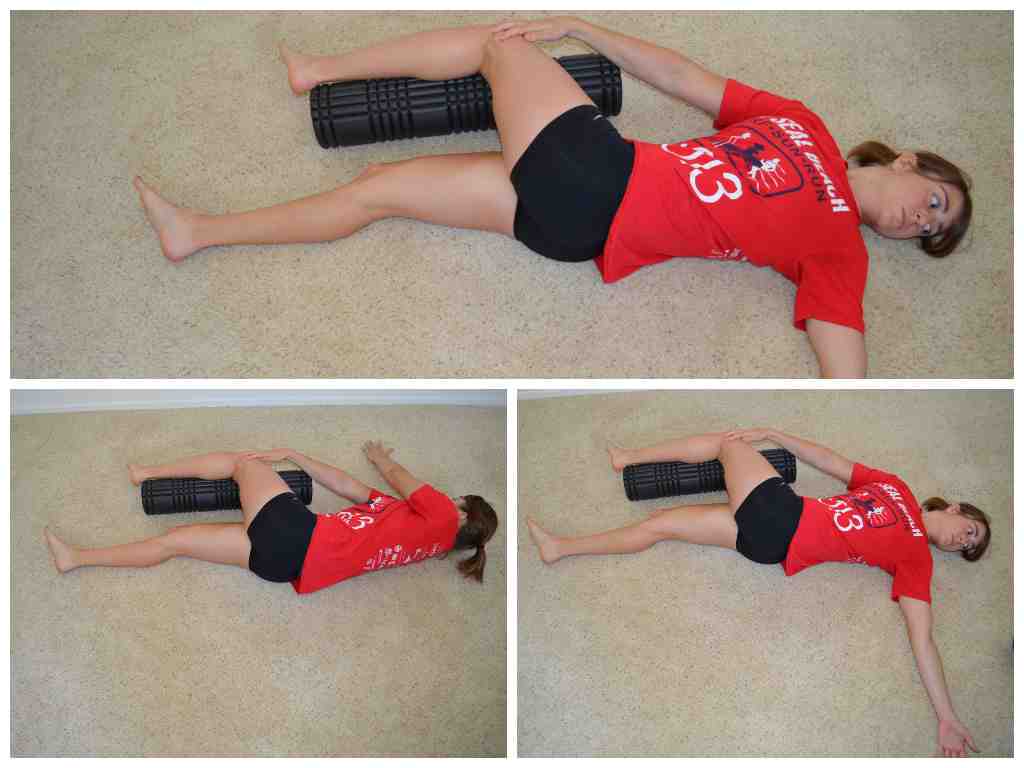
5. Star Stretch – Lie on your back with a foam roller or ball to your right side. Bend your left knee to about 90 degrees and pull it across your body so that your left knee is resting on the ball/roller. Place your right hand on top of your knee to hold your knee onto the ball or roller. Reach your left hand across your body and touch the floor on the right side with your palm. Then open that arm back up to the left side, trying to touch the back of the hand down to the ground. Relax the arm open, trying to drop the shoulder to the ground. Try to open up the chest as much as possible without letting the knee move from the roller or ball. Hold for a second or two and then bring the hand back across and repeat. Complete all reps on that side before switching.
6. Standing Lat Stretch – Place the side your hand on a wall, bookshelf or desk and then straighten your arm and bend over and walk away. You want to push your butt back and lengthen from your hand all the way down your side. Even rotate a bit so you are looking under the arm on the desk or wall and then away from the arm. Feel a nice stretch down your arm and into the side of your back. Hold and repeat on the other side. Child’s pose can be another great way to stretch your lats and your upper back as well as your lower back.
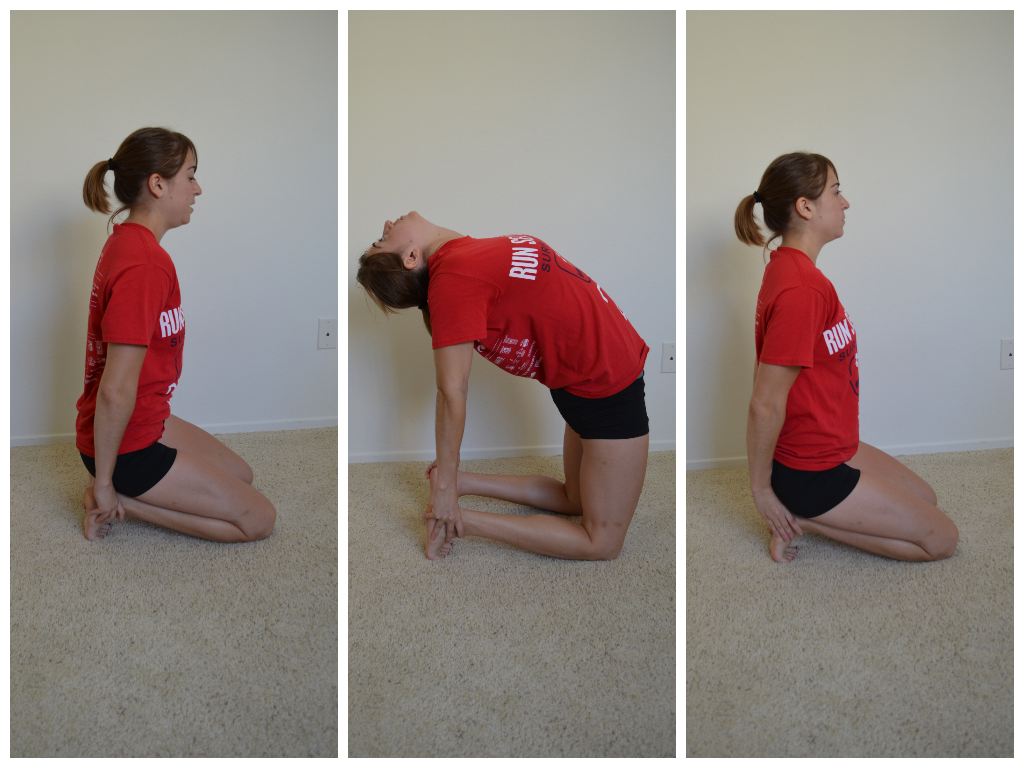
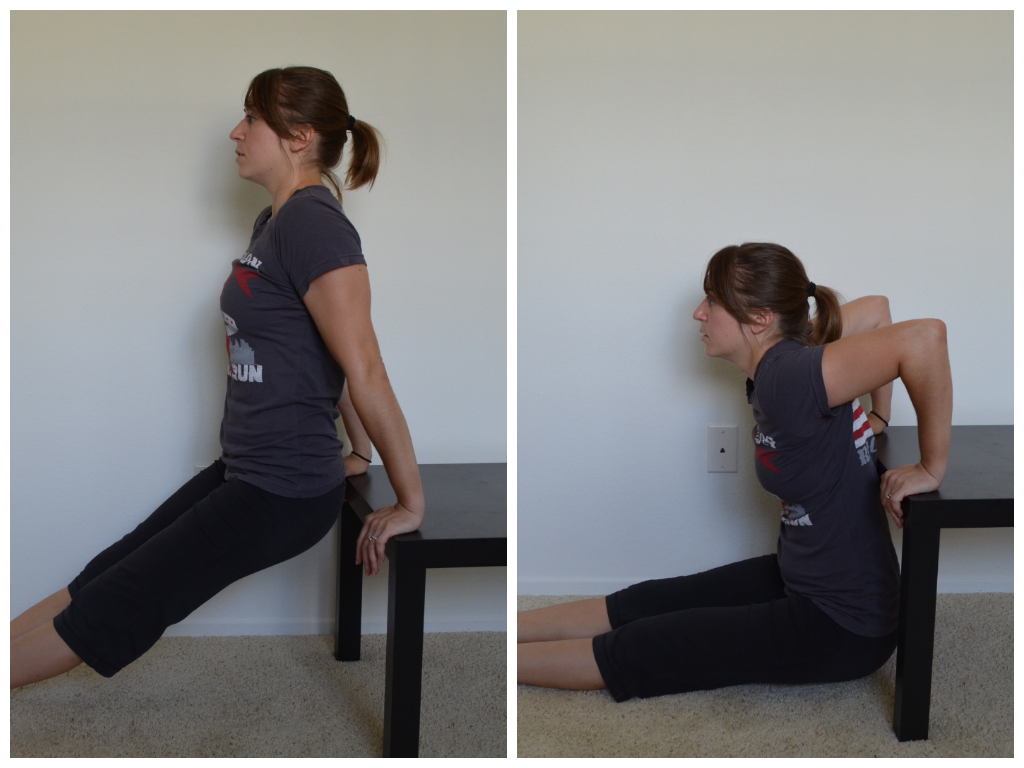
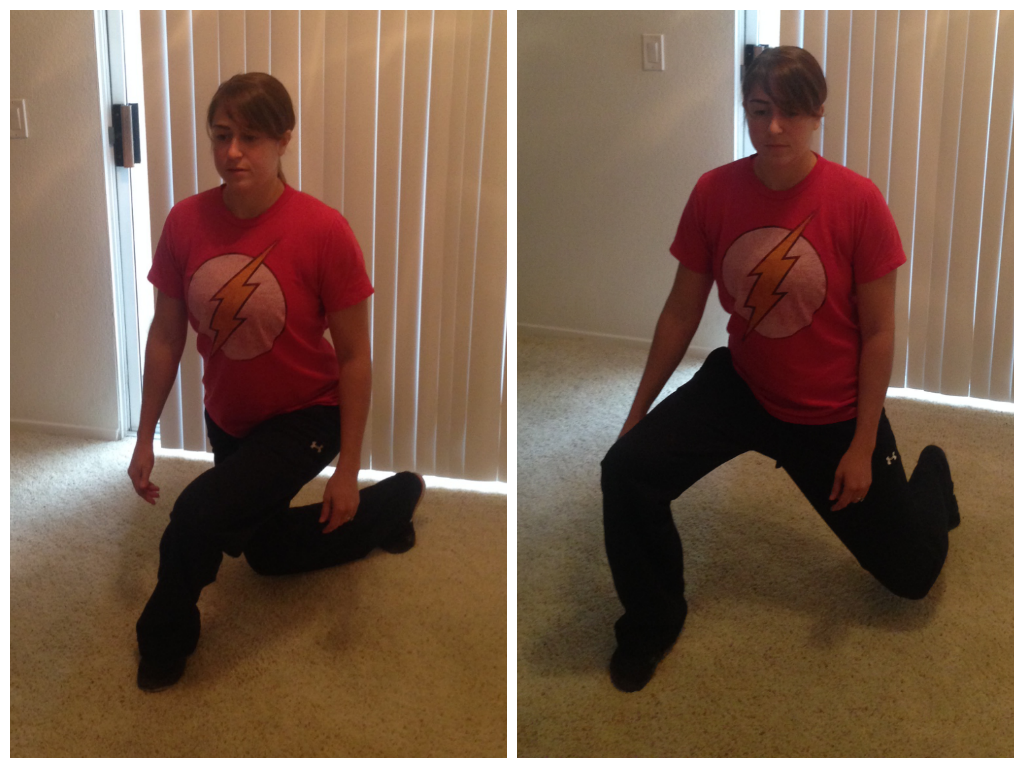
7. Kneeling Bridge – Start by kneeling on both legs with your feet flexed and toes tucked under. Sit back and place your hands on your heels. Then arch up off your heels, driving your hips forward and chest out, keeping your hands on your heels. Relax your head back and arch as much as you can, getting a nice stretch down your chest, core, hips and quads. Hold for 1-2 seconds and relax back down. Repeat. If you are less flexible, do this stretch with a couch, chair or table behind you. Kneel down and place your hands back behind you on the couch or table. Press your chest out and arch as much as possible away from the piece behind you while leaning your head back. Then relax back down and repeat.
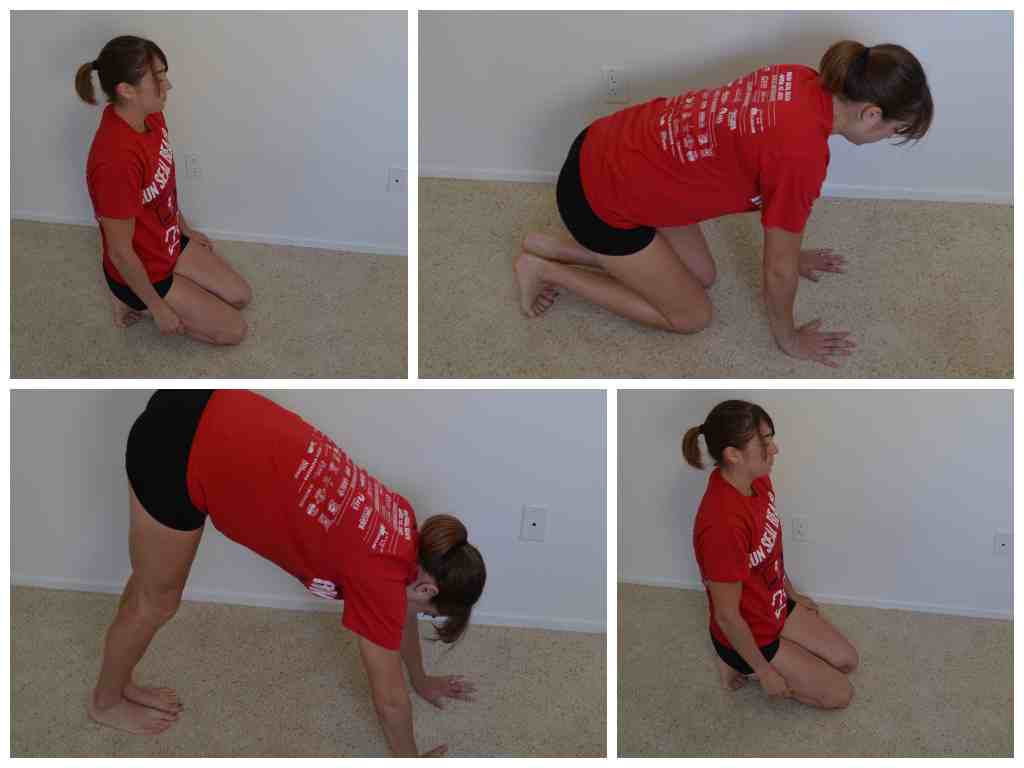
8. Kneeling Hip Circles – Come to your hands and knees on the ground. Place your hands underneath your shoulders and your knees underneath your hips. Lift one leg out to the side, keeping your knee bent to about 90 degrees. Lift your foot back and then bring your knee up around and forward. Then drop the knee down and around back to the starting point. Make big circles with your hip, going clockwise and then counterclockwise. Keep your arms straight as you circle.
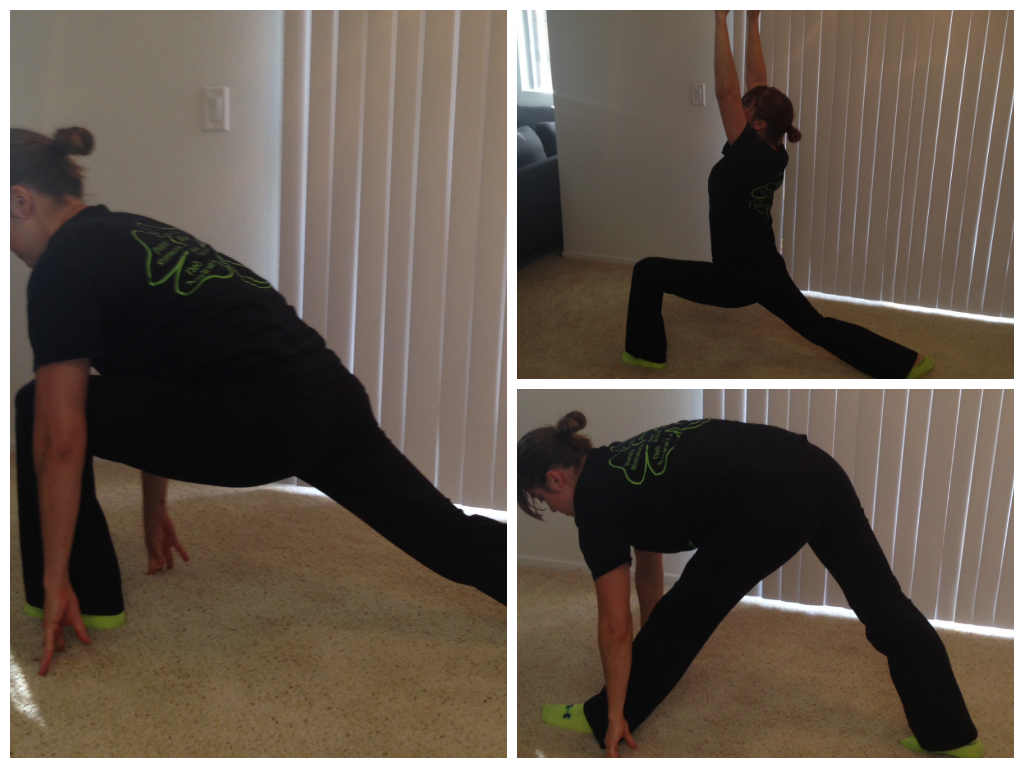
9. Crescent Pose to Hamstring Stretch – Start in a high plank position. Step one foot up between your hands with that front knee bent and your back leg straight behind you. Your front heel should be down while your back heel will be up. Lift your hands up off the ground and reach them back and overhead as you stay in a low lunge. Feel a nice stretch down the hip and quad of the back leg. Then bring the hands back down to the ground and hike your hips up to straighten your front leg. Lean your chest over and feel a stretch down the hamstring of the front leg. Sink back into the lunge and reach up and back overhead again to stretch the hip and quad before repeating the hamstring stretch. Complete all reps on one side before moving back into the plank and switching to the other side.
10. Bear Squat – Kneel on the ground with your hands on the ground in front of you. The closer you place your hands to your knees, the harder the stretch will be. Press your butt up into the air, driving your heels into the ground. Feel a nice stretch down your calves and hamstrings as you try to get your legs as straight as possible. Hold for 1-2 seconds and then drop back down to your knees before repeating.
Have nagging aches and pains from sitting all day? Want help to get rid of them? Comment below and I’ll get back to you with suggestions!
Short Workouts Are All The Rage
I’ve been excited to see mainstream media and even mainstream fitness companies promoting shorter workouts.
Even P90X is coming out with a P90X30 (Even though Tony Horton and I have very different views on nutrition, I think he is a workout/exercise genius and always love seeing what he comes up with.)
And while some may think short workouts are just the newest fitness “fad,” there is actually a lot of evidence to prove that they may just be what you need to get truly great results.
That many of us are actually working out for too long.
That short workouts aren’t simply “better than nothing.”
That 15-30 minutes may actually be better for your health and help you reach your goals faster than your hour-long workouts 5 days a week.
Here are some reasons why you should keep your workouts shorter and some ways to maximize your time in the gym.
Just to highlight the some key parts:
- Hormone levels are optimized with shorter workouts. After about 45 minutes of working out, your testosterone levels return back down to normal and your cortisol levels begin to rise. That means less muscle-building hormone is available AND more catabolic hormone (aka a hormone that breaks down muscle tissue) is starting to circulate.
- Mentally you just can’t keep your intensity up for an hour or longer. At some point you lose focus and really can’t push yourself to work as hard as you need to for great results. However, if you keep your workouts shorter, you will stay focused and work hard the entire time.
- It is easy to get a lot out of a short workout by playing with a few workouts variables like shorter rest, heavier weights, more volume, slower/faster repetition tempo…And many of these variables have great health and fitness benefits of their own that aren’t really capitalized on with longer workouts.
Here are also some great 30 minute workouts you can do anywhere.

In case you need something even shorter, you can get great results in just 15 minutes.
Just the other day, I posted a great 15 minute Lower Body Blast. Click here for this great lower body workout.
And below is an upper body 15 minute workout (just so you have a lower body AND upper body option)!
15-Minute Upper Body Blast
WARM UP
Stretch and Roll Out:
Chest/Shoulders
Back/Traps
Lats
WORKOUT
Set a timer for 15 minutes and complete as many rounds as possible in that time. Your goal is to get as much work done as you can in that time. Pick a variation of each exercise that challenges and fatigues you yet doesn’t cause you to go to failure so that you have to spend a lot of time resting.
CIRCUIT:
5-10 reps Dips
5-15 reps Inverted Rows
10-30 reps Battling Ropes Sidewinders
COOL DOWN
Stretch and Roll Out:
Chest/Shoulders
Back/Traps
Lats
EXERCISE DESCRIPTIONS:
Dips – Beginners may do an assisted variation off of dip bars or parallel bars. They may also do these off of kettlebells or a bench. Advanced exercisers will do full dips and may even add weight to challenge them.
To do a full dip, place one hand on each bar. Press up to the top so that your arms are fully extended. Then slowly bend your elbows and lower your body down. You want to lower yourself down until your upper arms are parallel to the ground. If you can’t get a full range of motion, regress the move so that you can. Then drive back up through your hands until you are fully extended at the top. Keep your core tight so you don’t arch your low back. Do not lean too far forward.
To do this move from the bench, place both hands on the bench behind you. Your finger tips should hang over the bench and face you. Stretch your legs out then in front of you, keeping your butt and back right up against the bench. The straighter your legs are and the further your heels are from your butt, the harder the move will be. To make the move easier, bend your knees and walk your heels back toward your butt and the bench. Bend your elbows and drop your butt toward the ground. Drop so your upper arms are parallel to the ground then press back up. Keep your butt and back right up against the bench. Do not let your body drift forward.
Inverted Rows – Hold a suspension trainer strap in each hand. Walk your feet out so you are leaning back. The closer to parallel to the ground you get, the harder the move will be. Squeeze your core and glutes and press your chest out so there is tension between your shoulder blades. Then row up, keeping your body in a nice straight line. Row until your chest comes up to the handles and then lower yourself back down. Don’t let your hips sink as you lower back down. Also, keep your chest pressed out the entire time (do not let your low back arch though). When you pull back up, don’t bounce off the bottom. If you don’t have a suspension trainer, you can use a smith machine bar or barbell set up low. If there is no bar or XT/TRX on which to do rows, do scapular push ups or corner rows.

Battling Ropes Sidewinders – Loop the rope around an anchor and hold one side in each hand. Keep more slack in the rope than you would with other battling ropes moves. Relax your arms down straight and stand with your feet between hip-width and shoulder-width apart. Bend your knees slightly and don’t be afraid to hinge forward a little. Then sweep your arms to the right, rotating through your core even pivoting a little up onto your left toes. Do not pull to far around. Then quickly sweep your arms to the left. You want to quickly push and pull with your abs to sweep the rope back and forth. Keep your arms more relaxed and only slightly bent. Your arms and the rope should stay out in front of you. The ropes should make snake-like waves on the ground and swish side to side. They should not move up and down off the ground. Make sure you do not round your back as you create the waves. Keep your chest up even if you slightly hinge forward as you create the waves.
If you don’t have a rope or the space to do sidewinders, you can do rotational med ball throws or even a russian twist. You want to pick a move that will work your core and, preferably, get your heart rate up just a teeny bit.
What are your favorite quick workouts?
Have you started integrating shorter workouts into your routine more often or do you feel like a workout doesn’t count if it isn’t at least an hour?
Bodyweight Home Exercises – Best Lower Body Moves
A bit ago I did a post with the 10 Best Bodyweight Upper Body Moves and today I wanted to take a second and go over 10 of the best lower body moves.
Bodyweight exercises are great to have on hand this time of year – when we are traveling, busy with family and the holidays and generally a little bit lazier about going outside on the weekends because it is cold.
The 10 Bodyweight Lower Body Exercises below don’t require much space and can easily be done in the comfort of your own home! (Shoot…they could even easily be used to create a home workout that the whole family can do together while gathered around for the holidays!)
1. Single Leg Deadlift (with slow eccentric) – Stand on one foot with the knee of that standing leg slightly bent. Hinge over at your hips, sweeping the other leg back toward the wall behind you. Pretend you are driving the heel of that foot straight into the wall behind you. Lean forward with your upper body as you hinge forward, keeping the back nice and flat. Make sure that as you hinge, you are sitting into the heel of your standing leg. Do not lean forward and come up onto your toes. To stand back up, drive through the heel of your standing leg and squeeze your glute at the top. Try not to tap the other foot down at all or at least not till you are fulling standing. Complete all reps on one side before switching to the other leg. To make the move harder, slow down your hinge over. Take 3-5 seconds to hinge over before you quickly stand back up. You can even slow down the stand back up or hold for a second or two while hinged over.
2. Single Leg Deadlift Hop – Stand on one leg. Hinge over, pushing your butt back and leaning your chest forward. Swing the leg off the ground back toward the wall behind you. Keep your back flat as you hinge over. Hinge over quickly, bending the standing leg just a little. Then quickly drive back up to standing, bringing your chest up nice and tall. As you drive up, explode up off the ground and drive the back leg forward, bringing the knee up. Then land back on the same leg and hinge back over before jumping back up. As you hinge over and drive up, you may want to swing your arms as if running with the opposite arm and leg working together. Make sure that as you hinge over your weight is in the heel of your standing leg. You want to also drive off that heel to really power your hop up.
3. Balance Lunge – Place your back foot up on a table, bench, chair or box. Hop your front foot out so you are in a nice wide stance with your back foot up on the bench or table. Then sink down, dropping your back knee toward the ground. Really sit back into the lunge. Make sure you aren’t going forward and that your weight is in your front heel and your front knee is not going past your toe. You should feel a nice stretch in the front of the leg that is back when doing this move. Beginners may want to use a super low box or do the move from the ground as a split squat.

4. Single Leg Squat – Choose a variation of the single leg squat that is right for you. Beginners may use a table or chair while more advanced lifters may use a doorway or a super low table or chair. If you can do a full pistol squat or use a plate weight to counter balance you, do that variation. Choose as hard a variation as you can do. To perform the basic single leg squat to a table, you will start by standing on one leg. Hold the other leg straight out in front of you. Lower yourself down until you are sitting on the table. Then driving off the heel on the ground, stand back up. Do not lean way forward or touch your raised foot to the ground. If you use a table, the more you allow yourself to sit down, the easier the move will be. The more you just lightly touch the table and come right back up, the harder the move will be. Also the lower the table you use or the lower down you go on any variation, the harder the move will be.

5. Towel Lunges – Side Lunges, Reverse Lunges, Curtsy Lunges…All can be made more difficult by putting a towel under the foo that is moving. For more details about the towel lunges, click here (and some other great towel exercises!).
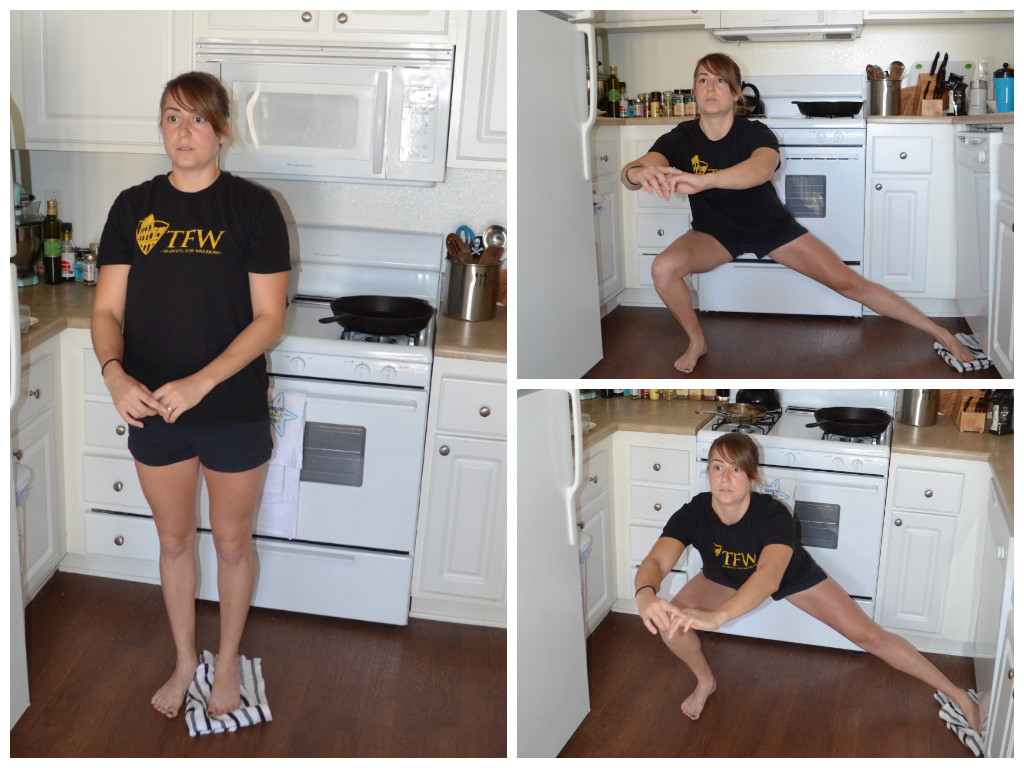
6. Skater Series – You can do a hold, side touches or even backward touches. For the hold, place your feet no more than a couple of inches apart. Sink down as low as you can, sitting your butt back while keeping your chest up. This squat is very similar to the chair pose in yoga. Do not let your back round and try to sink as low as possible, getting as close to parallel as possible. Hold in that low squat. To do the touches, once you sink down as low as possible with your chest up, you are then going to tap one toe at a time out to the side. You should stay low in the squat and not shift your weight. Keep your weight centered over the standing leg. Straighten the other leg out to tap the toe to the side. Do not let your weight shift as you touch. All your weight is in the standing leg. Alternate toe touches to each side until the time is up. For the backward touches, you are then going to tap one toe at a time backward. You should stay low in the squat and not shift your weight backwards as you lunge back. Keep your weight centered over the standing leg. Straighten the other leg back and just tap the toe. Do not let your weight shift into the foot touching back as you touch. All your weight is in the standing leg as if you are holding the isometric squat still. Do not come out of the squat as you touch back.
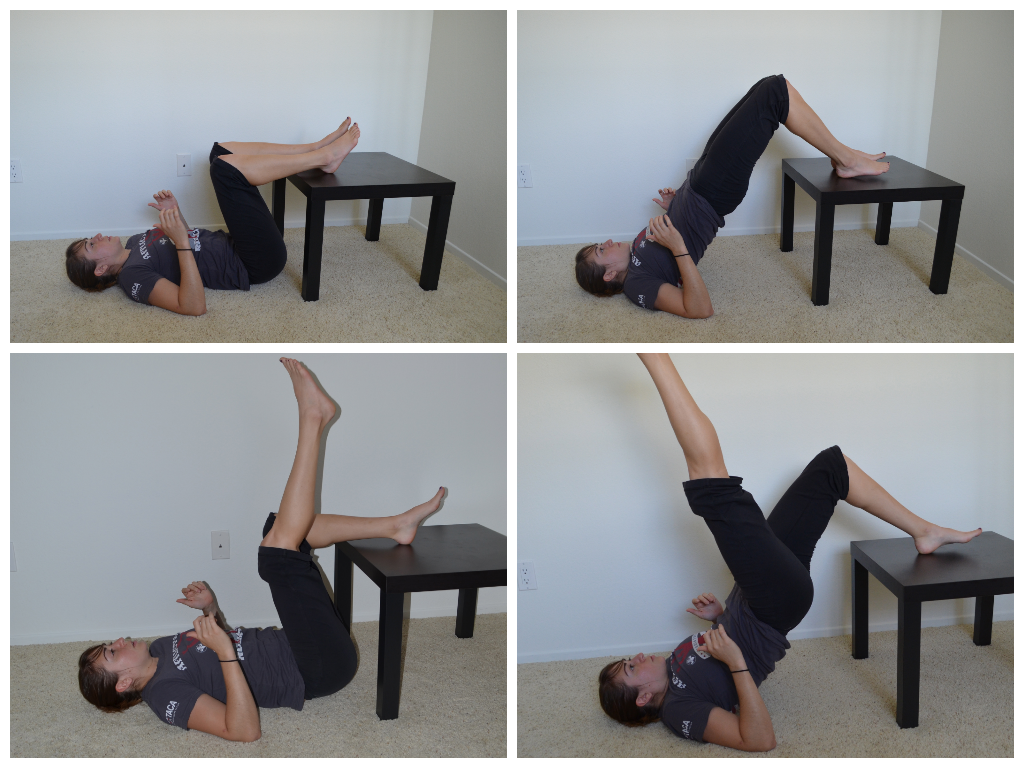
7. Glute Bridge (Off Table/Chair) – Beginners should do a single leg bridge from the ground or even a two leg bridge if they can’t get their hips up as high with the single leg bridge. Intermediate exercisers may want to do a two leg glute bridge with their heels up on the table. The single leg glute bridge off the table is an advanced progression. To do the glute bridge off the table, place your heels up on the table. Your butt should be right against the edge of the table. Bend your arms to 90 degrees with just your upper arm on the ground. Lift one leg up and point the toe toward the ceiling. Do not bend that leg or use it to help you bridge up. Drive through the heel on the table and press your hips up as high as you can. Squeeze your glutes and keep your core tight as you bridge up. Hold for a second or two and then lower down. Complete all reps on one side before switching.
8. Kneeling with Jump to Squat – This is an advanced move. It may be a challenge for many beginners to even do a step up from kneeling. To do the kneeling jump to squat, start on your knees with your knees about hip-width apart. Flex your feet. Sit your butt back and swing your arms back a bit so you are slightly hinged over. Hinge back and launch yourself from your knees up onto your feet in a low squat. Then stand all the way up. Once you are standing tall, step one foot back and come back to kneeling. As soon as you are kneeling again, hinge a little and jump back up to your feet. If you have a nice mat, you can jump back to kneeling, but this is not recommended unless you have a really nice mat.
9. Reverse Hypers – Lie face down on a table. Make sure your hips are right at the edge. Hold on to something in front of you if you want. Keep your upper body relaxed. Squeeze your legs together and point your toes out. Lift your legs to basically parallel to the ground, keeping your legs straight. Do not hyperextend your back and lift way higher than parallel. You do not want to feel this in your low back. Hold for 2-5 seconds and then lower down. Keep your core tight and really squeeze your glutes as you lift. If you don’t have a table to lie on, you can do this from the ground. Lie on the ground and relax your upper body. With your legs straight and heels together, lift your legs up as high as you can. Squeeze your glutes and get your quads off the ground.

10. Lunge Matrix (or part of it) – The lunge matrix basically tells you that you can lunge in every direction – forward, forward at an angle, to the side, back at an angle, straight back, back and crossed behind and even forward and crossed in front. If you think as yourself as lunging on a clock, you can literally lunge all the way around the clock. Sometimes I like to combine two or three lunges in a sequence. Or you can do a 360 lunge series, combining all seven and lunging around the clock!
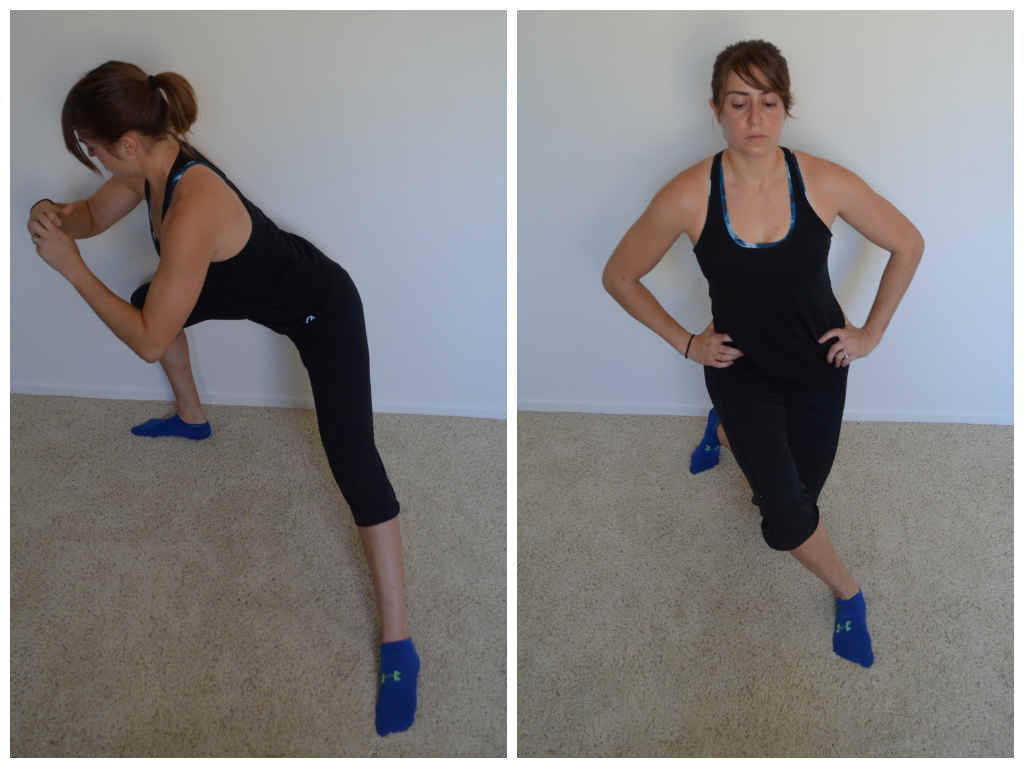
This is a backward angled lunge and a front lunge across.
This is a curtsy lunge and front angled lunge. Two other lunges in the matrix
Bonus Moves:
Of course any jumping moves are also great options to help you challenge yourself without any weight. Squat jumps, skater hops, split squat jumps, tuck jumps are all also great options!
What are your favorite lower body moves to do at home?
Tips To Help You Master The Pull Up
The other day I asked clients and my Facebook followers, “What move would you like to master in the New Year?”
It seems that the pull up is the tough move that everyone would love to master.
But it isn’t like bench press or squats or deadlifts where you just start with a lighter weight and work your way up.
Heck, even simply doing assisted pull ups doesn’t always even get you there.
But where there is a will, there is a way. Just like with any other fitness goal you have, you have to TRAIN to be able to do the pull up.
So here are some great strengthening moves to add into your training routine that will help you to master that elusive pull up in this coming year!
HOWEVER, you must be consistent in your training for these moves to work. You can’t simply do them a couple of times one week and then expect to be there!
1. Work on your scapular retraction.
Here are three moves to help. You can add these into your warm up routines any time you do an upper body workout. They are also great rehab moves if you’ve suffered from any neck or shoulder injuries. These moves also help you activate the correct muscles so you can use all those strong back muscles to help you do the pull up!
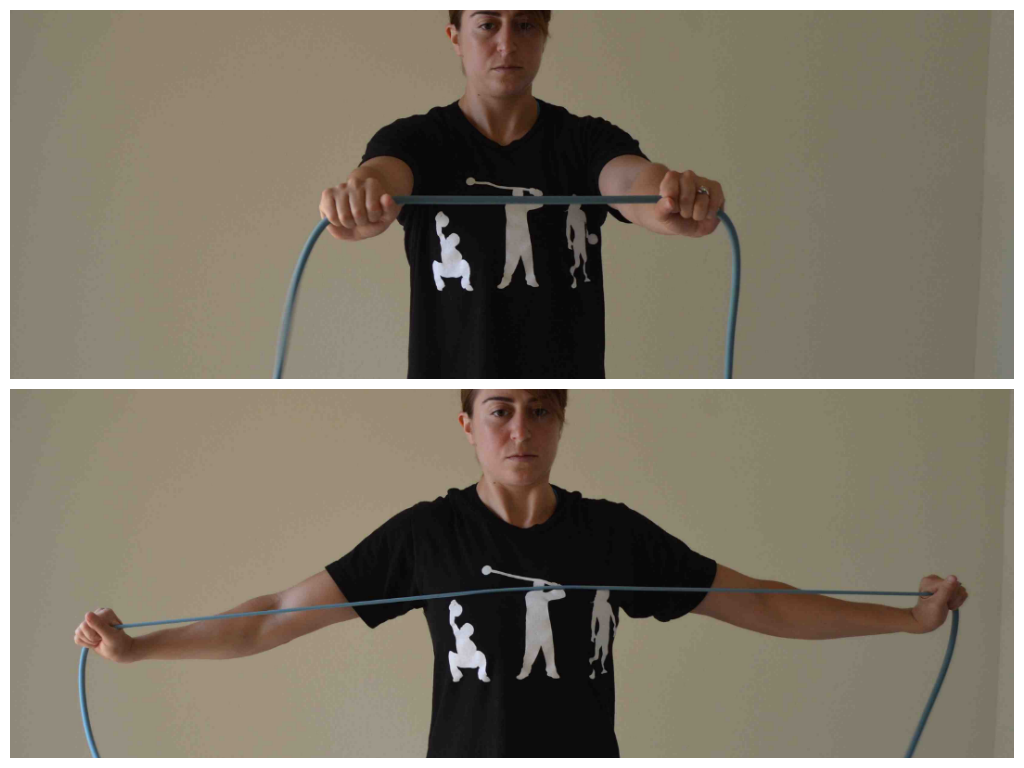
Scapular Band Flyes – Hold the resistance band with your hands about shoulder-width apart. Arms should be straight out in front of you at about shoulder height or right below. Keeping your arms straight, open your arms out to the side. Pinch your shoulder blades together as you open. Do not let your shoulders shrug up. Then once you open the band to your chest with your arms straight, bring your arms back together so your arms are about shoulder-width apart again and there is no slack in the band. Repeat.
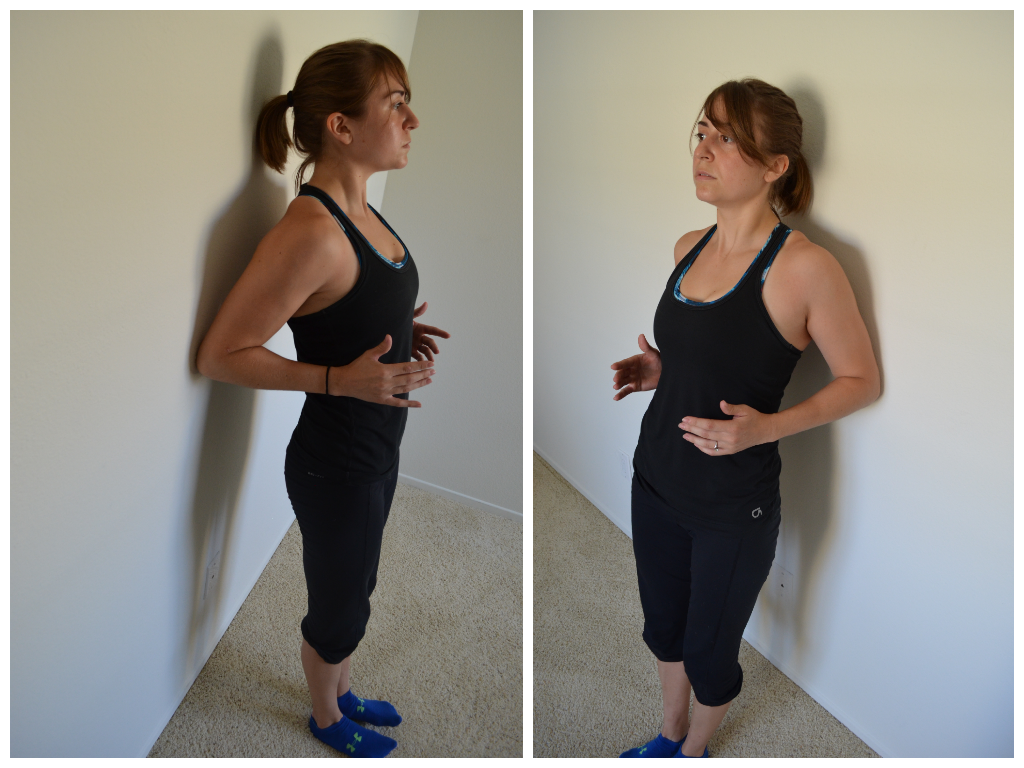
Scapular Wall Hold – Stand with your back to the wall. Step a couple of inches away and bend your arms to 90 degrees. Keep your elbows in by your sides and drive them back toward the wall. Lean onto your elbows on the wall. Do not let your upper arms or back touch the wall. Relax your head back. Pinch your shoulder blades down and back while keeping your core tight as you lean into the wall. You should feel this move low between your shoulder blades. To advance the move, move your feet a bit further from the wall.
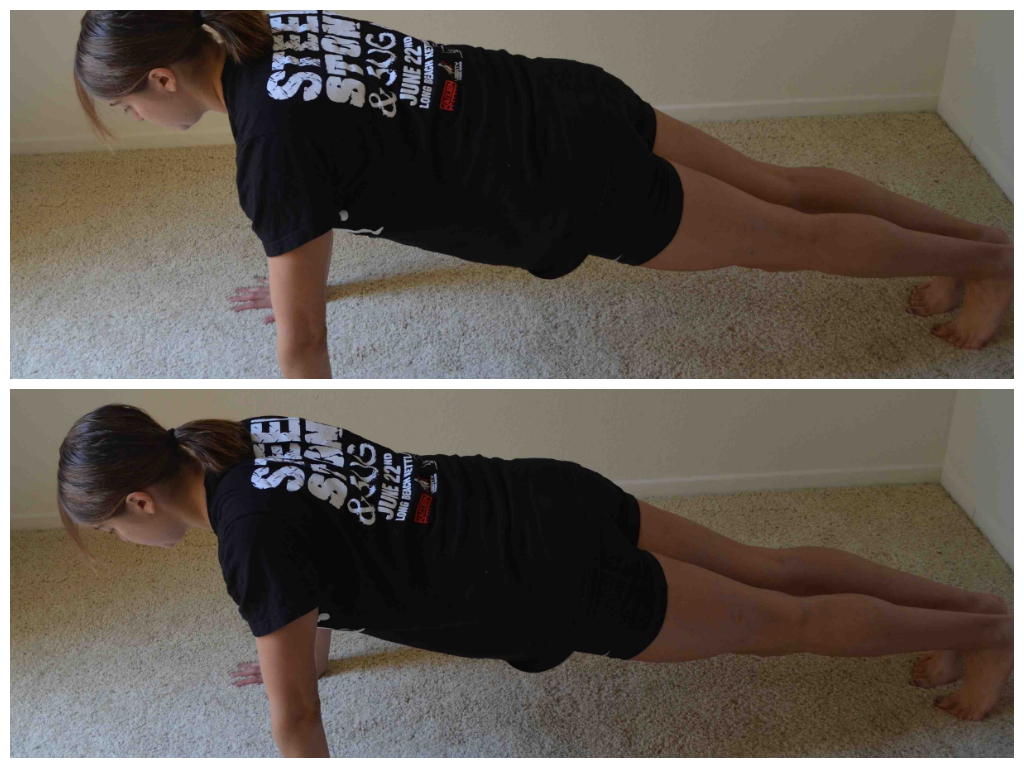
Scapular Push Ups – This move has only a very small range of motion. Set up in a push up position from your knees or toes. Create a nice straight line with your body. Then pinch your shoulder blades back and together and press your chest out. Then relax. It is really only a few inches of motion. DO NOT ALLOW YOUR CORE TO MOVE. Do not bend your elbows or allow your hips to sag. All you are doing is pinching your shoulder blades back and together. Also, do not let your shoulders shrug up by your ears.
2. Use isometric holds to strengthen your pull up.
Isometrics are a great way to strengthen the muscles used during pull ups without you having to be able to do a pull up. Here are three isometric holds that I love to use to work on each part of the pull up. The dead hang is an isometric at the bottom of a pull up and the pull up hold is at the top. The mid-pull up hold is exactly what it sounds like – a hold in the middle of a pull up.
Dead Hang – Hold on to a pull up bar or suspension trainer and hang from the bar. Your hands can be facing toward you or away from you. As you hang, do not let your shoulders shrug up. Keep your chest pressed out and your core tight. Your legs should hang down toward the ground. Do not tuck your knees up toward your chest.
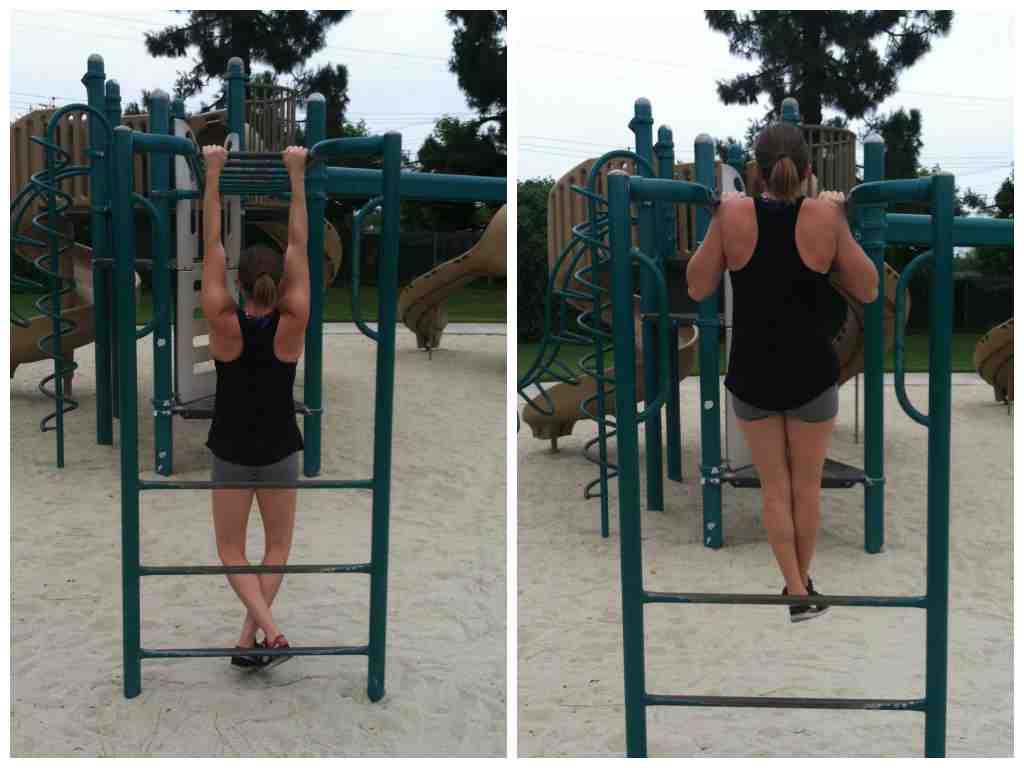
The first is a dead hang. The second is a pull up hold.
Pull Up Hold – You can do this as a chin up or pull up. You can do it off a bar, off a peg board and/or off of XT/TRX straps. Whichever you use pull to the top of a pull up or chin up and HOLD. The less stable the appliance, the harder this move will be. Keep your legs straight down toward the ground and your chin above the bar. Keep your chest should be pressed out and your shoulder blades should be down and back. Squeeze your belly button in toward your spine and keep your glutes tight. Hold there until time is up.
Mid-Pull Up Hold – Hold on to a pull up bar or suspension trainer. Your hands can be facing toward you or away from you. You can either jump or pull yourself so that you are half way up a pull up. If the bar is low enough, you can simply set yourself a mid-pull up then hang from there. You arms won’t quite be bent to 90 degrees. As you hang, do not let your shoulders shrug up. Keep your chest pressed out and your core tight. Your legs should hang down toward the ground. Do not tuck your knees up toward your chest. Try to keep your arms bent as if you are halfway up or down the pull up and do not let them lengthen.

3. Strengthen the muscles of your back.
Once you’ve got everything activated (and before that even you will want to roll out your chest and traps to make sure no overactive muscles are trying to take over), you will want to work on making the big muscles even stronger.
Inverted rows are a great move to help you work toward the pull up because they also force you to work on grip strength and lifting your own bodyweight.
Inverted Rows – Hold a suspension trainer strap in each hand. Walk your feet out so you are leaning back. The closer to parallel to the ground you get, the harder the move will be. Squeeze your core and glutes and press your chest out so there is tension between your shoulder blades. Then row up, keeping your body in a nice straight line. Row until your chest comes up to the handles and then lower yourself back down. Don’t let your hips sink as you lower back down. Also, keep your chest pressed out the entire time (do not let your low back arch though).If there is no bar or XT/TRX on which to do rows, do scapular push ups or corner rows.
One arm weighted rows and T-Bar Rows are also great options. When you do any weighted row, really focus on not rotating or using your legs to help you lift the weight. Focus on keeping a nice flat back and not rotating. You want your back to have to really work to row the weight up.
Doing pull ups are another great way to strengthen your back, but we will get into those with the next point….
4. Use different pull up variations to work on your weak points.
I’ve found that people get super stuck on one pull up variation and never mix it up.
Here are some ways to vary your pull ups to strengthen all the muscles needed to do an unassisted pull up:
- Mix up the grip you use. Don’t always hold with a pull up or chin up grip. Also try a neutral grip (palms facing each other and hands parallel). You can also place your hands wider or closer together. Each grip activates/uses the muscles in slightly different ways. For instance, a chin up engages a slight bit more bicep while a wide grip pull up uses a lot of lat!
- Do assisted variations. The key word there is VARIATIONS. Don’t just always hop on that assisted pull up machine. Try doing a pull up assisted by a jump. Or set up a bar so that your feet can help you push up by pushing off the ground. Or use a band. Vary the assistance you use to force your body to work in a few different ways. Also make sure you are always using as little assistance as possible. Just because something is hard doesn’t mean you can’t try using just a little less assistance. Find your point of failure and then move backward until you can just barely do one or two. Don’t just allow the move to be easy and depend on the assistance.
- Use tempo to strengthen your pull up. Slowing down the tempo of your pull up or down also helps strengthen your pull up. Do an assisted pull up, but pull up for a 3-5 count instead of pulling up as quickly as possible. OR jump to the top of the pull up, hold for a second then lower down as slowly as you can. All of these strengthen muscles in different ways to help you build toward the full pull up.
All of these moves and tips will help you master the pull up. While you need to be consistent in using them, you don’t have to use every single one every time you do an upper body workout. Mix a few in a couple of times a week.
Maybe during your metabolic use a pull up hold or even jumping pull ups. Or the next time you do a strength circuit do a weighted row and maybe some assisted pull ups.
Mix up the techniques you use, focusing on the moves that strengthen your weakest points. There is always a limiting factor to the weights or amount of reps we can do. Find that limiting factor, that weak link, and strengthen it.
And in case you aren’t sure what your weak link is, feel free to comment below and I can help you incorporate these tips into your training!
ALSO, while I didn’t discuss foam rolling above, make sure to roll out and do dynamic stretches before any strength training routine. A huge part of mastering these killer moves is getting the overactive muscles loosen and the correct muscles ready to work!
Monday Motivation and Fitspo – Focus on the positive
Today is Monday and #MondayMotivation and a bazillion Fitspo photos clog my social media.
For some reason we all just need that extra push on Monday.

POSITIVE! Promotes a great mindset and a great reminder to appreciate even the smallest success!
Be it that we fell off the wagon this past weekend or that we just need that little extra push to get going this week, many of us seem to seek out motivation on Monday.
And some of the motivational pictures, the fitspo that I see, I like. Others make me roll my eyes or simply don’t do anything for me.
I mean I think there is a ton of CRAP fitspo out there. A ton that does promote eating disorders and the belief that to be a bad-ass you need to push through the pain and risk injury….AKA BE STUPID.

I do think there is a ton of CRAP and I wish I could sometimes give a swift punch to the face of the people who created it.
BUT I don’t think ranting against it is going to do anything no matter how stupid or pathetic or whatever I think the images are.
For one….Different things inspire and motivate change for each of us.. And while I may not agree with it, while I may think it promotes unhealthy habits, others may find it is the motivation they need to create healthy change. They just interpret it differently.
And two…I think the best thing I can do is create and promote what I consider to be healthy and positive fitspo. I believe we have to BE the change we want to see – we can’t just complain about things.
So when I choose fitspo or #MondayMotivation, I think of what motivates me. What encourages me to have positive self talk. What boosts me up and what helps me mentally overcome all the excuses.
For me it is often a VISUAL of the positive self-talk I want to use or a visual of my end goal or even the positive emotions I want to feel about myself.
For me it is about the POSITIVE RESULTS I want to create and the POSITIVE MINDSET I need to get there.
I believe the POSITIVE truly MOTIVATES. While those negative fitspos GUILT you into making changes.
And GUILT doesn’t last long, which means you probably aren’t going to stick with your new lifestyle for long. And guilt promotes changes being made in unhealthy ways to try to get results fast to change the way you feel about yourself.
Good fitspo should help boost you mentally to achieve your goals.
So stop focusing on all the crap fitspo that doesn’t help you. Stop complaining about all the stupid images out there.
Stop trying to GUILT yourself into achieving your goals.
And shoot…If there isn’t any fitspo out there that you like, MAKE YOUR OWN!
I know I did! 🙂

Fit in your workout even when you’re busy!
The other day I read a great post on T-rex to Tigress about trying not to feel guilty about skipping a workout.
While yes, we do want to create a routine and stick to it….while yes, we don’t want to constantly let ourselves off the hook and make up excuses to miss our workouts….We do also have to recognize that sometimes life is going to get in the way and that sometimes WE HAVE TO CUT OURSELVES SOME SLACK!
Sometimes our routine gets interrupted. Sometimes our body just gets worn out. Sometimes our mind gets completely fried.
Sometimes we just need a day off even if we’d made other plans.
And if our body or mind really needs the day off, there is no reason to feel guilty. The day off will help us recover and become re-energized to take on all the upcoming challenges.
That recovery day will actually help us reach our goals more quickly if we need it.
Nothing bad is going to happen to our progress, to our results, to our health or even our routine if we make an educated decision to take a day off.
HOWEVER, there are times when we aren’t able to make it to the gym because life interferes that we can still get in a workout – that we still really want to get in a good workout.
So if you decide that life has interfered yet you still really really WANT and NEED to get in a workout (and it wouldn’t be better for your body and mind to take the day off), here are a couple of great ways to get in a quick workout WITHOUT going to the gym.
1. GO FOR A WALK! – Even if your body and mind or worn down, a walk is a great option! Walks are a great form of active recovery and they give your mind a chance to relax and de-stress. Go for a short walk around your neighborhood or even meet up with some friends for a chat session!

We go for at least a weekly walk/hike. It is a great time to chat and de-stress and get in a little exercise!
2. DO A WORKOUT AT HOME – While it may not be what you originally had planned or even as tough as what you planned to do, IT IS STILL A WORKOUT. Doing anything is generally better than nothing if you can’t make it to the gym because of time or energy. Doing something keeps you in the routine of working out. And usually once you get moving, you end up working pretty hard! Keep a few go-to home workouts around to make it even easier to stay on track!
Cardio in your home!
3. SET A TIMER FOR 15 MINUTES – Short on time so you can’t go to the gym? Short on the motivation to really put in a long, hard workout? Then simply do a short intense workout at home! At least once if not twice a week, my workouts are no longer than 15 minutes…and even though they are short, they are far from easy. Sometimes I find it is easier though to motivate myself to workout when I know it will be over quickly. Pick 3-4 moves and put them into a circuit. Do as many rounds as possible until the timer runs out! Heck, sometimes you can even just put a timer on for 5 minutes as choose one exercise and do it without stopping the entire time. Like 5 minutes of burpees. Or 5 minutes of bear crawls. It may only be 5 minutes, but if you do not rest and try to move as quickly as possible the entire time, you will be exhausted!
4. GO PLAY! – Working out doesn’t have to mean going for a long run or going to the gym and lifting weights. Working out can be playing with your kids at the playground or stand up paddling or surfing or hiking or any FUN ACTIVITY where you are moving. So next time your friend really needs to meet up to chat and you feel like you just can’t ditch her, don’t just go to dinner to talk! Take your conversation on the road and be active. Getting moving could be good for you both and may help you both de-stress! No it isn’t your planned workout, but simply moving will make you feel better and is good for your health!
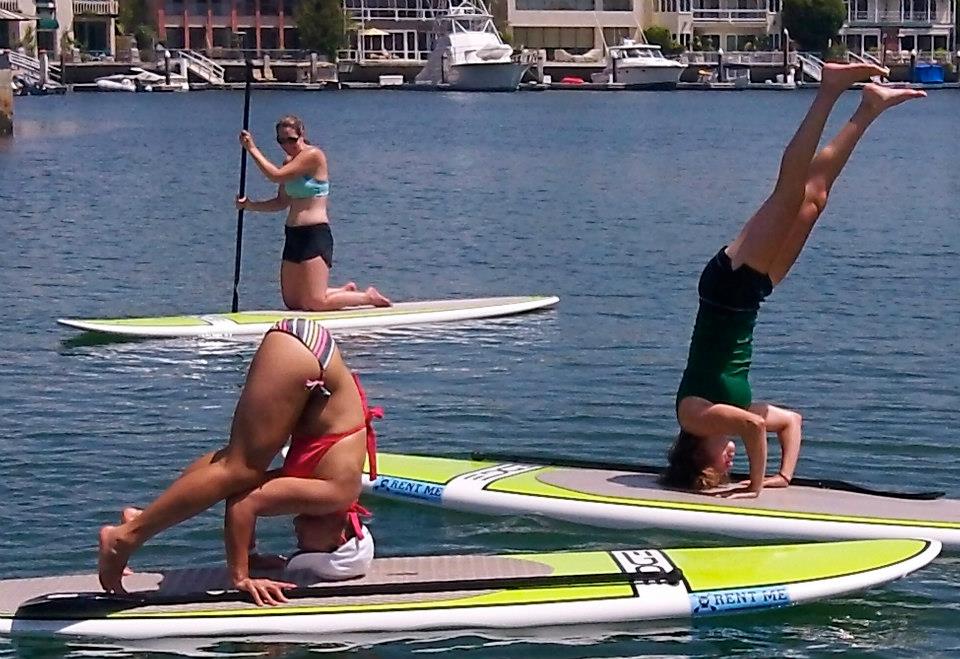
Go do headstands on a paddleboard even if you do flip over and fall in! (which by the way I did…numerous times…)
5. DO YOGA…OR PILATES – While both yoga and pilates are tough workouts, they can also be good for recovery. I have a Yoga workout I can easily do at home on days when my body needs a break but I still want to move. Plus if you are stressed or tired, it can be easier to motivate yourself to do a workout that you know won’t completely slaughter you and that you don’t have to travel anywhere to do. You may even find that going to the gym to do a Pilates or Yoga class makes it easier to push yourself to go to the gym on a day when you wouldn’t for a more intense workout.
What all the tips above basically show is that something is better than nothing, especially if we are trying to keep ourselves on a routine to create new healthy habits.
Life is going to get in the way sometimes, but the best thing we can do is not stress or feel guilty when that happens.
Heck, sometimes you even just need the day off.
But whatever happens, it is best not to stress. And if you really do want that workout…Well…Where there’s a will, there’s a way!
How do you handle life getting in the way of your routine?
P.S. Thought it was interesting to read T-Rex to Tigress’s post since most of my writing about life getting in the way has been about diet. But life most definitely can get in the way of working out too!
Here is also a great post by 43Fitness about life getting in the way (AKA TRAVEL/VACATION) and how she handles it. Thought she had some great rules!
Reaching Your Goals: Consistency Creates Habits
I often talk about being patient with yourself and not expecting perfection. I often talk about not worrying if life occasionally gets in the way and you “slip up.” I often talk about how you need to indulge and recharge every once in a while.
But there is also a flip side to all that.
While achieving your goals isn’t about being perfect day in and day out, you do have to be CONSISTENT.
The more consistently you work toward your goals day in and day out, the quicker you are going to reach them.
Often clients will get frustrated when they feel like they’ve been “good” yet they aren’t seeing great results.
Most of the time when they break things down though, they realize that “yes…they have been good, but not good for a long enough stretch in a row.”
Not “good” consistently.
I’ve often mentioned the 80/20 rule…80 percent of the time you do the things you should while 20 percent of the time you indulge in those not so healthy treats.
Eighty percent of the time is pretty darn consistent. Honestly, it’s more consistent than most people are . Twenty percent adds up very quickly.
80/20 doesn’t mean you can be good one week and then the next week slip back into old habits. It doesn’t mean you can be basically good during the week and then do whatever you please on the weekend. It doesn’t mean you can just excuse every little slip up!
80/20 really means consistently doing the right thing. It means creating habits that lead to change. And habits honestly take about 21 days to create.
That means for 21 days you have to follow the lifestyle that you truly want if you want it to create results and ingrain habits. It means you have to be consistent to adhering to the lifestyle you want.
I mentioned a bit ago that there are points where you will find you NEED to adhere more strictly to a diet and exercise program. That you shouldn’t feel like you are restricting yourself all of the time, but that there are times where it is ok to be super clean.
And one of those times is when you are trying to ingrain the habits.
I tell clients all the time that the hardest part is reaching their goal, not maintaining it.
Because once the habits are truly instilled, you won’t have to think twice about living the lifestyle you want. You won’t constantly be draining your self-control tank to eat clean and workout consistently.
So I would like to present a challenge….
Set aside 3 weeks right now. Don’t wait for the New Year to lose weight or have to worry about dieting over the holidays.
Take three weeks right now and be consistent in your healthy lifestyle. Take 3 weeks to do the right thing day in and day out.
Be strict for three weeks, ingrain those habits and realize just how much easier it is to get results when you are CONSISTENT!
Dedicating 21 days is really all it takes. Just three weeks to make a HUGE change.
Start next year off right….Create those habits NOW!
Wedding Week Part 2 – Adventure is out there!
I think that often fitness and working out is where we learn a lot about ourselves. I think it is a great way to become empowered and find the courage to be the person you want to be in your every day life.
It is a little microcosm that allows us to become the people we want to be.
I think working out is almost more important for the mental health benefits than the physical.
That being said, I’m going to stray today into the realm of sappiness and mental attitude with Part 2 of my Wedding Week series.
I think all big life events make us take time to reflect.
To reflect on where we’ve been. To reflect on what we really want out of life and who we are. To even reflect on where we want to go.

If you haven’t seen “Up,” go watch it right now! Just kidding….but seriously.
And when we reflect it isn’t necessarily the BIG EVENTS that truly stand out the most or seem the most meaningful. Actually it is often the boring little things that you can’t even fully describe that mean the most.
It is those boring little things that happen day in and day out that mold us.
Those boring little things are sometimes even the true adventures, whether or not we recognize it at the time.
I’ve done a lot of reflecting recently because of getting married…and because I was trying to figure out how to express how much I loved Ryan in my vows.
Actually it was super frustrating writing my vows. I generally have an easy time writing. I pick a topic and I just go. I rarely write a second draft. Most of the time if I have any sort of block I just walk around my apartment until the block has passed and that is often only a matter of minutes.
But with my vows nothing just seemed right. I can honestly tell you I wrote at least 10 drafts…some of them were even written in the note pad of my phone when I would randomly have an idea that seemed amazing.
In the end though, I wasn’t happy with any of them. They all seemed empty.
They stated that Ryan was my best friend….DUH.
They told funny stories about our relationship in an attempt to show our love. Like about how oddly perfect we are for each other.
But none of them could fully express just how much Ryan meant to me.

A little wedding weekend collage.
And then I stumbled onto a quote from the movie “Up.” (This by the way is one of my favorite movies and Ryan and I started our first dance to a song from this movie!)
In the movie, the little boy, Russell, tells a story to Carl about hanging out with his dad and then says, “That might sound boring, but I think the boring stuff is the stuff I remember the most.”
The boring stuff is the stuff that I remember the most….
The boring stuff is the stuff that relationships are made of…That love is made of.
It isn’t grand gestures or romantic getaways that make you love a person. That stuff isn’t LOVE.
It is the little things that happen every day. It is the boring little routines, even, that won’t interest anybody but you that truly shape things – that truly shape YOU.
It is those seemingly boring little events, routines, habits that are the TRUE ADVENTURES.
And this doesn’t just apply to love and relationships.
Honestly life, in general, should be about remembering and appreciating the boring little things because those are the things that truly matter.
At least I’ve always found that to be true.
Thinking back over the years what I remember more than specific victories (like winning the powerlifting competition) or defeats (like not hitting my goal at the kettlebell competition) is the journeys.
I remember all the hard work that I put in day in and day out. I remember that feeling of signing up for something that I’d never attempted before and then committing to training as hard as I could.
And don’t get me wrong, the big events are nice highlights, but they aren’t what truly mattered. They honestly didn’t do near as much to shape me as the journey….As the boring work I put in each and every day to reach them.
Those nondescript events, those daily struggles that looking back I can’t pinpoint, but just remember the feelings of, are what truly mattered. Those were the true adventures.
Those are the feelings that I wouldn’t trade for anything else.
So I guess after all this rambling, what I want truly want to say is, “Stop getting caught up in accomplishing something big. In doing something BIG.”
You don’t have to force some big adventure or think your life isn’t complete if you don’t do something HUGE. Adventure is out there every single day. All you have to do is be willing to put yourself out there and live.
Because 50 years from now when you look back, I honestly think more than anything you’ll be proud of the journey. Proud of the days you spent in happiness or even in struggle working to move forward, grow stronger, become more yourself.
Adventure is out there! Don’t wait for something big to happen. Go out and enjoy all those boring little things that happen every day!
Wedding Week Part 1 – Wedding Weekend Workout
This past Saturday, I married my best friend. I married the person that, even when he makes me so mad I want to punch him, I still want to run to him to make it better.
I married a man who accepts me completely – He accepts me in all of my Type A-ness, which sometimes even includes an inability to let go of work (this is honestly the longest I’ve gone without posting since the inception of Man Bicep AND I have still texted clients who’ve told me to stop texting them and get back to my vacation.)
I just love what I do…And he accepts that because he is AMAZING.
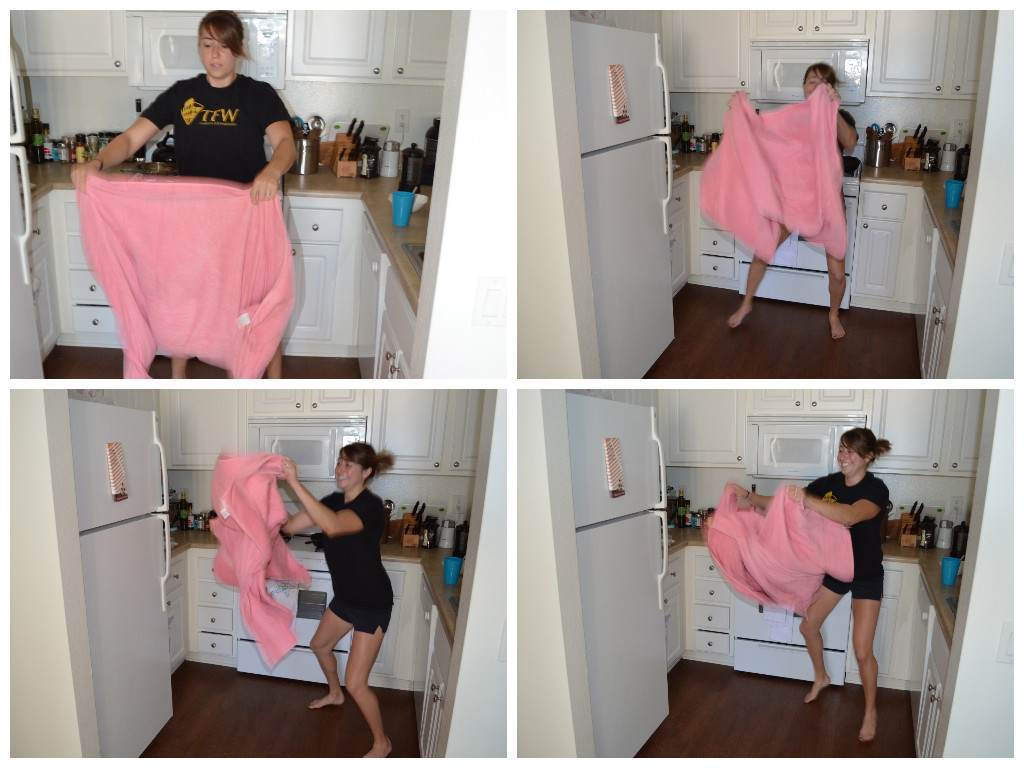
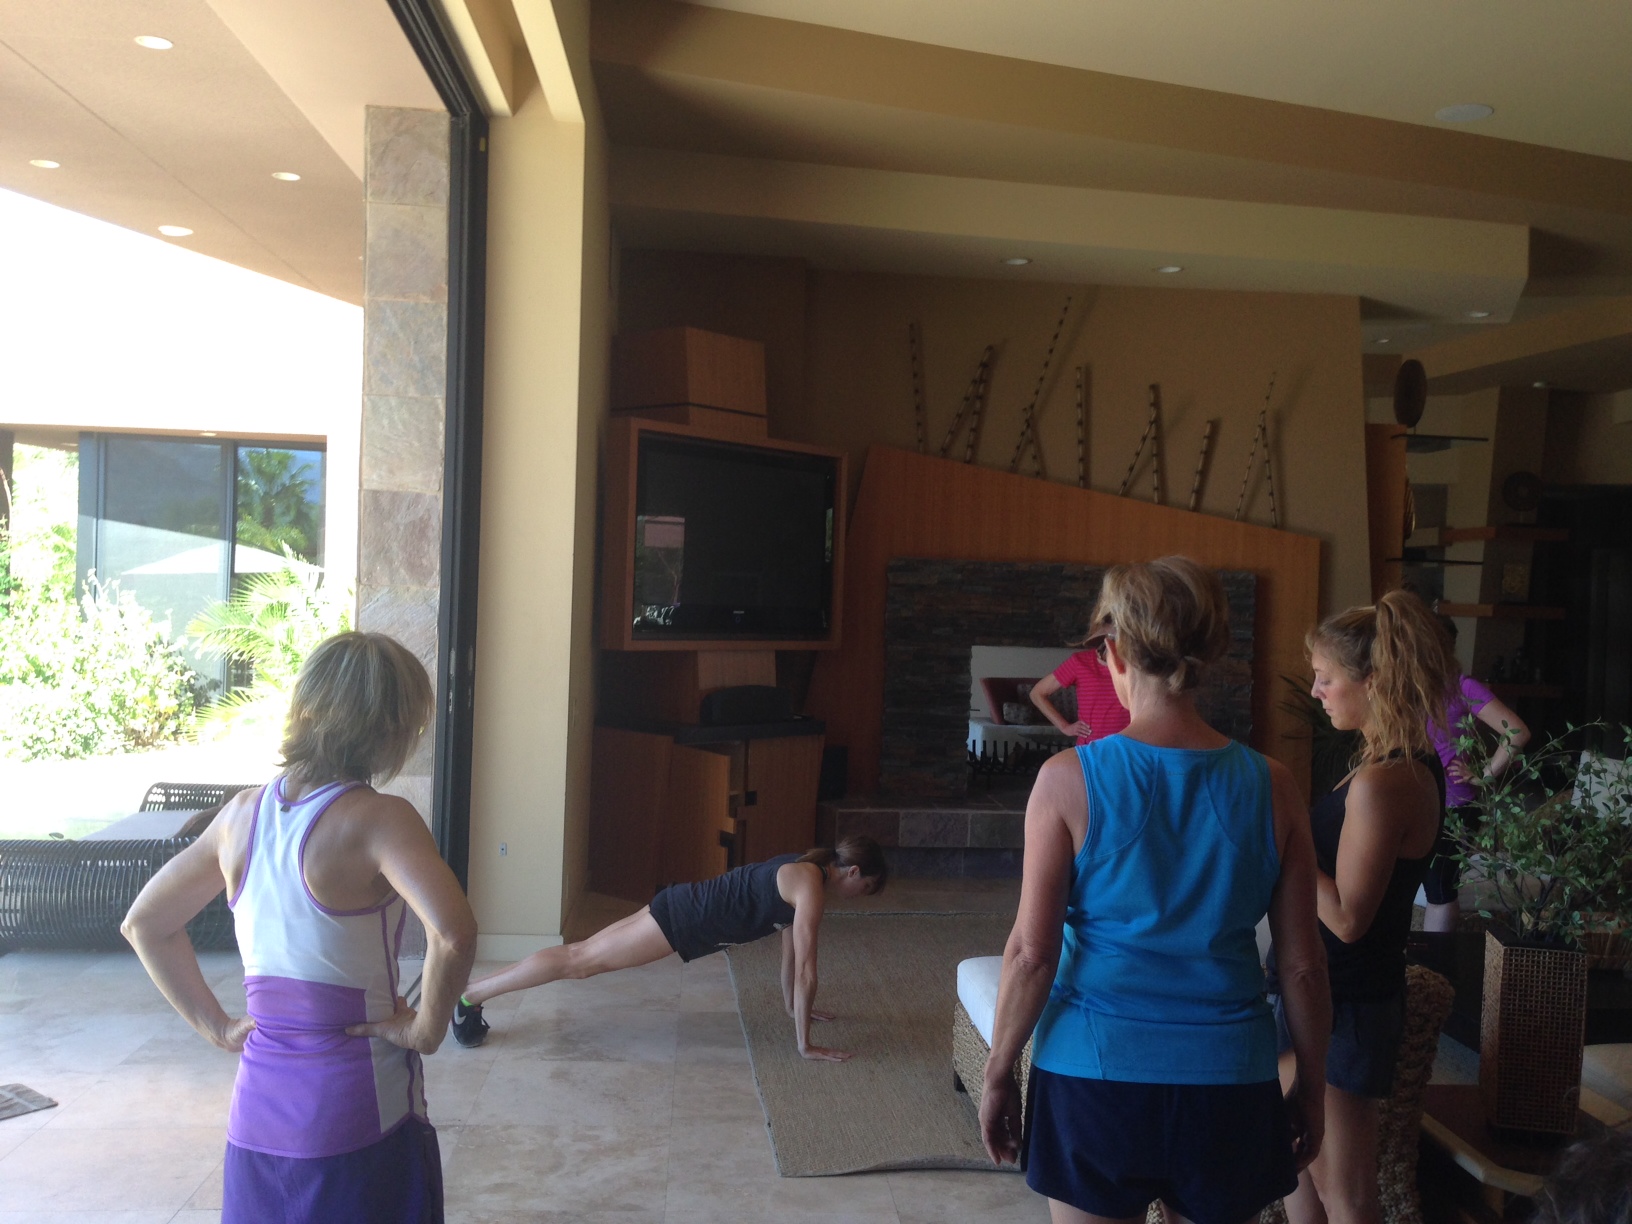
He even accepted (and took pictures in fact!) that I needed to teach a little wedding bootcamp at the house the day before the wedding. Which was a TON of fun!
Taught everyone some new moves they could do at home with no traditional equipment. (Monkey Knuckles, one of my best friends and a client from Boston, was even there. Miss you Juliana!)
With the workout, we got a good little sweat going and had some fun in the process (plus I think we ended up cleaning the floor with our towel moves!)
Here is our fun little workout if you want to give it a try! (Wouldn’t usually do so many different exercises, but wanted to give them lots of new stuff to leave with!)
Wedding Weekend Workout:

Post workout bicep pose!
Warm up (stretches for calves, hamstrings, glutes, hips, shoulders and back)
Circuit #1:
3 rounds:
8-12 reps Towel Glute Bridge with Curl (Do a single leg curl to regress)
3-4 Circle Crawls each way
Circuit #2:
3 rounds:
15-20 each side Towel Mountain Climbers (Do not use a towel under your feet to regress)
8-12 reps each side Single Leg Deadlifts (3 count lower down)
5-10 reps Gorilla Crawls forward
Demonstrating!
Circuit #3:
3 rounds:
8-12 reps each side Curtsy Lunge on Towel (Take out the towel to regress)
30 second Scapular Hold
8-12 reps Push Up (5 second lower to progress. Incline to regress)

Best move ever!
Circuit #4:
3 rounds:
20 second holds
Front Plank
Side Planks
Plank Hip Dips (Hold front plank and rotate side to side touching the hip down on each side)
This is a great total body workout you can do with no equipment. The workout doesn’t take very long and you can also easily simplify it if you are shorter on time!
And the best part was, everyone was challenged no matter their fitness level or exercising experience!
Stay tuned for more wedding week posts to come shortly!

Pre-workout workout…practicing walking in heels…And in case you can’t tell…They are wonder woman heels!

My wedding heels.
Meal Prep – The Key To A Healthy Diet
Being successful when creating a healthy lifestyle change is about more than KNOWING the right foods to eat, the right things to do.
It is about DOING the right things.
And DOING is definitely not near as easy as KNOWING.
The question then arises of HOW to make the lifestyle change and how to get it to stick. How do you eat healthy food when you hate cooking? How do you force yourself to eat the right thing when you get home exhausted and have to cook?
What is the KEY to making a healthy diet stick?
If I could tell you one tip to make following a healthy diet easier, I would say it was all about…
MEAL PREP!
If you want to succeed at creating a healthy lifestyle change, you need to plan ahead. And meal prep is all about planning ahead.
It is about preparing food so that you make it easier for yourself to make the healthy choice day in and day out.
Meal prep is about more than making healthy meals. It is even about more than prepping meals for the week.
It is about preparing yourself for success when it comes to eating healthily even when you are stressed and exhausted.
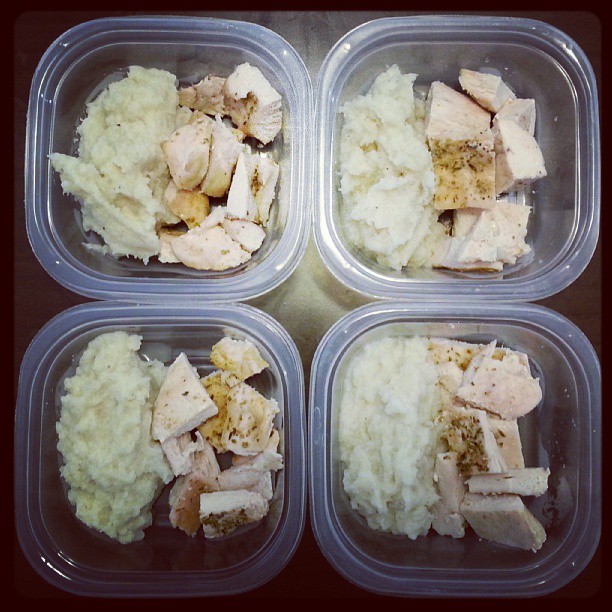
Prepping for the week like this might be the way to make adhering to a healthy diet easier, especially at the beginning! Thanks Starla for a great meal prep photo.
Meal Prep Keys To Success:
- Choose recipes that use the same basic ingredient and then make a grocery list based on these recipes. Choosing recipes that use the same basic ingredients will make your grocery shops easier. It will also ensure that you almost always have what you need to cook healthy meals on hand.
- Prepare a grocery list before you go to the store off of the recipes you plan to use. That way you won’t forget anything and you won’t have any excuse not to cook. It will also make it easier to avoid buying those tempting foods. It is easier to make excuses if you don’t have your plan of attack written down.
- Choose recipes that make leftovers! Leftovers are key. A big complaint about switching to a healthy lifestyle is the fact that people have to cook all the time….And they are too tired. Too exhausted…Don’t have enough time to do that. But if you choose recipes that make leftovers, you don’t need to cook every day. You can actually just take an hour or two on your day off and prep food for the entire week. You can make food for easy lunches. For quick dinners when you get home stressed.
- Keep It Simple! Don’t add in too much variety. Use the same basic recipes over and over. It may sound boring, but sometimes, at the beginning especially, we have to keep things simple so we don’t have to think too much about the change. We only have so much self-control. We can’t use too much of it thinking about our diet if we want to be able to maintain our heathy lifestyle over the long run.
- Get the proper tools. Sometimes you have to spend money to make things simple – aka sometimes you have to spend some money to get the proper cooking tools to make things easier. A crockpot, a blender…both are worth the money because they allow you to make meals with less hassle. Smoothies are a great quick meal. And if you have a crockpot, you can simply throw in some ingredients and then come home from work with a fully cooked meal. These tools are worth the cost because they make life easier. And if something is EASY, you are way more likely to continue doing it!
Eating well doesn’t have to be difficult. You just need to plan ahead. Proper meal prep is the key to making a healthy lifestyle stick because it makes things easier and gives you less room to make excuses!
How do you prep meals for the week? What are your favorite healthy recipes? Do you use a crockpot or just make tons of leftovers?


