Blog Archives
Bodyweight Exercises To Challenge Your Entire Body
I used to think that my strength was measured by the amount I could lift on the barbell.
But the weight you can lift on a barbell isn’t the only measure of strength…nor is it necessarily the best measure of strength.
I mean…What strength is great than the strength to be able to control your own body and be able to perform ANY move you want to!?!
There are so many bodyweight exercises out there that are challenging enough for even the advanced exercisers without adding weight.
Yet often the only ones I see people using are the pull up, push up and single leg squat.
Here are some great, more untraditional, bodyweight exercises everyone should be doing – 10 Untraditional Bodyweight Exercises You Need To Do.

And below are a variety of other articles about bodyweight exercises. Some are great for beginners while others will challenge even the most advanced exercisers.
The 30-Day Home Bodyweight Challenge
Yesterday I mentioned that the easier we make healthy changes, the more likely they are to stick.
And for some people, getting to the gym on a regular basis just isn’t easy. Yes it is an excuse, but it is an excuse that causes many people to fail at reaching their goals.
Which is why I’ve become big into posting home workouts you can do with just bodyweight.
Because I also love butt workouts, today I’m posting a great bodyweight glute workout.
For more workouts like this one, check out The 30-Day Fitness Challenge.
The Home Bodyweight Glute Workout
WARM UP
Stretch and Roll Out:
Calves
Hips
Quads
Hamstrings
Groin
ACTIVATION
Complete 2 rounds of the circuit below. Hold each move for 2-5 seconds at the top so you really feel the muscle begin to work.
CIRCUIT:
12 reps each side Donkey Kicks
12 reps each side Clams
WORKOUT
Do both exercises back to back then rest up to 1 minute between rounds. Between supersets, rest up to 2 minutes.
SUPERSET #1:
10-20 reps each side 3 Count Single Leg Deadlift
10-20 each side Single Leg Glute Bridge (Hold 2-5 seconds at the top.)
SUPERSET #2:
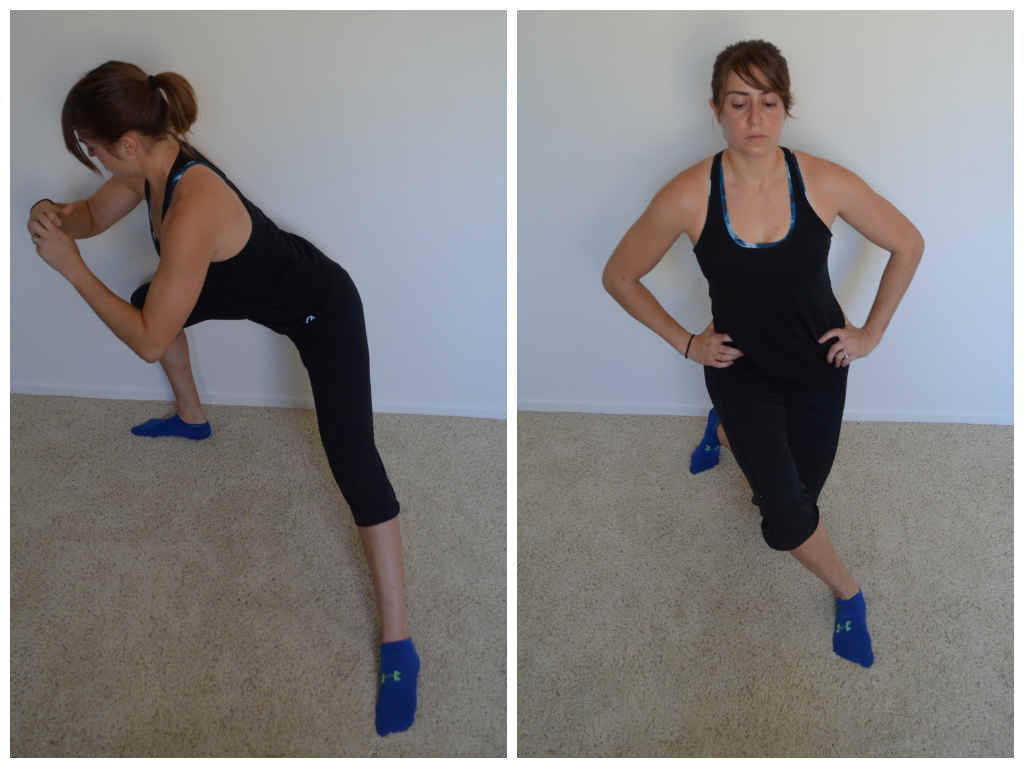
10-15 reps each side Diagonal Lunges (Curtsy to Front Angled. Both lunges equal one rep.)
15-20 reps Reverse Hyper (Hold 2-5 seconds at the top.)
SUPERSET #3:
10-20 reps each side Backward Lunge
10-15 reps each side Fire hydrants (Hold 2-5 seconds at the top.)
COOL DOWN
Stretch and Roll Out:
Calves
Hips
Quads
Hamstrings
Groin
NOTES:
If you have weights at home, you can definitely use them. But slowing down the tempo of each move, or adding in a towel for the back lunge, can also advance the exercise.
EXERCISE DESCRIPTIONS:
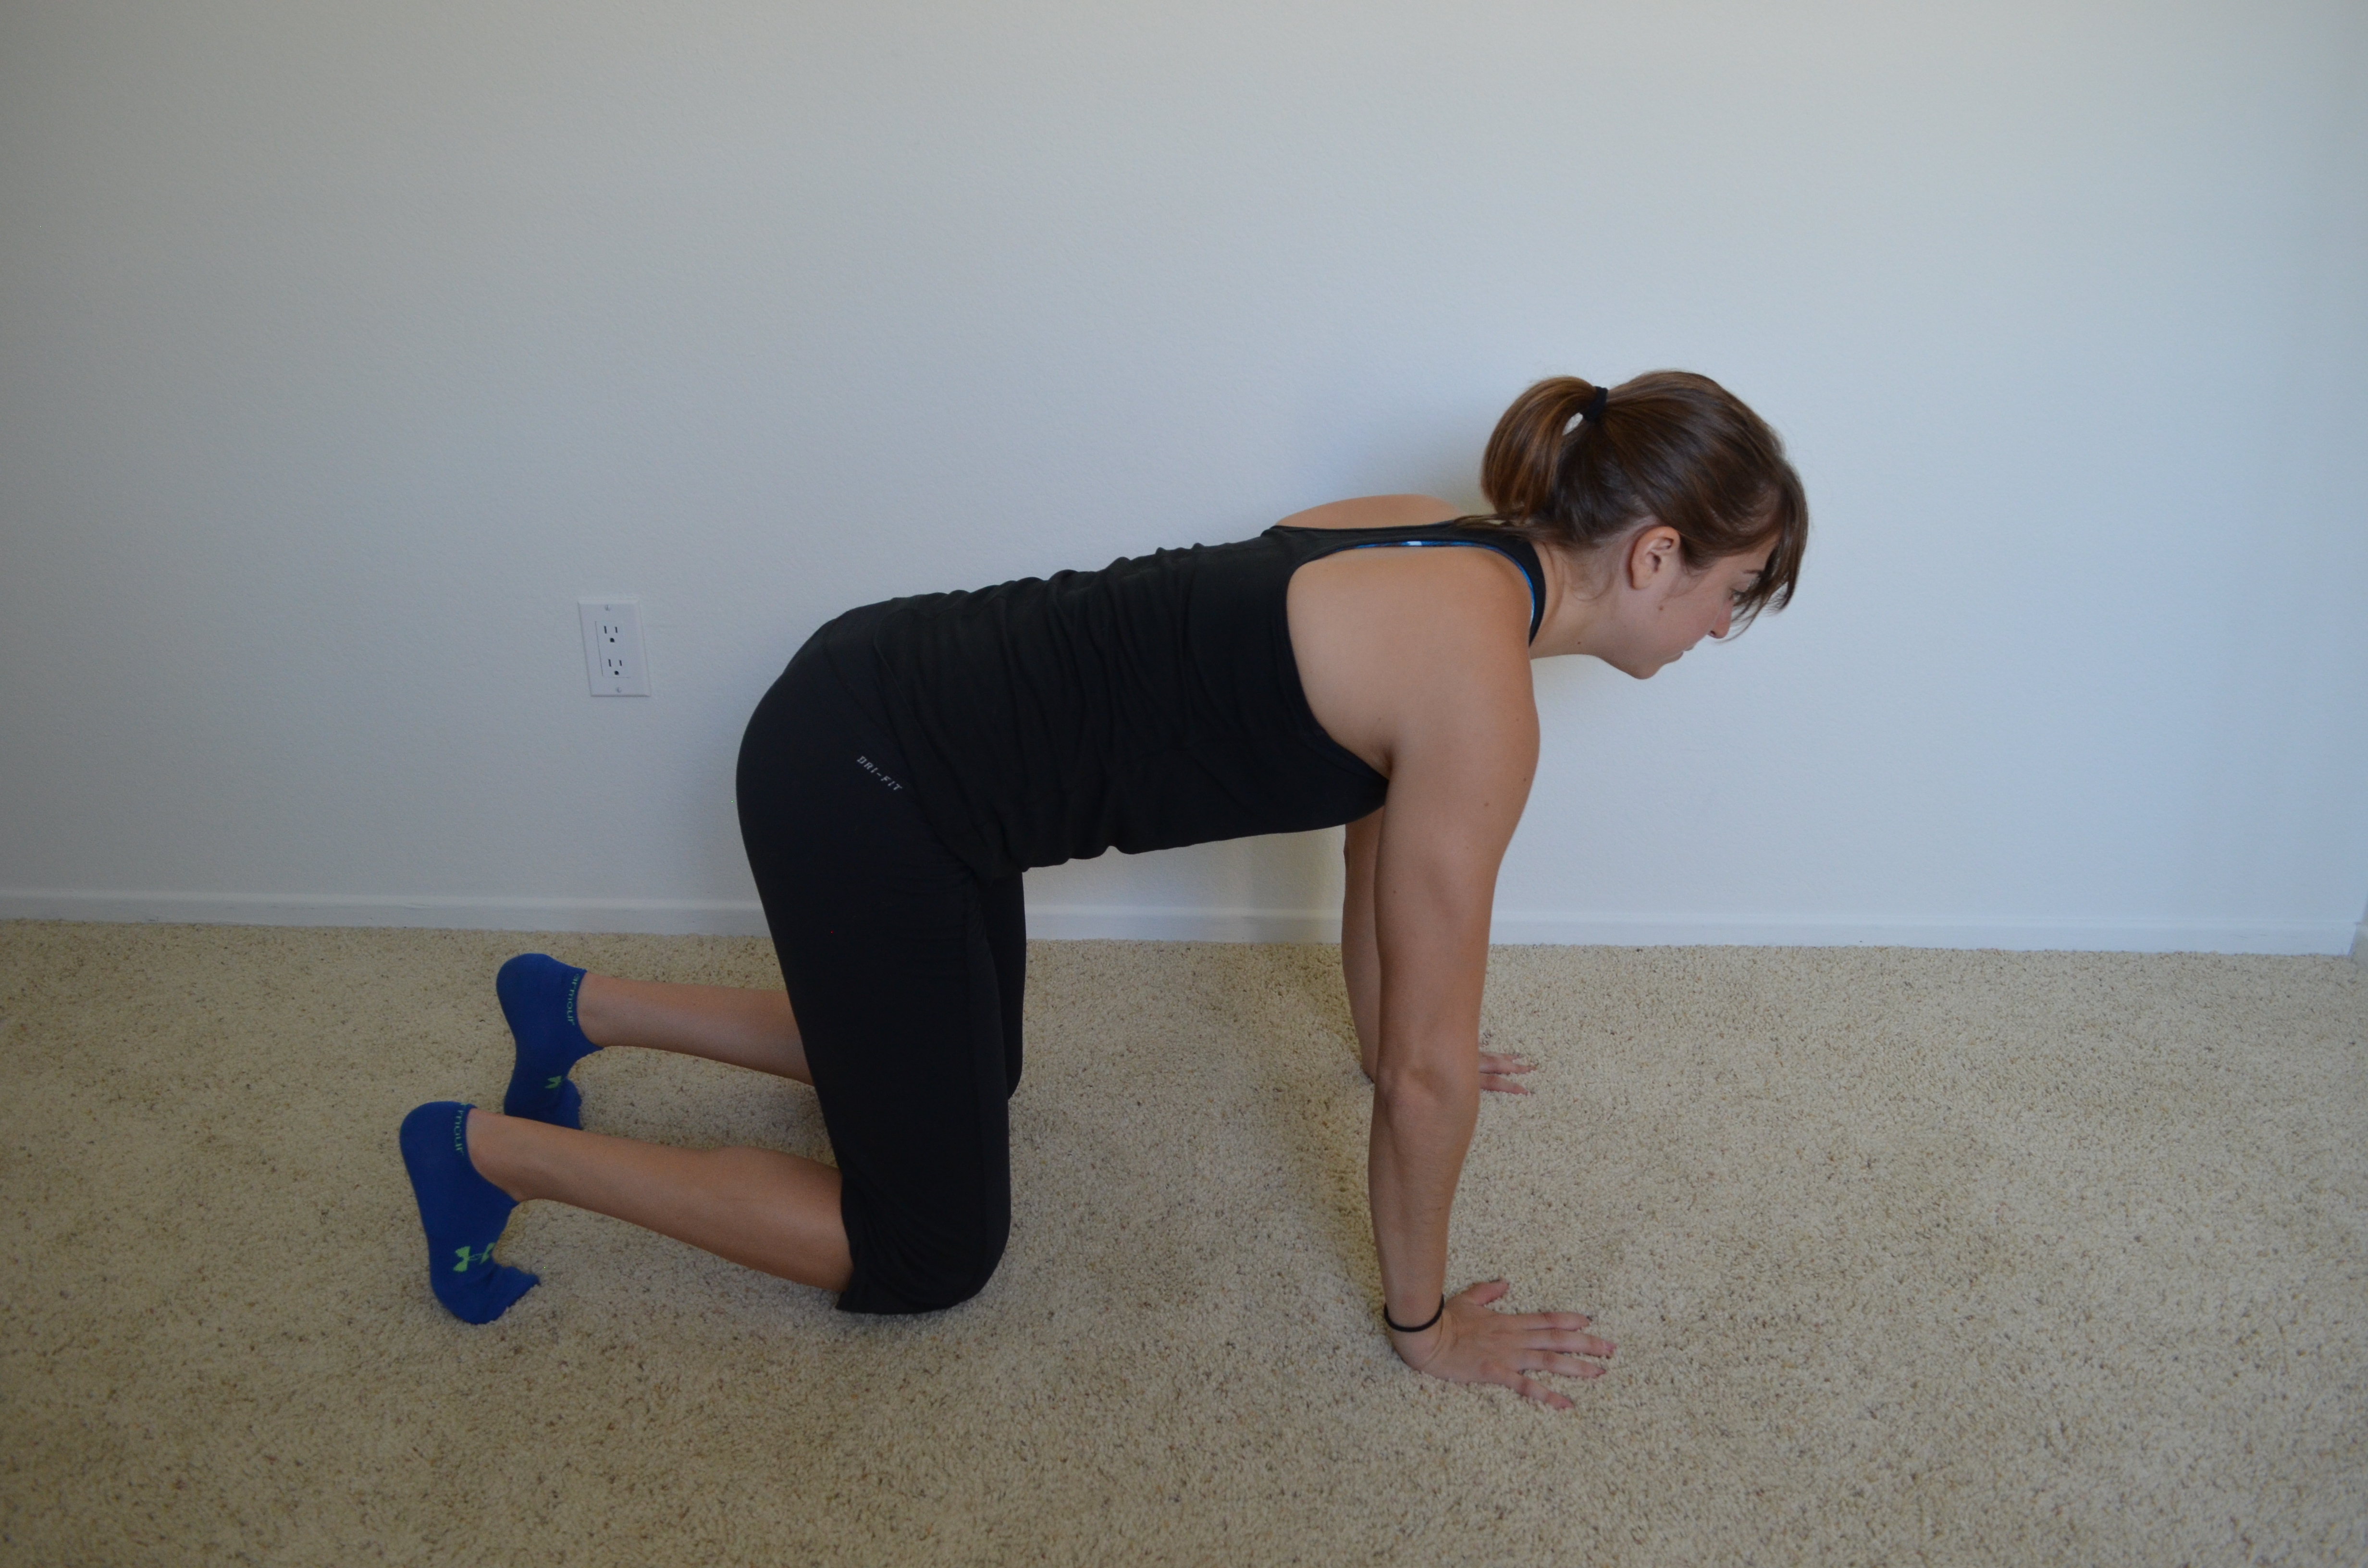
Donkey Kicks – Start on your hands and knees with your hands under your shoulders and your knees under your hips. Flex your feet. Drive one foot back and up toward the ceiling, keeping the knee bent to 90 degrees. Make sure to drive the heel up and back. Do not arch the low back. Squeeze the glute as hard as you can at the top of the lift. You should not feel this in your low back at all if you are squeezing your glute and not arching to get the leg higher. Do not let the knee rotate in or out. Hold at the top and then lower the knee down. Repeat all reps on one side before switching. Do not bend your arms as you perform the movement.

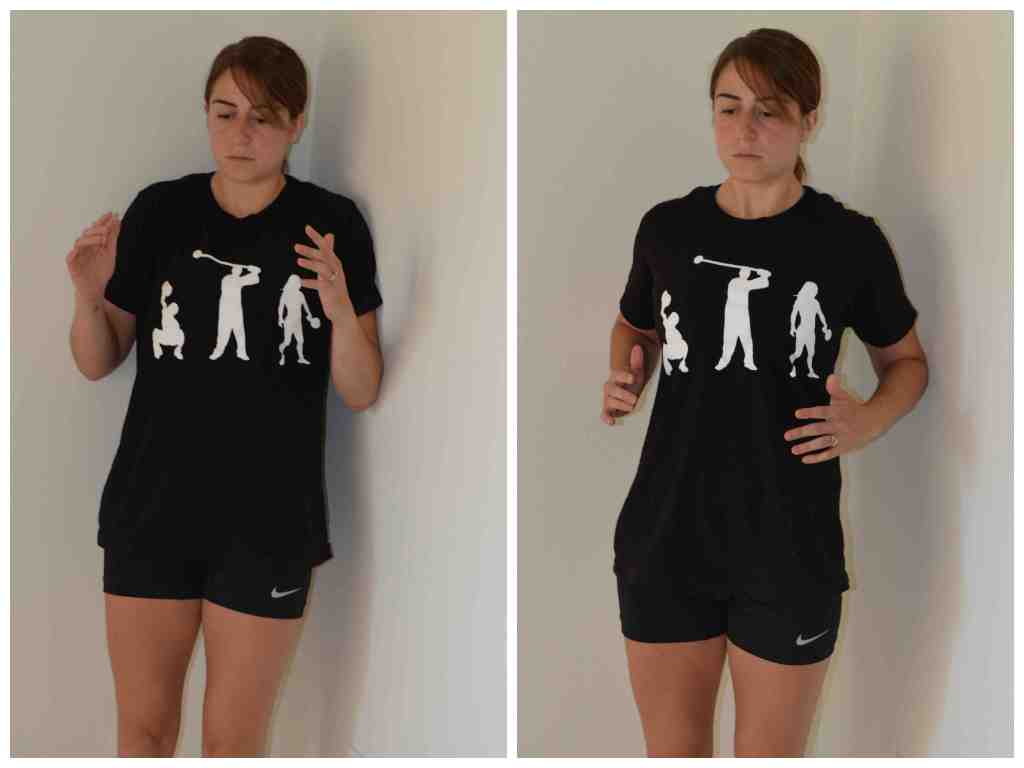
Clams – Lie on your side, propping yourself up on your forearm. Place both legs together, one directly on top of the other. Keep your feet together and bend your knees in a bit. To perform the move, lift the top leg open like a clam opening up. Keep the feet together as you open and don’t allow yourself to rock backward. You want to press your hips forward and squeeze your glutes as you open that top leg. When you first do this move, it can be good to do it against a wall so that you don’t rock backward. To apply some resistance, press down on the top leg with your hand or place a mini band around both legs below your knees. Perform all reps on one side before moving to the other side. Below is a picture with the band.

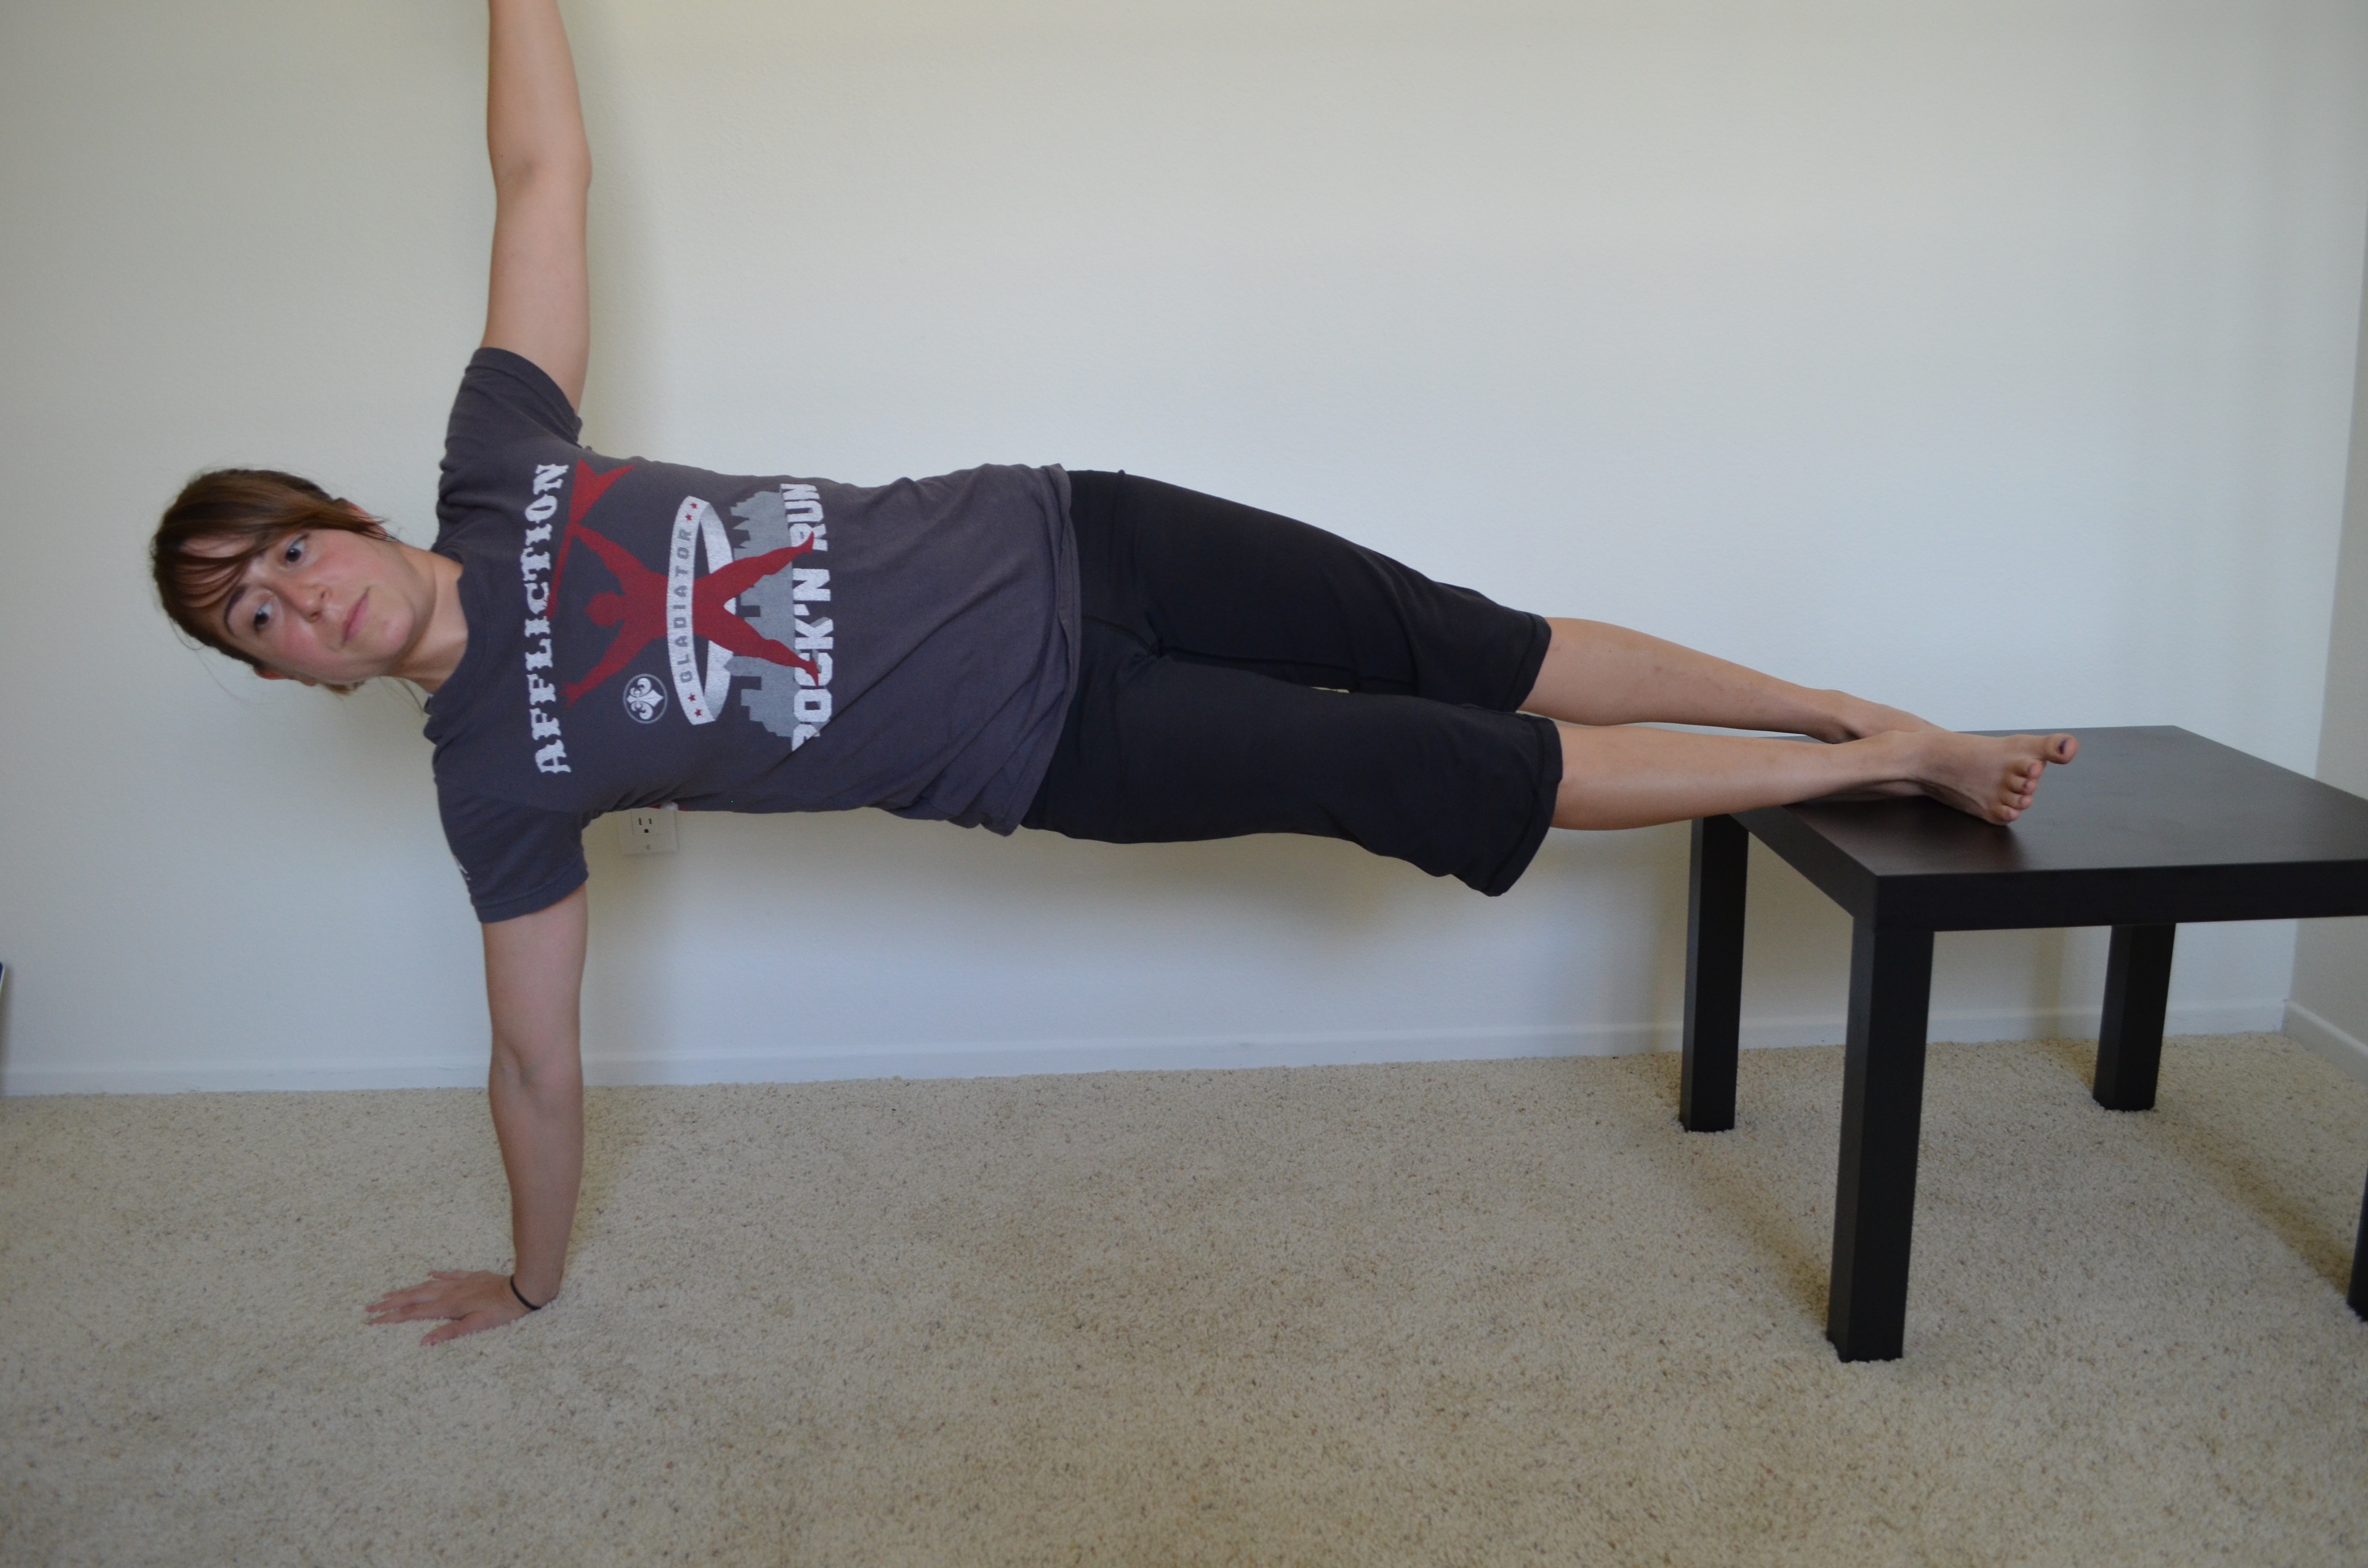
3 Count Single Leg Deadlift – Stand on one foot with the knee of that standing leg slightly bent. Hinge over at your hips, sweeping the other leg back toward the wall behind you. Take 3 seconds to hinge over. Pretend you are driving the heel of that foot straight into the wall behind you. Lean forward with your upper body as you hinge forward, keeping the back nice and flat. Make sure that as you hinge, you are sitting into the heel of your standing leg. Do not lean forward and come up onto the toes of your standing leg. Remember to lower down for a 3 count. To stand back up, drive through the heel of your standing leg and squeeze your glute at the top. Come up quickly. Try not to tap the other foot down at all or at least not till you are fulling standing. Then slowly lower back down, taking 3 seconds to hinge over. Complete all reps on one side before switching to the other leg. You can slow it down to a 5 count if the 3 count becomes easy or you can hold weights in each hand.

Single Leg Glute Bridge (Hold 2-5 seconds at the top.) – Lie on your back with your knees bent. Your feet should be flat on the ground. Try to bring your heels back close enough to your butt that you can just graze your heels with your finger tips. Lift one leg up and bend the knee to 90 degrees. Drive up through your heel on the ground, lifting your hips as high as you can. Keep your core engaged and squeeze your glutes so you don’t feel the move in your low back. Do not let your knees fall together. Your feet should be about hip-width apart. At the top of your glute bridge, you should be driving through your heel and your upper back. Hold at the top of each lift for 2-5s. To advance this move, place your foot up on a table or chair. To regress the move, do a two leg glute bridge from the ground.

Advanced variations
Diagonal Lunges (Curtsy to Front Angled. Both lunges equal one rep.) – Start standing tall with your feet together. Then, starting with the right foot moving, step the right foot across and behind the left leg. Step back toward about “7″ or “8″ on the clock. Do not step too close to the left so that you have space to sink down into a deep lunge. Drop the back knee toward the ground, keeping the front heel on the ground. You should feel the lunge in the outside of your front butt cheek. Then bring the right foot back forward and stand up nice and tall. Beginners will want to pause here while more advanced exercisers will want to go right from the curtsy lunge to the angled front lunge. Step the right foot forward out of the curtsy lunge into a front angled lunge. Move the right foot forward and out to about “1″ on the clock. Both toes should be pointing straight ahead as you bend both knees and sink down toward the ground. Keep your front heel down as you lunge down. Then drive off the front heel to come back to standing. Then go right from the angled lunge back into the curtsy lunge. Repeat until all reps are complete on that side and then switch.

Reverse Hyper (Hold 2-5 seconds at the top.) – Lie face down on a table or bed with your legs hanging off. Make sure your hips are right at the edge. Hold on to something in front of you if you want. Keep your upper body relaxed. Squeeze your legs together and point your toes out. Lift your legs to basically parallel to the ground, keeping your legs straight. Do not hyperextend your back and lift way higher than parallel. You do not want to feel this in your low back. Keep your core tight and really squeeze your glutes as you lift. You can also do this on the ground although it doesn’t give you as big a range of motion.
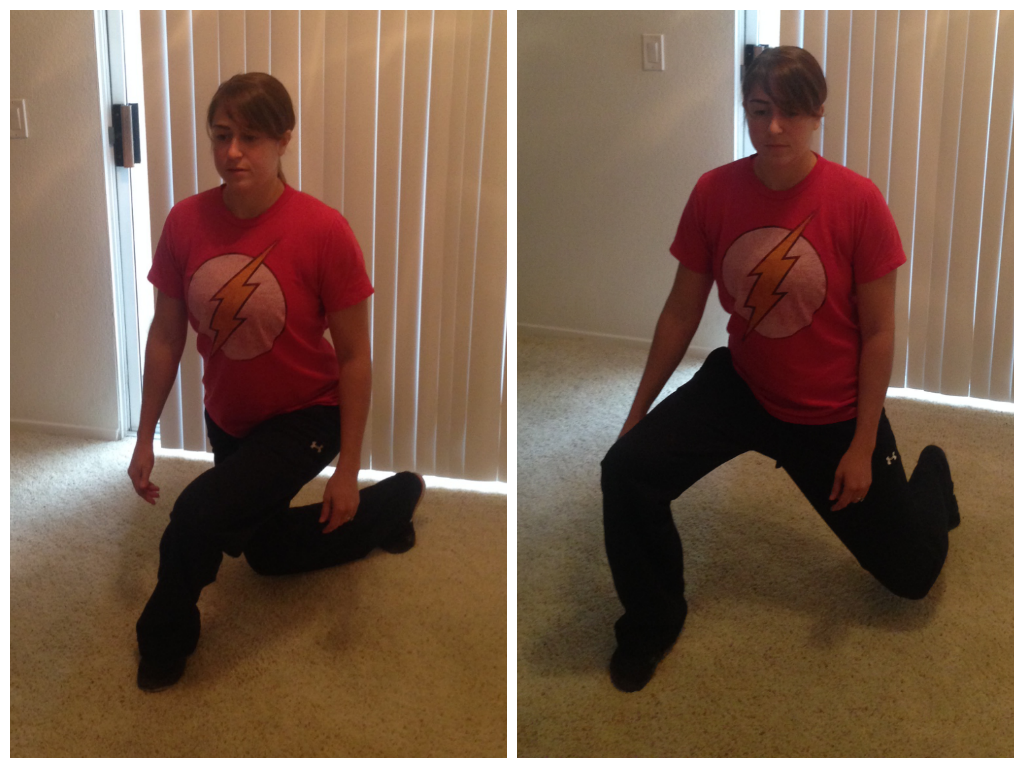
Backward Lunge – Start standing with your feet together. Step one foot back into as deep a lunge as you can handle, bending the back knee and dropping it toward the ground. Your front knee should bend as well, but your knee shouldn’t go forward over your toe. Make sure to really sit back on that front heel and keep your chest up nice and tall. Then, driving through that front heel, come back to standing. Step that back foot back forward. To make the move harder, place a towel or slider under the foot moving back. Instead of stepping, you will slide the foot back into a deep lunge.

The towel backward lunge variation.
Fire hydrants (Hold 2-5 seconds at the top.) – Start on your hands and knees with your hands under your shoulders and your knees under your hips. Both feet are flexed. Keeping the knee bent to 90, lift the leg straight out to the side like a dog peeing on a fire hydrant. Make sure to keep the knee and ankle at the same height. Your foot shouldn’t be way up in the air and your knee shouldn’t be way above your foot. Your lower leg should be in a nice parallel line from the ground. Do not bend your arms to raise your leg higher off the ground. Also try not to lean into the standing leg. Squeeze the glute and hold at the top, keeping the foot flexed. Then lower down and repeat.

Short Workouts Are All The Rage
I’ve been excited to see mainstream media and even mainstream fitness companies promoting shorter workouts.
Even P90X is coming out with a P90X30 (Even though Tony Horton and I have very different views on nutrition, I think he is a workout/exercise genius and always love seeing what he comes up with.)
And while some may think short workouts are just the newest fitness “fad,” there is actually a lot of evidence to prove that they may just be what you need to get truly great results.
That many of us are actually working out for too long.
That short workouts aren’t simply “better than nothing.”
That 15-30 minutes may actually be better for your health and help you reach your goals faster than your hour-long workouts 5 days a week.
Here are some reasons why you should keep your workouts shorter and some ways to maximize your time in the gym.
Just to highlight the some key parts:
- Hormone levels are optimized with shorter workouts. After about 45 minutes of working out, your testosterone levels return back down to normal and your cortisol levels begin to rise. That means less muscle-building hormone is available AND more catabolic hormone (aka a hormone that breaks down muscle tissue) is starting to circulate.
- Mentally you just can’t keep your intensity up for an hour or longer. At some point you lose focus and really can’t push yourself to work as hard as you need to for great results. However, if you keep your workouts shorter, you will stay focused and work hard the entire time.
- It is easy to get a lot out of a short workout by playing with a few workouts variables like shorter rest, heavier weights, more volume, slower/faster repetition tempo…And many of these variables have great health and fitness benefits of their own that aren’t really capitalized on with longer workouts.
Here are also some great 30 minute workouts you can do anywhere.

In case you need something even shorter, you can get great results in just 15 minutes.
Just the other day, I posted a great 15 minute Lower Body Blast. Click here for this great lower body workout.
And below is an upper body 15 minute workout (just so you have a lower body AND upper body option)!
15-Minute Upper Body Blast
WARM UP
Stretch and Roll Out:
Chest/Shoulders
Back/Traps
Lats
WORKOUT
Set a timer for 15 minutes and complete as many rounds as possible in that time. Your goal is to get as much work done as you can in that time. Pick a variation of each exercise that challenges and fatigues you yet doesn’t cause you to go to failure so that you have to spend a lot of time resting.
CIRCUIT:
5-10 reps Dips
5-15 reps Inverted Rows
10-30 reps Battling Ropes Sidewinders
COOL DOWN
Stretch and Roll Out:
Chest/Shoulders
Back/Traps
Lats
EXERCISE DESCRIPTIONS:
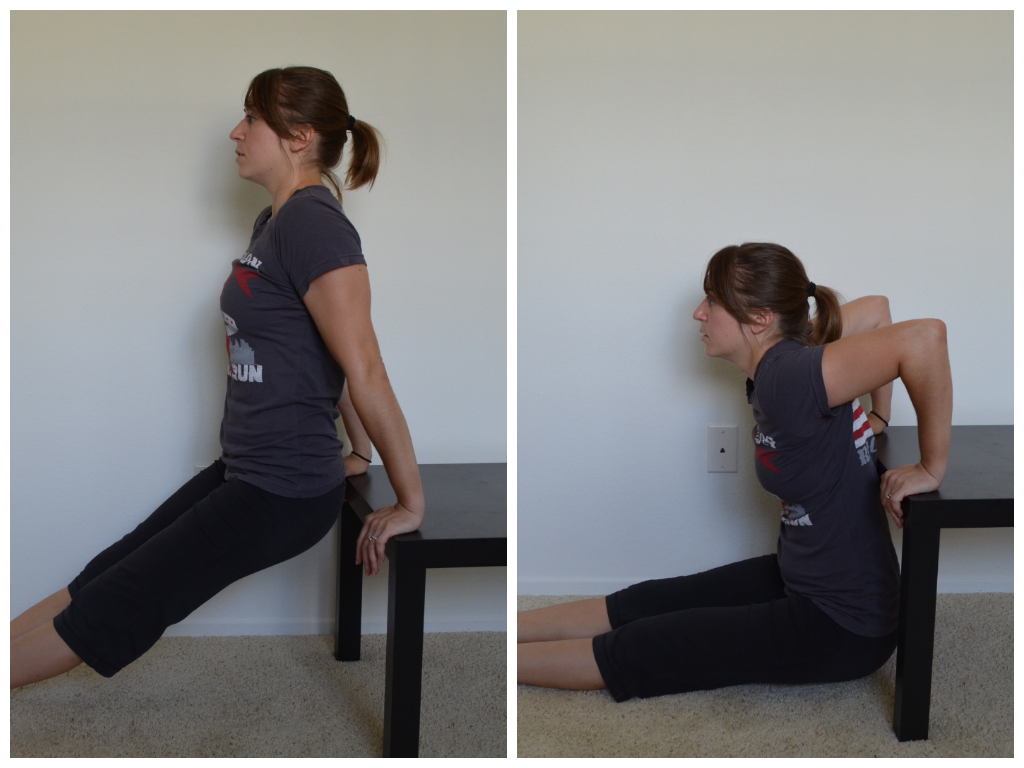
Dips – Beginners may do an assisted variation off of dip bars or parallel bars. They may also do these off of kettlebells or a bench. Advanced exercisers will do full dips and may even add weight to challenge them.
To do a full dip, place one hand on each bar. Press up to the top so that your arms are fully extended. Then slowly bend your elbows and lower your body down. You want to lower yourself down until your upper arms are parallel to the ground. If you can’t get a full range of motion, regress the move so that you can. Then drive back up through your hands until you are fully extended at the top. Keep your core tight so you don’t arch your low back. Do not lean too far forward.
To do this move from the bench, place both hands on the bench behind you. Your finger tips should hang over the bench and face you. Stretch your legs out then in front of you, keeping your butt and back right up against the bench. The straighter your legs are and the further your heels are from your butt, the harder the move will be. To make the move easier, bend your knees and walk your heels back toward your butt and the bench. Bend your elbows and drop your butt toward the ground. Drop so your upper arms are parallel to the ground then press back up. Keep your butt and back right up against the bench. Do not let your body drift forward.
Inverted Rows – Hold a suspension trainer strap in each hand. Walk your feet out so you are leaning back. The closer to parallel to the ground you get, the harder the move will be. Squeeze your core and glutes and press your chest out so there is tension between your shoulder blades. Then row up, keeping your body in a nice straight line. Row until your chest comes up to the handles and then lower yourself back down. Don’t let your hips sink as you lower back down. Also, keep your chest pressed out the entire time (do not let your low back arch though). When you pull back up, don’t bounce off the bottom. If you don’t have a suspension trainer, you can use a smith machine bar or barbell set up low. If there is no bar or XT/TRX on which to do rows, do scapular push ups or corner rows.

Battling Ropes Sidewinders – Loop the rope around an anchor and hold one side in each hand. Keep more slack in the rope than you would with other battling ropes moves. Relax your arms down straight and stand with your feet between hip-width and shoulder-width apart. Bend your knees slightly and don’t be afraid to hinge forward a little. Then sweep your arms to the right, rotating through your core even pivoting a little up onto your left toes. Do not pull to far around. Then quickly sweep your arms to the left. You want to quickly push and pull with your abs to sweep the rope back and forth. Keep your arms more relaxed and only slightly bent. Your arms and the rope should stay out in front of you. The ropes should make snake-like waves on the ground and swish side to side. They should not move up and down off the ground. Make sure you do not round your back as you create the waves. Keep your chest up even if you slightly hinge forward as you create the waves.
If you don’t have a rope or the space to do sidewinders, you can do rotational med ball throws or even a russian twist. You want to pick a move that will work your core and, preferably, get your heart rate up just a teeny bit.
What are your favorite quick workouts?
Have you started integrating shorter workouts into your routine more often or do you feel like a workout doesn’t count if it isn’t at least an hour?
Bodyweight Home Exercises – Best Lower Body Moves
A bit ago I did a post with the 10 Best Bodyweight Upper Body Moves and today I wanted to take a second and go over 10 of the best lower body moves.
Bodyweight exercises are great to have on hand this time of year – when we are traveling, busy with family and the holidays and generally a little bit lazier about going outside on the weekends because it is cold.
The 10 Bodyweight Lower Body Exercises below don’t require much space and can easily be done in the comfort of your own home! (Shoot…they could even easily be used to create a home workout that the whole family can do together while gathered around for the holidays!)
1. Single Leg Deadlift (with slow eccentric) – Stand on one foot with the knee of that standing leg slightly bent. Hinge over at your hips, sweeping the other leg back toward the wall behind you. Pretend you are driving the heel of that foot straight into the wall behind you. Lean forward with your upper body as you hinge forward, keeping the back nice and flat. Make sure that as you hinge, you are sitting into the heel of your standing leg. Do not lean forward and come up onto your toes. To stand back up, drive through the heel of your standing leg and squeeze your glute at the top. Try not to tap the other foot down at all or at least not till you are fulling standing. Complete all reps on one side before switching to the other leg. To make the move harder, slow down your hinge over. Take 3-5 seconds to hinge over before you quickly stand back up. You can even slow down the stand back up or hold for a second or two while hinged over.
2. Single Leg Deadlift Hop – Stand on one leg. Hinge over, pushing your butt back and leaning your chest forward. Swing the leg off the ground back toward the wall behind you. Keep your back flat as you hinge over. Hinge over quickly, bending the standing leg just a little. Then quickly drive back up to standing, bringing your chest up nice and tall. As you drive up, explode up off the ground and drive the back leg forward, bringing the knee up. Then land back on the same leg and hinge back over before jumping back up. As you hinge over and drive up, you may want to swing your arms as if running with the opposite arm and leg working together. Make sure that as you hinge over your weight is in the heel of your standing leg. You want to also drive off that heel to really power your hop up.
3. Balance Lunge – Place your back foot up on a table, bench, chair or box. Hop your front foot out so you are in a nice wide stance with your back foot up on the bench or table. Then sink down, dropping your back knee toward the ground. Really sit back into the lunge. Make sure you aren’t going forward and that your weight is in your front heel and your front knee is not going past your toe. You should feel a nice stretch in the front of the leg that is back when doing this move. Beginners may want to use a super low box or do the move from the ground as a split squat.

4. Single Leg Squat – Choose a variation of the single leg squat that is right for you. Beginners may use a table or chair while more advanced lifters may use a doorway or a super low table or chair. If you can do a full pistol squat or use a plate weight to counter balance you, do that variation. Choose as hard a variation as you can do. To perform the basic single leg squat to a table, you will start by standing on one leg. Hold the other leg straight out in front of you. Lower yourself down until you are sitting on the table. Then driving off the heel on the ground, stand back up. Do not lean way forward or touch your raised foot to the ground. If you use a table, the more you allow yourself to sit down, the easier the move will be. The more you just lightly touch the table and come right back up, the harder the move will be. Also the lower the table you use or the lower down you go on any variation, the harder the move will be.

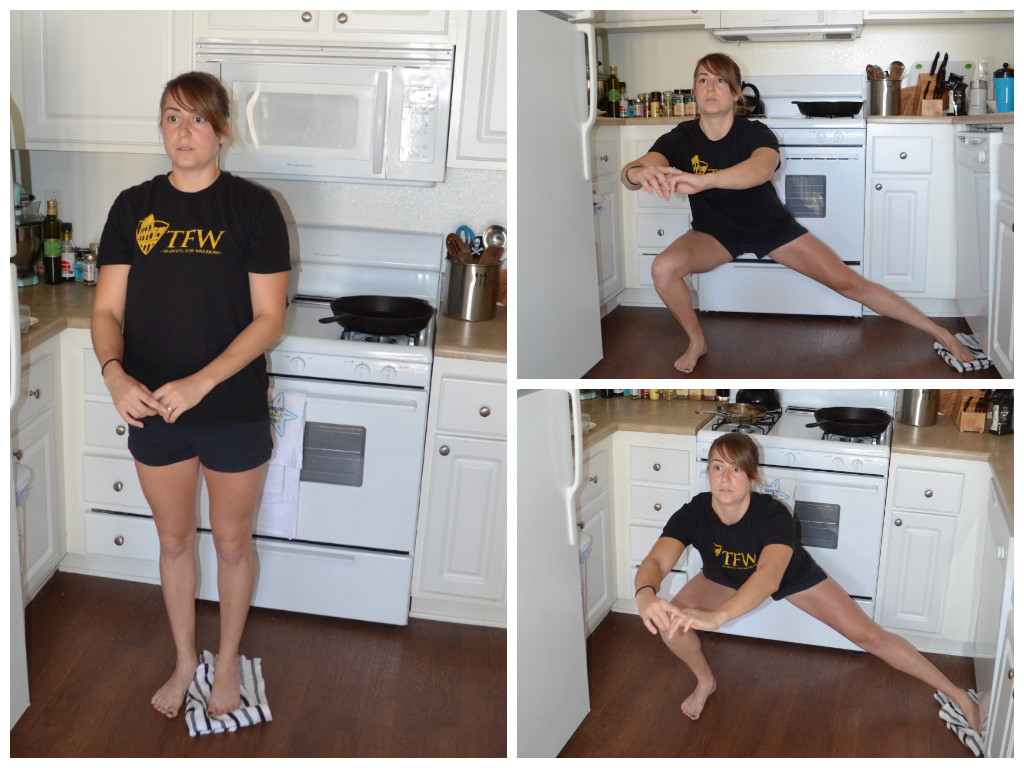
5. Towel Lunges – Side Lunges, Reverse Lunges, Curtsy Lunges…All can be made more difficult by putting a towel under the foo that is moving. For more details about the towel lunges, click here (and some other great towel exercises!).
6. Skater Series – You can do a hold, side touches or even backward touches. For the hold, place your feet no more than a couple of inches apart. Sink down as low as you can, sitting your butt back while keeping your chest up. This squat is very similar to the chair pose in yoga. Do not let your back round and try to sink as low as possible, getting as close to parallel as possible. Hold in that low squat. To do the touches, once you sink down as low as possible with your chest up, you are then going to tap one toe at a time out to the side. You should stay low in the squat and not shift your weight. Keep your weight centered over the standing leg. Straighten the other leg out to tap the toe to the side. Do not let your weight shift as you touch. All your weight is in the standing leg. Alternate toe touches to each side until the time is up. For the backward touches, you are then going to tap one toe at a time backward. You should stay low in the squat and not shift your weight backwards as you lunge back. Keep your weight centered over the standing leg. Straighten the other leg back and just tap the toe. Do not let your weight shift into the foot touching back as you touch. All your weight is in the standing leg as if you are holding the isometric squat still. Do not come out of the squat as you touch back.
7. Glute Bridge (Off Table/Chair) – Beginners should do a single leg bridge from the ground or even a two leg bridge if they can’t get their hips up as high with the single leg bridge. Intermediate exercisers may want to do a two leg glute bridge with their heels up on the table. The single leg glute bridge off the table is an advanced progression. To do the glute bridge off the table, place your heels up on the table. Your butt should be right against the edge of the table. Bend your arms to 90 degrees with just your upper arm on the ground. Lift one leg up and point the toe toward the ceiling. Do not bend that leg or use it to help you bridge up. Drive through the heel on the table and press your hips up as high as you can. Squeeze your glutes and keep your core tight as you bridge up. Hold for a second or two and then lower down. Complete all reps on one side before switching.
8. Kneeling with Jump to Squat – This is an advanced move. It may be a challenge for many beginners to even do a step up from kneeling. To do the kneeling jump to squat, start on your knees with your knees about hip-width apart. Flex your feet. Sit your butt back and swing your arms back a bit so you are slightly hinged over. Hinge back and launch yourself from your knees up onto your feet in a low squat. Then stand all the way up. Once you are standing tall, step one foot back and come back to kneeling. As soon as you are kneeling again, hinge a little and jump back up to your feet. If you have a nice mat, you can jump back to kneeling, but this is not recommended unless you have a really nice mat.
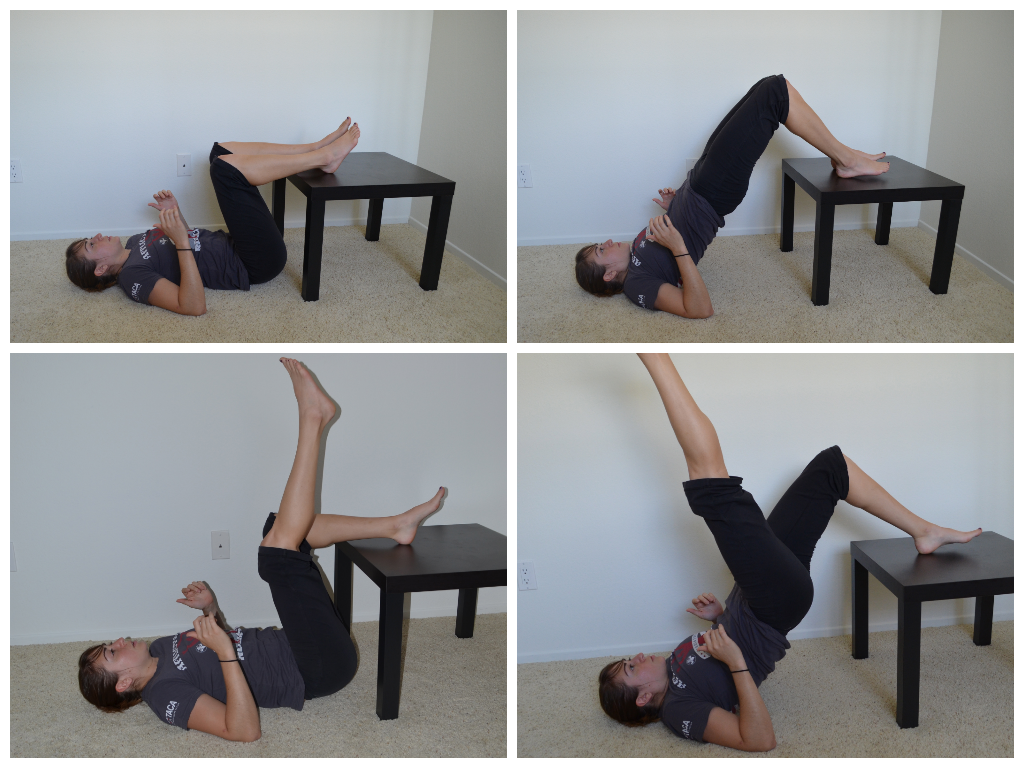
9. Reverse Hypers – Lie face down on a table. Make sure your hips are right at the edge. Hold on to something in front of you if you want. Keep your upper body relaxed. Squeeze your legs together and point your toes out. Lift your legs to basically parallel to the ground, keeping your legs straight. Do not hyperextend your back and lift way higher than parallel. You do not want to feel this in your low back. Hold for 2-5 seconds and then lower down. Keep your core tight and really squeeze your glutes as you lift. If you don’t have a table to lie on, you can do this from the ground. Lie on the ground and relax your upper body. With your legs straight and heels together, lift your legs up as high as you can. Squeeze your glutes and get your quads off the ground.

10. Lunge Matrix (or part of it) – The lunge matrix basically tells you that you can lunge in every direction – forward, forward at an angle, to the side, back at an angle, straight back, back and crossed behind and even forward and crossed in front. If you think as yourself as lunging on a clock, you can literally lunge all the way around the clock. Sometimes I like to combine two or three lunges in a sequence. Or you can do a 360 lunge series, combining all seven and lunging around the clock!
This is a backward angled lunge and a front lunge across.
This is a curtsy lunge and front angled lunge. Two other lunges in the matrix
Bonus Moves:
Of course any jumping moves are also great options to help you challenge yourself without any weight. Squat jumps, skater hops, split squat jumps, tuck jumps are all also great options!
What are your favorite lower body moves to do at home?
Bodyweight Home Exercises – Best Upper Body Moves
Recently I’ve heard too many complaints about people not being able to fit in their workouts.
And when I tell them, “Well just set a timer and do a 15 minute workout AT HOME.” (Because, let’s face it, all of us have 15 minutes we can spend working out especially if we don’t have to waste any time on travel!)
They tell me, “But I don’t have any equipment at home!”
Well that is no excuse! While I’ve written numerous articles with bodyweight exercises you can do at home, today I would like to focus on some of the best UPPER BODY moves you can do.
Many people can think of a ton of lower body moves to do (squats, squat jumps, lunges, chair step ups), they often can’t think of a variety of upper body moves to do.
So here are some great Bodyweight Upper Body Moves that you can easily do at home that will challenge everyone from the beginner to even the most advanced lifter.
There are honestly more than 10 listed here since I think we often forget about all the options out there and skip our workouts because we are bored doing the same 3 moves over and over again.
1. Handstands – Whether you are new to handstands and need to start with a modified downward dog or you can hold a handstand without any support, handstands are a GREAT upper body move. They work your shoulders, triceps upper back and core. They are also FUN and can easily be made to challenge any level. Go to Redefining Strength and download the bodyweight guide for more handstand variations!

2. Scapular Hold – If you’ve read more than one article on this blog, you know by now that I LOVE scapular holds or Batwings. These are a great way to work your back and improve your posture (and lessen neck and shoulder pain!). The basic variation of scapular holds is done against the wall. You can also do this against the ground if you are really up for a challenge; HOWEVER, progressing down to the ground isn’t really necessary if you really focus on activating the correct muscles while against the wall. The scapular hold can also be made into a dynamic move called the Corner Row. The corner row works the same muscles although I do find it challenges the core a bit more since you must hold your body in a straight line while moving. Both are essential for less pain and better posture!
3. Push Up variations (T-push ups, incline, close grip, wide grip, push up to fly, push up to dip, divebombers…) – Push ups can be made easier for the beginner (incline) or more advanced for the experienced exerciser (decline). They can also be made to focus more on the shoulders, chest or triceps. They are a great move to work your chest, shoulders and triceps as well as your core. Here are even more push up variations if you are bored with the ones you’ve been doing.
Remember the push up to fly!?!
4. Scapular Push Ups – A great push up variation to work your upper back. While you may only perform an inch or two of movement, this is a hard move that really works the lower traps. Great to improve posture and alleviate neck and shoulder pain! You can make this easier by doing it from your knees. You can also change it up by doing this move from your forearms instead of your hands.
5. Crawls – Forward, backward, sideways, circles… Bear crawls, alligator crawls, crab crawls, gorilla crawls…All these crawls work your shoulders, triceps, core and even your quads. PLUS they are a great way to get in some cardio! With crawls I often hear the excuse that people don’t have enough room to do them, but all you need to be able to do is take a step or two forward and a step or two backward. And you can keep things interesting by mixing up the type of crawl you do. Shoot, sometimes simply doing crawls for your workout is enough!
6. Plank variations (plank with reach through, plank with reach out, plank holds, climbers) – Planks don’t just work your core. They are a great way to develop shoulder stability and work your upper body as well as your abs. Planks are more than the basic isometric hold we see done so often. They can also be a dynamic movement like climbers or plank with reach out.

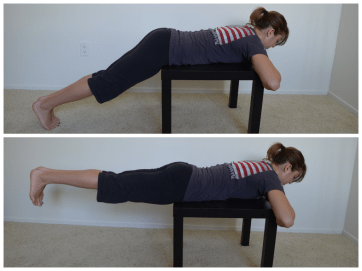
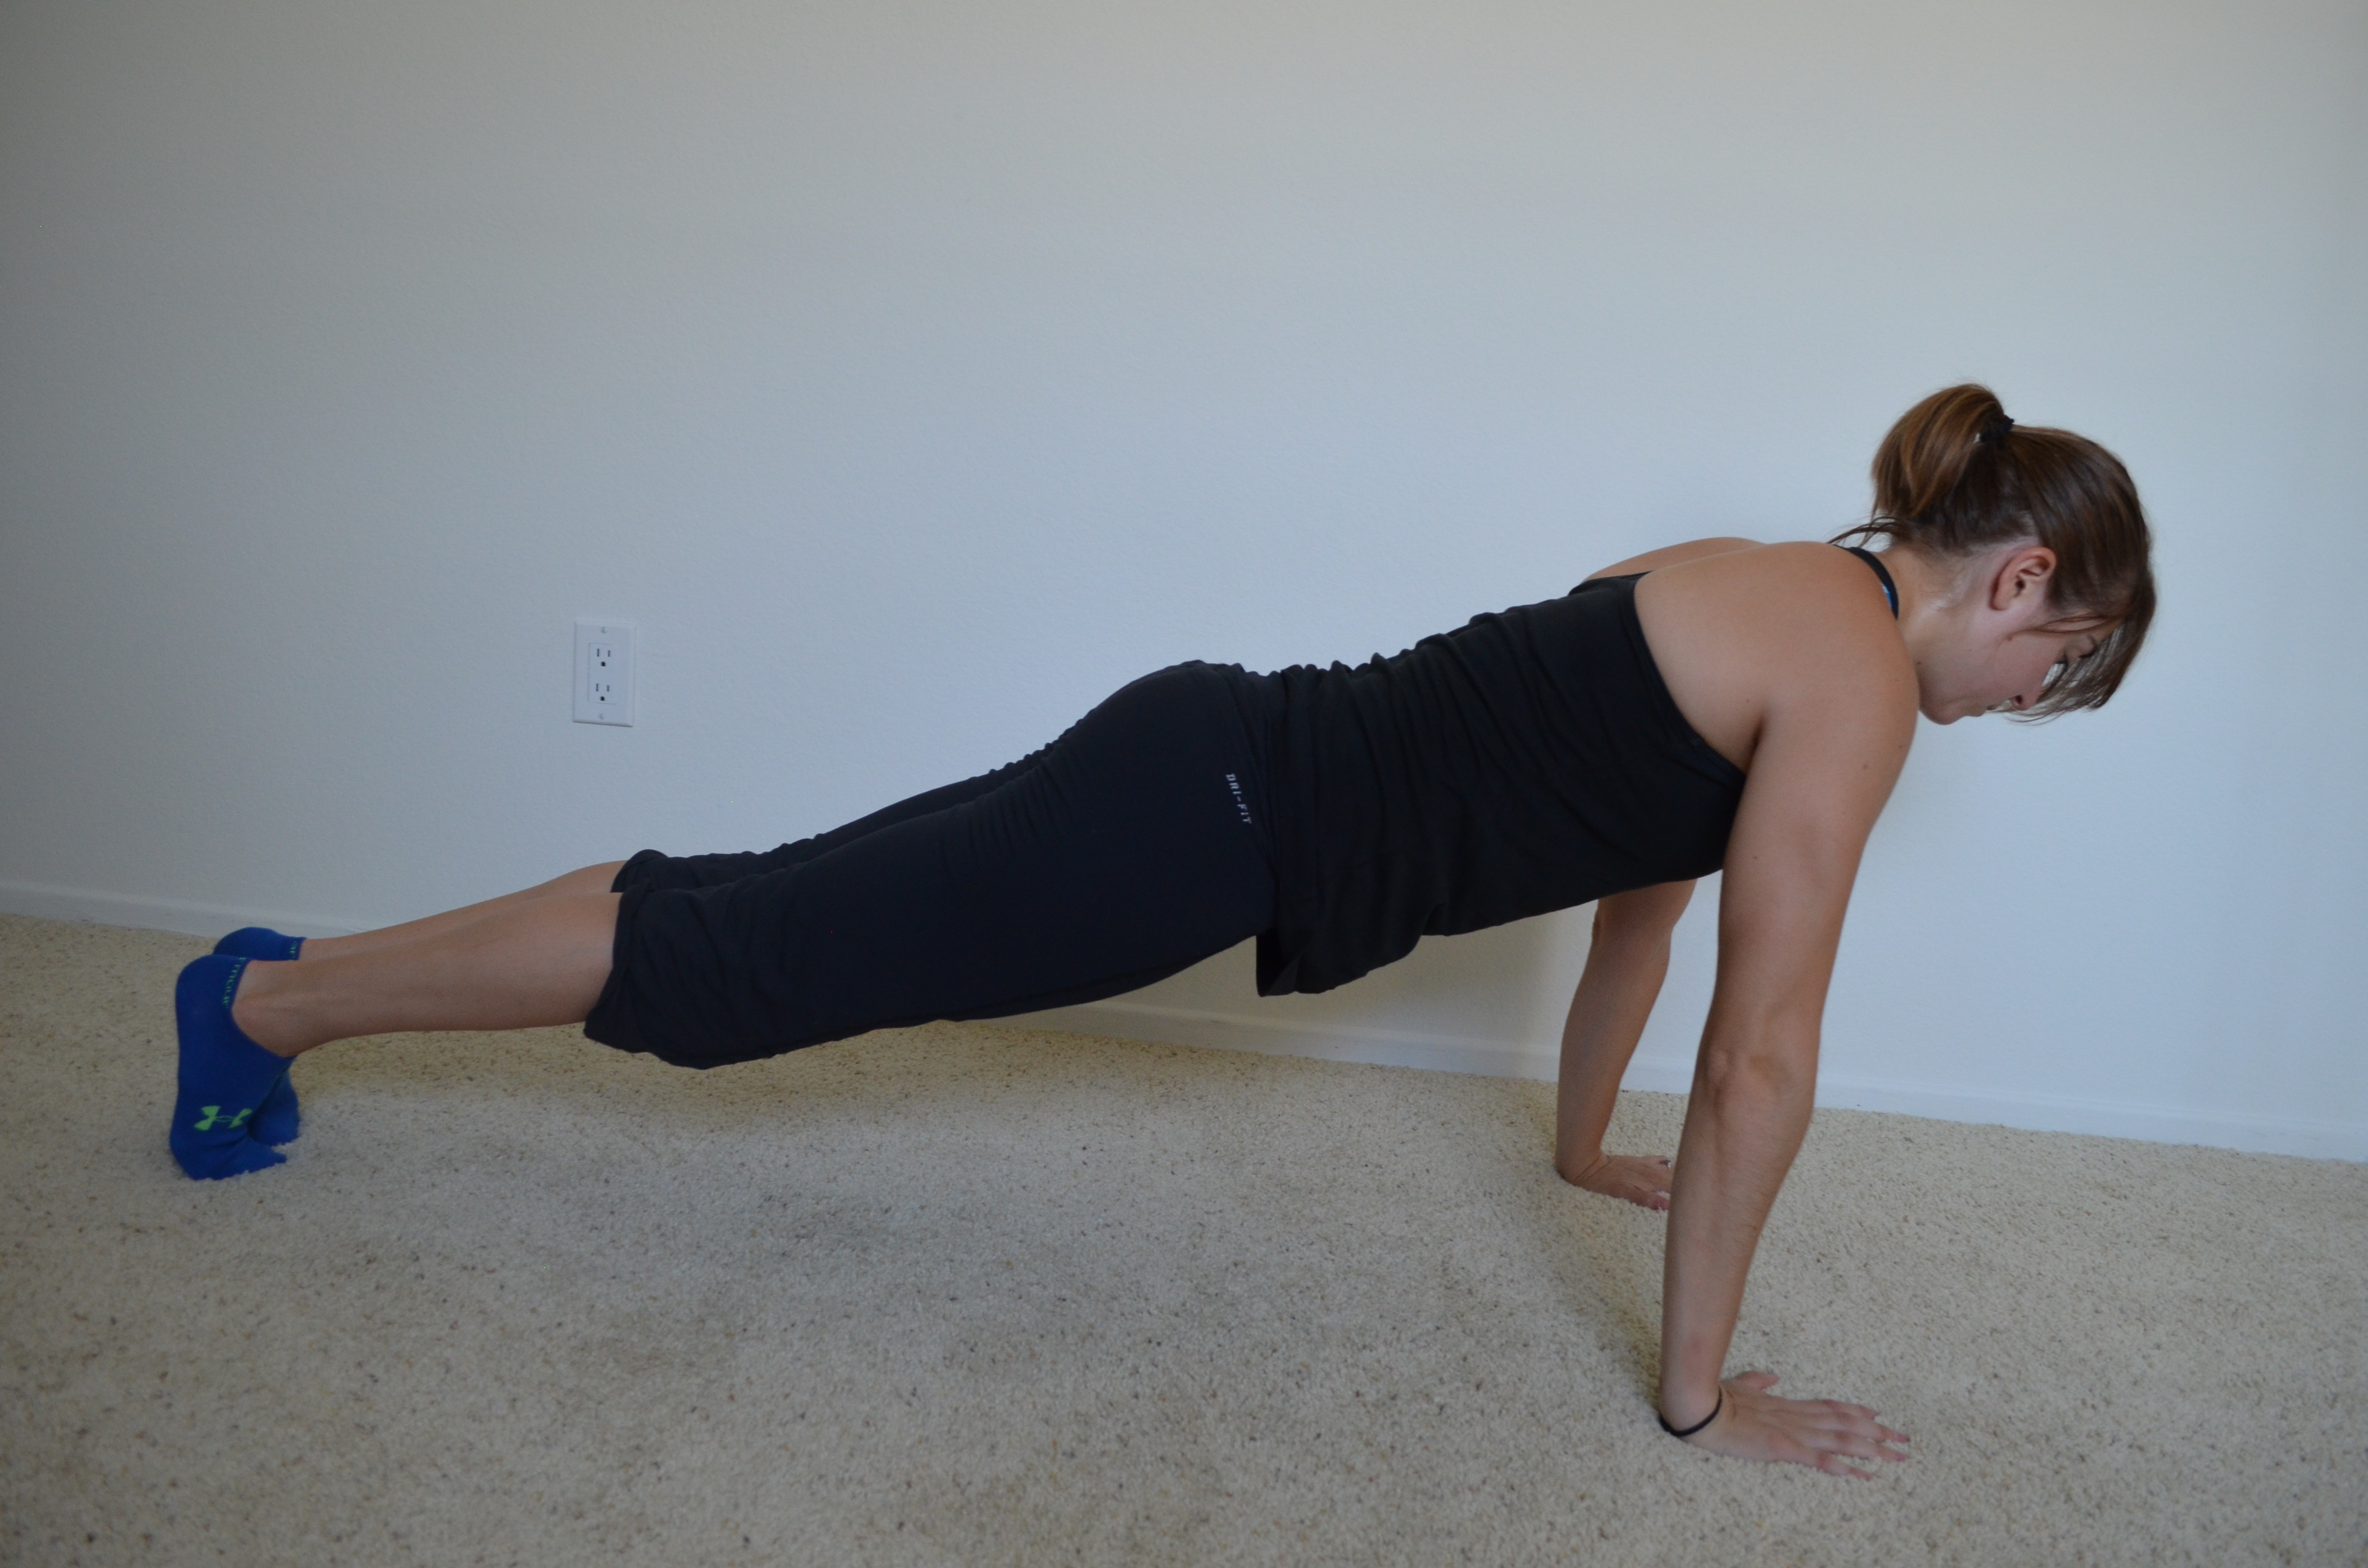
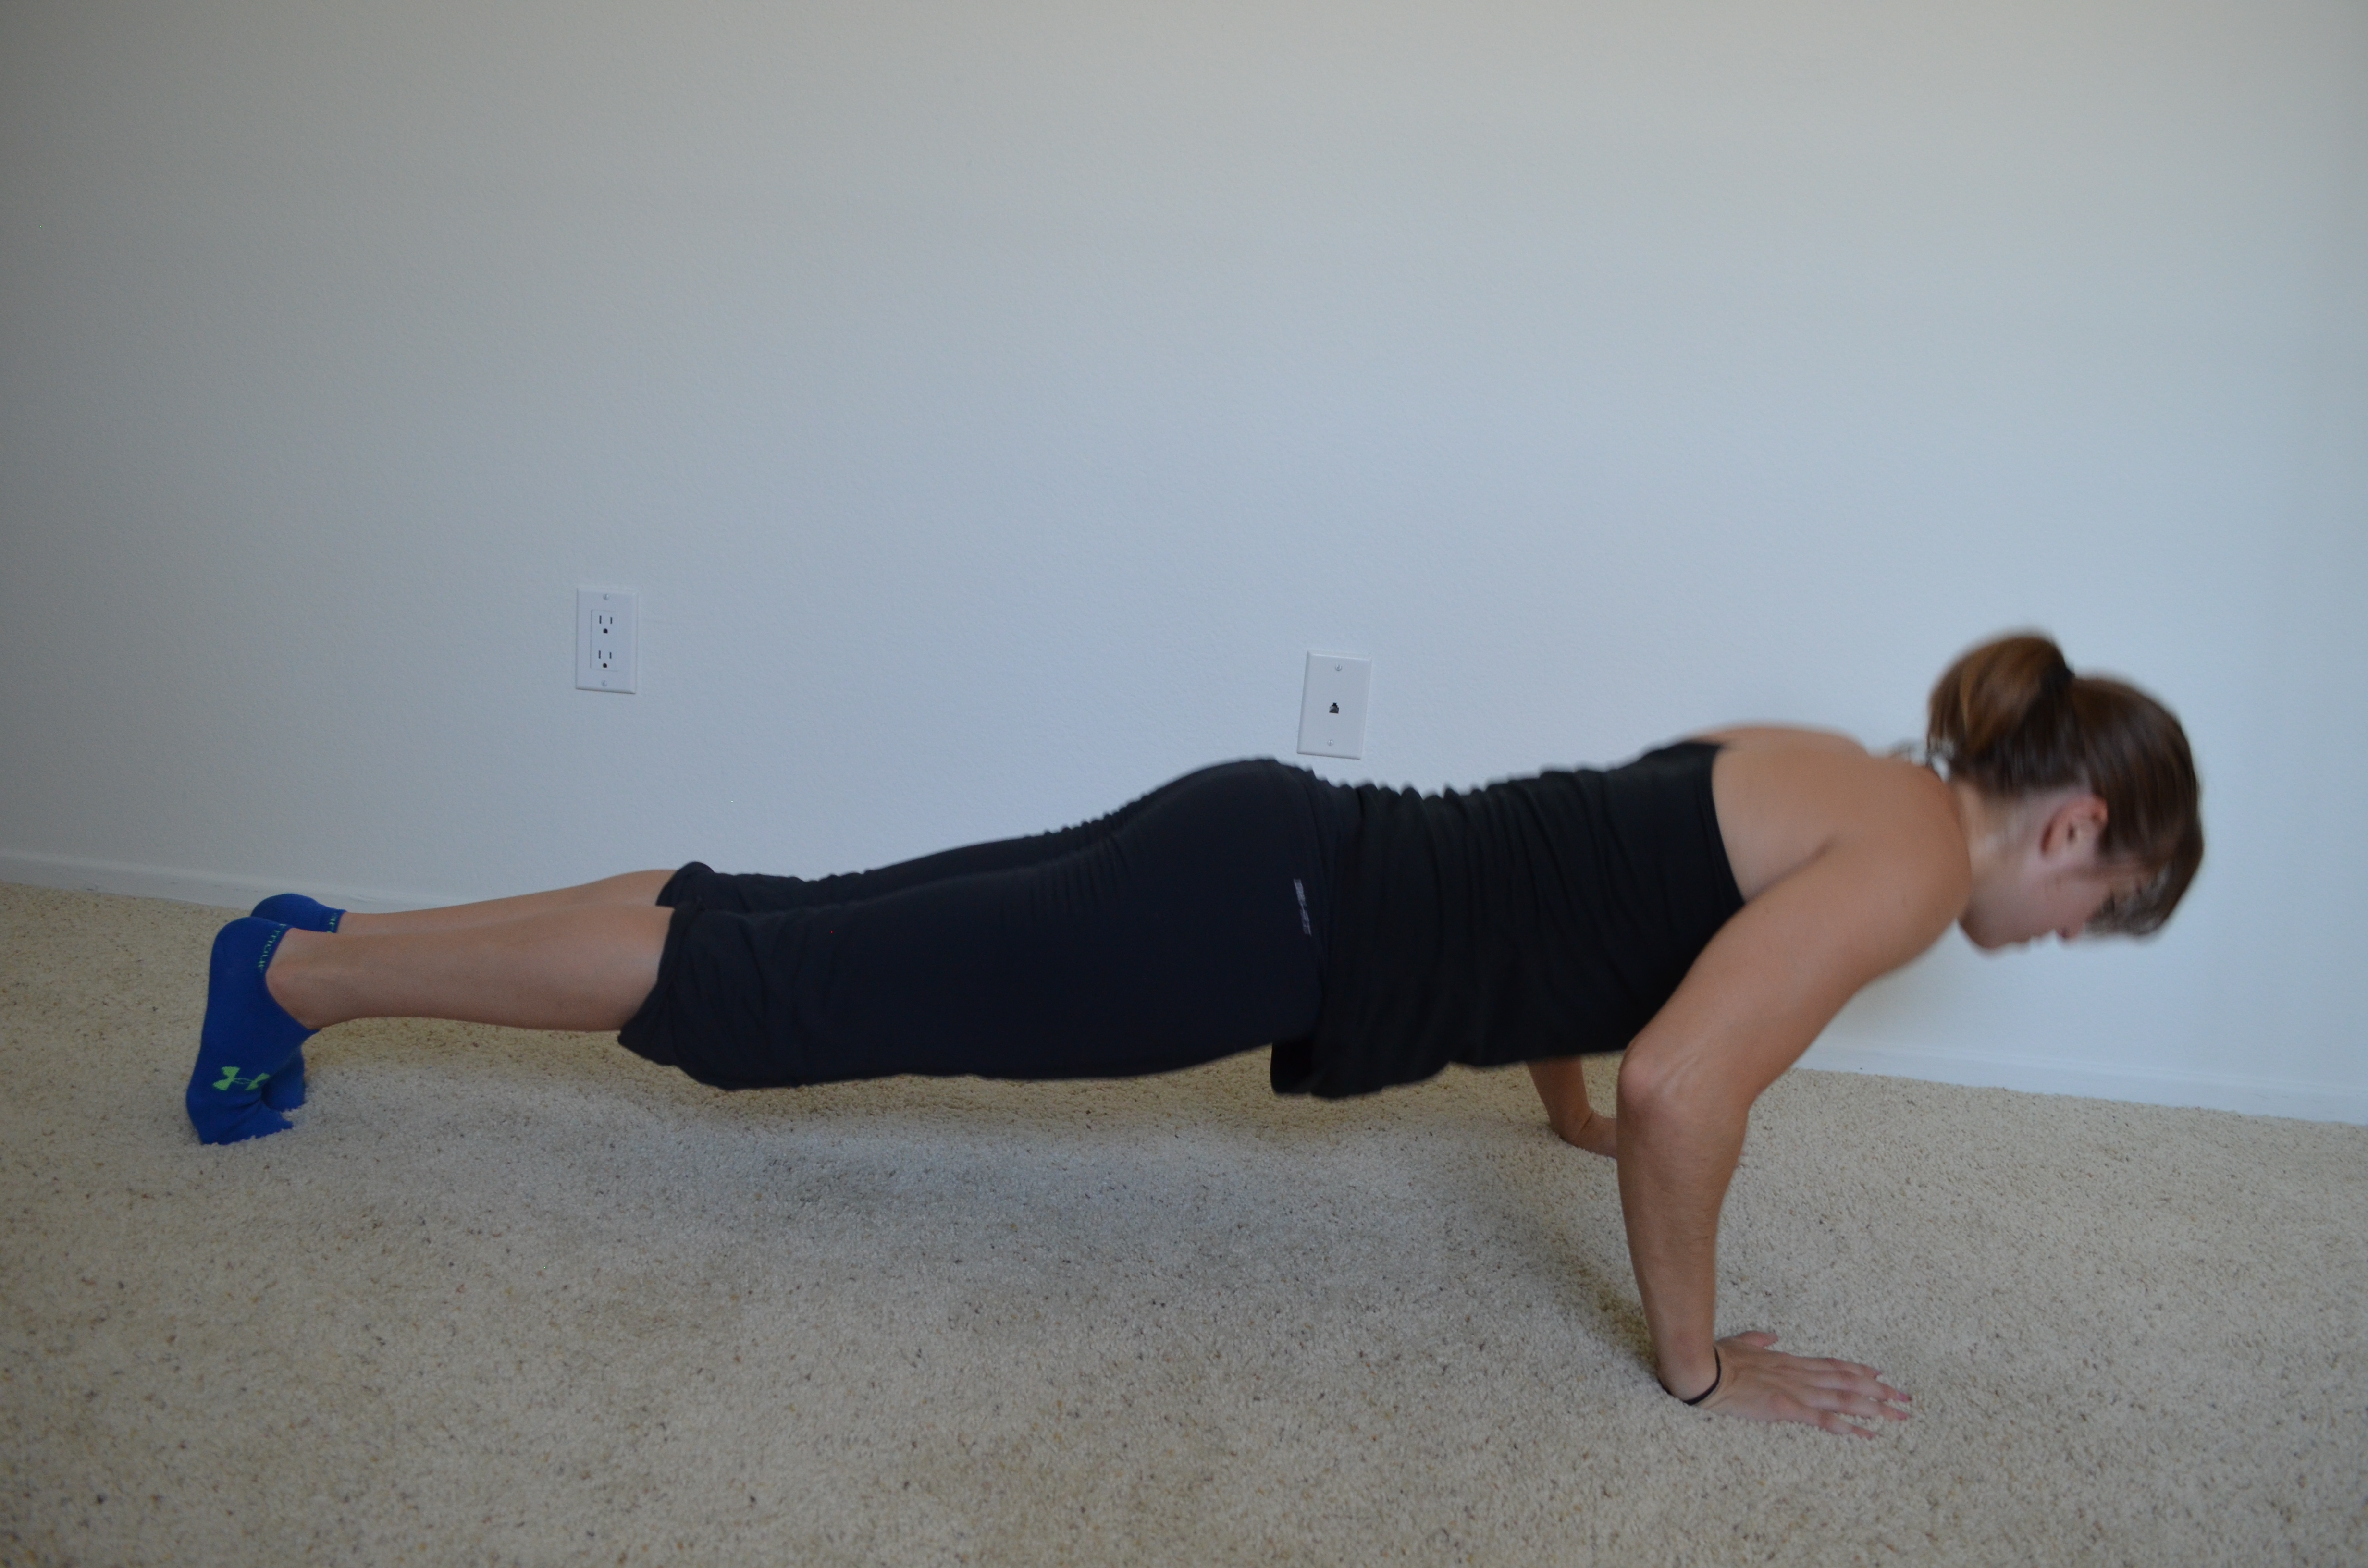
7. Posterior Plank – A great move for your entire backside, the posterior plank works everything from the back of your shoulders down to your ankles. You can advance this move by doing a single leg variation or you can make it easier by bending your knees a bit instead of having them out straight. Every time I do this move, I can’t help but think of Flash Dance.
8. Towel Lat Pulldown – A great way to work on those pull ups even when at home without a pull up bar (although I do think a doorway pull up bar is a great investment!). This move helps work on scapular retraction and lat activation. It is also great if you have overactive upper traps and suffer from shoulder and neck pain!

9. Towel Taz – One of my favorite cardio moves that also works the shoulders and can be done at home, or in your hotel room, with something we all have…A TOWEL. While you want to make sure you aren’t in a place where you can knock things over, you don’t actually need much room to do the Towel Taz. Flap the towel up and towel or press your arms in and out. Both will work your upper back, shoulders, triceps and core. (Plus if you move around quickly, your legs and cardiovascular system are going to get some great exercise as well!)
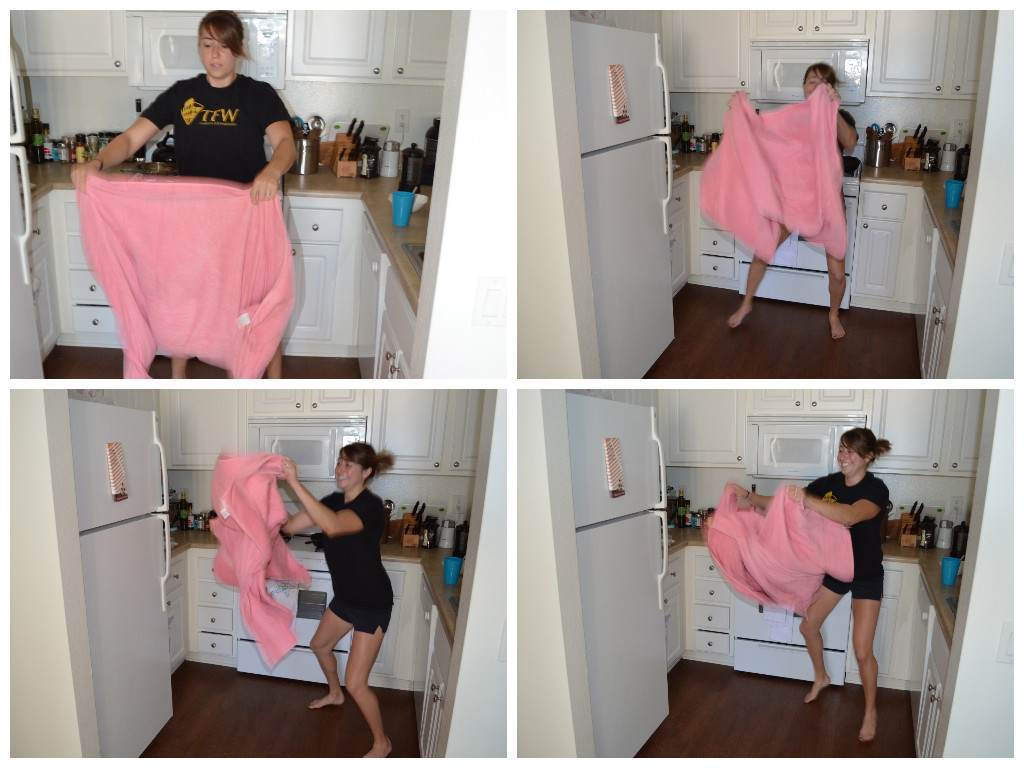
Cardio in your home!
10. Glute Bridge with Reach – This move is a great way to work your back, butt and core as well as get a nice stretch in. It can be a great dynamic warm up and activation move as well as a challenging move to add to your workouts. Since I haven’t really ever mentioned this move before….To do this move, set up in a glute bridge. Drive through your heels and get your hips up as high as you can. Keeping your core and glutes tight, reach one arm across your body and overhead as if you are reaching for something over your shoulder and behind you. You will bridge up onto one shoulder, keeping your hips up. Come back to center, lower the hips down and then bridge back up and reach across and back over the other shoulder. Repeat alternating sides and rotating the core while in the glute bridge.

I will extend my arm a bit more and really bridge up on the one shoulder while keeping the other arm down by my side, but this gives you a basic variation.
So there are at least 10 Upper Body moves you can do at home….Maybe you can even use them today to help you stay on track this weekend….
How many of these had you forgotten about?
Fit in your workout even when you’re busy!
The other day I read a great post on T-rex to Tigress about trying not to feel guilty about skipping a workout.
While yes, we do want to create a routine and stick to it….while yes, we don’t want to constantly let ourselves off the hook and make up excuses to miss our workouts….We do also have to recognize that sometimes life is going to get in the way and that sometimes WE HAVE TO CUT OURSELVES SOME SLACK!
Sometimes our routine gets interrupted. Sometimes our body just gets worn out. Sometimes our mind gets completely fried.
Sometimes we just need a day off even if we’d made other plans.
And if our body or mind really needs the day off, there is no reason to feel guilty. The day off will help us recover and become re-energized to take on all the upcoming challenges.
That recovery day will actually help us reach our goals more quickly if we need it.
Nothing bad is going to happen to our progress, to our results, to our health or even our routine if we make an educated decision to take a day off.
HOWEVER, there are times when we aren’t able to make it to the gym because life interferes that we can still get in a workout – that we still really want to get in a good workout.
So if you decide that life has interfered yet you still really really WANT and NEED to get in a workout (and it wouldn’t be better for your body and mind to take the day off), here are a couple of great ways to get in a quick workout WITHOUT going to the gym.
1. GO FOR A WALK! – Even if your body and mind or worn down, a walk is a great option! Walks are a great form of active recovery and they give your mind a chance to relax and de-stress. Go for a short walk around your neighborhood or even meet up with some friends for a chat session!

We go for at least a weekly walk/hike. It is a great time to chat and de-stress and get in a little exercise!
2. DO A WORKOUT AT HOME – While it may not be what you originally had planned or even as tough as what you planned to do, IT IS STILL A WORKOUT. Doing anything is generally better than nothing if you can’t make it to the gym because of time or energy. Doing something keeps you in the routine of working out. And usually once you get moving, you end up working pretty hard! Keep a few go-to home workouts around to make it even easier to stay on track!
Cardio in your home!
3. SET A TIMER FOR 15 MINUTES – Short on time so you can’t go to the gym? Short on the motivation to really put in a long, hard workout? Then simply do a short intense workout at home! At least once if not twice a week, my workouts are no longer than 15 minutes…and even though they are short, they are far from easy. Sometimes I find it is easier though to motivate myself to workout when I know it will be over quickly. Pick 3-4 moves and put them into a circuit. Do as many rounds as possible until the timer runs out! Heck, sometimes you can even just put a timer on for 5 minutes as choose one exercise and do it without stopping the entire time. Like 5 minutes of burpees. Or 5 minutes of bear crawls. It may only be 5 minutes, but if you do not rest and try to move as quickly as possible the entire time, you will be exhausted!
4. GO PLAY! – Working out doesn’t have to mean going for a long run or going to the gym and lifting weights. Working out can be playing with your kids at the playground or stand up paddling or surfing or hiking or any FUN ACTIVITY where you are moving. So next time your friend really needs to meet up to chat and you feel like you just can’t ditch her, don’t just go to dinner to talk! Take your conversation on the road and be active. Getting moving could be good for you both and may help you both de-stress! No it isn’t your planned workout, but simply moving will make you feel better and is good for your health!
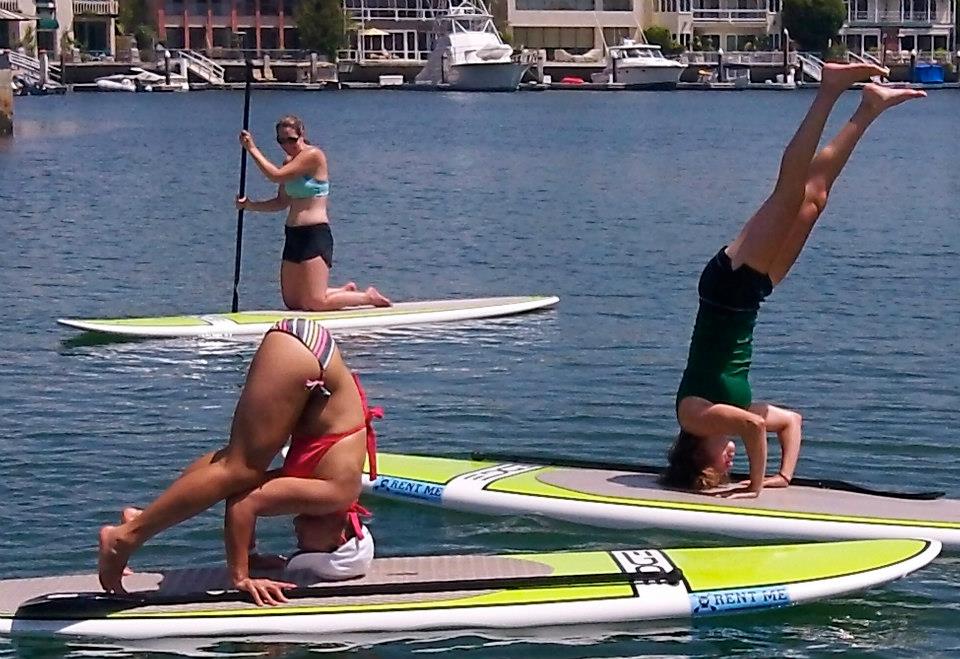
Go do headstands on a paddleboard even if you do flip over and fall in! (which by the way I did…numerous times…)
5. DO YOGA…OR PILATES – While both yoga and pilates are tough workouts, they can also be good for recovery. I have a Yoga workout I can easily do at home on days when my body needs a break but I still want to move. Plus if you are stressed or tired, it can be easier to motivate yourself to do a workout that you know won’t completely slaughter you and that you don’t have to travel anywhere to do. You may even find that going to the gym to do a Pilates or Yoga class makes it easier to push yourself to go to the gym on a day when you wouldn’t for a more intense workout.
What all the tips above basically show is that something is better than nothing, especially if we are trying to keep ourselves on a routine to create new healthy habits.
Life is going to get in the way sometimes, but the best thing we can do is not stress or feel guilty when that happens.
Heck, sometimes you even just need the day off.
But whatever happens, it is best not to stress. And if you really do want that workout…Well…Where there’s a will, there’s a way!
How do you handle life getting in the way of your routine?
P.S. Thought it was interesting to read T-Rex to Tigress’s post since most of my writing about life getting in the way has been about diet. But life most definitely can get in the way of working out too!
Here is also a great post by 43Fitness about life getting in the way (AKA TRAVEL/VACATION) and how she handles it. Thought she had some great rules!
Cardio At Home
It’s kind of interesting, but I hear all the time that people can’t really do cardio at home.
They have this idea that they either have to go outside and run or have some sort of cardio equipment (like a treadmill or bike) at home to be able to do cardio, especially aerobic endurance, longer duration cardio (jogging).
But that isn’t the case.
There are plenty of ways to get in cardio at home without any equipment. And you don’t just have to do short, intense intervals to make these exercises work. You can work on your aerobic endurance as well!
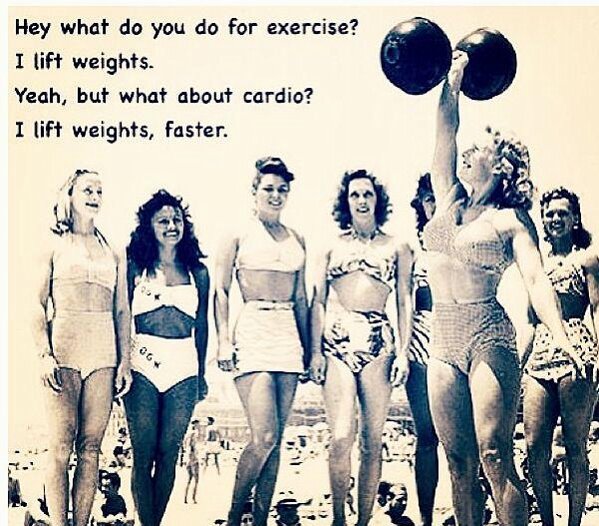
Well this is my idea of cardio! It does make the point that you don’t need a treadmill to do your cardio!
Here are 5 great Indoor Cardio Options that you can do at home:
1. Towel Taz – One of my favorite ways to do cardio at home because EVERYONE can do it and feel challenged by it. And you don’t need any equipment or really any space to do it!
This move is great to use to do intervals of 30 seconds or longer. If you do 2 minute intervals with shorter rest, you can really build your aerobic endurance.
To do the towel taz, take a bath or beach towel. Hold one corner of the towel in each hand. Move side to side and all around quickly, shaking the towel up and down and forward and back. Your movements should be quick.
2. Plyometrics – Commonly known as jump training. While plyometric training is better for shorter intervals, it is still a great cardio option.
Jump squats, split squat jumps, skater hops…There are a ton of options that allow you to work your legs from every angle.

Skater Hops
But what if you are older and/or your knees won’t allow you to jump quickly and explosively off the ground? Plyometric training can be regressed.
For example: With the squat jump, you can start with a quick bodyweight squat. Then you can progress that and do a squat and come up to your toes at the top of the squat instead of exploding off the ground. Next you will just do a very very little jump off the ground, pausing after every rep. Then you will try to get higher and more explosive off the ground, still pausing or going more slowly between reps. Finally you will be as explosive and quick as possible with the jump squat.
Also, plyometric training is about training muscles to be explosive. It isn’t restricted to lower body exercises. Plyo push ups, bobcats, medicine ball throws are all examples of upper body plyos.
Actually bobcats are full body and a great way to develop a mind-body connection.
To do a bobcat, start in the crawling position on your hands and toes. The first level of this move is to just bend your elbows and drop your knees to the ground quickly and explosively. Your goal is to make sure your upper body and lower body move TOGETHER as quickly as possible. Once you start to get everything to move together, you are going to explode off the ground. Go slowly at first, focusing on everything leaving the ground and hitting the ground together. So explode up off your hands and toes and then land on your hands and toes at the same time, staying in that crawling position. As you get more comfortable, start to move as quickly as possible.
This move is super tough. It is hard to get your upper body and lower body to move together quickly!
So this is actually a video that Aaron did. This only shows a little bit of the bobcat while used in knife fighting but it will give you an idea since pictures don’t really cut it. (And actually knife fighting is another option if you have a partner. Just be careful you don’t get to into it if you are in a confined space!)
3. Crawling – Not all cardio has to be done from your feet. Crawling is a great way to get your heart rate up and it can be done as sprints or as longer, slower, endurance cardio. You can do bear crawls or gorilla crawls or even crab walks. There are a ton of different ways to crawl! Crawling is great too because it really is fully body and you don’t need much space to do it. As long as you can take a couple of steps forward and back or even just move in a circle, you are all set!

I mean shoot…you can even crawl like an alligator! Talk about tough on the core and upper body
4. Metabolic Circuit Training – If you do exercises quickly with little or no weight and little to no rest, your heart rate is going to go up.
I mentioned the other day in my Squat Variations post that you could do 5 minutes of bodyweight squats. Trust me, that definitely gets your heart rate up.
You can also do different intervals. Tabata intervals of 20 seconds on/10 seconds off can be great as long as you pick exercises that challenge you within 20 seconds.
For example, while you can use the bodyweight squat when working for 5 minutes, you may want to use a squat jump if only working for 10 seconds.
Metabolic circuits can really use any exercise.
That’s right…Any exercise can be CARDIO. Push ups when done quickly definitely get your heart rate up. Not to mention they kill your upper body!
You can easily choose exercise options that fit the space you have and your current fitness level and turn them into a great cardio circuit. Remember the key here is to move quickly not use the heaviest weight possible.
5. Cone Drills – Cone drills are a great way to improve your mind-body connection AND get your heart rate up.
And you really don’ need much room to do them…or even need cones for that matter. You can use books, pieces of paper, underwear….Really anything to just mark off the spots. Obviously, if you do have a bit more room, it is easier to set them up.
They can be great to do at a park as well!
You can do quick side shuffles to cones. You can go back and forth for time. The shuffles don’t have to be long. Two or three shuffles each way is really all you need!
You can do star drills or even four point drills. Actually there is one four point drill I love to use from my tennis days.
Set up four “cones” in a diamond. Start in the center. Sprint forward to the cone in front of you. Then go back to center. Back pedal to the cone behind you and then come back to center. Side shuffle to one side cone and then go to the other.
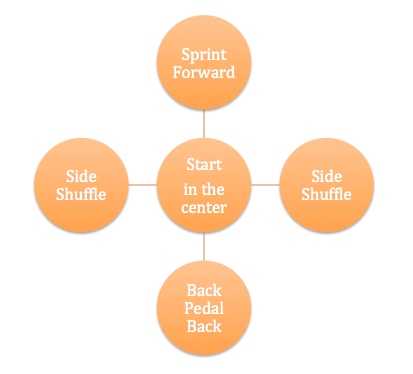
Hopefully this gives you a picture of what I’m talking about.
You can mix up exactly what direction you go. Try to not just follow the same pattern, but make your movements quick to each cone. Just remember to go back to the center after going out to each cone.
Cone drills are one of my favorite forms of cardio because they really do improve that mind-body connection which is so key for not only athletic performance but also proper functioning in EVERY DAY LIFE!
So there you have it. Five cardio options you can do at home no matter your fitness level. And the best part is – THEY REQUIRE NO EQUIPMENT!
What is your favorite way to do cardio?
Home Workouts – Keep It Simple Stupid
The other week I was contacted by the OC Register about participating in a column they were writing throughout the year about workout moves you could do at home. They were talking to a few different trainers in the area and getting each of them to demo about 8-10 exercises. (My first move will be featured on the 25th…AHHHHHHH!)
You could use equipment. It just had to be something that could easily be stored.
I was super pumped to participate and instantly started writing out a list of things I could do. I debated about a kettlebell or sandbag.
But decided against using any equipment except for something someone would easily have lying around the house.
I’ve become extremely interested in finding and creating great and challenging home workout moves you can do with limited space and no equipment and I wanted to highlight some of those moves.
And when the reporter asked me why I picked the moves I did when there are so many crazy cool new pieces of equipment out there that could be stored easily at home….
I said, “Because you don’t NEED any of those!”
Equipment can be fun. It can keep you interested and add variety to a routine that is getting stale.
But it isn’t NECESSARY.
Equipment doesn’t mean you are going to get a more challenging workout. Heck sometimes it even means getting away from truly functional moves that will truly have the most benefit.
Equipment is a TOY. It isn’t necessary even though people have become convinced that they can only get in a great workout if they have the latest and greatest TOY.
Basically, I explained to him that I wanted to make a point that you don’t really need ANYTHING to get in a great workout at home! That there are a ton of tweaks you can make to traditional moves to make them more challenging and keep your workout interesting.
Yea I love equipment, but sometimes it just takes us away from what is important. Sometimes it distracts us from focusing on what will actually help us achieve our goals.
Sometimes equipment just complicates moves unnecessarily.
Sometimes we would get more out of a workout if we just KEPT IT SIMPLE and stuck to basic moves and movements!
Pull, push, squat and hinge. Those four basic movements are all you need.
Push Ups, pull ups (or rows), squats and lunges. These are examples of each of the four movements above.
Those four moves work your entire body. And those four moves can be made challenging without any equipment. There are also a ton of variations you can do without anything fancy so you never get bored.
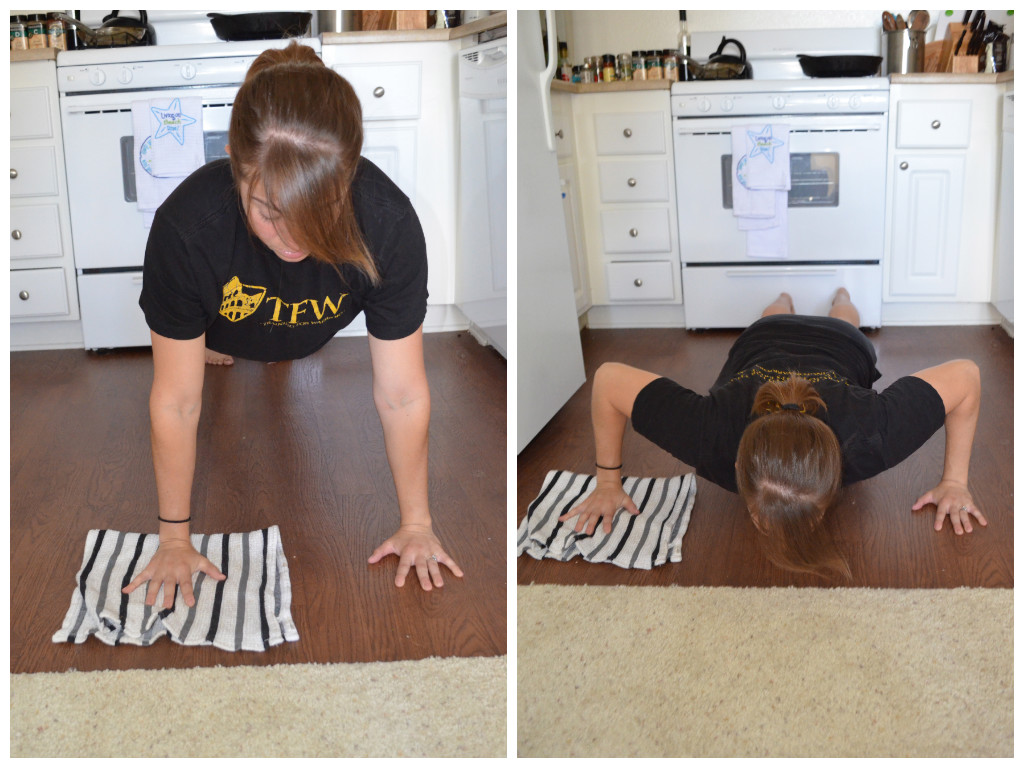
Push ups can be done on an incline. Or you can do them on a decline to advance them. You can do handstand push ups. Or set up some books and do a shuffle push up over them. You can also do a push up to side plank or a fly to push up on a towel. (For more push up variations, here are some ideas. You can do all of these at home even the push up to dip.)
There is always the spiderman push up too….
All these moves are simple. None of them require anything you don’t have at home. And all just are slight variations on the traditional push up.
We aren’t reinventing the wheel here.
We are just tweaking it slightly to make it harder or easier. We are adjusting it to focus on slightly different parts of our body.
Same goes for the pull ups or rows, squats and lunges.
Especially the lunges.
People think of lunges and they think forward and backward lunges….maybe they even include side lunges. But what about curtsy lunges? What about lunges in EVERY DIRECTION? You can do angled lunges. Rotational lunges…You can literally lunge in every direction to hit different aspects of your leg.
You can lunge in EVERY direction!
And on top of that you can add a towel to one foot to increase the intensity of the lunges. Or you can even do a balance lunge with your foot up on a couch/chair/table to make the basic split squat even more difficult.
You can do lunges where the weight is on the leg moving out. Or you can do a lunge where the leg working is more static. For example: On a side lunge, you can either step out into the lunge and sink into the leg that has stepped out OR you can sink into the standing leg and then just reach the other leg out straight to tap the toe out to the side.
Both work the leg in very different ways!
But you don’t need any fancy equipment to make the moves hard or even add variety! You can work your legs from every angle just by doing a LUNGE.
Keep it simple stupid.
Don’t worry about the latest and greatest equipment. Stick with the basics and you will get results!
What are your favorite variations of the push up, pull ups (or rows), squats and lunges? Do you find that you get caught up always looking for the next new piece of equipment? Do you even skip workouts at home because you don’t have “equipment?”
P.S. Who likes working out with a friend or a spouse? Interested in some great partner moves? Check back tomorrow!!!
10 Isometric Exercises – Why You Need To Include Them
At least once a week, as part of the warm up, I would do isometrics with my volleyball girls. (I also use them with my clients.)
But they are an especially important tool to use with young athletes because they work not only on physical strength but also on MENTAL TOUGHNESS.
Isometric exercises are any exercise you HOLD under tension.
And holding a move when your muscles are shaking and your brain starts to say, “QUIT!”…well there is nothing mentally more challenging. There is no movement to make it better. No place to escape the pain.
You’ve just got to sit, stand or lie there and hold it through the pain. (They sound really great right now…huh?!?)
You can use isometrics as part of a warm up, to get muscles activated and working together. You can also use them as a workout by themselves by doing only holds or by pairing the isometric exercises with strength or power repetitions.
Here is a list of a few of my favorite Isometric Exercises.
1. Toes (Single or Double) – This move works on your balance and warms up your feet, ankles, knees, hips and core. It is also a great calf and core strengthener. To do this move, stand on both feet and go up as high on your toes as you can. Hold that position for 30 seconds to 1 minute. To make this move harder, do single leg balancing on your toe.
2. Squat Hold (Wall Sit) – The squat hold can be done as a wall sit or as a free-standing squat and hold. Place your feet between hip-width and shoulder-width apart. Sink down until your thighs are parallel to the ground. To make it easier, do not sink as low. Keep your core engaged and your chest up. Do not lean forward too much. Make sure to sit back on your heels when you squat. You should not be on your toes at all. Do not sink below 90 degrees with this move as that actually makes it easier. And do not let your knees collapse inward. Hold for 30 seconds to 1 minute. If you want to make this move harder, you could hold a weight at chest height or even on your lap while doing a wall sit. Or you can even do a single leg wall sit!

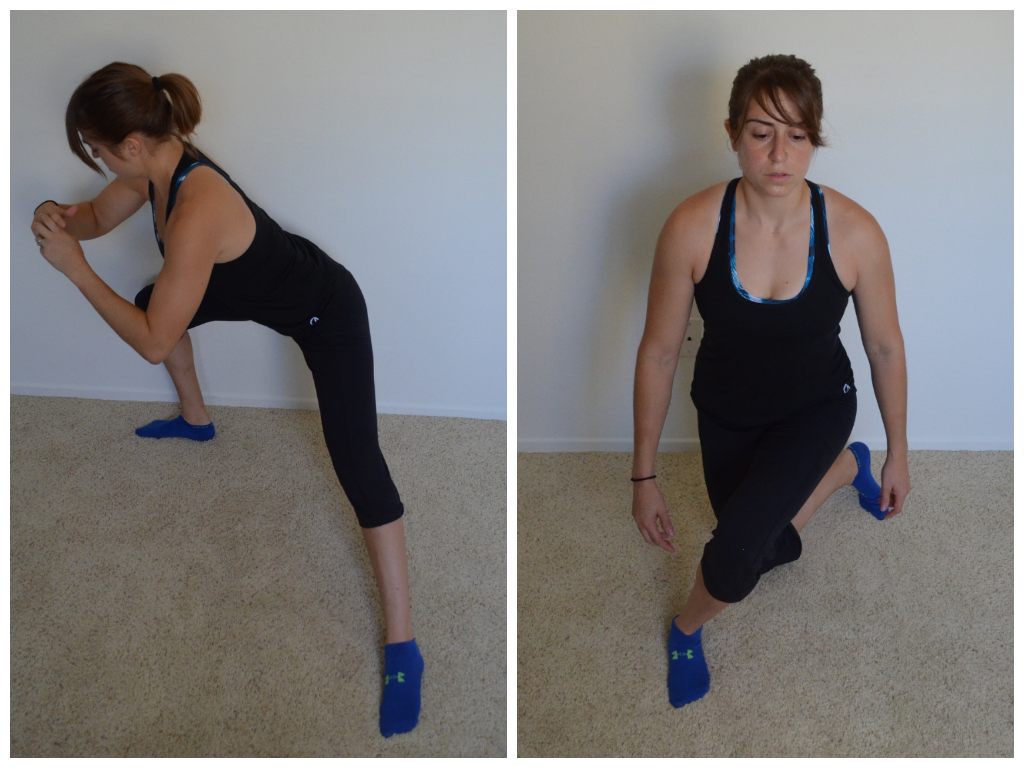
3. Warrior Pose – Many yoga classes use isometric moves. Any time you hold one of the warrior poses, you are performing an isometric exercise. I call this move the “warrior pose” (although I know there are a few different warrior poses in yoga). To do this move, set up in a wide stance for a lunge. Turn your back foot so that the toe is pointing away from you. Your back foot will be perpendicular to your front foot, which will be pointing straight ahead. Do not let your front knee collapse in as you sink down in the lunge. Keeping the back leg straight, sink down as low as you can. Shoot for the front knee to be at 90 degrees. Make sure your front foot is firmly planted on the ground at that your knee stays about over your ankle. If you want to add a bit of shoulder work in, bring your arms up to shoulder height. Reach one forward and one backward toward opposite walls. If you want to make this move easier, don’t sink as low. Hold 30 seconds to 1 minute.
4. Split Squat – Set up in a wide stance with one foot forward and one foot back. Both toes are pointing straight ahead. Sink down until your back knee is almost touching the ground. Make sure you are not leaning forward. Your front knee should be over your ankle. If you want to make this move easier, don’t go as low. Hold for 30 seconds to 1 minute.

5. Scapular Wall Hold (Could also be a row up and hold) – THE BEST MOVE FOR POSTURE AND PULL UPS! Bend your elbows to 90 degrees. Lean back into a wall with only your elbows touching. Press your chest out and your shoulder blades down and back. Walk your feet away from the wall only as much as needed to feel the muscles behind your shoulder blades working. Do not let your shoulders shrug up by your ears. The bigger the incline from the wall, the harder the move will be. Make sure to keep your body in a nice straight line. Keep your core tight and squeeze your quads and glutes. You could also sub out the scapular wall hold for an inverted row to hold. You could row up on either a TRX or barbell and hold at the top of the row. Hold for 30 seconds to 1 minute.
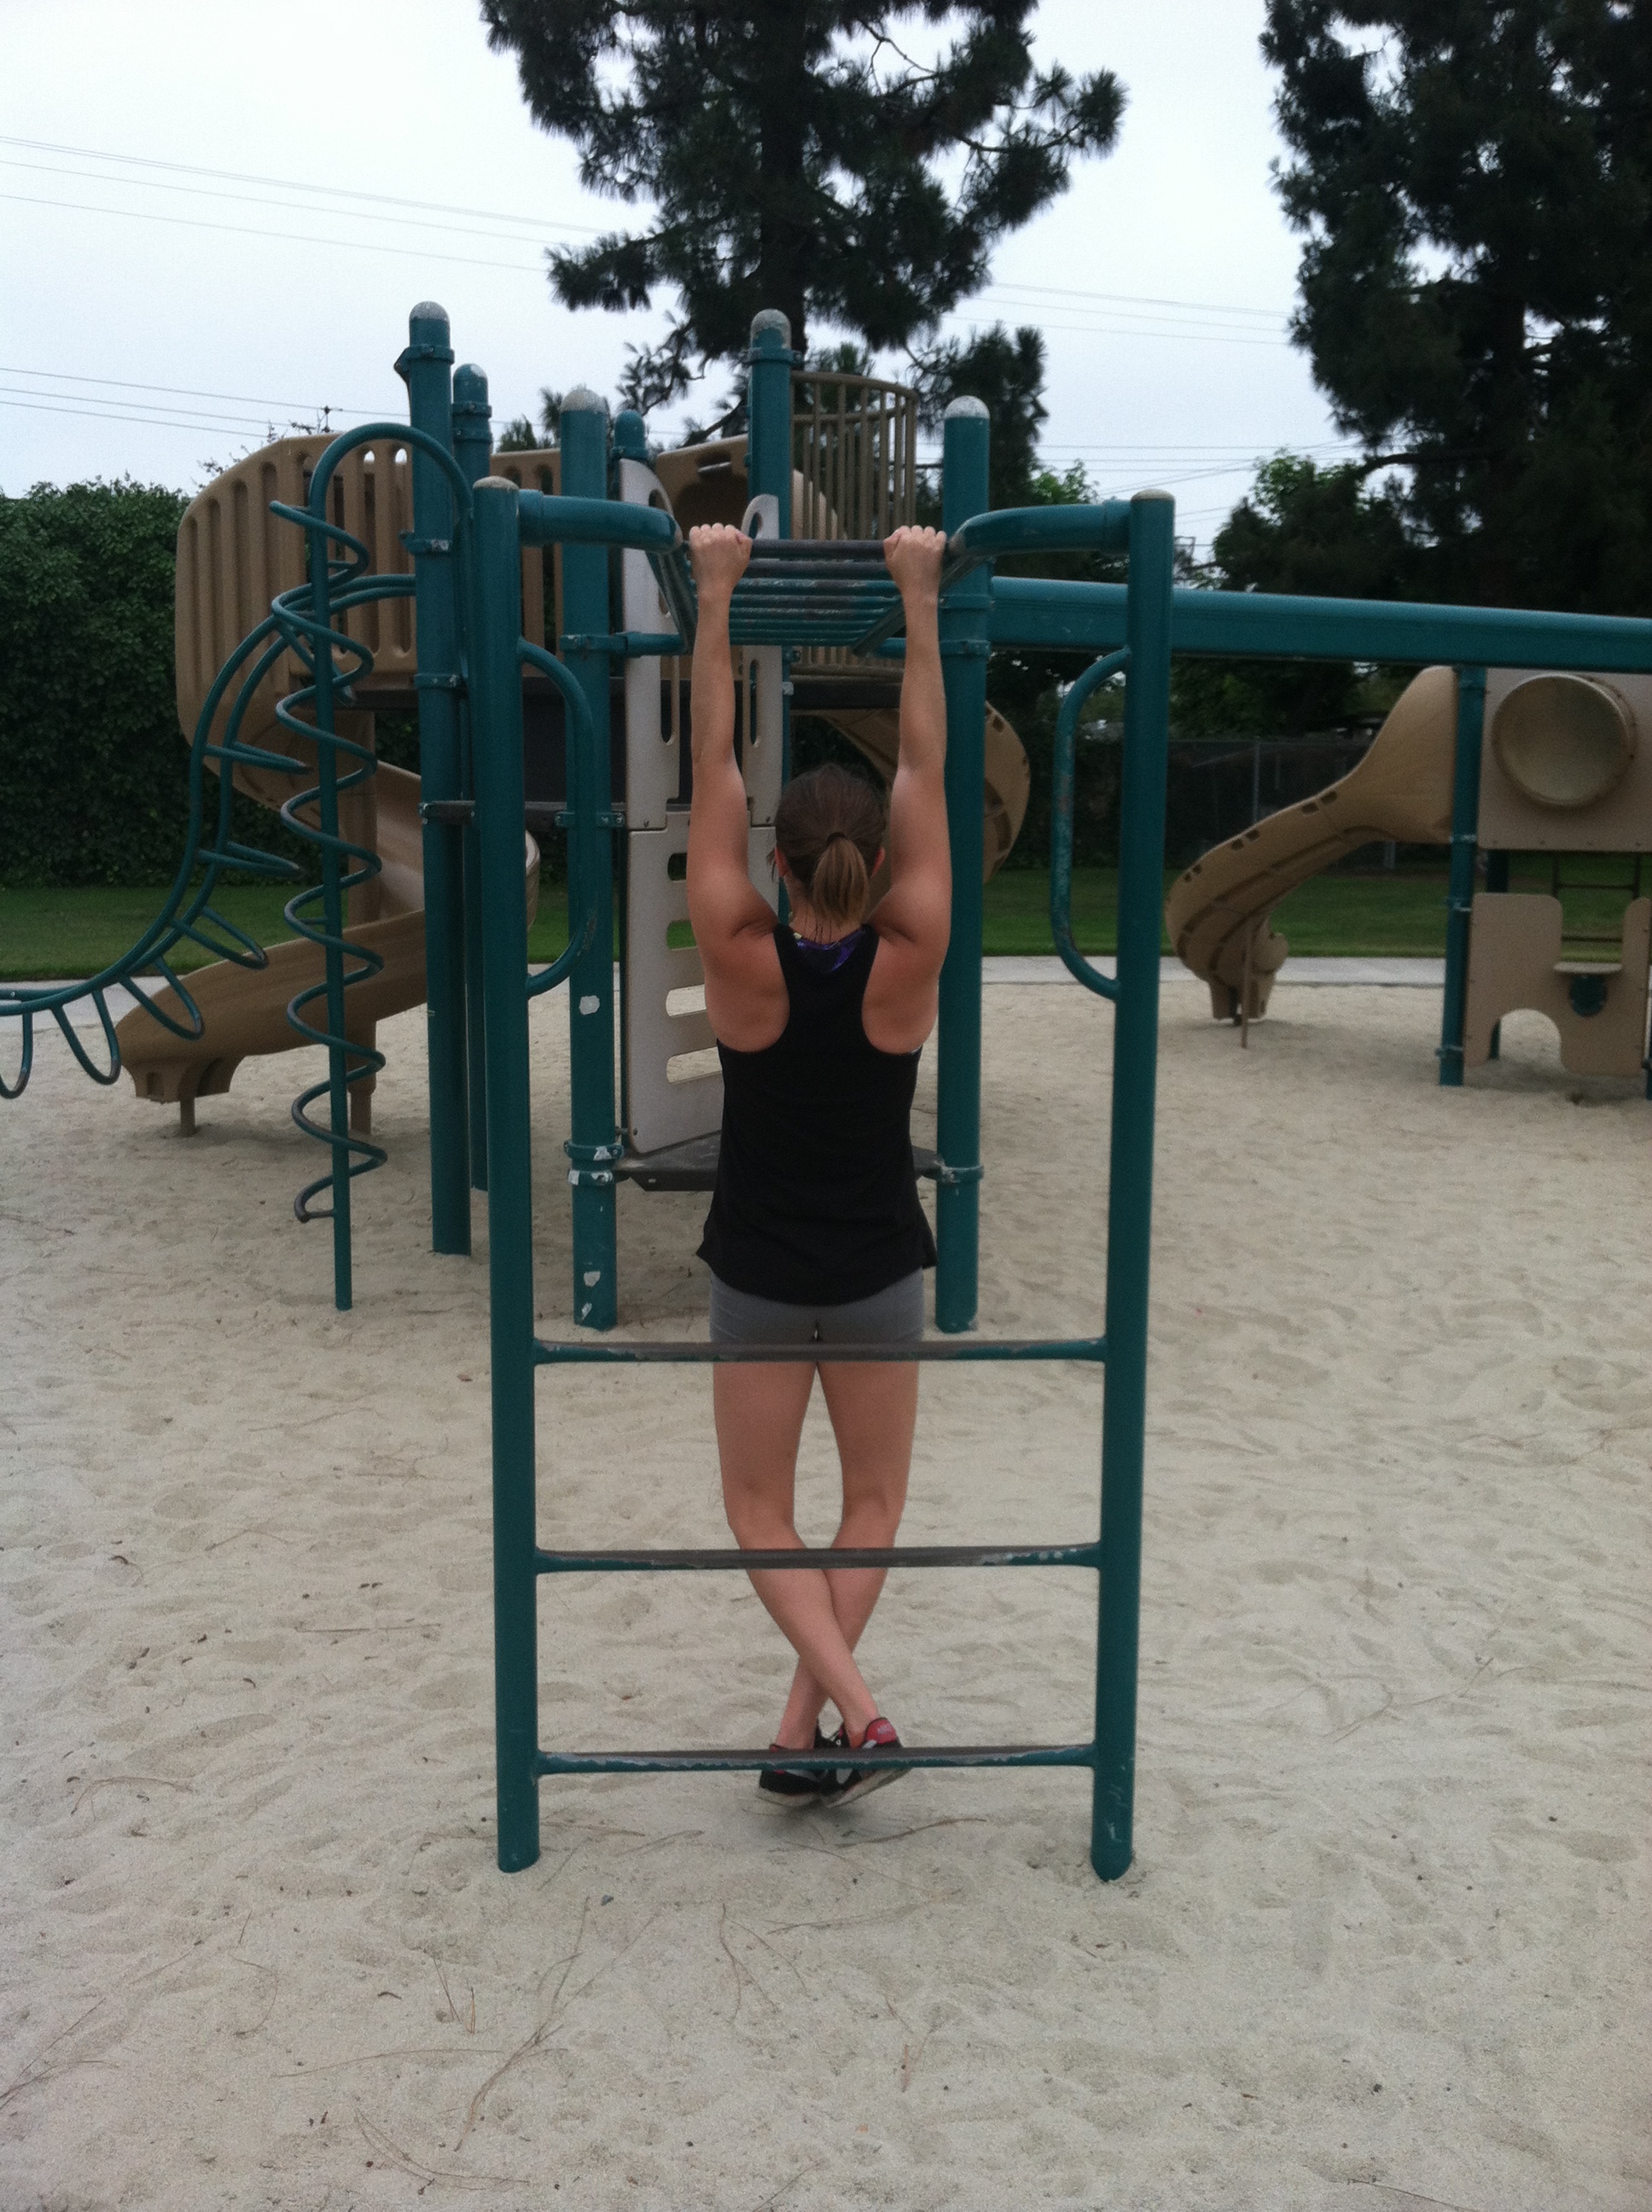
6. Dead Hang (Pull up and Hold) – You can hold at the bottom, middle or top of the pull up and each will have its benefits. My two favorite are the dead hang (holding at the bottom and just pinching your shoulder blades down and back) and the pull up to hold (holding at the top). With the dead hang, grab the pull up bar and pinch your shoulder blades down and back. You want to press your chest out and tighten your core as if you are going to pull up. To make this move easier, hold for a shorter time OR add some assistance by either keeping your feet on the ground so you are pulling less weight or by using a band around your knee. To do the pull up and hold, hold at the top of the pull up. Your shoulder blades should be down and back and your legs should be straight. Do not tuck your knees. To make this move easier, use a band or place one foot on the ground for assistance. Hold 30 seconds to 1 minute. (Below are the dead hang and the assisted hold at the top.)

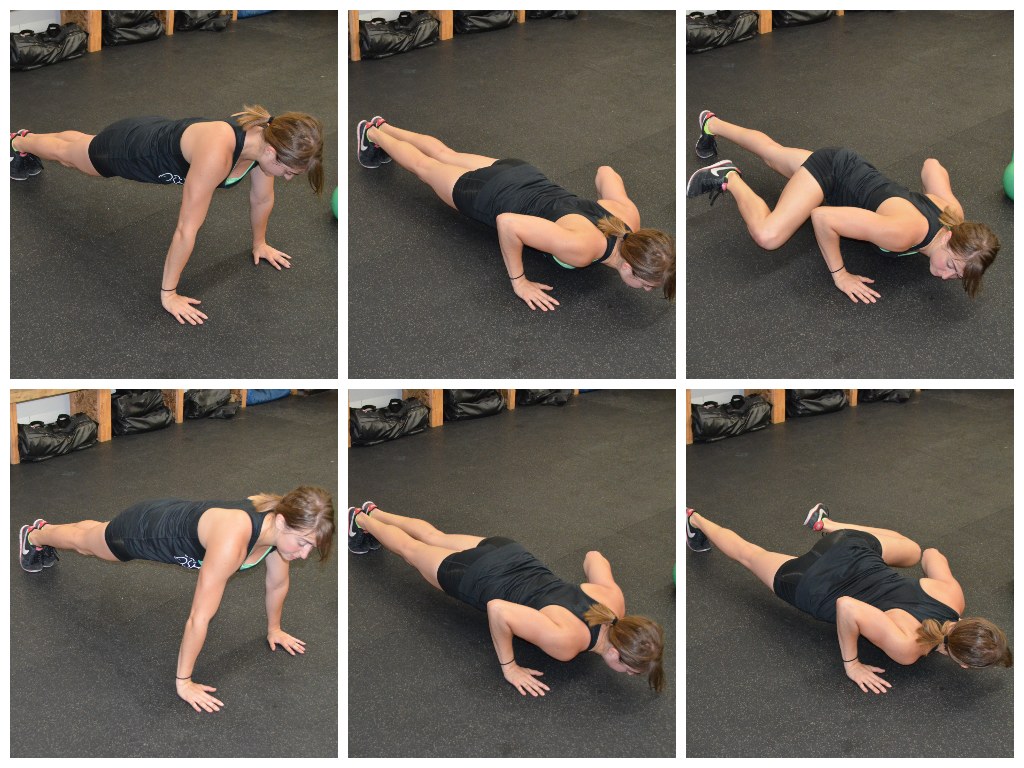
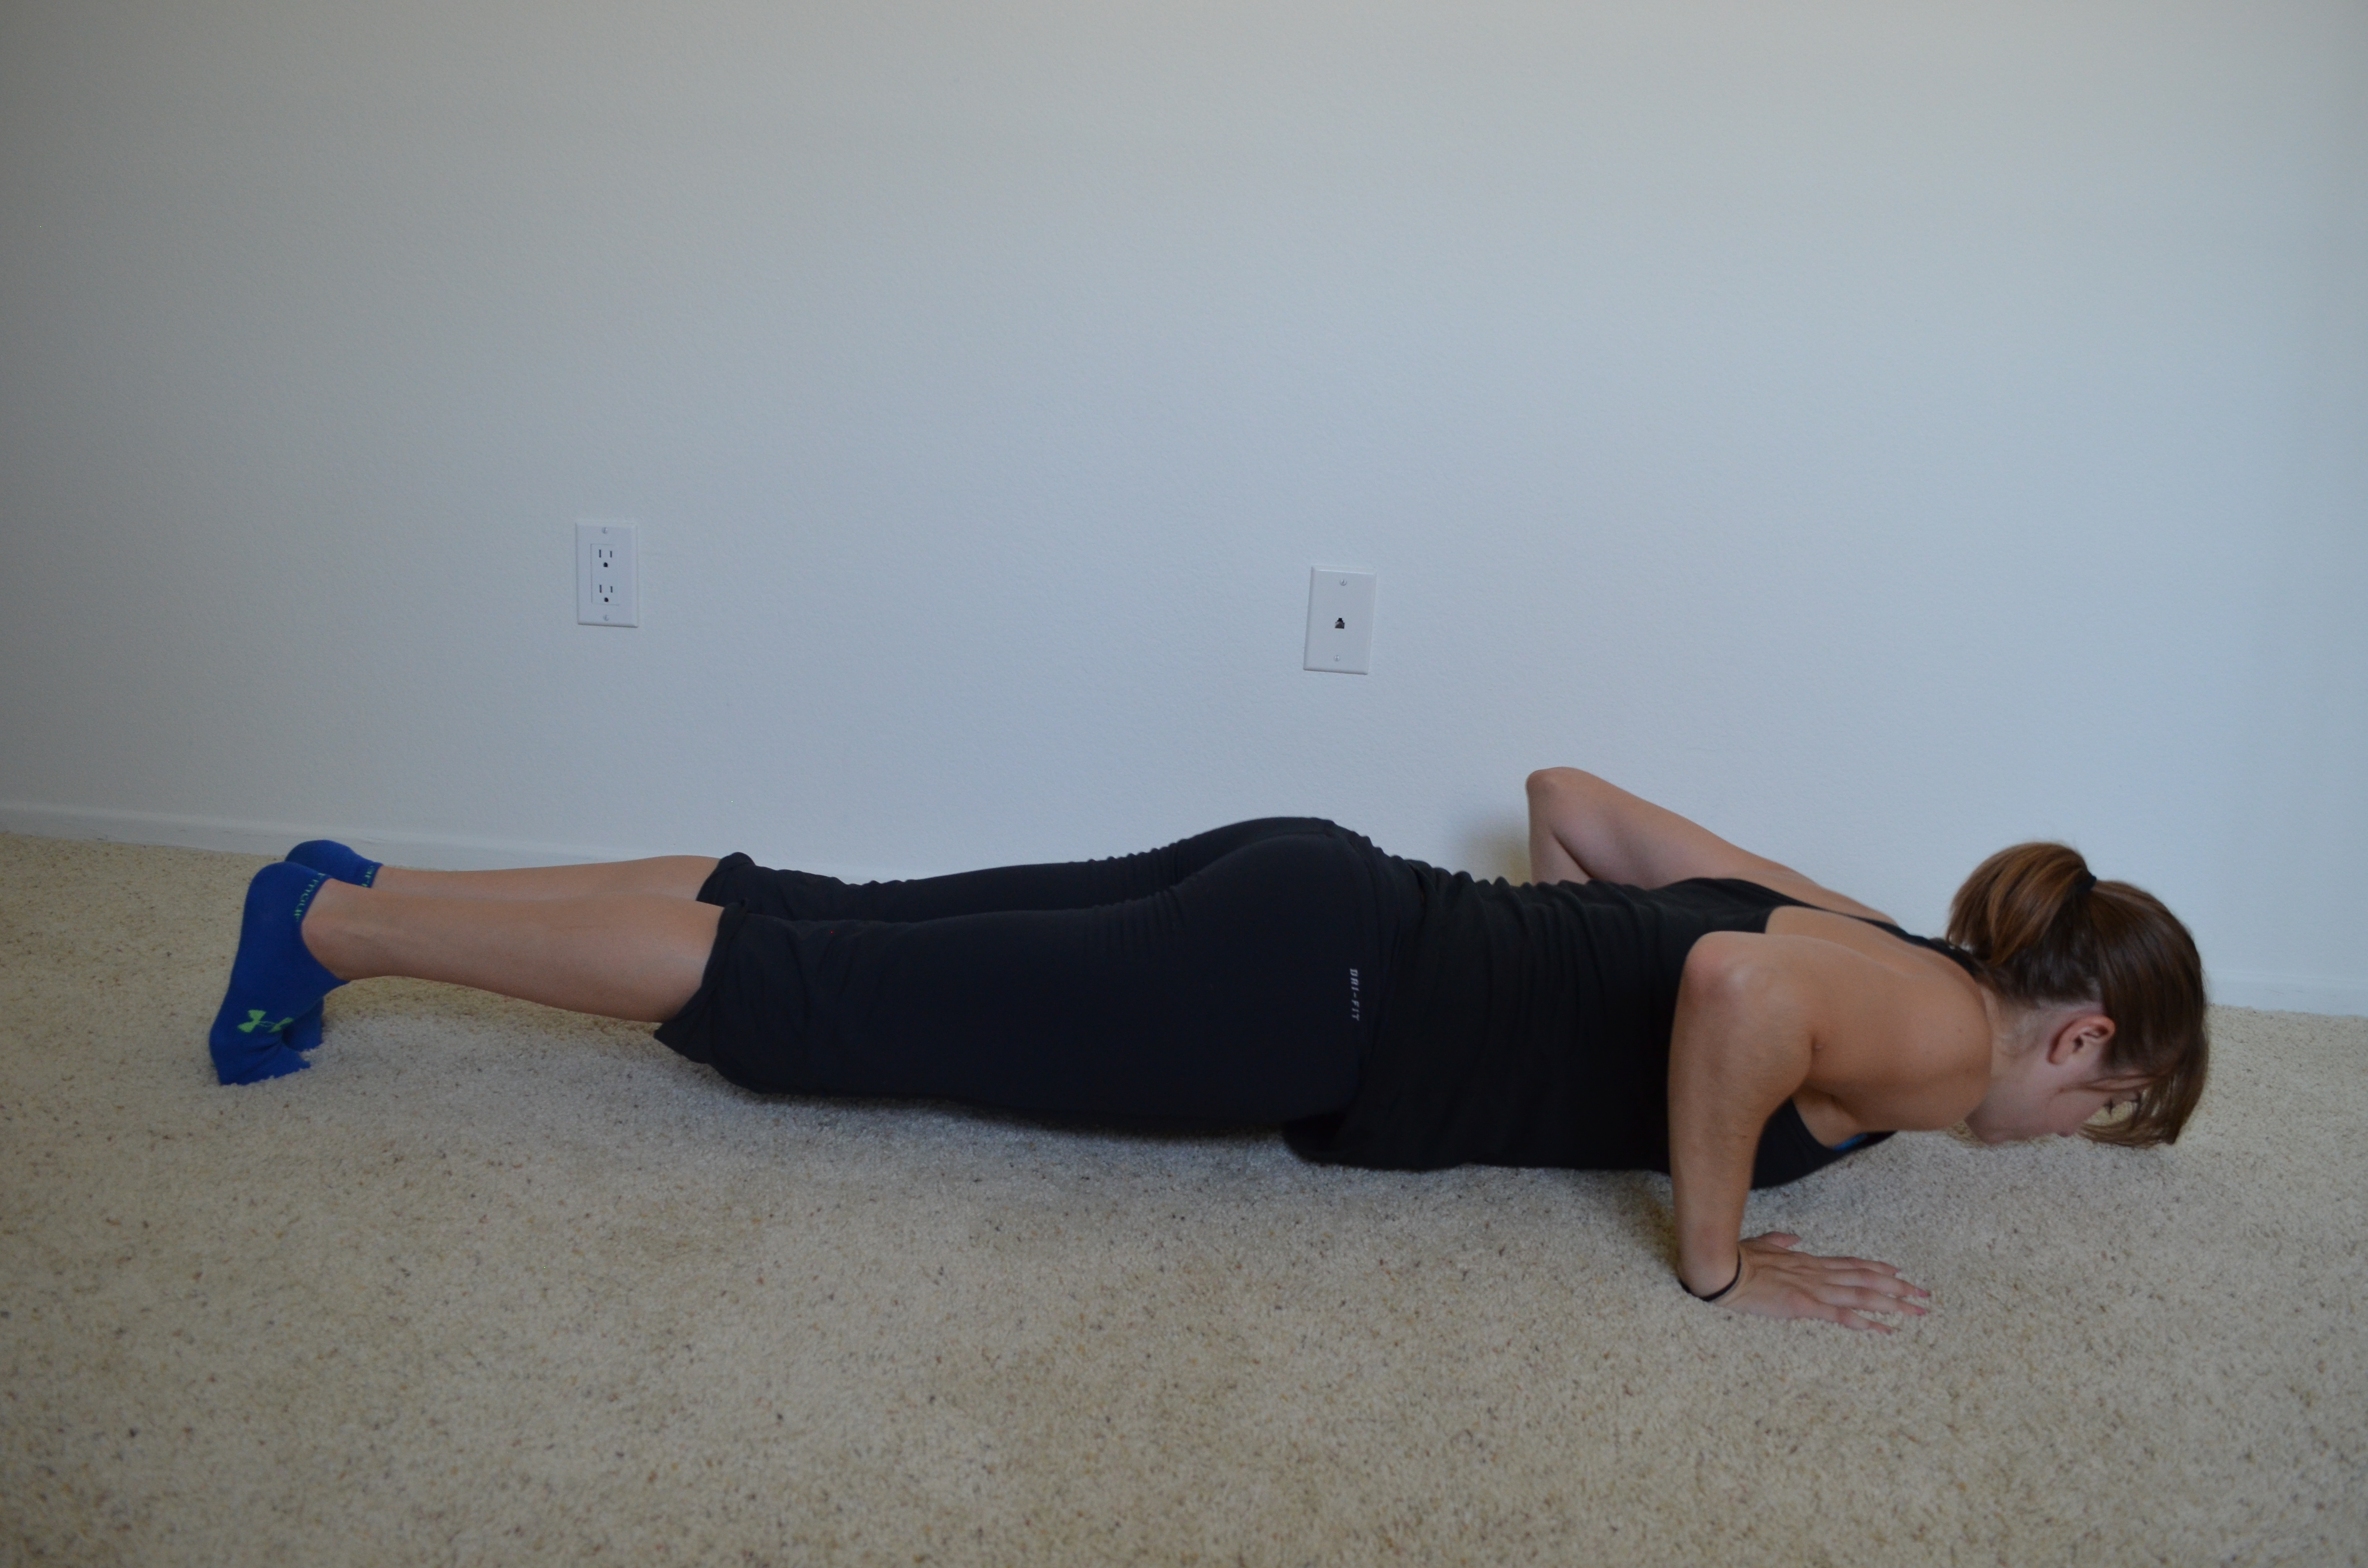
7. Push Up Hold (Hold top, bottom or middle) – I most often hold this move from the top of the push up. So set up on your hands and toes. Feet are together and hands are underneath your shoulders. Draw your belly button into your spine and squeeze your quads, glutes and adductors. Your shoulder blades should be down and back and your shoulders shouldn’t be up by your ears. Keep your head in line with your spine. Hold for 30 seconds to 1 minute. When I do isometric holds at either the middle or bottom of the push up, it is usually for only 3-5 seconds. When I do those holds, I’ll hold at the top for 5 seconds, middle 5 seconds and then bottom for 5 seconds before pushing back up to the top. I’ll usually do anywhere from 5-15 reps like that. (Below are holds at the top, middle and bottom.)
8. Side Planks – You can do these from your hands and toes or knees and forearms. Going down to your knees or forearms will make the move easier. Place your hand underneath your shoulder. Rest on the side of your feet. Stack one foot on top of the other or place one foot in front of the other. Raise up on your hand and the side of your foot. Do not let your hip sag toward the ground. Keep your chest open. Do not let it rotate toward the ground. Hold in a nice straight line, squeezing your core, quads and glutes. Hold 30 seconds to 1 minute each side.
Can make the side plank harder by putting your feet up or raising the top leg.
9. Glute Bridge – Lie on your back. Bend your knees and place your feet flat on the ground. You should be able to graze your heels with your finger tips. Squeeze your glutes and raise your hips off the ground. Keep your core tight and drive up as high as you can. Your weight should be in your heels. Do not go up on your toes. To make this move harder, do a single leg hold. Hold 30 seconds to 1 minute.

You can make the bridge harder by holding on a power wheel.
10. Bull Dog – Start on your hands and knees. Knees should be under hips and hands underneath shoulders. Tuck your toes under and raise up onto your toes and hands. Hold with your knees just an inch or so off the ground. Do not let your low back arch. Keep your core tight. You will feel this a lot in your quads too. If you don’t, make sure your knees are under your hips. Hold 30 seconds to 1 minute. To make this easier, raise up a bit higher or walk your feet back a bit. You can also perform a shorter hold.
While it is hard to tell, my knees are hovering about an inch off the ground.
And in case you aren’t completely sure how to combine the moves above, below are two workouts you can start with!
Isometric Holds (can be shortened to a warm up)
3-5 rounds of 30 second to 1 minute holds:
Toes
Squat Hold
Scapular Wall Hold
Bull Dog
Side Planks
Isometric Holds and Repetitions
3-5 rounds of the following:
Toes 30 seconds to 1 minute
Jump Rope 25 reps
Split Squat Hold 30 seconds to 1 minute
Split Squat Jumps 10 each side
Scapular Wall Hold 30 seconds to 1 minute
Inverted Row 10 reps
Push Up Hold 30 seconds to 1 minute
Push Ups 10 reps
Glute Bridge Hold 30 seconds to 1 minute
Single Leg Glute Bridge 10 reps each side
Rest 1 minute between rounds.
For more isometric moves, check out these Isometric Moves To Alleviate Desk Job Aches and Pains!
And if you are a runner, here is a Runner’s Recovery Workout using isometric moves.
NOTE: Handstand holds are also a great isometric move that I didn’t include but wanted to make note of because I love them!
Redefining Strength – Empowerment through exercise
So over the last year, I’ve thought a lot about what Man Bicep stood for in my life and the life of my clients.
It wasn’t about powerlifting. It most definitely wasn’t about running. And it wasn’t even about a specific diet.
It was about doing something….anything…that made you feel healthy and strong. It was about working out to feel empowered.
It was about taking on new challenges and feeling like you COULD do anything.
It was about redefining what strong really means.
And so I started considering what could really make us feel more empowered. And I began developing workout programs based around this principle.
I believe that working out can be an outlet, a release. I believe it can help us build confidence in a way few other things can. Overcoming physical challenges – lifting more or running further than we thought possible – is just about the most empowering thing you can do.
So I created “Redefining Strength.”
Right now the site has a few products that I’m giving away. I spent a lot of time considering what would be most helpful and supplement everything that I post here, on Man Bicep.
If you go over and subscribe, you will get 4 different reports. One is bodyweight exercises that can be done by beginners and advanced a like. They are basically exercises you can do anywhere and get a full body workout.
Handstand progression…I show you ways to progress up to one!
You will also get a list of 10 Simple Diet Changes. Be you vegetarian or Atkins dieter, there are tips on there that EVERYONE needs to follow.
I also spent a lot of time creating a foam rolling video library and cheat sheet. I believe that foam rolling is one of the most important things when it comes to moving well and feeling great. I even included some foam rolling videos that show you how to roll out even if you don’t have any of the fancy trigger point equipment.
And last, but not least, you will get a goal setting sheet. I debated about putting this one in since many of you will skip it. But honestly, goal setting is one of the best things you can do for yourself.
I know it’s cheesy. I know it’s boring and seems stupid. But trust me it’s worth the time if you really set goals that MATTER.
Goals that MATTER are what keep you committed even through the roughest of times. Goals CAN be motivating and keep us on course.
You just have to set goals in a way that don’t allow them to fall by the wayside like most people’s New Years resolutions!
So head over to Redefining Strength and check out those four guides and the video library. I hope it gets you as excited as I am for the programs launching in August!
As always, if you have any questions, feel free to email me at manbiceps@gmail.com.


