Jalapeño Bacon Burger with Avocado Cream
I’ve been having a very up and down week. I think that is just the ebb and flow of being in a field where you are constantly dealing with people, both clients and other trainers. Not that you really needed to know that….
BUT…
All of yesterday, I complained to Ryan. I moped and complained and just plain old whined. I even whined at him through text message (I was at work and had all of a sudden gotten hungry but had some more training to do before dinner.)
So he texted me, “Jalapeño bacon burgers with blue cheese avocado cream….”
My frown instantly turned upside down and I stopped my whining.
When I got home, a DELICIOUS meal was waiting for me.
The burgers were so good I just had to share the recipe!
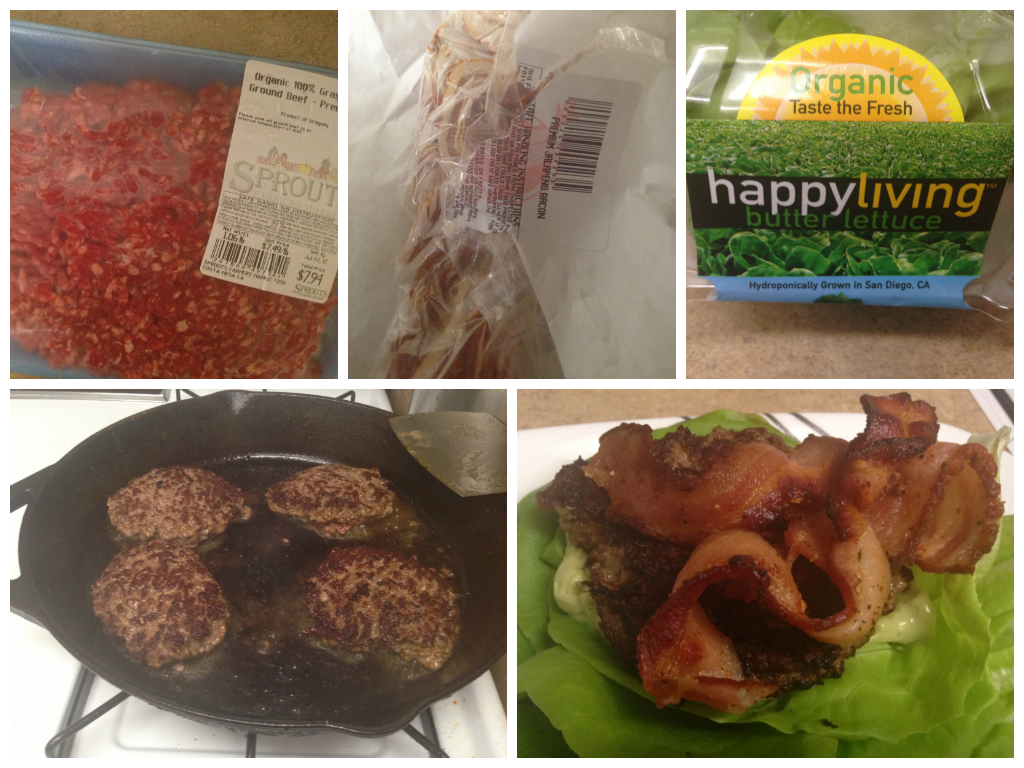
Jalapeño Bacon Burgers with Blue Cheese Avocado Cream
Ingredients:
4 slices jalapeño bacon
1 pound of grass-fed ground beef
4 fresh lettuce leaves
Salt and Pepper
1 large avocado
2 oz Blue Cheese
3 tbsp Heavy Whipping Cream
1 tsp Garlic
Salt and Pepper to taste
Shape the ground beef into patties (we made four). Season with salt and pepper. Cook the jalapeño bacon in your skillet.
Remove bacon when browned and add burger patties to bacon grease. Cook to desired temperature.
While burgers are cooking, add avocado, blue cheese, garlic, salt, pepper and cream to a food processor. Process until creamy.
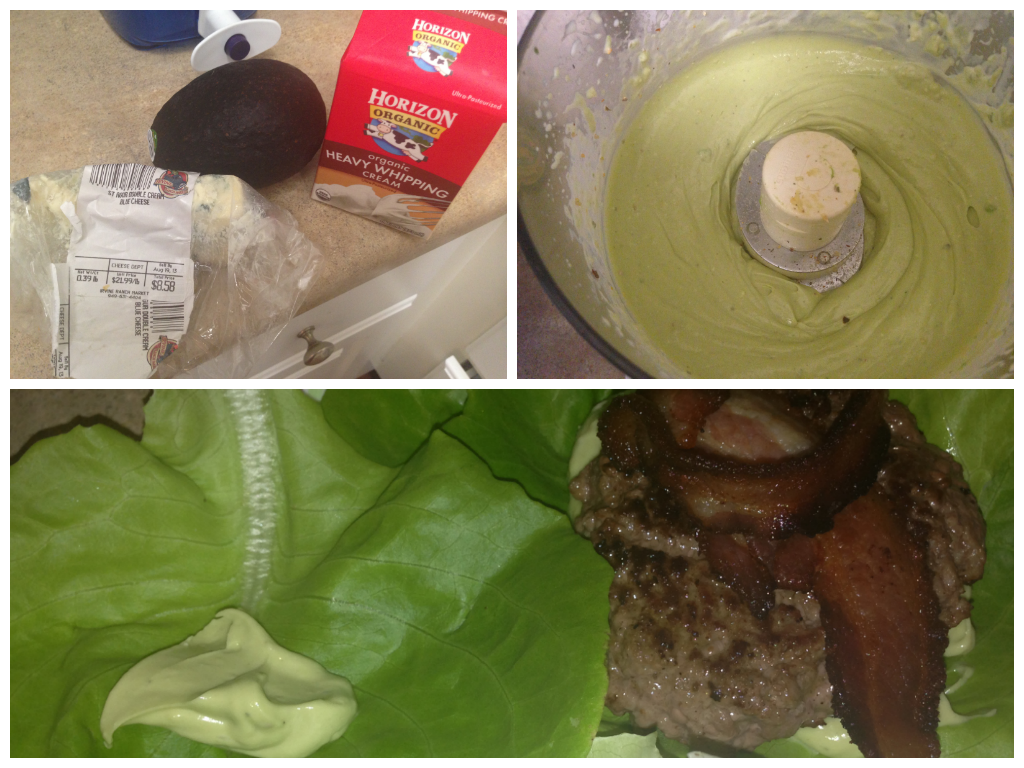
When burgers are done, put two lettuce leaves on each plate. Top with avocado cream, burger patty and 2 slices bacon. Add a dash more avocado cream to the top piece of lettuce.
Then chow down!
(We did single patty burgers. You can do double or you can cook the other patties and save for lunch the next day. There is plenty of avocado cream sauce leftover for some burgers the next day too!)
10 Isometric Exercises – Why You Need To Include Them
At least once a week, as part of the warm up, I would do isometrics with my volleyball girls. (I also use them with my clients.)
But they are an especially important tool to use with young athletes because they work not only on physical strength but also on MENTAL TOUGHNESS.
Isometric exercises are any exercise you HOLD under tension.
And holding a move when your muscles are shaking and your brain starts to say, “QUIT!”…well there is nothing mentally more challenging. There is no movement to make it better. No place to escape the pain.
You’ve just got to sit, stand or lie there and hold it through the pain. (They sound really great right now…huh?!?)
You can use isometrics as part of a warm up, to get muscles activated and working together. You can also use them as a workout by themselves by doing only holds or by pairing the isometric exercises with strength or power repetitions.
Here is a list of a few of my favorite Isometric Exercises.
1. Toes (Single or Double) – This move works on your balance and warms up your feet, ankles, knees, hips and core. It is also a great calf and core strengthener. To do this move, stand on both feet and go up as high on your toes as you can. Hold that position for 30 seconds to 1 minute. To make this move harder, do single leg balancing on your toe.
2. Squat Hold (Wall Sit) – The squat hold can be done as a wall sit or as a free-standing squat and hold. Place your feet between hip-width and shoulder-width apart. Sink down until your thighs are parallel to the ground. To make it easier, do not sink as low. Keep your core engaged and your chest up. Do not lean forward too much. Make sure to sit back on your heels when you squat. You should not be on your toes at all. Do not sink below 90 degrees with this move as that actually makes it easier. And do not let your knees collapse inward. Hold for 30 seconds to 1 minute. If you want to make this move harder, you could hold a weight at chest height or even on your lap while doing a wall sit. Or you can even do a single leg wall sit!

3. Warrior Pose – Many yoga classes use isometric moves. Any time you hold one of the warrior poses, you are performing an isometric exercise. I call this move the “warrior pose” (although I know there are a few different warrior poses in yoga). To do this move, set up in a wide stance for a lunge. Turn your back foot so that the toe is pointing away from you. Your back foot will be perpendicular to your front foot, which will be pointing straight ahead. Do not let your front knee collapse in as you sink down in the lunge. Keeping the back leg straight, sink down as low as you can. Shoot for the front knee to be at 90 degrees. Make sure your front foot is firmly planted on the ground at that your knee stays about over your ankle. If you want to add a bit of shoulder work in, bring your arms up to shoulder height. Reach one forward and one backward toward opposite walls. If you want to make this move easier, don’t sink as low. Hold 30 seconds to 1 minute.
4. Split Squat – Set up in a wide stance with one foot forward and one foot back. Both toes are pointing straight ahead. Sink down until your back knee is almost touching the ground. Make sure you are not leaning forward. Your front knee should be over your ankle. If you want to make this move easier, don’t go as low. Hold for 30 seconds to 1 minute.

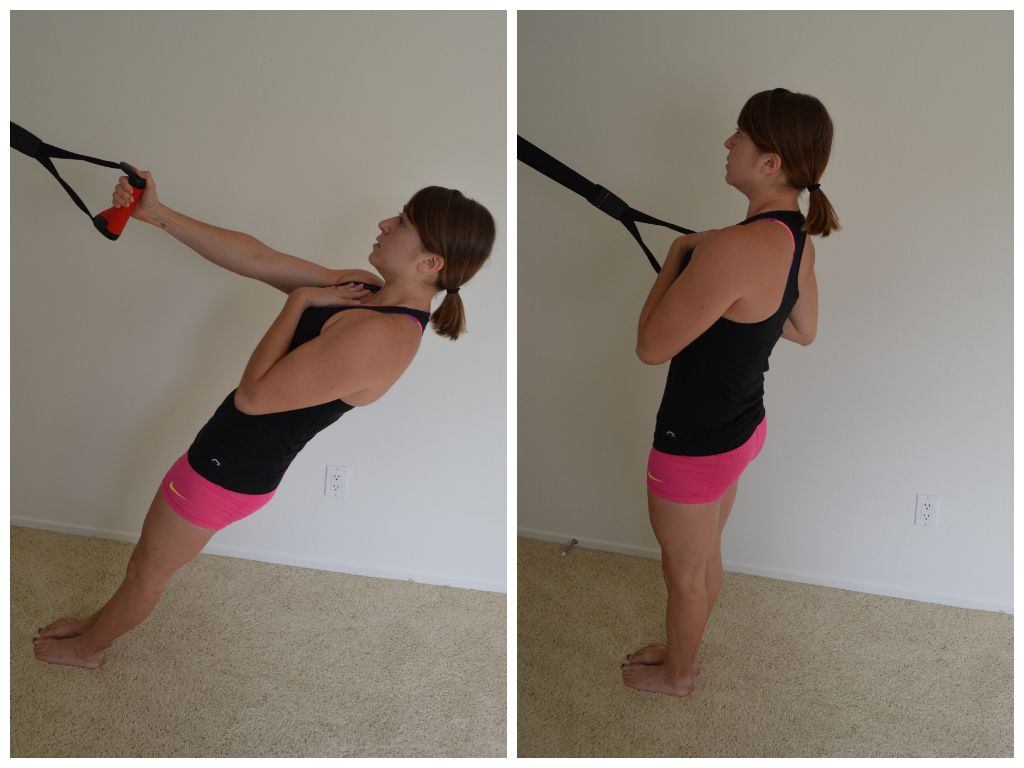
5. Scapular Wall Hold (Could also be a row up and hold) – THE BEST MOVE FOR POSTURE AND PULL UPS! Bend your elbows to 90 degrees. Lean back into a wall with only your elbows touching. Press your chest out and your shoulder blades down and back. Walk your feet away from the wall only as much as needed to feel the muscles behind your shoulder blades working. Do not let your shoulders shrug up by your ears. The bigger the incline from the wall, the harder the move will be. Make sure to keep your body in a nice straight line. Keep your core tight and squeeze your quads and glutes. You could also sub out the scapular wall hold for an inverted row to hold. You could row up on either a TRX or barbell and hold at the top of the row. Hold for 30 seconds to 1 minute.
6. Dead Hang (Pull up and Hold) – You can hold at the bottom, middle or top of the pull up and each will have its benefits. My two favorite are the dead hang (holding at the bottom and just pinching your shoulder blades down and back) and the pull up to hold (holding at the top). With the dead hang, grab the pull up bar and pinch your shoulder blades down and back. You want to press your chest out and tighten your core as if you are going to pull up. To make this move easier, hold for a shorter time OR add some assistance by either keeping your feet on the ground so you are pulling less weight or by using a band around your knee. To do the pull up and hold, hold at the top of the pull up. Your shoulder blades should be down and back and your legs should be straight. Do not tuck your knees. To make this move easier, use a band or place one foot on the ground for assistance. Hold 30 seconds to 1 minute. (Below are the dead hang and the assisted hold at the top.)

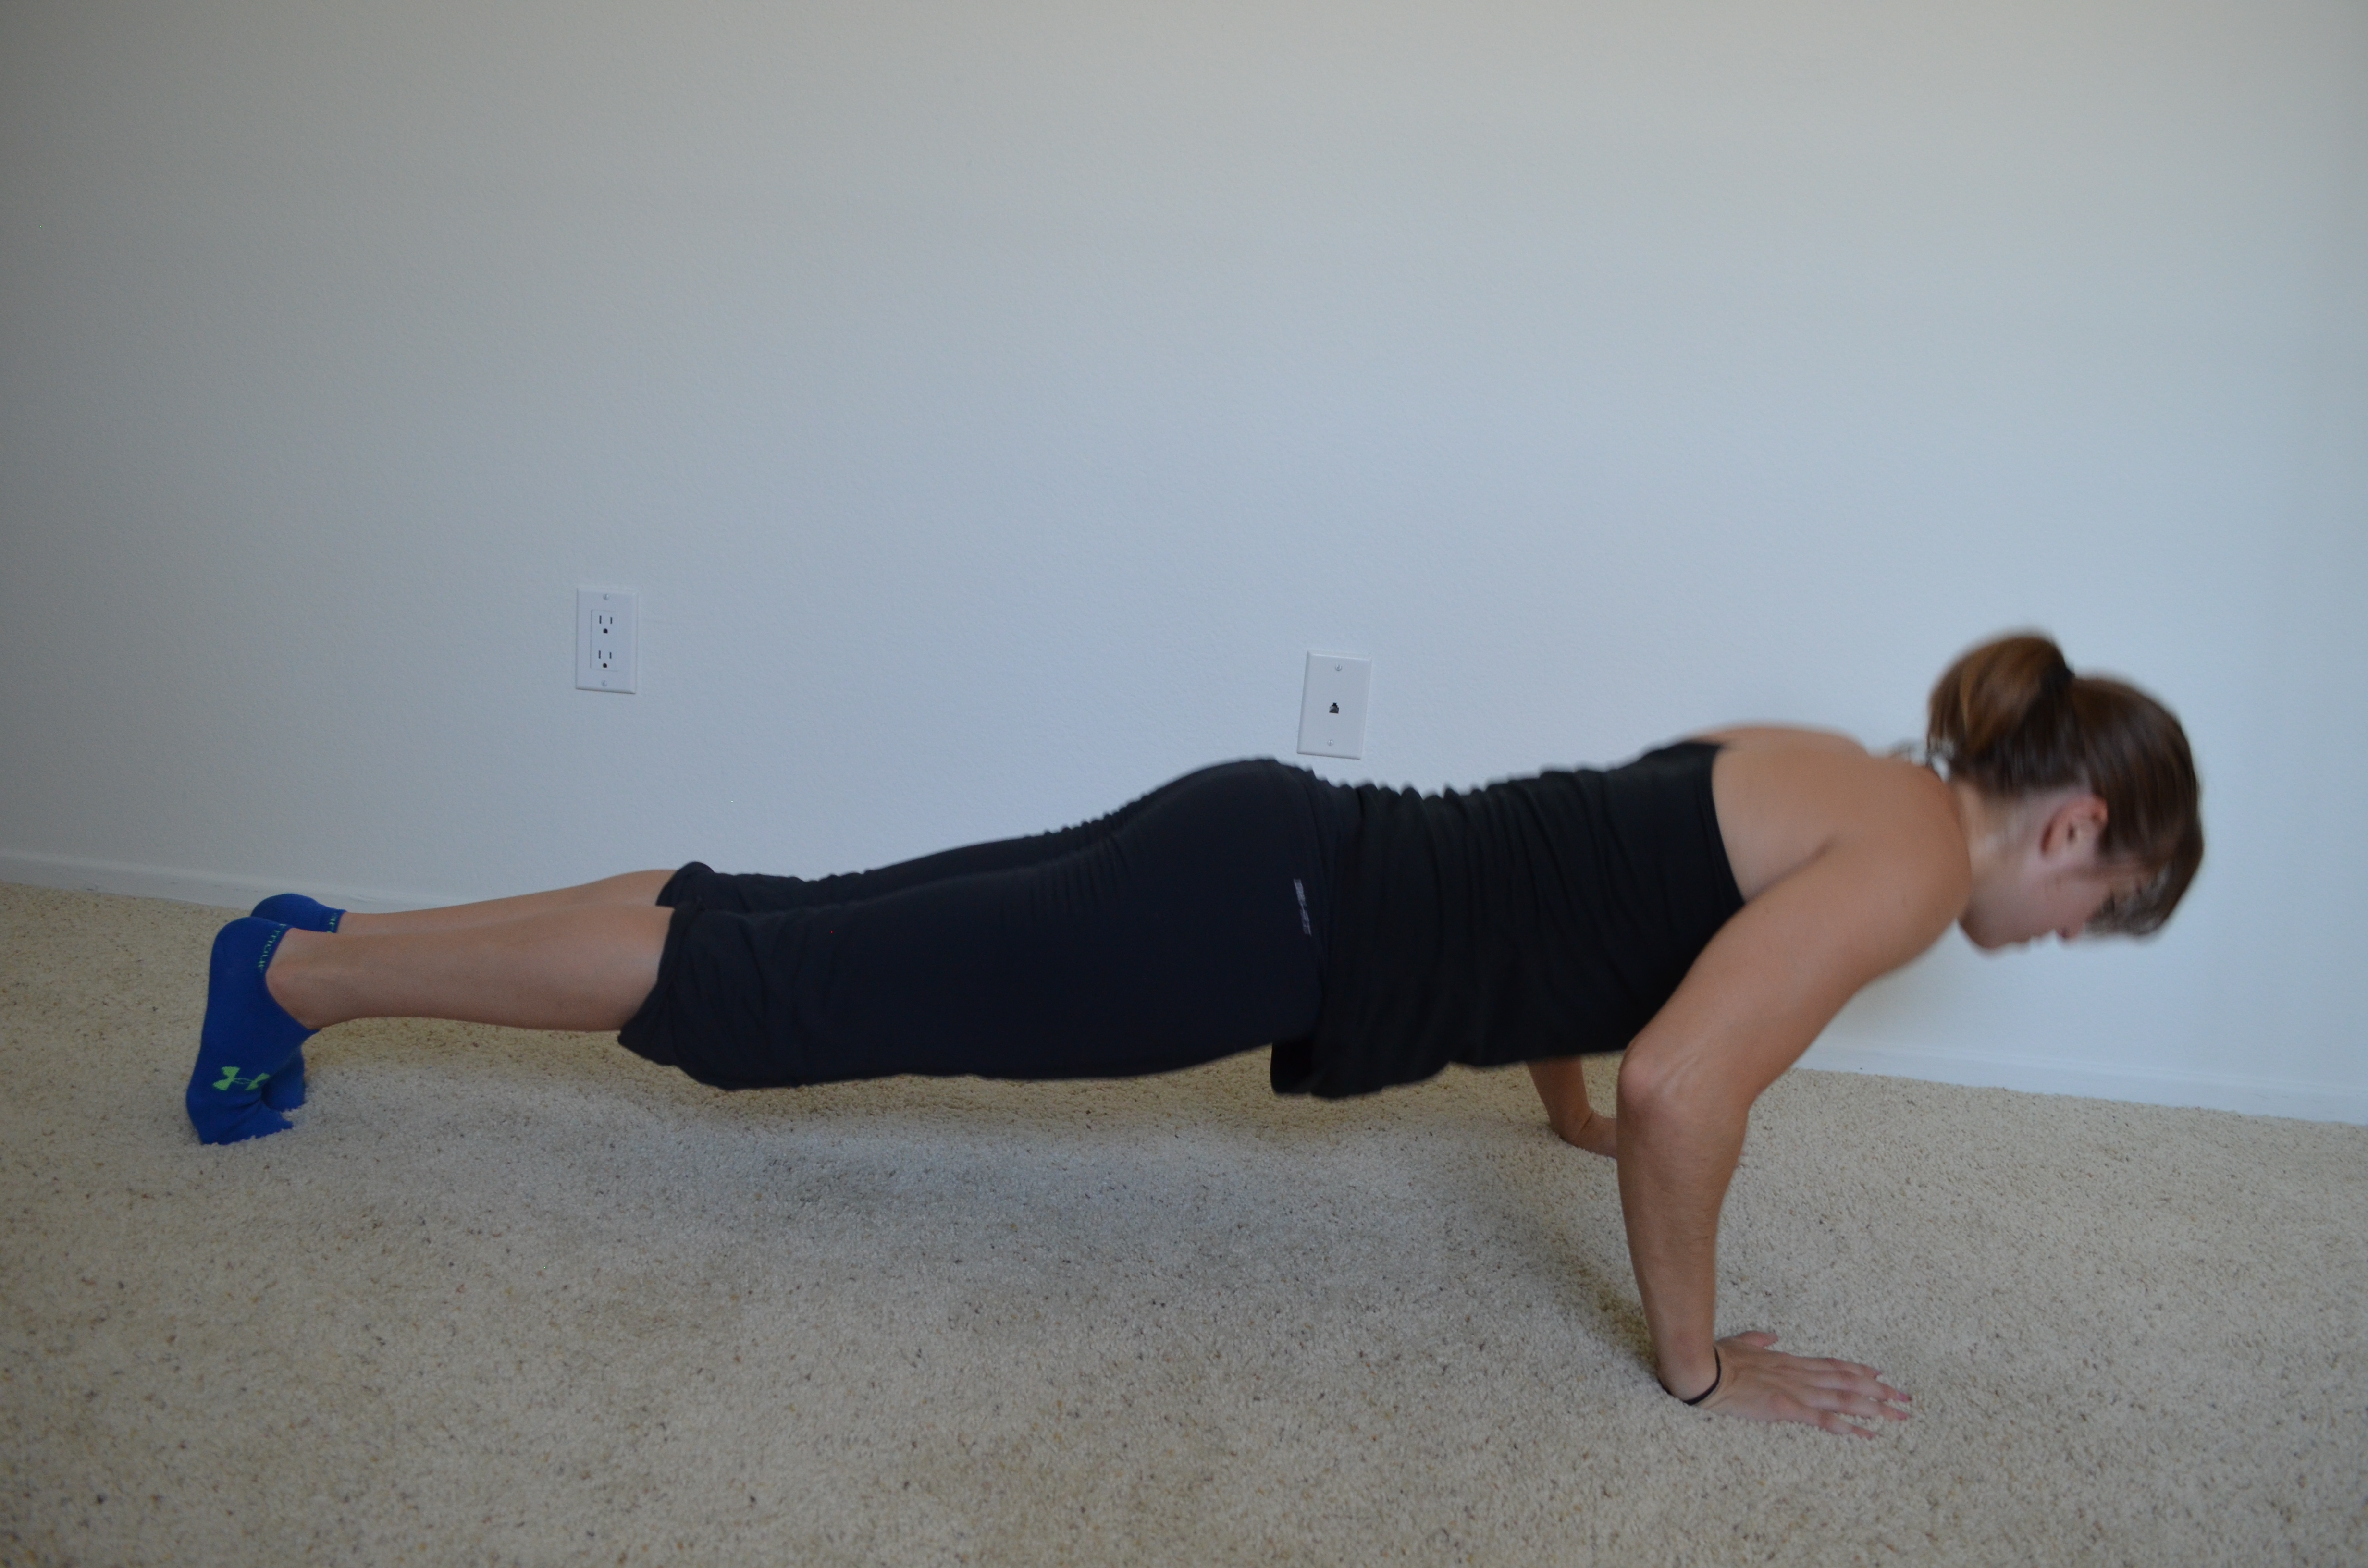
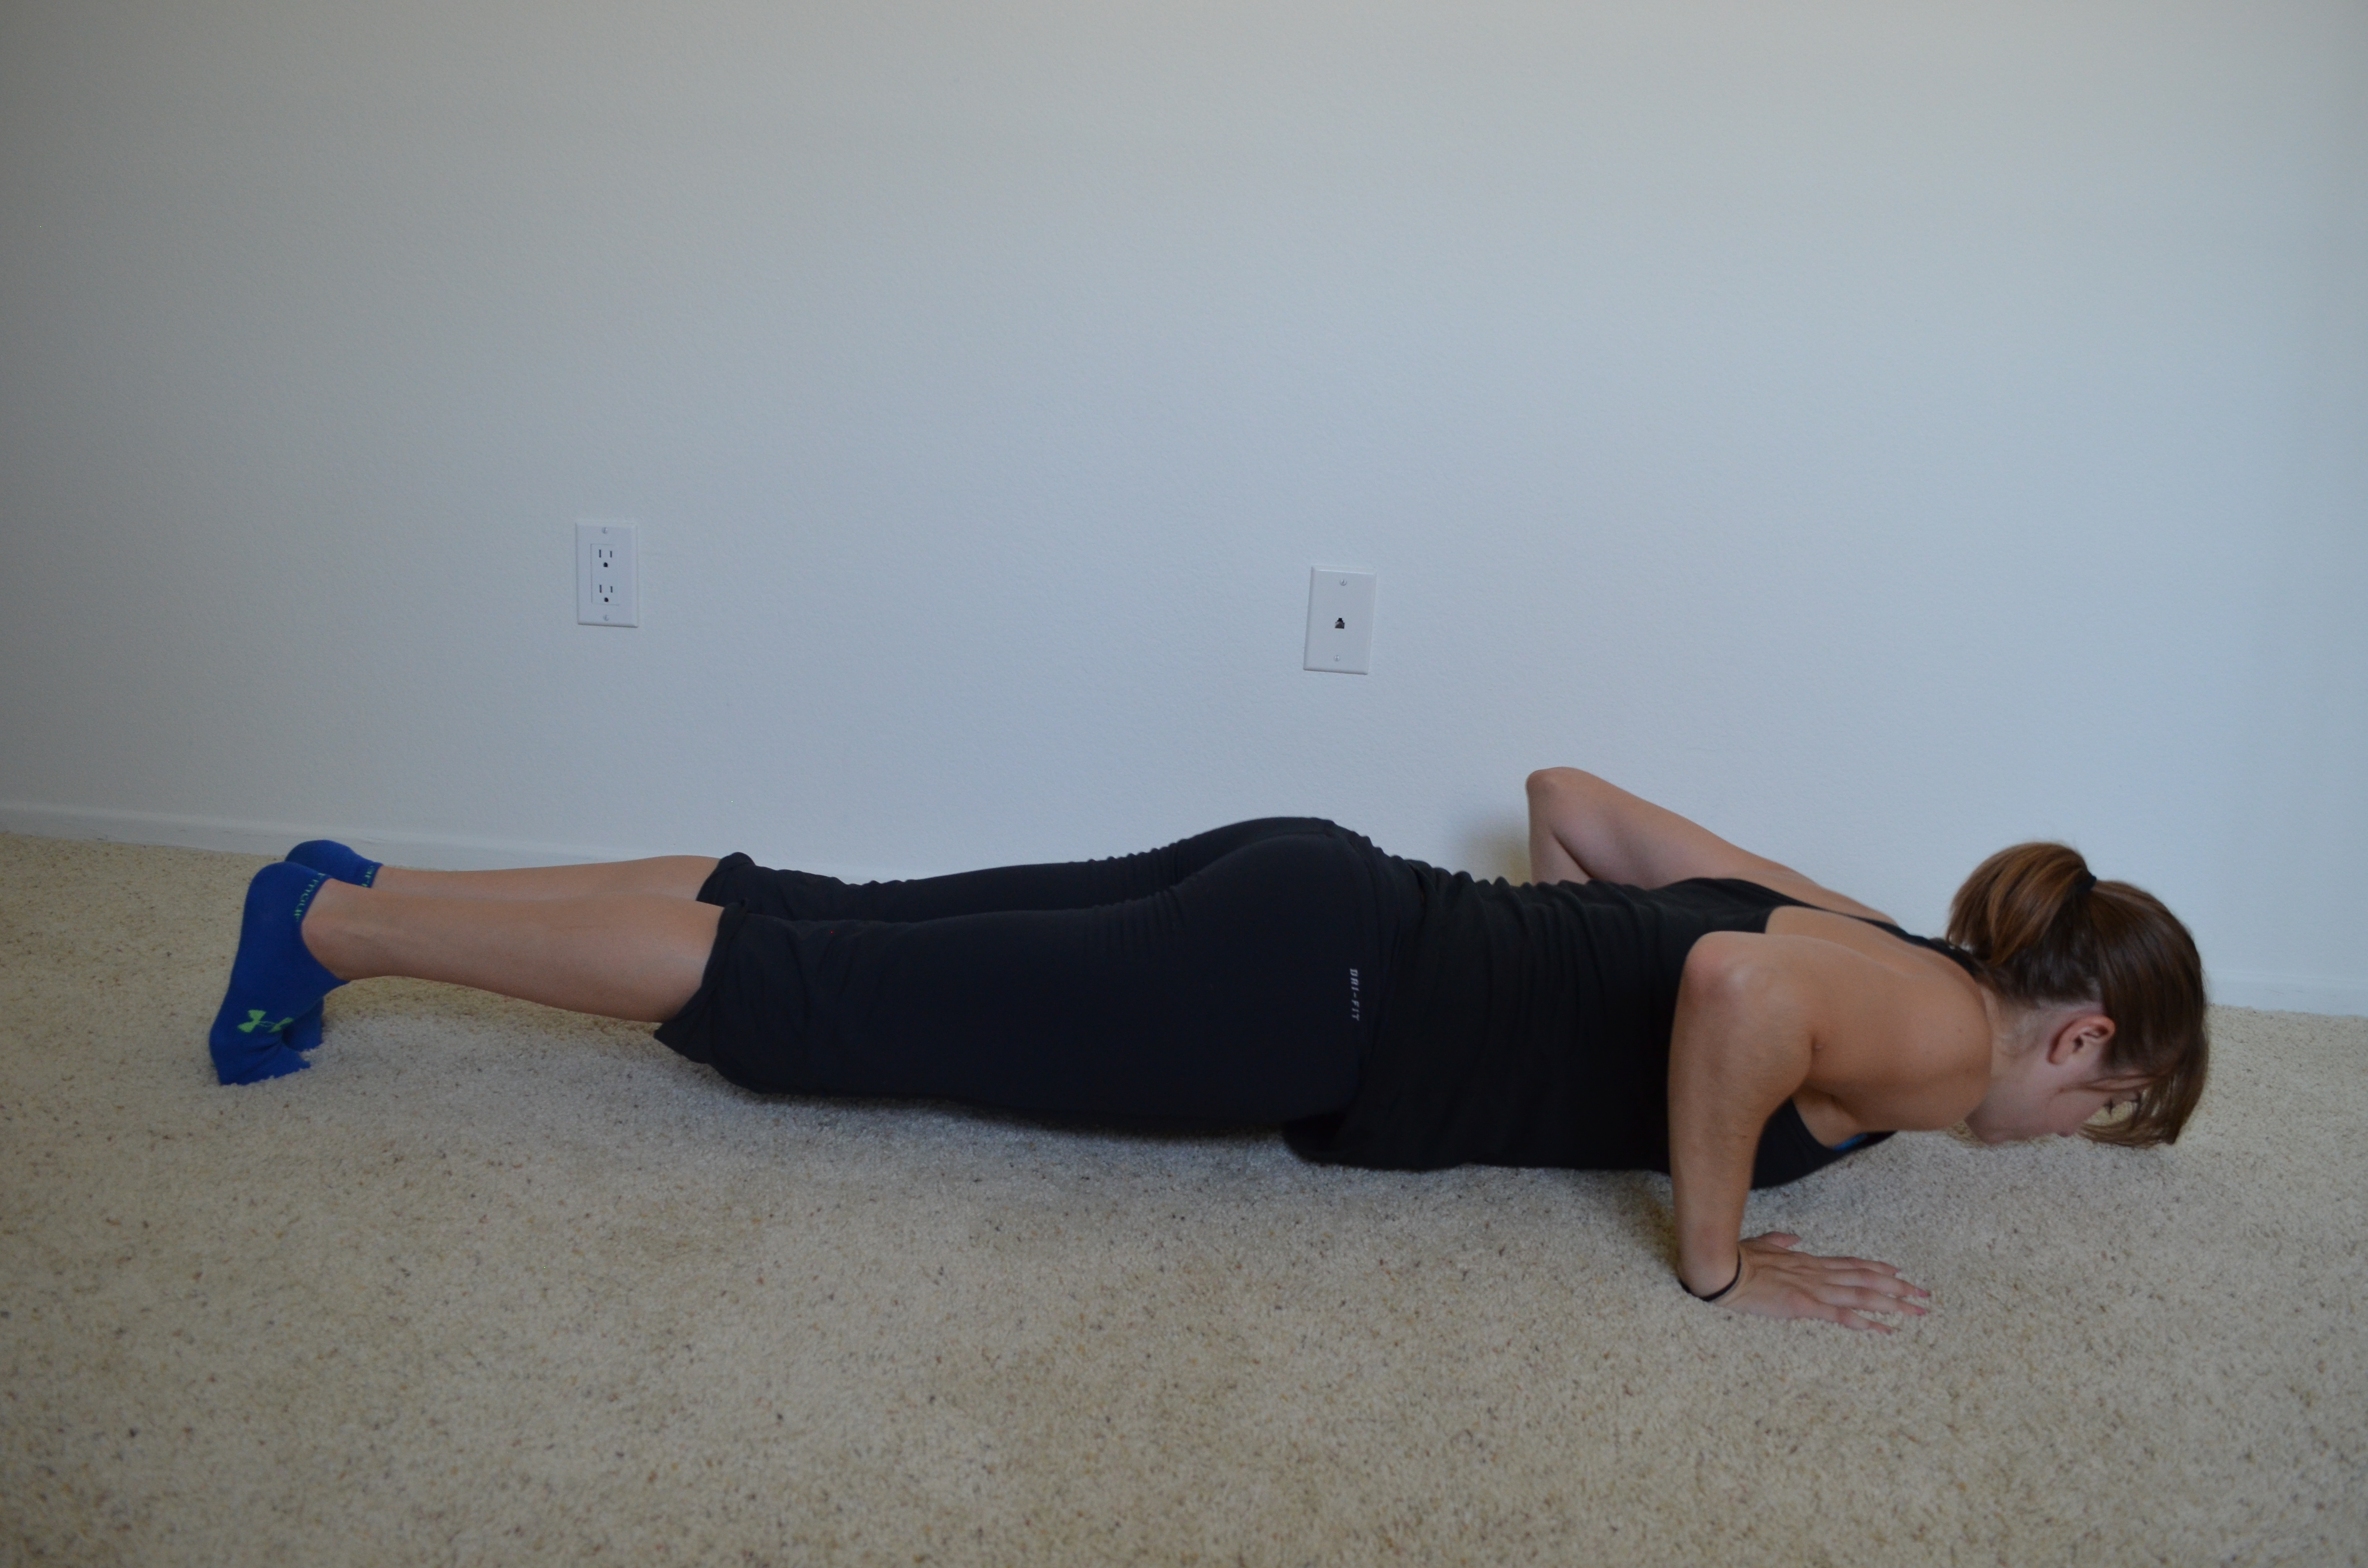
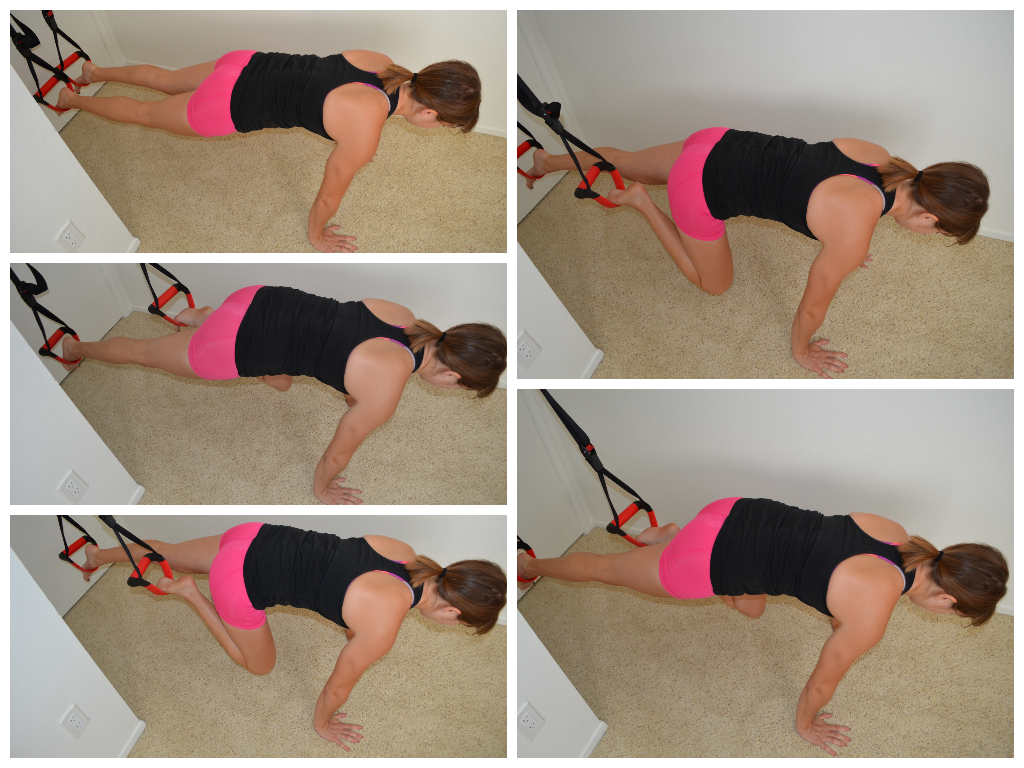
7. Push Up Hold (Hold top, bottom or middle) – I most often hold this move from the top of the push up. So set up on your hands and toes. Feet are together and hands are underneath your shoulders. Draw your belly button into your spine and squeeze your quads, glutes and adductors. Your shoulder blades should be down and back and your shoulders shouldn’t be up by your ears. Keep your head in line with your spine. Hold for 30 seconds to 1 minute. When I do isometric holds at either the middle or bottom of the push up, it is usually for only 3-5 seconds. When I do those holds, I’ll hold at the top for 5 seconds, middle 5 seconds and then bottom for 5 seconds before pushing back up to the top. I’ll usually do anywhere from 5-15 reps like that. (Below are holds at the top, middle and bottom.)
8. Side Planks – You can do these from your hands and toes or knees and forearms. Going down to your knees or forearms will make the move easier. Place your hand underneath your shoulder. Rest on the side of your feet. Stack one foot on top of the other or place one foot in front of the other. Raise up on your hand and the side of your foot. Do not let your hip sag toward the ground. Keep your chest open. Do not let it rotate toward the ground. Hold in a nice straight line, squeezing your core, quads and glutes. Hold 30 seconds to 1 minute each side.
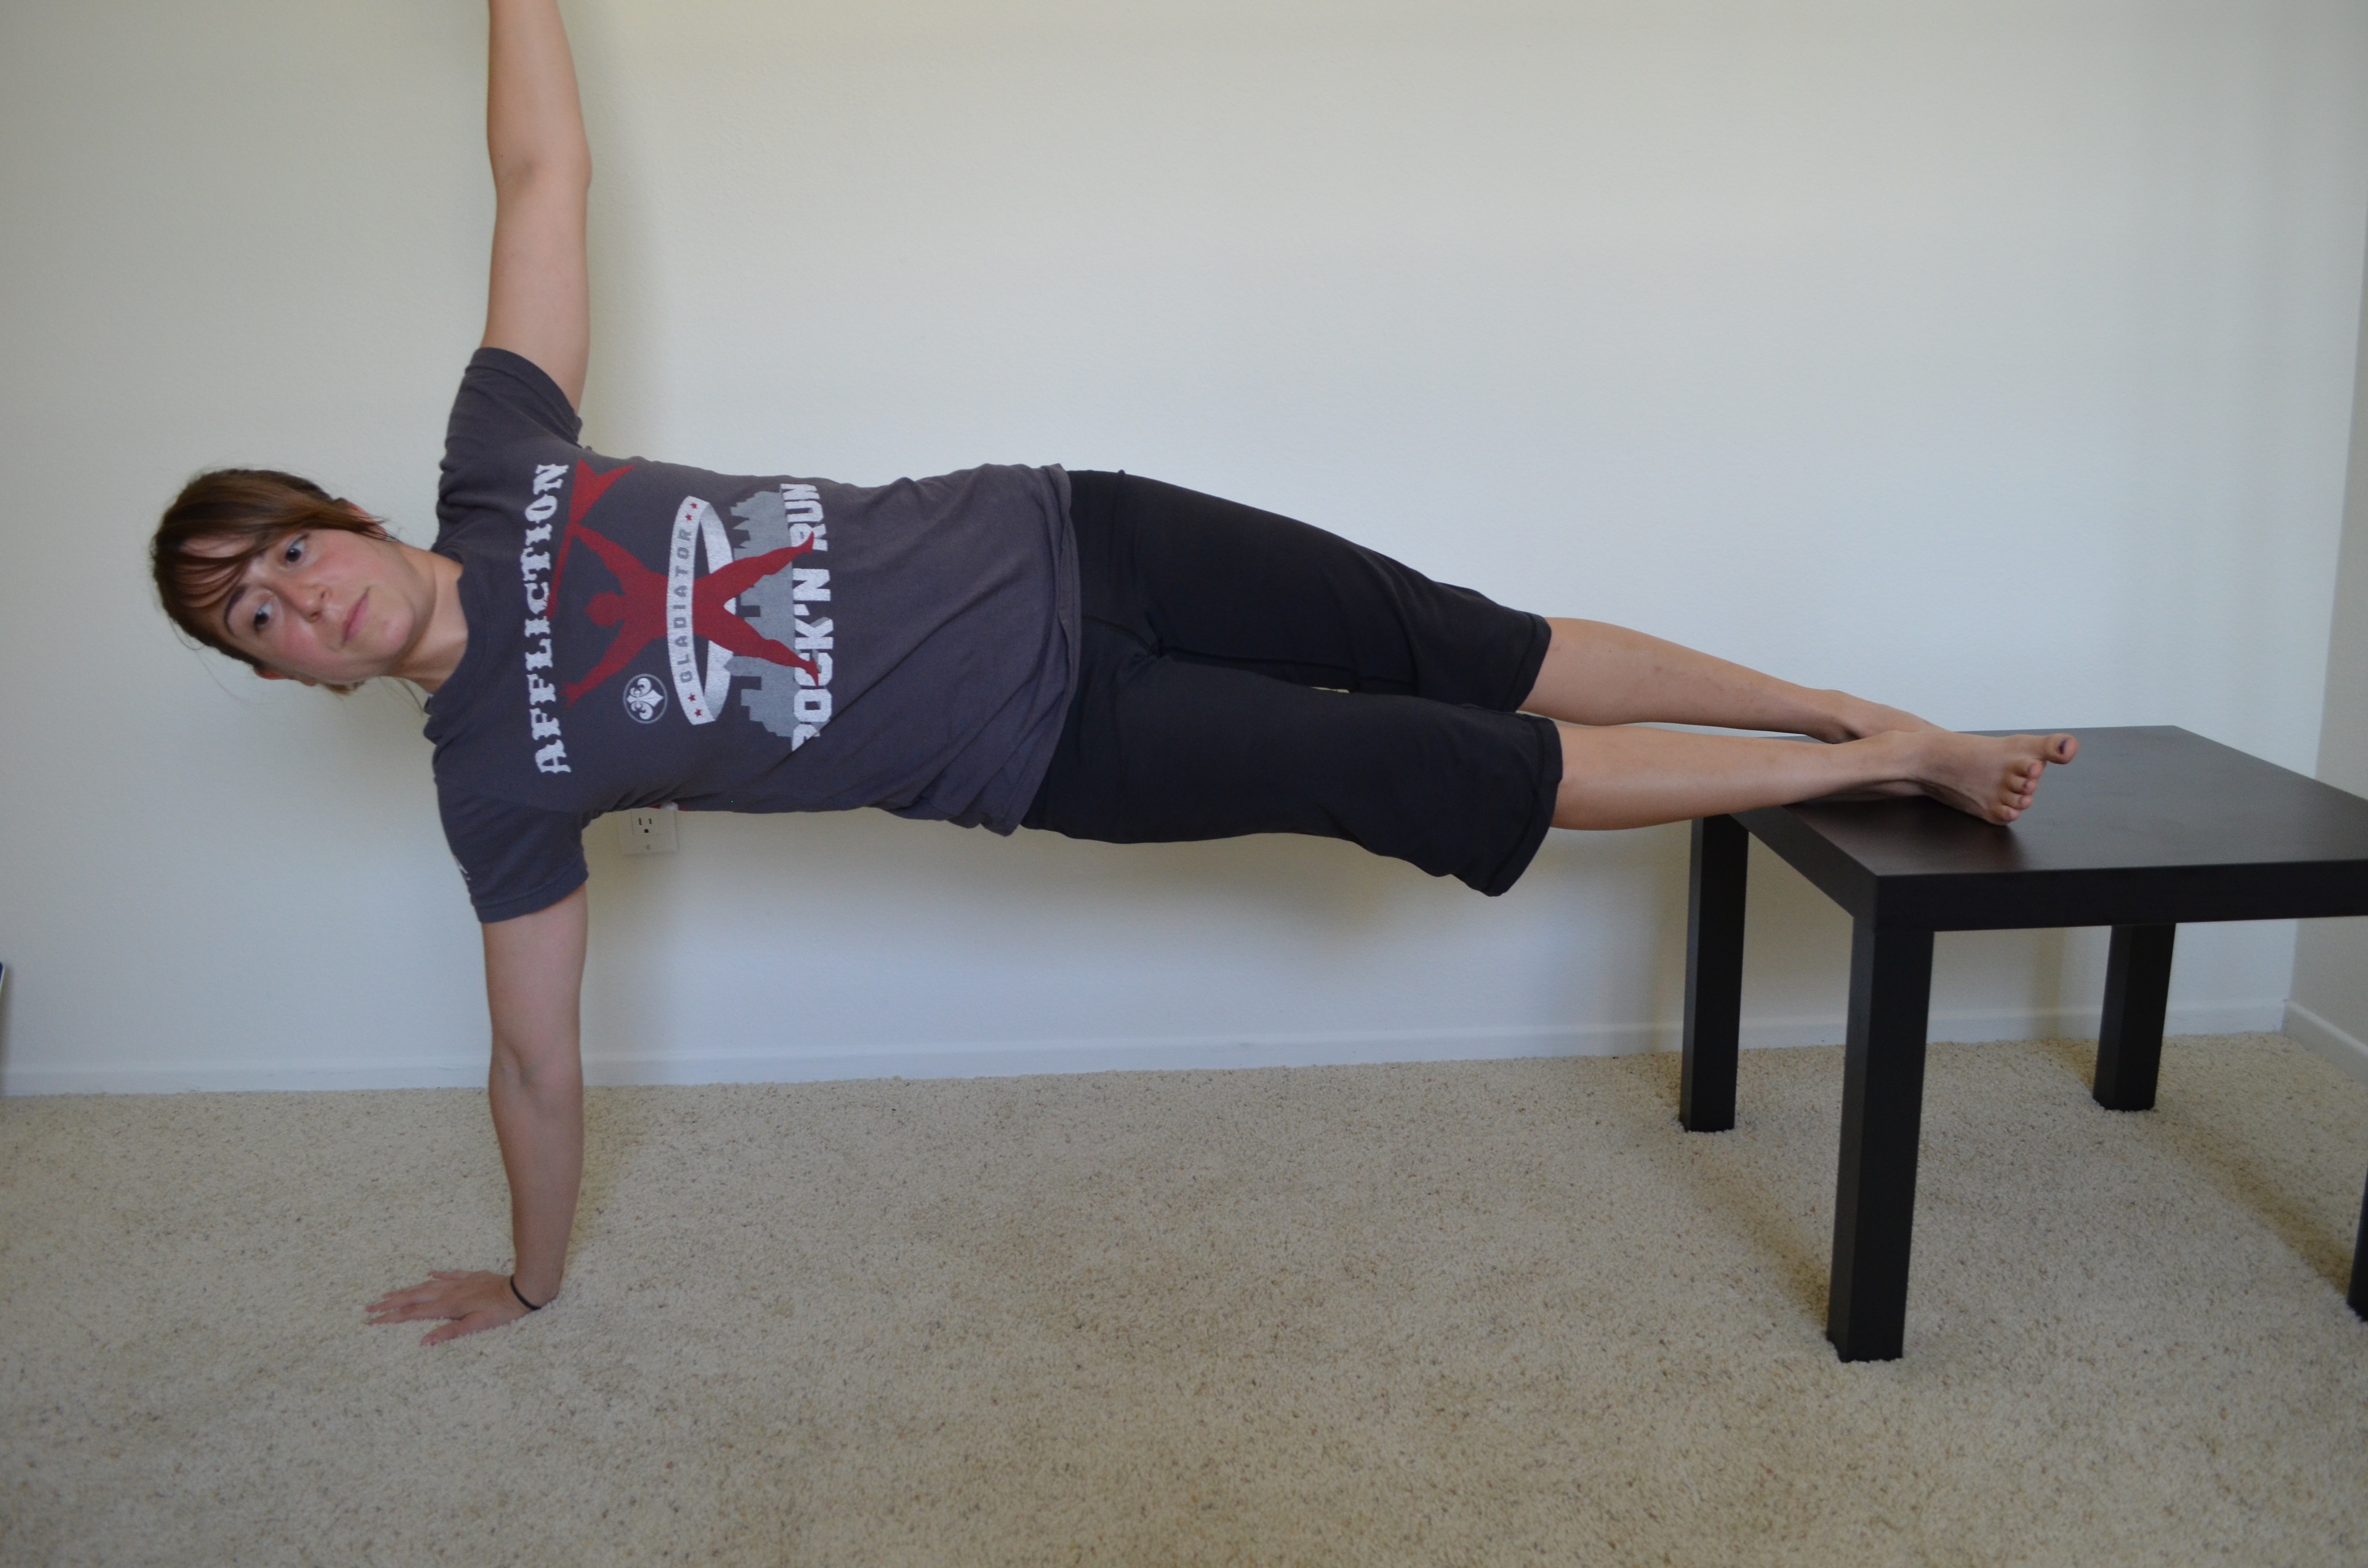
Can make the side plank harder by putting your feet up or raising the top leg.
9. Glute Bridge – Lie on your back. Bend your knees and place your feet flat on the ground. You should be able to graze your heels with your finger tips. Squeeze your glutes and raise your hips off the ground. Keep your core tight and drive up as high as you can. Your weight should be in your heels. Do not go up on your toes. To make this move harder, do a single leg hold. Hold 30 seconds to 1 minute.

You can make the bridge harder by holding on a power wheel.
10. Bull Dog – Start on your hands and knees. Knees should be under hips and hands underneath shoulders. Tuck your toes under and raise up onto your toes and hands. Hold with your knees just an inch or so off the ground. Do not let your low back arch. Keep your core tight. You will feel this a lot in your quads too. If you don’t, make sure your knees are under your hips. Hold 30 seconds to 1 minute. To make this easier, raise up a bit higher or walk your feet back a bit. You can also perform a shorter hold.
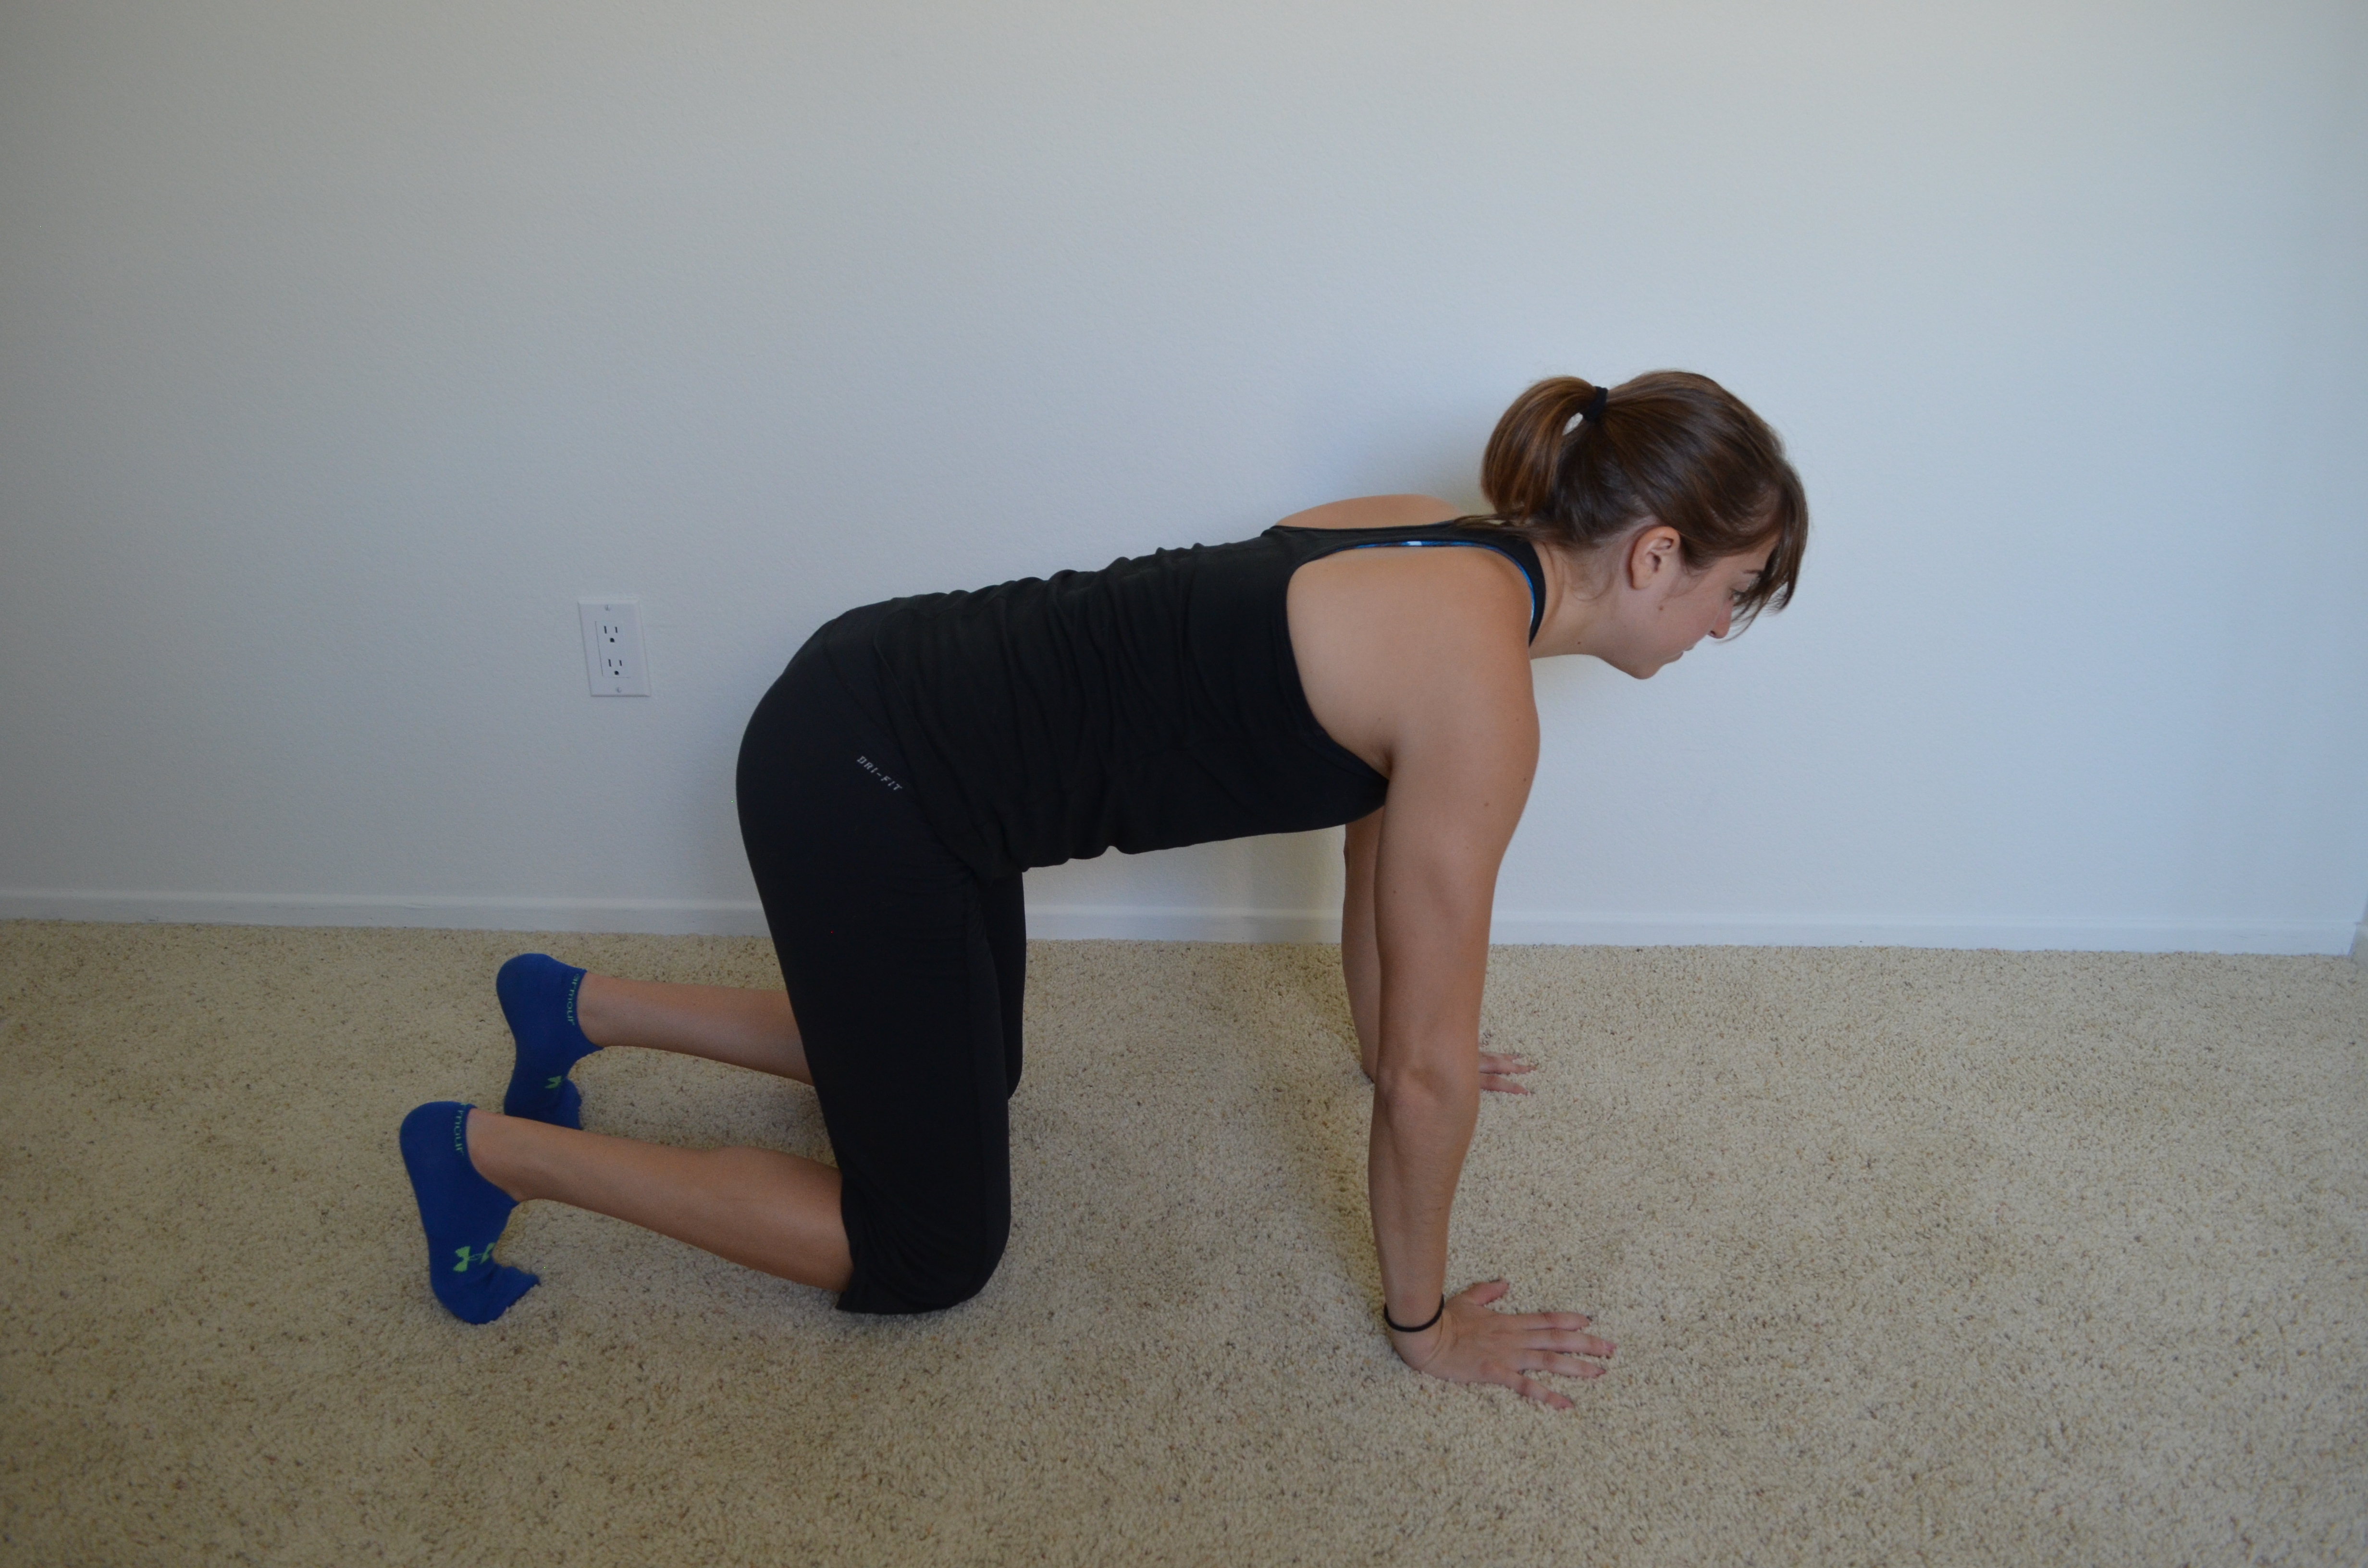
While it is hard to tell, my knees are hovering about an inch off the ground.
And in case you aren’t completely sure how to combine the moves above, below are two workouts you can start with!
Isometric Holds (can be shortened to a warm up)
3-5 rounds of 30 second to 1 minute holds:
Toes
Squat Hold
Scapular Wall Hold
Bull Dog
Side Planks
Isometric Holds and Repetitions
3-5 rounds of the following:
Toes 30 seconds to 1 minute
Jump Rope 25 reps
Split Squat Hold 30 seconds to 1 minute
Split Squat Jumps 10 each side
Scapular Wall Hold 30 seconds to 1 minute
Inverted Row 10 reps
Push Up Hold 30 seconds to 1 minute
Push Ups 10 reps
Glute Bridge Hold 30 seconds to 1 minute
Single Leg Glute Bridge 10 reps each side
Rest 1 minute between rounds.
For more isometric moves, check out these Isometric Moves To Alleviate Desk Job Aches and Pains!
And if you are a runner, here is a Runner’s Recovery Workout using isometric moves.
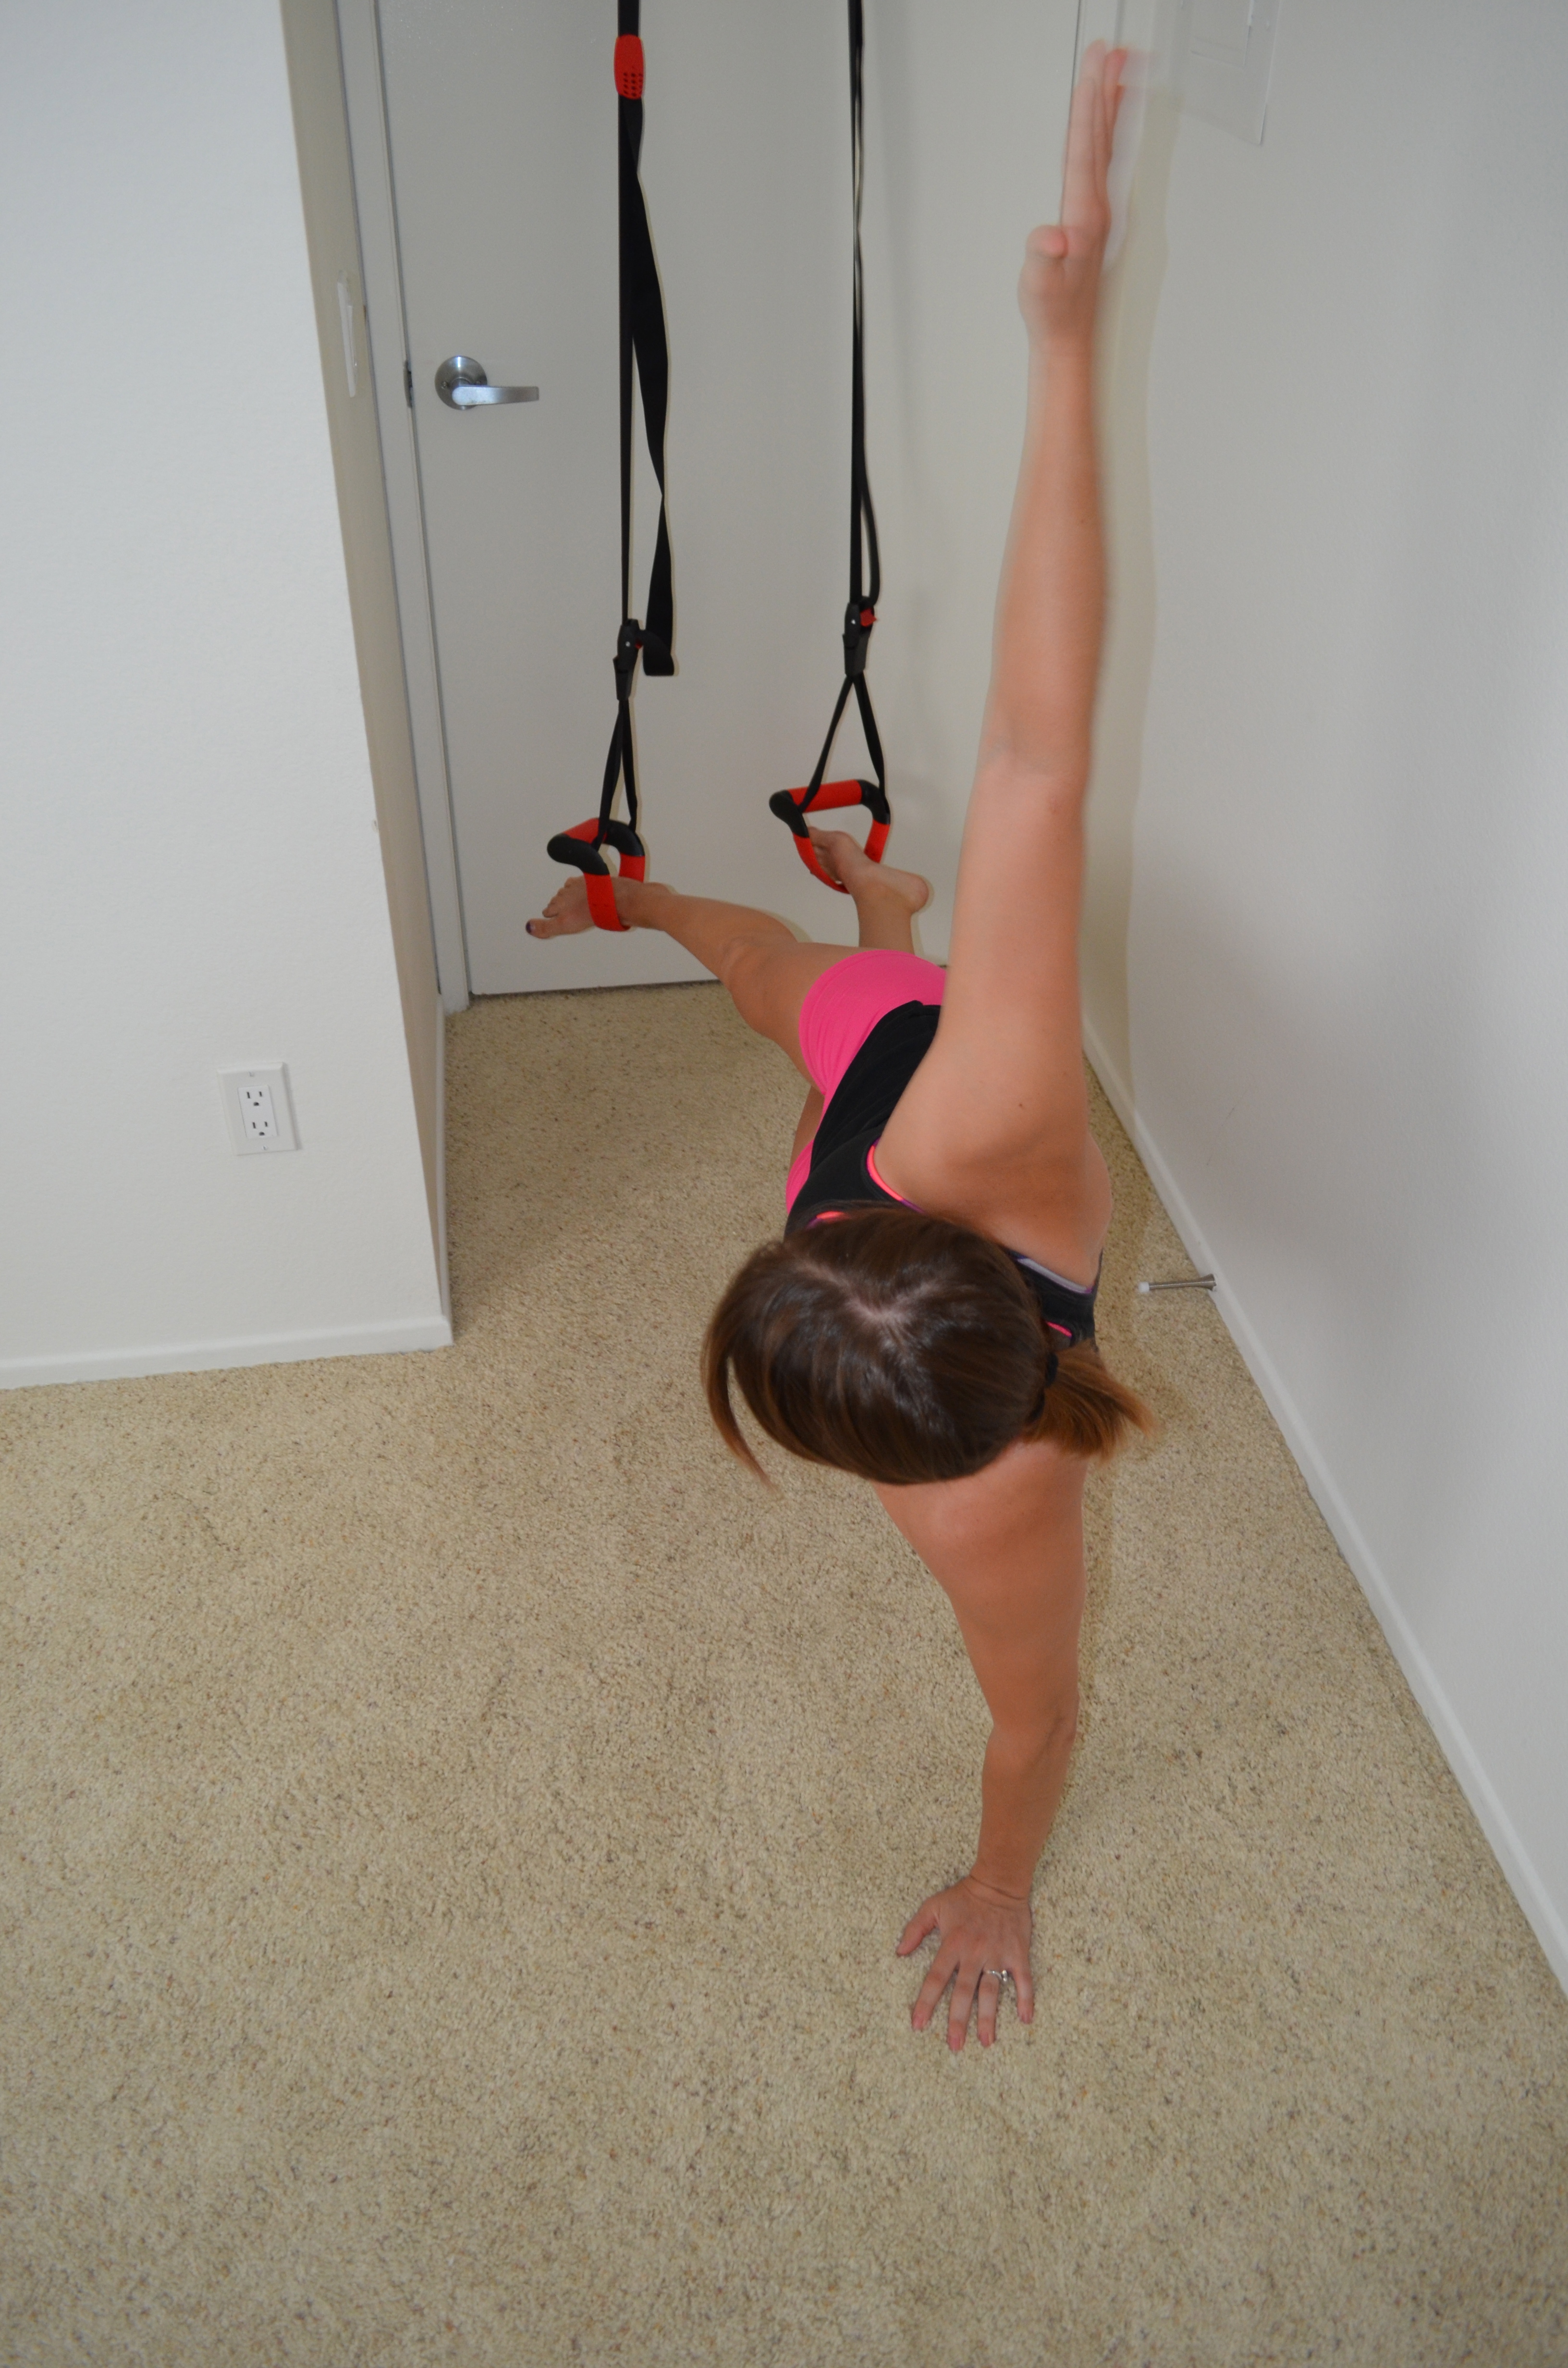
NOTE: Handstand holds are also a great isometric move that I didn’t include but wanted to make note of because I love them!
Calorie Cycling: Are you cutting out TOO MUCH?
Today I want to take a second and talk about weight/fat loss and dieting. While I always drive people to have performance goals, a great percentage of the clients I deal with do have weight loss goals as one of their reasons for wanting to start with training.
Some are completely aesthetic goals. Some are health related.
But whatever the reason, weight loss is a very common goal.
And many people think that weight loss or body fat loss means cutting everything out.

Your plate should NOT look like this.
But can cutting out TOO MUCH actually be the reason why they aren’t seeing results?
YUP!
If you cut out too much, your body is going to think it is starving. And when your body thinks it is starving, it is going to try to slow everything down so that it can protect the stores that it has.
AKA your metabolism slows down, which fights against you losing the weight/fat you were trying to lose.
Not to mention that if you aren’t fueling properly, your body is going to be stressed, which will negatively affect your hormone levels.
And you aren’t going to have the energy to workout or even really make it through the day functioning at a high level.
All those hours you are putting in at the gym may not be paying off because you don’t really have the energy to push your body to work as hard as it needs to for you to make the strength/muscle/cardiovascular gains you are looking to make.
And I bet you are now shaking your head, thinking, “But I need to really cut calories or I won’t lose weight! Even Bob Harper’s diet says to eat only 800 calories a day for three weeks!”
If you eat 800 calories a day and expect your body to function at a high level, you are kidding yourself. At that rate, you are going to stall very quickly and your body is going to revolt.
Plus, 800 calories from meat and veggies is going to affect your body way differently than 800 calories of M&Ms. You are going to see drastically different results if you eat the RIGHT FOODS.
You now may be thinking, “Ok so you are one of those “quality matters more than the number of calories.”
Yes…and No.
I do think creating a calorie deficit matters. BUT I think that quality of the food you consume matters just as much.
And while I’m a fan of low carb, I do believe that cutting out too much of ANYTHING, be in calories or a macronutrient, for prolonged periods of time leads to plateaus and potentially even backslides.
So what do you do if cutting out a ton of calories isn’t the way and it isn’t only about eating the right foods?
YOU CYCLE!
I call it carb cycling, but it could very well be described as calorie cycling as well.
I meet my body’s needs.
And every day my body doesn’t need the same thing.
Some days I completely deplete my glycogen stores. I do a super tough workout and have had a few days of lower carb. And now my body needs carbs.
And if I don’t do a carb refeed, I’m going to be a grouchy low-energy person. I’m going to be angry and not very fun to be around. My workouts will suffer and that will only serve to make me more peeved.
So I avoid letting that happen.
I do a carb refeed. I respect what my body needs.
Just like I respect the fact that on some days my body wants breakfast and on others it doesn’t. Some days it needs 3,000 calories and other days it is fine with only 1,500.
And the thing is, your body functions best when it is getting what it NEEDS!
If you want to lose fat, if you want to lose weight, yes, you’ve got to make changes to your diet. And yes, you will need to create a calorie deficit at points, but you’ve also got to respect what your body needs to keep functioning at a high level.
Because when your body functions well, it will also do a good job of losing the weight and performing well.
But on top of that, cutting out “enough” calories to lose weight, or cutting your carbs, doesn’t mean you do it to the same extent EVERY SINGLE DAY.
CYCLE.
Cycle in high days. Cycle in low days. When you workout, fuel your workout. Replenish your body.
When you don’t workout, don’t give it calories or foods it doesn’t need.
The cycling allows you to create the calorie deficit and/or carb fluctuations you need over the weeks, months, or even years to lose the weight/fat without your body feeling deprived or stressed so that your hormone levels and metabolism work against you.
If you’re progress has stalled, take a look at your diet. You may just be cutting too much out.
Just like we vary our workouts to create some “muscle confusion” since our body adapts, we need to vary our diet since our body will adapt and try to prevent starvation if we cut out too many calories.
Have you ever suffered from the, “If I barely eat I’ll lose more weight” mentality?
When did you realize that NOT STARVING yourself actually led to greater results!?! (Maybe right now…..)
NOTE: STOP WEIGHING YOURSELF EVERY DAY! If you cycle calories and carbs, your weight will fluctuate day to day. Pick one day a week or even each month to weigh. Do not put it right after your carb refeed.
10 Core Moves That AREN’T Crunches
In my workouts I rarely ever include crunches.
If I put them in, they are generally meant as sort of an active rest station. And I only use ones that are full body like the super crunches.
Here by the way are the super crunches from Saturday’s Bikini Workouts Post.

Crunch up and reach outside your legs. Go back down and crunch up reaching one hand inside. Perform a third crunch reaching the other hand inside. That is one super crunch.
In general though, crunches are worthless and I don’t include them. But that doesn’t mean I think core work isn’t important.
Because it is! Heck I’ve even done another post about core exercises even though I did one pretty recently called 10 Core Moves.
If you want to work your core, do it in a way that has either some functional benefit OR that works a ton of different muscle groups at once so you get a big bang for your buck.
Below are a variety of great moves that work more than just your abs and are functional.
I’ve included both rotational moves that will help you be strong when lifting something and twisting and anti-rotational moves that will help you prevent injury when trying to resist a rotational force.
Some of these moves are very core specific and some actually are “focused” on working another muscle group but do A LOT to strengthen your core.
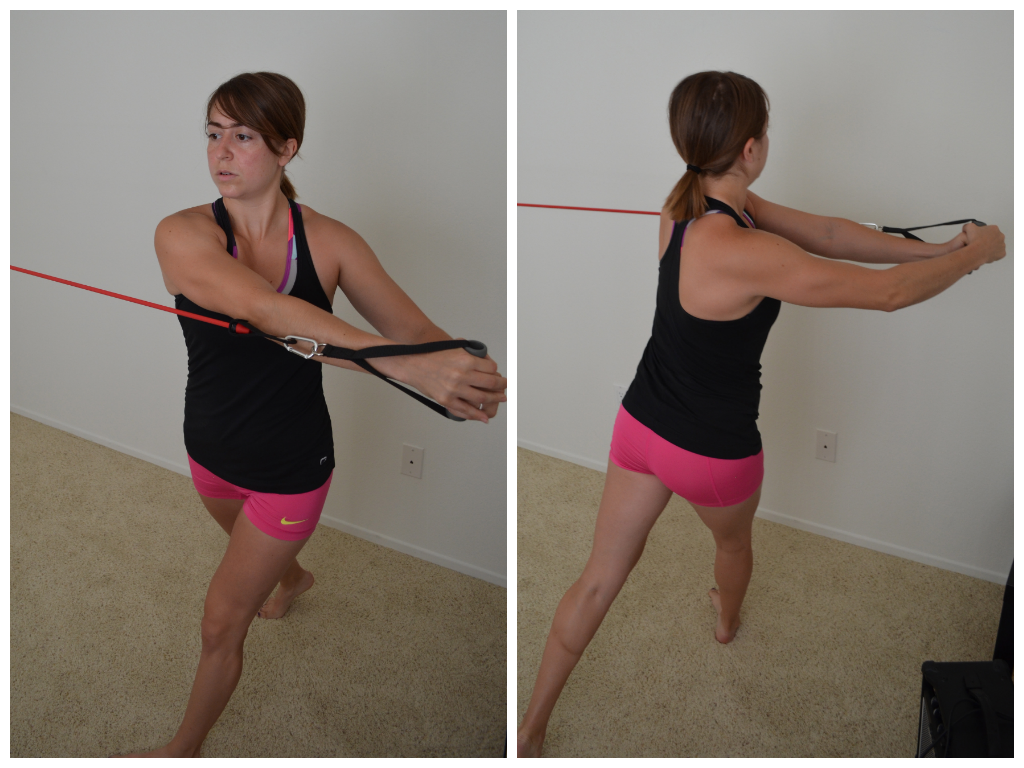
1. XT Strap Anti-Rotational Row – A great single limb movement that allows you to work each side of your back individually while also working your core. You can do this on the XT straps or even off a barbell in a rack. To do this move, place one hand across your chest and grab the strap in the other hand. Set up in a nice straight line, squeezing your quads, glutes and core. DO NOT let your body rotate. You want to move in a straight line as you row up and down. You are fighting your body’s desire rotate. You should move as if both arms are pulling instead of letting the side not rowing rotate open toward the ground. To advance (or regress this move), change the incline of your body. The closer you get to parallel to the ground, the harder the move gets.
2. XT Strap Rotational Row – In the other single arm row, we are fighting rotation. In this one we are working with rotation to row up. During this move, grab one strap in one hand. Reach the other hand up the strap as high as you can. Then rotate that hand toward the ground almost as if you are doing a hanging side plank. Keep your body in a straight line and don’t let the hips sag toward the ground. Keeping the core tight, rotate back to the start. To advance (or regress this move), change the incline of your body. The closer you get to parallel to the ground, the harder the move gets.

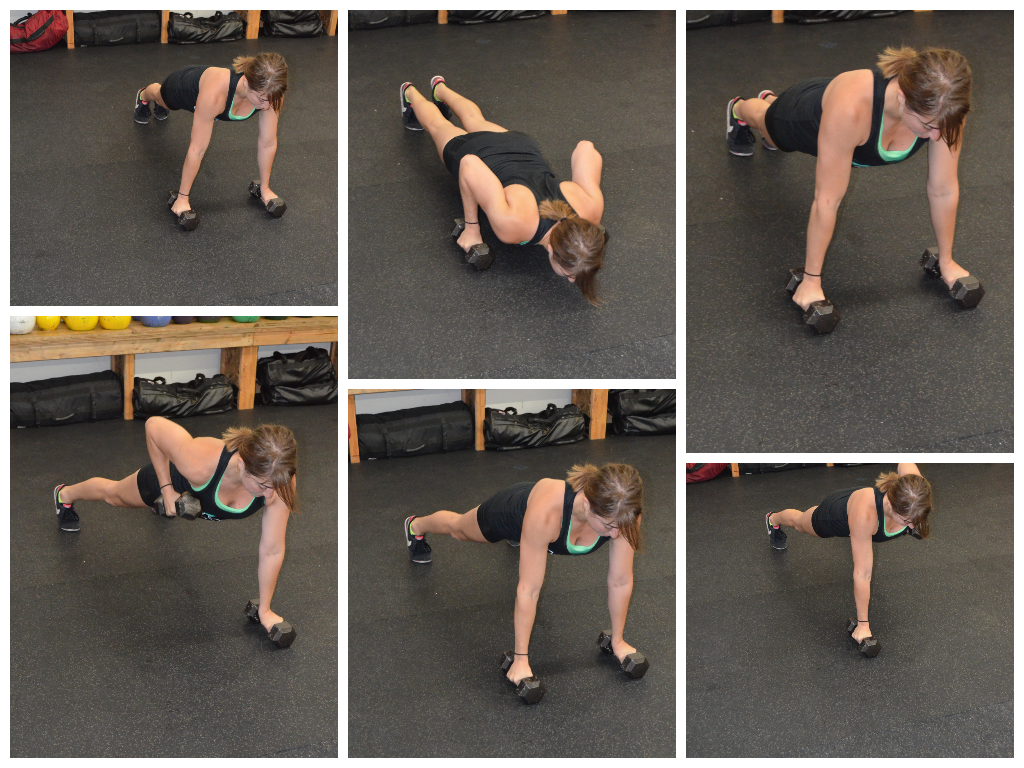
3. Mountain Climbers – I’ve shown these before on the towels. They can also be done simply on the ground to make them easier. Today, I did them in the XT straps, which creates a bit more instability. Put your feet into the straps and set up in a high plank. Run your knees into your chest without losing control so that your feet shoot out everywhere. You can also bring your knees across your body or to the outside of your elbow to hit slightly different areas of your core!
4. Rotational Knee Tucks – These knee tucks can also be done as straight leg pikes, but for today I just showed the tucks. Like mountain climbers, they can also be done where you just bring your knees straight into your chest. However, they are a great rotational move so that is the one I showed today. Set up in a high plank with your feet in the straps. Alternate bringing your knees to each elbow. Try to really get the knees to the elbow or outside to really work the rotation. If you are a beginner, you may want to do this move on the ground by jumping your feet in and back. You can also do this move on the towels!

5. Side plank – I showed a couple of variations of the side plank in my vacation workout a week ago, but you can also do one in the XT Straps. Using the straps creates a lot more instability so that you have to fight more to keep from rotating or collapsing. A great way to progress the side plank.
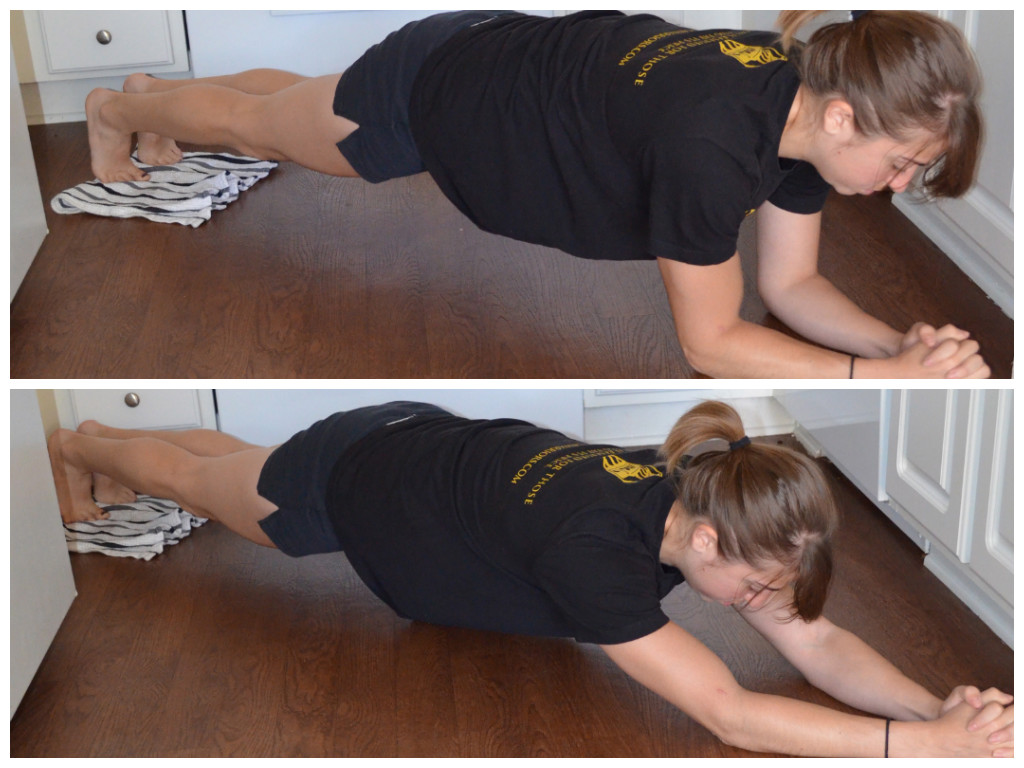
6. XT Strap “Ab roller” – Moves with this are great because they teach us to engage our core to support our back even when we are reaching for something. You can do this move on an ab roller. The bodysaw and the band pull below are two other moves that work the body in a similar way. To do this move, put each hand in a strap. Lean into the straps and straighten your arms fully. Bring them above your head and then back down to your shoulders. The closer to parallel to the ground you are, the harder the move will become. You should not feel this move in your low back. You should feel this move in your abs, arms and quads.

7. Band Stability Press – One of my favorite anti-rotational moves. You feel this all down the side closest to the anchor point of the band. You can also do this on a cable pulley machine. Step away from the anchor point as far as you can without allowing your body to rotate towards the anchor. Start with the handle at your chest. Push the band straight out from the center of your chest until your arms are straight. Do not let your arms go back toward the anchor. Then slowly bring your arms back in. This move looks easy, but when you try it, you realize how much your entire body fights rotating back toward the band hook!

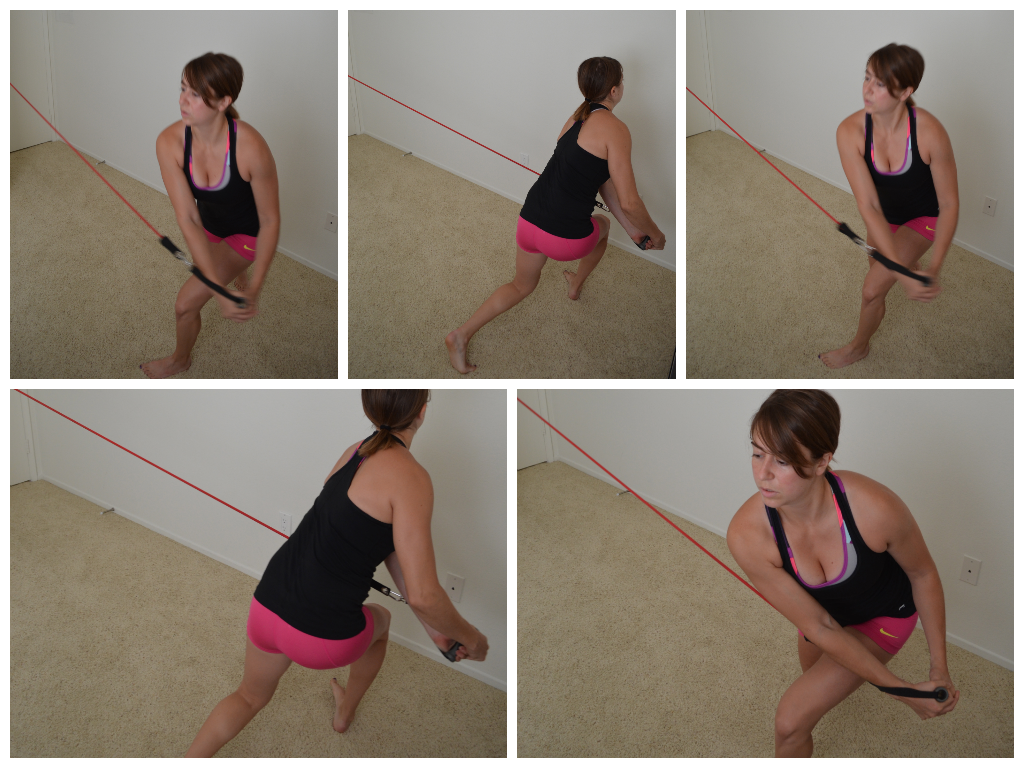
8. Band Rotations (Shoulder to Shoulder and High to Low) – These were some of my favorite moves in college. We used to do them a lot with medicine balls, which I loved. But since I can’t slam a medicine ball into the wall of my house….I do these with bands. Keeping your core tight and your shoulders down and back, rotate the band from side to side keeping your arms fairly straight. You can either rotate side to side at shoulder height or you can rotate the band down outside your hip. With both, make sure to rotate the back foot so that you are twisting your knee in a funny direction. With pulling the band down outside your hip, you will want to get more of a squat/lunge in than you will with the shoulder height rotation. Both are great, just different variations that target slightly different muscles.
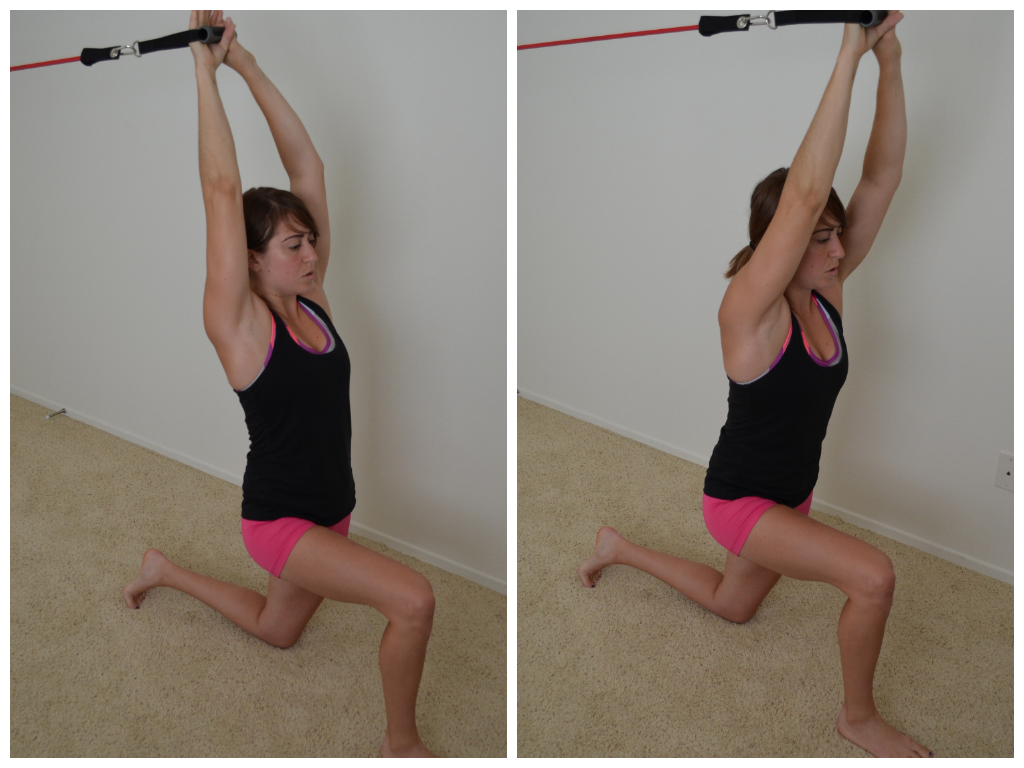
9. Band Reach – So this is the move that works the body in a similar way to the ab roller. It reminds me of that extension at the top of an overhead medball slam. It helps strengthen that extension so that your core is strong at that range of motion and so that your lats are even working to help stabilize and generate power. Kneeling, allow the band to pull you back. Then using your lats and core, press the band back forward. It isn’t a huge range of motion, but you will feel your abs working to stabilize especially as you allow yourself to be pulled back!
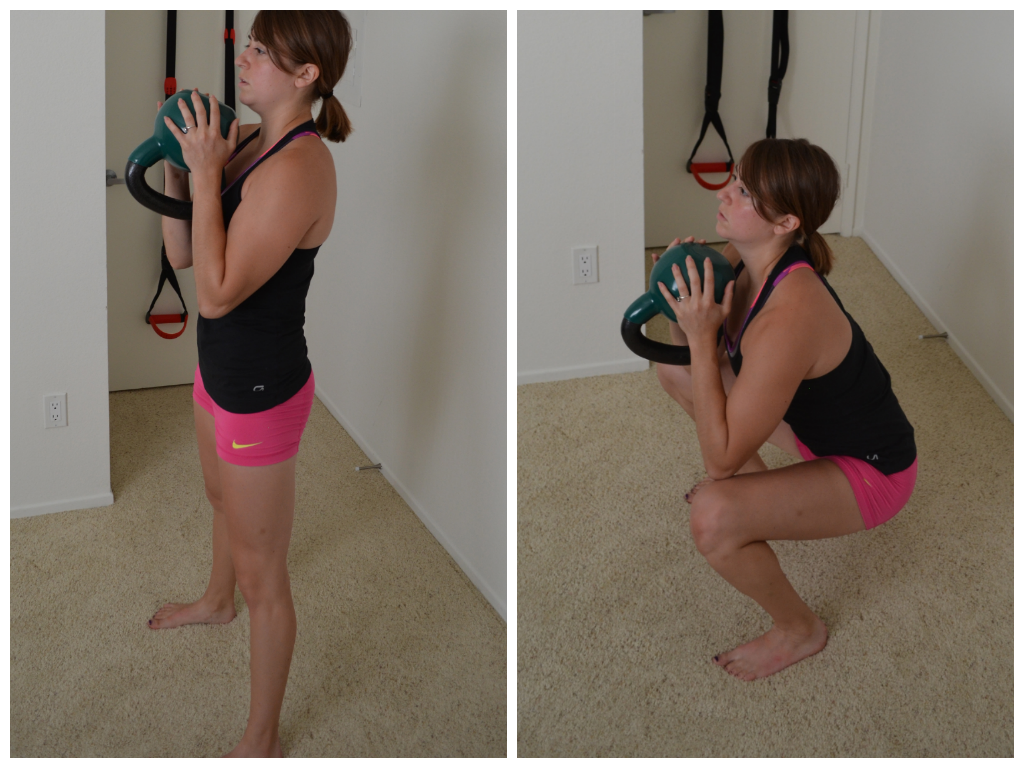
10. Front Squat – Potentially my favorite move on the list. The front squat works your legs AND your core. Any time you front load, be it a kettlebell, barbell or sandbag, you cause your core to engage to hold you upright. Seriously feel my core working so hard every time I do these. LOVE IT! Works a major muscle group, is incredibly functional and forces your core to really brace and stabilize during a functional movement!
Bonus: Handstands, push ups, crawling, bodysaw on towels, climbers, Plank with Reaches (Out and Back or Underneath and Through), Sit Thrus

On top is the sit thru, on the bottom left is the plank with one-handed waves and on the bottom right is an amazing mom and her daughter doing handstands!
I didn’t take pictures of these moves because I just recently featured them in my towel workout or hotel room workout posts. But I did want to make note that these are also great CORE moves so that you could see just how many different great moves really worked your core.
And honestly, all these moves are only the tip of the iceberg. You can do farmers walks (especially unilateral farmers walks). You can hold at the top of a dip. You can do pull ups or use the battling ropes. Heck you can even do one of my favorites, Superman/Banana from P90x where you are rolling around on the ground! (One of the most fun ones by far!)
There are so many great core moves that have so much more benefit than crunches! So are you still going to waste time on upper or lower isolated crunch moves!?!
I DON’T THINK SO!
Get your best body EVER – In TWO SECONDS!
I’ve spent the last week working with Jeff, perfecting our next workout progression for the gym. We’ve considered so many different variables to make sure that everyone gets the most out of each workout that my head is spinning.
And the crazy part is, both of us still feel like the progression could be better.
At some point though, you have to decide it is good enough. So I log into Pinterest for a little mental break before beginning some other work.
I don’t know how I feel about Pinterest. It is stupid…But at the same time…I LOVE IT.
I generally try to avoid looking at the Health and Fitness section because I know it will just make me angry.
But today I said, “What the heck. Maybe I’ll find something good.”
AHHHHHHH! (Insert a picture of me pulling my hair out and then starting to rant to Ryan about all the stupid things that are posted…You all should be feeling slightly sorry for Ryan right about now…He listens to a lot of ranting….)
Anyway, every other post is about some QUICK FIX! Some stupid challenge that will help you lose weight INSTANTLY!
I mean…I get it. We all want there to be some secret out there that will fix all of our problems. We all want an easy way out.
But it just simply doesn’t exist.
And on top of that, half the things being posted out there advertising a “quick fix” are complete nonsense!
A month squat challenge where all you do is squats?
WHY?!?
Please someone tell me what the point is? It isn’t even a progression to help you add more weight!
And then there are the 30 days to 6-pack abs ones…Just do a bazillion crunches and you will look amazing….
RIGHT!?!
WRONG!
I mean I get that they are trying to make easy little workouts to get people at least moving and motivated. Even small changes can lead to big results. And I also get that you aren’t going to “pin” a whole diet and exercise program to get a 6-pack.
But really…a bazillion different crunches? Not even full-body core moves!
Seeing these ridiculous quick workouts just made me angry after spending days on a progression. There are just so many HOLES in them.
So many ridiculous workouts that won’t get people any results whatsoever.
Which is sad. Because quick workouts CAN get results.
And 30 day challenges can be really beneficial! In 30 days, you can see a ton of changes and gain the momentum you need to make a healthy lifestyle change. In 30 days, you CAN really dig in and accomplish your goal!
If you are going to “pin” some quick workouts, at least find ones or make some that are truly beneficial. Don’t just throw together some random exercises because it seems like it would be hard or “gnarly.”
Don’t be suckered in by a title like “Better Booty in 2 moves!”
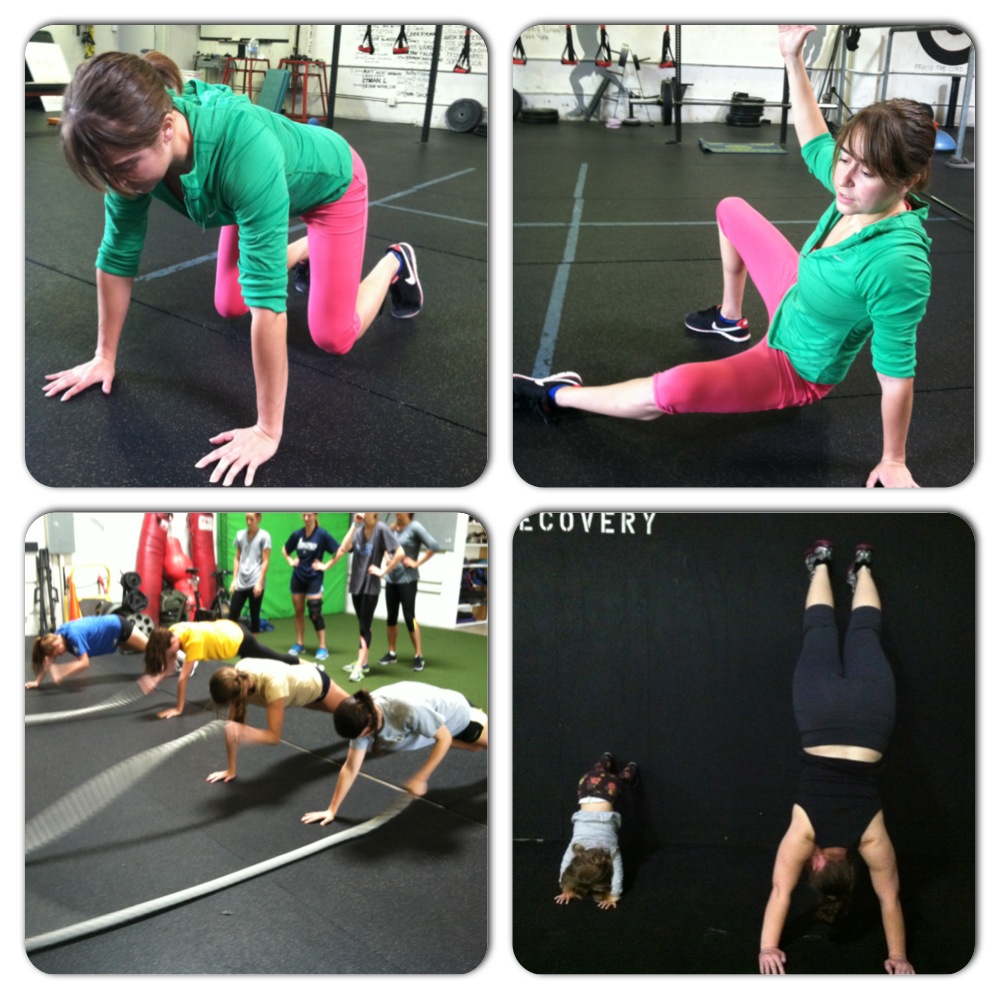
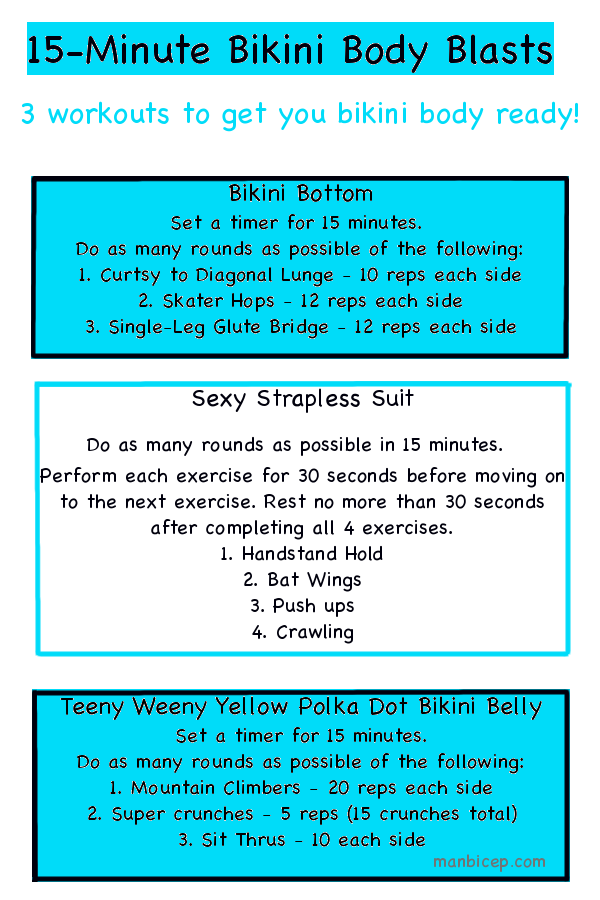
Because I also don’t simply want to rant without doing something about the crap out there, here are my Pinterest Bikini Body Blasts. I wouldn’t normally call them that, but I like the sarcasm I know is behind the title.
These workouts are under 15 minutes, shoot you can even set a timer for 10 minutes if you are really short on time.
And they WILL actually get you results…be it a bikini body, moving and feeling better or getting stronger.
They involve compound movements and work your entire body. The make you move in all the different planes of motion and they work on stability, strength and power. They can be done anywhere or taken to the gym and weighted down to make them even tougher.
You can take less rest and make them more “cardio” or you can take more rest and go really heavy with the moves to focus more on strength.
They will help you burn fat while strengthening your entire body, which, along with a good diet, is what it takes to have the “bikini body” that people are searching for.
Enjoy!
P.S. Super Crunch for you Jill!
My Fitness Pal – Consciously consuming
I never count calories now. I haven’t for years.
I eat whole natural foods and I know my calorie intake will be where it should be.
Really the only time you need to count calories is when you have to worry about calories in vs. calories out. And that only happens when you don’t consume quality calories.
So while I’ll make basic notes about to help guide my eating, I don’t that often use a calorie counter or food tracking app.
However, there will be periods of time that spur me to be curious about my exact macronutrient breakdown, which is when I turn to a calorie counter/food tracking app.
Food logs or food tracking apps/websites are a great way to help you really be conscious about what you are eating. While I think calorie counting is awful and stressful, I think tracking what you are eating can be super helpful.
If we aren’t truly aware of what we are consuming, how are we going to know what needs to be changed if we aren’t making progress? If we are succeeding, how are we going to know what works so that we can keep doing it?
That is where a food log comes in handy.
Anyway, after our Metabolic Typing workshop at Innovative Results, I became interested to see my exact macronutrient breakdowns.
I generally don’t worry about exactly what ratios I’m eating. I focus on eating meats and veggies as the base of my diet, with carb cycling throughout the week. My carbs include rice, potatoes, fruit and the occasional corn tortilla.
I knew my carbs stayed low, under 60g, on most days and about 150-300g on carb refeeds (with my fat intake under 50g on carb days).
But I honestly had no idea what my fat and protein intakes truly were.
So I decided to try out a food tracking app.
In the past I’ve used Fitday.com.
And I like Fit Day, but honestly, it isn’t the easiest thing in the world to use. If you are willing to spend the time to put in your own foods and the nutritional breakdown, it is perfect.
I’ve also had clients use Spark People and love it. I found it easy to use and liked that it had some good information in addition to the tracker for anyone using the site.
But I decided to try out My Fitness Pal since a ton of my clients love it and I’ve liked using the phone app with them.
I’ve only used it with clients and never really sat down and fully used it myself so I was curious to really give it a try.
And it is pretty darn great and tracks a ton of stuff.
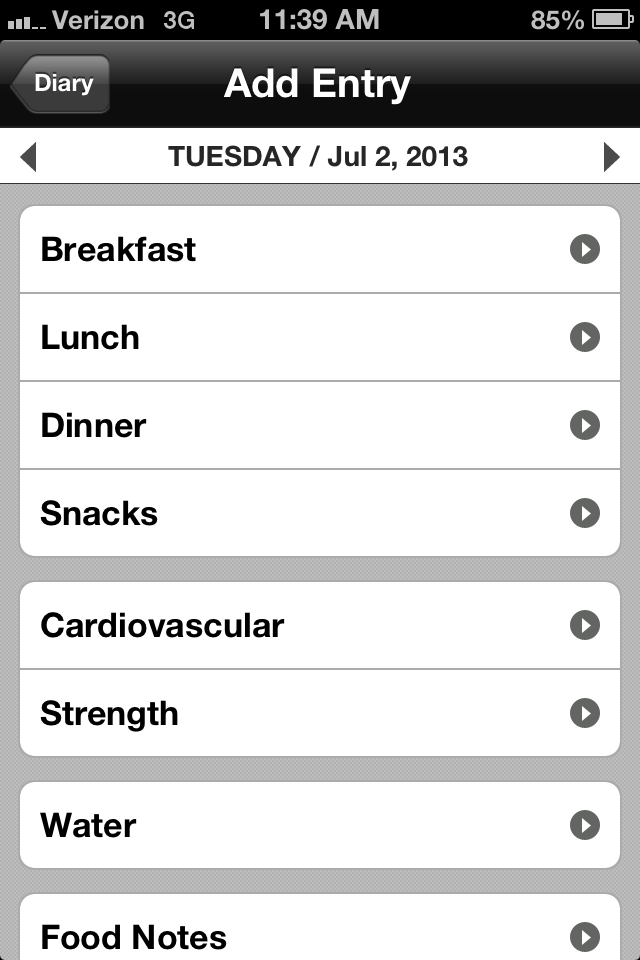
Tracks food and workouts. I do like the “notes” part as well.
I customized my own macronutrient ratios and there are a ton of foods listed in the counter already.
It is also super easy to save a meal so that you don’t have to go back through and select the list of foods in that meal every time you eat it (which for me is great since I eat a lot of the same meals over and over again).
Of course, I was amused by how many different foods there were in there….It is always interesting to see what people consider healthy…Lots of soy milk lattes and sugar-free things….YUCK!
There were also a lot more restaurant dishes and processed foods than whole natural ones. Which I guess, at least, allows people to know what they are eating when they eat out. But still, it is sad to see how much of even the diet of people trying to be “healthy” is really processed crap.
At least though, people are CONSCIOUS of what they are eating when they track it. Because so many people aren’t conscious of what they eat.
And being conscious of what you eat is extremely important. As I said above, if you know what you are consuming, you can figure out what is working and what isn’t.
Same thing goes for tracking your workouts.
Which is why it is nice that My Fitness Pal allows you to track your goals AND your workouts along with your food.
However, while I like the food tracking portion of this app, I can’t say I’m a fan of how the other two sections work.
I like that they exist…Just not how they work.
Under goals, you can choose macronutrient goals. You can even take a few measurements. You can record how many times a week you want to workout. Which is great.
But really the main focus is on weight loss. And it almost even encourages you to weigh every day…Which I don’t like.
AT ALL.
It shouldn’t allow people to record their daily weight. Because daily fluctuations don’t matter and can even discourage people.
Shoot if I weigh right before a carb day and then right after a carb day, I can fluctuate numerous pounds. It’s not really cause I gained weight though! And sometimes I might have even eaten fewer calories than on a low-carb day.
And actually the carb days are what help me become even leaner over the long run even if I do gain weight on the scale right after them.
The point is…YOUR WEIGHT FLUCTUATES. Be it water weight or whatever else. Weight fluctuates so shouldn’t be tracked daily.
And while it has measurements, it only allows you to record neck, waist and hips. Waist and hips are two great places to measure, and tell you a lot, but still…Why not just include arm and thigh as well?
You can lose/gain inches on a number places. And all can show progress. So why not include them all?
I know that there are only so many things a food/workout tracking app can do, but a couple extra measurements should be included.
Just like I think it would be great if the app included a place to record a couple lifts and/or runs and their numbers or times.
Right now, the app asks for workout goals that include how many workouts per week, how long and even how many calories you want to burn. And yes, working out the number of times you planned to, and having that be tracked, can be motivating.
But performance goals for during your workouts can be even more motivating! Having performance goals can help keep you motivated so that you accomplish other goals, like weight loss goals.
Because, let’s face it, when you have a performance goal, you are more likely to eat well AND workout hard no matter how much you want to skip the workout that day.
Anyway, I just think it would be nice for the app to allow you to include a bit more under “goals.”
Not everyone who wants to track their food intake cares about losing weight. And if weight loss IS the goal, it never hurts to have other markers of progress to help keep you motivated!
I know I just went on a bit of a rant about the goals portion of My Fitness Pal, but really the only thing I HATE about the app, is the workout portion.
I’m not sure how they could make it more accurate, but it isn’t accurate at all when it comes to calories burned. Which doesn’t matter to me, but since they add that in to what people can then eat, you would think they would want it to be more accurate. (I guess though if you really care, you could manually enter it yourself….)
But worse than that, is the fact that the app puts a HUGE emphasis on cardio.
Because when you choose the strength training moves, they don’t show you any calories being burned. Fortunately you can add weight, so if you really wanted to track your lifting progress you could always scroll back through your workouts.
However, the only way to show calories being burned during a strength training workout is to select “Circuit Training” under Cardio!
I, personally, don’t care if it doesn’t show what I burned during my workout, but since they do add that in to what you should then be consuming, you would think that strength training would have some value.
It just made me mad because I felt like it perpetuated the LIE that cardio is key to weight loss (and health in general).
Anyway, I’ve found tracking to be very interesting. And I would recommend My Fitness Pal, at least for the food tracking portion.
Do you keep a food log? Workout log? What is your favorite app? Anyone else pissed off about the exercise portion of my fitness pal? (Am I just maybe missing something that makes it better?)
P.S. Another reason I like some of these online/phone apps is that you can easily SHARE and create a community. The more you involve other people in your goals, the more likely you are to accomplish them. ACCOUNTABILITY and SUPPORT!
Celebrating Fourth of July…With a park workout!
This is Ryan and my first fourth of July out in Cali…And I can’t say I’ve minded at all!
Fourth of July is one of Ryan’s favorite holidays…Random, I know. But he LOVES warm weather and therefore loves summer holidays. So we always have to do a little something outside.
Last fourth of July was one of our last weeks in Boston. We celebrated with an outdoor workout and some delicious BBQ.
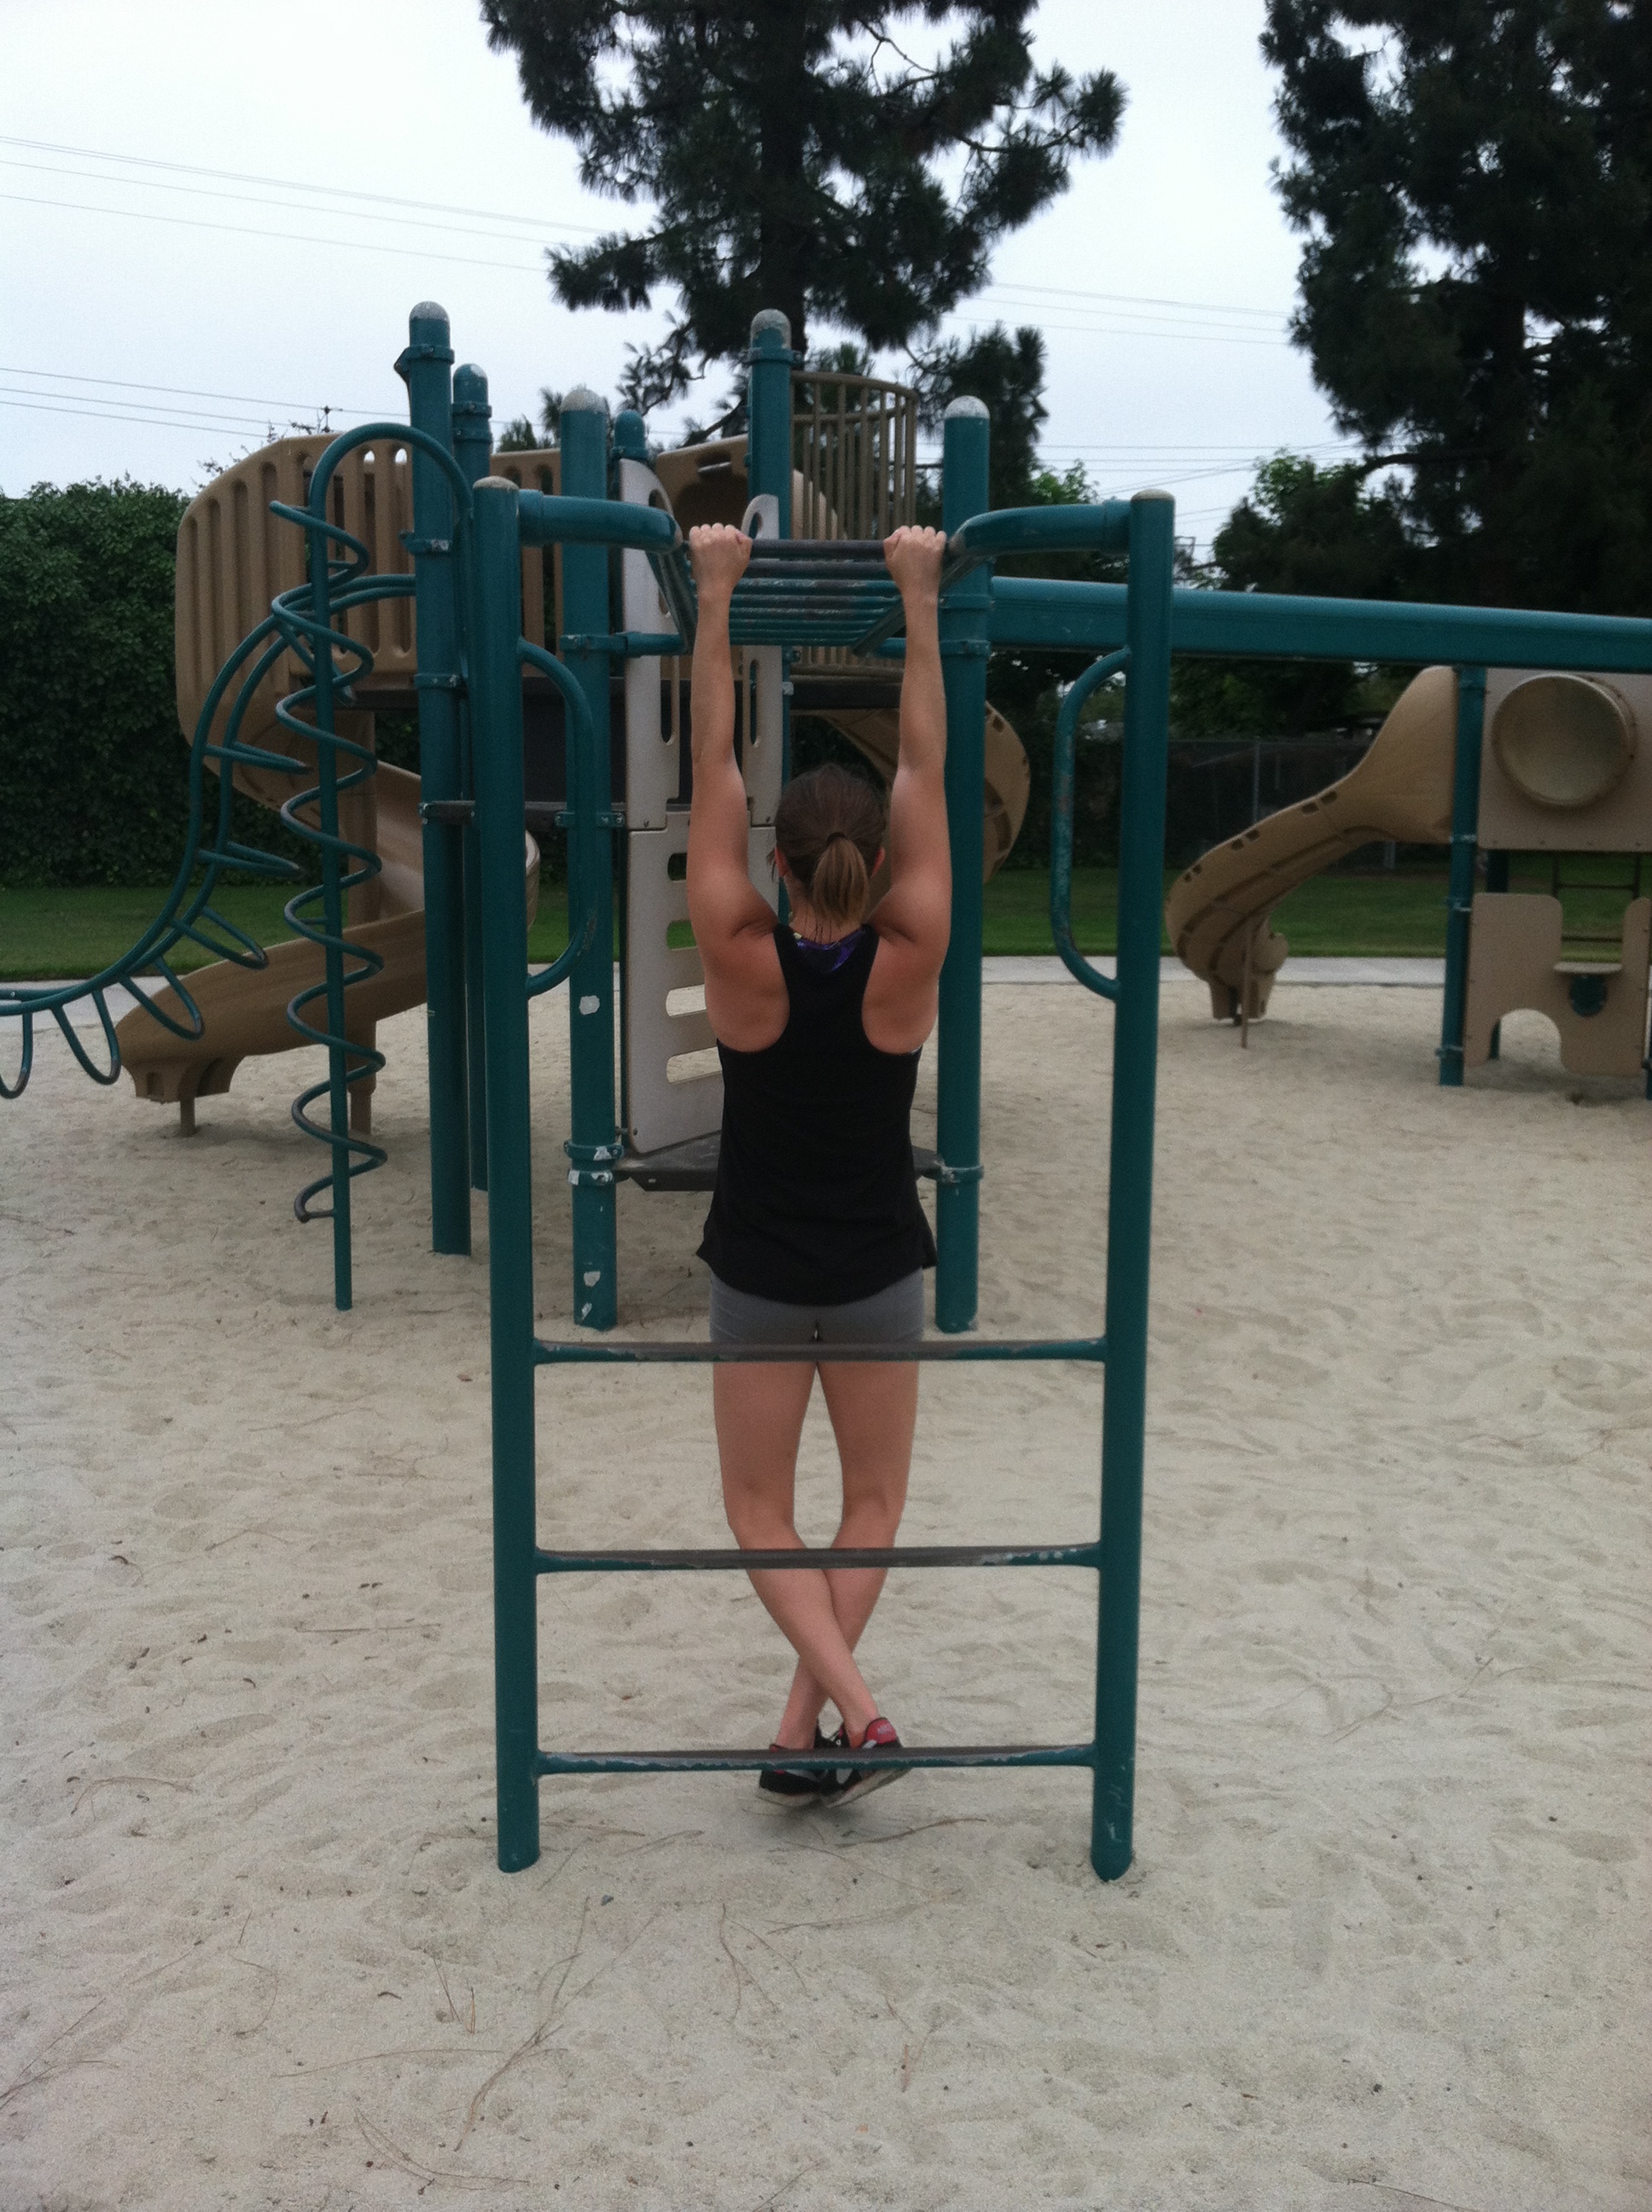
This year, we kept the tradition going with a great outdoor park workout – sprints, monkey bar pull ups and battling ropes.
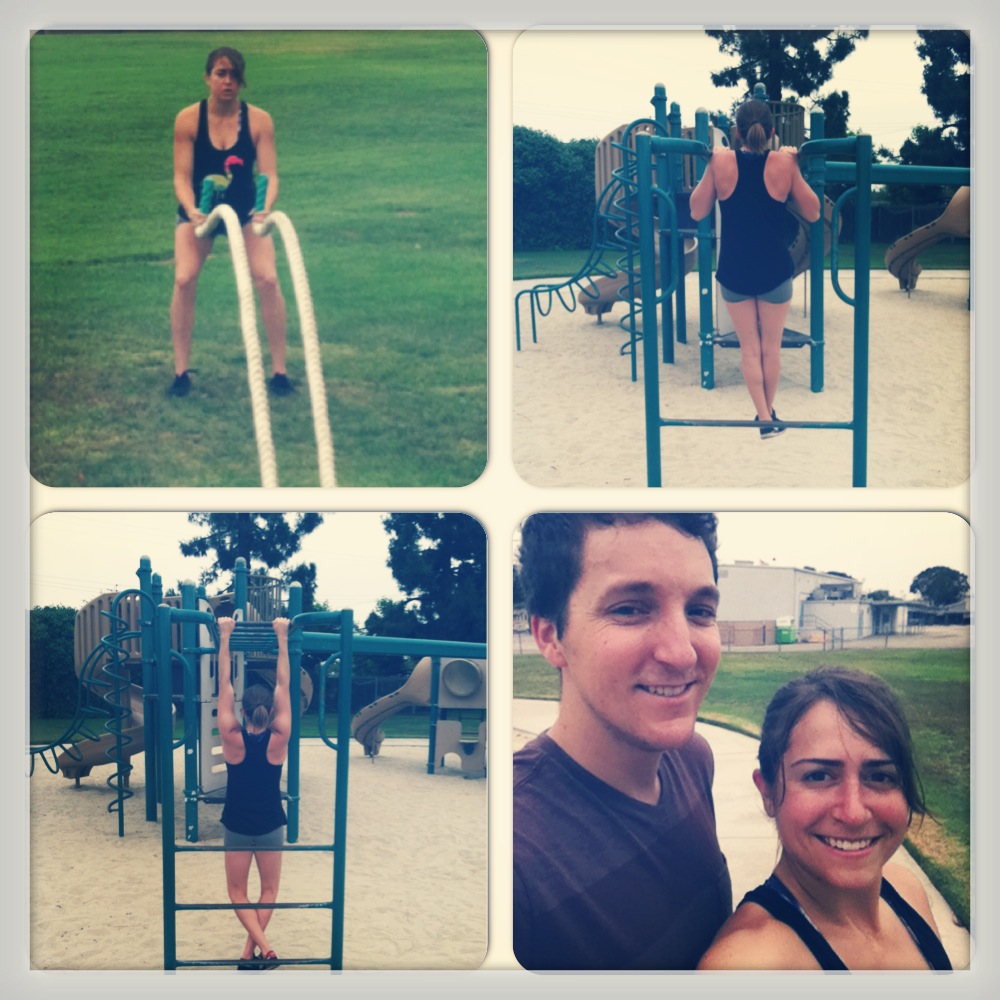
Ryan willing to make a rare appearance after our workout…and me super sweaty and tired.
Our workout was only 15 minutes, but it was a killer. A great way to kick-start the day!
What’s your favorite quick outdoor workout?
Anyway…Happy Fourth! Go outside and play! Soak up some Vitamin D and de-stress.
Push Up Variations
A bit ago I posted about how to do a perfect push up.
Today, I want to talk about all the fun and different challenging variations of push ups you can do.
For some of you, these will be easily doable now. For others, this is something to motivate you to EARN these harder exercises.
Do not attempt these if you haven’t mastered at least a perfect push up from your knees. Many of these can be done from your knees.
HOWEVER, many of these are more difficult than even a perfect push up from your toes.
Anyway, maybe these will be a fun challenge for some of you to try out tomorrow during you 4th of July BBQ! See what other push up variations you can come up with!
1. The Push Up Climb – So this one is difficult because it includes a ton of push ups and because you are doing a variety of push ups as you climb your way back and forth across the weights. You can honestly set up as many different “hills” as you want. I did three. Two smaller ones and a taller one in the middle. Perform a push up besides the first tower. Then climb one hand up on the weights and do another push up. Then place both hands on top of the weights and do a close grip push up. Then climb one hand down and do another push up. Then both hands should be down on the ground for a narrower push up. Repeat up and down the next few towers. A great way to really hit your chest, shoulders and triceps from a few different angles. This can be done from knees or toes. You can even turn it into a competition and see who can get back and forth across the most times before failing! (I have a sick sense of fun…I know…)

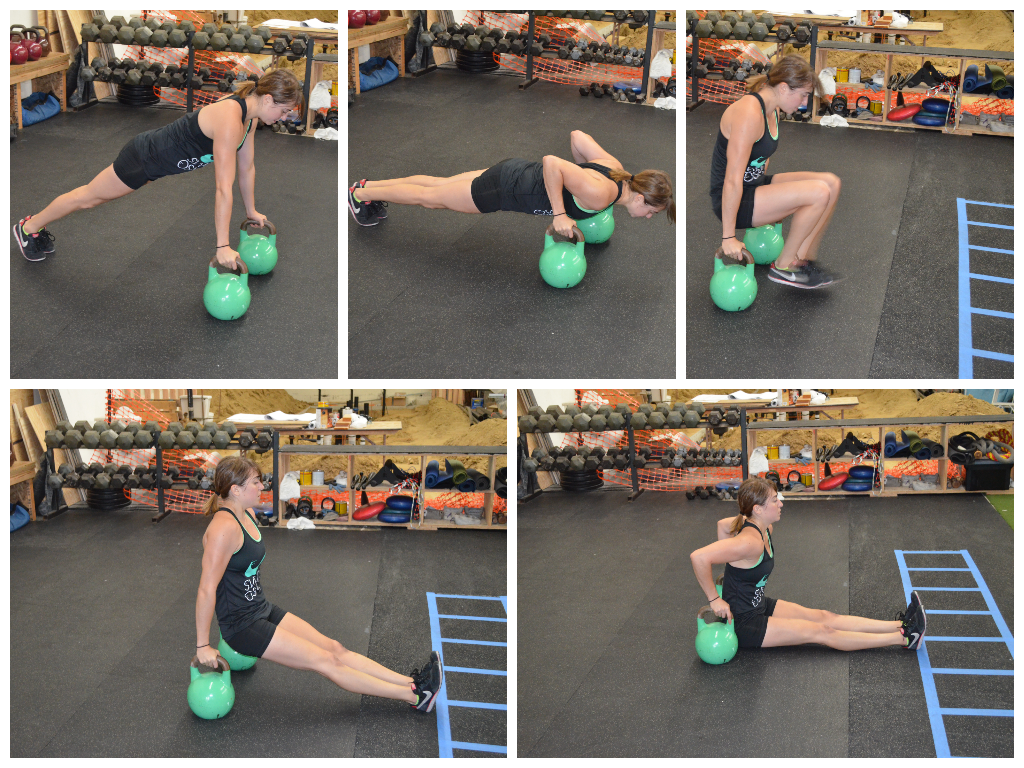
2. Push Up to Dip – Seriously one of my favorite moves. Set up two kettlebells or two push up stands. The stands should be narrow enough that you really can only slide your feet through. Perform two push ups on the stands and then swing your legs through and perform two dips. The more you “swing” through and the less you walk back and forth through the kettlebells, the more challenging the move will become. Make sure that when you do the dip, your butt is back by the kettlebell. This move can be regressed in a couple of different ways. It can be done from the knees or even on an incline. You can use a bench and do two push ups followed by two dips off the bench. Do about 5 rounds of this….Sounds easy to only do 10 push ups but with the dip in between your triceps get a bit shot.
3. Handstand Push Up – A great shoulder move and really works your core. Set up in a handstand and then drop your head toward the ground before pushing back up. This move can be made a bit easier if done as a pike push up off a bench or box…Like in the IKEA table workout! Or it can be made more difficult by doing it free-standing!

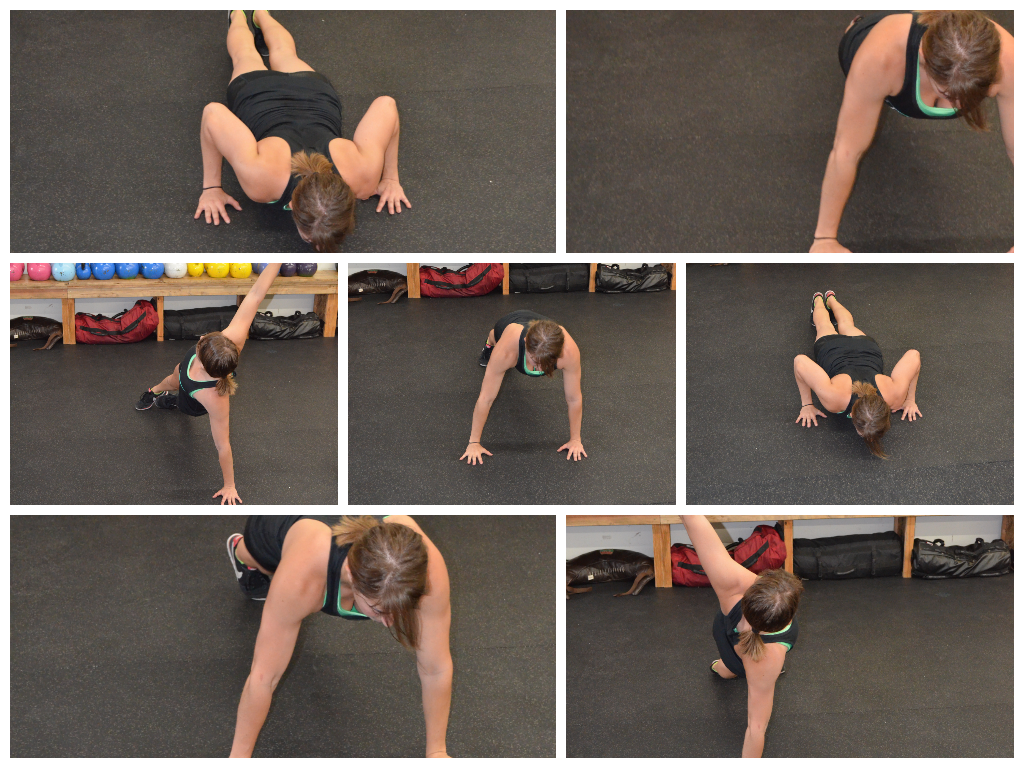
4. Spiderman Push Up – With this move you get in some oblique work as well. Perform a push up. Holding at the bottom of the push up, bring one knee outside your body toward the same elbow. Then put the foot back and do another push up bringing the foot in on the other side. You can also do both feet in every push up! Could be done on an incline to make it easier although you won’t get as much benefit out of bringing the knee in.

5. The Belly Button Push Up – I’ve debated about whether or not this is the hardest one on the list. Still not sure but it is definitely up at the top. Lie facedown on the ground with the heel of your hands down beside your belly button. Push up and then return back down.
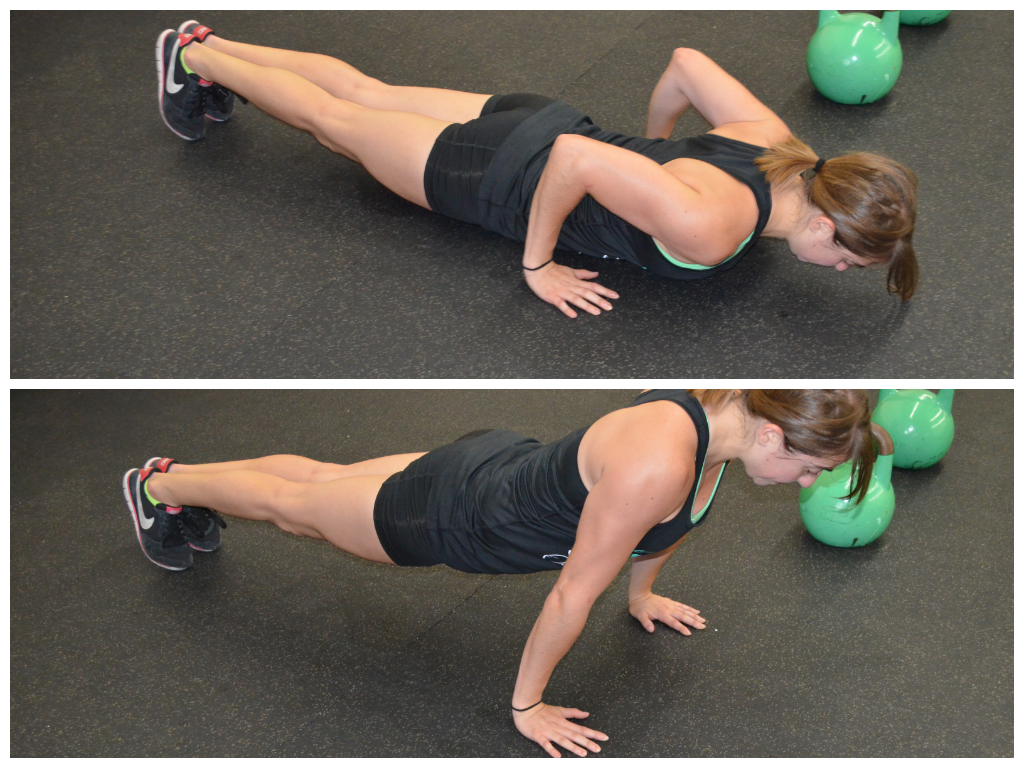
6. Decline Push Up – One of my favorites and a great way to hit a different portion of your chest. Put your feet up on something and perform a push up. Your hands will not be directly outside your chest when you do this one.

7. Close to Wide Grip Push Up – If you want to hit EVERYTHING, do these push ups. Start with a diamond push up. Then slowly walk your hands out one at a time until you perform a wide push up.

8. Staggered Push Up – Honestly I think this one looks cooler than it is difficult. Just a great way to add some variety and keep your push up workouts interesting. Place one hand up by your head with finger tips pointing in and the other hand as normal outside your chest. Perform some push ups and then switch which hand is staggered forward. You could even add in a little plyo move and switch your hands every time!

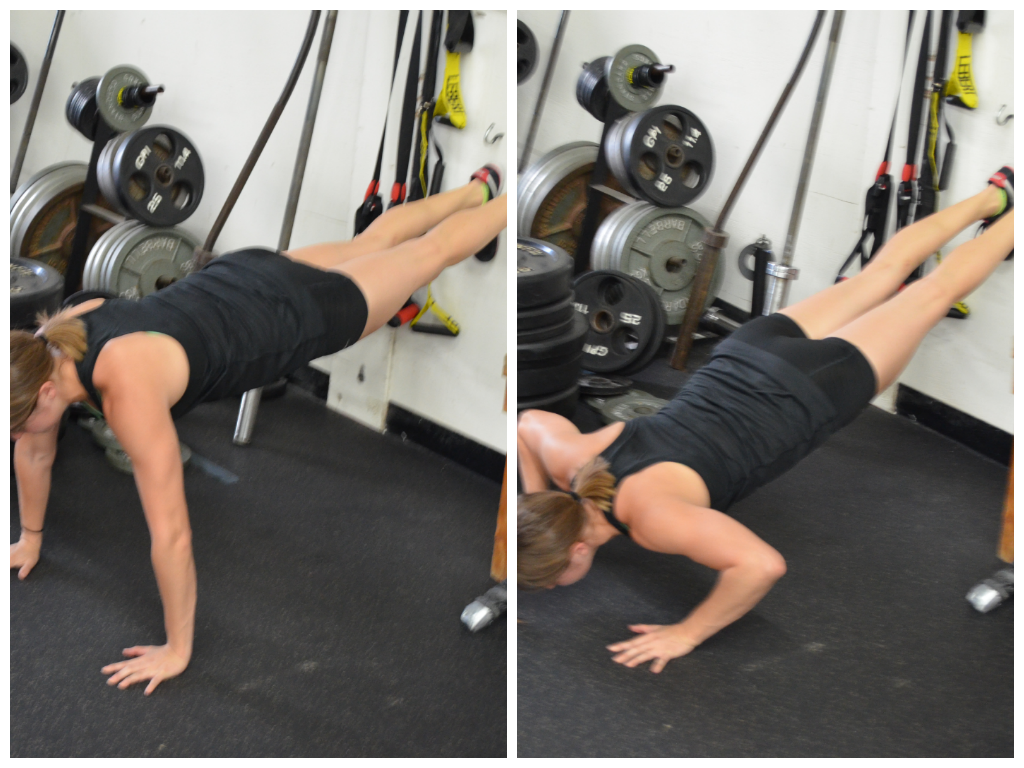
9. “No Feet” Push Up – This is called the “no feet” push up because your feet are up on the wall and you are performing a push up. A great way to work your core and make sure everything is engaged. A bit easier if your shoes have traction! Walk your feet up the wall until in a good push up position. Then do a regular push up without letting your feet slide.
10. T Push Up – This push ups gives you a little extra shoulder and core work and can be done from the toes, the knees and even on an incline. Set up in a regular push up position. Do a push up and then rotate open balancing on one hand as if you are doing a side plank. Hold and then rotate back to a push up position. Do another push up and rotate to the other side.
BONUS: Back and chest move – Push up to plank row!
What’s your favorite push up move? Clapping? One handed? With chains hanging off of you?
Want some great workouts so you can do MORE push ups?
Check these out:
Are we there yet?!?

As a trainer, you sometimes feel like a parent being asked by your kids over and over again, “Are we there yet!?!”
Sorry trainees, but it’s true.
Most people come to the gym to accomplish a specific goal – be it a new lifting number or weight loss.
And most people get frustrated when they don’t start seeing results on paper almost instantly.
They start asking,”What am I doing wrong?” “Why am I not there yet!?!”
The answer is…Maybe you aren’t doing anything wrong.
Most likely, you just haven’t given yourself enough TIME to see the results adding up.
You can’t necessarily FEEL yourself getting stronger every time you workout.
Heck, there may even be some workouts where you feel like absolute crap and even feel like you’ve gotten weaker. (Which honestly probably isn’t the case.)
Sometimes you might not see the weight on the scale changing. Or even your measurements.
But that doesn’t mean good things aren’t happening!
I, myself, am not a patient person. I don’t like waiting in any sense of the word. If I have a project to do, I want to do it now, even if that means working through the night.
So I do understand when people want results instantly.
That simply isn’t the way it happens though…at least not in the sense most people want it to be true.
Every day you WORK toward your goal, you are getting results. Doing the hard work, itself, is a huge result!
Think about how many people out there are still only thinking about doing what you are trying to do!
And I don’t mean to put those people down…I’m just saying you have to give yourself credit for taking that first step.
Every time you workout. That is a result. It is a step in the right direction.
Every time you make a healthy eating decision, even if it is a conscious decision to cheat, that is a result!
It may not seem like it, but it is!
Because results are about us making better decisions. Results are every time we make a decision to do something that leads to our long-term goal.
Results come in many different forms and BIG RESULTS are the culmination of hard work day in and day out.
Think about it…People don’t expect to be the CEO of the company the work for in one day…one week…or even a year.
Yet they expect to be as strong/fit/in-shape as they desire in a matter of weeks. And the crazy part is, most of them spend way more hours each day focused on their job than they do on their health.
So how do we stop focusing on the numbers and stop getting discouraged when we aren’t there yet?
We start focusing on small victories and enjoying those successes. We enjoy the journey.
Yea, yea, yea…Enjoy the journey!
HA!
Are we there yet!?!
Ok, not every day is going to be fun, but reaching your goals doesn’t have to be about sacrifice and torture. Find an exercise or a diet that you ENJOY doing. Trust me…it is possible. There are so many physical activities out there that can help you stay healthy…and a lot of them don’t even involve a gym!
On top of finding something you enjoy, celebrate your mini victories. Give yourself CREDIT for all of your hard work.
Because when you focus on the destination and not on enjoying the journey, you get stuck in a cycle of “Are we there yet?” When you constantly ask that question, trust me….it makes the trip feel a whole heck of a lot longer!
If you are doing the right things day in and day out, things will add up.
It just takes time.
And a slight side note…but just to demonstrate that even if you aren’t SEEING huge number jumps you probably ARE getting results.
One of my clients whose goal is to lose a bit of weight and feel healthy just managed to do an exercise she wasn’t able to do before.
It wasn’t a concrete goal of hers to be able to be strong enough to do that specific move, but the fact that she could do it, showed that she was making progress.
And it made her pretty freaking excited even if it wasn’t part of her long-term plan.
How often do you question yourself and think “Why am I not there yet?” instead of focusing on all the things you can now actually do?
Hotel Room Workout
Generally when I travel I don’t worry about workouts since I usually just plan out my progression so that my vacation is my recovery week.
I make sure I’m always active during vacation, taking casual walks or just goofing around, but I generally only workout if I really feel like it.
HOWEVER, I do have a number of clients who travel often and therefore like to do workouts on the road so that they stay in a routine.
And since hotel gyms are so hit or miss, I think it is best to always provide workout options that can be done with only the little space you have in your hotel room.
Here are 10 moves to use in your Hotel Room Workout! (I recommend putting down a towel instead of cuddling with the ground…just saying….) I used all of these in a great full body workout while staying in Palm Springs last week.
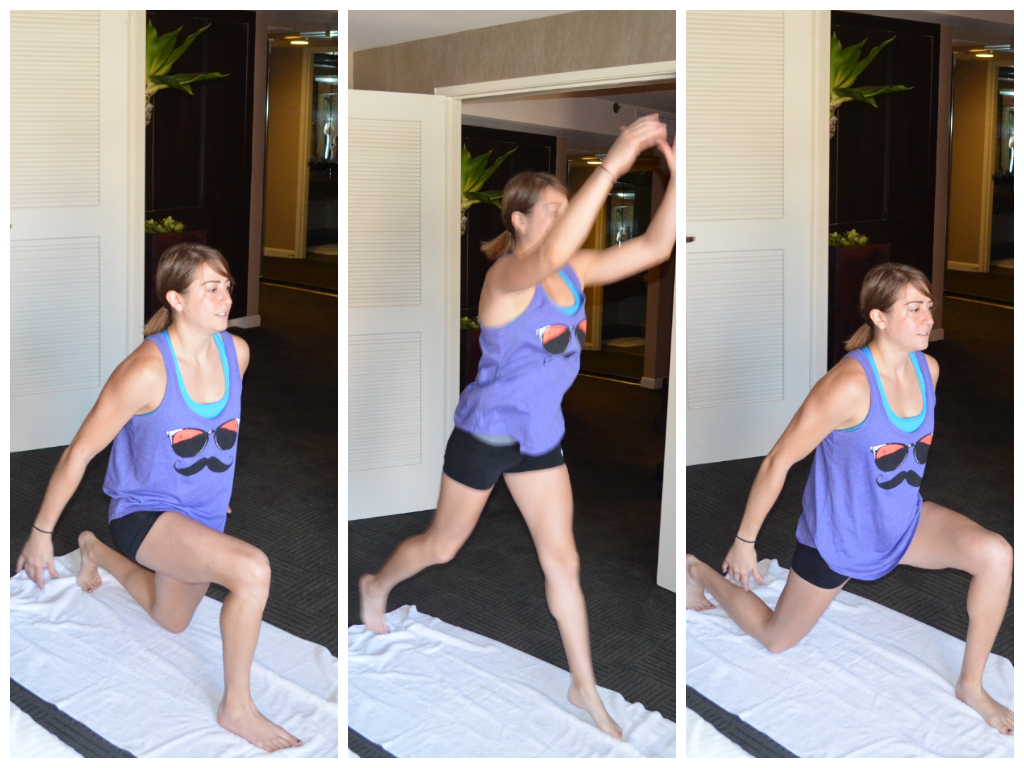
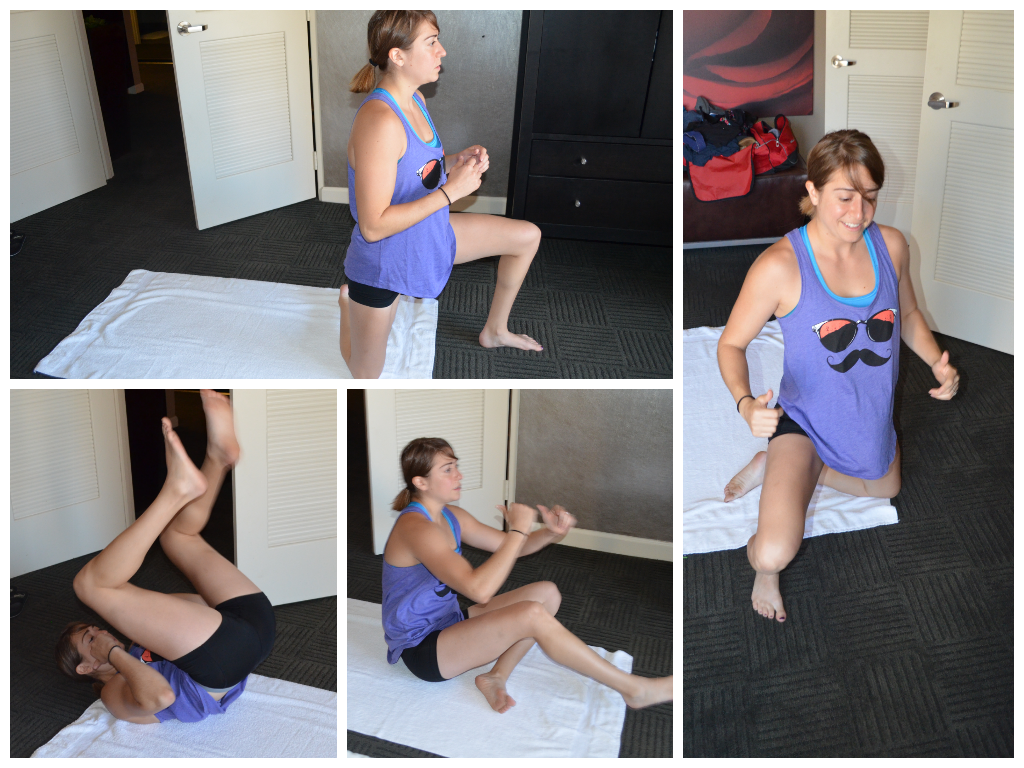
1 and 2. Split Squats (Stability, Strength and Power) – There are three great ways to use the split squat in your hotel room workout. You can do a split squat hold, a split squat with reps on each side or a split squat jump. Sometimes I even combine two into one, like I’ll do a 20 second hold followed by 10 reps on the same side. To do a split squat, step one foot forward into a wide lunge stance. Bend your knees as if you are kneeling onto the ground. Hold with your back knee just barely off the ground or perform reps, moving up and down. Do not step your feet back together. Keep the wide stance until all reps are completed. To do the split squat jumps, start in a lunge position and then jump up and switch to a lunge on the other side. Beginners may want to start with alternating step back lunges instead of split squat jumps to lower the intensity and take out some of the impact.
For the hold, you would hold at the bottom. For reps, go down and up.
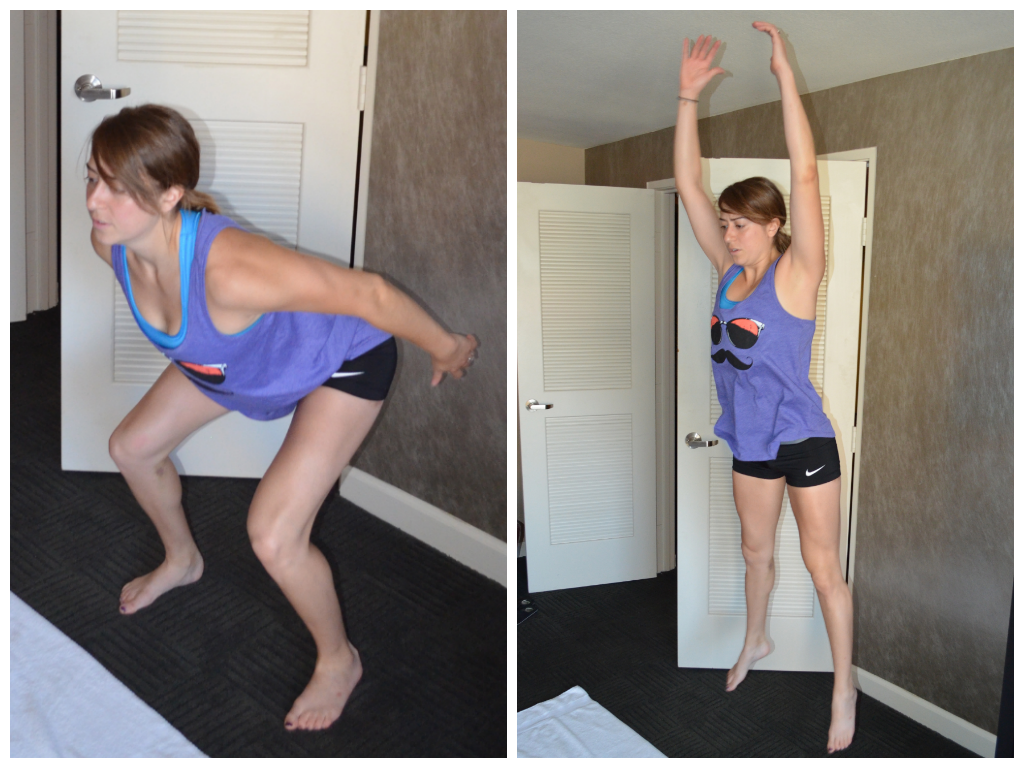
3. Wall Sit – A very traditional bodyweight move, but also a super tough one. A great way to work your legs! You could even add some variety to this move by lifting one leg off the ground. Or if you wanted to add some weight, you could always hold your suitcase or something on your lap….I love to do this move followed by either bodyweight squats or even squat jumps. To do a wall sit, sink down so that your knees are bent to 90 degrees and your back is pressed solidly into the wall. Beginners may not want to sink as low or hold as long.
4. Squat Jumps – Another traditional cardio/leg move, but I love to pair it with a wall sit or even a bodyweight squat. The best way to turn your legs to jello without using any weight. While this move is a “squat” jump, you don’t want to squat too low when you prep for the jump. It really should be more of a combination hinge and squat then full on squat. If you squat to low, you will actually reduce the amount of power you can generate. Make sure that you are also driving up off your heels when you jump and not just staying on your toes. Also, focus on SOFT landings. Landing softly from toe to heel with knees bent is important to protect the knees. You shouldn’t ever land with your legs straight.
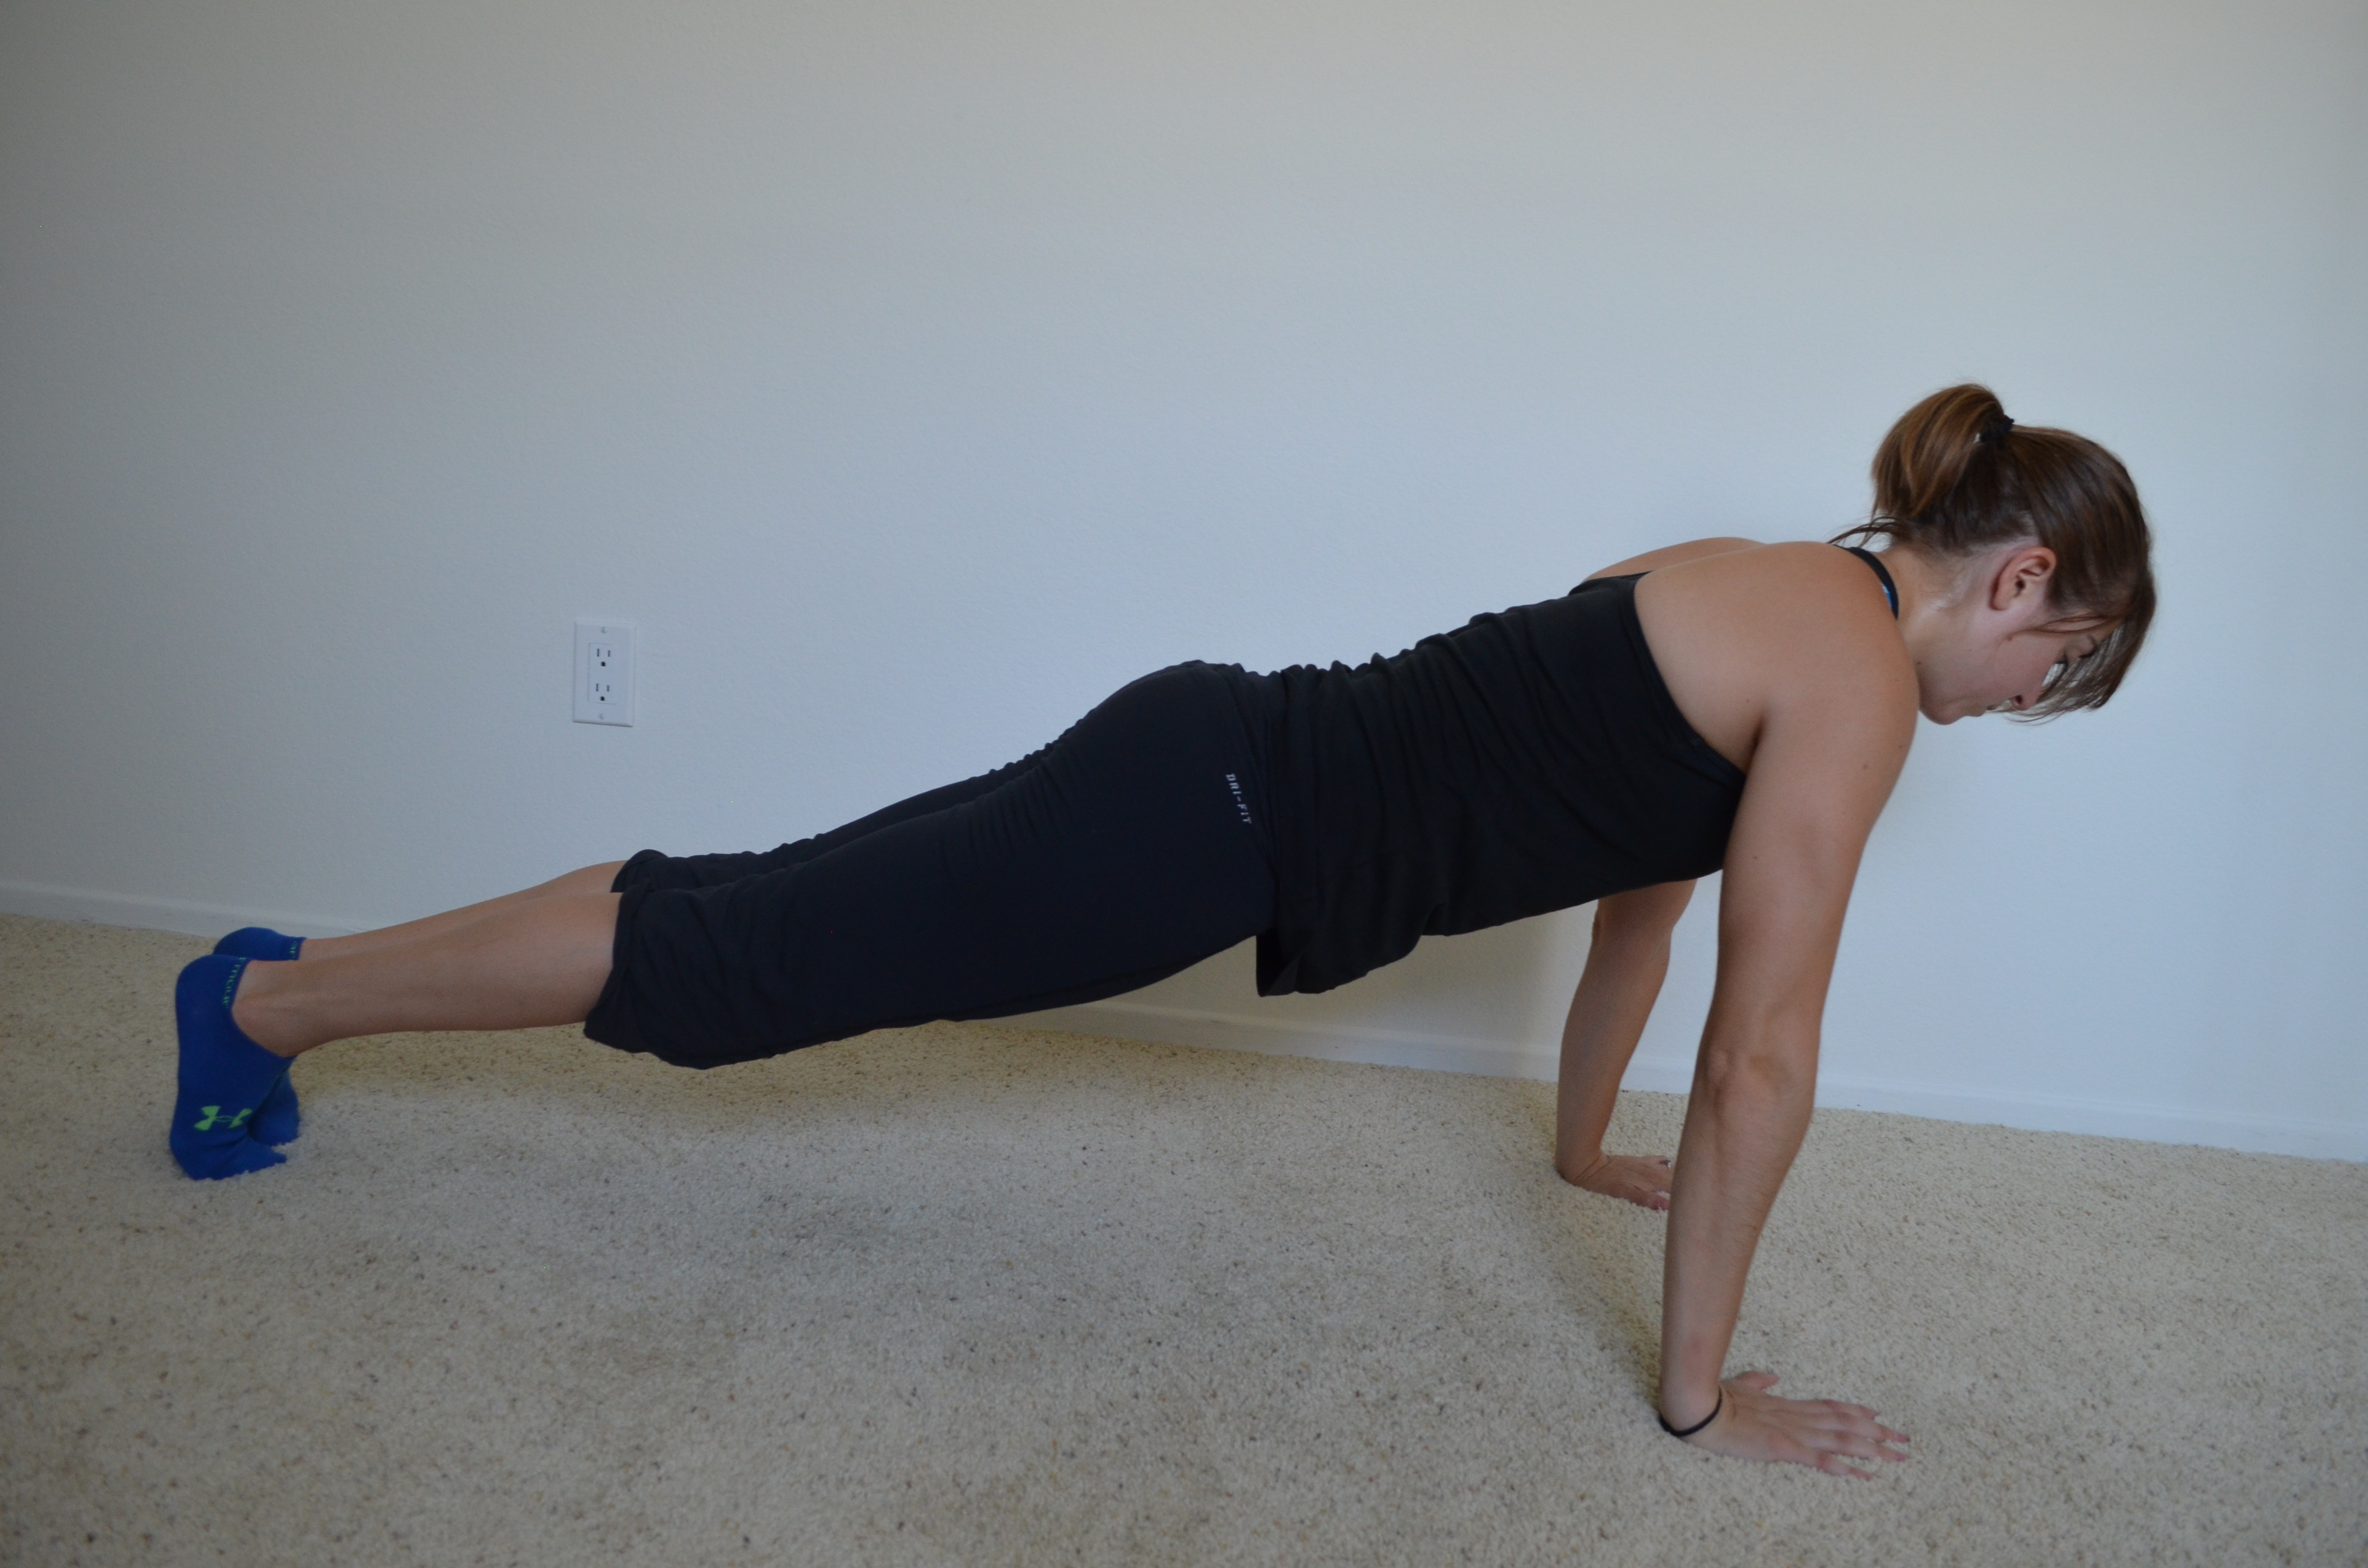
5. Planks (Side and Front) – I love using isometric moves in workouts especially when I don’t have a lot of space. Holding a plank is one of the best ways to work everything from your shoulders to your knees, especially if you really focus on keeping everything super tight. I like doing planks from my hands. You can do this move from your forearms and/or knees to make it easier. Feet should be together and you should squeeze your legs together. Your butt, quads and core should also be tight. Don’t let your shoulders get up by your ears. Retract your shoulder blades down and back. If you are contracting as hard as possible, you should be able to make yourself shake! Hold for 30 seconds to 1 minute. You can also do a side plank from your hands (an easier version would be from your knees or your forearms or both). To make the side plank harder, raise the top leg. Do not let your chest rotate toward the ground with the side plank. Also make sure to really keep the bottom hip up off the ground. A great way to isolate each side and work the obliques. Plus the leg raise really helps you work your glutes! (Sometimes I even like to hold the plank position and then do push ups….)
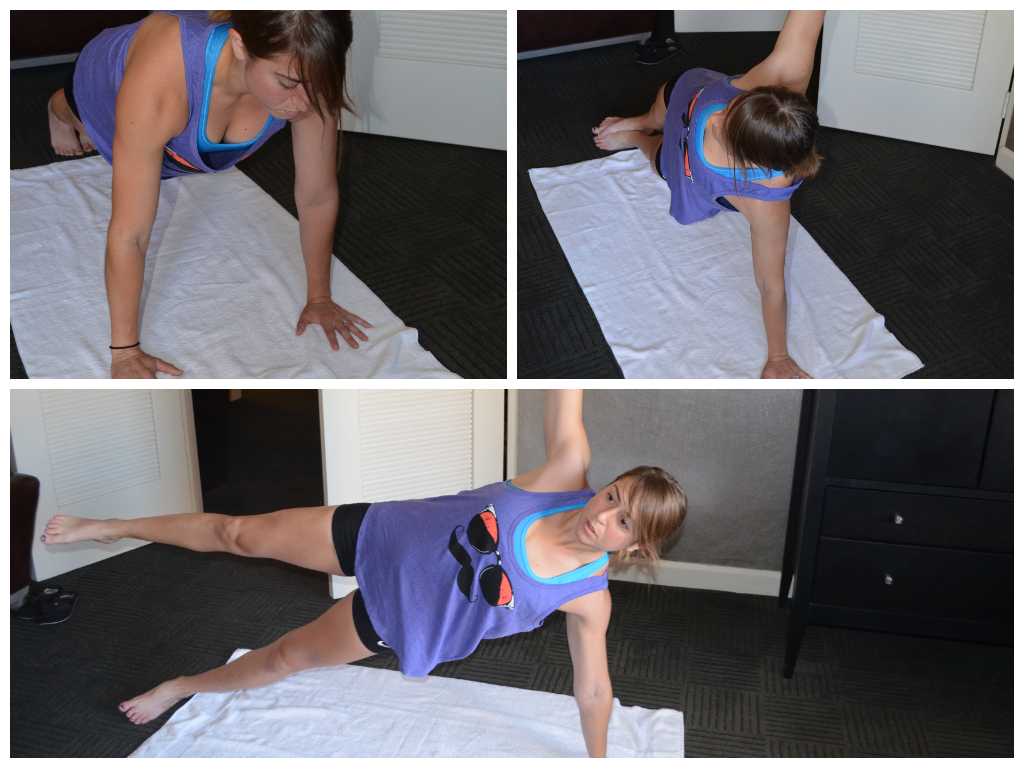
6. Plank with reach thru – A great core and shoulder stabilization move. Set up at the top of a push up from either your knees or toes. Reach one hand under the other armpit as if you are reaching toward something on the opposite wall. Then rotate open toward the ceiling in a side plank. Make sure to keep your hip down and really reach underneath and through. You aren’t simply patting yourself on the back…You are REACHING.

7. Plank with reach back and out – A great hip hinge and core move (Also deceptively tough). This move can be modified in a couple of different ways. Beginners will do this from their knees and reach back between their legs and then out. Intermediate exercisers may do this from their toes with no reach out. And advanced lifters will do the reach back and out from their hands and toes. To do this move, set up on your hands and toes. Reach one hand back toward the opposite ankle. Your butt should go up in the air. Then reach back forward, tightening your core as you drop your hips a bit and extend out. From your knees and hands, you will sit back as if doing child’s pose and reach between your knees. Then moving into a modified push up position, reach out with the hand that just reached back.
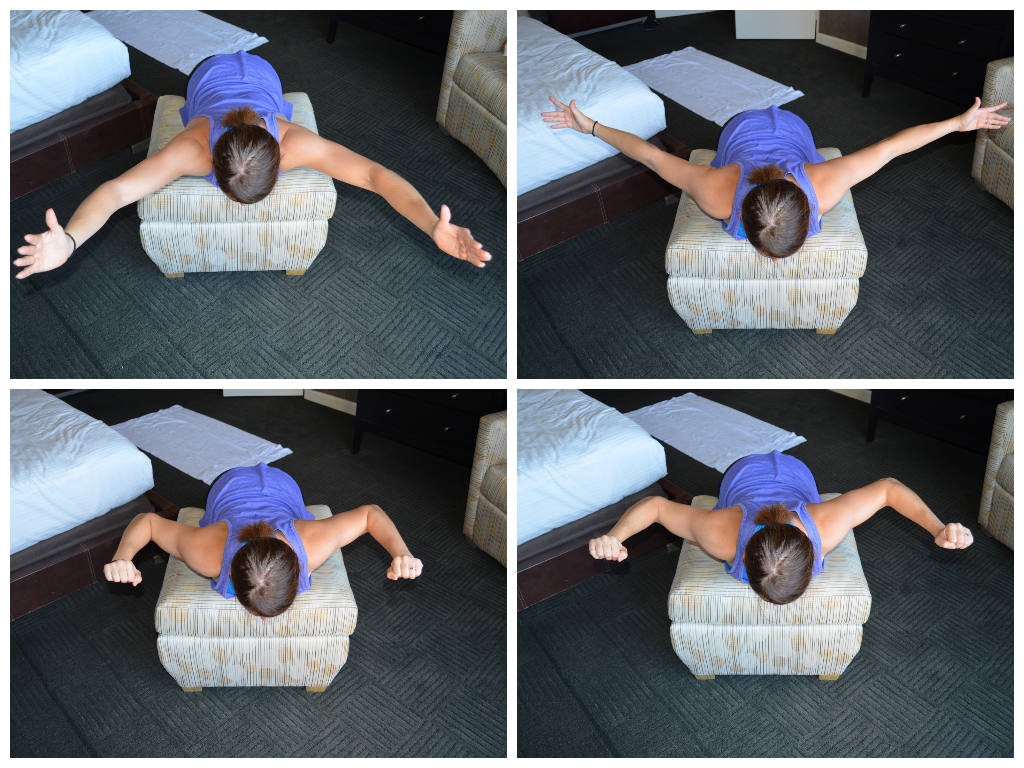
8. YTWLs – I show this move on a little foot stool, but it can be done on a bed or even from the ground if your room doesn’t have a foot stool. YTWLs are a great way to work your upper back and even strengthen your rotator cuff muscles. There are four different arm positions with this move. I complete all reps of one motion before moving on to the next. Lay on the ground or over a stool. Keep your low back relaxed. You want to feel this in your upper back behind your shoulders and in between your shoulder blades. None of these are really big movements. To do a Y, your thumbs should be pointing toward the ceiling and your arms should be above your head in the shape of a Y with your body. Lift up, using the muscles in your upper back. To do a T, have your thumbs pointing up toward the ceiling. Your arms should make a T with your body. If you are doing this on the ground, you are really only going to lift an inch or two off the ground. Over a bench or stool, you may be able to relax further down. To do a W, bend your elbows to create a W with your body. Your thumbs should be pointing in toward you. Lift and lower. The final move, the L, will be done two different ways depending on where you do it. If you are lying on the ground, you will set up with your elbows bent to 90 degrees and your elbows in line with your shoulders. Palms facing the ground, try to rotate the backs of your hands toward your toes. Then relax. If you are doing this from a stool or bench, you will actually start with your arms handing toward the ground. You will then lift your arms, bending your elbows to 90 degrees. Finally, keeping the elbows bent, you will rotate the backs of your palms toward the ceiling. None of these moves involve a big range of motion. Do not rush through the movements. (Unfortunately because of the angle, which I didn’t notice at the time, you can’t fully see the angle of my elbows especially during the Ls. Sorry!)
9. Rocking Chair Abs – A great core sequencing move and kind of fun. Start kneeling on one knee, squeezing your glute to press your hips forward. Then roll onto your back and switch the leg crossed underneath so that when you roll back up you can come to a kneeling position on the other side. This is a great move to weight down as you become stronger. Also, use your arms for momentum only if needed. Less arm swing makes the move tougher.
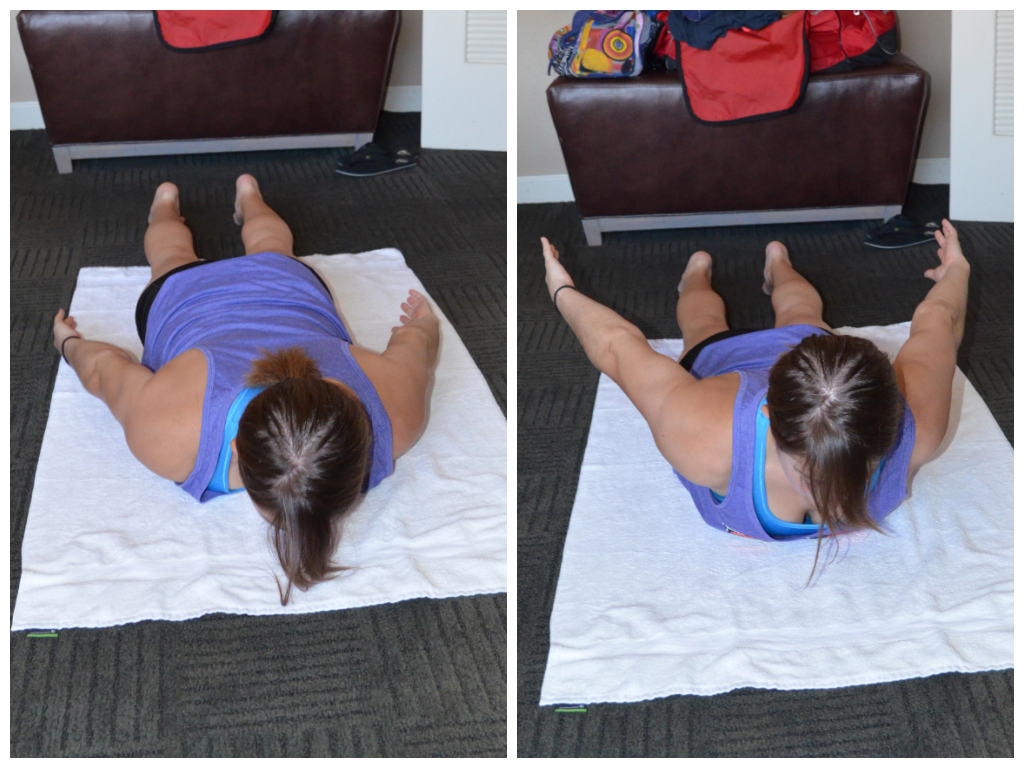
10. Cobra – A great total back move. Place your arms down by your sides and lie face down on the ground. Lift your chest up off the ground and pinch your shoulder blades back and down. You should feel this move in your low and upper back. Then lower back down and repeat. Make sure to hold for a second or two at the top.
Do you like to workout when you travel? What is your favorite workout? Do you love isometrics too!?!
P.S. Bonus move! Pull ups off the balcony…Just kidding…although tempting!
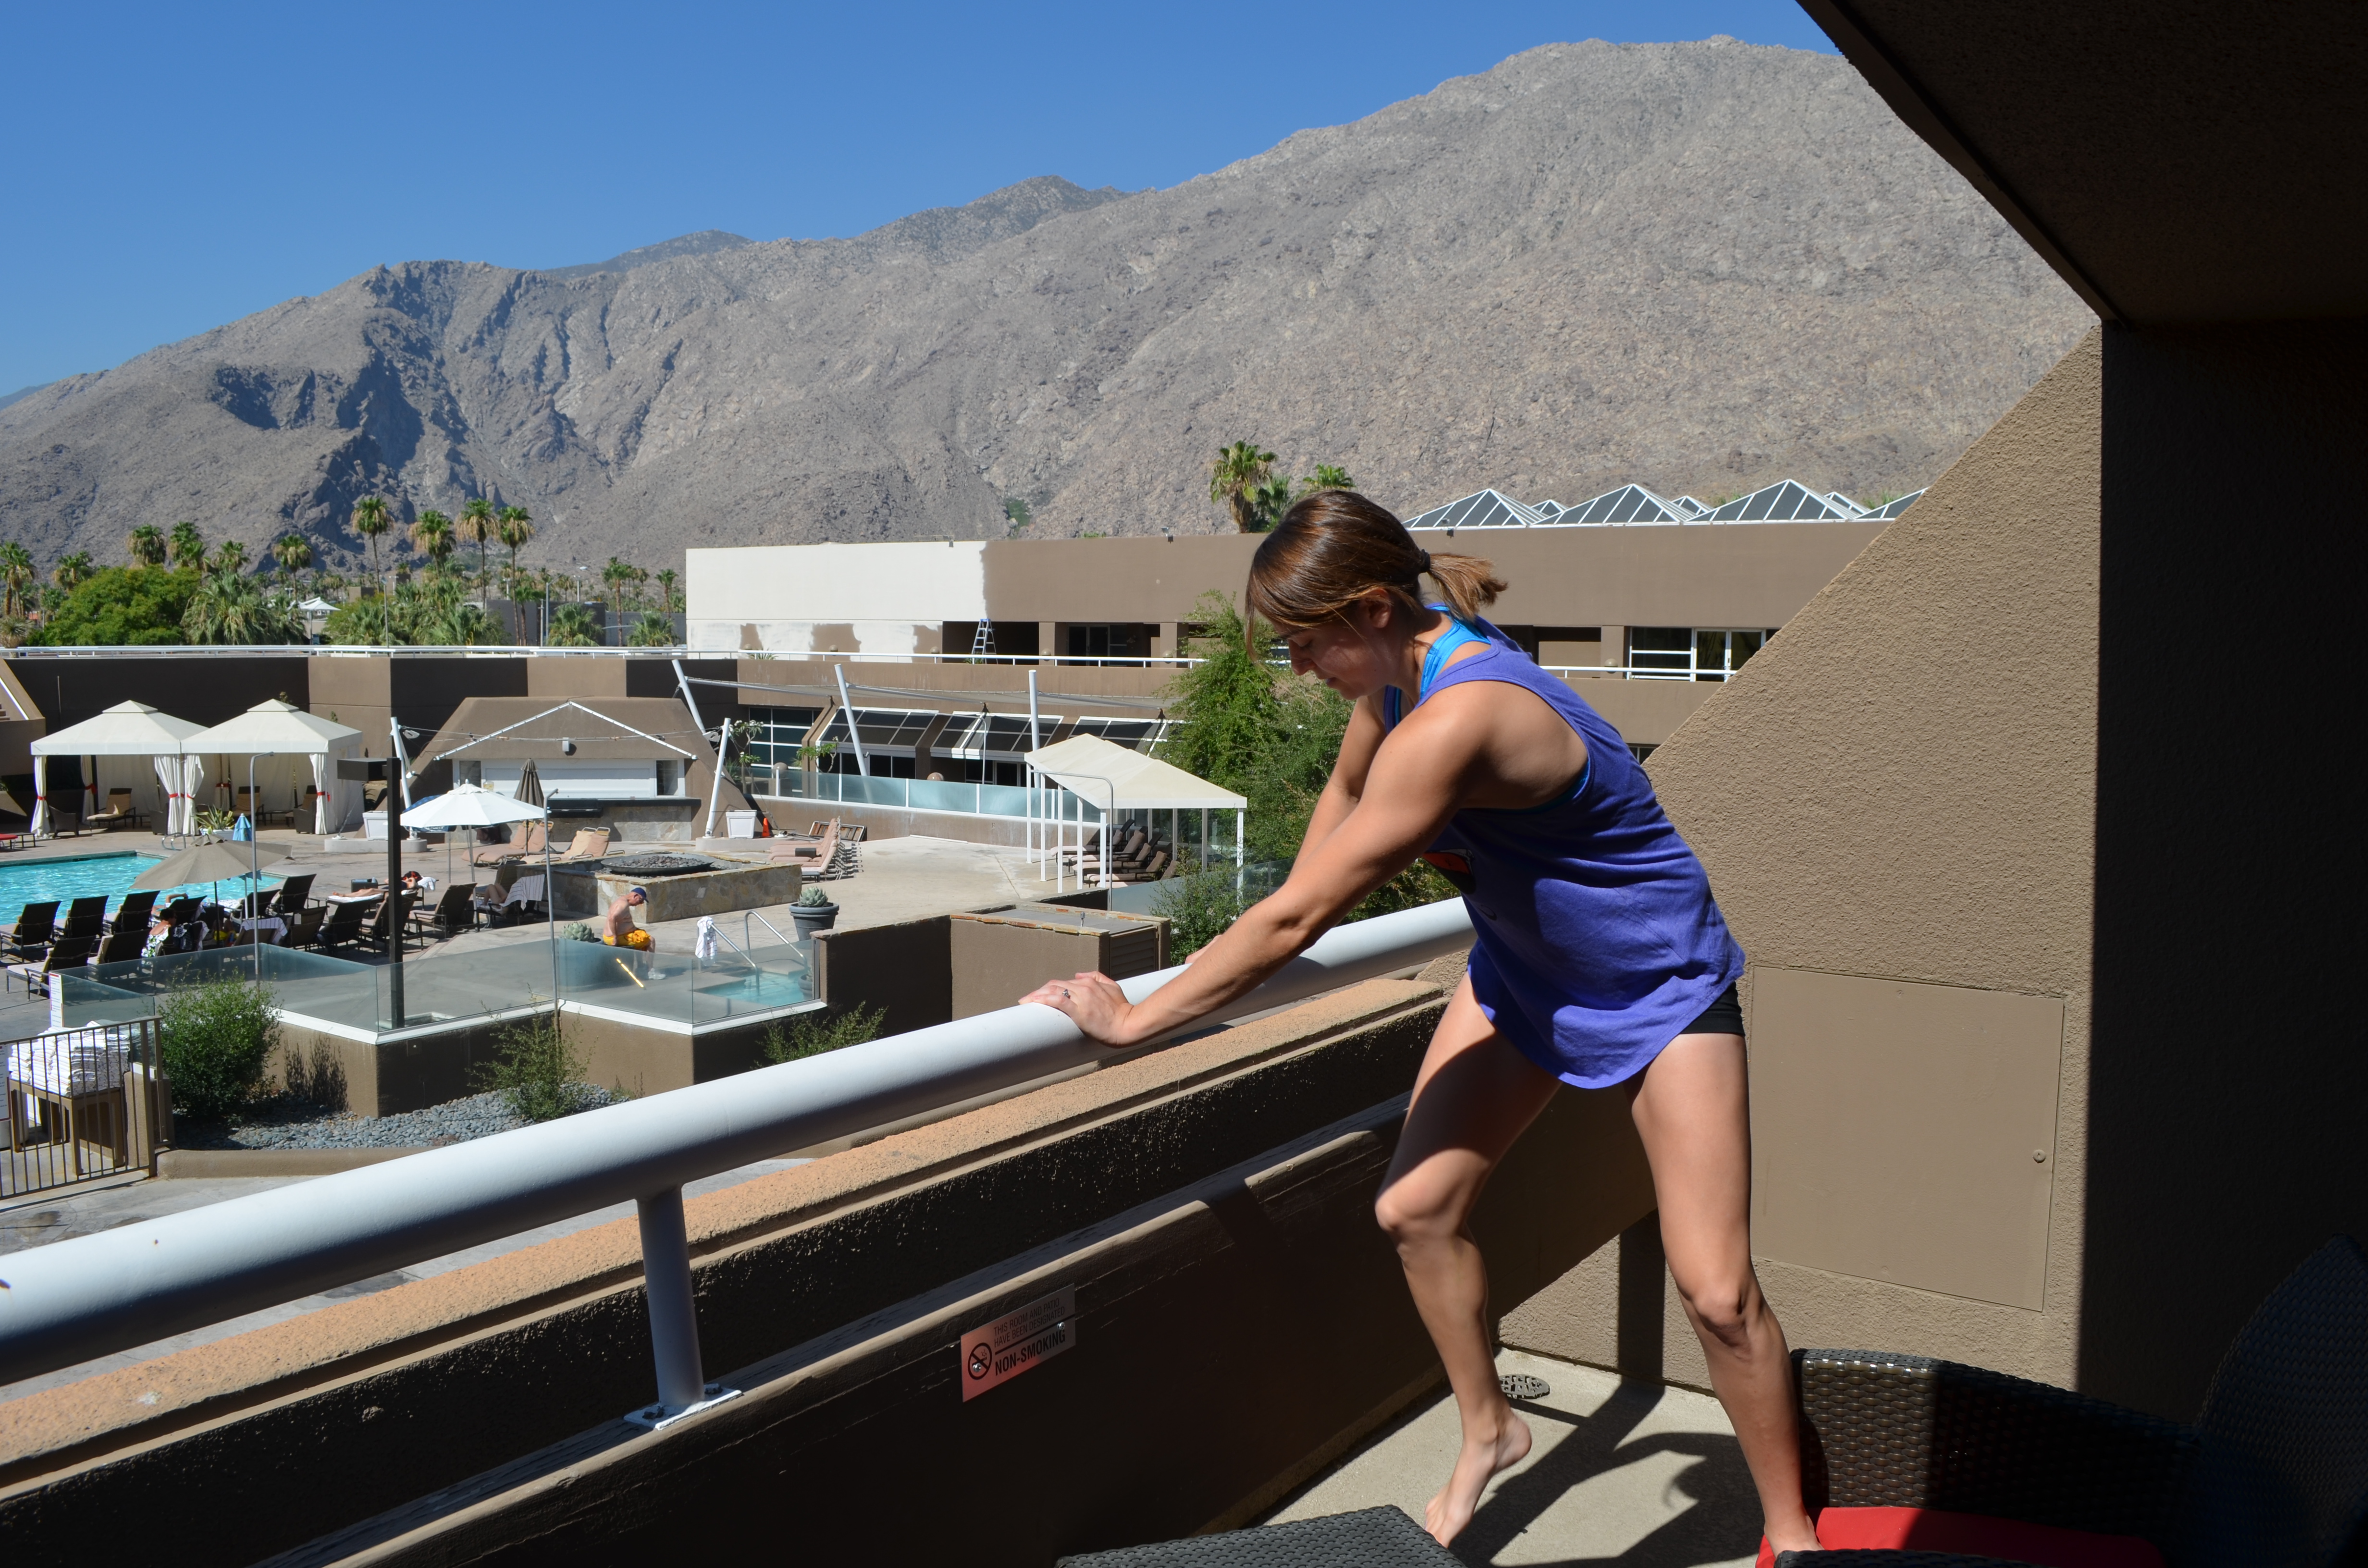
The question is…did I do it?


