Category Archives: program development
Tips To Help You Master The Pull Up
The other day I asked clients and my Facebook followers, “What move would you like to master in the New Year?”
It seems that the pull up is the tough move that everyone would love to master.
But it isn’t like bench press or squats or deadlifts where you just start with a lighter weight and work your way up.
Heck, even simply doing assisted pull ups doesn’t always even get you there.
But where there is a will, there is a way. Just like with any other fitness goal you have, you have to TRAIN to be able to do the pull up.
So here are some great strengthening moves to add into your training routine that will help you to master that elusive pull up in this coming year!
HOWEVER, you must be consistent in your training for these moves to work. You can’t simply do them a couple of times one week and then expect to be there!
1. Work on your scapular retraction.
Here are three moves to help. You can add these into your warm up routines any time you do an upper body workout. They are also great rehab moves if you’ve suffered from any neck or shoulder injuries. These moves also help you activate the correct muscles so you can use all those strong back muscles to help you do the pull up!
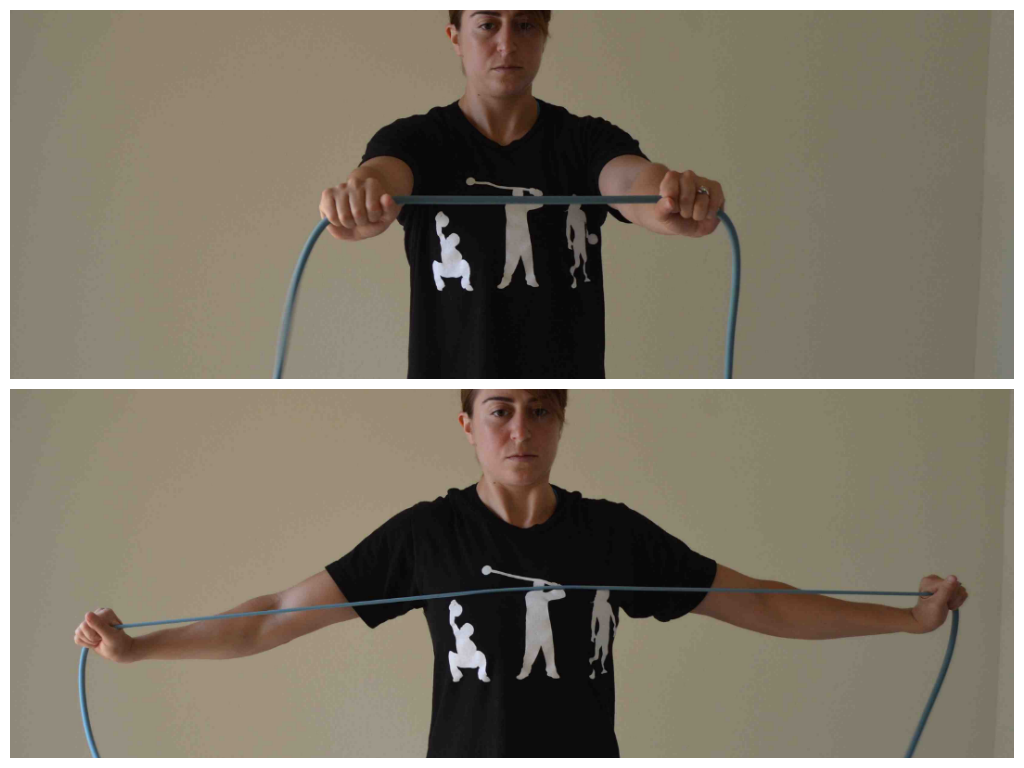
Scapular Band Flyes – Hold the resistance band with your hands about shoulder-width apart. Arms should be straight out in front of you at about shoulder height or right below. Keeping your arms straight, open your arms out to the side. Pinch your shoulder blades together as you open. Do not let your shoulders shrug up. Then once you open the band to your chest with your arms straight, bring your arms back together so your arms are about shoulder-width apart again and there is no slack in the band. Repeat.
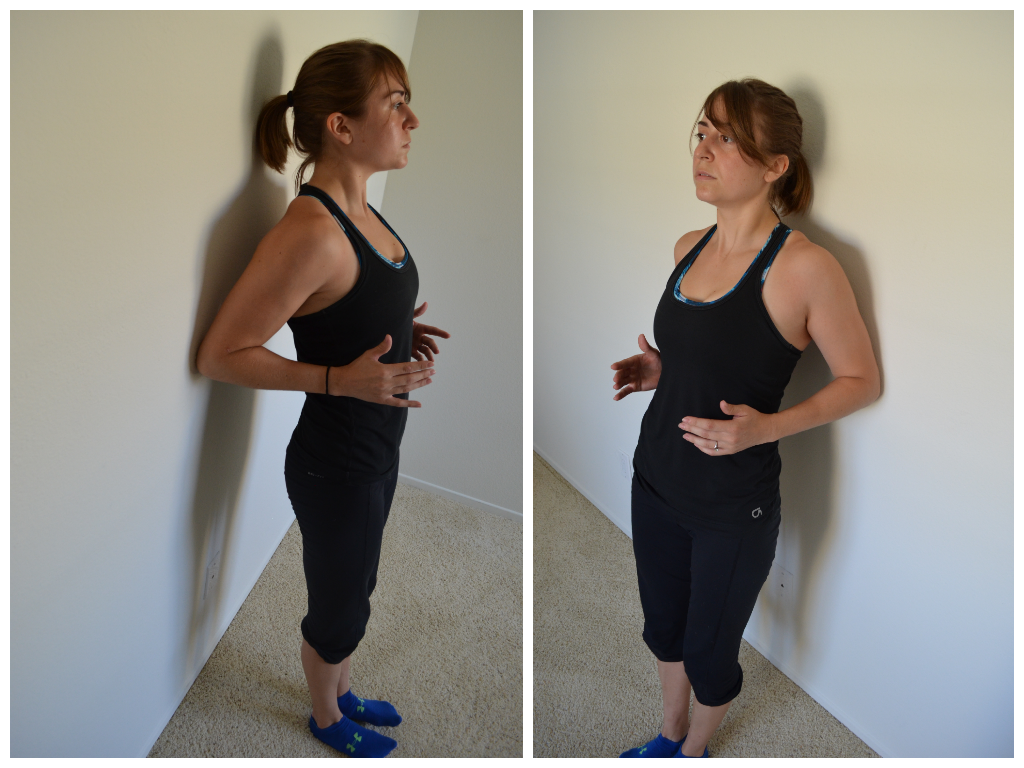
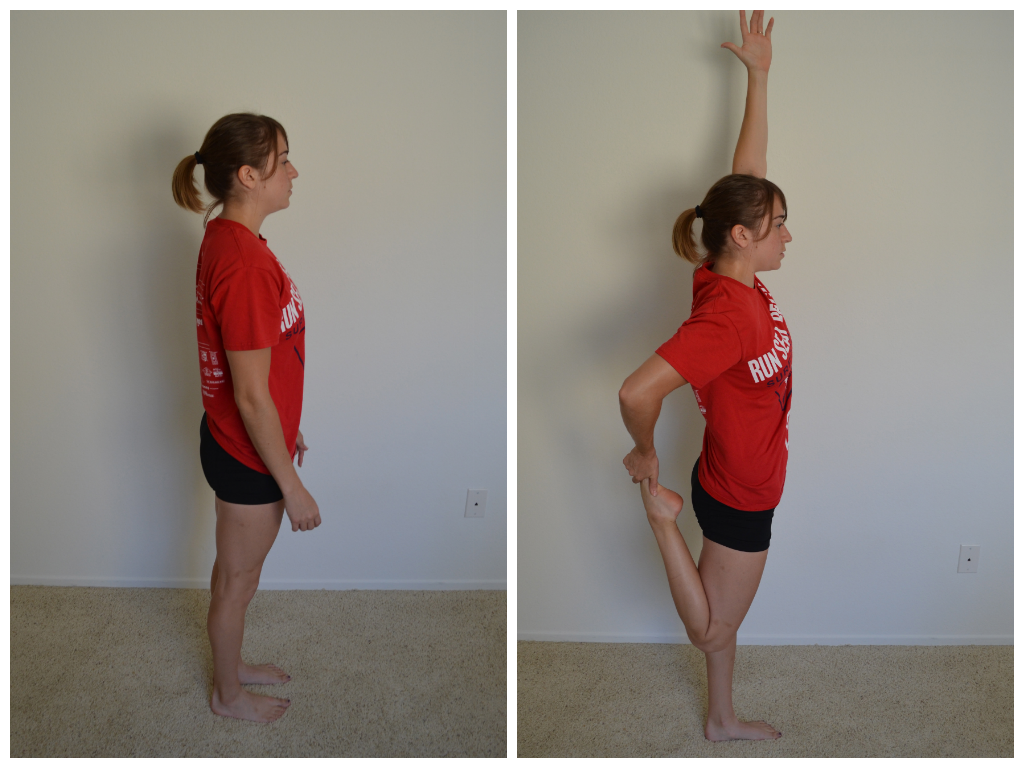
Scapular Wall Hold – Stand with your back to the wall. Step a couple of inches away and bend your arms to 90 degrees. Keep your elbows in by your sides and drive them back toward the wall. Lean onto your elbows on the wall. Do not let your upper arms or back touch the wall. Relax your head back. Pinch your shoulder blades down and back while keeping your core tight as you lean into the wall. You should feel this move low between your shoulder blades. To advance the move, move your feet a bit further from the wall.
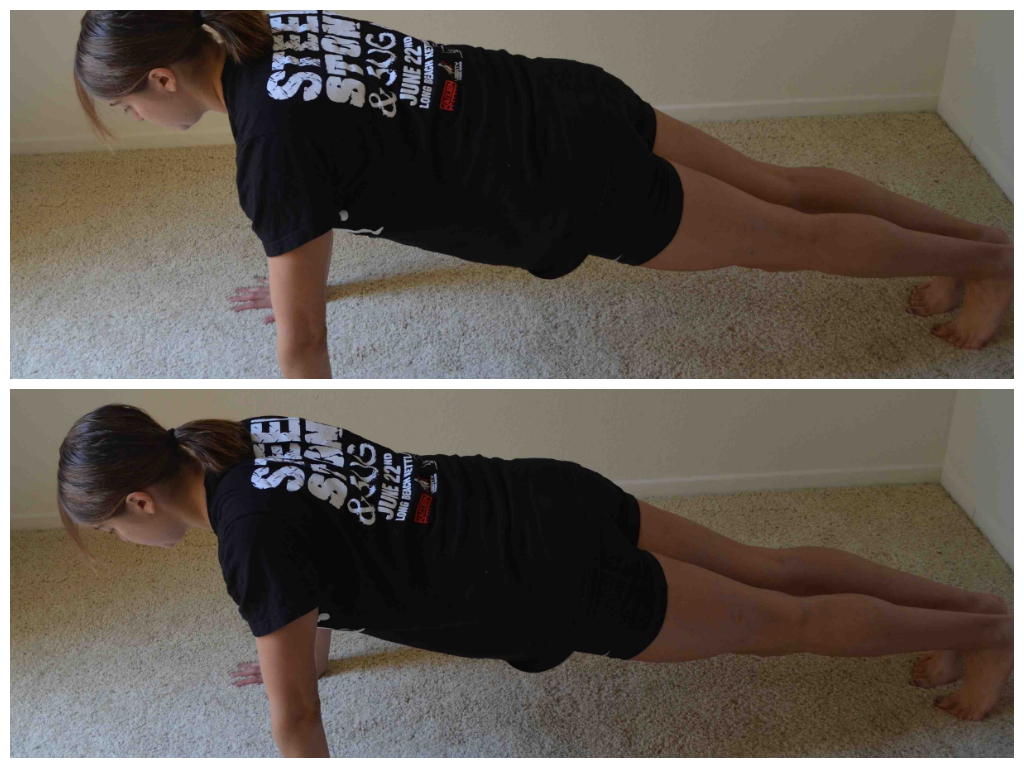
Scapular Push Ups – This move has only a very small range of motion. Set up in a push up position from your knees or toes. Create a nice straight line with your body. Then pinch your shoulder blades back and together and press your chest out. Then relax. It is really only a few inches of motion. DO NOT ALLOW YOUR CORE TO MOVE. Do not bend your elbows or allow your hips to sag. All you are doing is pinching your shoulder blades back and together. Also, do not let your shoulders shrug up by your ears.
2. Use isometric holds to strengthen your pull up.
Isometrics are a great way to strengthen the muscles used during pull ups without you having to be able to do a pull up. Here are three isometric holds that I love to use to work on each part of the pull up. The dead hang is an isometric at the bottom of a pull up and the pull up hold is at the top. The mid-pull up hold is exactly what it sounds like – a hold in the middle of a pull up.
Dead Hang – Hold on to a pull up bar or suspension trainer and hang from the bar. Your hands can be facing toward you or away from you. As you hang, do not let your shoulders shrug up. Keep your chest pressed out and your core tight. Your legs should hang down toward the ground. Do not tuck your knees up toward your chest.
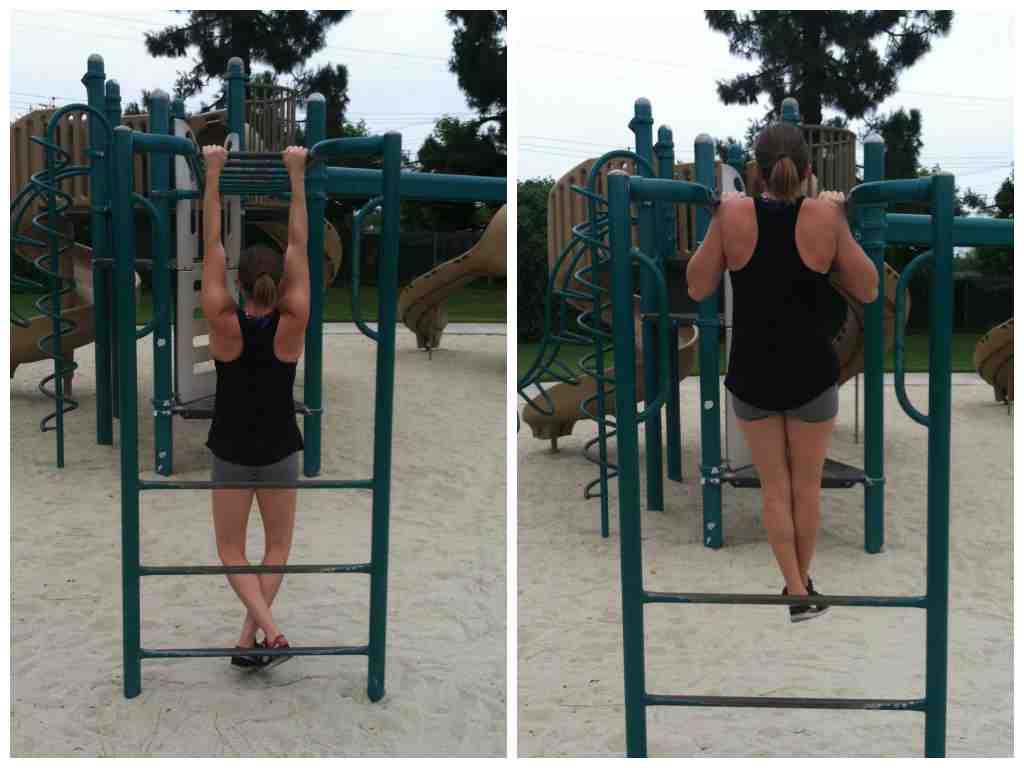
The first is a dead hang. The second is a pull up hold.
Pull Up Hold – You can do this as a chin up or pull up. You can do it off a bar, off a peg board and/or off of XT/TRX straps. Whichever you use pull to the top of a pull up or chin up and HOLD. The less stable the appliance, the harder this move will be. Keep your legs straight down toward the ground and your chin above the bar. Keep your chest should be pressed out and your shoulder blades should be down and back. Squeeze your belly button in toward your spine and keep your glutes tight. Hold there until time is up.
Mid-Pull Up Hold – Hold on to a pull up bar or suspension trainer. Your hands can be facing toward you or away from you. You can either jump or pull yourself so that you are half way up a pull up. If the bar is low enough, you can simply set yourself a mid-pull up then hang from there. You arms won’t quite be bent to 90 degrees. As you hang, do not let your shoulders shrug up. Keep your chest pressed out and your core tight. Your legs should hang down toward the ground. Do not tuck your knees up toward your chest. Try to keep your arms bent as if you are halfway up or down the pull up and do not let them lengthen.

3. Strengthen the muscles of your back.
Once you’ve got everything activated (and before that even you will want to roll out your chest and traps to make sure no overactive muscles are trying to take over), you will want to work on making the big muscles even stronger.
Inverted rows are a great move to help you work toward the pull up because they also force you to work on grip strength and lifting your own bodyweight.
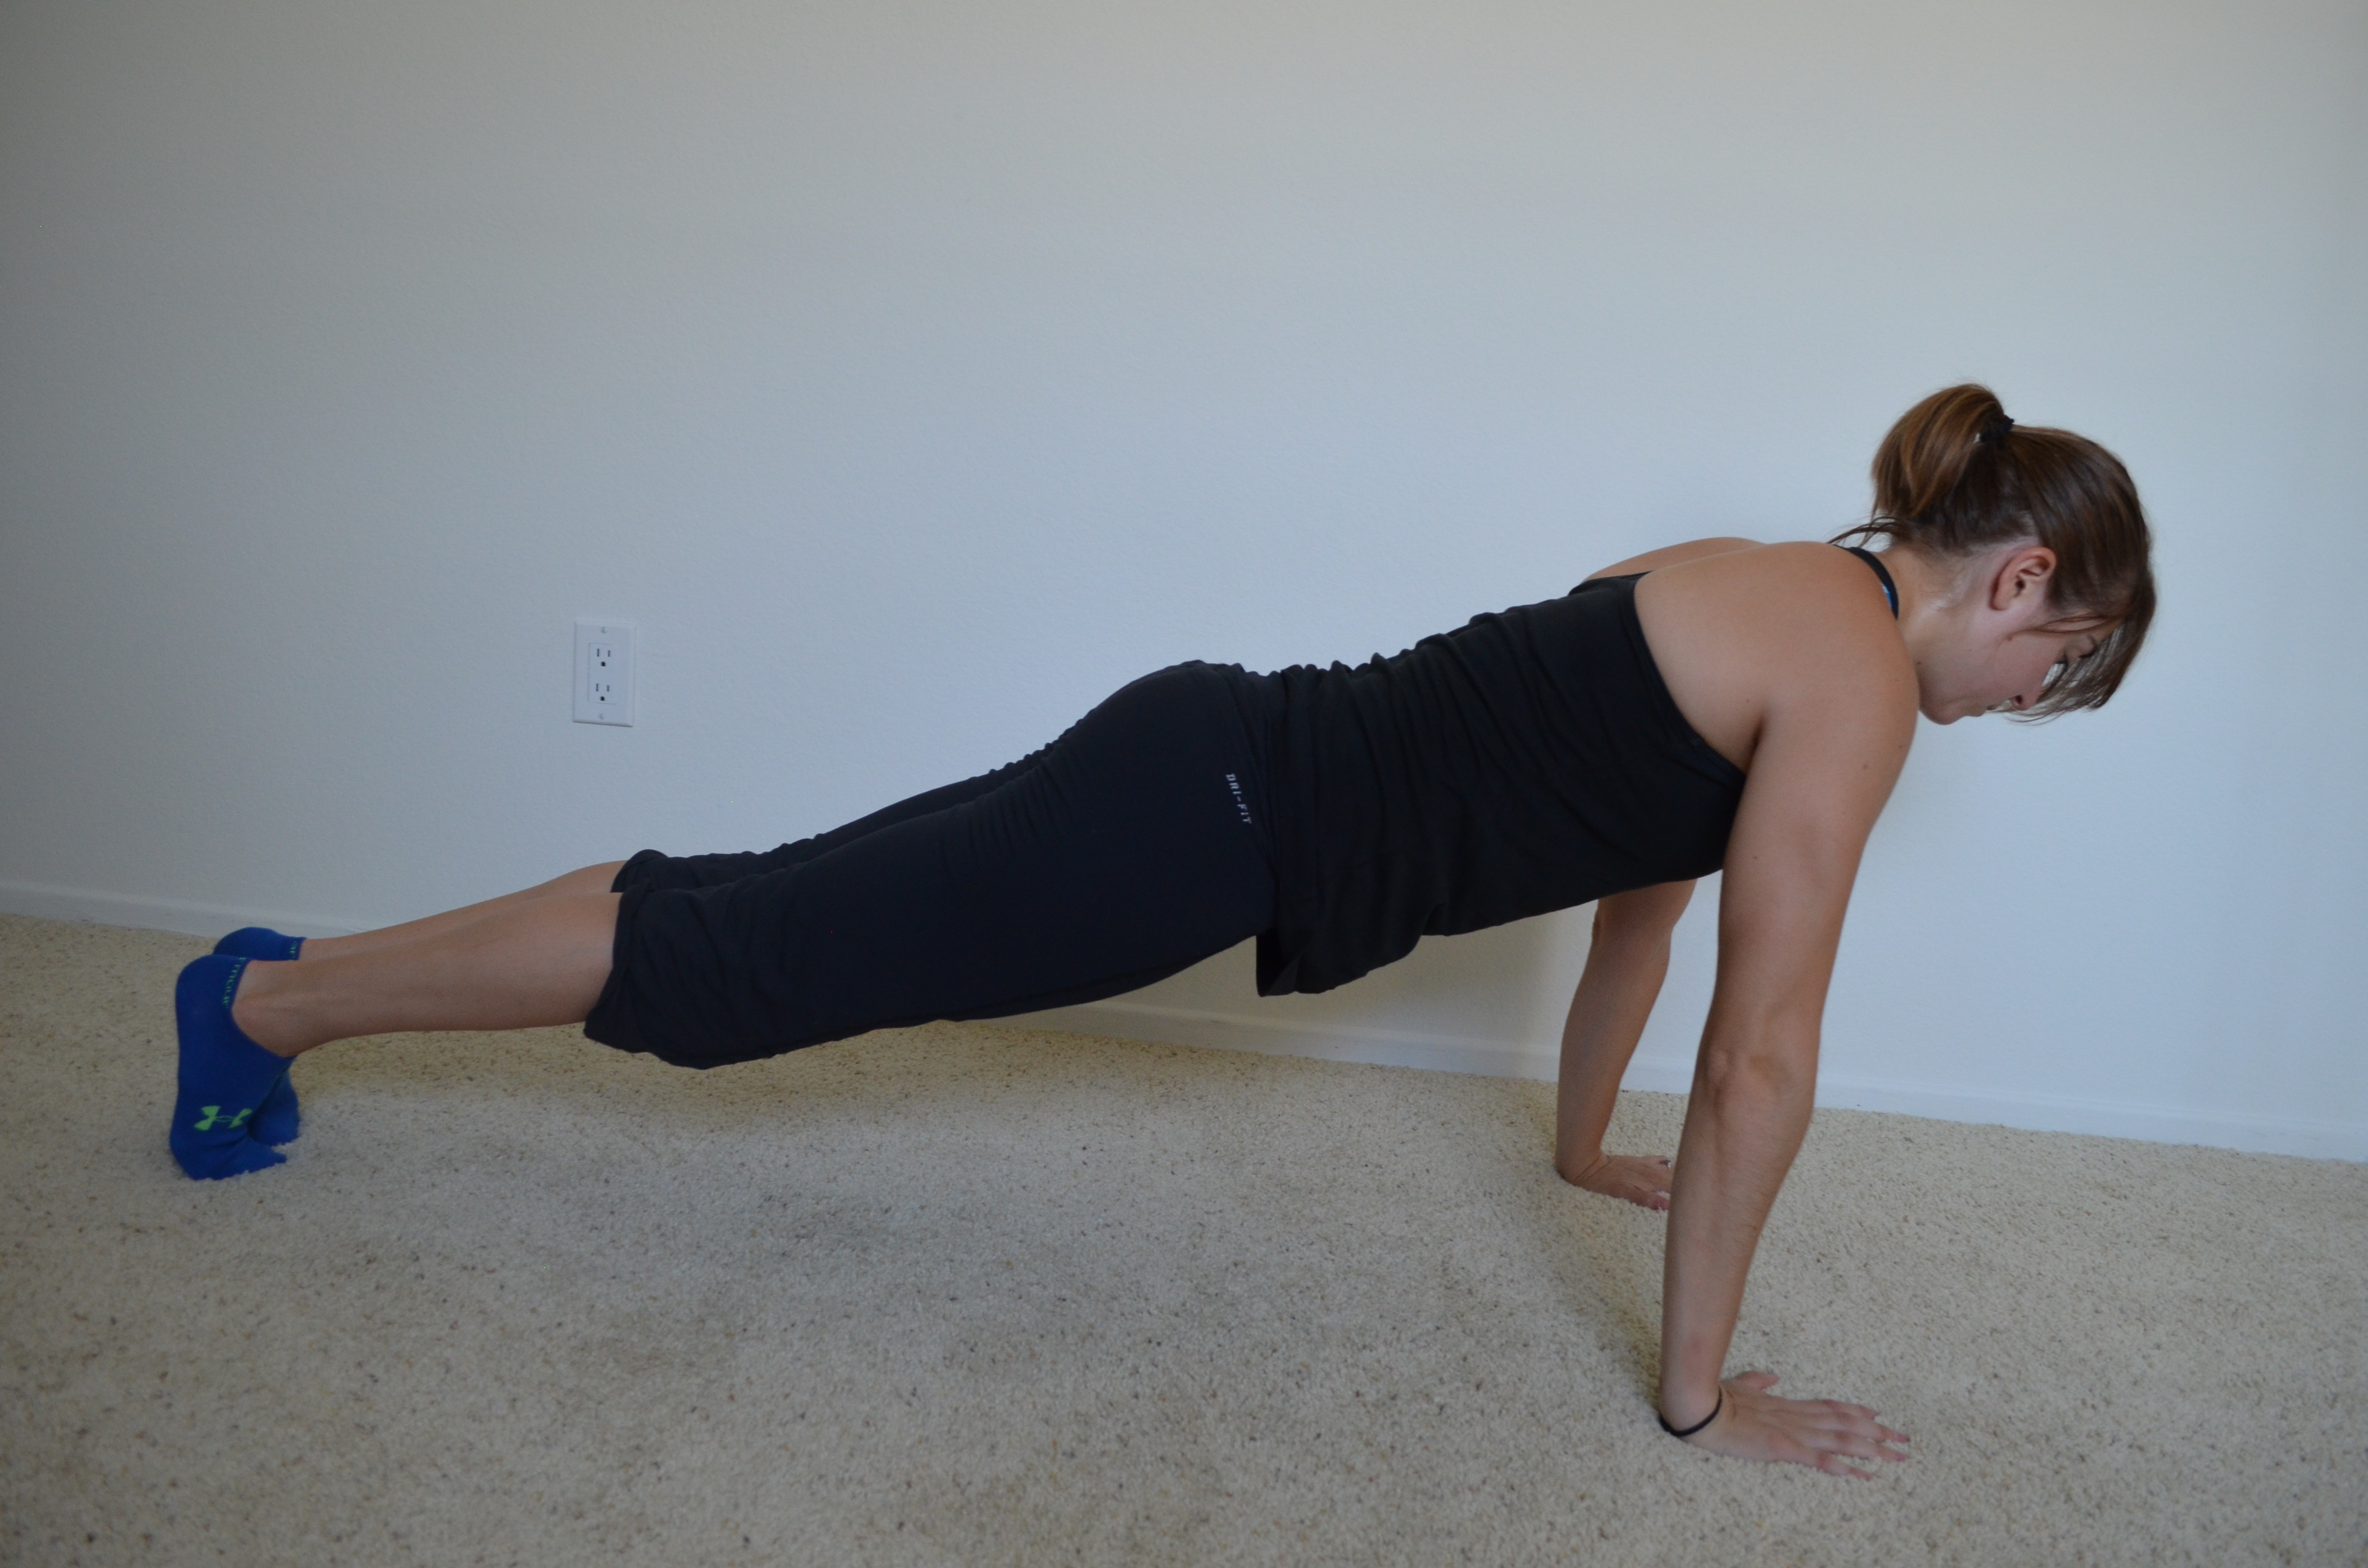
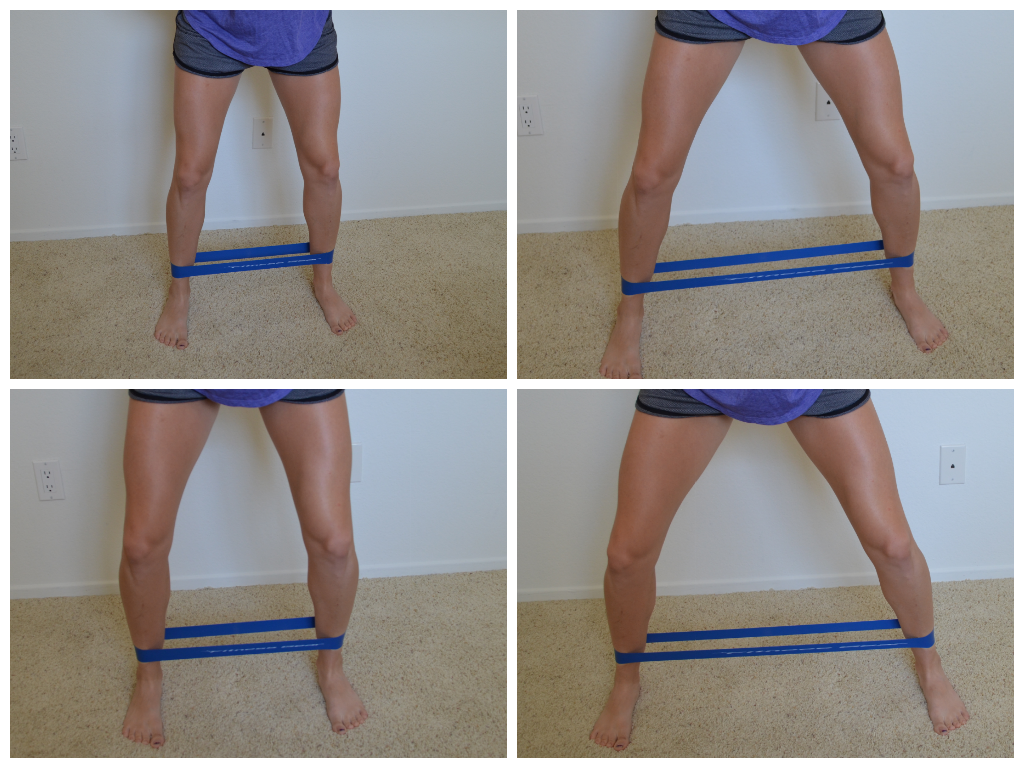
Inverted Rows – Hold a suspension trainer strap in each hand. Walk your feet out so you are leaning back. The closer to parallel to the ground you get, the harder the move will be. Squeeze your core and glutes and press your chest out so there is tension between your shoulder blades. Then row up, keeping your body in a nice straight line. Row until your chest comes up to the handles and then lower yourself back down. Don’t let your hips sink as you lower back down. Also, keep your chest pressed out the entire time (do not let your low back arch though).If there is no bar or XT/TRX on which to do rows, do scapular push ups or corner rows.

One arm weighted rows and T-Bar Rows are also great options. When you do any weighted row, really focus on not rotating or using your legs to help you lift the weight. Focus on keeping a nice flat back and not rotating. You want your back to have to really work to row the weight up.
Doing pull ups are another great way to strengthen your back, but we will get into those with the next point….
4. Use different pull up variations to work on your weak points.
I’ve found that people get super stuck on one pull up variation and never mix it up.
Here are some ways to vary your pull ups to strengthen all the muscles needed to do an unassisted pull up:
- Mix up the grip you use. Don’t always hold with a pull up or chin up grip. Also try a neutral grip (palms facing each other and hands parallel). You can also place your hands wider or closer together. Each grip activates/uses the muscles in slightly different ways. For instance, a chin up engages a slight bit more bicep while a wide grip pull up uses a lot of lat!
- Do assisted variations. The key word there is VARIATIONS. Don’t just always hop on that assisted pull up machine. Try doing a pull up assisted by a jump. Or set up a bar so that your feet can help you push up by pushing off the ground. Or use a band. Vary the assistance you use to force your body to work in a few different ways. Also make sure you are always using as little assistance as possible. Just because something is hard doesn’t mean you can’t try using just a little less assistance. Find your point of failure and then move backward until you can just barely do one or two. Don’t just allow the move to be easy and depend on the assistance.
- Use tempo to strengthen your pull up. Slowing down the tempo of your pull up or down also helps strengthen your pull up. Do an assisted pull up, but pull up for a 3-5 count instead of pulling up as quickly as possible. OR jump to the top of the pull up, hold for a second then lower down as slowly as you can. All of these strengthen muscles in different ways to help you build toward the full pull up.
All of these moves and tips will help you master the pull up. While you need to be consistent in using them, you don’t have to use every single one every time you do an upper body workout. Mix a few in a couple of times a week.
Maybe during your metabolic use a pull up hold or even jumping pull ups. Or the next time you do a strength circuit do a weighted row and maybe some assisted pull ups.
Mix up the techniques you use, focusing on the moves that strengthen your weakest points. There is always a limiting factor to the weights or amount of reps we can do. Find that limiting factor, that weak link, and strengthen it.
And in case you aren’t sure what your weak link is, feel free to comment below and I can help you incorporate these tips into your training!
ALSO, while I didn’t discuss foam rolling above, make sure to roll out and do dynamic stretches before any strength training routine. A huge part of mastering these killer moves is getting the overactive muscles loosen and the correct muscles ready to work!
Goal Setting For The New Year
Around this time everyone begins setting goals for the New Year.
Unfortunately, 90% of those goals never get accomplished.

Don’t let this be you!
And it isn’t because they aren’t meaningful. It isn’t because people don’t want to accomplish them. It isn’t because they aren’t doable.
It is because the goals aren’t clear, aren’t measurable aren’t WELL PLANNED.
The goals that never get accomplished are vague. Like I want to be healthier.
I want to be healthier. That is your goal!?!
Way to set yourself up for failure.
I mean…What is your definition of healthier? How are you going to measure that? What specific things are you going to do to get there? How will you even know if you’ve gotten there?
Heck…Why do you even want to be healthier? Because you are supposed to be healthier? Because you are supposed to WANT to be healthier?
And I’m not saying that being healthier can’t be what you truly want, your overall goal. I’m just saying that if you want to move toward being healthier, you must have specific things to accomplish, things you can measure.
You have to understand WHY you truly want it and what it means to you.
You need to be able to see and measure your progress.
So here are some great tips to help you take that vague goal and turn it into something meaningful that you will actually accomplish this next year!
Goal Setting Tips:
- Focus on one thing at a time
- 10 tips to help you break bad habits
- How to set SMART goals
- Track your progress
- Know the WHY behind your goal
What are your goals for the New Year? What moves would you like to master?
Challenge Yourself With VOLUME
There are so many ways to challenge yourself with your workouts.
But all too often people only focus on lifting more weight.
You can do longer or shorter workouts. You can change up the intensity. You can change up the exercises and the equipment you use. You can vary your rest. You can change up your repetition tempo.
You can also vary the VOLUME that you do.
And by “volume,” I mean changing up the number of reps and sets you do during your workout. HOWEVER, increasing your workout volume doesn’t have to mean longer workouts.
It does, however, mean you won’t be able to lift the heaviest weight you’ve ever used.
That being said though, you do want to use a challenging weight that won’t cause you to go to failure, but will create muscle shake-age (that is my very technical term for feeling your muscles start to fatigue as you lift).
You want to challenge yourself while allowing yourself to move from one exercise to the next with little to no rest between.
And even though you aren’t going to failure or using the heaviest weight you can handle, the sheer volume of work you are doing will create muscle gains.
Using heavy weights and low reps isn’t the only way to develop strength and gain lean muscle mass!
Higher volume with slighter lighter weights can also cause great gains.
For example, the forced reps variations I discussed a few months ago can be a great way to increase your workout volume, challenge yourself and help you progress toward your fitness goals WITHOUT just focusing on always lifting heavier weights or doing lower rep counts.
Another great way to increase your workout volume is by doing density sets. One of my favorite ways to do density sets is by setting a timer and then trying to do as many rounds of two or three exercises in that allotted time as possible.
During these sets, you will use a lighter weight and stop before reaching failure so that you never really need to rest more than 30 seconds at any time.
These density set workouts can also be a great way to get in a little extra “cardio” and can be a great way to give your body a break from the low rep, heavy lifting while still helping you to move forward! And if you’ve plateaued with your low rep, heavy lifting workouts, a high volume workout may be just what you need to get over your plateau.
(Shoot, I also love these workouts because I can get in a high volume of work done WITHOUT having to do 20 reps at one time…Since for some reason my brain, in general, hates counting up to 20….)
Below is a sample high volume workout to get you going this week!
Glute Density Set Workout
WARM UP
Stretch and Roll Out:
Calves
Hamstrings
Quads
Hips/Glutes
Groin
Back
WORKOUT
Set a timer for 15 minutes for each circuit. Perform as many rounds of each circuit as you can in that 15 minutes. Rest 2-3 minutes between circuits. Try to rest no more than 30 seconds at one time during each circuit if you rest even that long.
Mark down how many rounds of each circuit you get in 15 minutes so next time you have something to compete against and show progress!
CIRCUIT #1:
15 minute timer
8-12 reps each side Single Leg Deadlift
10-25 reps Reverse Hypers
Rest 2-3 minutes
CIRCUIT #2:
15 minute timer
5-10 reps each side Backward Rotational Lunge to Front Lunge Across
8-12 reps each side Single Leg Glute Bridge
COOL DOWN
Stretch and Roll Out:
Calves
Hamstrings
Quads
Hips/Glutes
Groin
Back
EXERCISE DESCRIPTIONS:
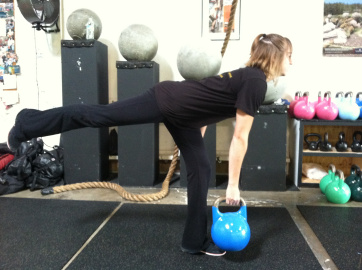
Single Leg Deadlift – For this move, you can hold dumbbells or kettlebells, but remember DO NOT GO TO FAILURE. Beginners should start with bodyweight. Stand on one foot with the knee of that standing leg slightly bent. Hinge over at your hips, sweeping the other leg back toward the wall behind you. Pretend you are driving the heel of that foot straight into the wall behind you. Lean forward with your upper body as you hinge forward, keeping the back nice and flat. Make sure that as you hinge, you are sitting into the heel of your standing leg. Do not lean forward and come up onto your toes. To stand back up, drive through the heel of your standing leg and squeeze your glute at the top. Try not to tap the other foot down at all or at least not till you are fulling standing. Complete all reps on one side before switching to the other leg.
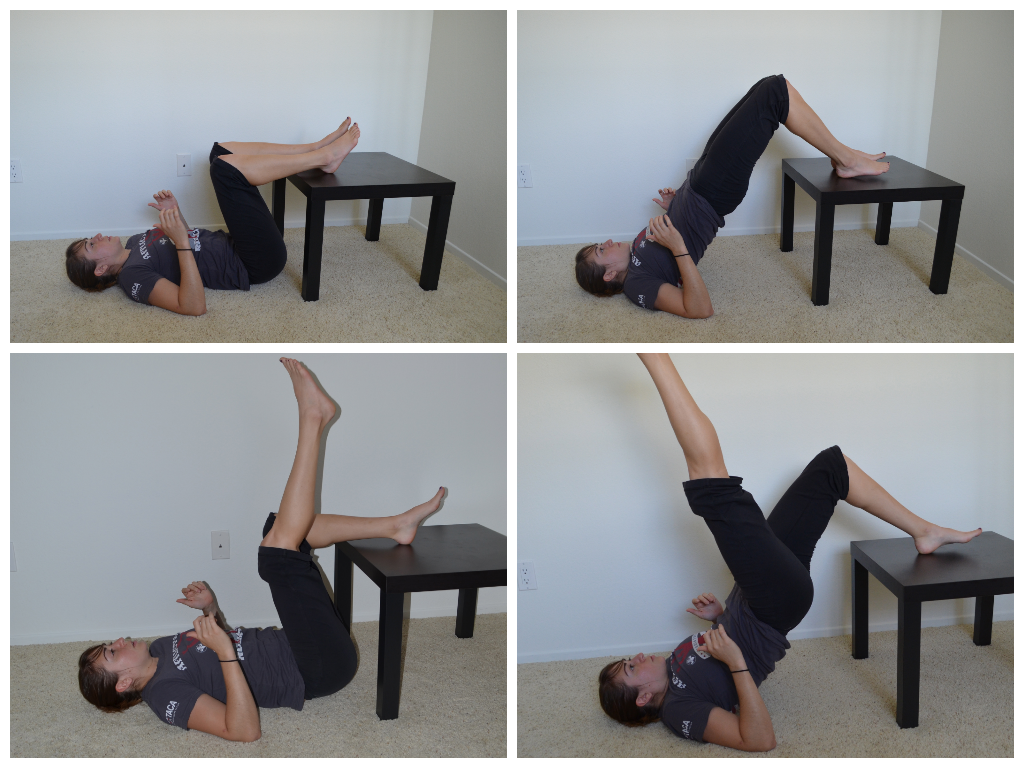
Reverse Hypers – Click here for a description and pictures of me using a small side table I have at my house to do the Reverse Hypers. You can also use a box step or do this move from the ground; however, I do prefer the range of motion the table or box step provides.

Backward Rotational Lunge to Front Lunge Across – This move is actually two lunges, which means that 1 rep is actually 2 lunges. On one you rotate back and open and on the other you come forward and across. Start with both feet pointing toward “12” on a clock. Performing the lunge first with the right foot moving, take the right foot and move it back toward “5” on the clock. As you reach your foot back toward “5,” you will pivot that toe so that it is perpendicular to the front foot which is still pointing toward “12.” Lunge down, bending the right knee while keeping the left leg straight. You are sinking your weight back into that right foot. Then drive up off the right heel and come back to standing. Beginners may need to pause in the middle between lunges while more advanced exercisers can go right from the back rotational lunge into the forward cross lunge. After driving the right foot back to center, bring it forward and across the body toward about “10/11” on the clock. Your right foot will again turn so it is perpendicular to your left foot which is pointing toward “12.” Sink down into a lunge, bending both knees and then drive off the right heel to come back to standing. Repeat those two lunges and then switch to the other side. Beginners will want to use bodyweight while more advanced lifter may front load with a kettlebell or dumbbells.
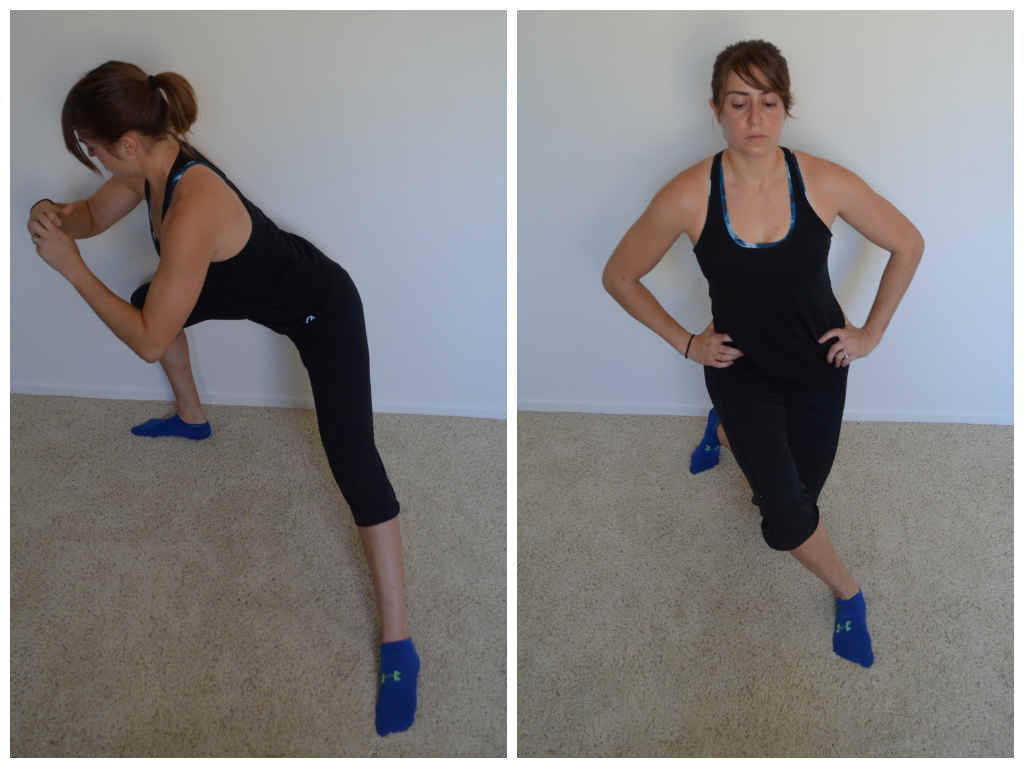
In this I show the backward rotational lunge and the front lunge across but without turning the toe. Not turning the toe on the front lunge can reduce the stress on the knee if you are new to these lunges and/or have knee problems.
Single Leg Glute Bridge – Beginners will perform a single leg glute bridge from the ground (however, if you can’t get your hips up as high as with the two leg glute bridge, stick with the two leg variation for now). More advanced exercisers may put their foot up on a box or advance the move further by putting your back and your foot up on benches/boxes. Remember though, you can’t go to failure during these density sets.
Do you pay attention to the volume of work you are doing?
How do you challenge yourself without just adding more weight?
NOTE: Not every workout should contain a ton of reps and sets. Do not go overboard with volume and/or intensity. Not every workout has to be the hardest thing you’ve ever done. Varying your volume and intensity is key to getting results while preventing overuse and injury. Workout variables need to be manipulated to help you work toward your goal.
Where do you feel it?
When you do an exercise, do you just go through the motions? Or do you actually think about where you should be and actually are feeling the move?
Hopefully you are thinking about where you are feeling the move because that will not only make sure you are doing it correctly but will also allow you to figure out if certain muscles are tight or overactive or underactive.
AND it will build that very important mind-body connection.
One of the first questions I always ask clients when they do a new move is “Where do you feel it?”
It really makes you focus on the move and really makes your mind have to connect and think about your body and the movement.
I also prefer asking that to even telling them where they should feel it because then they have no notion of where they “should” feel it and instead truly consider where they DO feel it.
Because when we consider where we are feeling the move instead of just going through the motions, we may realize we actually aren’t feeling the correct muscles working.
Like when squatting down…if we feel the squat a lot in our low back it may be because our abs aren’t engaged or our hips and even calves are tight. It also probably means our glutes aren’t engaged and firing.
And yes that means we need to do some core engagement exercises and roll out and stretch our calves and hips. And yes, it also even means we need to do some glute activation exercises.
But more importantly it means we need to THINK about the move and focus on engaging the proper muscles to make sure we feel the exercise working the correct muscles.
We can do all the proper activation exercises and learn how to activate and engage the muscles in isolation, but still not have that translate to compound moves IF we don’t focus on doing it during the movement.
Here are some quick tips address some of the most common form problems people have with a few common exercises. These tips help build that mind-body connection along with proper stretching, rolling and activation exercises. These exercise variations and adjustments help you learn to what it feels like to do the movements correctly so your mind knows how to focus on activating the correct muscles so that when you do any variation of the exercise and are asked “Where do you feel it?”, you will feel it in the correct places.
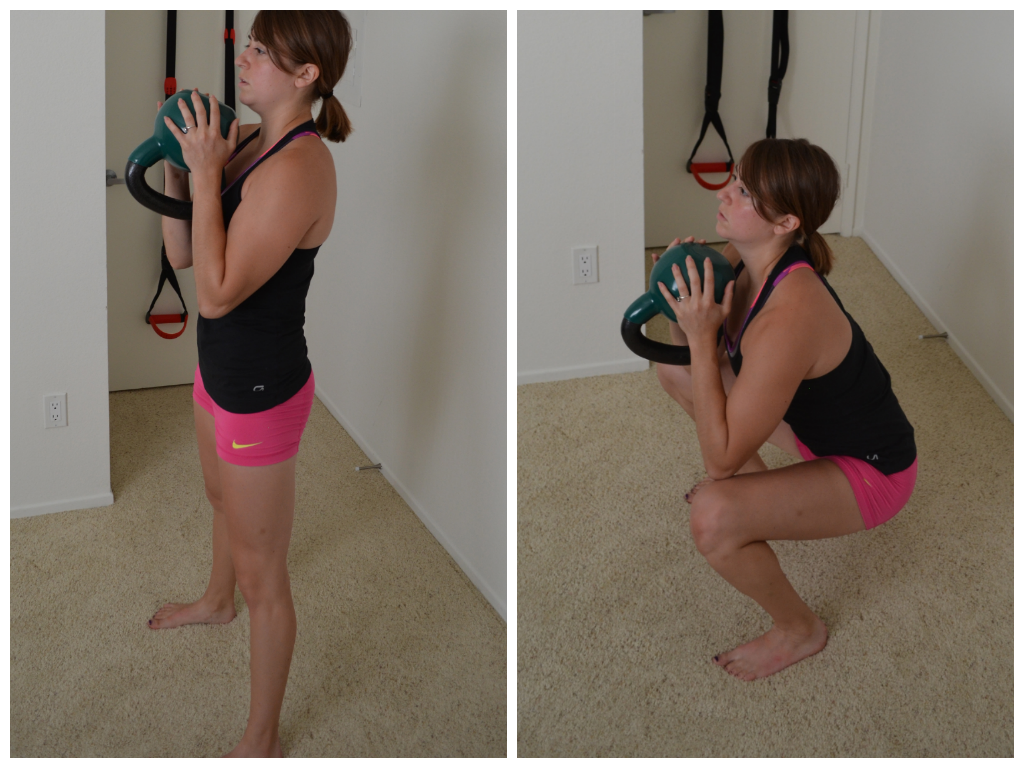
Squats:
- You feel it in your low back – Try a bear hug squat with a sandbag. By hugging the sandbag to your chest, you will force your abs to engage throughout the squat movement. A good next progression from this is even a light front squat with a kettlebell (aka a goblet squat) since front squats require more core engagement. Then you can move into heavier back squats once you’ve learned to focus on engaging your core during the movement.
- You lean forward and feel it in your low back – Stand in front of a wall and perform the squat. Sometimes we may have done enough to loosen up muscles so that we should have proper form yet still repeat the same bad movement patterns because they are so engrained and our mind doesn’t stay focused on controlling our body. The best way to make the new movements muscle memory and get that mind-body connection is by sometimes giving our body no way to compensate. If you lean forward during your squats, stand in front of a wall close enough that you can lean forward and instead have to sink your butt to get closer to the ground. Make sure, however, that you don’t compensate by coming up onto your toes!
- Your heels come up – Many people actually don’t realize their heels come up or that they are coming forward in the squat and that is why they only feel the squat in their quads and not at all in their butt. A great way to correct this is by doing a squat to a box or bench. Stand enough in front of the box that you have to REACH your butt back to sit down on the bench. This will force you to sit back on your heels and then drive up through your heels, engaging your glutes and keep you from injuring your knees and coming up on your toes.

While this is a single leg squat, it shows you that a box forces you to sit back.
Deadlift variations
- Your back rounds as you hinge over – The most common one and often one of the hardest to focus on and correct since so many people are so used to rounding forward over their desks. A great way to ingrain the correct movement pattern is by starting your hinge with a pole or stick down your back. Keep the stick in contact with your head, upper back and butt at all times throughout the exercise. This insures that you have a flat back and do not round. Next move to just keeping your hands behind your back. The hands behind the back reminds you to keep your chest open which in turn keeps your back flat.
- You don’t feel your glutes working – I’ve found a great way to train the hinge motion and driving up through the glutes is by standing 2 or 3 inches from a wall, facing away from the wall. Lean forward and reach the butt back toward the wall. If you only lean forward and put all the work in your back, your butt will not move closer to the wall.But if you only lean forward to counterbalance your butt reaching back, you will feel a stretch down your hamstrings and you will feel your butt touching the wall. If you are working on a straight-leg hinge, you will not bend your knees as much. If you are working toward a conventional deadlift, stand a bit farther away and allow your knees to bend as you reach your butt back and lean forward (keeping your back flat) to counterbalance your butt reaching back to touch the wall. This move should make you aware of how it feels to sit back and the “stretch” you will feel if you are doing the move correctly. Advance to using a band around your hips while trying to reach your butt back to a pole or wall.
- Your low back is feeling it – Doing a light weight front-loaded good morning is a great way to get the core really activated while hinging. Too often when we are holding a barbell or kettlebells while lifting we are more focused on the hinge and keeping our back flat than our core engaged. But a front loaded move like the good morning is a great chance to really focus on the core. Hold a dumbbell, sandbag or kettlebell at your chest. Perform a straight two-leg deadlift, sitting your butt back and hinging forward. Because of the weight in front you will really need to focus on engaging the core so your low back doesn’t feel it. If you just rush through this move, you can easily irritate your low back. BUT I like to use it because it does really seem to make people more aware of how engaged their core should be.

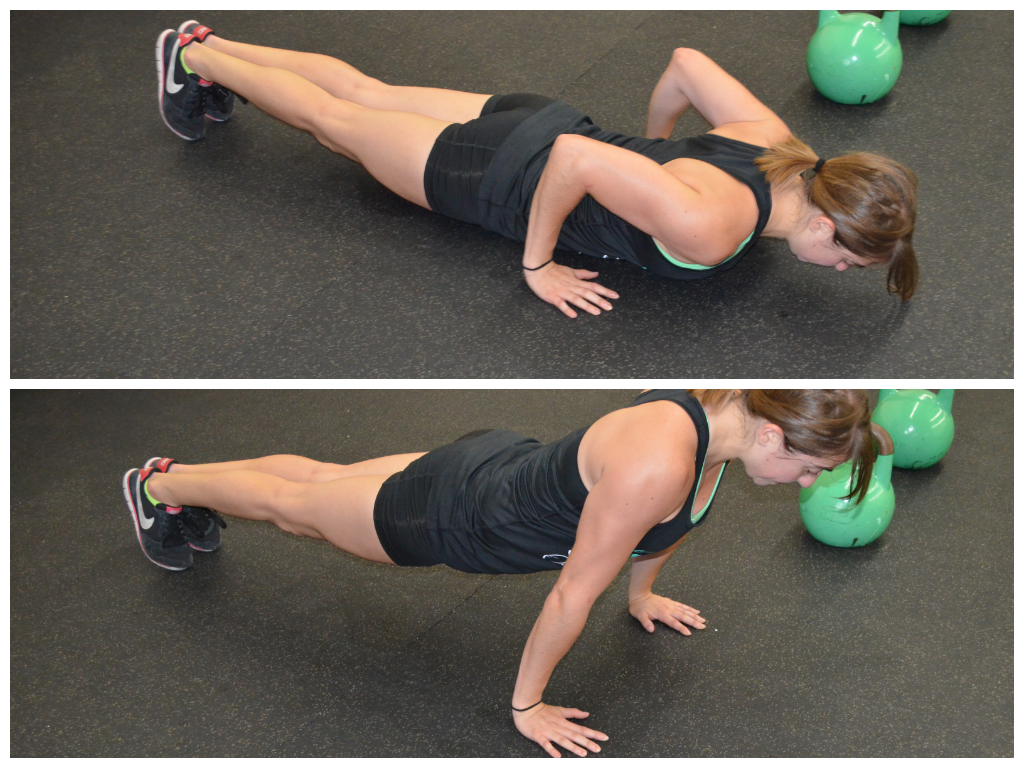
Push Up
- Push ups are one exercise everyone thinks they can do and hardly anyone actually does correctly. One of the best ways to train correct push ups is to make them as easy as possible to start with. INCLINE PUSH UPS should be done to start. Heck use a wall and do almost completely standing up straight push ups if you need to. By making it super easy, you allow yourself to focus on correct movement patterns….Like everything moving together and you not tucking your chin and your elbows not flaring out toward you head….
- You feel it in your low back – This means your core isn’t engaged. Try placing yoga blocks under your body. Make sure everything hits the yoga blocks at the same time. If your hips hit it before your chest then your hips are sagging and your core isn’t engaged…aka you are going to feel it in your low back! This may just make you aware enough to correct it or you may need to do some pelvic tilts and plank holds!
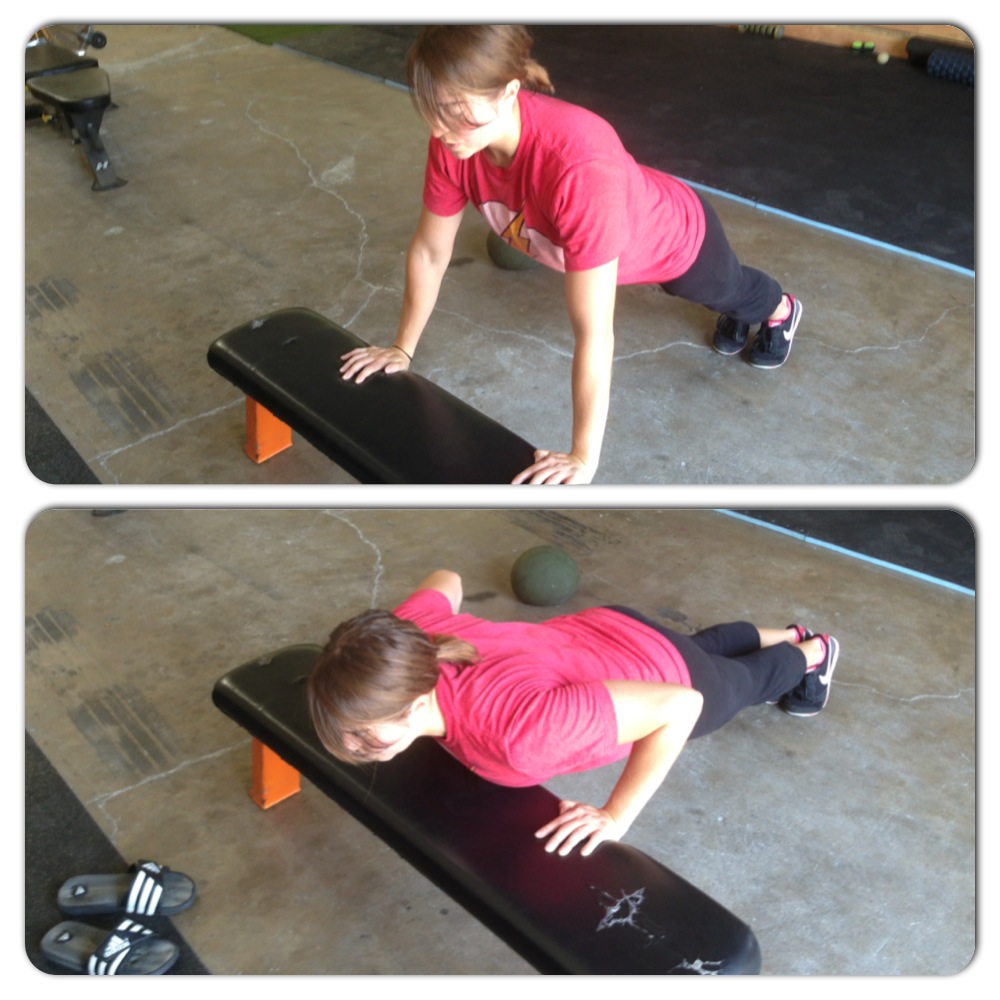
- You feel it in your traps and neck – You are shrugging your shoulders and not engaging your lower traps or lats. A great way to train yourself to keep your shoulders down is by doing a push up with your hands low down like toward your hips. Because this is a difficult push up, you may need to do a modified push up or even an incline variation.
Row
- You feel it in your neck and traps – I find this is super common especially during inverted rows. It means you aren’t activating your lower traps. It is also easily corrected by focusing on pressing the chest out and by rowing LOWER on your chest. So instead of even focusing on engaging a muscle, focus on just rowing the strap or bar to lower on your chest…like below the nipple at least.
- Your back is rounded – Just like with the deadlift, a pole or rod can be used down your back to keep your spine in alignment. Make sure your head, upper back and butt all maintain contact with the pole throughout the move. This will also prevent you from rotating so that you actually feel the move in your lower traps and lats! (This isn’t great for keeping a straight line during the inverted row but during the bent over row or even a row supported on a bench.)
- You only feel it in your biceps – While any back exercise does work your grip and your biceps, you should feel the move in your back. Focus on driving your elbows up toward the ceiling and not letting your forearms curl toward your chest when you row. To learn this, it actually works best to stand up straight. Stand with your back to a wall. The wall should be only a few inches away. Standing up nice and tall, drive your elbows back to touch the wall. If you “curl” instead of “row,” your elbows won’t touch the wall. But if you pinch your shoulder blades down and back and row, your elbows will touch the wall. This is the exact motion you will use when performing an actual row and rowing your elbows up to the ceiling!

Row low on the chest. Do not let your forearms curl toward your chest.
These are only some very basic cues and variations to help you develop that mind-body connection. But if you use them they will help you become more AWARE of your body so that you can keep the correct muscles engaged and working even during other variations.
Now ask yourself, “Where do you feel the (insert exercise here)?” Are you using the correct muscles or just going through the motions?
Why you need to write out your workouts BEFOREHAND
Contrary to popular belief, there are days when even I don’t feel like working out.
Like since it has started getting darker earlier and a bit chillier in the evening…And all I want to do at 8 p.m. is go home and eat…not workout.
But I’ve gotten myself to stay and workout. Not because I have superhuman self-control. And not because I just love working out more than the average person.
But because I’ve planned out my workouts ahead of time.
Too often people don’t go in with a PLAN. They think, “I’ll just decide what workout to do based on what is sore and what equipment is not in use and how I feel when I get there.”
But not having a plan is the best way to give yourself an excuse to not go to the gym.

For some reason this quote often bugs me, but it actually fits today. Often we let the stress of our day make us want to skip our workouts, when our workouts will not only help us reach our dreams, our goals, but will also make us probably feel more relaxed!
When we plan ahead, we provide ourselves with motivation, with expectations. And it is way easier to let yourself off the hook if you don’t have expectations.
It is way easier to go straight home after work and sit on the couch if you don’t have a plan to do a push up, pull up pyramid. Because who would just decide to do a push up, pull up pyramid spur of the moment after a long day at work!?!
And it is way easier to decide that 15 minutes on a treadmill is enough if we don’t plan out a true metabolic session to help us work toward our goals. Because after a stressful day, who wants to force themselves into a workout that may almost feel puke inducing?
Let’s face it…It is way easier to SLACK if we don’t have a plan because there is nothing pushing us, nothing guiding us to work hard.
At the end of a long/stressful/draining/tiring/boring/insert-adjective-here day there may not be much, if any, internal motivation left to push us to workout.
We may need a little bit of external motivation – and that external motivation can come in the form of a pre-written, planned out workout. Because having a workout clearly outlined and written out in your hand is evidence of what you are SUPPOSED TO DO. And if we don’t do, there will be not only the knowledge, but also clear evidence that we didn’t do it.
It is easy to ignore the idea of a workout. It is easy to just go home and forget about it.
But it isn’t as easy to ignore something pre-planned and written out. Something that we will clearly know we didn’t do because it is staring right back at us.
And not only does that planned workout make us go to the gym, but it also generally pushes us to work hard even when our mind would tell us the warm up was enough.
I find that even when I want to quit, knowing that I laid out a certain routine keeps me going.
Even though no one but me will know….I WILL KNOW that there was something written out that I didn’t do.
If I’d made the workout up on the spot, it wouldn’t be as hard to change it because it wouldn’t feel set in stone – it would feel like I was just adjusting because I didn’t “feel” that good during the workout.
But writing it out ahead of time, even just earlier that morning, makes me realize that when I was motivated, I did feel good enough to do the workout and that now I’m just being lazy and making excuses.
That it is all really just in my head.
Like the other night. I’d set out a workout.
About 15 minutes in, I felt pretty toasted. My mind was telling me, “I’m done.”
And I thought to myself, “I sometimes do workouts like this and just push hard for 15 minutes. I can go home now…I worked really hard!”
But then the workout goals were clearly laid out in front of me. And I knew I was just giving up because I wanted to go home and not because I was truly exhausted.
So I pushed on. Having the plan kept me going past what my mind wanted to do that night, to what my body really should have, and could have, done.
And the best part is, getting yourself over that first hurdle of pushing hard even when you didn’t want to seems to really get the momentum rolling and makes it easier to repeat the action.
Pushing yourself to go to the gym one night even when you are super tired because you have a workout planned out, will make it easier to push yourself to do it again.
It’s almost like doing it once proves that it really isn’t that bad and therefore allows you to be able to repeat the action.
You often hear, “The beginning is always the hardest.”
And it is really true. But a plan, a workout written out before your motivation dwindles, can be just the motivation you need to truly get started!
So stop waiting till you get to the gym to decide your workout. Start planning!

Help yourself take that step by planning it out!
P.S. Not only does planning keep you motivated, but it also allows you to reach your goals more quickly. You can plan out workouts focused on your goals and not just how you are feeling. Plus writing down your workouts allows you to truly track your results and progress so you can determine what is and isn’t working.
Getting Started – Pain Cycle
Somewhere deep down inside, we all know that moving more, that exercising more, will make us feel better.
However, many of us are stuck in the Pain/Injury Cycle, which prevents us from every consistently working out.
Pain Cycle:
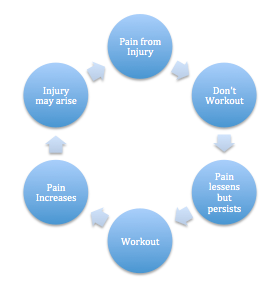
Many people, at one point or another, attempt to start a new workout program.
They don’t really know where to start or what to, but they give their workouts 110% effort.
And then they get injured. So they take some time off.
During the time off, the pain does lessen yet they may suffer from other aches and pains. So they again start working out in an attempt to get rid of their pain.
But because they haven’t really improved their movement patterns or rehabbed their injuries, their pain increases and may even lead to further injury.
That in turn leads to them quitting their exercise program yet again and leads to continued chronic pain.
This cycle of pain and injury is why it is hard for many people to even get started on a healthy lifestyle program.
Most of us don’t like doing things that are uncomfortable. Most of us doing like being in pain.
Actually most of us will do a lot to ever avoid suffering pain, which unfortunately can cause us to never truly feel good.
So how do you get started when you are suffering from pain and exercise just seems to cause more pain?
YOU LEARN TO MOVE WELL!
Don’t worry about lifting a ton of weight. Don’t worry about doing crazy cool stuff.
Deal with the pain first!
Start with the boring tedious stuff that everyone wants to avoid.
Start with the foam rolling. With the stretching. With the activation moves. With the strengthening moves.
THEN learn to move correctly before you worry about adding weight or doing brutal workouts.
BABY STEPS!
If we try to run before we can walk, we may be able to run for a bit but we are probably not going to be running for long because our body doesn’t truly know how to run. So it will get injured.
BE PATIENT. Allow your body to grow and to learn.
Don’t skip those first ESSENTIAL steps. No, that first rehab/prehab stuff isn’t glamorous, but it is essential if you want to run and run without pain.
It is essential if you want to stop that pain cycle from repeating itself over and over again.
I know we all want to just jump right in and use all the cool equipment and do all the crazy “badass” workout moves so we can post our gnarly workouts on Facebook, but if you want to MOVE BETTER AND FEEL BETTER, if you want to make working out a way of life, you’ve got to EARN those moves.
Start with the basics. Learn to move well and you will earn the fun stuff! Plus you will break the pain cycle and really start feeling good!
Here are a few posts about EARNING your exercises and progressing your workouts. Plus if you want some great stretches, foam rolling and activation moves, check out Redefining Strength!
Flexin’ Friday Workout
There are lots of workout formats that work.
There are a ton of variables out there to play with to make a great workout.
And since I’ve been overwhelming you all with talking about the variables recently, I just wanted to show you how I manipulated some of them into a great squat workout the other day.
Squat Workout
WARM UP (15 minutes-ish):
Foam Rolling (Picked out places that will be used and could be tight. Quickly moved on if an assessment showed no trigger points. Spent time on areas with trigger points.)
Calves (couple of trigger points)
Hamstrings (focused on the area right under my butt since tight from other workout)
Quads (tight around knees)
Hips (TFL and glutes a bit tight)
Back (not too bad a bit tight in middle back..loosened up traps for holding KB a bit)
Adductors (good..quick sweep over cause no trigger points found but felt a bit tight)
IT Bands (good…quick sweep..no trigger points found)
Dynamic Stretches (10-15 reps each one round through all)
3 Way Ankle Mobility

Bear Squat (calves)
Hip Hurdles
Dynamic Hamstring Stretch
Dynamic Quad Stretch
Dynamic Squat Stretch
Side Lunges
Activation (1 round through 45 second holds each)
Squat Hold
Scapular Hold
High Plank Hold
Glute Bridge
STRENGTH:
1.
5 rounds of the following 1 minute on, 1 minute off:
Heavy KB Goblet Squat
(Use the heaviest KB possible, but make sure to get no fewer than 20 reps in the minute. Hold weight up at your chest and squat down to at least parallel. Do not lean forward or let the chest fall to the ground. Keep the core tight and drive up off the heels.)
Rest 2-3 minutes.
2.

5 rounds of 8-12 reps with about 1 minute of rest between:
Weighted Jump Squats
(Can hold dumbbells by side or place a bulgarian bag around your shoulders like I did. Choose the heaviest weight you can while still being super explosive and getting high off the ground. Do not make it so heavy that you are quick and explosive with the move. Beginners may not want to make the move as explosive. They can regress to a squat or a squat then come up to their toes. They could then progress to a jump where they only slightly leave the ground. If your landings aren’t soft you need to regress! Super important to have good landing mechanics if you are adding weight!!!!)
CONDITIONING:
5 rounds, 50 ft sprints about 45 seconds to 1 minute rest between:
Sled Sprints
(Lighter weight so that you can sprint the entire distance, but challenges you. You don’t want it to be a jog!!)
COOL DOWN
Walked to let my heart rate come down and everything relax.
Stretched out a few areas that felt tight and rolled them out (calves, quads, hips were main focus)
Workout Breakdown
Above is just one way to manipulate the variables.
While I worked quickly when I worked, the workout itself wasn’t a quick circuit. I completed all rounds of one exercise before moving on. I took my time and rested and recovered in between sets.
It wasn’t a race to the finish with me trying to get everything done as quickly as possible.
It was about quality reps and getting myself to create the same quality output each and every round. I wasn’t afraid, especially with the jump squats or sprints to take more time if I needed even though I was trying to go as quickly as I felt recovered. (With the KB squats I did force myself to go on the 1 minute intervals.)
If you notice, I also only included 3 exercises. Not every workout has to have 10 or 20 different moves.
And if you also notice, I chose all movements in the same place of motion – the sagittal.
While I’ve mentioned before that you don’t only want to work in one plane of motion, there are times when you can choose to manipulate your workouts so that you really are only working in one plane of motion. The point is that you are aware of what you are doing.
And not all exercise have to be done for reps.
My squats were based on time. I had to move as quickly as possible the entire minute to perform as many squats as possible. I used my goal of around 20 reps (25 was fine but meant I should try to go up in weight) as a guide to choose a challenging weight while still keeping myself moving quickly the entire time.
I also didn’t mix up rep tempo very much. I did quick squats and then some explosive moves. So the explosive moves were quicker, but there wasn’t a huge tempo change. Didn’t want to…Didn’t need to. Not every variable needs to be used or manipulated into something crazy every workout.
The point is you can play around with workout variables and combine them in a lot of different ways. This is just one example (and one that shows an example of my warm ups too…).
Hopefully this highlights some of the ways the workout variables I’ve talked about in the past can be used and makes considering them seem a bit less daunting.
It’s even a great workout if you need one for this beautiful Friday!
The Importance of Progress
I want all my clients to see progress immediately.

Confused as to why I have a picture of a turtle on a skateboard? Read on! 😛
But sometimes change is slow to happen. If you slowly make changes to your diet or slowly build your exercise program, results aren’t going to happen immediately.
And while I think that slow steady changes can be best when trying to create new habits, there are times when I recommend clients take an all or nothing approach.
Not seeing the results you want can be frustrating. It can make you feel down. It can make you want to give up.
It can completely derail the healthy lifestyle habits you are trying to instill because you believe they aren’t working.
Forward progress is motivating. Results create excitement and build momentum. They make you even more dedicated to what you are doing because you know it is working.
Progress builds confidence.
So sometimes it is worth suffering through a few really strict weeks or even months to build that forward momentum – to create great progress.
While I’m a huge proponent of slow steady changes, of making realistic changes that you know you can maintain, I do think there are times where you might just have to suck it up and do something that is more intense, more strict, than you would like to maintain. Sometimes there are periods where you have to do something slightly more drastic, slightly unsustainable to get the ball rolling and the momentum moving in the right direction.
This conversation actually came up when I was actually talking to a client yesterday who was frustrated by her very slow progress.
I told her the truth – Her diet wasn’t strict enough and her workouts simply weren’t yet consistent enough to see the drastic changes she wanted as quickly as she wanted them. Her expectations weren’t unrealistic. They were just unrealistic if she made the changes as slowly and inconsistently as she was making them.
I told her she needed to start eating cleaner, cutting her carbs and really focusing her diet on meat, vegetables and fruits.
She then told me that a diet like that simply wasn’t sustainable in the long run for her.
And then I told her something I don’t say very often, “Well it doesn’t need to be!”
She gave me a surprised look because it definitely wasn’t the answer she was expecting.
Sometimes you need to take it back to basics and just cut out everything but the cleanest of clean.
I told her that for the next few months she should focus on just meat, veggies and fruits. If she does that, she will start to see way more progress over the next few weeks.
I told her that once she really got the ball rolling, that forward momentum would start to build on itself and help her keep moving in the right direction.
And as she builds momentum and really gets things rolling then we can slowly start adding back in the foods she enjoys until we’ve created a sustainable diet that doesn’t leave her feeling super deprived.
Because deprivation can derail your diet. There are no ifs, ands, or buts about it.
HOWEVER, if you only deprive yourself for a very short amount of time with a clear end date in mind, it is easier to push through those feelings. It is easier to push through when you know there is a light at the end of the tunnel – when you know this isn’t meant to be the diet you follow for the rest of your life.
And the progress you will see if you choose to buckle down for a few months or a few weeks, will be a huge motivator.
In my opinion it is well worth the few weeks of deprivation to get the momentum rolling in the right direction.
While slow steady changes are great, while I definitely feel like in many cases the tortoise wins out over the hare, if occasionally the tortoise could move just a little bit faster, I don’t think she’d turn down the opportunity.
Stricter periods in your diet and exercise program can help you see results quicker and can reinforce your dedication to your healthy lifestyle.
You aren’t going on a crash diet and expecting it to be the program you follow for the rest of your life. You are just choosing to be a bit stricter for a few weeks to get the momentum going or even just simply to get over a plateau.
You are creating progress with the intention of then slowly developing habits and changes that you can maintain.
You are simply being a tortoise that stumbled on a skateboard and could roll awhile downhill before returning to its steady climb up and over the next hill!

And another one!?! At least you get why I put a turtle on a skateboard now!
Warm Up – Always Ask Questions
Yesterday on my post, I got the following questions. Generally I try to respond in the comment or by email, but I thought this comment by Jill posed some interesting questions and raised some interesting issues. (It actually made me think of a post by 43 Fitness about questions and how sometimes we, fitness professionals, don’t always realize all the questions that need to be answered to really help others on their journey). That being said….
Cori, I really like your blog and the way you approach workouts in a sensible way. I just sometimes feel a bit overwhelmed reading it and wondering how to incorporate these things. Basically, you are WAY smarter and stronger than me and it sounds really complicated to get to where you are at. How many activation and strengthening exercises do we need in our warmup? Should we always be doing the same warmup? How do we know what to focus on? Usually I just do a dynamic warmup with many of the exercises you linked that I found in a book (New Rules of Lifting for Abs or something similar). What are some corrective exercises? I don’t really know what my imbalances are, other than that I always seem to injure my right quad when doing exercises like step-ups so I’m obviously not using good form. How long do you recommend the warmup should be? You don’t have to take the time to answer all these questions…they are just a few that come to mind as I read your post. I’m moving from my running “season” back into weight training and want to do it right. (The good news is I did achieve my goal I set at the beginning of the year to run a half marathon under 1:35 and now I feel like I can take a break from running.)
For one, congrats Jill on achieving your half-marathon goal!
Two, it doesn’t matter how much you know. All that matters is that you question and seek out knowledge. We all have to start somewhere and have to grow from there. It doesn’t matter our starting point just how hard we work to learn and grow!
When it comes to health and fitness, especially, there really are a ton of different “correct” answers. You’ve got to do your own research and come to your own conclusions.
And three, health and fitness is, but isn’t complicated. There are a ton of workout variables you can manipulate to make your workouts good. BUT you can’t freak out about manipulating each and every one every single workout.
The point is more to know that all of them matter and can affect your results. When you know the variables that matter, you can better track your progress and figure out what works and what doesn’t work.
It is good to know the details just don’t get bogged down in them.
Anyway…Let’s see if I can break some of this down so that it not only answers your questions, but questions I’m sure others have as well!
Warm Up
How many activation and strengthening exercises do we need in our warmup?
I’m sure you all will love this answer…IT DEPENDS!
I usually pick out about 6 or 7 moves for my warm up although I have spent longer on days when my body is super tight.
Some are stretches and some are activation moves. The exact number and breakdown of what I do depends on the workout and how my body feels. I generally do one or two activation moves during the warm up although I can do up to 4 or 5 with a butt workout.
I generally base my warm up on how I feel during foam rolling. Don’t get me wrong…I have some stretches planned out based on the workout, but I may lengthen or shorten the warm up based on how loose my body feels when I foam roll.
If I find a ton of trigger points and am super tight I may add in a stretch or two more or do more reps of the stretches I planned to do.
For example…with a back workout I may do:
1 or 2 Forearm stretches (depends on how tight my forearms are and how much computer work I did that day…or grip work I did the workouts earlier that week)
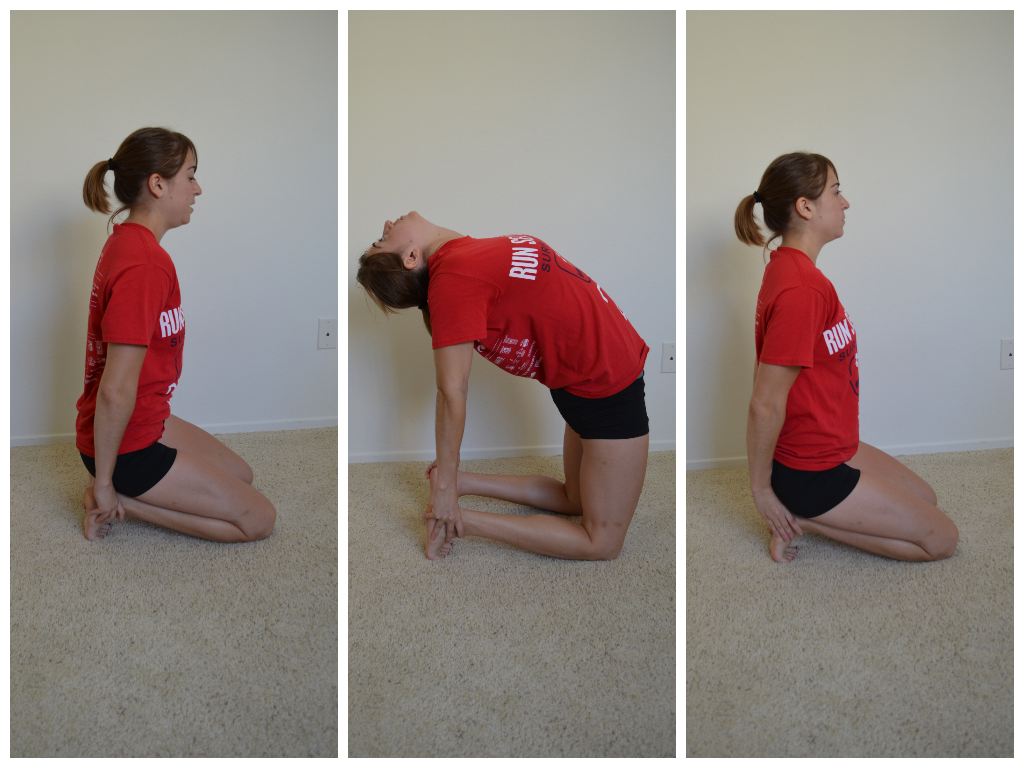
2 or 3 Thoracic mobility moves (Here is a link to a post with a few. I may do more or less depending on how tight my back feels and how much I’ve been seated and hunched over recently)
1 or 2 Lat stretches (See the link above for options)
1 or 2 Chest stretches (See the link above for options.)
2 or 3 rounds Scapular Holds for activation
There is no set number of exercises you should do. I generally wouldn’t do more than 10 moves in a warm up. I usually do fewer exercises and just more reps.
I pick out those moves based on what my workout is going to work.
The MOST IMPORTANT RULE when it comes to warming up is to make sure that your body FEELS loose and ready to work. You want the muscles you are going to use to be warm and mobile. You don’t want to be forcing a range of motion when you start using weights!
Should we always be doing the same warmup?
I like mixing up my warm up so that I can stretch the muscles in different ways. Let’s face it…Our bodies do adapt to whatever movements we do.
HOWEVER, if you pick out moves that create the mobility you need for your workout, it isn’t that important to mix it up.
I probably mix it up more than most people because I’m constantly experimenting with new mobility moves I learn to see if there are better ones out there than the ones I’m currently using (because then I’ll use those with my clients).
Find moves that create mobility around your joints….So that you have proper thoracic extension, shoulder mobility, hip mobility…ankle mobility…
I must say…Those 15 moves I listed are some of my favorites and staples in my warm ups.
Also, different types of workouts require different warm ups. An upper body workout shouldn’t have the same warm up as a lower body day. Chest workouts should have different warm ups than back workouts.
Shoot cardio or metabolic workouts should have a different warm up than strength warm ups.
Focus on your workout and use that to figure out what your warm up needs to do to get you ready!
How do we know what to focus on?
Your focus in warm up is always to get your body prepared for the work it is going to do during the workout.
If you are doing an upper body workout, don’t worry about warming up your lower body. Focus on what you plan to use during your workout and the movement patterns you plan to do.
What is the goal of your workout? What muscles are you working? Is it cardio oriented or strength oriented? What movements are you going to be doing?
Once you answer these questions, stretch out the areas and activate the muscles that are going to be used.
For instance, say you are doing a Squat Day.
You need to warm up your hips to be able to squat. Dynamic squat. Hip flexor stretches. Low back stretches. Quad and hamstring stretches. Think
You will also need to warm up and stretch your ankles so that you have the mobility to squat. (Many people can’t squat very low because they don’t have much dorsiflexion…Their calves and even the sides of their shins are tight). Ankle mobility is key during a squat workout warm up.
You may also want to warm up your core and back on squat day, especially if you plan to do front squats.
Think about that movement. You need to make sure you work on your thoracic extension because you don’t want your back to round forward as you perform squats. You want a nice tall posture. You want to remain upright while holding the weight.
Focus on the muscles and movements used during the workout and what needs to be activated.
Then also consider what feels tight on you. If I’m going to squat and I’ve been sitting a lot and know my hips are tight, I may spend extra time stretching my hips and working on hip extension.
One of my favorite stretches to stretch everything made tight by sitting. A great one for days when you do front squats.
Remember the whole point of a warm up is so you can do the workout movements correctly and prevent injury!
What are some corrective exercises?
Ok corrective exercises ARE NOT squats on a bosu. They don’t need to be overly complicated or confusing.
Corrective exercises are moves that make the body develop stability, a better mind-body connection and PROPER MOVEMENT PATTERNS.
Corrective exercises work to activate inactive muscles and inhibit overactive muscles. So foam rolling, stretching and activation exercises are all part of a corrective exercise program.
It’s really hard for me to tell you that this or that exercise is a corrective exercise.
Glute bridges, bird dogs, band walks, squats with a band, planks, YTWLs…They can all be corrective exercises.
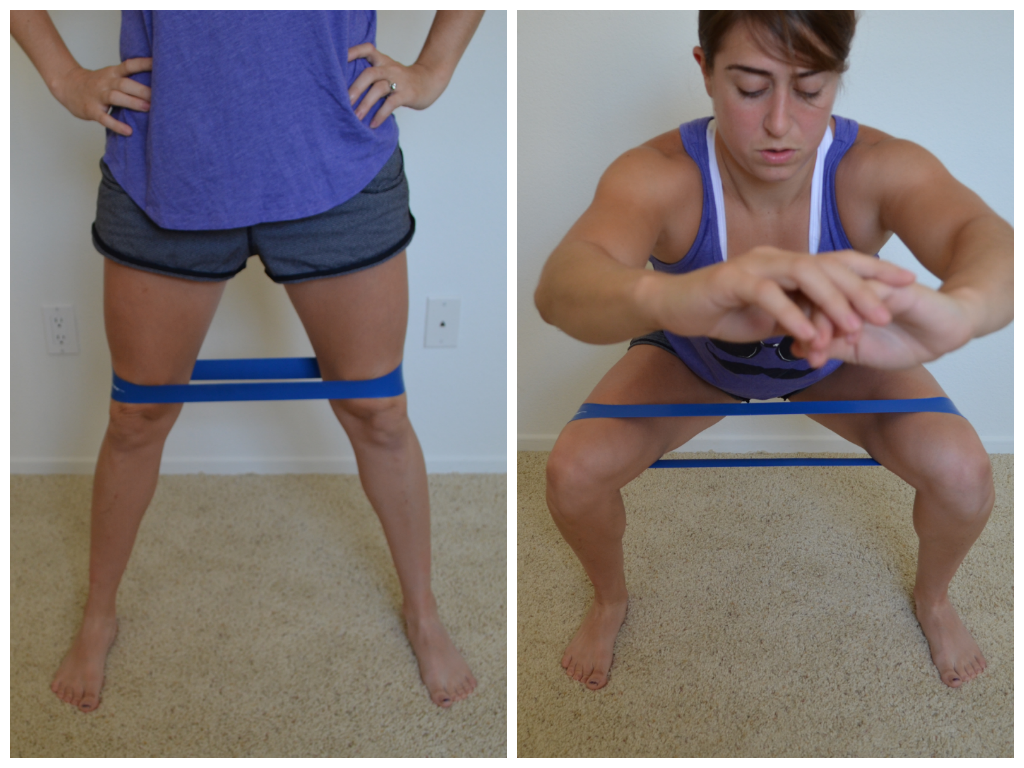
Makes sure you activate the glutes and is great if your knees tend to cave in when you squat.
The point is to do moves that strengthen and improve your movement patterns.
If you’ve had an ankle injury, balance exercises or single leg deadlifts may be the corrective exercises you need.
Corrective exercise CORRECT imbalances.
These are generally best prescribed by someone after an assessment. However, you can pick out exercises to work on your weak points and do those to “correct” your problems.
I don’t really know what my imbalances are, other than that I always seem to injure my right quad when doing exercises like step-ups so I’m obviously not using good form.
Ok here are a few things to do/questions to ask yourself to figure out your imbalances…
Do you have a dominate side?
Have you ever had any injuries?
Do an assessment. Watch yourself squat or have someone else watch you. How low can you go? Do your toes point out? Do your heels come up? Do you lean forward? Do you arch your low back? All of these hint at potentially tight/underactive areas. (I recommend getting a trainer or outside party to assess you since they can see your movement from different angles.) The assessments I like to do are squat, push up and row. You can tell a lot by just watching these three movements.
Heck you can learn a lot by looking at someone standing there. Are they rounded forward. Do they slouch to one side. Is there head forward or pelvic tilted?
We all have imbalances…
If you don’t have someone else to assess you, you can tell a lot by just foam rolling. Take a day and roll out your body from head to toe. Where are your trigger points? Are they all on one side? Are they only in specific areas? Trigger points mean that an area is probably tight and may be causing problems in other areas close by.
Once you know the tight areas, stretch them out!
That is at least a start!
And once you know the tight areas, you can work on strengthening their opposite. Like if your hips or low back are tight, strengthen your glutes. If your chest is tight, strengthen your back. If your upper traps are tight, strengthen your lower traps.
While I explain this, I do want to note that it is best to have a fitness professional perform an assessment and give you some guidance.
In terms of your quad and step ups. My recommendations:
Roll out and really stretch your quad, low back, TFL and IT Band before you do them. Then do some glute activation exercises to make sure your glutes are firing. A great warm up move for you could be hurdles (stepping back and forth as if stepping back and forth over a little fence).
Then try a lower step up. Start close to the step, place one foot on top and drive through the heel to come to standing on the box.
Watch yourself in the mirror. Do you lean forward as you step up? Or do you go straight up. Does your weight go forward onto your toe? Or do you drive through your heel?
If everything looks fine (aka you don’t lean forward and you drive through your heel) and you feel it in your glute, move to a higher step up.
Take it back a bit and regress the move until you can do that perfectly and feel it in the correct places. Then move forward.
How long do you recommend the warmup should be?
My warm ups last about 10-15 minutes depending on what I’m doing and how tight that area of my body feels that day.
If I’m just going for a leisurely walk, I may not really warm up at all. However, if something feels super tight I may take a second to roll out before.
For harder workouts though, especially more cardio workouts, I generally spend longer on warm ups and make sure I do enough to “pre-fatigue” my body.
I may not “warm up” as long for strength workouts if my first few sets will be lighter and build since that will also warm me up and get me past that first little fatigue hurdle.
While answering these questions, I realize that in some areas I’ve just given you more variables to consider.
Take a deep breath and don’t get overwhelmed.
Don’t stress about length. Or about doing new warm up moves every time. Don’t even worry about corrective exercises or imbalances.
Lots of different things can work!
These variables that I discuss are all just things to be aware of.
The best thing you can do is to look at your workouts and feel what is tight and then pick out a few moves that you feel like hit your tight areas.
If you have any other specific questions, or if this creates new questions for anyone, please let me know and I will try to address them.
Hope this helps!
Develop Workouts to Move Better and Feel Better
Yes, lifting makes you feel strong and empowered. Yes, working out makes you healthier and helps you lose weight.
Yes, taking on new physical challenges can be fun and invigorating.
But the real reason most people workout is because they want to MOVE BETTER AND FEEL GOOD.
That is what HEALTH is. That is what YOUTH is.
And whether or not you recognize it as your motivation to workout, moving well and feeling better is the underlying goal of a diet and exercise program.
The question then is, “How do you develop workouts to help you move better and feel better?”
Too often these days I hear about people getting injured when training. About people feeling more worn out or broken down.
While it can be fun to do “brutal” workouts where you feel absolutely destroyed, this shouldn’t be an everyday occurrence.
If you want great results (be healthier, fitter, stronger), if you want to FEEL BETTER AND MOVE BETTER, you can’t just beat yourself down each and every workout.
Here are 5 tips to help you develop workouts that will make you move and feel better!
1. WARM UP – A good warm up consists of MORE than just walking or jogging on a treadmill or elliptical for five minutes. A good warm up is key to preventing injuries, which is key if you want to feel better and move better!
A proper warm up with loosen up overactive and tight muscles through foam rolling and dynamic stretches. It will also activate weak and/or inhibited muscles through activation exercises.
A proper warm up is important because it will make sure your body is truly ready to move so that you don’t get injured during your workout!!
Here are 15 great dynamic warm up moves.
Before you workout, you don’t need to stretch and roll out every area of your body. You just need to focus on the areas you will be using during the workout. You will also want to target areas that are perpetually tight or are prone to problems and injuries.
2. Build Up Slowly – Just because you CAN lift something or DO something, doesn’t mean your body is truly READY to do it. You’ve got to build slowly so that you don’t push your body too quickly and too far.
Injuries often occur when our body is forced to do something it isn’t mobile or strong enough to do.
If we build up slowly, making changes over time, we can prevent injury while getting great results!
Slowly build up and adjust your loads, speeds, intensity and repetitions. Don’t up everything all at once!
For example, if I have a new client who hasn’t really ever worked out before, I’m not going to have them doing jump squats on their first day (even if other people are doing jump squats). And maybe the client can technically do the jump squats.
But because the client has never done them and the client doesn’t even have much of a workout base, I’m not going to have them do jump squats.
I’m going to have them first start out with bodyweight squats. Then bodyweight squats quickly. Then bodyweight squats where they raise up onto their toes as they come back to standing.
Then I will finally have them perform a very VERY small jump off the ground. Then a bigger jump and finally a bigger, quicker jump.

Everything can be progressed or regressed to help someone build. This move helps you build toward a single leg squat!
They will BUILD UP SLOWLY because their body needs to learn the movement pattern and adjust to the load and explosiveness of the move.
An important part of working out isn’t just to do it…It is to do QUALITY movements!
Build up slowly and prevent undo stress being placed on your body which will lead to injury.
3. Work to Correct Imbalances – While my goal is to get everyone moving and having fun as quickly as possible, you can’t ignore the need to do all those supposedly boring corrective exercises.
Muscle imbalances lead to injury or may even be the result of an injury and can lead to further future problems.
Muscle imbalances usually mean that a muscle is doing work that it shouldn’t be doing because something is overactive, underactive, weak and/or tight.
Foam rolling, stretching and activation and strengthening exercises are all essential to correct the imbalances so that you can properly perform exercises during your workout and move better in everyday life.
When you start an exercise program, corrective exercises and stabilization exercises will make up the bulk of your workout.
However, even an advanced exerciser needs to do some corrective and stabilization exercises. Foam rolling, stretching and activation moves should be included in every warm up, especially if you have or have ever had an injury or imbalance.
And stabilization exercises are great for even elite athletes to do as recovery and to ensure that their movements are correct when they move onto some of their more demanding workouts.
Don’t wait to deal with your muscle imbalances until after you’ve become injured. Address the problem before serious symptoms arise!
A glute activation exercise since a very common weak and underative area is our glutes!
4. RECOVERY – Your body can’t handle working out intensely ever single day. If you workout too much and too intensely, your body may be overtrained and you may stop seeing progress. Also, if you never cycle your workouts, you may find yourself plateauing because your body is no longer challenged by the workouts.
PROGRESSION is key. And a huge part of PROGRESSION, is proper RECOVERY.
Not only do you want to slowly build up and constantly challenge yourself by mixing up your workouts, but you also want to make sure that you cycle back through weeks of RECOVERY no matter your level.
Recovery is when our bodies rebuild. Recovery weeks though don’t have to mean that we completely take the week off.
Recovery workouts are a great time to do those exercises that help us prevent injury and correct any imbalances that may have developed during our intense training. Recovery weeks are also a great time do to injury prehab and to work on our weakness.
I also use recovery weeks as chances to improve my mind-body connection with exercises that require more stabilization and less load. The better the communication between our mind and body, the better our movements will be.
Also, if you’ve suffered an injury in the past, it is especially important to include exercises that really work on improving our mind-body connection since injuries can damage that connection. And a damaged mind-body connection can lead to further injury!
Recovery weeks are necessary to give our body a chance rebuild so that we don’t become injured. They are also a great chance to add in all those boring exercises that keep us moving well!
And recovery allows us to unwind…Be it a full week or just a day off. RELAXING is not only good for the body but also for the mind. Move better and FEEL BETTER.
Basically recovery is essential.
All of your hard work will be for nothing if you don’t take enough time for your body to rebuild. During our workouts we break down our body. When we RECOVER, we rebuild the damaged muscles. No recovery means perpetual breakdown.
Perpetual breakdown leads to feeling bad and injury!
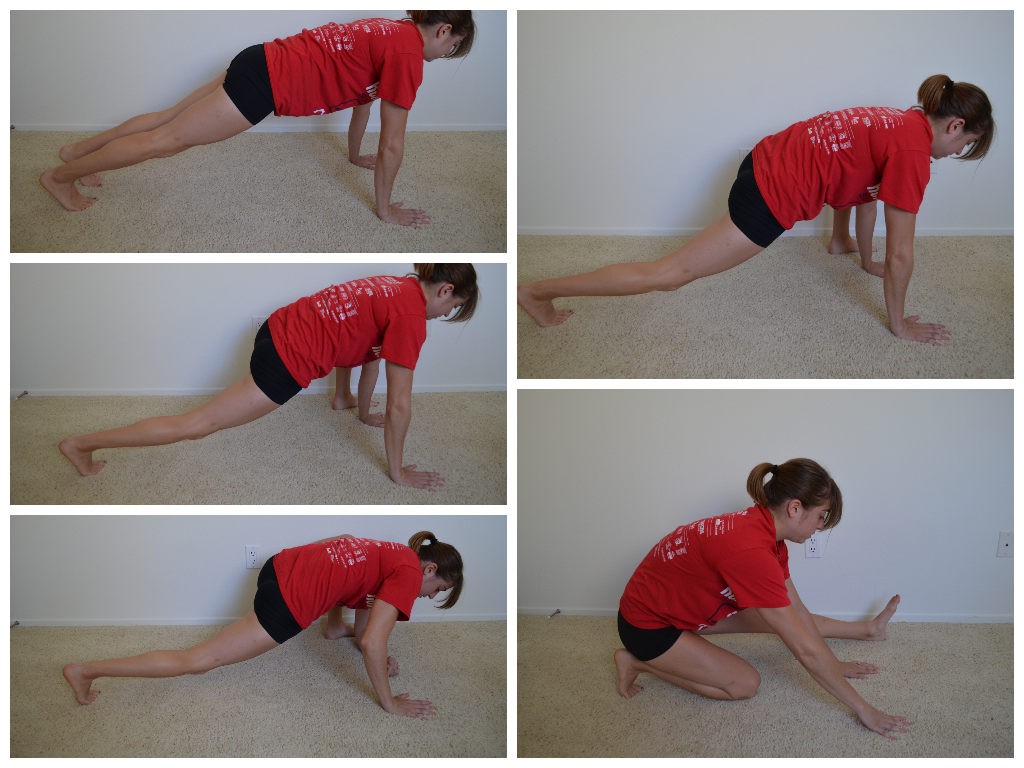
Here is one of the types of recovery workouts that I do. It is all isometric holds, which is far from easy, but puts a different strain on the body. I also love doing workouts with single limb movements during recovery weeks.
5. Focus on Your Goals – Workout with a goal in mind.
When we workout with a goal in mind, we develop a program and a progression to get us there. When we workout with direction, we are more likely to do things that will help us move better.
We are more likely to include warm ups. To include recovery.
We are more likely to pick exercises with a purpose, not just because they are hard.
We are less likely to just throw together workouts with the hardest variables we can think of so that it will be BRUTAL.
Each exercise variable (how many exercises, types of exercises, reps, sets, rest, load, speed, intensity…) all can be manipulated to help us reach or goals.
We can’t just randomly throw them together. We must consider HOW they will HELP us reach our goals.
If your goal is to deadlift 500lbs, pick exercises and variables to match that.
Don’t waste time doing workouts with a bazillion burpees just because you know they will make you exhausted!
And on top of that, whatever your goal is, whether it is to be the best at your sport, lose weight or bench press four adult human beings, you first need to move well to accomplish it.
Therefore, when you focus on your goal, no matter what it is, you are going to work to move better!
Your plan to help you reach your goal is going to need to include all of the four other tips above even if that means not every workout you do will be so hard you have to lie on the ground completely exhausted.
Not every workout can be the hardest thing you’ve ever done!
Stop wasting your time being so focused on making every workout hard! Stop ignoring how important it is to move well!

I know lots of people have become obsessed with doing BRUTAL WORKOUTS and therefore skip the boring prehab stuff in favor of doing gnarly crap.
But I’m sorry…All that does is lead to injury.
While hard workouts are fun, working out is about more than being gnarly.
Start working out to move better and feel better!
You may find that once you start working out for those reasons, you may actually start hitting some of your other goals more easily (and feeling even better while you do it!).


