Blog Archives
How often should I do prehab/rehab?
I often get asked when and how often people need to do prehab/rehab stuff for aches, pains and even old injuries. They ask how often they need to foam roll, stretch and even do activation exercises.
And my answer….
Before you have pain!
If you’ve had an injury or you know you are prone to aches and pains in certain areas, you need to take care of those areas before pain arises or before you do things that could lead to pain if those areas aren’t loosened and activated.
And if pain has flared up in an areas, you need to be extra diligent to do everything you can to alleviate.
How often you need to do the prehab/rehab will vary. If you stay on top of things, a few minutes each day may suffice.
If you wait till things start to flare up, you may have to spend more time on prehab activities.
But I would like to point out that if you have neck, shoulder or upper back pain from sitting at a desk all day, rolling out for one minute every other day isn’t going to do it.
Just think about how long you sit with poor posture….Does one minute of pain prevention (aka foam rolling, stretching, activation) really seem like it equals the time you sit with poor posture?
Does it really seem like that minute can counteract the 9 hours?
NOPE.
So why do we all expect results when we basically spend only minutes a day doing the right things and hours doing the wrong things?
The thing is we can’t.
While there is no exact amount of time we need to spend doing rehab/prehab exercises and stretches, we do need to consider just how much time we spend each day doing things to counteract all the good we do in the gym.
That one hour each day we spend there with our 5-10 minutes of warm up (foam rolling, stretching and activation) simply isn’t enough.
But that doesn’t mean you need to spend hours each day to see benefit. Five minutes when you wake up, the occasional stretch or rolling at your desk, 5-10 minutes before you workout, a few minutes after your workout and maybe a minute or two before you go to bed.
If you did that every day…WOAH!
At most, what I outlined above, is like 30 minutes out of your day…AT MOST.
And yet we can’t find the time for that?!?
Suffering from pain and injury is our alternative and yet we skip those 30 minutes and wonder why we never get better.
30 MINUTES a day! An excuse to get up and stretch while sitting at our desk all day! Or heck simply a stretch in the doorway when we get up to go the bathroom. (AHEM…Look at all those stretches you can easily do at your desk!)
Or some balancing and leg swings when we brush our teeth to keep our ankles strong.
This is seriously not hard stuff. Shoot it isn’t even as hard as finding 15-30 solid minutes to workout! Almost all of these things can be done while doing something else.
Watching TV? Sit on a ball on the ground to roll out your glutes, hips and low back to get rid of your achy low back!
Simple little prehab/rehab things can go a long way to keeping an area pain and injury-free.
Because even if you did the initial rehab after an injury, you are never done.
You ALWAYS have to take care of that area and make sure to maintain strength in the muscles up and down the kinetic chain from that disruption.
Because every day we do things to create imbalances and potentially upset old aches and pains or create new ones.
So to live pain free…What is a few minutes each day on exercises to keep you balanced?
Are you diligent about doing prehab activities – foam rolling, stretching, activation, balance and stability stuff?
How do you fit those things into your day?
Here are some great tips and exercises to help you prevent and alleviate minor aches and pains:
- 5 Quick Fixes For Wrist and Elbow Pain
- Alleviate Low Back Pain
- The Complete Foam Rolling Video Course and E-Book
NOTE: This is discussing previously rehabbed injuries and minor aches and pains. If you suffer from an injury, make sure to do the physical therapy rehab prescribed to you!
In case you’ve missed these….
So I’ve done a few posts over at Redefining Strength, which I think are pretty helpful….
In case you didn’t see them (and in case they will help you since I know they answered a number of questions I’ve received recently), I’ve posted them below!
This first post “10 Hanging Core Exercises” is because I get asked for “ab exercises” all the time and honestly crunches really give you very little bang for your buck.
Hanging core exercises on the other hand work on your grip strength, lat strength and core strength. They can help you work toward all sorts of exercises such as pull ups, L-sits and front levers.
They are a compound movement and have some functional benefit…unlike crunches.
For 10 of the Hanging Core Exercises I use most often, check these out!

And while we are discussing core strength, I think it is important that we cover BACK PAIN. One of the best tools to alleviate back, hip, neck and shoulder pain is the PEANUT.
The Peanut is a cheap, homemade tool made out of athletic tape and tennis balls. Here are instructions on how to make and use the Peanut to alleviate your pain! (Can I also just say…It isn’t freaking easy to use spray paint!?!)

And the last two posts I want to point out are on Rotational Exercises and the Dip.
The 10 Rotational Exercises post came up because all too often people are only training in one plane of motion…And then they wonder why they get injured lifting something in everyday life. It is because in everyday life we lift awkward crap in every plane of motion. And if we want to remain injury free, our workouts need to reflect that. (Plus…still on my whole “strengthen your core thing” rotational exercises are great core moves!)

And the Dip post is for all of you women out there asking me how to get sexy arms for tank top, strapless dress and bikini season. The Dip can be a great compound movement to strengthen and tone your entire upper body. Don’t waste your time with isolated movements like the tricep extension! Work numerous muscles at once. And if you are already doing push ups, the Dip is a great vertical push exercise to include in your routines!
And if you can’t do a full dip, the post has some great ways to regress the movement!

The Workout Warm Up Guidelines
I get a lot of questions from people about warming up. How long? What should they include? Do you need to foam roll? Stretch? Walk on a treadmill?

Isometric Holds are a great way to warm up the body. They can stretch and activate the muscles to make them ready to move.
And while there is no one right answer, I like to follow these Warm Up Guidelines:
- Focus on warming up the specific muscles used. Walking on a treadmill isn’t really a great warm up for an upper body strength day. Foam roll those muscles than do a stretch or two to loosen them up. Use stretches that hit more than one area at a time to make your warm up more time efficient.
- Before a workout all muscles must be warmed up that are going to be used so that you are ready to go when you start your workout. By rolling out and stretching the muscles that are going to be used, you will get more out of your workout because your body is ready to move. You will also prevent injuries from occurring. Focus on the tightest spots. If you find a knot, roll it out. If there is no knot, move on.
- Do dynamic stretches to loosen up all muscles and MOVEMENTS that you are going to use during the workout. If you are going to move laterally, warm up so that your body is ready to move laterally. Spend more time and do more stretches for tight areas and fewer for areas that feel loose.
- Any day you have time, you should focus on areas you know are tight or painful to roll out even if you aren’t necessarily using them . These tight, knotted areas need extra attention as often as you can. If you aren’t using these areas, don’t spend a lot of time on them but do touch on them. The more often you can do proper mobility/flexibility work for them, the quicker they will get better.
- Do activation exercises for the muscles you want to work that day especially if they are traditionally underactive. If you sit at a desk all day, you will most definitely can’t skip mid/lower trap activation exercises as well as glute activation exercises if you are doing a back or butt day. These activation exercises will help you avoid injury and even alleviate minor aches and pains you may already have.
- Especially if you are doing a metabolic day, you want to get your heart rate up a bit and the sweat flowing. You want to feel warm when you start your workout. Getting a little out of breath in the warm up isn’t a bad thing. Even getting a little fatigued in a warm up isn’t a bad thing.
- The more muscles you plan to work and the higher the intensity of your workout, the more you may find you need to warm up. Same goes for if you are working out first thing in the morning. Your body may need a bit more time to really wake up and get warm enough to work hard and handle the intensity.
- Always include something to really get the muscles working, be it activation, isometrics, locomotion or crawling. Use exercises that, while they may stretch, also make the muscles begin to work to stabilize the body. Use exercises that wake everything up. For example, a glute bridge hold will activate the butt and get the muscles working while also stretching your hips. Or a plank reach out and back…It will warm up the core while stretching the hips and activating the glutes. The important part really is to get everything WOKEN UP.
- Don’t make it too long! Too often we skip the warm up to make the workout shorter, when in fact, it doesn’t have to be very long at all. Even the longest, most thorough warm up, including foam rolling, shouldn’t last more than 15 minutes. And, unless you are doing a full-body, super intense workout, it probably doesn’t even need to last longer than 5-8 minutes. Even when I rounded up for my full body warm up, it was still only 11 minutes….And I definitely rounded up. So while you want to get things moving and even a little sweat going, you don’t want to sap your body of too much energy.
Here is one of my favorite warm ups for a full body or leg day. There is also a great warm up for cyclists and one for runners in the Elite Library….Yes that’s right, you really should warm up before you ride or run!
Here are also some great dynamic stretches to include in your warm up.
What do your warm ups look like?
Warm Up – Always Ask Questions
Yesterday on my post, I got the following questions. Generally I try to respond in the comment or by email, but I thought this comment by Jill posed some interesting questions and raised some interesting issues. (It actually made me think of a post by 43 Fitness about questions and how sometimes we, fitness professionals, don’t always realize all the questions that need to be answered to really help others on their journey). That being said….
Cori, I really like your blog and the way you approach workouts in a sensible way. I just sometimes feel a bit overwhelmed reading it and wondering how to incorporate these things. Basically, you are WAY smarter and stronger than me and it sounds really complicated to get to where you are at. How many activation and strengthening exercises do we need in our warmup? Should we always be doing the same warmup? How do we know what to focus on? Usually I just do a dynamic warmup with many of the exercises you linked that I found in a book (New Rules of Lifting for Abs or something similar). What are some corrective exercises? I don’t really know what my imbalances are, other than that I always seem to injure my right quad when doing exercises like step-ups so I’m obviously not using good form. How long do you recommend the warmup should be? You don’t have to take the time to answer all these questions…they are just a few that come to mind as I read your post. I’m moving from my running “season” back into weight training and want to do it right. (The good news is I did achieve my goal I set at the beginning of the year to run a half marathon under 1:35 and now I feel like I can take a break from running.)
For one, congrats Jill on achieving your half-marathon goal!
Two, it doesn’t matter how much you know. All that matters is that you question and seek out knowledge. We all have to start somewhere and have to grow from there. It doesn’t matter our starting point just how hard we work to learn and grow!
When it comes to health and fitness, especially, there really are a ton of different “correct” answers. You’ve got to do your own research and come to your own conclusions.
And three, health and fitness is, but isn’t complicated. There are a ton of workout variables you can manipulate to make your workouts good. BUT you can’t freak out about manipulating each and every one every single workout.
The point is more to know that all of them matter and can affect your results. When you know the variables that matter, you can better track your progress and figure out what works and what doesn’t work.
It is good to know the details just don’t get bogged down in them.
Anyway…Let’s see if I can break some of this down so that it not only answers your questions, but questions I’m sure others have as well!
Warm Up
How many activation and strengthening exercises do we need in our warmup?
I’m sure you all will love this answer…IT DEPENDS!
I usually pick out about 6 or 7 moves for my warm up although I have spent longer on days when my body is super tight.
Some are stretches and some are activation moves. The exact number and breakdown of what I do depends on the workout and how my body feels. I generally do one or two activation moves during the warm up although I can do up to 4 or 5 with a butt workout.
I generally base my warm up on how I feel during foam rolling. Don’t get me wrong…I have some stretches planned out based on the workout, but I may lengthen or shorten the warm up based on how loose my body feels when I foam roll.
If I find a ton of trigger points and am super tight I may add in a stretch or two more or do more reps of the stretches I planned to do.
For example…with a back workout I may do:
1 or 2 Forearm stretches (depends on how tight my forearms are and how much computer work I did that day…or grip work I did the workouts earlier that week)
2 or 3 Thoracic mobility moves (Here is a link to a post with a few. I may do more or less depending on how tight my back feels and how much I’ve been seated and hunched over recently)
1 or 2 Lat stretches (See the link above for options)
1 or 2 Chest stretches (See the link above for options.)
2 or 3 rounds Scapular Holds for activation
There is no set number of exercises you should do. I generally wouldn’t do more than 10 moves in a warm up. I usually do fewer exercises and just more reps.
I pick out those moves based on what my workout is going to work.
The MOST IMPORTANT RULE when it comes to warming up is to make sure that your body FEELS loose and ready to work. You want the muscles you are going to use to be warm and mobile. You don’t want to be forcing a range of motion when you start using weights!
Should we always be doing the same warmup?
I like mixing up my warm up so that I can stretch the muscles in different ways. Let’s face it…Our bodies do adapt to whatever movements we do.
HOWEVER, if you pick out moves that create the mobility you need for your workout, it isn’t that important to mix it up.
I probably mix it up more than most people because I’m constantly experimenting with new mobility moves I learn to see if there are better ones out there than the ones I’m currently using (because then I’ll use those with my clients).
Find moves that create mobility around your joints….So that you have proper thoracic extension, shoulder mobility, hip mobility…ankle mobility…
I must say…Those 15 moves I listed are some of my favorites and staples in my warm ups.
Also, different types of workouts require different warm ups. An upper body workout shouldn’t have the same warm up as a lower body day. Chest workouts should have different warm ups than back workouts.
Shoot cardio or metabolic workouts should have a different warm up than strength warm ups.
Focus on your workout and use that to figure out what your warm up needs to do to get you ready!
How do we know what to focus on?
Your focus in warm up is always to get your body prepared for the work it is going to do during the workout.
If you are doing an upper body workout, don’t worry about warming up your lower body. Focus on what you plan to use during your workout and the movement patterns you plan to do.
What is the goal of your workout? What muscles are you working? Is it cardio oriented or strength oriented? What movements are you going to be doing?
Once you answer these questions, stretch out the areas and activate the muscles that are going to be used.
For instance, say you are doing a Squat Day.
You need to warm up your hips to be able to squat. Dynamic squat. Hip flexor stretches. Low back stretches. Quad and hamstring stretches. Think
You will also need to warm up and stretch your ankles so that you have the mobility to squat. (Many people can’t squat very low because they don’t have much dorsiflexion…Their calves and even the sides of their shins are tight). Ankle mobility is key during a squat workout warm up.
You may also want to warm up your core and back on squat day, especially if you plan to do front squats.
Think about that movement. You need to make sure you work on your thoracic extension because you don’t want your back to round forward as you perform squats. You want a nice tall posture. You want to remain upright while holding the weight.
Focus on the muscles and movements used during the workout and what needs to be activated.
Then also consider what feels tight on you. If I’m going to squat and I’ve been sitting a lot and know my hips are tight, I may spend extra time stretching my hips and working on hip extension.
One of my favorite stretches to stretch everything made tight by sitting. A great one for days when you do front squats.
Remember the whole point of a warm up is so you can do the workout movements correctly and prevent injury!
What are some corrective exercises?
Ok corrective exercises ARE NOT squats on a bosu. They don’t need to be overly complicated or confusing.
Corrective exercises are moves that make the body develop stability, a better mind-body connection and PROPER MOVEMENT PATTERNS.
Corrective exercises work to activate inactive muscles and inhibit overactive muscles. So foam rolling, stretching and activation exercises are all part of a corrective exercise program.
It’s really hard for me to tell you that this or that exercise is a corrective exercise.
Glute bridges, bird dogs, band walks, squats with a band, planks, YTWLs…They can all be corrective exercises.
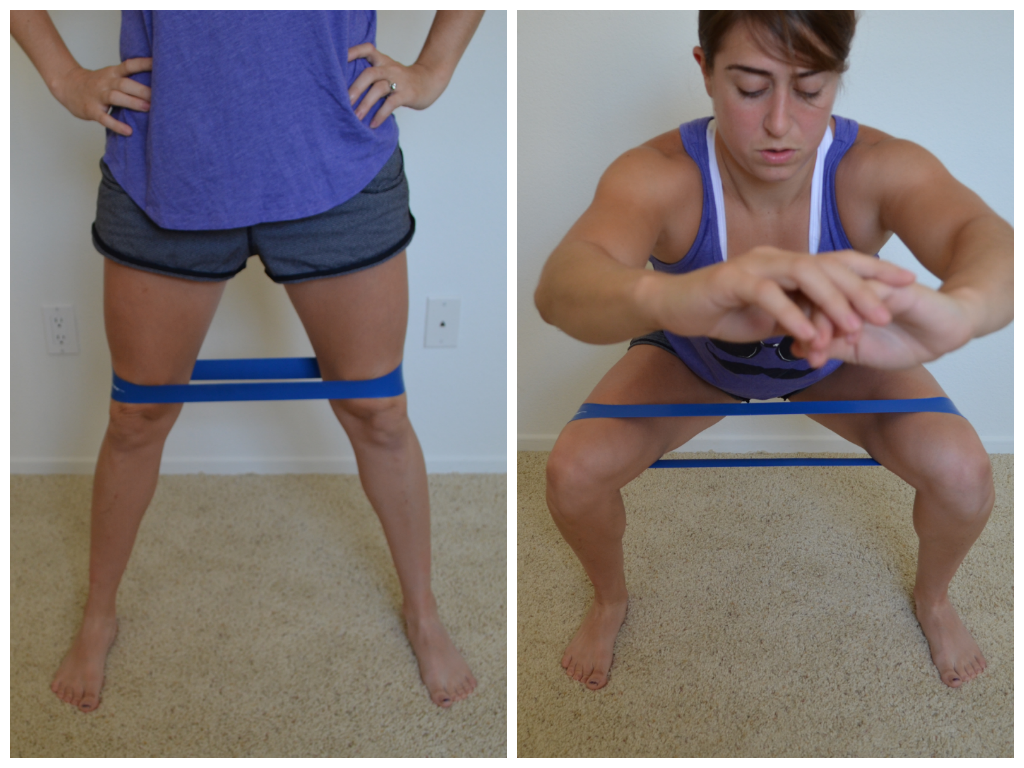
Makes sure you activate the glutes and is great if your knees tend to cave in when you squat.
The point is to do moves that strengthen and improve your movement patterns.
If you’ve had an ankle injury, balance exercises or single leg deadlifts may be the corrective exercises you need.
Corrective exercise CORRECT imbalances.
These are generally best prescribed by someone after an assessment. However, you can pick out exercises to work on your weak points and do those to “correct” your problems.
I don’t really know what my imbalances are, other than that I always seem to injure my right quad when doing exercises like step-ups so I’m obviously not using good form.
Ok here are a few things to do/questions to ask yourself to figure out your imbalances…
Do you have a dominate side?
Have you ever had any injuries?
Do an assessment. Watch yourself squat or have someone else watch you. How low can you go? Do your toes point out? Do your heels come up? Do you lean forward? Do you arch your low back? All of these hint at potentially tight/underactive areas. (I recommend getting a trainer or outside party to assess you since they can see your movement from different angles.) The assessments I like to do are squat, push up and row. You can tell a lot by just watching these three movements.
Heck you can learn a lot by looking at someone standing there. Are they rounded forward. Do they slouch to one side. Is there head forward or pelvic tilted?
We all have imbalances…
If you don’t have someone else to assess you, you can tell a lot by just foam rolling. Take a day and roll out your body from head to toe. Where are your trigger points? Are they all on one side? Are they only in specific areas? Trigger points mean that an area is probably tight and may be causing problems in other areas close by.
Once you know the tight areas, stretch them out!
That is at least a start!
And once you know the tight areas, you can work on strengthening their opposite. Like if your hips or low back are tight, strengthen your glutes. If your chest is tight, strengthen your back. If your upper traps are tight, strengthen your lower traps.
While I explain this, I do want to note that it is best to have a fitness professional perform an assessment and give you some guidance.
In terms of your quad and step ups. My recommendations:
Roll out and really stretch your quad, low back, TFL and IT Band before you do them. Then do some glute activation exercises to make sure your glutes are firing. A great warm up move for you could be hurdles (stepping back and forth as if stepping back and forth over a little fence).
Then try a lower step up. Start close to the step, place one foot on top and drive through the heel to come to standing on the box.
Watch yourself in the mirror. Do you lean forward as you step up? Or do you go straight up. Does your weight go forward onto your toe? Or do you drive through your heel?
If everything looks fine (aka you don’t lean forward and you drive through your heel) and you feel it in your glute, move to a higher step up.
Take it back a bit and regress the move until you can do that perfectly and feel it in the correct places. Then move forward.
How long do you recommend the warmup should be?
My warm ups last about 10-15 minutes depending on what I’m doing and how tight that area of my body feels that day.
If I’m just going for a leisurely walk, I may not really warm up at all. However, if something feels super tight I may take a second to roll out before.
For harder workouts though, especially more cardio workouts, I generally spend longer on warm ups and make sure I do enough to “pre-fatigue” my body.
I may not “warm up” as long for strength workouts if my first few sets will be lighter and build since that will also warm me up and get me past that first little fatigue hurdle.
While answering these questions, I realize that in some areas I’ve just given you more variables to consider.
Take a deep breath and don’t get overwhelmed.
Don’t stress about length. Or about doing new warm up moves every time. Don’t even worry about corrective exercises or imbalances.
Lots of different things can work!
These variables that I discuss are all just things to be aware of.
The best thing you can do is to look at your workouts and feel what is tight and then pick out a few moves that you feel like hit your tight areas.
If you have any other specific questions, or if this creates new questions for anyone, please let me know and I will try to address them.
Hope this helps!
Neck and Upper Back Pain Fixes
Let’s face it…Even if we are pretty active, we spend a great deal of time hunched over a computer. Which generally leads to bad posture and upper back and neck pain.
Because most people sit looking at a computer screen all day, muscles get out of their proper alignment. For instance because you hunch over the computer, your upper traps may become active (aka you may be tense a lot with your shoulders up by your ears). If your upper traps are overactive, most likely your lower traps will be underactive. Muscles therefore aren’t working the way they should be.

When muscles aren’t properly aligned and working the way they should be, other muscles compensate, leading to injury.
Below are some great trigger point release, stretches and strengthening moves you can do to alleviate minor aches and pains in your neck, shoulders and upper back. These moves will release and stretch any muscles that would be tight from sitting all day. They will also strengthen those muscles that are underactive.
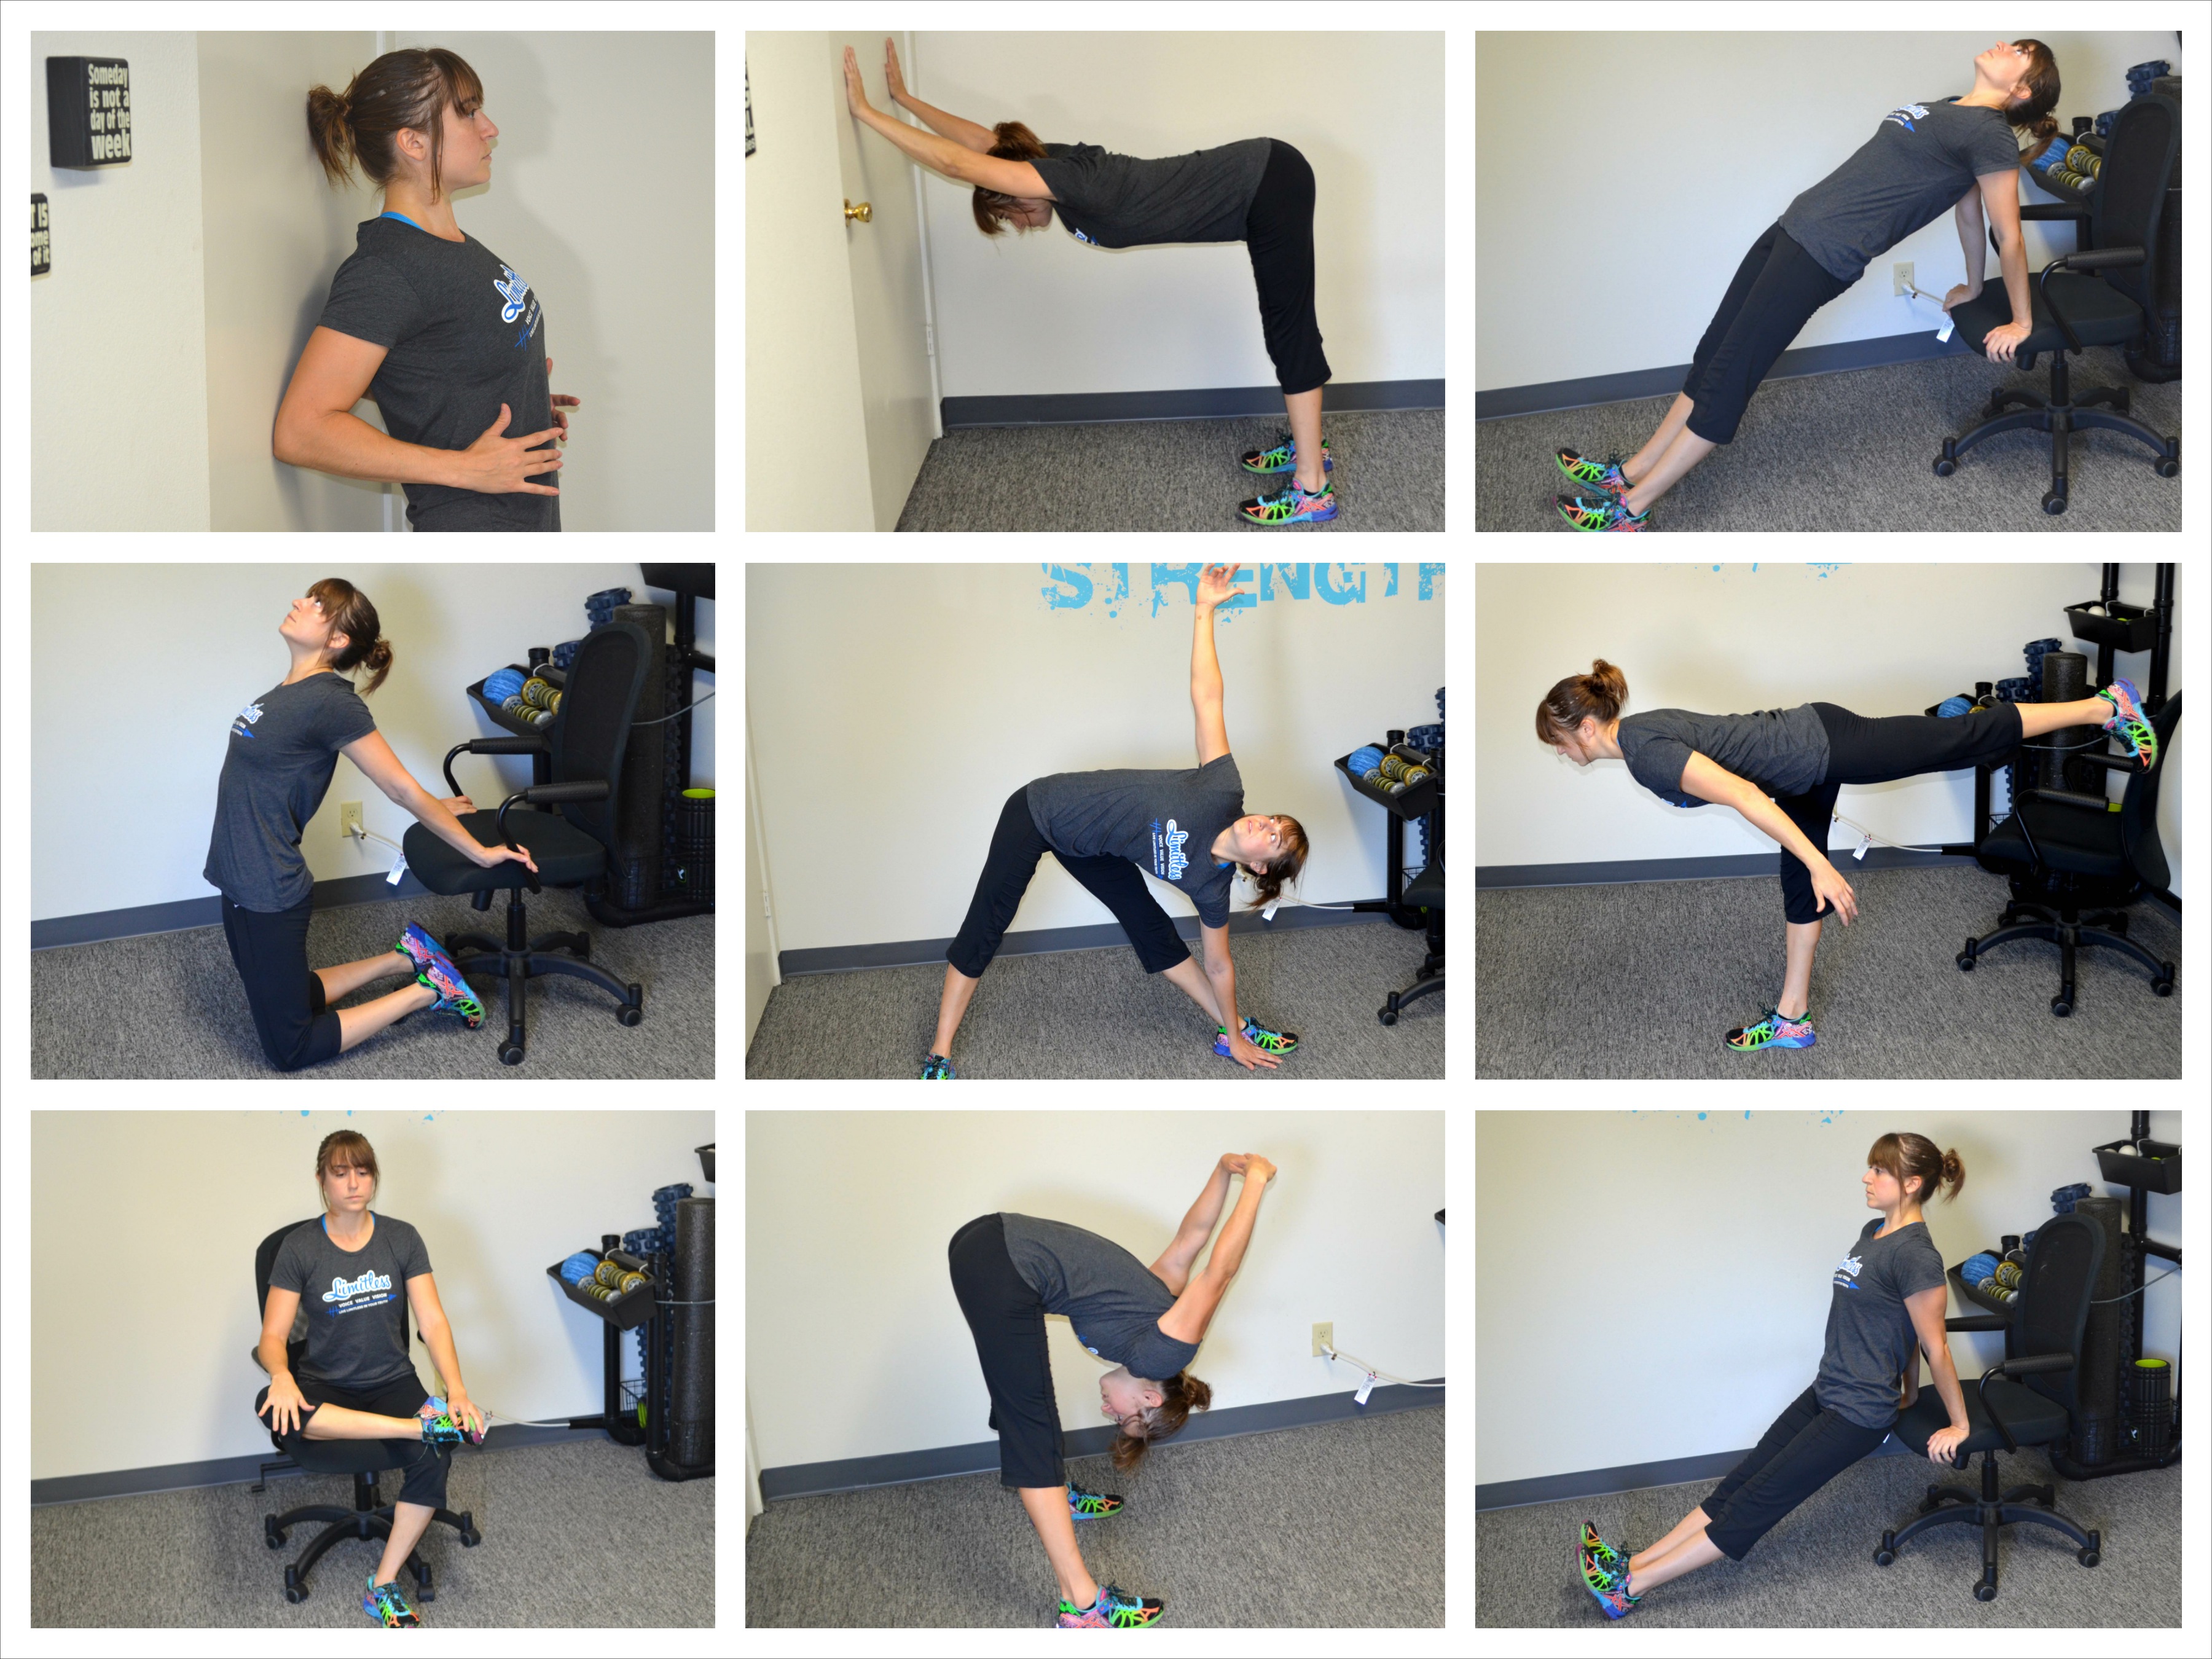
NECK – Be careful when rolling out your neck. Use a very softer ball and stand against a wall with the ball between the wall and your neck. Do not go over your vertebrae. Dig in lightly to any tight spots. Look side to side and up and down to release any trigger points.
UPPER TRAPS AND SHOULDER BLADES – Stand with your back to a wall. Place a tennis ball right behind your trap (just to the side of your neck). Roll the ball out toward your shoulder and then back in. Then roll it down your shoulder blade and back up. Hold on any tight spots. You can even stretch your neck away from the side of the ball and then relax to help dig out the trigger point. As you work your way down your shoulder blades, you may even cross one arm (the arm on the side with the ball) across your chest to allow you to really work under the shoulder blade. Hold on any tight spots and relax and breathe.
CHEST – A big foam ball works best if you do this on the ground. Take the foam ball and place it in your chest near the shoulder joint, but not on the shoulder joint. Lie face down on the ground with the ball in your chest. Reach your hand overhead and then bring it back down by your side. You can even reach out to the side and then bring your hand back in. Hold on any tight spots. You can also do this standing with a smaller ball against a pole, door frame or corner of a wall into a hallway. Place the ball on the wall in your chest near your shoulder joint. You should put it in the side of your chest that isn’t blocked by the wall so you can stretch your arm out in front of you. Stretch your arm out in front of you at shoulder height. Then raise it over head and lower it back down to the ground. Move the arm around to help dig out any trigger points.
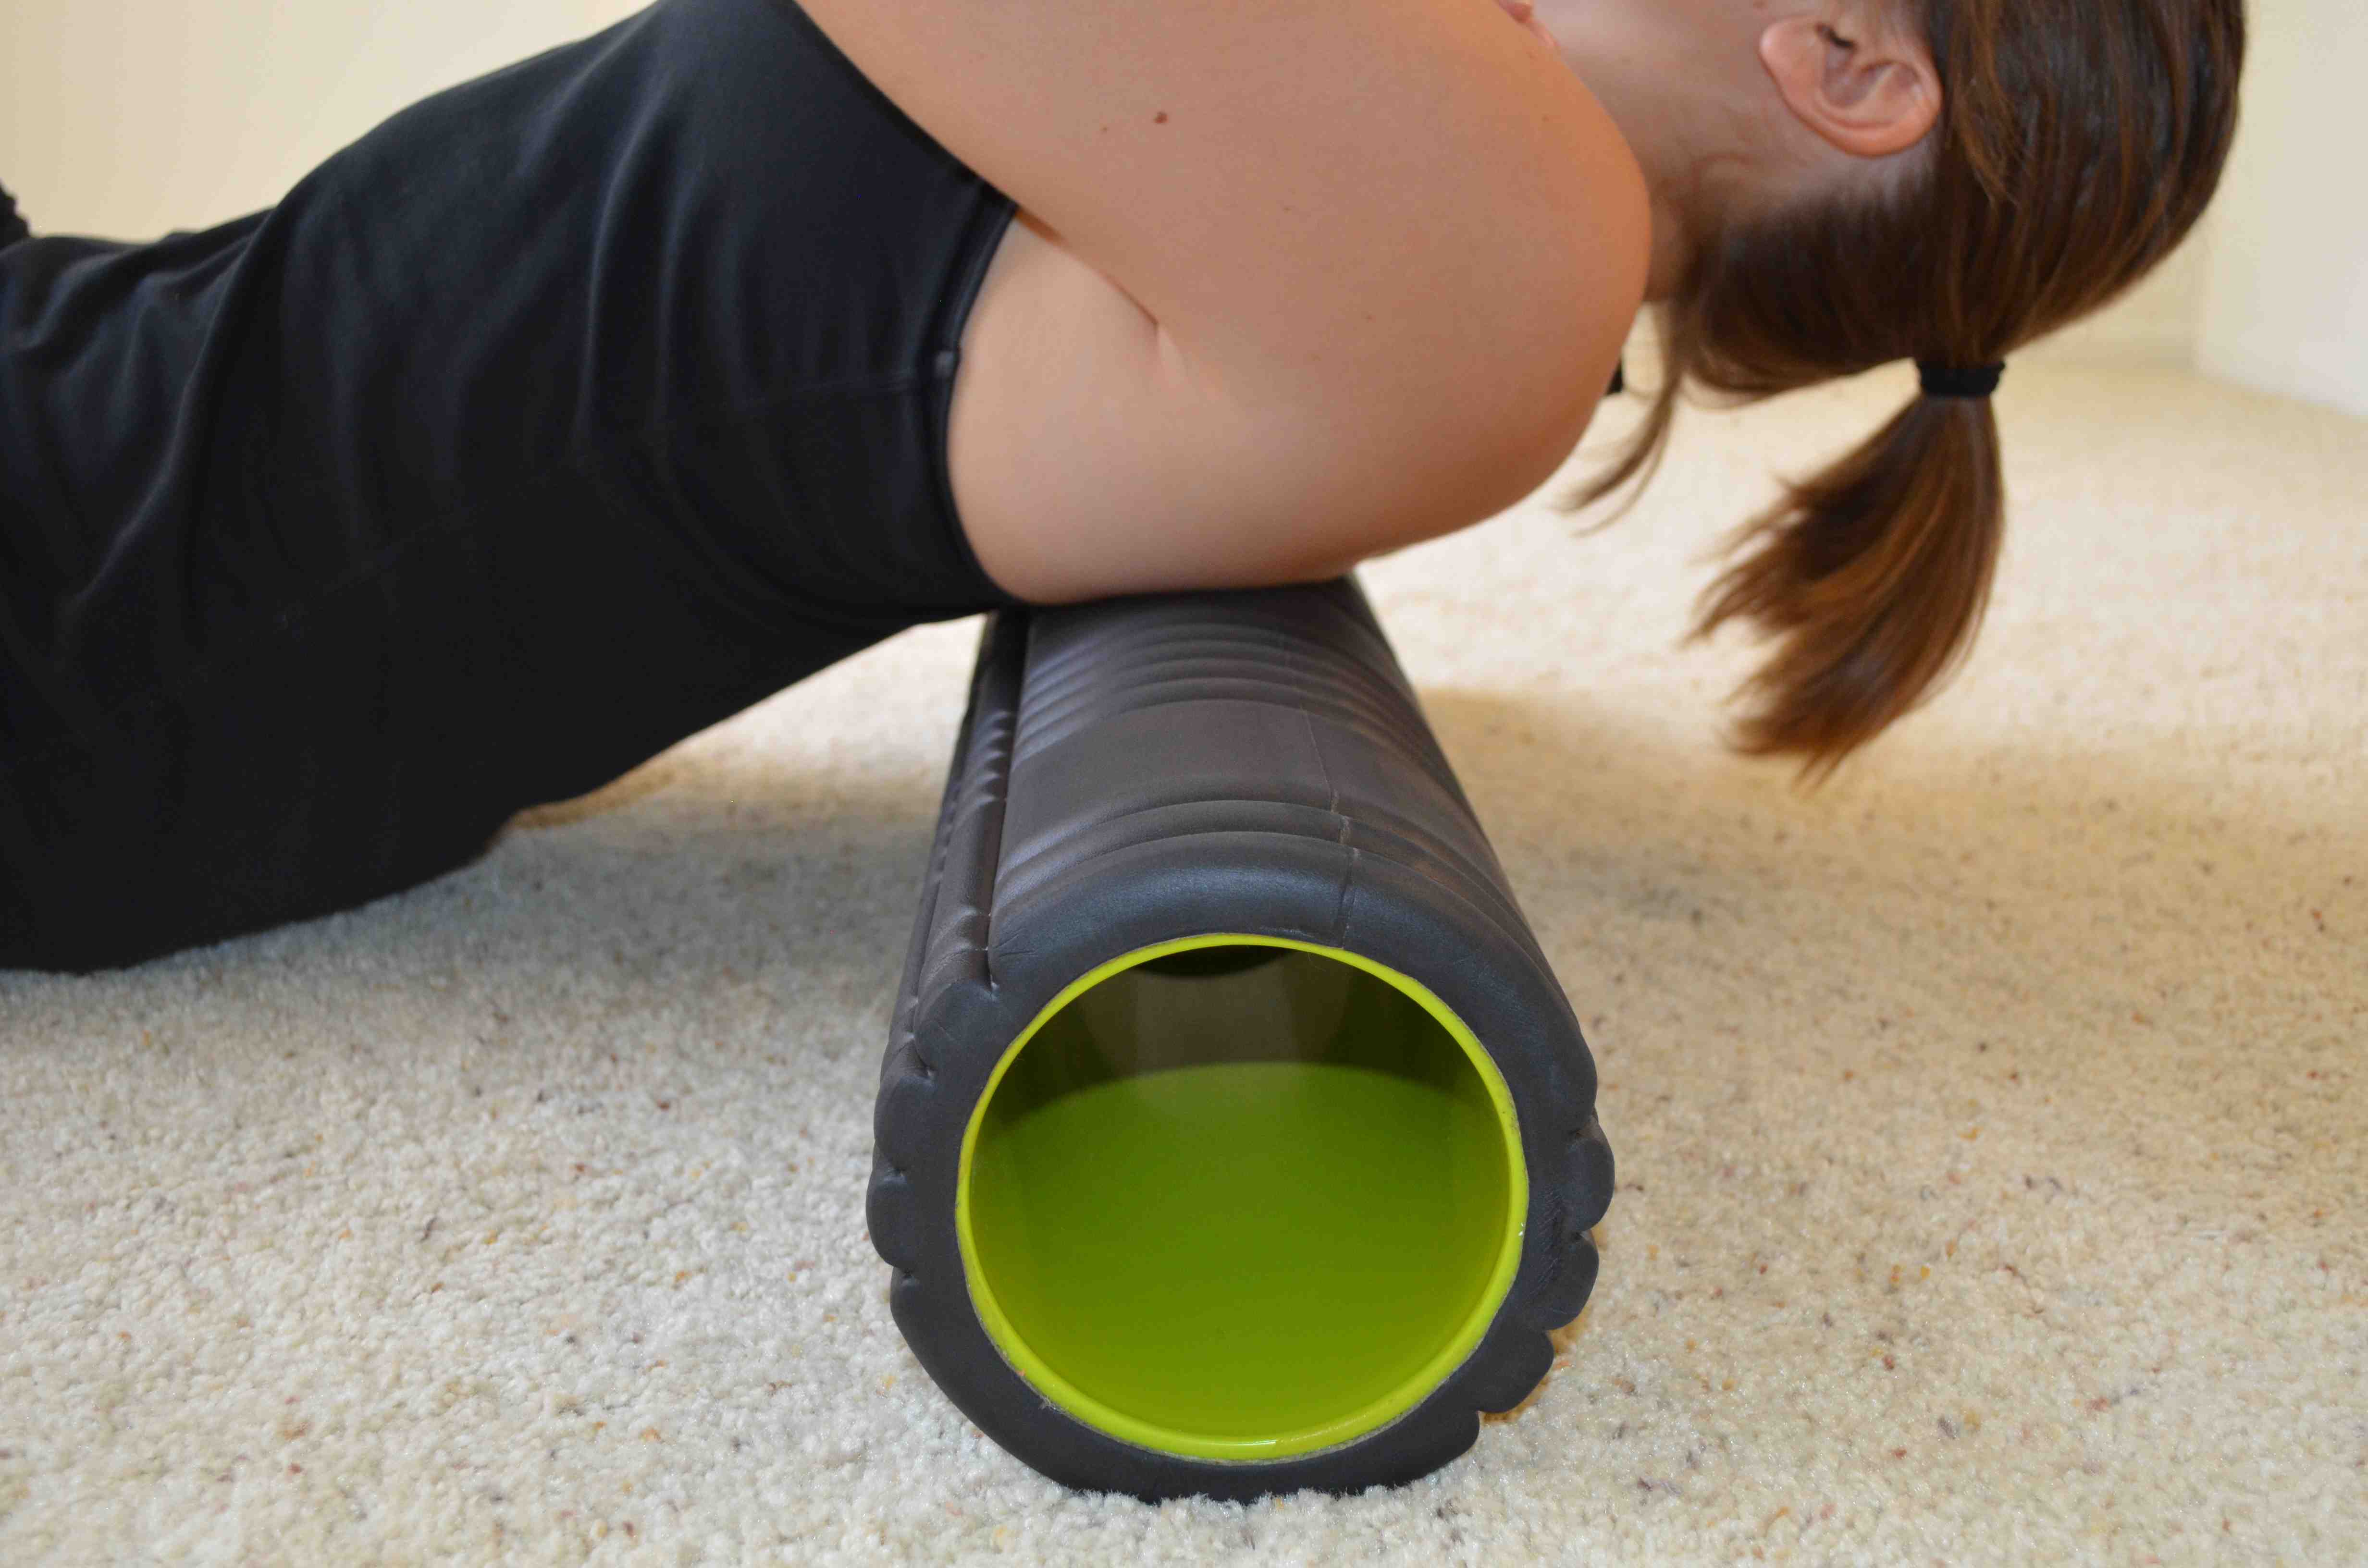
LATS – You can use a foam ball or a ball. I prefer the roller because I can hit my lats and also roll out my upper back and work on thoracic extension. Lie on your side with the roller under one armpit. Rock forward and backward and then move the roller down your side toward your belly button. Work down your lat to about the end of your ribs. Rock forward and backward as you move to really dig out the lats. If you use the blue ball, you can actually start in your chest and then roll the ball under your armpit and up between your shoulder blades. It is a great move if you want to hit your back, lats and chest all in one!

THORACIC EXTENSION – Take a roller and roll out your upper back. Let it roll from about your ribs to your shoulders. You can lean a bit to either side to change exactly where the roller hits. You can also use a ball to roll out your upper back. I like the roller though because after your roll out your back you can do a nice little stretch. With the roller in your upper back, drop your butt down to the ground and then lean back over the roller, trying to drop your head to the ground behind you. Change where the roller is in your upper back and then drop your butt to the ground and extend back over again. Really works on thoracic extension since we seem to be in thoracic flexion for 8 hours a day while sitting in front of the computer screen!
For more great foam rolling techniques, check out the Redefining Strength video library.
STRETCHES
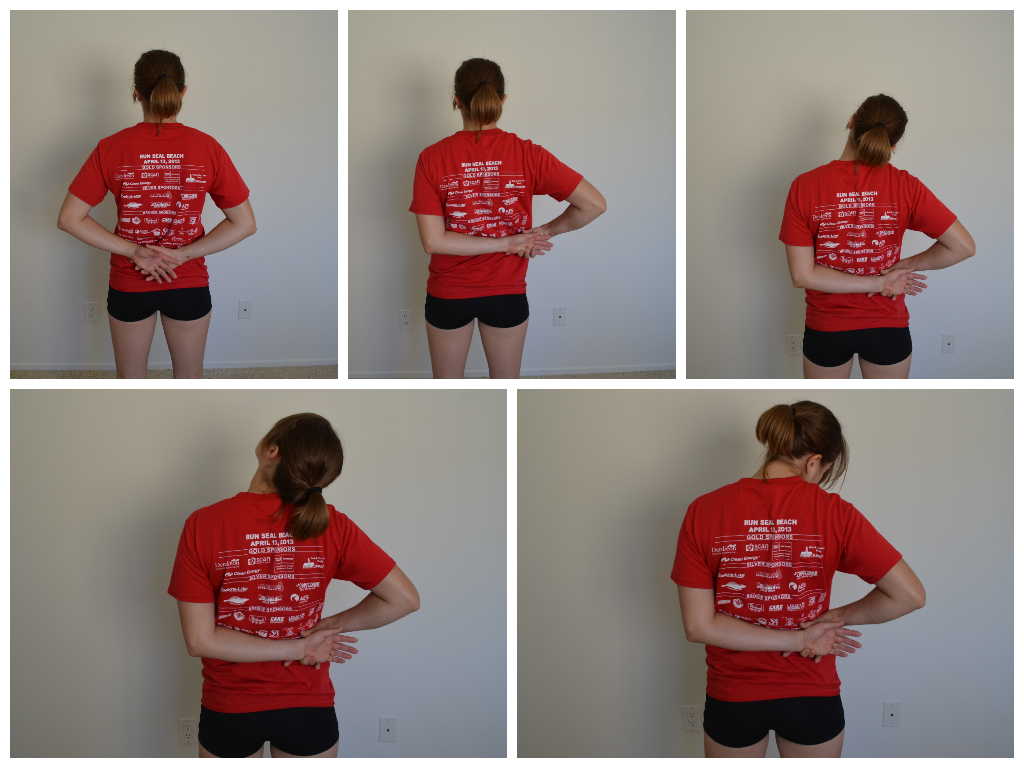
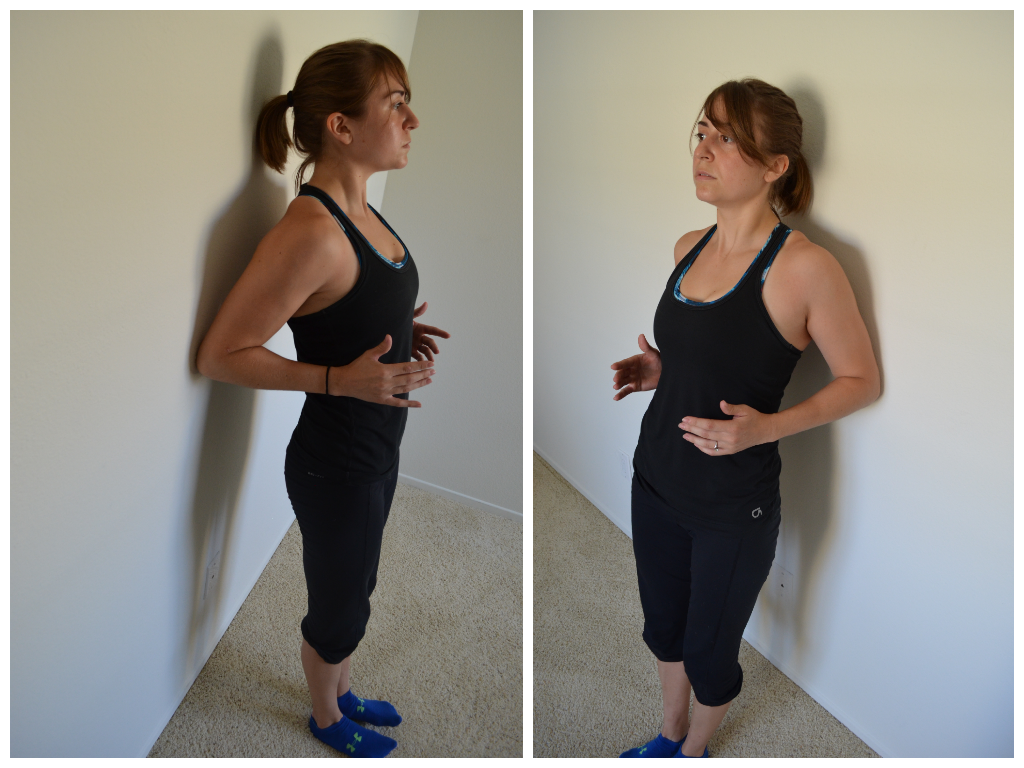
THREE WAY STRETCH – You can do this move seated or standing. Reach one hand behind your back and then grab that wrist with the other hand. Pull the arm behind your back toward the opposite side. Then lean your head to the side you are pulling to. Do not tense your shoulders and bring them up toward you ears. Relax into the stretch. Then change the direction of your gaze. Look up and hold for a second or two. Then look straight ahead. And then look down. Move your chin as you look and not just your eyes. Changing the direction of where you look, will change exactly which muscles in your necks and upper back that you stretch.
HEAD NODS — There are three types of head nods I like. The “yes” head nod where you look down toward the ground then lean your head back and look up at the ceiling as if doing a big nod yes (move slowly trying to open up your range of motion). The “no” nod where you look side to side, trying to look as far both ways as possible as if you doing a big slow no nod (do not move to quickly and make yourself dizzy). And the “rooster” nod where you pull your chin back in toward your chest as if trying to create a double chin and then you extend your chin back out (it kind of reminds of the rooster head movement). All should be done slowly and with the shoulders relax. If you feel your shoulders creeping up by your ears, stop and relax them. You may even want to slightly reach down toward the ground with your hands to keep them relaxed.
WALL SLIDES – An oldie but goodie, this one works on thoracic flexibility. Stand against a wall with your core tight and your butt and upper back firmly against the wall. Place your forearms against the wall with your elbows bent. Then try to reach your forearms and hands up the wall as far as possible without losing contact with the wall. Don’t let your head, butt or upper back move from the wall either and try to keep your core tight. Slide your hands up and down, increasing the range of motion if you can with each rep.

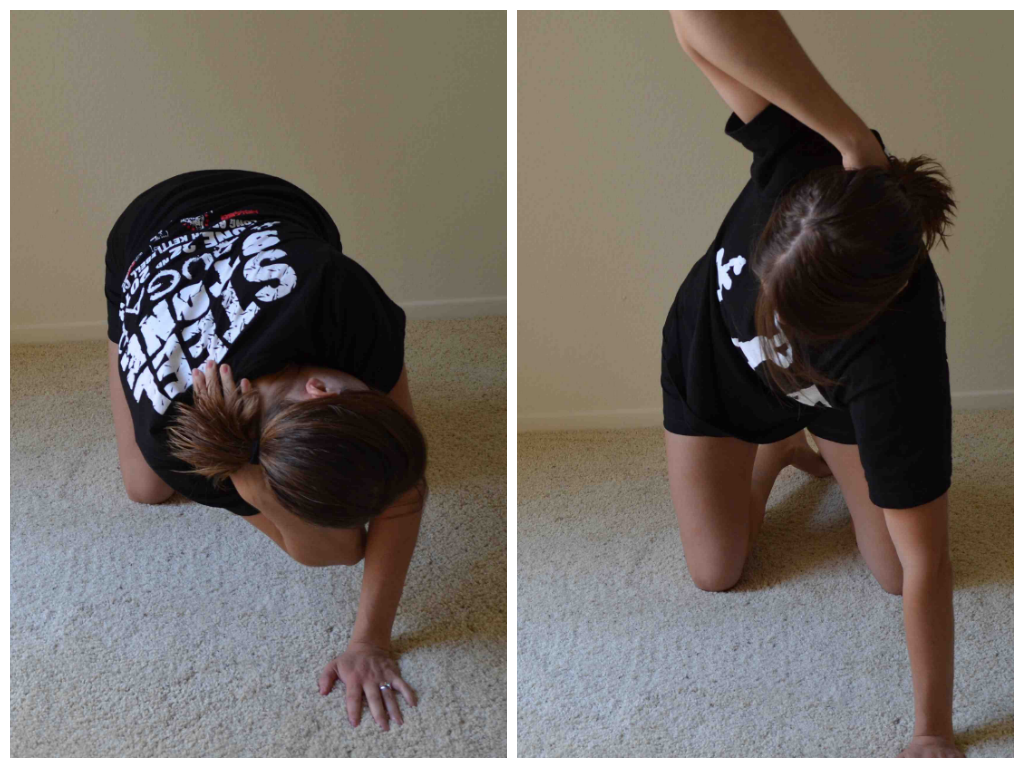
KNEELING THORACIC EXTENSION – On your hands and knees, reach one hand down your neck and spine. Fingertips should be pointing down your back toward your butt. Then rotate your core so that your elbow goes under your arm on the ground. Then rotate open driving the elbow up toward the ceiling. Try to focus on just opening up your back and not really shifting your weight in your lower body. Then rotate back closed and repeat.
CAT/CAMEL – You can do this move standing or on your hands and knees. The basic move is that you round your back as much as possible and then you extend back the other way as much as possible. So on your hands and knees. Round your back up toward the ceiling. Then drop down and arch your back driving your belly button toward the ground and even looking up toward the ceiling with your head. If you do this standing, you will round forward as if hunching over your desk. Even bring your hands and arms forward as you round. Then extend open, opening your arms and even looking up toward the ceiling. Really exaggerate the extension if you can.

UPPER BACK AND LAT – Probably my favorite stretch of all time shown to me by Mark at the gym. Kneel on the ground. Then lean forward and rotate onto one side. Drop the side of your head and shoulder down to the ground. Reach the bottom arm out in front of you. Then reach the top hand back and overhead. Really try to rotate your chest open toward the ceiling. Hold and then repeat on the other side.
LAT STRETCH – Child’s pose can be a great way to stretch your lats and your upper back. You can also simply place the side your hand on a bookshelf or desk and then straighten your arm and bend over (if needed) and walk away. Even rotate a bit so you are looking under the arm on the desk or wall and then away from the arm. Feel a nice stretch down your arm and into the side of your back. Hold and repeat on the other side.
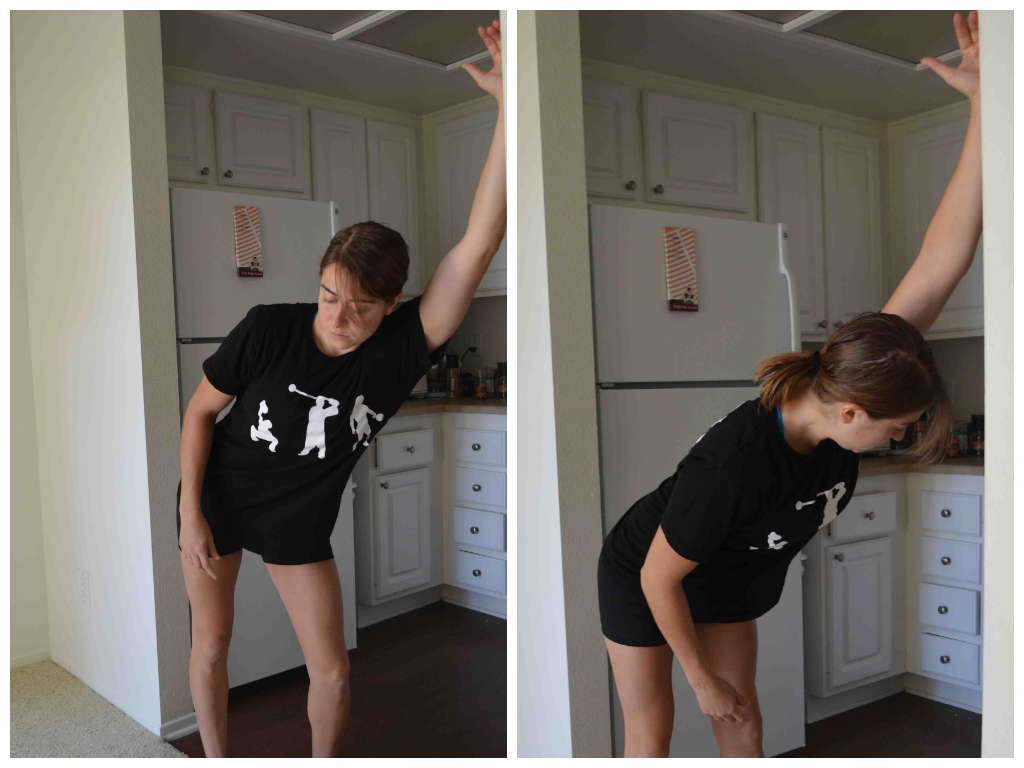
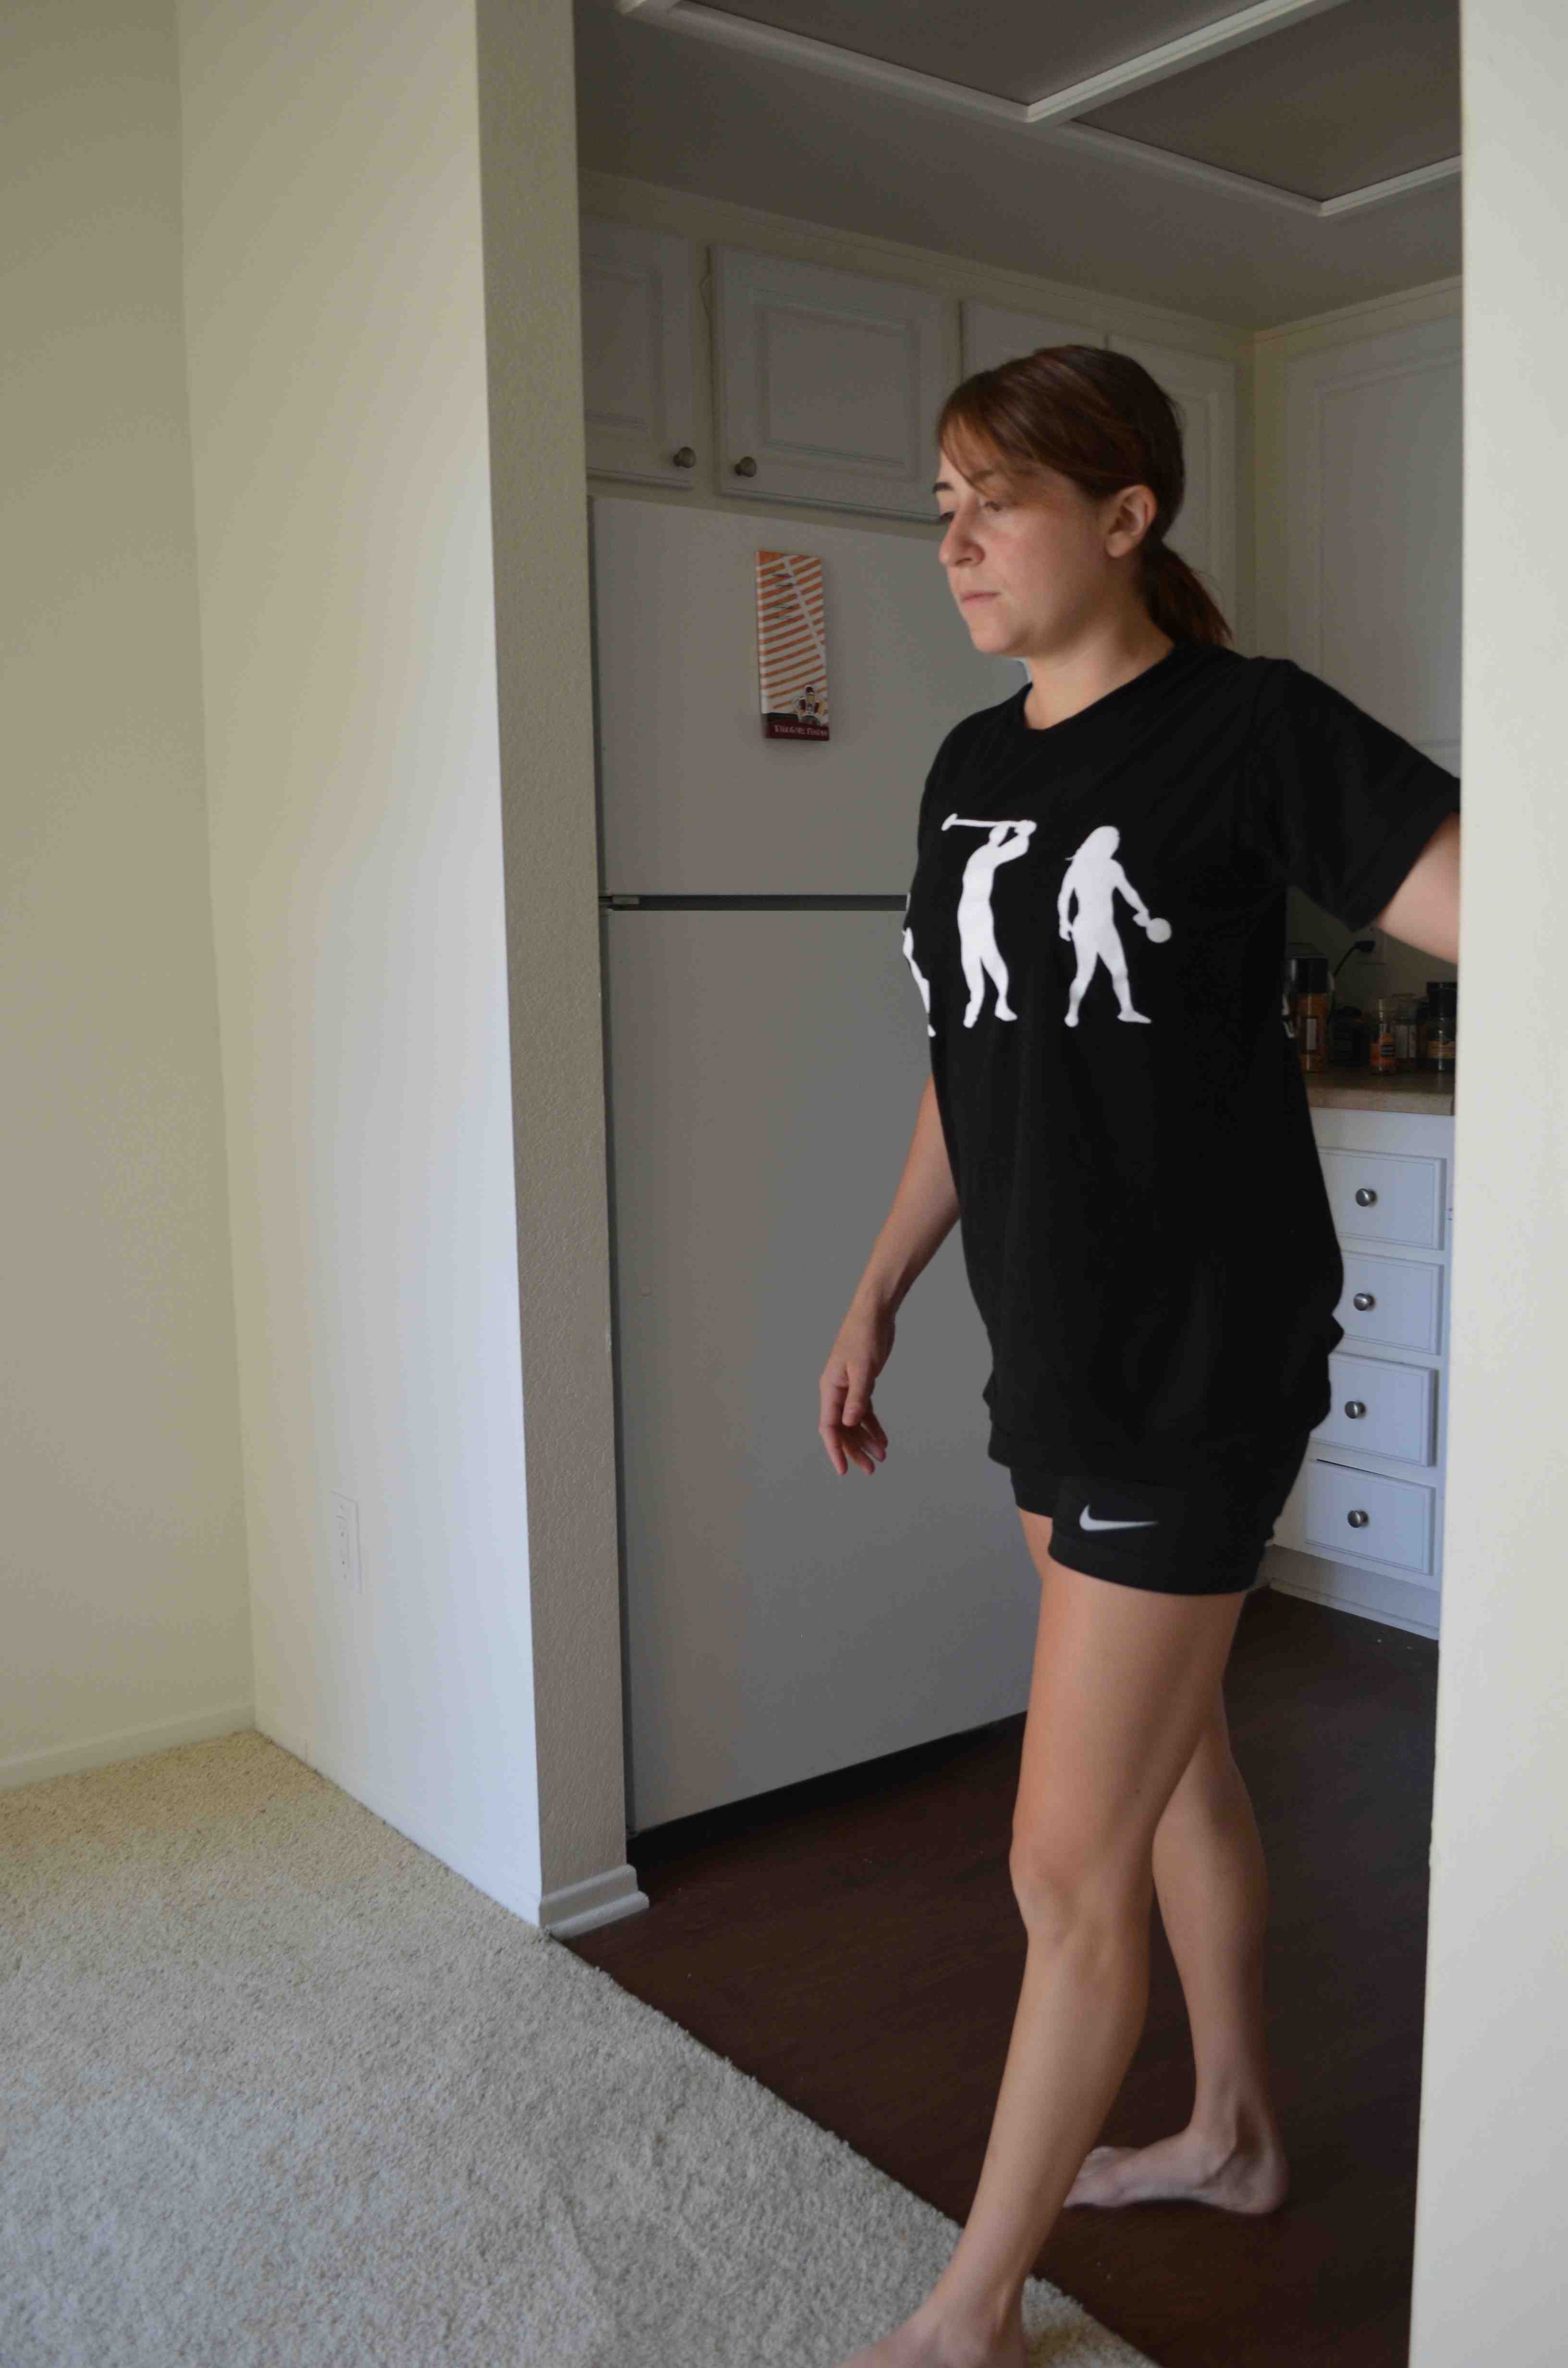
CHEST STRETCH – A doorway, pole or corner is great for this stretch. Place your hand or forearm on the side of the doorway. Step through the doorway until you feel a stretch down your chest and into your shoulder. Do not rotate toward the arm in the doorway. Try to face straight ahead. Hold and then switch.
STRENGTHENING
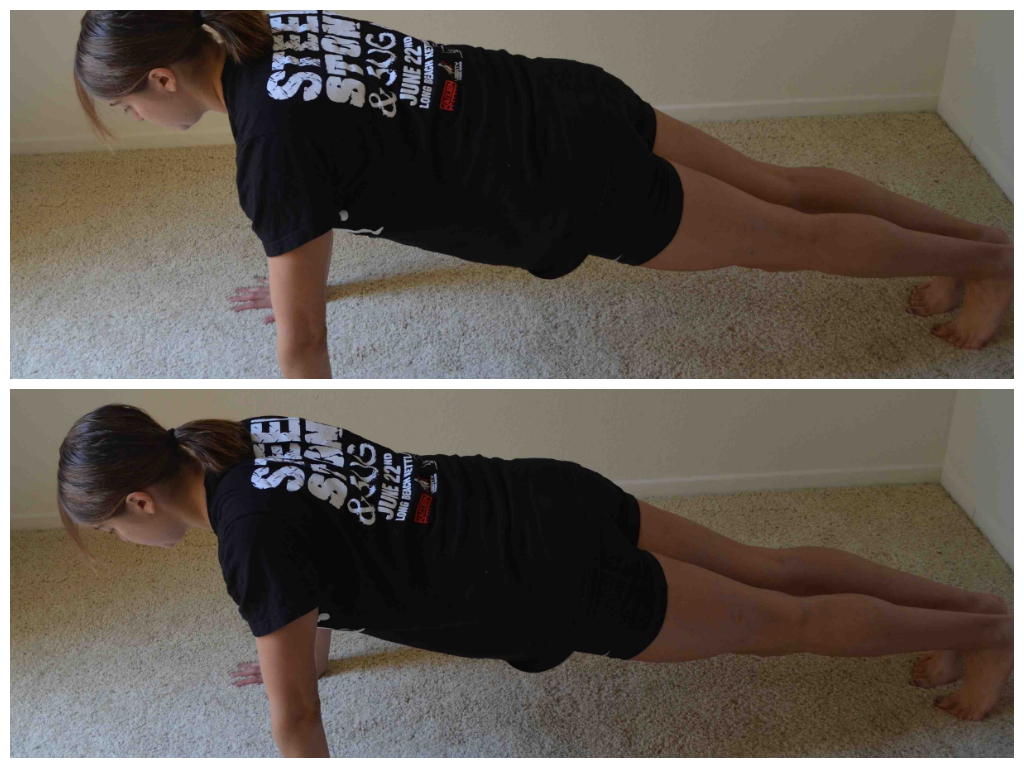
SCAPULAR PUSH UPS – These are hard for many people to do so you may want to have someone watch your form the first time. This is a very small range of motion. Set up in a push up position from your knees or toes. Create a nice straight line with your body. Then pinch your shoulder blades back and together and press your chest out. Then relax. It is really only a few inches of motion. DO NOT ALLOW YOUR CORE TO MOVE. Many people will drop their hips and move their core or bend their elbows. All you are doing is pinching your shoulder blades back and together. Do not let your shoulders shrug up by your ears.
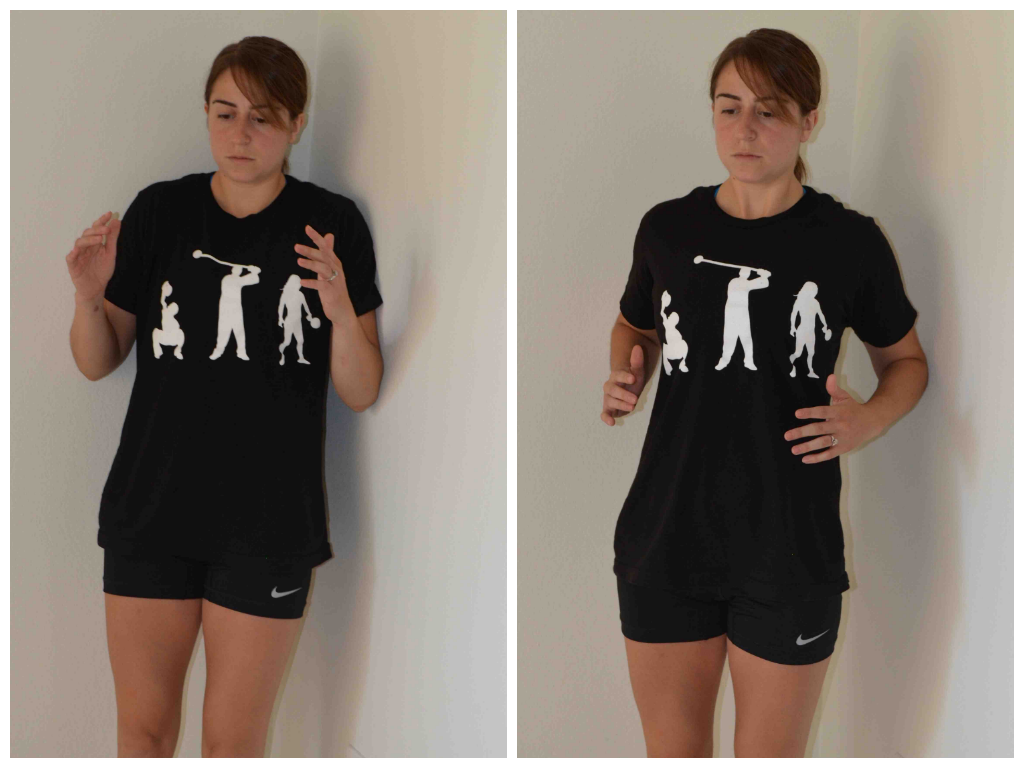
SCAPULAR WALL HOLD – An essential move if you sit at a desk all day. Stand with your back to a wall. Bend your elbows with your arms at your side. Drive your chest out and pinch your shoulder blades down and together. Do not let your shoulders shrug. Lean back into the wall. Only your elbows and maybe your head should touch the wall. Walk your feet away from the wall only if needed to increase the resistance. Press your chest out and draw your shoulder blades together as you hold. You create the tension and this move will only be difficult if you really activate the muscles.
CORNER ROW – A dynamic scapular hold. Stand in a corner in the same position as the scapular hold. Place one elbow on each side of the corner. Drive up into the scapular hold and then relax back into the corner and repeat. Do not let the shoulders shrug up as you row out. Also the farther from the wall your feet are, the harder the move will be.
LAT TOWEL PULLDOWN – You can do this move with or without a towel. It is very much like the wall slides except you aren’t against a wall. Reach your hands up with your elbows bent. Your hands should be on either side of your chest with your palms facing forward. You can hold a towel tight between your hands. This sometimes helps to remind you to keep tension between your shoulder blades and activate your lats. Reach your hands up overhead, keeping tension on the towel. Then pull the towel back down, pulling with your lats as you pinch your shoulder blades down and together. Repeat, keeping tension between your shoulder blades and using your lats to pull.

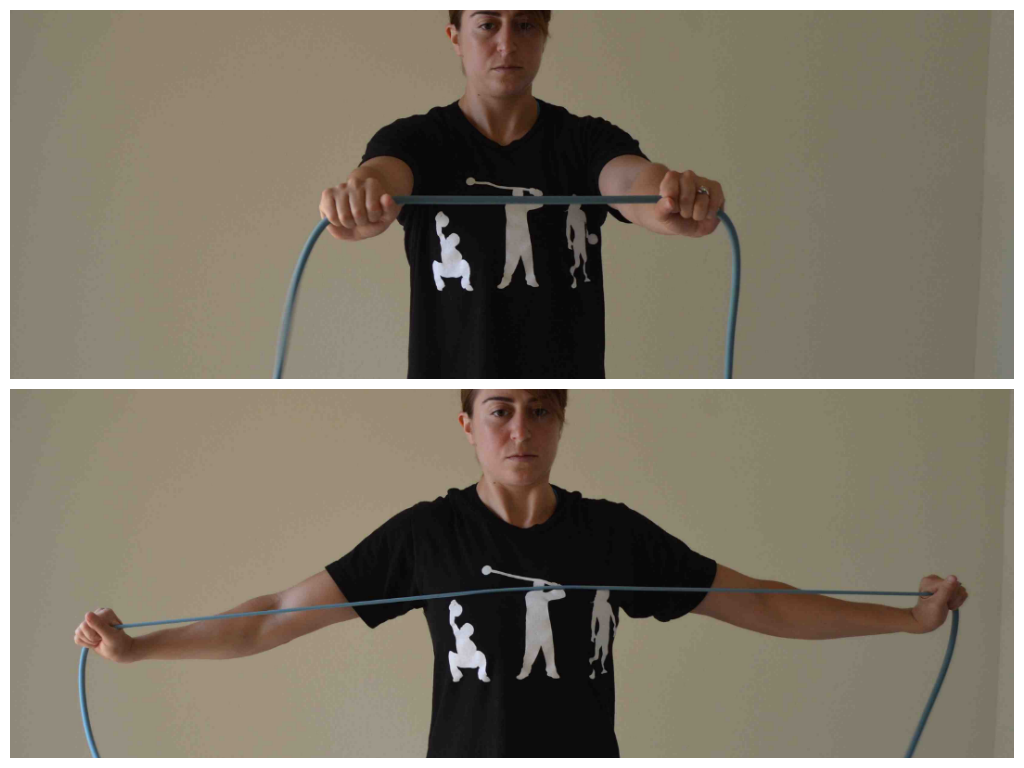
BAND SCAPULAR FLY – For this one you need a light resistance band. Hold the resistance band with your hands about shoulder-width apart. Arms should be straight out in front of you at about shoulder height or right below. Keeping your arms straight, open your arms out to the side. Pinch your shoulder blades together as you open. Do not let your shoulders shrug up. Then once you open the band to your chest with your arms straight, bring your arms back together so your arms are about shoulder-width apart again and there is no slack in the band. Repeat.
Many of these moves can even be done in your office when you need a quick break from looking at the computer screen. I tell clients all the time that at least every hour or so they should get up and do a couple quick stretches and a scapular hold for a minute or two. Great way to reverse the effects of hunching over AND a great way to become even just a little bit more active!
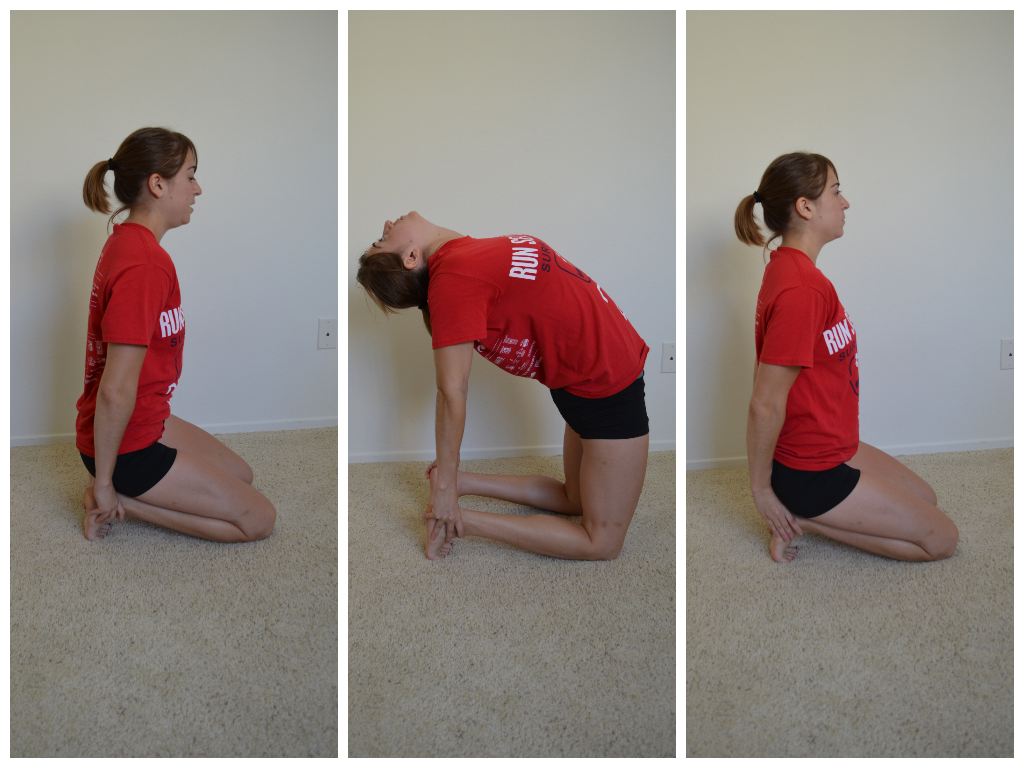
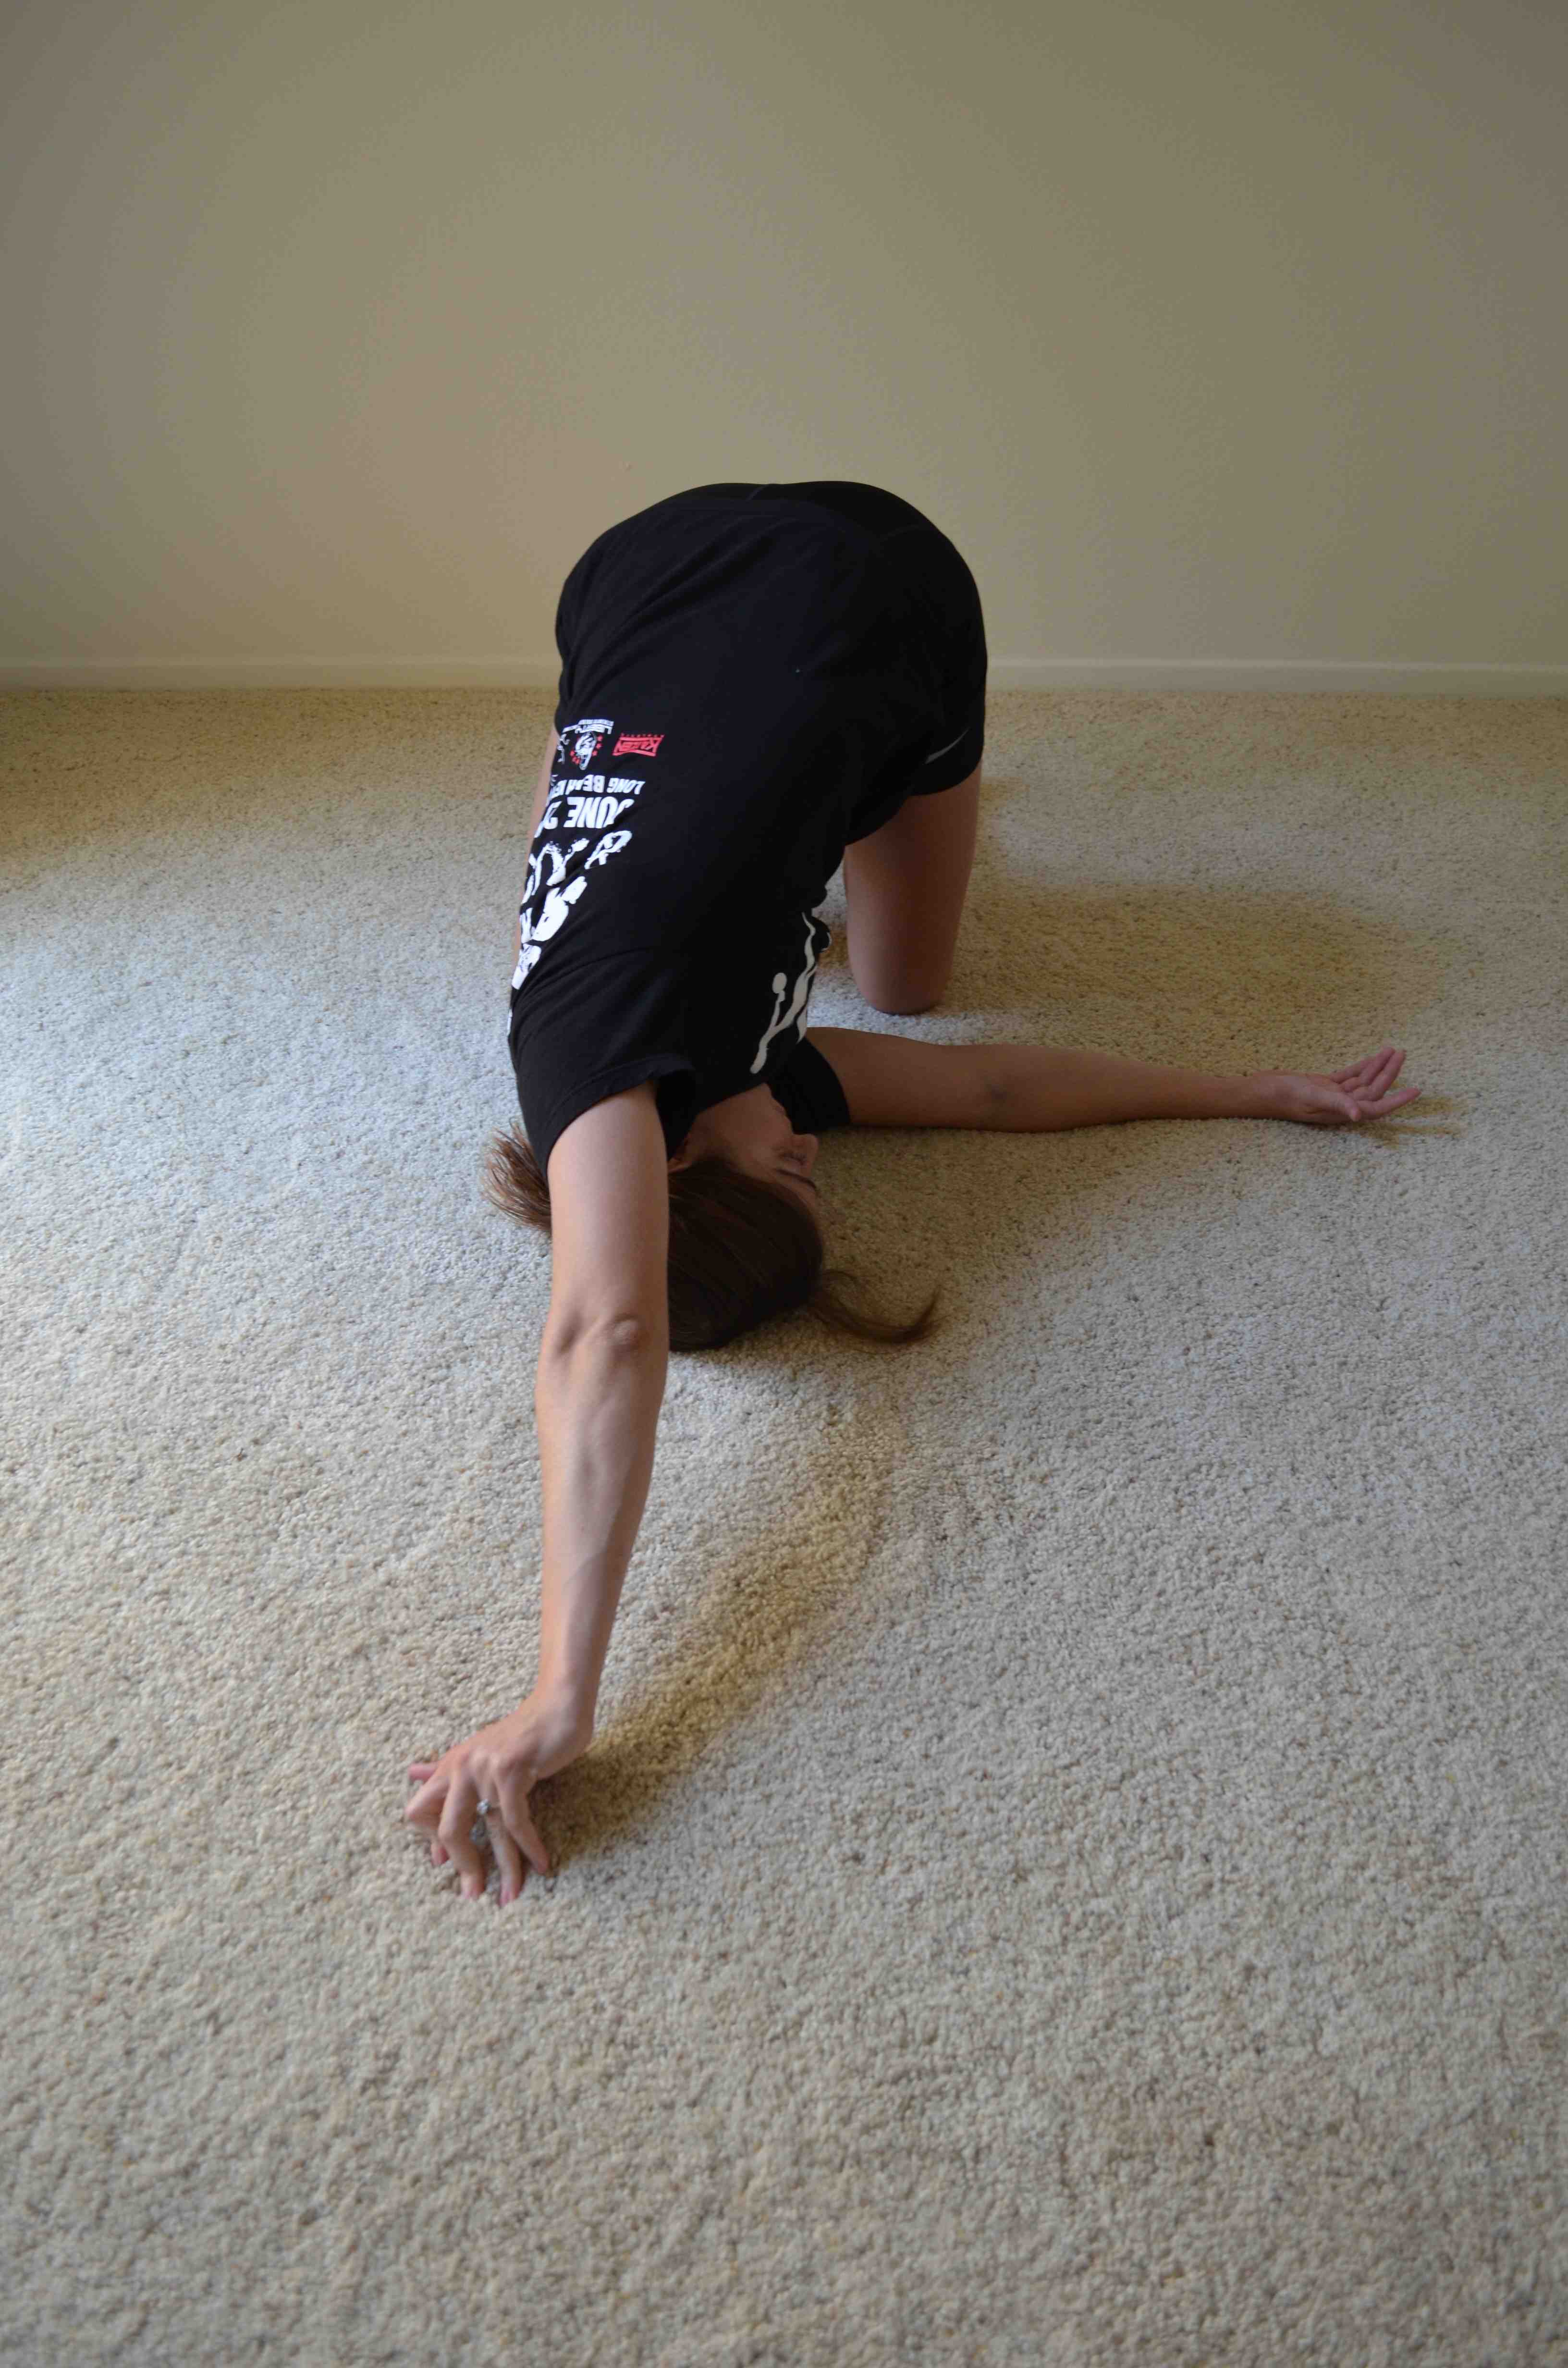
Here is actually a great move to extend EVERYTHING that is basically flexed all day at the computer.
Kneeling bridge
NOTE: Anyone love…I mean hate…burpees? Look out for some cool burpee variations to come later this week!
Redefining Strength – Empowerment through exercise
So over the last year, I’ve thought a lot about what Man Bicep stood for in my life and the life of my clients.
It wasn’t about powerlifting. It most definitely wasn’t about running. And it wasn’t even about a specific diet.
It was about doing something….anything…that made you feel healthy and strong. It was about working out to feel empowered.
It was about taking on new challenges and feeling like you COULD do anything.
It was about redefining what strong really means.
And so I started considering what could really make us feel more empowered. And I began developing workout programs based around this principle.
I believe that working out can be an outlet, a release. I believe it can help us build confidence in a way few other things can. Overcoming physical challenges – lifting more or running further than we thought possible – is just about the most empowering thing you can do.
So I created “Redefining Strength.”
Right now the site has a few products that I’m giving away. I spent a lot of time considering what would be most helpful and supplement everything that I post here, on Man Bicep.
If you go over and subscribe, you will get 4 different reports. One is bodyweight exercises that can be done by beginners and advanced a like. They are basically exercises you can do anywhere and get a full body workout.

Handstand progression…I show you ways to progress up to one!
You will also get a list of 10 Simple Diet Changes. Be you vegetarian or Atkins dieter, there are tips on there that EVERYONE needs to follow.
I also spent a lot of time creating a foam rolling video library and cheat sheet. I believe that foam rolling is one of the most important things when it comes to moving well and feeling great. I even included some foam rolling videos that show you how to roll out even if you don’t have any of the fancy trigger point equipment.
And last, but not least, you will get a goal setting sheet. I debated about putting this one in since many of you will skip it. But honestly, goal setting is one of the best things you can do for yourself.
I know it’s cheesy. I know it’s boring and seems stupid. But trust me it’s worth the time if you really set goals that MATTER.
Goals that MATTER are what keep you committed even through the roughest of times. Goals CAN be motivating and keep us on course.
You just have to set goals in a way that don’t allow them to fall by the wayside like most people’s New Years resolutions!
So head over to Redefining Strength and check out those four guides and the video library. I hope it gets you as excited as I am for the programs launching in August!
As always, if you have any questions, feel free to email me at manbiceps@gmail.com.
Home Workouts – 10 Moves You Can Do With An Ikea Table
So yesterday when Ryan and I were doing some foam rolling stuff, I used a table for a couple of the moves.
It was just our little $10 Ikea table, but it was amazingly sturdy considering I put it together…Although that may be better than if Ryan put it together…Sorry Ryan…But it’s true…
Anyway, when I used the table, Ryan said to me, “I wonder if you could do a full body workout with just that table?”
My answer, “You totally could!”
Here are 10 moves you can do with just a cheap little Ikea side table! Love you Ikea! 🙂 (The moves are in no particular order)
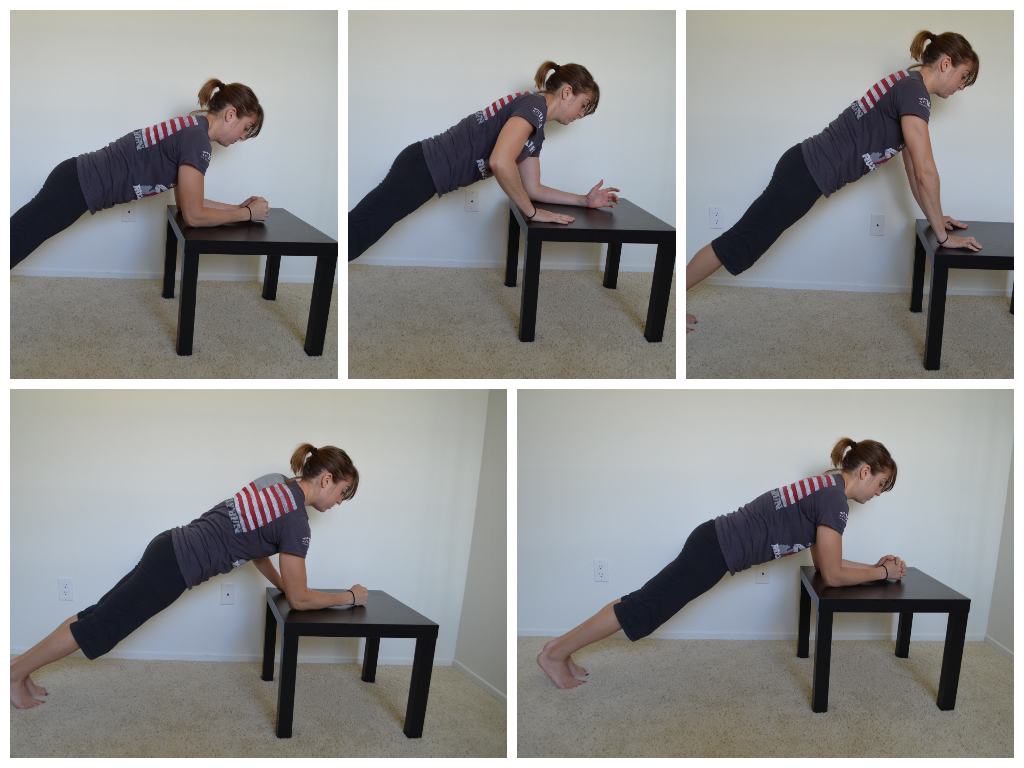
1. Decline or Incline Push ups – You can make the push up easier or more advanced using the table. To make the push up easier, put your hands on the table and then perform the push up from your knees or toes. Doing the push up from your knees will make it easier than from your toes. To advance the push up, put your toes on top of the table.
2. Balance Lunges – The balance lunge is a great leg move to do if you don’t have weights. Place your back foot up on the table and hop your front foot out so you are in a nice wide stance. Then lunge down, dropping your back knee toward the ground. Really sit back into the lunge. Make sure you aren’t going forward and that your front knee is not going past your toe. You should feel a nice stretch in the front of the leg that is back when doing this move.

3. Single Leg Squats – This table is a great way for beginners especially to start working on their pistol squats. It is also a great way to really correct imbalances since you are working legs individually. If the table is too low for you at the beginning, start with a two-leg squat to bench. Then progress to one leg. Beginners can completely sit down on the table. As you advance, try to only barely tap the table with your butt before standing up. Do not rely on sitting on the bench to stand back up.

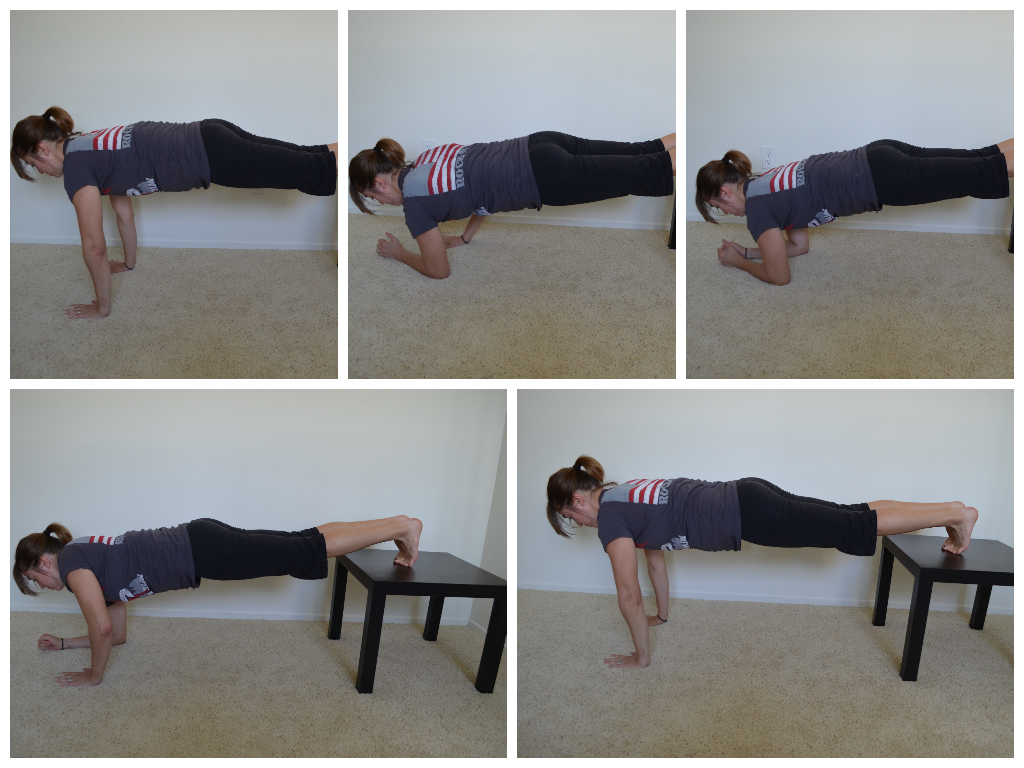
4. Incline or Decline Climbers – These aren’t mountain climbers. With climbers you are working your shoulders and triceps. Beginners should start in a plank position with their forearms on the table. Next climb up one hand at a time until you are at the top of a push up position. Then climb back down to complete the rep. Advanced exercisers should do this move with their feet elevated on the table instead.
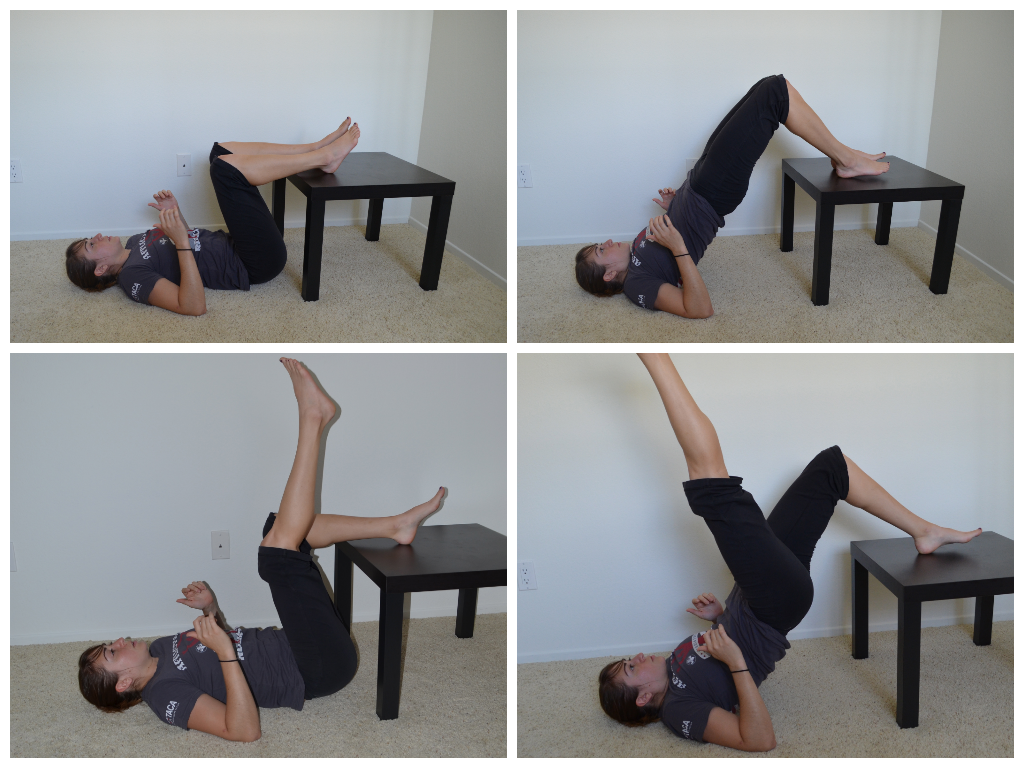
5. Glute Bridge off table – A great way to advance the glute bridge is by putting your feet up on the table. You can do either a double leg glute bridge, which is a bit easier, or a single leg bridge, which is a bit more difficult. Start by lying on the ground with your heels on the table. Your butt should be close to the table. Arms are bent to 90 with elbows driving into the ground. Squeeze the glutes and drive through the heels, lifting your hips as high as you can in the air. Keep your core tight and glutes squeezed. You should not feel this in your low back. To make the move even more beneficial, hold each rep at the top for 2-5 seconds.
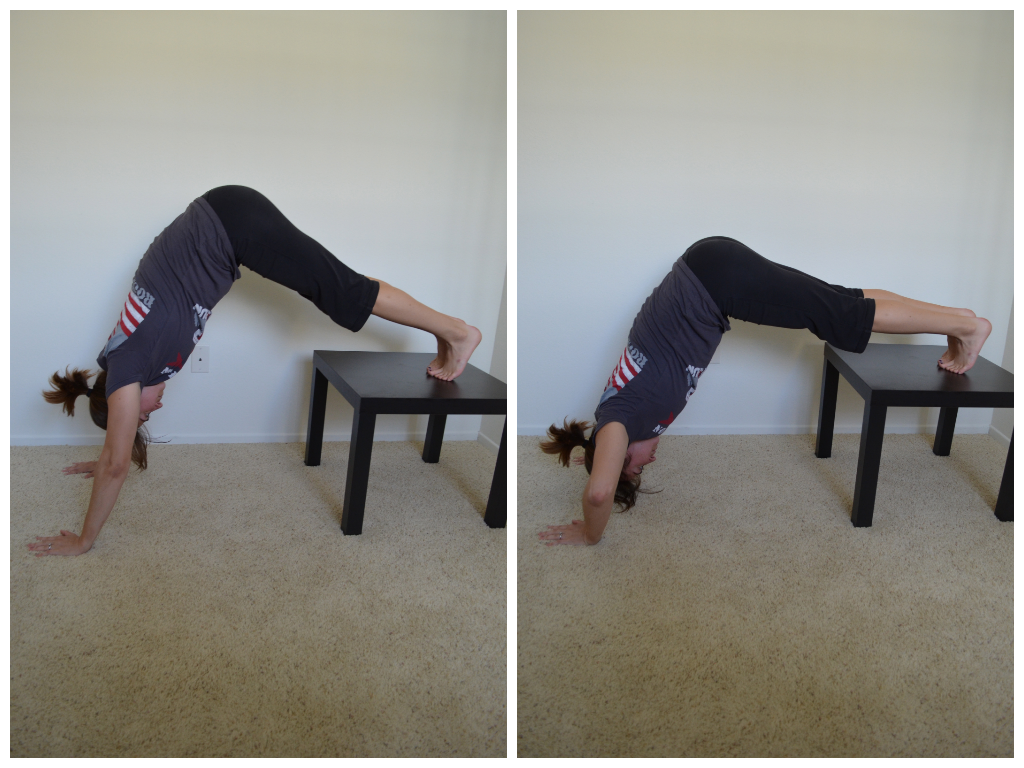
6. Handstands – Handstands are a great upper body move. Using the table you can either do a beginner handstand hold or you can make the move more advanced by adding in a push up. To do the hold, place your feet on top of the table. Walk your hands back a bit and push your butt up towards the ceiling. Push off your toes to get as vertical as possible, creating a nice straight line from your hands, up your arms and core to your tailbone. If this is easy, add the push up in while holding this position. Drop your head down to the ground and then lift back up.
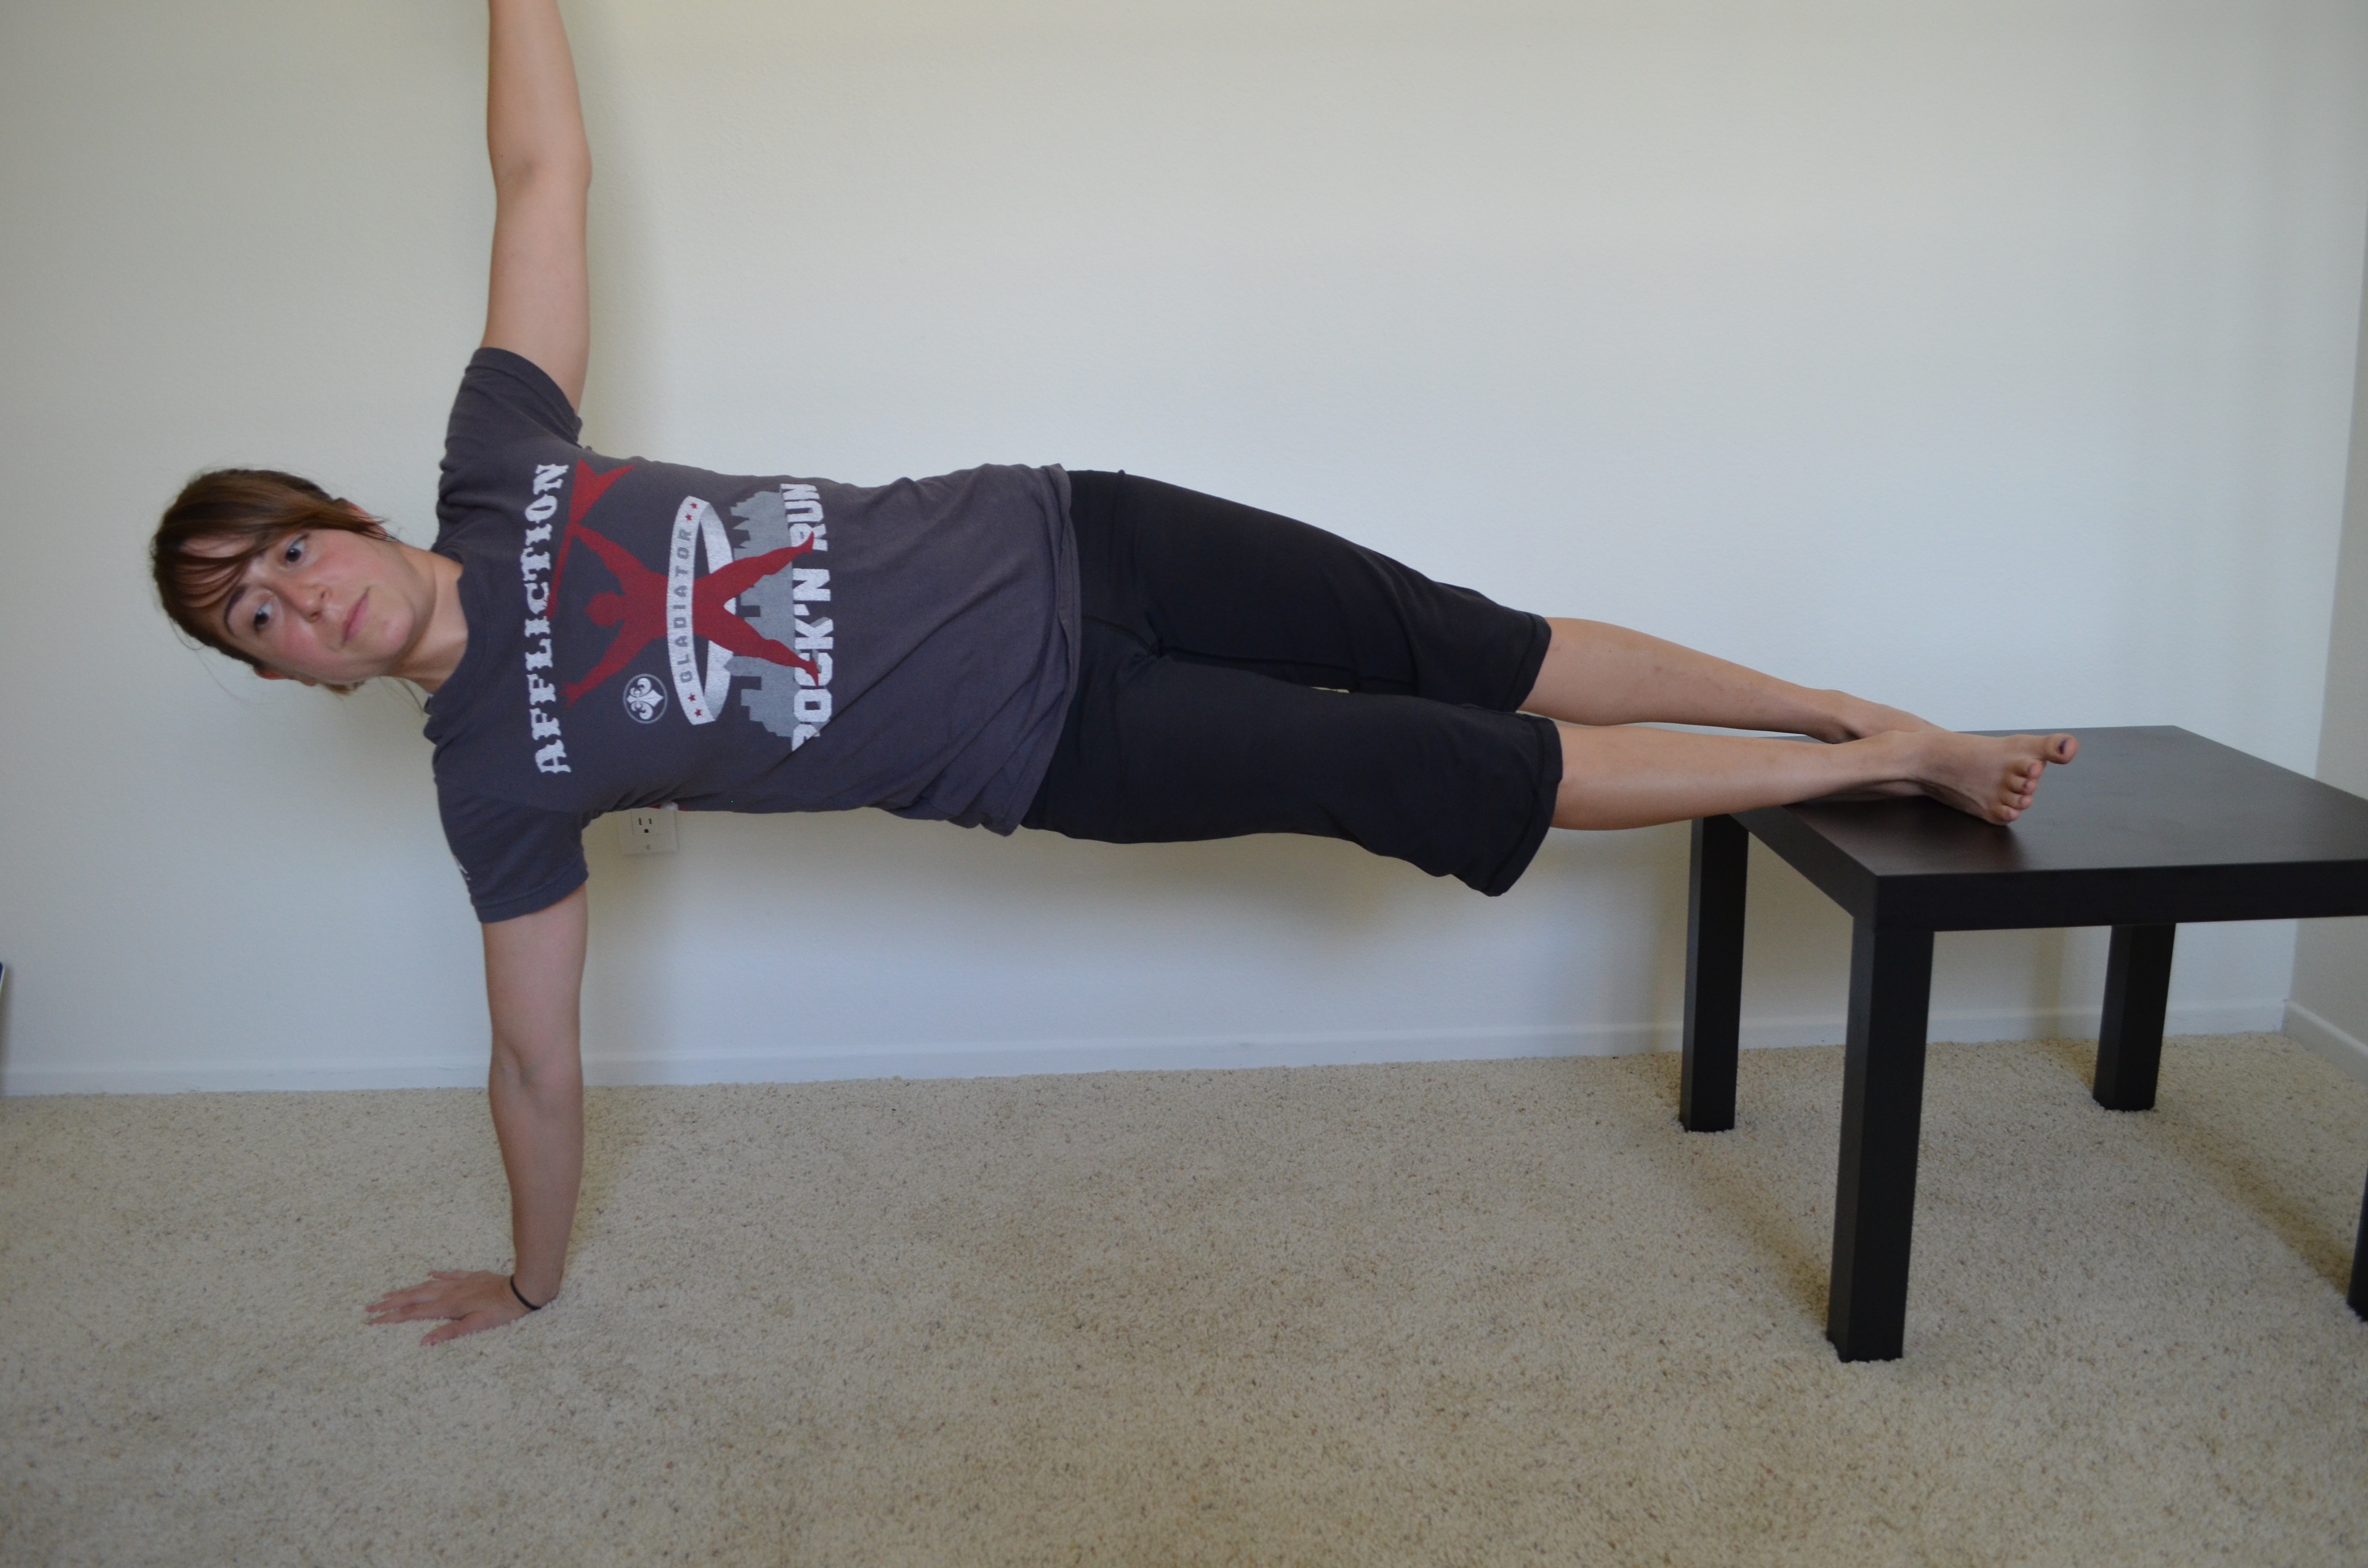
7. Plank Holds – Plank holds are a great overall core move and the table can be used to make the move easier and more difficult. Beginners can hold front and side planks with their hands on the table and feet on the ground while advanced lifters can have their feet on the table and hands on the ground.
8. Lying Bat Wings – One of my favorite moves is scapular wall holds. When playing with the table, I realized you could do the same hold while lying face down on the table. Lie down with your chest on the table. Bend your arms to 90 degrees and then pinch your shoulder blades down and back. Try to bring them together you are pinching back so hard. Hold that move. Beginners can hold for 30 seconds. Advanced can hold for up to a minute. If you want to make it even more challenging, you could add weight to each hand…even if it is just in the form of a book.

9. Reverse Hypers – A great move for the glutes and hamstrings and most easily done with a piece of equipment; HOWEVER, using a table is a PERFECT way to do reverse hypers at home. Lie face down on the table. Make sure your hips are right at the edge. Squeeze your legs together and lift your legs to basically parallel to the ground. Hold for 2-5 seconds and lower. You can do reverse hypers with either bent or straight legs. Both have their benefits. You should not feel either though in your low back. Keep the core tight and really squeeze the glutes.

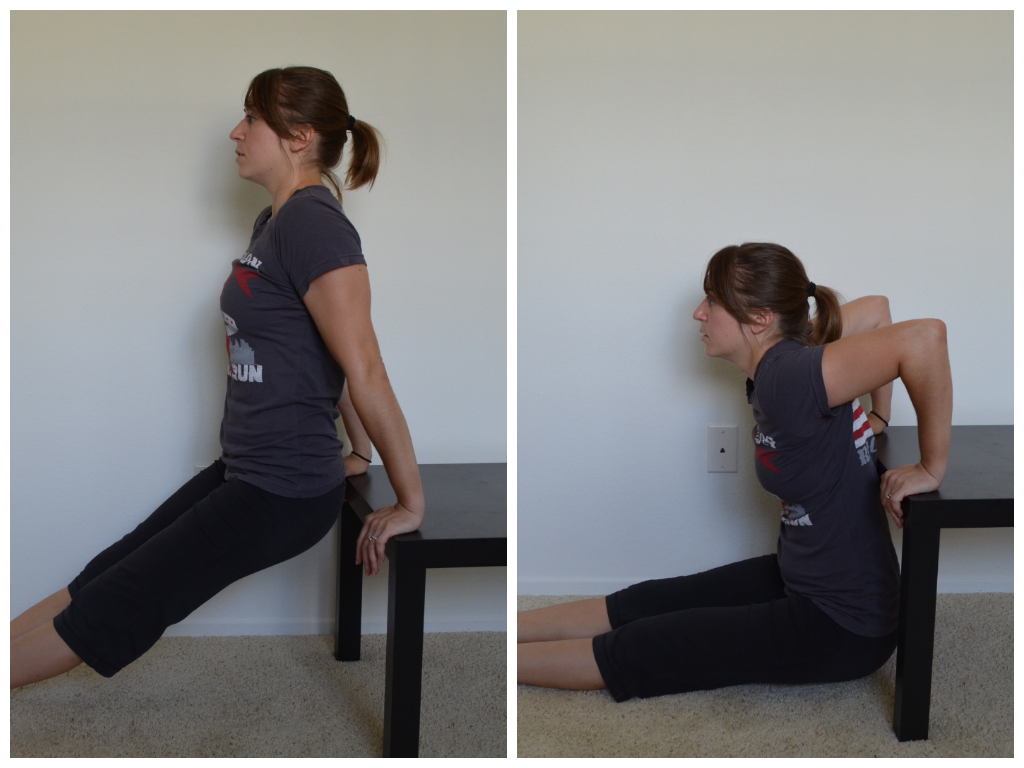
10. Dips – One of the most common home exercise moves, dips can’t be ignored. Place your hands behind you on the table with finger tips hanging over the side. Beginners can bend their legs while more advanced exercisers can keep their legs straight. Drop your butt as close to the ground as possible, bending your arms to 90 degrees and keeping your back and butt close to the table. You could even make the dips harder by doing two push ups followed by two dips for 3-5 rounds. Talk about a way to smoke your triceps….
If you like these moves and have enjoyed other Man Bicep posts, I suggest you head over to my new site Redefining Strength for a sneak peek and a few great workout freebies, including a COMPLETE FOAM ROLLING VIDEO LIBRARY!
P.S. Thank you Ryan for an amazing post idea!
Part 2: Being Bootilicious – Inhibition
So this post should actually have been post number one because what you need to start with is inhibiting and lengthening the tight, overactive muscles!
If you want to work your butt, the first thing you have to do is relax the tight muscles.
You aren’t going to feel butt exercises in the correct places if the right muscles aren’t activated!!! And you won’t activate the right muscles if other muscles are overactive and tight!
SO what do you do?
The first thing I do before I workout is roll out.
And if I really want my butt to work, I’ve got to make sure that everything around my hips is loose.
While I’m fortunate enough to not be confined to a desk all day, I sit enough that my hips are flexed for a good portion of the day.
That means they are tight. And tight hips can lead to low back pain. They can also restrict your glutes from really activating during exercise.
If your glutes don’t activate during leg movements, you are going to use your low back, have inefficient movement patterns, not lift as much AND risk injury. You are also going to miss out on working one of the biggest muscles in your body!
SO roll our your hips before you begin!
While a foam roller is great, I find any sort of ball to be WAY better at getting into those trigger points around your hips.
I prefer a tennis ball, trigger point ball or lacrosse ball. I find the golf ball to be too small.
If you are just starting out, you may want to invest in one of the foam blue balls that are a little bigger and a little softer. The smaller and harder the ball you use, the more you are really going to dig in.
Ok so to roll out your “hips,” and I use this term a bit loosely, my three favorite moves are:
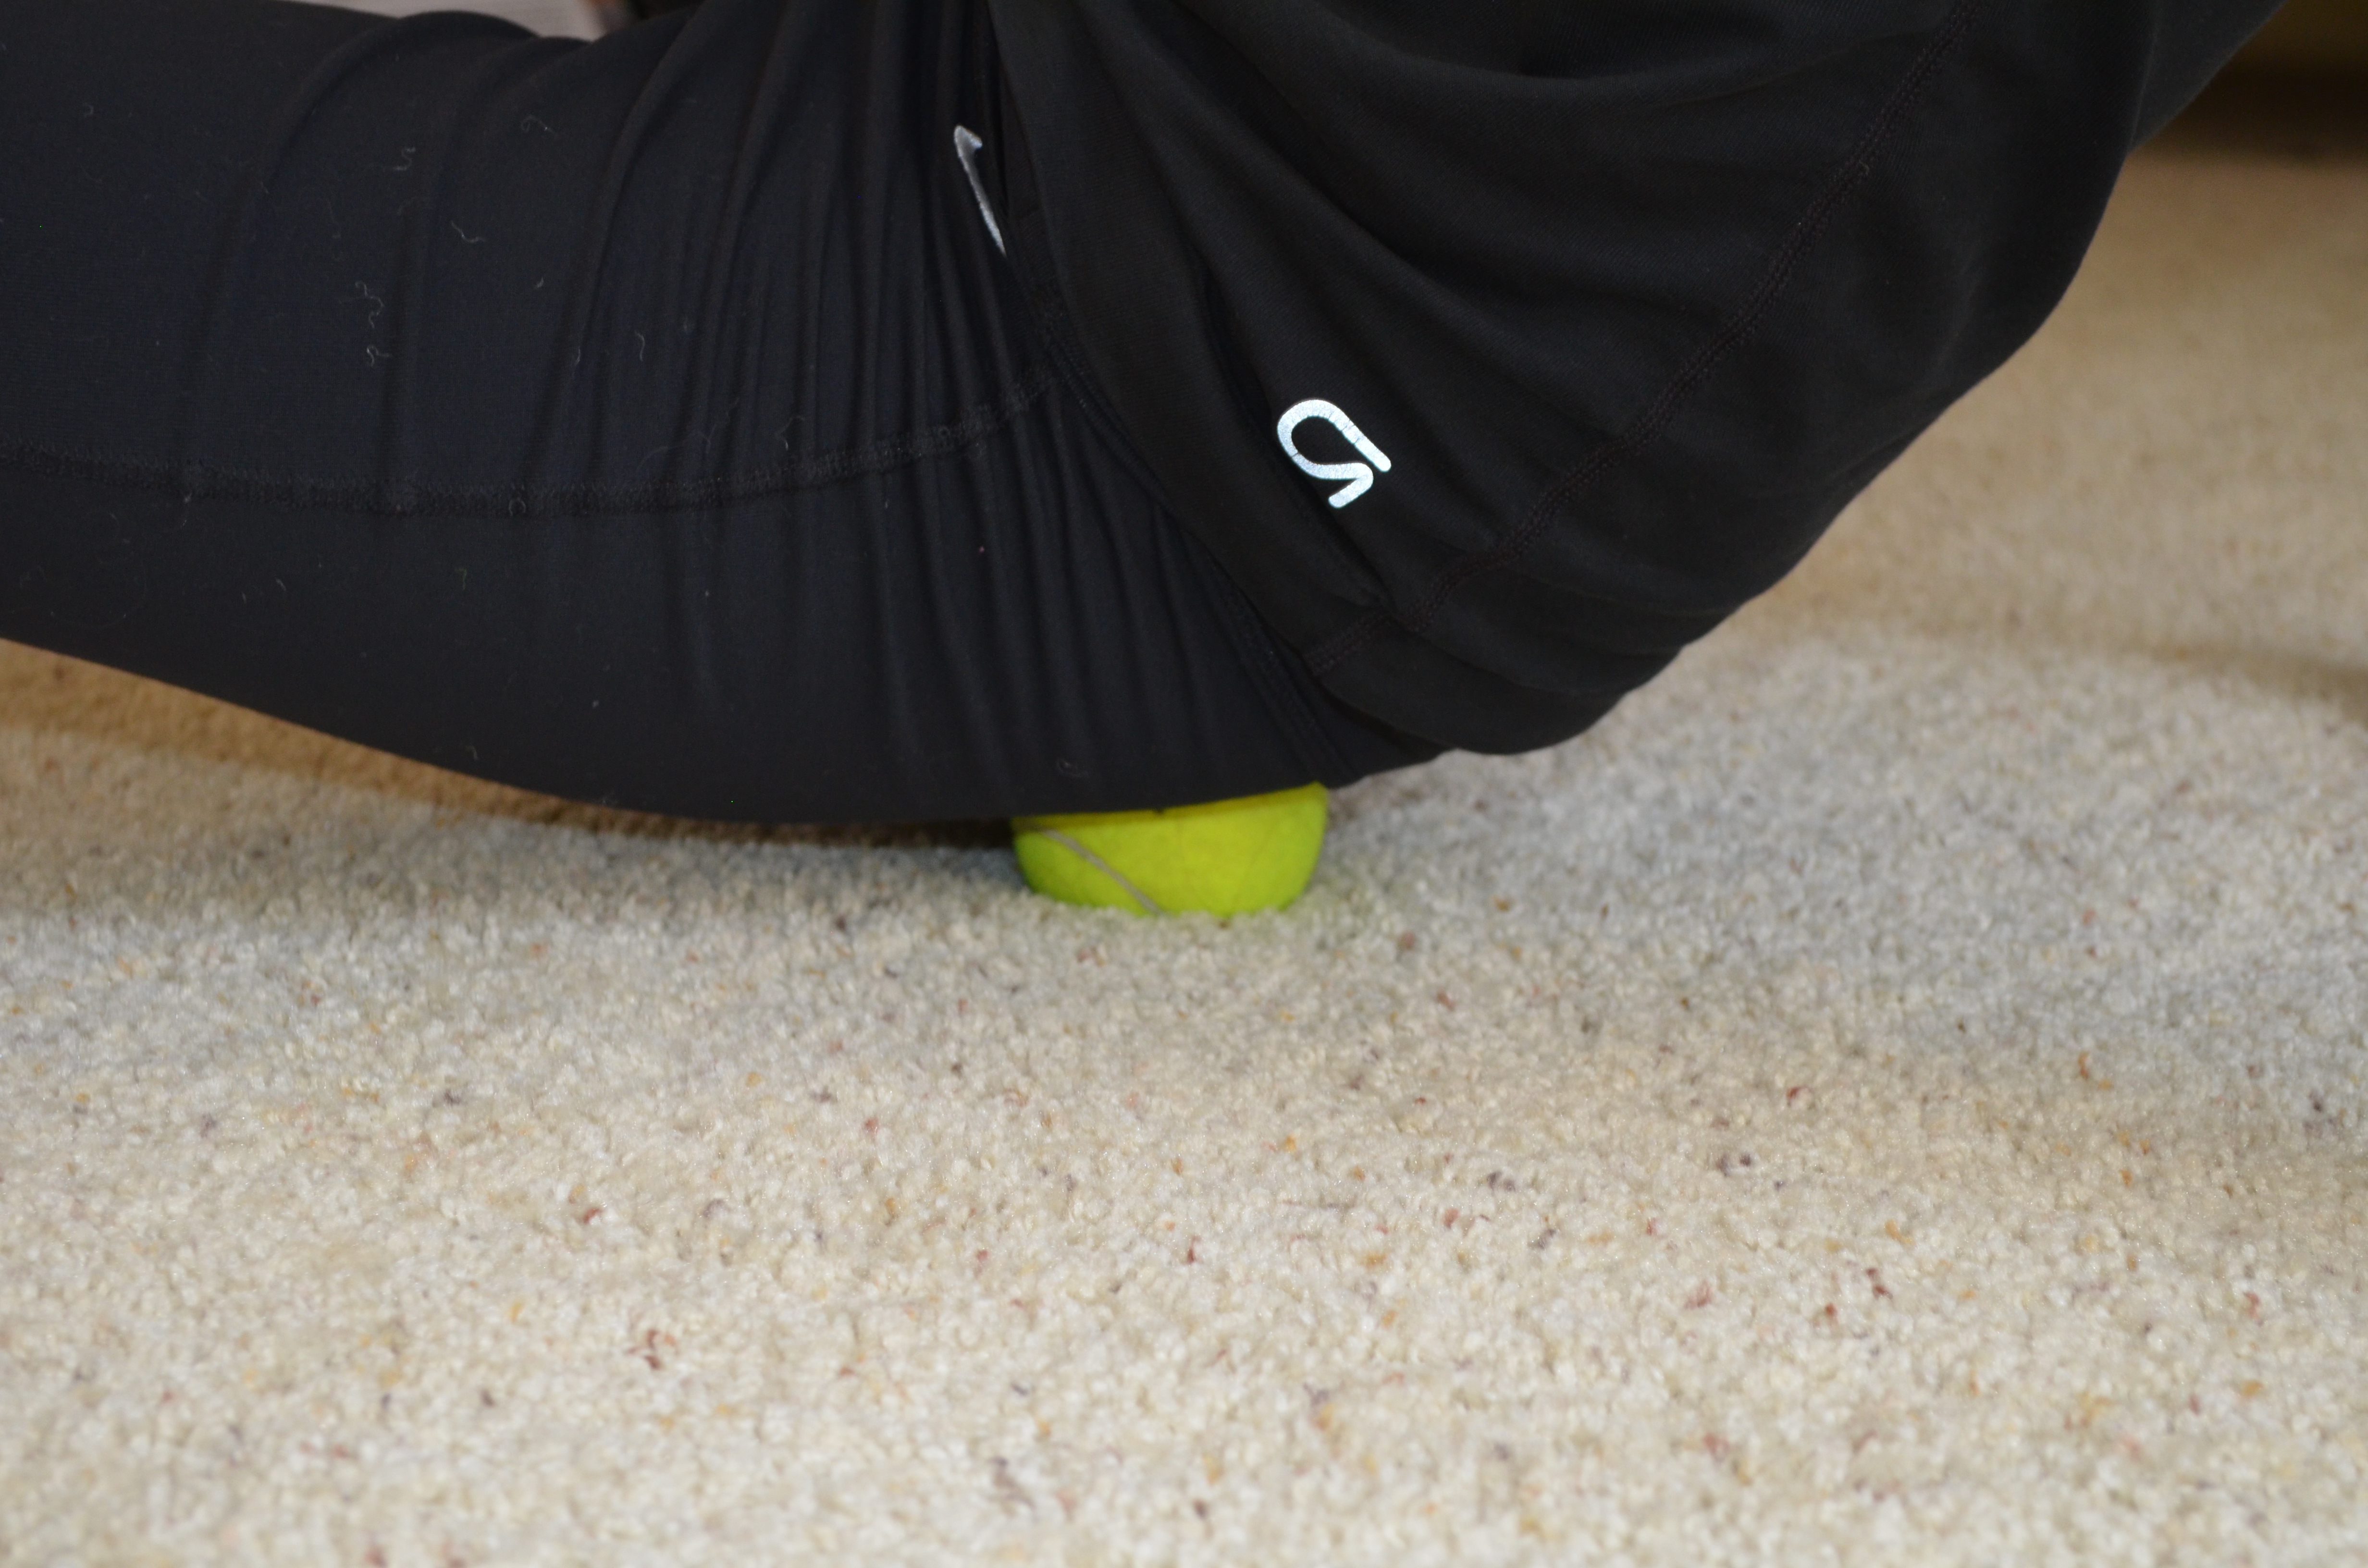
- The Hip U – So in this move you start by digging out the fleshy part of your butt. Literally sit on the ball with it under one butt cheek. Roll it around until you find a sore spot. Hold it on that sore spot and remember to breathe. You can also lift and lower the leg to help get deeper into the muscle. As you roll out your butt cheek, move the ball up to your low back. Find any trigger points there and hold for a bit. Then make an arc over the hip bone once you dig out your butt and low back. Hit your side butt, or glute medius. This is usually very tight on people. Again hold as you find trigger points. Then roll the ball to the front of your hip. Dig out the TFL and all the muscles right around that hip bone. Remember to HOLD if you find a sore spot…also remember to breathe! So that is the U over the hip
- Ab release – So most of the time we go for the exact spot where we “feel” pain. So we roll out our low backs if we feel pain when the cause of the pain may actually be somewhere else…like our tight hip flexors! BUT that being said that doesn’t mean we need to target the muscles that insert right below our hips. A hip flexor muscles actually connects up at a point in our spine! Which can mean that by placing a ball in your abs by your belly button and relaxing over it, you can actually help release your hip flexors! So try it…get a ball (and if you have a small ball you may need to put it on a trigger point block to really get it to dig in, but lay over the ball and relax. The ball should be to the side of your belly button and above the hip.
- The peanut – So one of my absolute favorite foam rolling tools is what I call the peanut. It is two tennis balls tapped together. They are perfect to use on the area around your spine. I like to hit my lower (and upper back for that matter) with these two balls. You can really get in and around your SI joint and then up into your low and mid-back. You can even target the spot where you psoas connect up in your spine.
So while these aren’t the only moves to use and you may also want to hit your adductors, calves and chest (other common tight muscle groups) these three moves are a great place to start!
After foam rolling, you will then want to do some dynamic stretches for these muscles before you begin your workout.
Notice I said DYNAMIC. Save the static stretching till afterwards!
A dynamic stretch is a stretch that you don’t hold for a long period of time, but actually move through (not bouncing though). A static stretch is one you hold for about 30 seconds or so. A static stretch is great for flexibility BUT has been show to reduce power during the workout.
So in an effort to increase mobility without any strength or power lost, we will use only dynamic stretches BEFORE exercise.
Here are some great moves I use to open up my hip area:
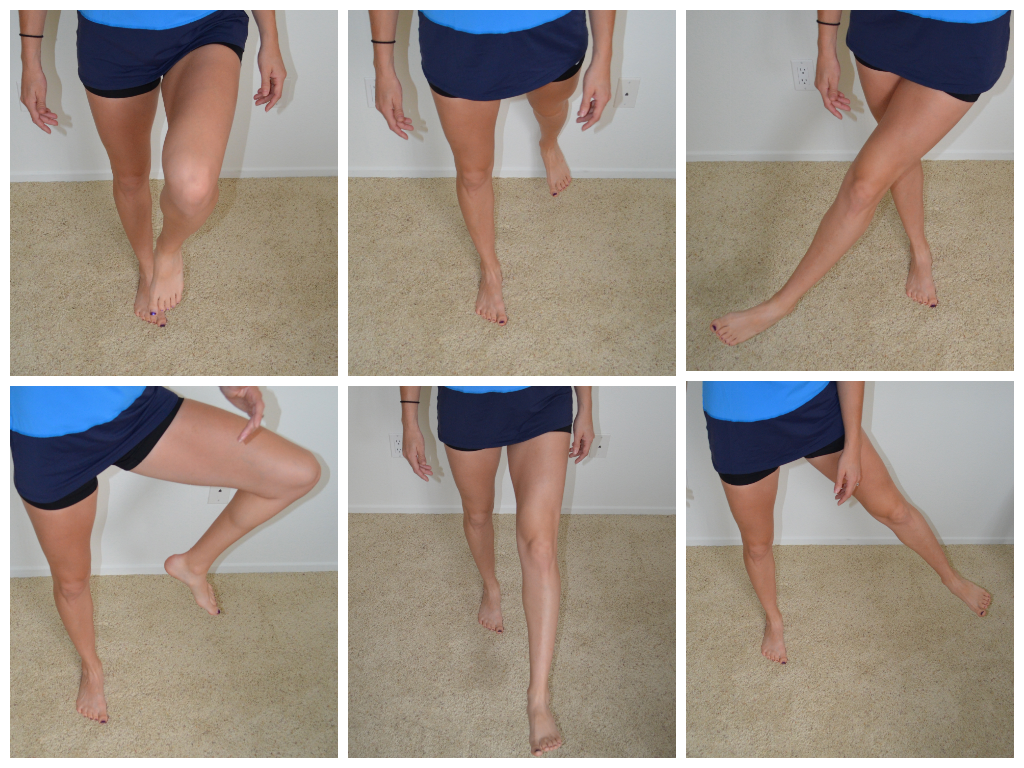
- Leg swings – You can do these swinging your legs forward or back or side to side. Both ways open up your hips. Try to increase the range of your swing without leaning your upper body forward and back. It is best to hold a wall when doing these.
- Hurdles – These are a variation of the leg swing. You can do these going forward or backwards (or BOTH!). What you do is bend your knee and swing your hip as if stepping over a hurdle. Alternate sides. Do about 10 per side.
- Simple kneeling hip stretch – So the basic stretch for your hip and even your quad is the kneeling hip stretch. Kneel on your right knee with your left leg bent to 90 degrees in front. You can make this dynamic by stretch by pushing the hip forward and then relaxing back. You can also add in a reach overhead and across. So if your left knee is forward, your right arm is going to lift up overhead and across. Then you will relax back down. You can also do a rotational stretch, so rotating over the front knee. To increase this stretch down your quad, you can also pull in the foot of the knee that is down and then release. By pulling the foot of the knee that is down up toward your butt, you will bring the stretch lower in your quad.
- Lying glute stretch – Lay on your back with your right knee bent and foot flat on the ground. Cross the left ankle over the right knee. Then grab behind either your right hamstring or in front of your right shin. Pull the right leg with the left foot across it unto your chest and then release. You should feel that in your glute. This stretch will make sure you are loose all around the hip joint! (I love doing the pigeon pose after my workouts as my static stretch!)
- Spider stretch – So this stretch is great to open up the hips. It can get your groin and your hamstrings and even calves too! So to do this stretch step one leg forward in a lunge. If this is too much you can put your knee on the ground. So if you lunge your right leg forward, you will then drop your right elbow right into your instep. Then rock back and sit on your other heal and straighten that forward leg to stretch the hamstring. Then rock back forward and drop your elbow again. Do about 10 each side moving smoothly through the movement.
- 360 Lunges – One of my favorite dynamic moves to warm up the hips is the lunge. BUT I don’t just use the forward lunge…I lunge in a few different angles. One lunge out front. Maybe one front at an angle. One out to the side. One opening up back. I do those four lunges on each side to create a 360 circle!
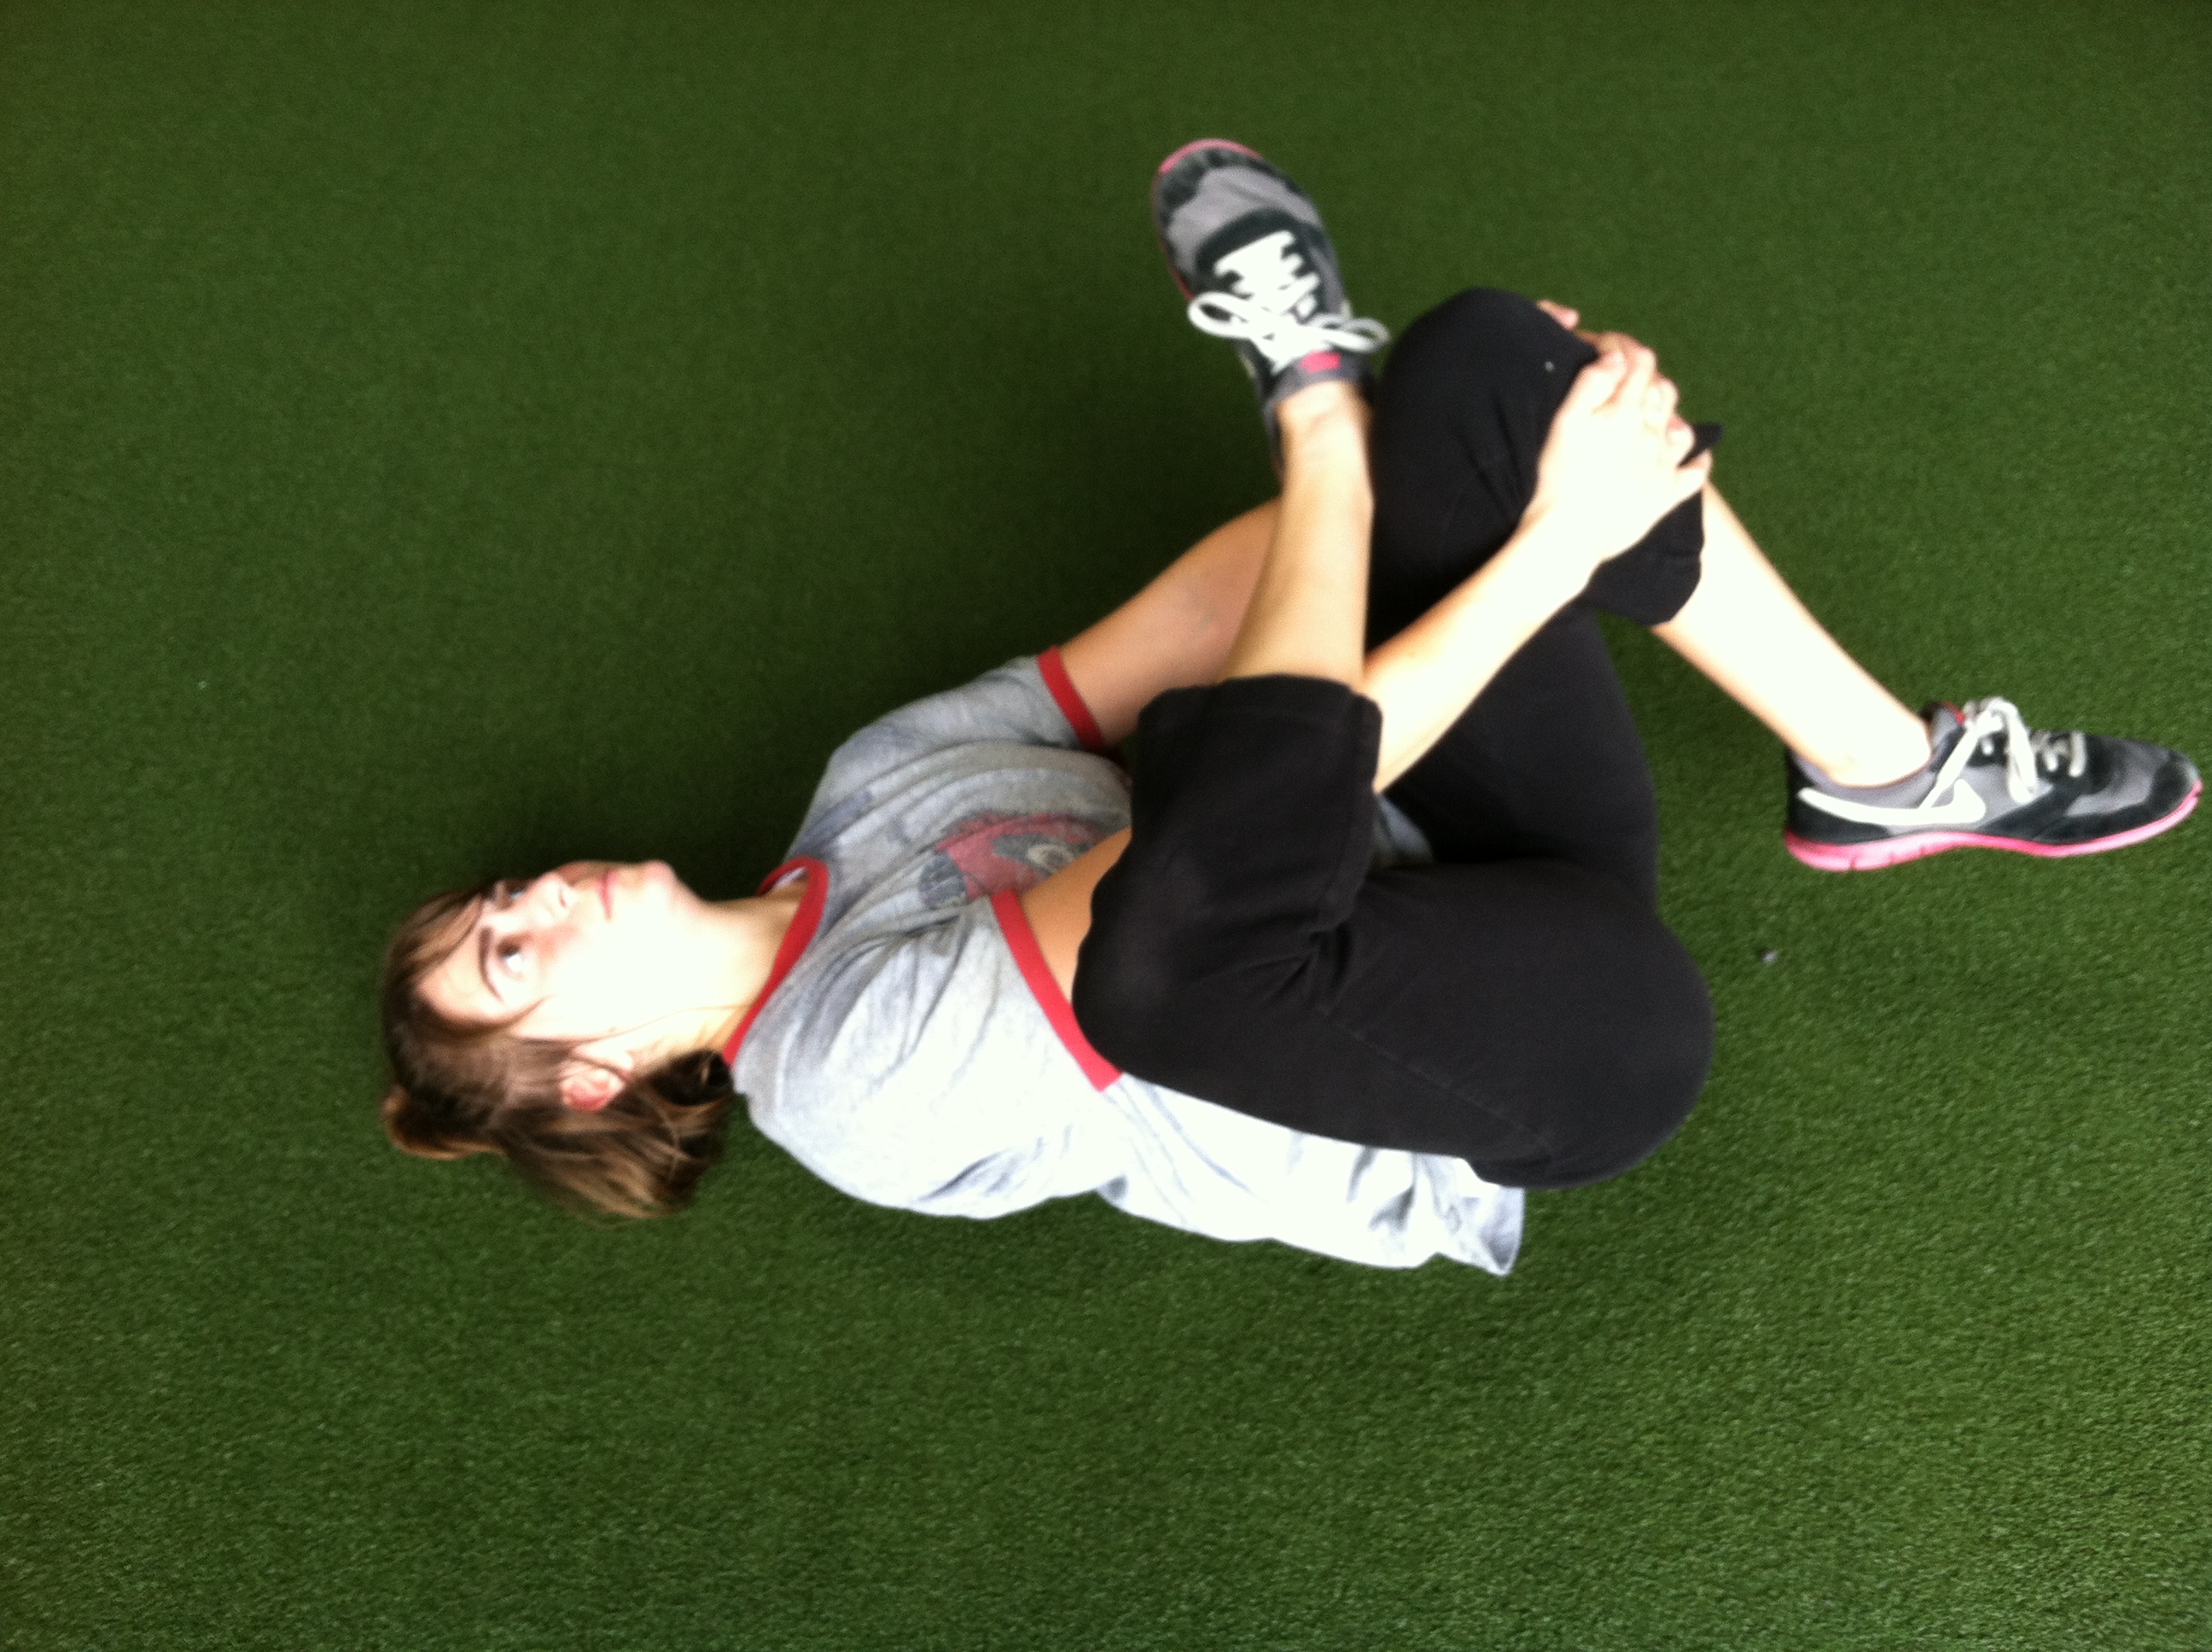
Glute Stretch
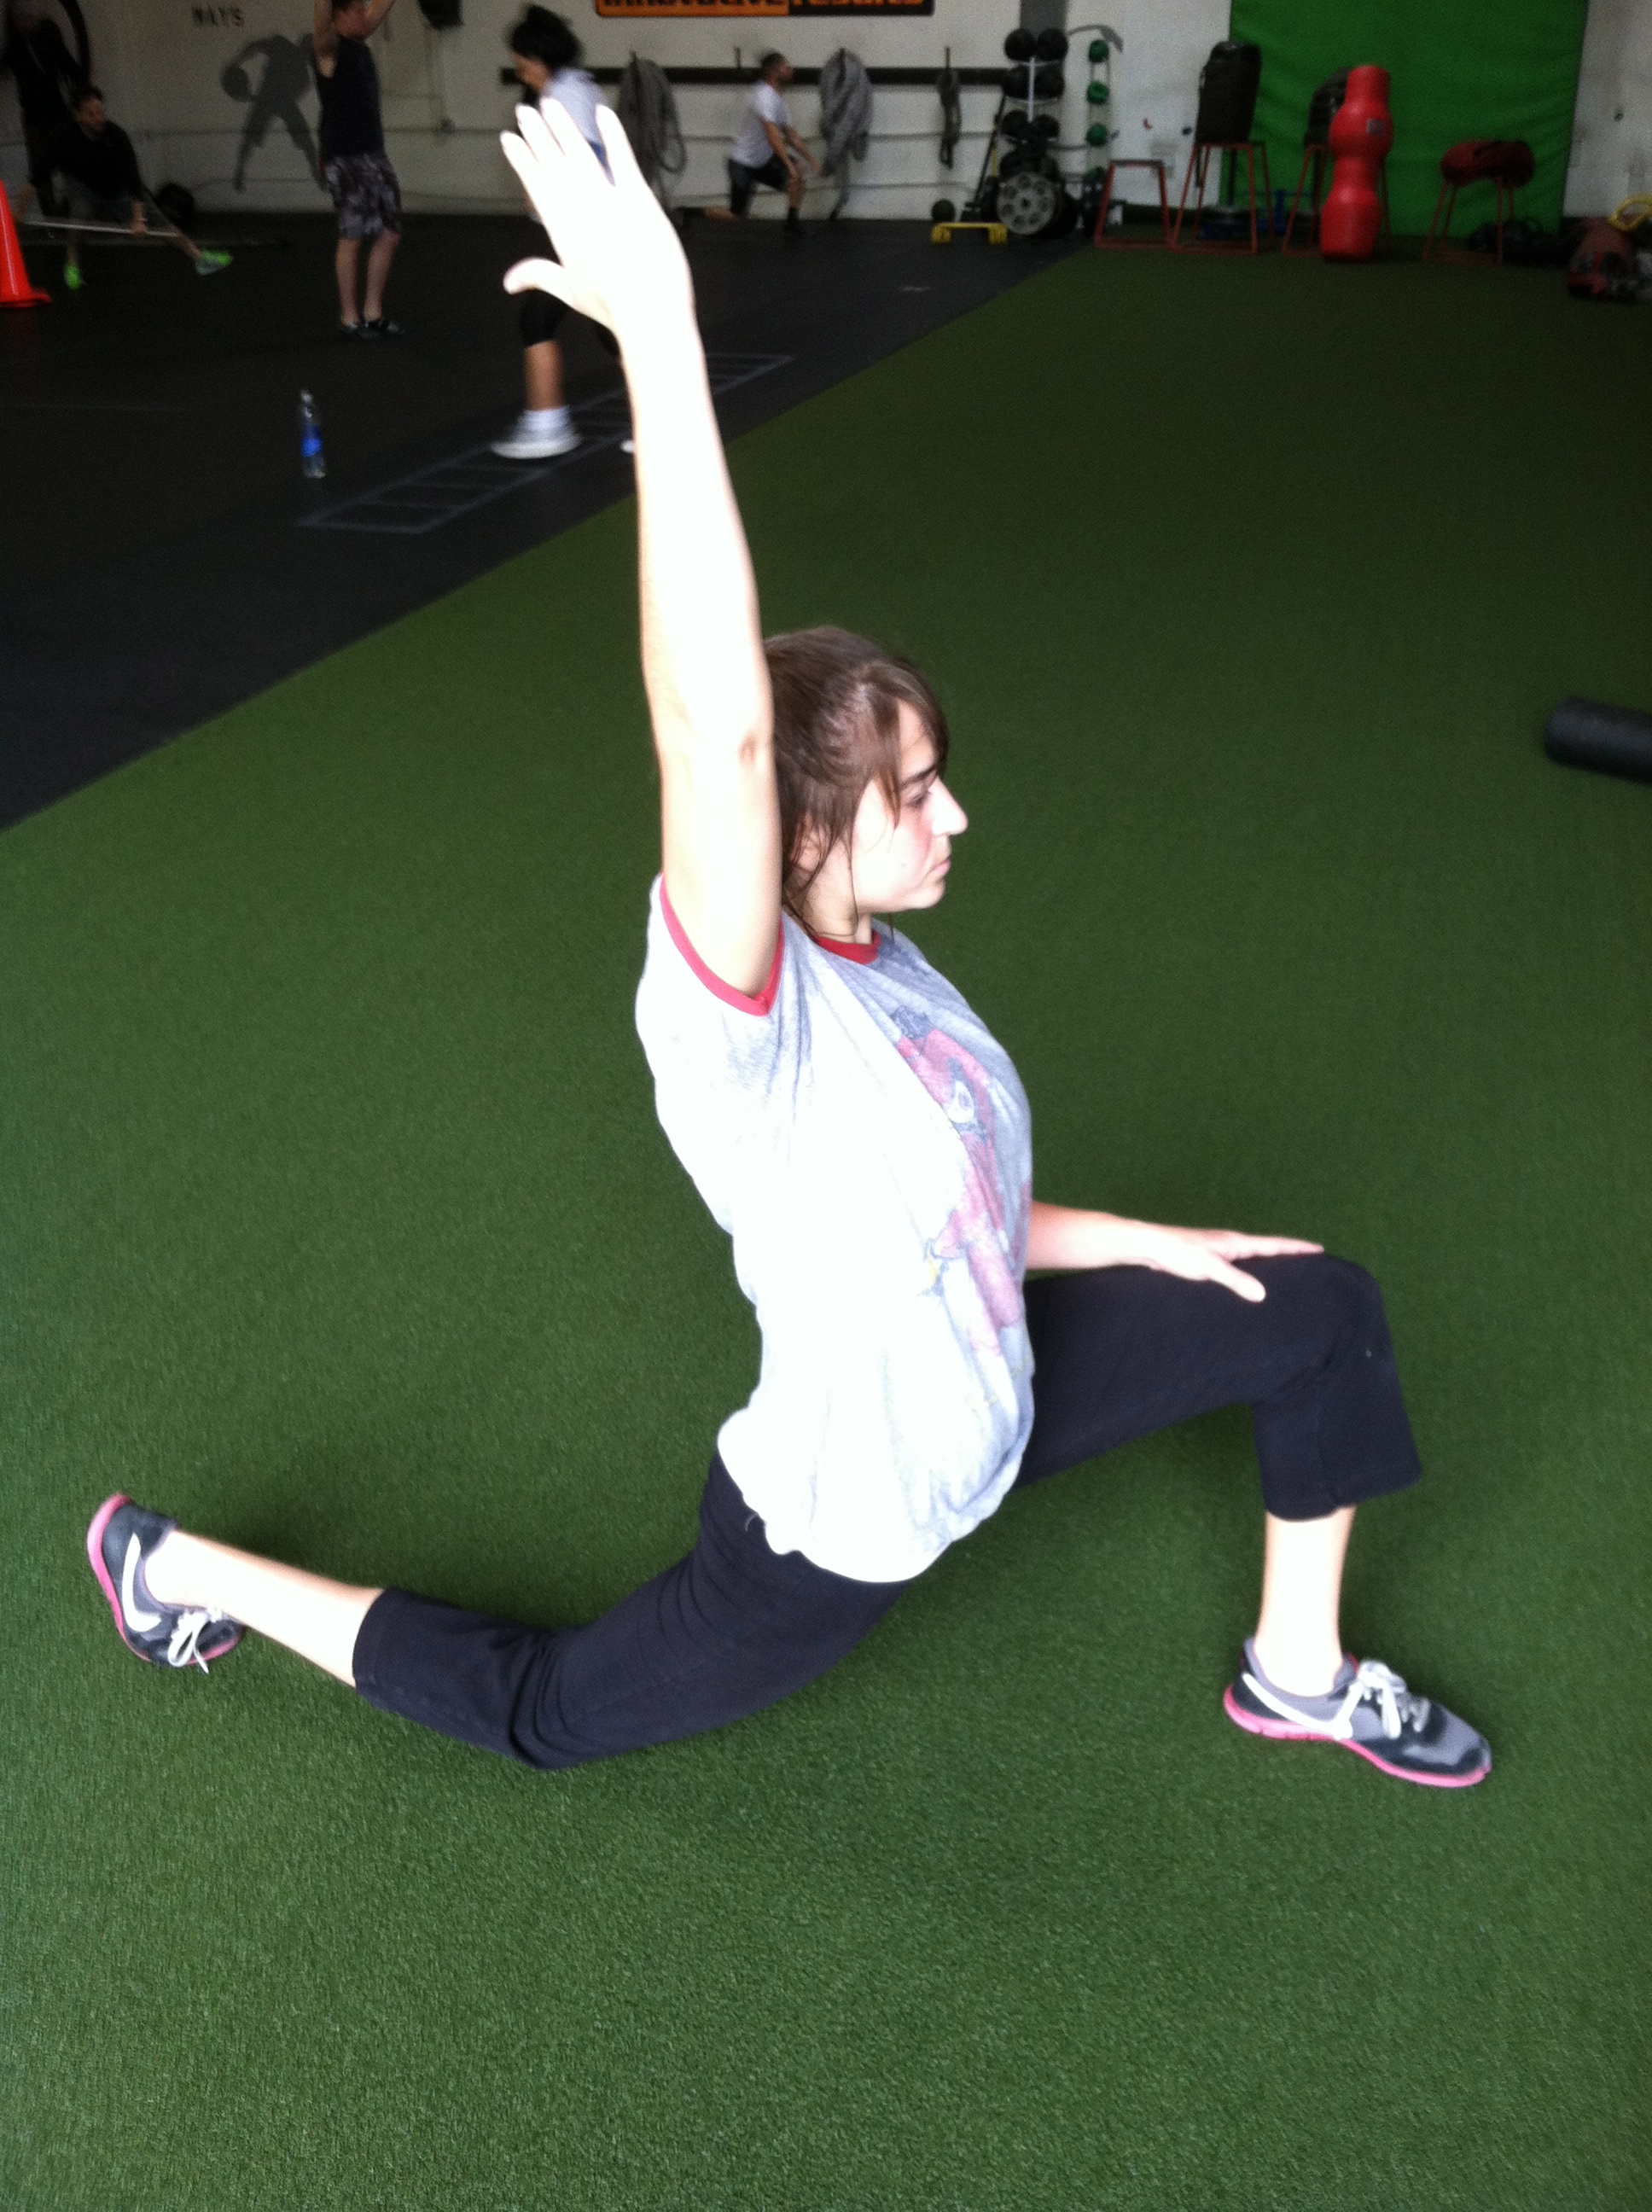
Kneeling hip stretch variation
These stretches and even the foam rolling moves aren’t the only ones you can do. I didn’t even really get into static stretching…BUT the point is these are good ones to start with and are very efficient ways to target all the muscles in and around the hips.
So between the foam rolling and stretches, your hips should be loose and ready to let your butt be activated!
Check back for Part 3 when we discuss glute activation exercises to use in your warm up!
P.S. I will add more photos! Sorry for these few that I managed to quickly take a few weeks ago after a workout!
Back to Basics
We’ve been discussing core values at our gym, Innovative Results, in Costa Mesa and one of the core values that has really stood out for me these last few weeks is “Back to Basics.”
There are so many FADS out there, telling you they have the “quick and easy” solution.
Of course when I see “quick and easy” associated with a diet and/or exercise program, I laugh and ignore it (unless of course I want something to rant about…).
Because there really is no quick and easy solution. Hard work is involved!
BUT if you stick to the basics, I will guarantee you will actually get the results you seek.
But what does sticking to the basics really mean?
Does it mean only traditional moves like the deadlift, squat and bench press? Or does it mean battling ropes, foam rolling and corrective exercise? Does it mean only doing 3 simple exercises for the rest of your life or is variety key?
Or is everything I listed above correct?
For me sticking to the basics means these four key things:
- Compound exercises that use muscles in an integrated fashion and work the major muscle groups.
- Moves that are functional aka training that helps us move better in day-to-day life.
- Preventing injuries by correcting imbalances and developing STRENGTH.
- Creating a PROGRESSION with well-considered variables.
So for me sticking to the basics doesn’t mean SIMPLE, it means well thought out and EFFICIENT.
It means not doing the freaking leg extension machine at the gym unless you have a really really really good reason to do it (aka don’t do single muscle group movements).
It means picking out a few KEY COMPOUND EXERCISES for the month that work YOUR BIG MUSCLE GROUPS.
It means STICKING to a ROUTINE and not just throwing in random exercises that you’ve seen in a magazine.
It means correcting problem areas THAT YOU HAVE and not just doing corrective exercises and SMR (foam rolling) on areas that you’ve been told COULD BE problem areas.
Going “Back to Basics” doesn’t have to mean being boring or only doing the same few things day after day.
Honestly, it means creating something measurable. When you just put together random exercises with random weights, repetitions and sets, you aren’t setting yourself up to measure your progress.
If you stick to the basics, you will create a program that will not only allow you to measure you progress but will also probably help you reach your goal faster!
So take a second right now to think about your current exercise program. Can you measure your progress? Are you doing compound movements and working your major muscle groups? Do you stick to a progression for at least a month? Are you correcting YOUR imbalances?
If you answered no to some of the questions above, maybe it’s time you got BACK TO THE BASICS!
P.S. Getting back to the basics most definitely also applies to diet. Just think, “WHOLE NATURAL FOODS!” This will definitely be a focus of mine after four days traveling and eating all of the goodies that St. Louis and Bloomington have to offer! 🙂
I cuddle with my foam roller
I LOVE my foam roller. I even miss it when I travel. Actually I miss it so much that I’ve even been tempted to try to pack it in my suitcase!

I can't believe someone else made this picture!!!!
A little weird? Probably…but I don’t care! I LOVE MY FOAM ROLLER!
Why am I obsessed? Because my body feels better when I foam roll every day, which means I get more out of my workout!
However, not everyone loves the foam roller…actually I’ve found that most of my clients hate it. And I can’t blame them. Foam rolling or, self-myofascial release, can be painful especially if you are super tight.
It is essentially a deep tissue massage, which releases tension in your muscles through autogenic inhibition and improves your flexibility, function, performance all while reducing your risk of injury!
Sounds great right!?! Yes!!!
Just so you don’t get scared away by how painful it may be the first time you do it…remember these WONDERFUL benefits of foam rolling!!!
- Reduce muscle soreness
- Correct muscle imbalances
- Increase joint range of motion
- Relieve joint stress
- Maintain normal functional muscular length
When you foam roll, make sure you do your back, butt (specifically your piriformis), hamstrings, quads, adductors and IT bands. I’ve found that the IT bands are the most painful for most of my clients. To lessen the pressure when you roll your IT bands, don’t stack your feet but instead place the foot of your top leg in front of you. To add more pressure, stack your feet!
Here is a link with some good descriptions and diagrams to help you get started foam rolling!!!


