Blog Archives
How often should I do prehab/rehab?
I often get asked when and how often people need to do prehab/rehab stuff for aches, pains and even old injuries. They ask how often they need to foam roll, stretch and even do activation exercises.
And my answer….
Before you have pain!
If you’ve had an injury or you know you are prone to aches and pains in certain areas, you need to take care of those areas before pain arises or before you do things that could lead to pain if those areas aren’t loosened and activated.
And if pain has flared up in an areas, you need to be extra diligent to do everything you can to alleviate.
How often you need to do the prehab/rehab will vary. If you stay on top of things, a few minutes each day may suffice.
If you wait till things start to flare up, you may have to spend more time on prehab activities.
But I would like to point out that if you have neck, shoulder or upper back pain from sitting at a desk all day, rolling out for one minute every other day isn’t going to do it.
Just think about how long you sit with poor posture….Does one minute of pain prevention (aka foam rolling, stretching, activation) really seem like it equals the time you sit with poor posture?
Does it really seem like that minute can counteract the 9 hours?
NOPE.
So why do we all expect results when we basically spend only minutes a day doing the right things and hours doing the wrong things?
The thing is we can’t.
While there is no exact amount of time we need to spend doing rehab/prehab exercises and stretches, we do need to consider just how much time we spend each day doing things to counteract all the good we do in the gym.
That one hour each day we spend there with our 5-10 minutes of warm up (foam rolling, stretching and activation) simply isn’t enough.
But that doesn’t mean you need to spend hours each day to see benefit. Five minutes when you wake up, the occasional stretch or rolling at your desk, 5-10 minutes before you workout, a few minutes after your workout and maybe a minute or two before you go to bed.
If you did that every day…WOAH!
At most, what I outlined above, is like 30 minutes out of your day…AT MOST.
And yet we can’t find the time for that?!?
Suffering from pain and injury is our alternative and yet we skip those 30 minutes and wonder why we never get better.
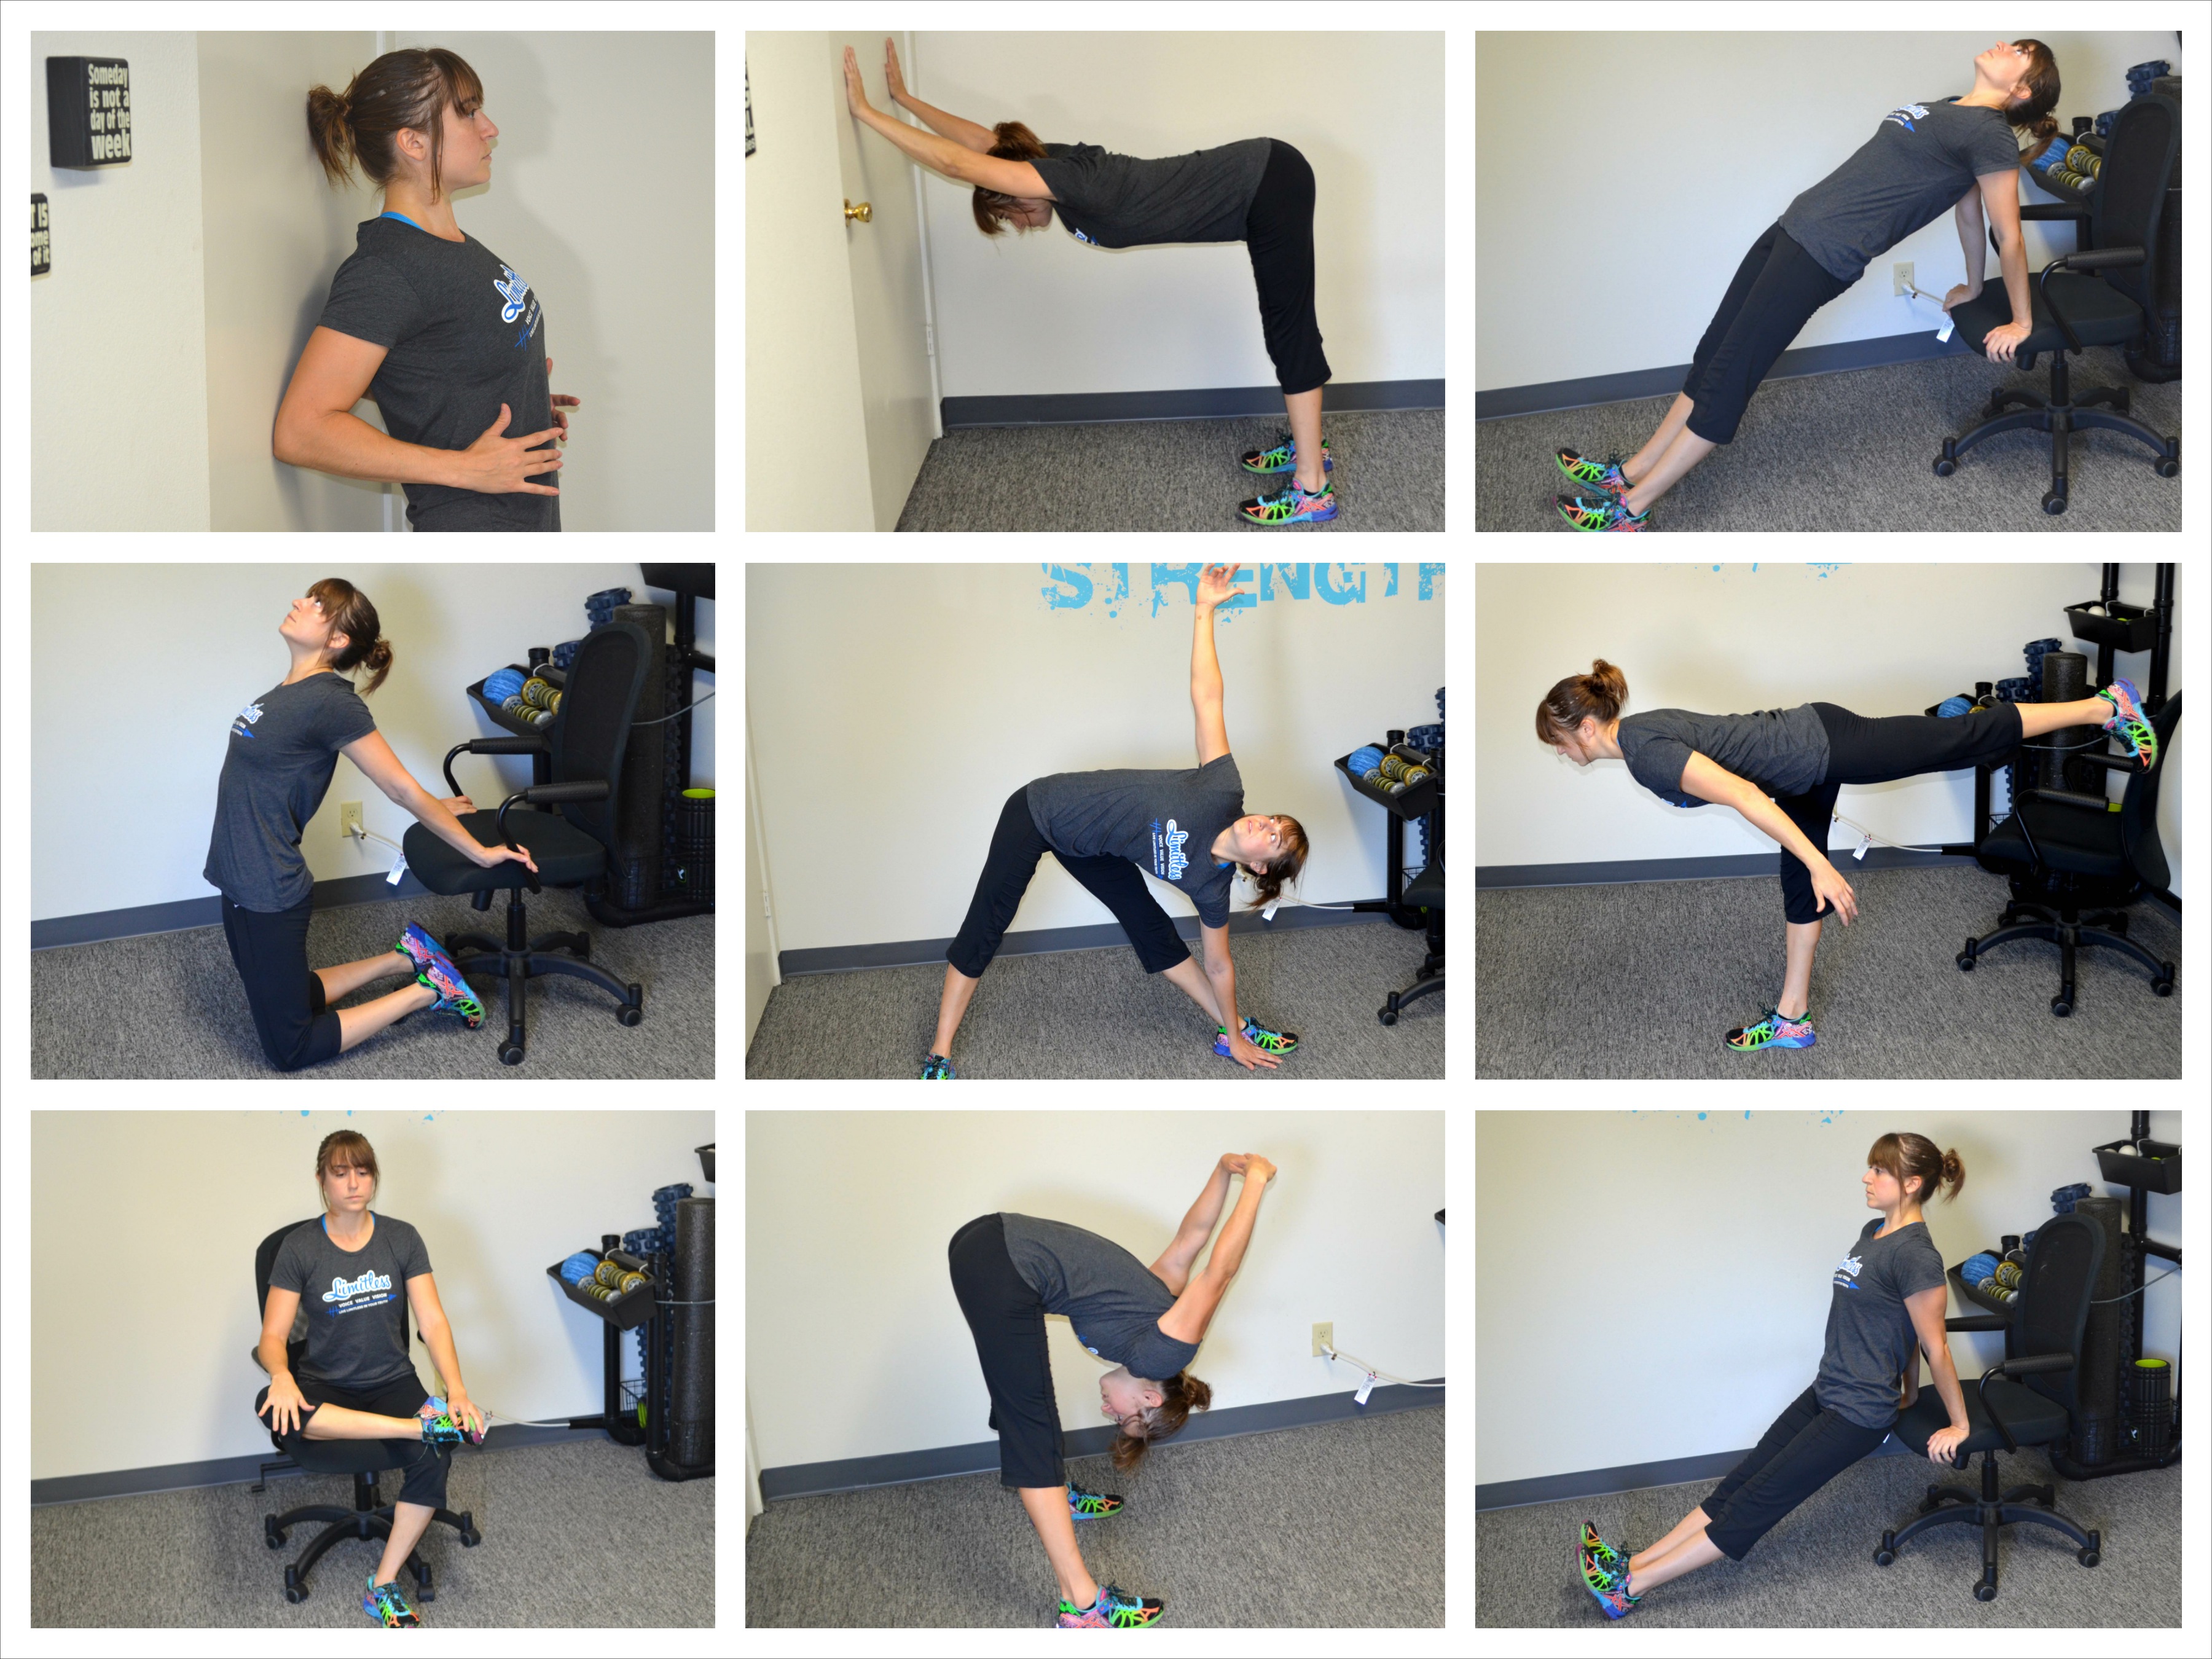
30 MINUTES a day! An excuse to get up and stretch while sitting at our desk all day! Or heck simply a stretch in the doorway when we get up to go the bathroom. (AHEM…Look at all those stretches you can easily do at your desk!)
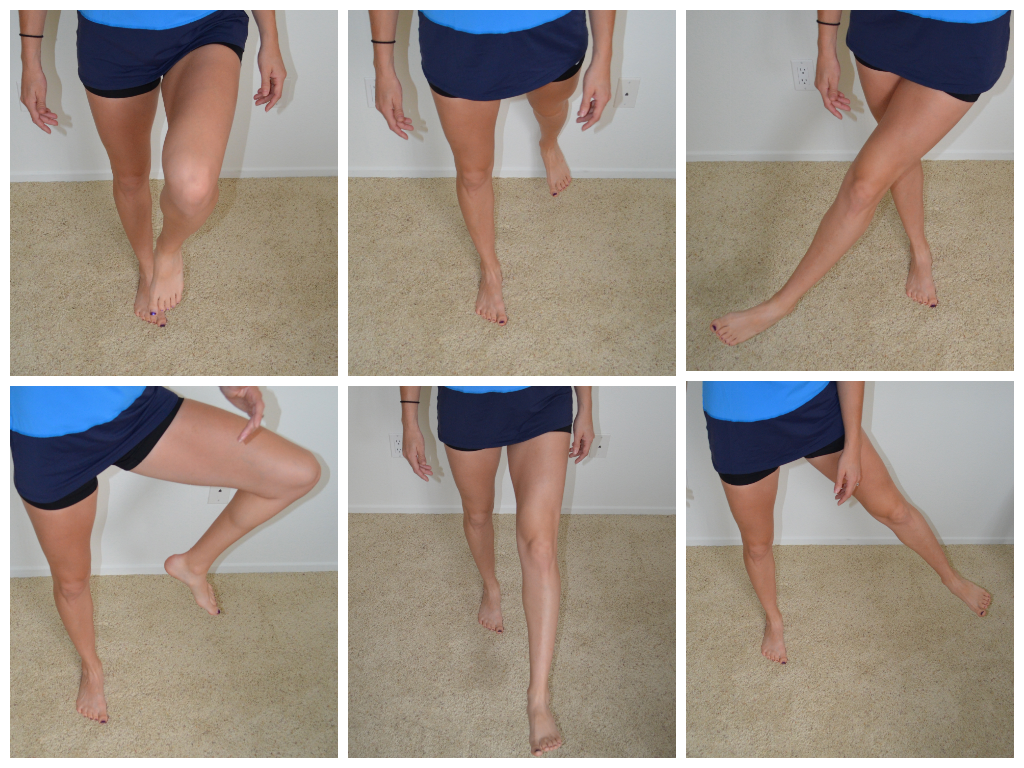
Or some balancing and leg swings when we brush our teeth to keep our ankles strong.
This is seriously not hard stuff. Shoot it isn’t even as hard as finding 15-30 solid minutes to workout! Almost all of these things can be done while doing something else.
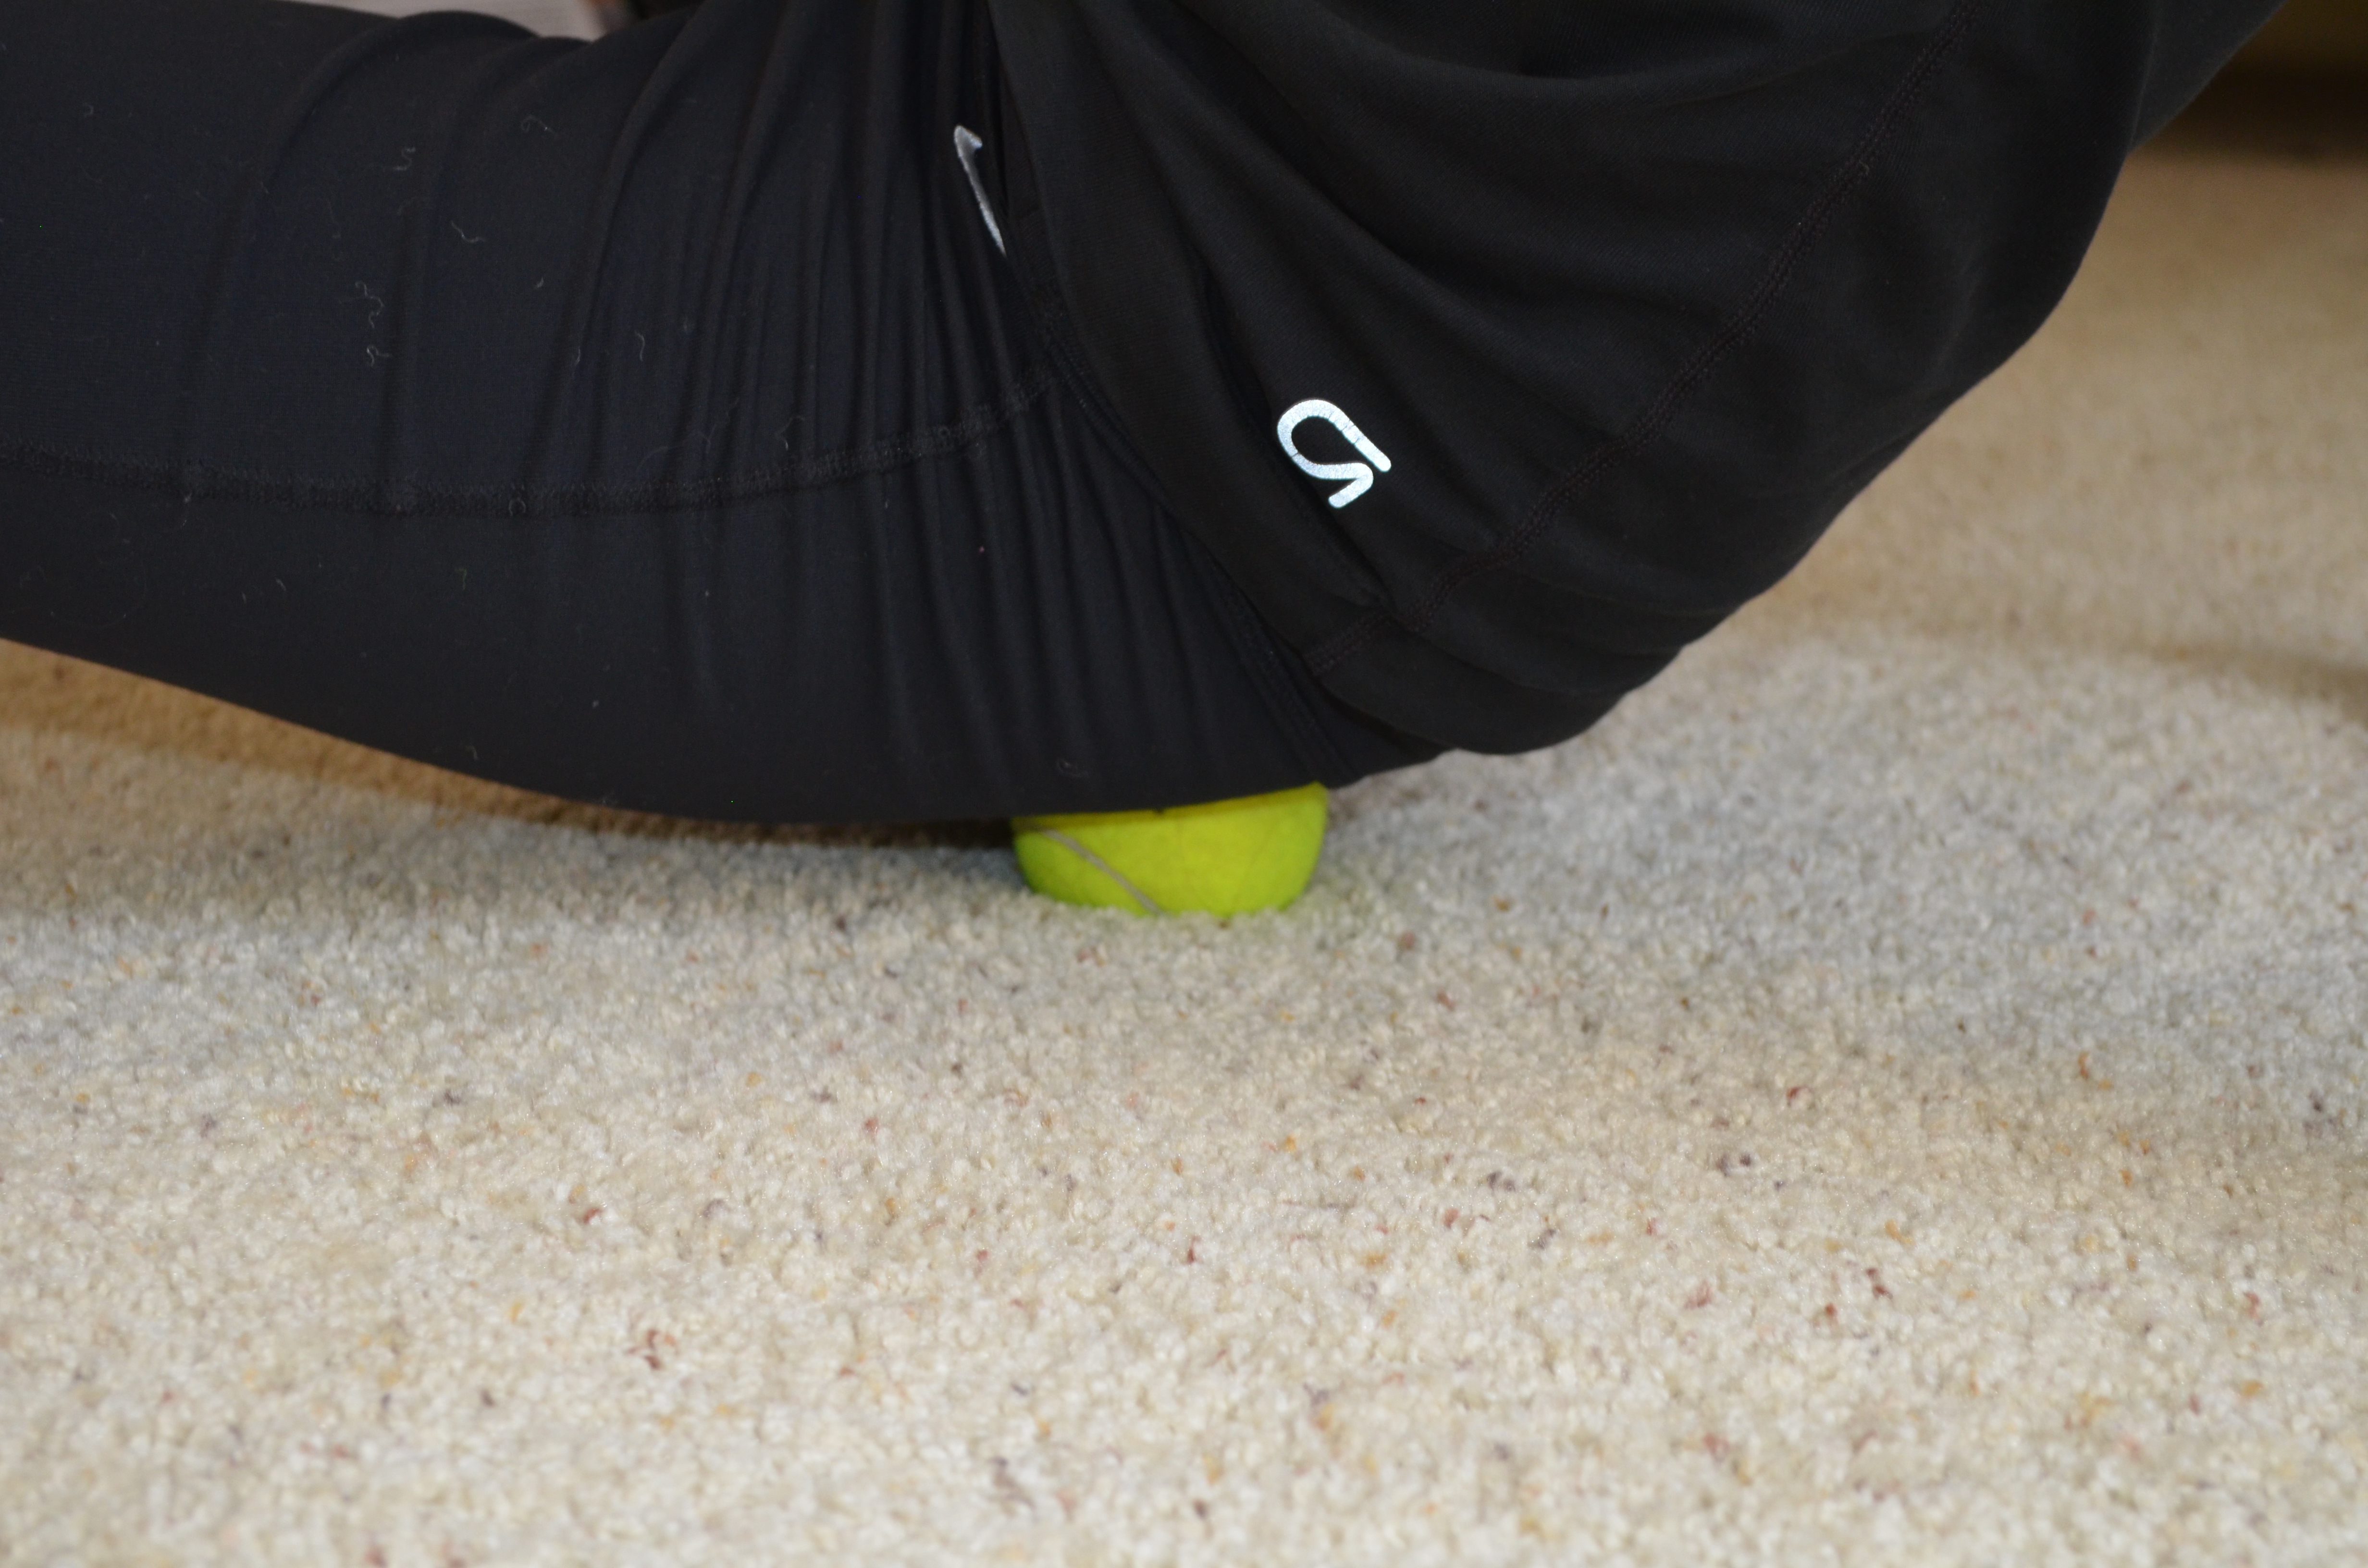
Watching TV? Sit on a ball on the ground to roll out your glutes, hips and low back to get rid of your achy low back!
Simple little prehab/rehab things can go a long way to keeping an area pain and injury-free.
Because even if you did the initial rehab after an injury, you are never done.
You ALWAYS have to take care of that area and make sure to maintain strength in the muscles up and down the kinetic chain from that disruption.
Because every day we do things to create imbalances and potentially upset old aches and pains or create new ones.
So to live pain free…What is a few minutes each day on exercises to keep you balanced?
Are you diligent about doing prehab activities – foam rolling, stretching, activation, balance and stability stuff?
How do you fit those things into your day?
Here are some great tips and exercises to help you prevent and alleviate minor aches and pains:
- 5 Quick Fixes For Wrist and Elbow Pain
- Alleviate Low Back Pain
- The Complete Foam Rolling Video Course and E-Book
NOTE: This is discussing previously rehabbed injuries and minor aches and pains. If you suffer from an injury, make sure to do the physical therapy rehab prescribed to you!
Injury Prevention – Don’t Skip Your Warm Up
I’ve written a number of articles about injury prevention and the importance of following these four steps:
1. Foam Rolling (Self-Myofascial Release or SMR)
2. Stretching
3. Activation
4. Strengthening (The “workout”)
These four steps help prevent imbalances and make sure you have good movement patterns.
However, most people skip the first three steps and go right to the fourth step because the fourth step is fun and they see the most direct results from it (aka weight loss, strength, endurance).
What they don’t realize though is that without the first three steps, without a well-balanced program, they risk having all that work they put in at the gym to lose weight and get stronger, backfire on them.
Because jumping right into your work out after you’ve been sitting all day doesn’t make for good movement patterns.
Why doesn’t it make for good movement patterns?
Because you are sitting at a computer all day typing, which isn’t a natural position for us!

Which one are you guilty of?
And sitting in that unnatural position for 9 hours a day means that you are going to have created imbalances – imbalances that won’t truly allow you to do all of your exercise movements correctly.
So if you always just jump right into your workouts and do nothing to reverse the effects of sitting at your desk all day, you are probably going to get injured.
You can’t skip your “warm up!” Because your warm up is when you begin to reverse all those negative effects from sitting all day!
You need to WARM UP your body and ready it for the more intense movements it’s going to do. You need to loosen up tight muscles, return them to their proper length-tension relationships and then you need to get those underactive muscles active and ready to do the work they should be doing.
Here are some great guidelines to follow for a proper warm up.
Also, when it comes to warming up, I often find that people do know a variety of stretches to do. They even more often know what activation moves to do than they do foam rolling techniques to use.
Foam rolling is still one of those things that isn’t as widely known or as widely used.
That is why I put together a Foam Rolling Course to Alleviate Aches and Pains…Because all too often people don’t know how to target specific areas of pain.
This course has 33 videos showing you how to roll out common areas of tightness throughout your body. It also does have stretching, activation and strengthening moves included for common aches, pains and injuries.
So don’t skip your warm up and jump right to step four. If you want to prevent injury, you need to warm up properly and foam rolling, stretch and activate!
P.S. Here is also a great basic full body warm up I use!
Reducing Aches and Pains
I’ve discussed this before, but reducing aches and pains is a process. Simply taking time off isn’t enough and often doesn’t even heal the problem.
To reduce aches and pains, you need to do the following things:
- Massage or Self-Myofascial Release (foam rolling)
- Stretching
- Activation
- Ice and/or Heat
While rest is important, often chronic aches and pains are caused by the muscles of our body being out of alignment. If we never loosen the tight muscles and activate the weak muscles, then we are going to continue to have problems no matter how much we rest.
All components of our body must be working together for us to move properly. If one part of our body isn’t working properly and efficiently, then other parts will have to compensate. And when other parts take on a load they aren’t supposed to handle, they break down. This overload and faulty movements lead to INJURY.
So those minor aches and pains could accumulate if you don’t do something to correct them!
Why We Need To Consider Our Desk Job When Working Out
With the increased popularity of Olympic lifting and the fact that Crossfit has brought it to the masses, now more than ever, we need to consider how our day job affects our bodies and may actually be at odds with the exercises and workouts we may want to do.

We may want to do Olympic lifts. We may want to do gnarly, cool exercises.
Heck we may even technically be strong enough to do them.
But before we can, we have to make sure our body is mobile and ready to truly move through the range of motion.
Because if our body can’t truly do the motion, we are going to compensate and end up getting injured.
What should truly be our goal?
While many people come in with weight loss goals or even performance goal, the true goal of a workout program is to make you FEEL better.
Your workouts should help you prevent injury. They should help you feel stronger, more coordinated and ready to take on daily life.
They should help your body stay young so that at 80 you still feel free to move around and chase after grandkids.
Last week I discussed the importance of agility and balance training to improve our mind-body connection and help us move WELL.
Today I want I just want to harp on the importance of ACTIVATION exercises.
Any good program needs to start with mobility work. But many people are now starting to recognize this.
However, all too often exercise routines are still devoid of activation exercises.
Activation exercises are important because they get the CORRECT muscle groups working.
Muscles that aren’t always active because we sit at a desk 9 hours a day hunched over a computer.
Our poor hunched-over-a-desk-all-day posture causes us to sometimes overuse smaller muscle that shouldn’t be doing the brunt of the work…And this leads to injury.
So to truly feel good, prevent injury and get the most out of your workouts, you’ve got to get those big muscle groups active and working.
And since many people have also said they want to be able to do a pull up this year…..
Here is an ESSENTIAL activation move we all need to be doing – THE SCAPULAR WALL HOLD!
This move will help alleviate neck and shoulder pain. It will get your lats and your mid and lower traps activated and working.
It will help you have better posture AND do more pull ups!
For a breakdown of the Scapular Wall Hold and a few other scapular hold variations, click here!

It All Starts With The Mind-Body Connection
Want to run faster? Be more agile? Have better coordination? Be stronger?
Then you need to simplify things and work on your mind-body connection.
Balance work, agility ladder and drills, core sequencing exercises, activation exercises…These all need to be done so that you have control over your body and can activate the correct muscles when needed.
Speed, agility, quickness, coordination and frankly even strength don’t just simply come from lifting more or moving faster.
They come from your mind and body being able to communicate more quickly, which comes from everything being in balance.
Hmmm….maybe all those isometric workouts and moves I’ve been posting have even more benefit than simply recovery.
Many of those isometric moves work on your balance. And they correct imbalances as well.

Don’t think this requires a lot of balance and a great mind-body connection? HA!
If you have an injury, the communication between that area of your body and your mind has probably been interrupted. And depending on how good your recovery is, the injury may cause or have caused pain and problems higher up or lower down on your, meaning you may have many areas that aren’t connecting as well with your brain as you should.
Isometric moves work on repairing and correcting those imbalances. They work on mobility. They build stability in the muscles. They make sure the correct muscles are activated.
Isometric moves improve your mind-body connection. They make you focus and THINK about the muscles that should be activated.
Here is a great Isometric Workout to reduce pain and start working on your mind-body connection. It is a basic full body workout to correct many of those imbalances we have from sitting all day.
But isometric moves won’t do it alone. You must also do agility drills.
Many people think agility drills are just for athletes, but they are just as important for the average person especially as we age.
The agility ladder is a great tool, especially for us all to work on our coordination. HOWEVER, often people try to go as fast as possible without focusing on form.
If you want to get the most out of the agility ladder, you need to focus first on getting the move down and THEN on going as fast as possible. And you also need to mix it up. You need to go forward and backward. You need to go sideways and work each side.
Pay attention to which side feels more coordinated and don’t let your dominate side always lead!
Here are a few agility ladder drills to get you started. (I’ll be posting a video soon with my favorites.)
But the agility ladder isn’t the only agility drill you can do. You can set up cones or even use a few basic playing cards and set up points you shuffle, sprint, back pedal and carioca to (or any other locomotion move you want). Move quickly and make the distances super short so it is more about being quick and changing directions than getting up to speed.
Reaction drills are also great to improve the speed at which your mind and body communicate. Instead of using cones, have a friend tell you to shuffle to the left. Then whenever they want they can tell you to sprint forward then shuffle to the right. They can mix it up so you never know what is coming.
They can also do the drill with you and make you “shadow” them. LOVE shadow drills. They make you really focus and have to react.
You can also improve your coordination to get stronger, faster and fitter by doing core sequencing moves. These are moves that get the muscles of your core to work together as they should.
The Turkish Get Up, or its modified variation the Baby Get Up, is a great exercise to get your core to work together.

Here is a great workout to teach you the Turkish Get Up and help you strengthen each part of the lift.
What are you doing to improve your coordination and your mind-body connection? Simply lifting heavier weights and/or running faster aren’t going to be enough!
When Pain Doesn’t Mean You Should Skip Your Workout
Rest when you have injuries is super important.
And time off may be just want your body needs.
HOWEVER, sometimes just sitting on your butt and not working out can cause your injuries and aches and pains to become worse and last way longer than they should.
Recovery isn’t all about time-off.
It is also about doing the correct things to increase, mobility, flexibility and stability to help the body become stronger and more balanced.

You can’t just “take it easy” on your ankle, or knee or hip the rest of your life! You can just “rest” ever day all day.
No, life requires you to move around.
And if you don’t rehab the injury, if you just rest until it “feels better,” you are going to end up re-injuring it very quickly OR have to live with never being able to return to your previous activity level.
Seriously…Who wants to be limited the rest of their life!?!
NOT ME!
That is why I’ve written a ton of posts about activation, stretching and foam rolling exercises.
You’ve got to STRENGTHEN the muscles around the injured area and CORRECT any imbalances.
So in case you’ve just been resting your injury and haven’t done any rehab, check out these articles this weekend and GET STARTED TODAY!
Shin Splints and Plantar Fasciitis
Ankle Injuries and Regaining Mobility
Mini Band Glute Activation Exercises
Foam Rolling and Stretching for Hip/Low Back Pain
Single Limb Exercises to Correct Imbalances and Prevent Pain!!!!!
Functional Core Strength to Prevent Injury
Plank Variations to Improve Core Strength and Reduce Low Back Pain!
Where do you feel it?
When you do an exercise, do you just go through the motions? Or do you actually think about where you should be and actually are feeling the move?
Hopefully you are thinking about where you are feeling the move because that will not only make sure you are doing it correctly but will also allow you to figure out if certain muscles are tight or overactive or underactive.
AND it will build that very important mind-body connection.
One of the first questions I always ask clients when they do a new move is “Where do you feel it?”
It really makes you focus on the move and really makes your mind have to connect and think about your body and the movement.
I also prefer asking that to even telling them where they should feel it because then they have no notion of where they “should” feel it and instead truly consider where they DO feel it.
Because when we consider where we are feeling the move instead of just going through the motions, we may realize we actually aren’t feeling the correct muscles working.
Like when squatting down…if we feel the squat a lot in our low back it may be because our abs aren’t engaged or our hips and even calves are tight. It also probably means our glutes aren’t engaged and firing.
And yes that means we need to do some core engagement exercises and roll out and stretch our calves and hips. And yes, it also even means we need to do some glute activation exercises.
But more importantly it means we need to THINK about the move and focus on engaging the proper muscles to make sure we feel the exercise working the correct muscles.
We can do all the proper activation exercises and learn how to activate and engage the muscles in isolation, but still not have that translate to compound moves IF we don’t focus on doing it during the movement.
Here are some quick tips address some of the most common form problems people have with a few common exercises. These tips help build that mind-body connection along with proper stretching, rolling and activation exercises. These exercise variations and adjustments help you learn to what it feels like to do the movements correctly so your mind knows how to focus on activating the correct muscles so that when you do any variation of the exercise and are asked “Where do you feel it?”, you will feel it in the correct places.
Squats:
- You feel it in your low back – Try a bear hug squat with a sandbag. By hugging the sandbag to your chest, you will force your abs to engage throughout the squat movement. A good next progression from this is even a light front squat with a kettlebell (aka a goblet squat) since front squats require more core engagement. Then you can move into heavier back squats once you’ve learned to focus on engaging your core during the movement.
- You lean forward and feel it in your low back – Stand in front of a wall and perform the squat. Sometimes we may have done enough to loosen up muscles so that we should have proper form yet still repeat the same bad movement patterns because they are so engrained and our mind doesn’t stay focused on controlling our body. The best way to make the new movements muscle memory and get that mind-body connection is by sometimes giving our body no way to compensate. If you lean forward during your squats, stand in front of a wall close enough that you can lean forward and instead have to sink your butt to get closer to the ground. Make sure, however, that you don’t compensate by coming up onto your toes!
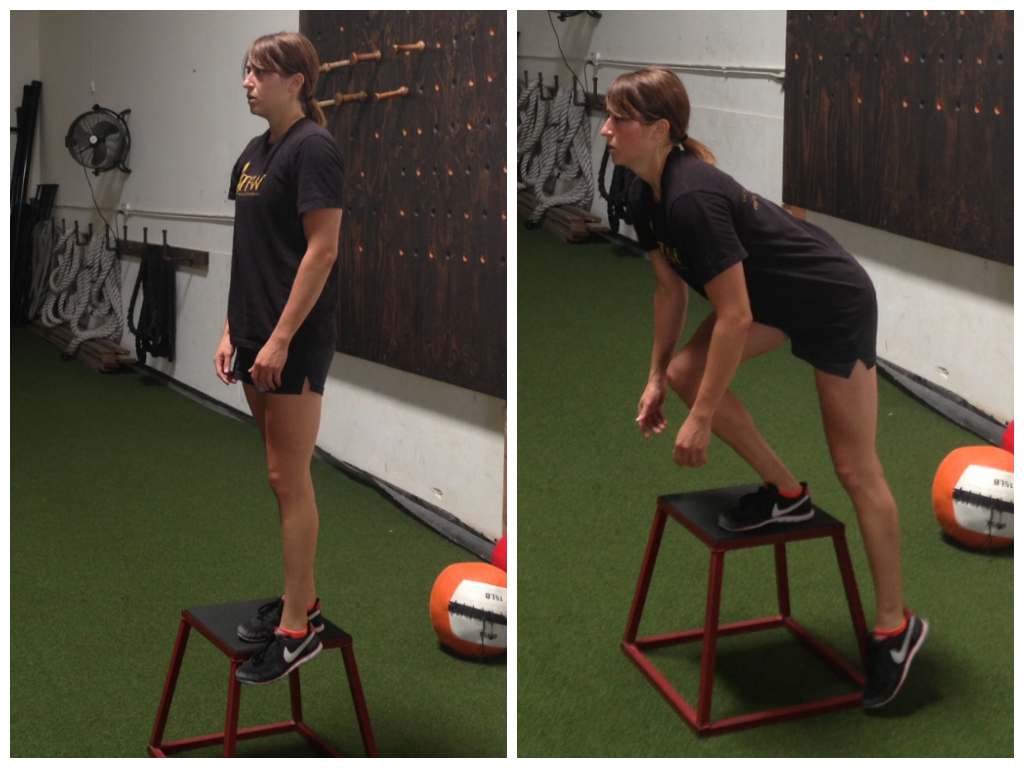
- Your heels come up – Many people actually don’t realize their heels come up or that they are coming forward in the squat and that is why they only feel the squat in their quads and not at all in their butt. A great way to correct this is by doing a squat to a box or bench. Stand enough in front of the box that you have to REACH your butt back to sit down on the bench. This will force you to sit back on your heels and then drive up through your heels, engaging your glutes and keep you from injuring your knees and coming up on your toes.

While this is a single leg squat, it shows you that a box forces you to sit back.
Deadlift variations
- Your back rounds as you hinge over – The most common one and often one of the hardest to focus on and correct since so many people are so used to rounding forward over their desks. A great way to ingrain the correct movement pattern is by starting your hinge with a pole or stick down your back. Keep the stick in contact with your head, upper back and butt at all times throughout the exercise. This insures that you have a flat back and do not round. Next move to just keeping your hands behind your back. The hands behind the back reminds you to keep your chest open which in turn keeps your back flat.
- You don’t feel your glutes working – I’ve found a great way to train the hinge motion and driving up through the glutes is by standing 2 or 3 inches from a wall, facing away from the wall. Lean forward and reach the butt back toward the wall. If you only lean forward and put all the work in your back, your butt will not move closer to the wall.But if you only lean forward to counterbalance your butt reaching back, you will feel a stretch down your hamstrings and you will feel your butt touching the wall. If you are working on a straight-leg hinge, you will not bend your knees as much. If you are working toward a conventional deadlift, stand a bit farther away and allow your knees to bend as you reach your butt back and lean forward (keeping your back flat) to counterbalance your butt reaching back to touch the wall. This move should make you aware of how it feels to sit back and the “stretch” you will feel if you are doing the move correctly. Advance to using a band around your hips while trying to reach your butt back to a pole or wall.
- Your low back is feeling it – Doing a light weight front-loaded good morning is a great way to get the core really activated while hinging. Too often when we are holding a barbell or kettlebells while lifting we are more focused on the hinge and keeping our back flat than our core engaged. But a front loaded move like the good morning is a great chance to really focus on the core. Hold a dumbbell, sandbag or kettlebell at your chest. Perform a straight two-leg deadlift, sitting your butt back and hinging forward. Because of the weight in front you will really need to focus on engaging the core so your low back doesn’t feel it. If you just rush through this move, you can easily irritate your low back. BUT I like to use it because it does really seem to make people more aware of how engaged their core should be.

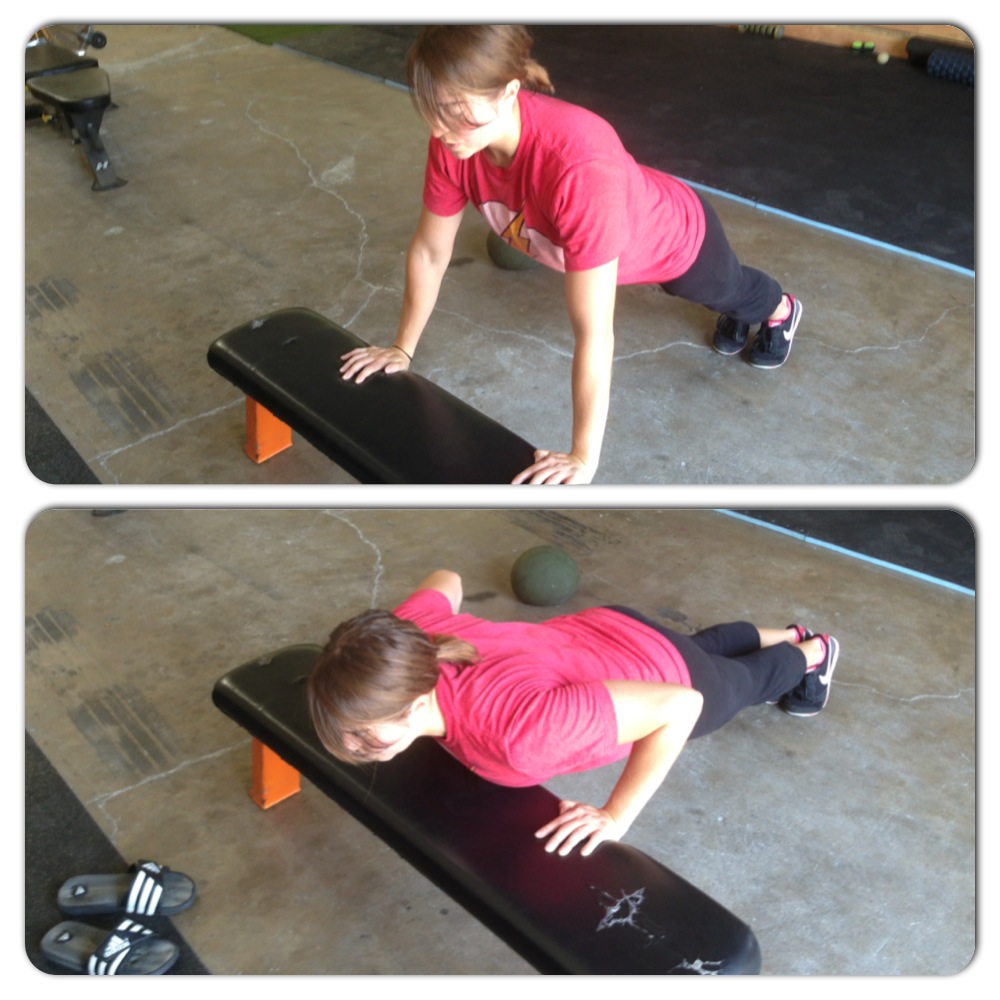
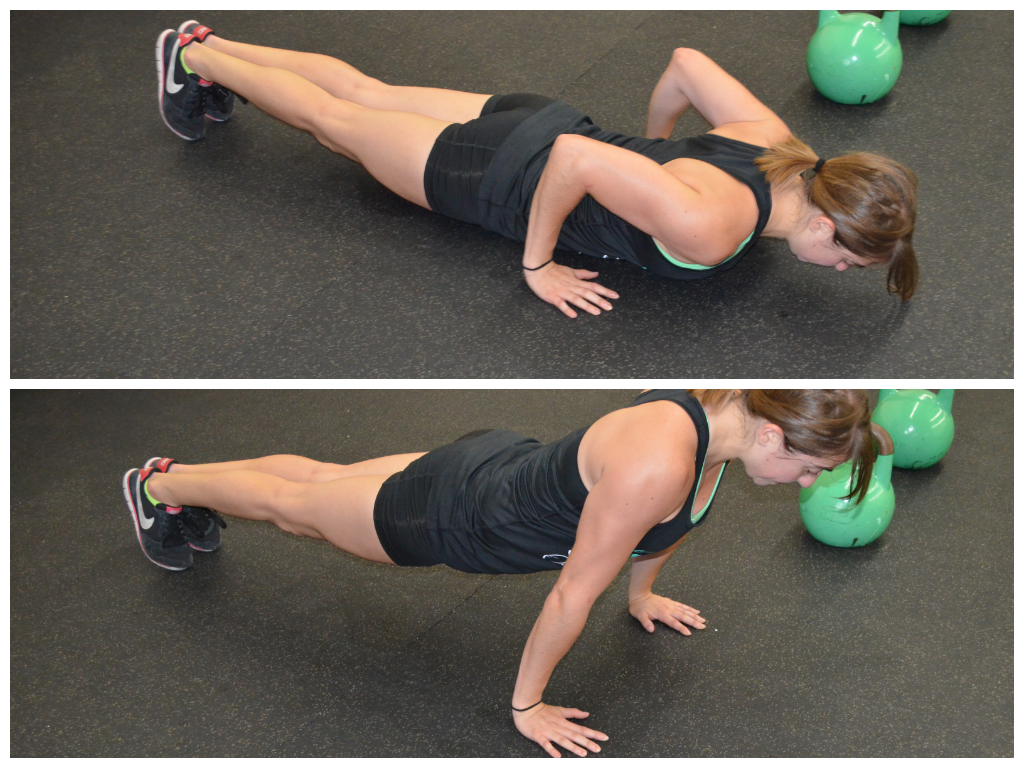
Push Up
- Push ups are one exercise everyone thinks they can do and hardly anyone actually does correctly. One of the best ways to train correct push ups is to make them as easy as possible to start with. INCLINE PUSH UPS should be done to start. Heck use a wall and do almost completely standing up straight push ups if you need to. By making it super easy, you allow yourself to focus on correct movement patterns….Like everything moving together and you not tucking your chin and your elbows not flaring out toward you head….
- You feel it in your low back – This means your core isn’t engaged. Try placing yoga blocks under your body. Make sure everything hits the yoga blocks at the same time. If your hips hit it before your chest then your hips are sagging and your core isn’t engaged…aka you are going to feel it in your low back! This may just make you aware enough to correct it or you may need to do some pelvic tilts and plank holds!
- You feel it in your traps and neck – You are shrugging your shoulders and not engaging your lower traps or lats. A great way to train yourself to keep your shoulders down is by doing a push up with your hands low down like toward your hips. Because this is a difficult push up, you may need to do a modified push up or even an incline variation.
Row
- You feel it in your neck and traps – I find this is super common especially during inverted rows. It means you aren’t activating your lower traps. It is also easily corrected by focusing on pressing the chest out and by rowing LOWER on your chest. So instead of even focusing on engaging a muscle, focus on just rowing the strap or bar to lower on your chest…like below the nipple at least.
- Your back is rounded – Just like with the deadlift, a pole or rod can be used down your back to keep your spine in alignment. Make sure your head, upper back and butt all maintain contact with the pole throughout the move. This will also prevent you from rotating so that you actually feel the move in your lower traps and lats! (This isn’t great for keeping a straight line during the inverted row but during the bent over row or even a row supported on a bench.)
- You only feel it in your biceps – While any back exercise does work your grip and your biceps, you should feel the move in your back. Focus on driving your elbows up toward the ceiling and not letting your forearms curl toward your chest when you row. To learn this, it actually works best to stand up straight. Stand with your back to a wall. The wall should be only a few inches away. Standing up nice and tall, drive your elbows back to touch the wall. If you “curl” instead of “row,” your elbows won’t touch the wall. But if you pinch your shoulder blades down and back and row, your elbows will touch the wall. This is the exact motion you will use when performing an actual row and rowing your elbows up to the ceiling!

Row low on the chest. Do not let your forearms curl toward your chest.
These are only some very basic cues and variations to help you develop that mind-body connection. But if you use them they will help you become more AWARE of your body so that you can keep the correct muscles engaged and working even during other variations.
Now ask yourself, “Where do you feel the (insert exercise here)?” Are you using the correct muscles or just going through the motions?
Relieving Aches and Pains
The other day I agreed to do some mobility and stabilization work with a collegiate men’s basketball team.
They were probably the most inflexible, broken down and injured group of people EVER.
And they were high level athletes!!
But the craziest part is that they just seemed to accept their inflexibility, pain and injuries. When they shouldn’t, and most definitely don’t have to.
Sometimes I think we become so used to chronic pain that we just start to accept it and avoid certain activities INSTEAD of working to correct the pain so that we don’t have any limitations.
But most injuries can be made better. And most aches and pains can be gotten rid of.
it just takes spending some time on those not so fun pieces of working out – like stabilization exercises, stretching, foam rolling and RECOVERY.
Working out isn’t all glitz and glamour. Actually you get all the glitz and glamour, all the fun exercises and great results, by doing that tedious, boring, prehab and rehab stuff.
Because if you don’t do enough prehab and rehab not only will you suffer from chronic pain at the site of that injury, but you also risk causing injury further up your kinetic chain!
Here are some prehab/rehab exercises, stretches and trigger point release techniques to get you started this weekend. Check back this next week for more stretches and exercises to help alleviate those nagging aches and pains from sitting at a desk all day!
Accepting Pain and some quick tips to fix it!
Neck and Upper Back Pain and Injury
Lower Leg and Foot Pain and Injury
Glute activation exercise for less low back pain (good to do after an ankle, knee or hip injury!)
Recovery Week Workout
Last week was my Recovery week from all my super heavy lifts and my 10-7-3-1 workouts.
Sometimes my “recovery” workouts aren’t easy at all. Sometimes they are simply DIFFERENT exercises and “lighter loads” than what I’ve been doing.
Sometimes they simply require my body to move in a different way than it’s been moving for the last 3-5 weeks.
I also love doing single limb movements and more bodyweight moves during my recovery workouts. These moves aren’t EASY though. I just find they really force me to work more on activation and correcting imbalances.
Recovery doesn’t always mean time off and it doesn’t always mean EASY.
Here is my far from easy (and actually made me super super sore) recovery Glute Workout from this past week.
Recovery Glute Workout
WARM UP:
Foam roll – lower legs, hamstrings, hips, back
Stretch – Calves, hamstrings, hips
Activate – Glutes with lateral and monster band walks
STRENGTH:
4 rounds:
8-12 reps each side Single Leg Deadlift holding double kettlebells
(Increase weight with each round if possible unless 8 rep max hit. Keep standing leg slightly bent and back flat as you hinge over. Hold one kettlebell in each hand by your side. Do not let your back round as you hinge over.)
8-12 reps each side Single Leg Glute Bridge Off Box
(Heel up on box and bridge up. If you can’t get up as high as with a two leg bridge then stick with a single leg bridge off the ground)
4 rounds:

8-12 reps each side Curtsy Lunge holding double kettlebells
(Increase weight with each round if possible unless 8 rep max hit. Make sure as you lunge back and come to standing that you are in full control of the lunge and driving off the heel of the front leg. Really cross behind and keep your chest up as you lunge. Hold each kettlebell down by your side.)
8-12 reps each side Single Leg Step Down
(Start standing on the box as if doing a lateral step up. Step down to the side of the box, hinging over a bit as you lower down. Lower down slowly. Do not let the foot going down fully touch the ground. Only let the toe lightly graze the ground and then press quickly back up to standing. Only go as low as you can control. DO NOT push back up off the ground!! The higher the box the harder the move.)
Make sure to sink back into the heel on the top of the box. Don’t be afraid to lean forward just keep the core tight.
CONDITIONING:
3 rounds:
40 seconds of work, 20 seconds of rest
Heavy Kettlebell Swings
While these moves didn’t use the heavy loads that many of my lifts have required recently, the loads were still heavy and CHALLENGING for the moves I did.
And the bodyweight bridges and bodyweight step downs were far from easy.
These moves all challenged my glutes to work and stabilize to become stronger for my heavy lifts. Since they were also single limb movements my dominate leg couldn’t take over and compensate. My weaker leg was forced to work equally hard, which helps to correct any imbalance that may exist.
And my butt was sore for days actually and my glutes were definitely shaking a bit during the workout.
My rest periods were also very short during the workout since I wasn’t trying to lift my max, making it a rather quick workout. However, I did rest enough that I could still use CHALLENGING weights and give a good work output each and every round.
The little conditioning blast at the end was also short and sweet. It worked on grip strength and power. It also got my heart rate up a bit while working my glutes that last little bit to utterly fatigue them.
What do your recovery week workouts look like? Do you simply take the week off or do you do workouts to work on your weak points?


