Category Archives: program development
Home Workouts
So I hear all the time that people don’t have the space OR the equipment to get in a great workout at home.
That is ABSOLUTELY ridiculous.
And I just did a workout in my kitchen to prove it….using just a little hand towel. (Which now is a bit dirty but at least I cleaned my floors!)
So here is my Small Space at Home Workout – 5 great moves you can do with just a hand/dish towel!
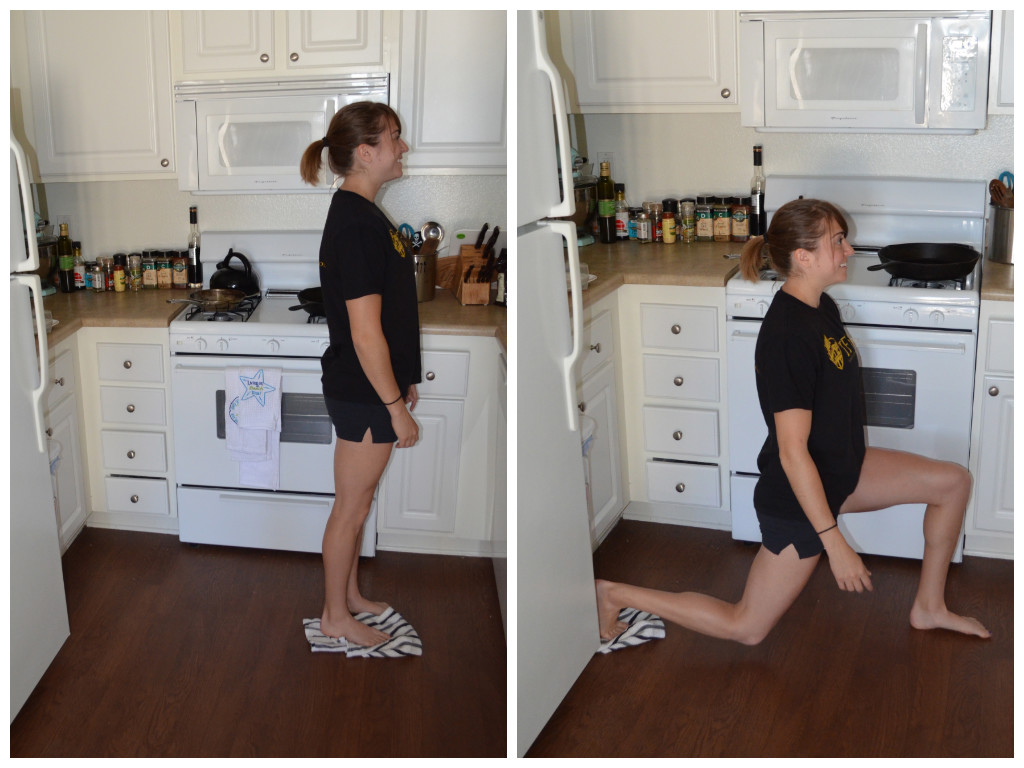
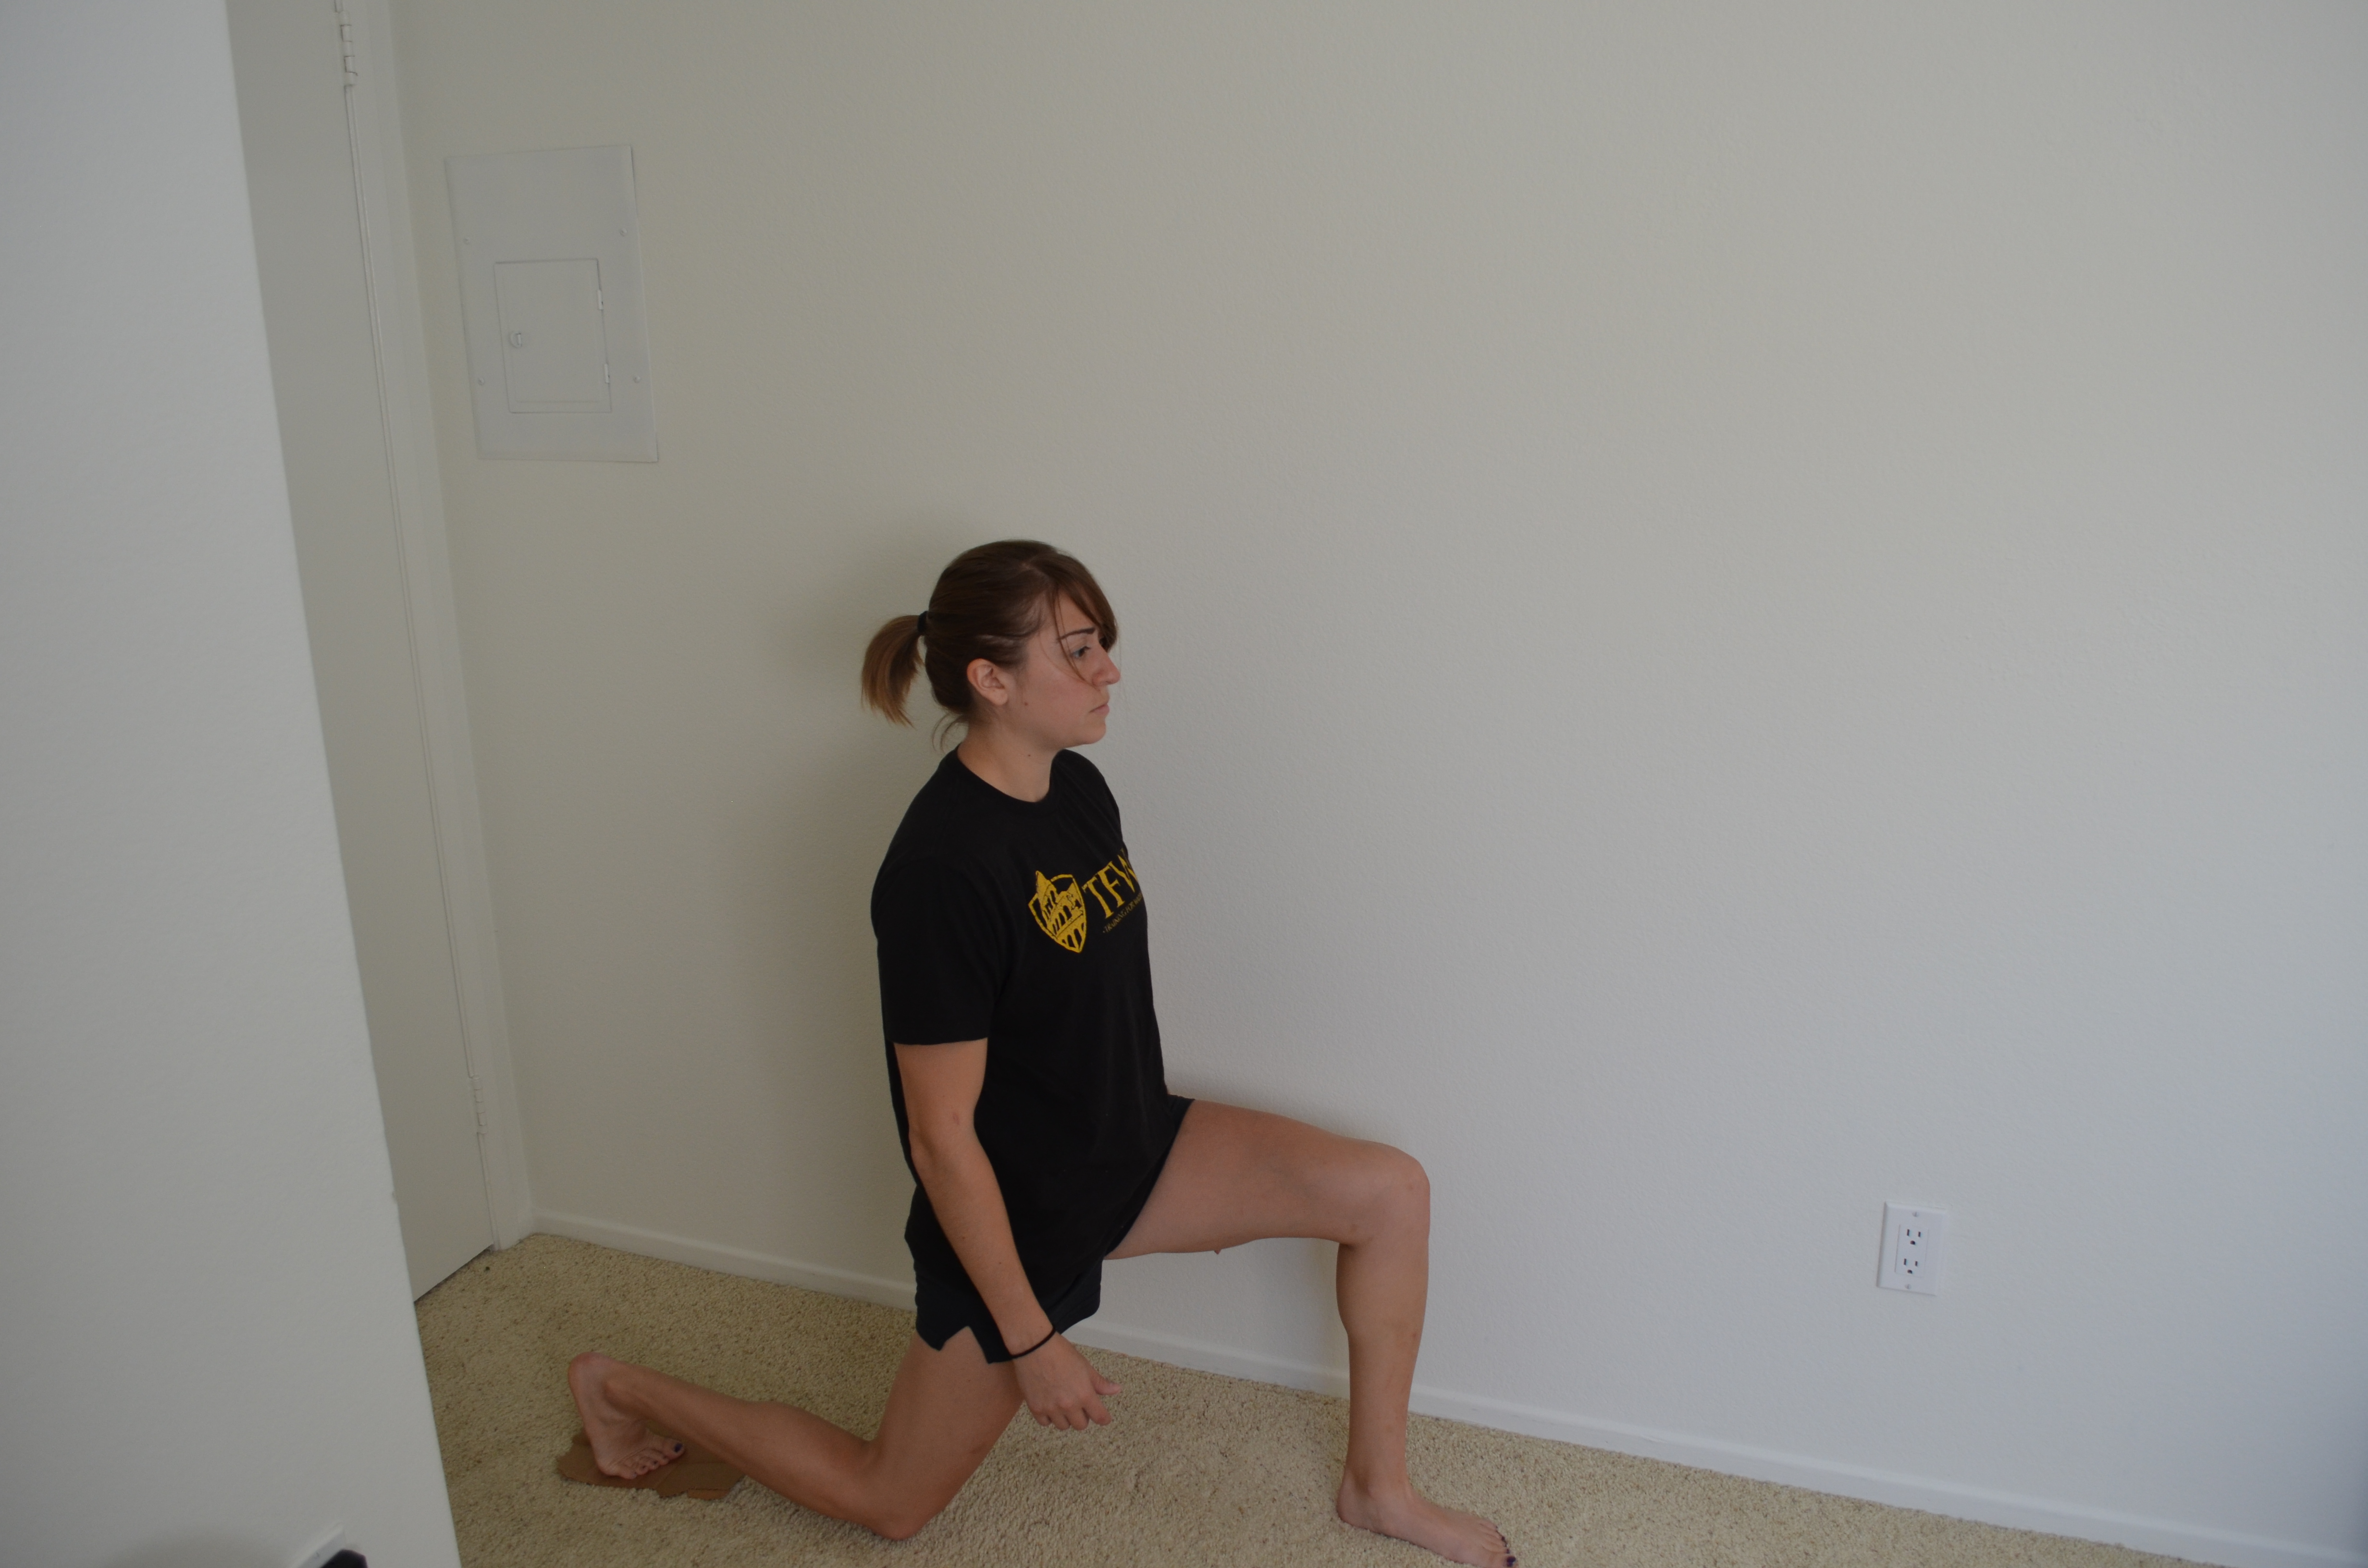
- Towel Backwards Lunge – The backwards lunge is a great move to work the glute and when you use a towel/slider, you increase the intensity AND engage the glute even more. Make sure to really squeeze the glutes as you come back to standing. To perform the move, place the towel under one foot and slide that foot back into as deep a lunge as you can handle. Make sure to really sit back on that front heel. Then driving through that front heel, come back to standing.

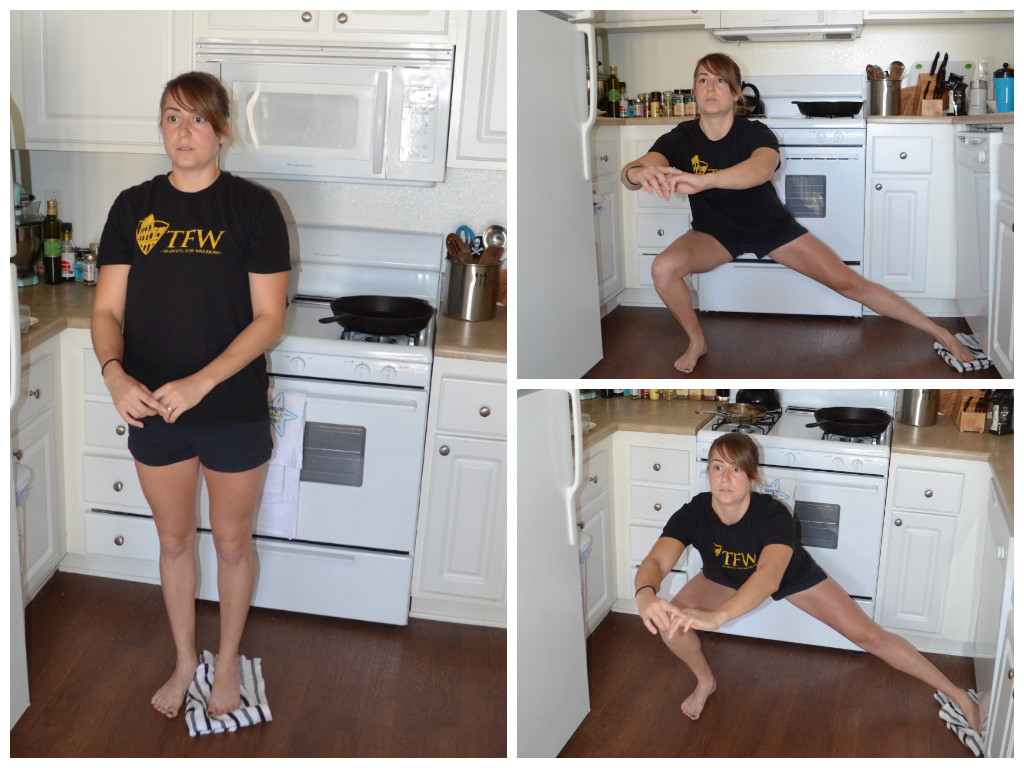
- Towel Side Lunge – This is a great move to work the glute and adductors. Please be careful the first time you try this lunge as it is easy to go too far out and not be able to get back up since there is no traction. To do this move, place the towel under one foot. Slide that foot out to the side, sitting back into the lunge. Then to stand back up, drive through the foot not on the towel. Do not allow yourself to go forward. Make sure to really sit back and then drive off the heel.

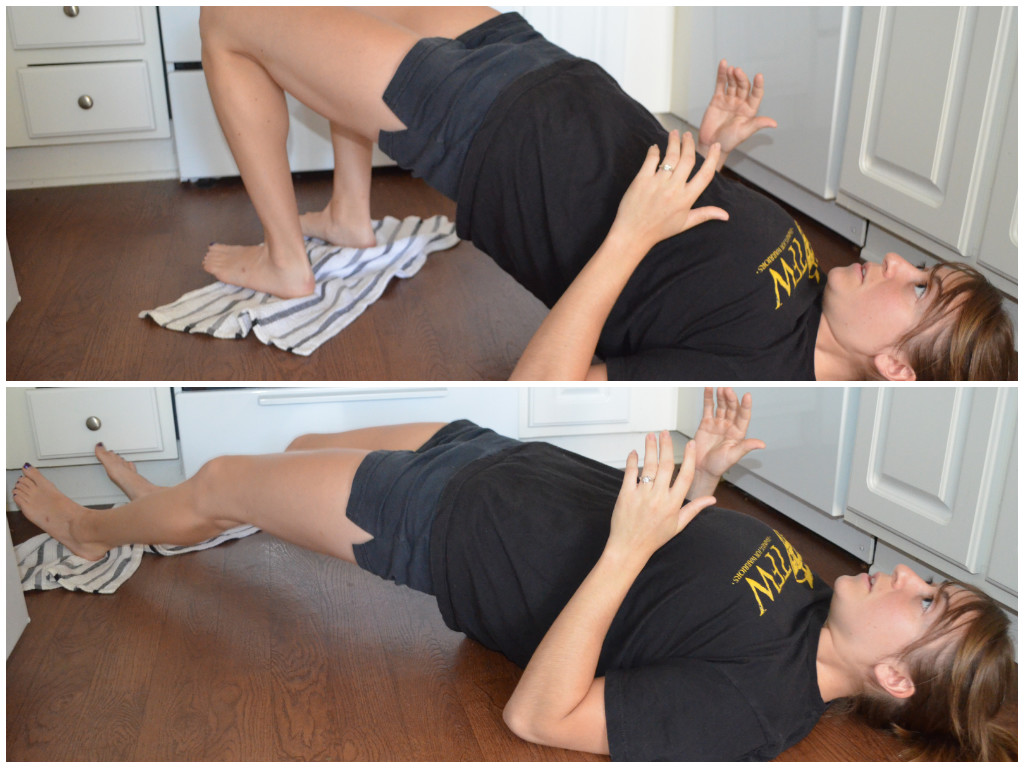
- Towel Bridge and Curl – This one is great although not a beginner move. A beginner may want to start with the towel under only one foot and slide out one leg at a time. To perform the two leg curl, place both feet on a towel about hip width apart. Start in the bridge position and slide your feet out. Keep your hips off the ground and your glutes engaged as you slide out. Then curl the heels back in, bringing the hips up again in a glute bridge.

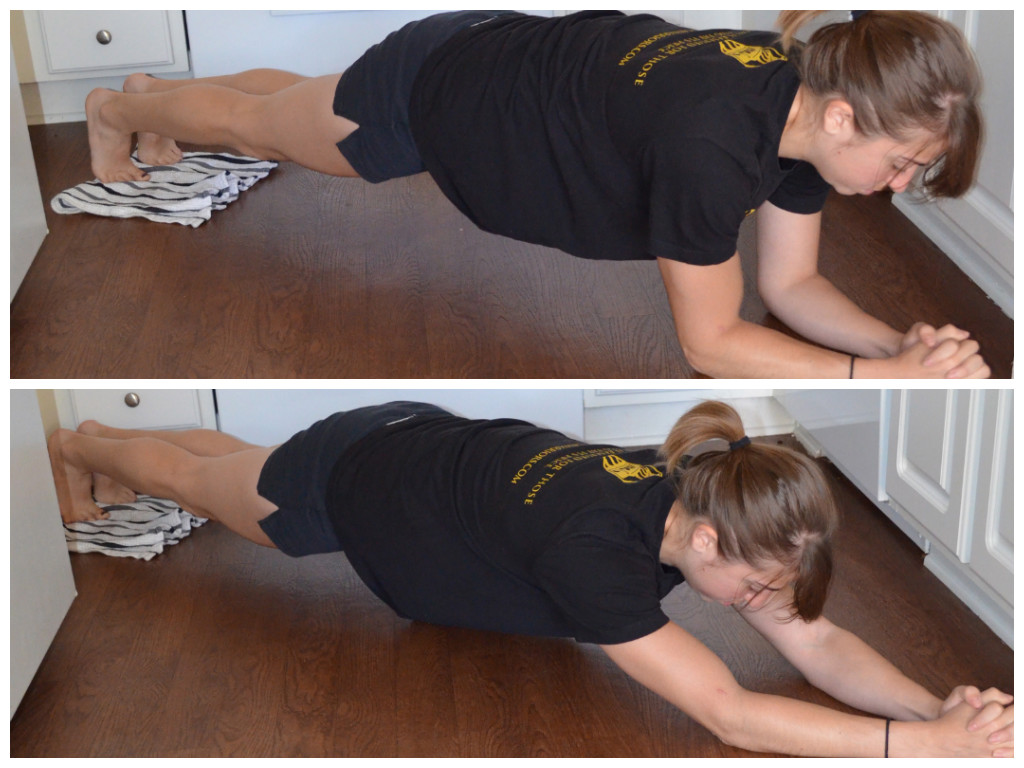
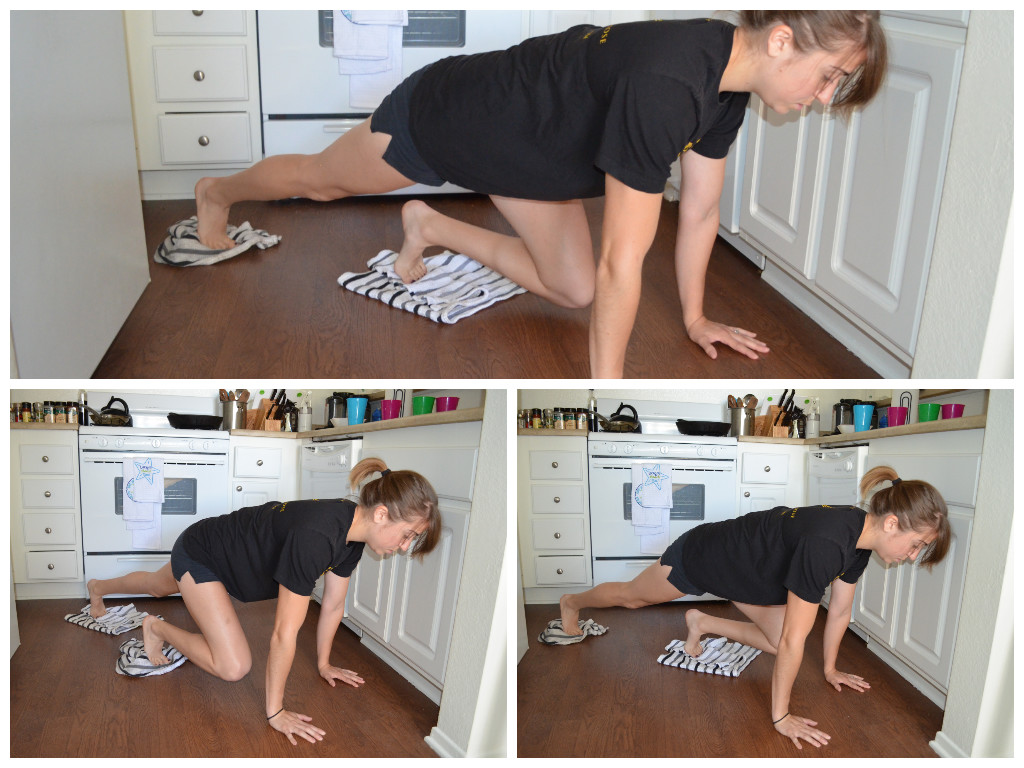
- Body Saw – This is another advanced move. To regress this, perform the move without the towel. Walk your feet backwards and then back in, elongating through your triceps and core. To do this with the towel, keep your body in a straight line with your belly button drawn in. Slide back on the towel, lengthening your body out as much as you can. Then pull straight back in to the plank position. Do not let your hips sag toward the ground or your butt go up in the air. You should not feel this in your low back.

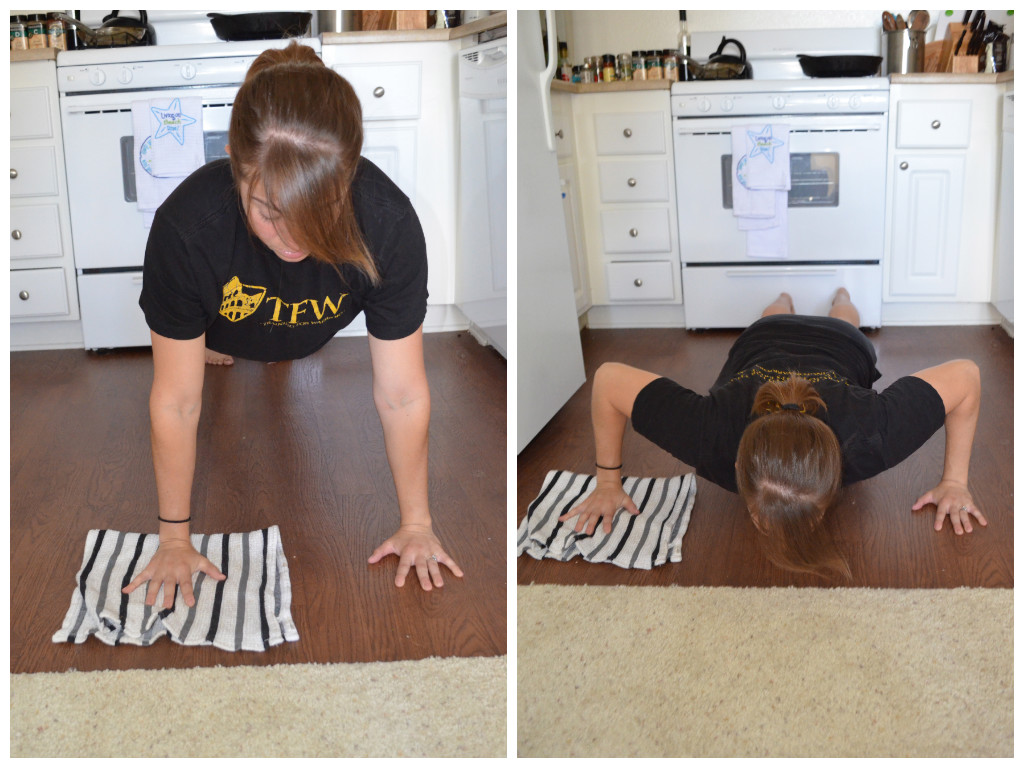
- Fly to Push Up – A great two in one chest exercise. This can be done from the knees or the toes. Start at the top of your push up with one hand on the towel. Then slide the hand out to the side and perform a push up. After the push up, slide the hand back into the starting position. Even though this is a wider push up, don’t let your elbows flare way out by your ears!

So there you have it. Five moves done with just a dish towel and space that I could barely lie down in.
Here are two other bonus moves…Since I think most people do have a bath towel and two dish/hand towels lying around somewhere!
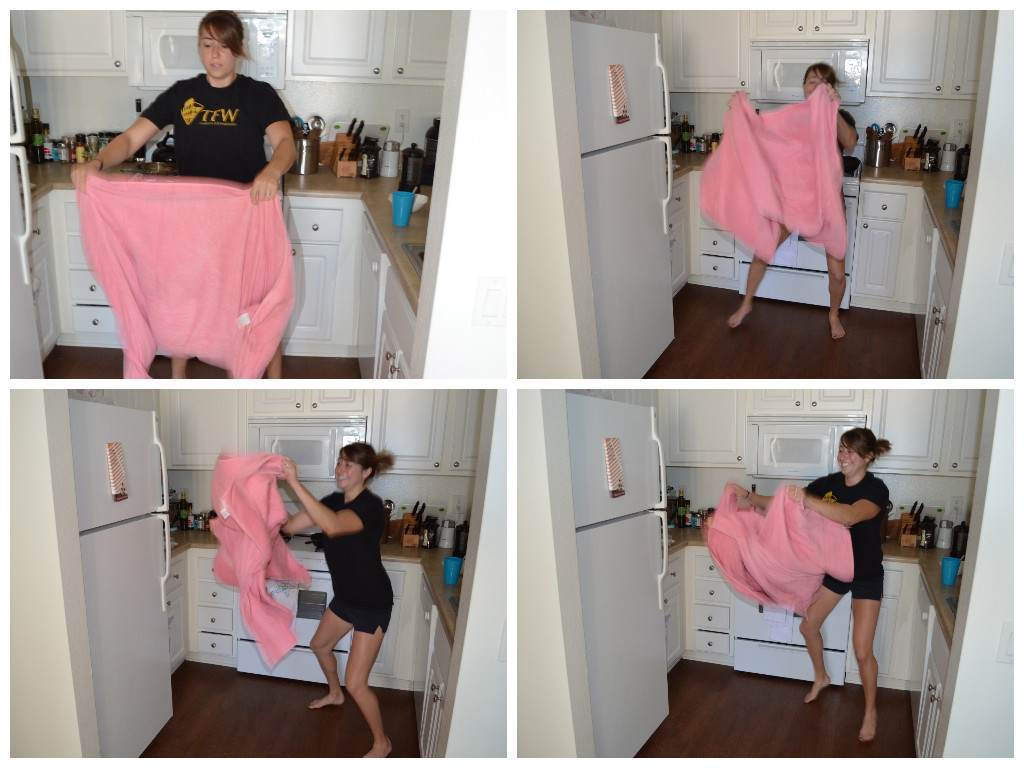
- Towel Taz – So basically anyone at any level can do this. And while challenging, it is rather fun. Move around as quick as you can in every direction and shake the towel down and up and in and out.

- Mountain Climbers – Place a towel under each foot and set up as if you are going to do a push up. Then, keeping your core tight, run your knees in toward your elbows, alternating legs.

AND if you are thinking…”Well my house is all carpet..”
Mine basically is too! To do all hand towel moves on carpet, all you need is a piece of cardboard…(I tore mine off of a box we used recently to move!)
What moves do you love that require no space and use things you just have lying around the house?
How to do a perfect push up
In my opinion two of the hardest bodyweight moves, especially for women, are pull ups and push ups.
These are also, in my opinion, two moves that EVERYONE should be able to do!
The other week, I outlined some tips and progressions to help you build toward a full pull up and today I want to address the push up.
A few things I usually see when clients do “push ups:”
- They don’t go all the way down. They bend their elbows maybe an inch. (Guys do the opposite of this where they don’t actually lock out at the end of the push up)
- Their head juts forward as if they are looking towards their toes.
- Their shoulder blades are jutting out.
- Their elbows flare out way up by their ears and their fingers are rotated in toward their chest.
- They do THE WORM!
Here is a photo of some pretty ugly form….doing a number of the bad things above.
So if you do one….or maybe all…of these things, how do you do a perfect push up?
Perfect push ups form:
- Your body is in line from your heels to the tip of your head. Your finger tips should be pointing forwards and your hands should be right outside your chest. Your feet are together not shoulder or hip width apart.
- At the top of your push up, your arms are locked out and your legs are straight. You are squeezing your butt cheeks and are drawing your belly button in toward your spine. You are in a straight line. Hips aren’t dropping to the ground. Head is jutting forward. Back is not excessively arched.
- As you lower down, you lower your chest directly between your hands, keeping a nice straight line. Your elbows shouldn’t flare out from your body. Your elbows should almost make an arrow with your body. Like –> Your shoulders, elbows and wrists should all be in a straight line.
- Your chest should touch the ground when you lower. Your body should move together. Hips shouldn’t move back up first. Everything should lift as one. Don’t let the hips sag or the elbows flare out as you lift.
- You should then return to the exact same position you started with.

Now that you know the form for a great push up that doesn’t mean you are going to be able to perform one perfectly.
First you have to address the issues you are having with your form.
While a full range of motion is something that you have to practice and developing strength in your chest, shoulders and triceps is always beneficial, there are some other issues you have to address first.
Below I address areas you should foam roll, stretch and strengthen if you are having some of the problems I listed above. If you don’t know if your form is breaking down, have a friend or a trainer watch you perform a push up!
Problems and some fixes:
- Head jutting forward and/or chin tucked to chest – Roll out and stretch your upper traps and neck.
- Scapular winging (aka if your shoulder blades are really popping out) – Roll out and stretch your chest. Strengthen your mid and lower traps with the scapular wall hold. You can also strengthen your traps and your serratus anterior (the muscles sort of on your ribs under your armpit and down the side) with this great exercise, the push up plus or scapular push up.
- Shoulders are up by your ears – If your shoulders are up by your ears, roll out and stretch your traps and your neck. You are also going to want to do a ton of scapular wall holds to strengthen your mid and lower traps! When doing the push up, focus on engaging the muscles between your shoulder blades.
- Elbows flare out – Many people are taught to do a push up like a T, but that puts a ton of strain on the rotator cuff. Make sure to roll out and stretch your chest. Also, having your elbows in closer will require you to strengthen your triceps since having your elbows in closer engages your triceps more. Also to help you remember to do this, start the push up with your hands right outside your chest. As your hands get wider, it becomes easier to revert back to the T form.
- Hands turn in – Make sure to keep the finger tips pointing straight ahead. Pretend your hands are both on a piece of paper. Try pressing down and apart as if you are trying to rip the piece of paper in half. This will help you keep your hands straight and will help you engage your lats and keep your body tight overall.
- Low back sags and hips go toward the ground – Start by rolling out and stretching your low back and your hips. You will then also want to strengthen your core and your glutes. When I say “strengthen your core,” I don’t mean do a trillion crunches. You want to work on “bracing” your core – you want to work on contracting your abs and drawing your belly button in toward you spine. You can practice this by laying on your back with your knees bent and your feet flat on the ground. Draw your belly button in toward your spine and press your low back into the ground. Hold that position. That is how you want to brace your core during a push up. When doing a push up, to keep your hips from sagging, squeeze your glutes and draw in your belly button!
- Butt goes way up in the air – If this happens you are also going to need to work on core strength. Planks are a great way to build up the core stabilization needed for a push up…Because let’s face it…A push up is basically a moving plank. Also, use the drawing in maneuver I went over above to teach yourself to engage your core! Also, if you squeeze your glutes during the push up, it is going to be extremely difficult to have your butt up in the air!
Once you begin to address those issues, you can start to work on building up toward that perfect push up.
Today, I don’t want to get into all the supplemental moves you can do to strengthen your chest, shoulders, triceps and core, but I do want to discuss how you can regress the push up so that you can do it no matter what level you are starting from.
The first push up regress is NOT from your knees.
The wall push up is the first step. Step about a foot or two away from the wall and place your arms out toward the wall right outside your chest. Your finger tips should point straight up toward the ceiling. As you lower your body toward the wall, your hands should be outside your chest. Go as close to the wall as you can (do not smack your face into the wall). Make sure you keep your elbows in super close to your body. This is a great time to really work the triceps and keep your arms against your body. Your wrists, elbows and shoulders should all be in one straight line. Your body should remain in a straight line with your core and glutes engaged. Don’t worry about keeping your heels on the ground.
If you can perform 3 rounds of 20 wall push ups with perfect form easily, it is time to use a lower incline. Squat racks (if no one is using them because people definitely don’t like you doing anything put squatting in them) and Smith machines are great places to help you work on your push ups. I hate Smith machines so this is about the only time I would use one.
Smith machine push ups allow you to control the incline. As you progress, you can lower the bar until you are basically parallel to the ground. You want to keep the same form as the wall push up.
Since we don’t have a Smith machine at the gym (and since we just moved and our jungle gym for squats isn’t set up) I demonstrated these from a bench…which is also another tool you can use if the incline is appropriate.
And if you only have a bench, but the incline is just a bit too low, you can do push ups off the bench two different ways. You can do them from your toes or from your knees.
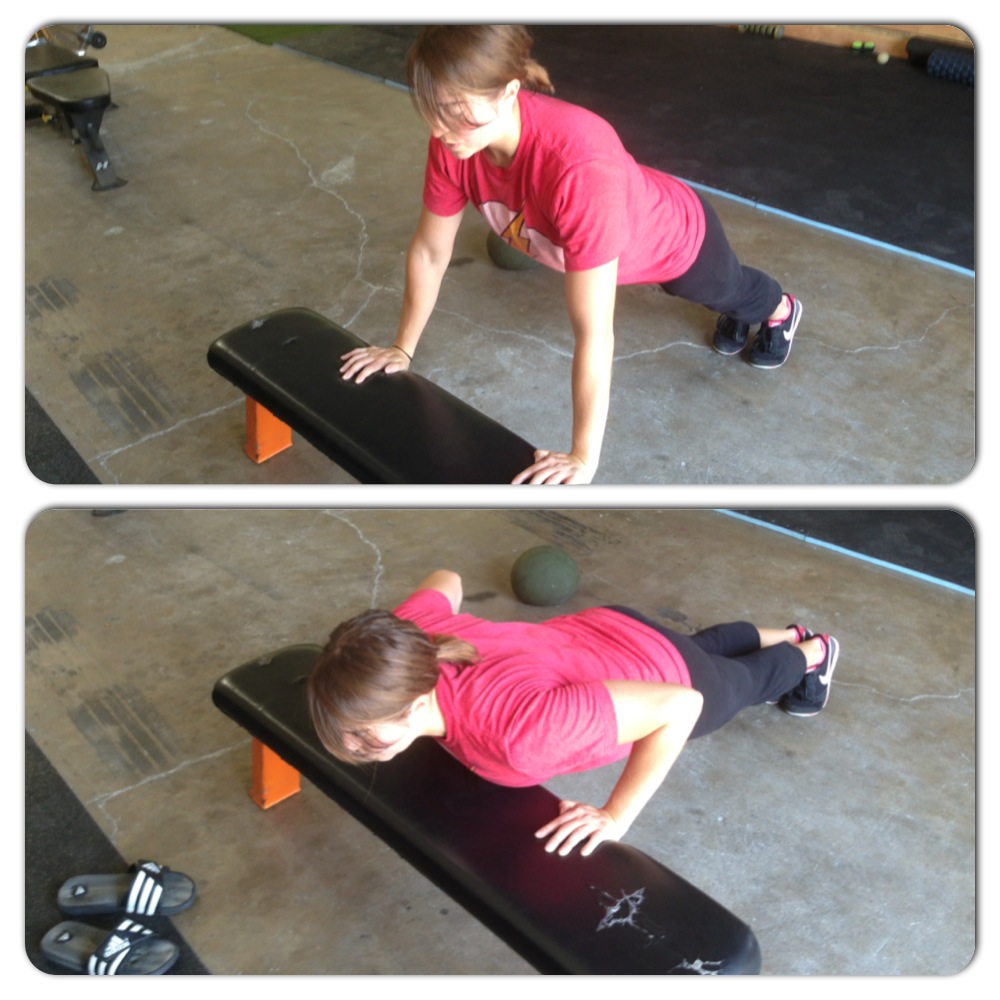
Doing push ups from your knees can allow you to decrease the incline as you progress down toward the ground.
Once you’ve mastered the incline push up and have gotten down to at least the height of a bench (from your toes), you can start to try push ups from your knees on the ground.
If you aren’t completing full reps and your form is breaking down, don’t keep progressing!
You’ve got to EARN the next level!

Then once you can perform perfect push ups from your knees, start to add in one or two push ups from your toes until you can do 5, 10, 15….100 from your toes!
Doing even one perfect push up doesn’t happen overnight. Take your time! Quality is important if you want to get the most out of each and every push up!
Once you’ve mastered the perfect push up, it is then time to start playing around with decline push ups (feet up on bench or such) and other fun variations…Like my favorite the push up to dip!
But remember…YOU’VE GOT TO EARN THE PROGRESSIONS!
Do you love push ups?
What weights should I use?
So I get asked all the time by clients, what weight should I use?
A challenging and heavy one!
My answer is always “A challenging one!”
No matter what rep range you do, you want to select a weight that makes those last few reps of every round a struggle.
If you aren’t using a weight that truly makes you struggle, you aren’t going to get near as much as you could out of the workout.
So how do you determine if the weight is the “right” weight? How do you know if you are struggle “enough?”
Well for one, as you workout more and more, you will begin to understand what weights feel challenging.
You will also be able to track your weights and then add more weight based on what you did the week before. Small incremental changes are best. Don’t do a drastic jump especially if you are new to lifting.
BUT if you haven’t done a lot of working out and don’t have a great idea of where to start, I suggest you first perform the exercises with bodyweight to get down the form.
Then ask yourself, “How easy did that feel?”
If it was super easy, add weight. Try to perform the same number of reps. If you can easily do the same, up the weight again. If you can only do fewer reps before form breaks down or you can’t do any more, you may want to drop the weight just a bit until you can perform your desired amount of reps.
If you felt a burn on the last couple of reps and stopped at 10 reps BUT at the same time felt you could have done a bit more, maybe try doing 12 reps with the same weight and see if that is more challenging.
While you do want to pick a rep range to work in based on your level and your goals, the reps you plan to do shouldn’t be set in stone. (Here is a great post about rep ranges.)
If you pick a weight that is a bit too easy for the reps you chose to do that round, do a couple of more.
It is more important to feel the weights challenging you than it is to do 12 reps instead of 15 even though those numbers are technically in different ranges (hypertrophy vs. endurance).
When I workout, even though I track my numbers I sometimes still have to play around with weight depending upon how I feel that day.
And a lot of the time, I will go up as I do sets or rounds even though I started with a challenging weight. I will usually try to increase each round until I hit a weight where I can no longer perform the desired amount of reps. And then I will either hold at that weight or drop down to the one right below it for the next round.
It all depends on what rep range I’m shooting for. Say I’m working in the hypertrophy range of 8-12 reps. I may start out with a weight and say that I’m going to shoot for 10 reps.
That weight may be easier than I thought on that day, so I’ll do 12 or even 13 or 14. I’ll go until that last rep is really a struggle.
Then the next round I’ll go up to the next weight. I’ll again shoot for as many as possible in that hypertrophy range. If I hit 12, I’ll go up again.
I’ll keep going up through all my sets UNLESS I find a weight that I can barely do 8 with (a weight I don’t think I can add to without falling below my desired rep range). If I hit a weight that is a struggle for 8, I will hold at that weight for the last set (or two) and even try to force out a 9th or 10th rep if I can.
The point is that rep ranges are only as beneficial as the weight you use. If you do 5 reps with easy weight or 15 reps with weight you don’t even feel, you aren’t going to get results.
The weights you use should challenge you if you want results! The “heavier” the feel to you, no matter what weight they actually are, the more likely you will be to reach your goals of fat loss, muscle gain, muscle tone, strength, endurance, weight loss…..ANYTHING!
NOTE: If you are a beginner, increase weight slowly even if it feels easy! Your body needs to adjust to the new demands. And even though your muscles may be able to handle the weight, your joints and connective tissues might not be ready!
How to build a COMPLETE home gym
Here is how to build a COMPLETE home gym in five pieces:

- The five essentials!
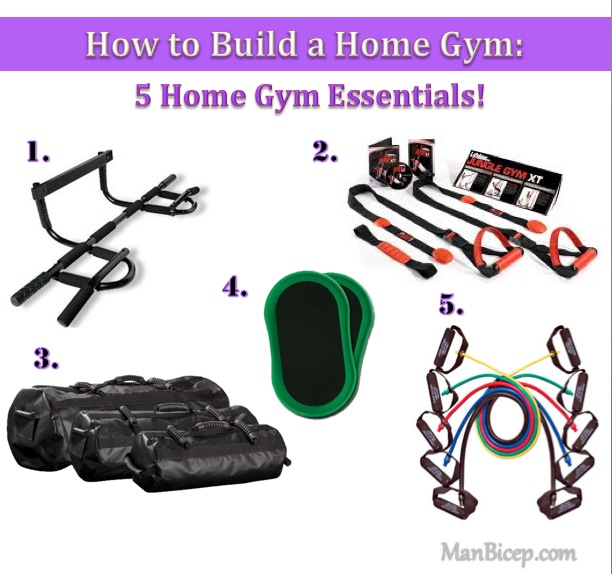
1. Pull up bar – I love pull ups. And while I almost considered excluding this and instead including foam rollers, I felt that the pull up bar was just too essential (and it is too easy to foam roll with a ball you just have lying around the house). Even if you can’t do pull ups YET, a pull up bar can be used to do all the isometric holds to work up to being able to do a full pull up. You can also do scapular retractions on the bar as well as ab exercises. While the least necessary piece for beginners on the list, it is really probably the best piece for core and back work.
2. Jungle Gym straps – Best way to work your ENTIRE BODY. Honestly as long as you have a door or another place to hang them, this is the single best piece of equipment to have for your home. They are just like the TRX straps but a bit cheaper and in my opinion just as good if not better. You can literally work every muscle using these straps. And these straps can be used to make moves easy enough for the beginner or difficult enough for even the advanced lifter. Balance lunges with your foot up in the strap or single leg squats with only one of the straps for assistance can be extremely difficult! So don’t think that you need a ton of weights to get in a gnarly workout at home. There are always ways to progress moves for any body part on the Jungle Gym straps!
3. Sandbag – Since I love lifting heavy, I did want to include some sort of weight equipment on this list….and sandbags won out. They can be used to work any part of the body and the weight can be easily adjusted by pulling out some of the filler bags or not filling the bags completely full. They are also an extremely functional weight since they are awkward. They also really don’t take up that much room and you won’t really have to buy more pairs, like you would dumbbells, as you progress. Not as necessary for the beginner, but a great way to start lifting some weight.
4. Sliders – Sliders can be used to progress exercises for any part of the body and can be a good substitute for weighted activities. They make exercises more difficult because they create a more unstable environment. For example, there is no traction when you slide out to do a side lunge and then try to drag the slider back in toward the standing leg (I always tell people NOT to go out as far as they think they can the first time because they won’t make it back in). Sliders are also fairly cheap and a small piece of equipment that you can basically store anywhere. They are a great way to progress moves without needing weights. And shoot, if you have hardwood floors you can even make your own sliders out of socks!
5. Resistance bands – While I was at first hesitant to put these on the list because you can basically strengthen the exact same body parts with the Jungle Gym straps, they did end up making the list because they are probably the easiest and best piece of equipment to carry with you if you travel a lot. Also, I had considered putting on mini bands for glute activation exercises (since glute activation exercises are extremely important yet everyone skips them) BUT you can make modifications so that you can sub resistance bands for mini bands! Anyway, the point is resistance bands are super versatile, easy to store and can be used by everyone from the beginner to the advanced lifter. Also, unlike dumbbell lifts, moves done with resistance bands have a lot more tension and resistance throughout the full range of motion of the lift, which is an added bonus.
So now you know the only five pieces you really need for a COMPLETE home gym.
BUT what if you can’t get all five?
If you can only get two items from this list, I would suggest getting only the Jungle Gym Straps (or resistance bands) AND a sandbag. HOWEVER, if you want to spend less, resistance bands and sliders can be a great way to increase the intensity and add variety to any of the bodyweight or home workouts you may be doing.
As I mentioned before, foam rollers almost made the list. And it was a very hard decision NOT to put them on there.
They honestly didn’t make it because a tennis ball or rolling-pin will work 95% of the time and most clients I’ve encountered have one or the other (or would rather spend the few dollars on one of those instead of shelling out $50 to $100 bucks for a true trigger point tool). However, if money isn’t an issue and you have space for a bit more equipment and are serious about getting great results, I would suggest investing in some trigger point tools to target exactly your problem areas!
What are your favorite pieces of home equipment? Need some help creating your home gym and designing workouts? Let me know!
NOTE: In posts to come, look for exercises using each of these pieces.
Crawl, Walk, Run
So I’ve encountered a lot of people recently who are doing exercises and weights way beyond their current abilities.
And they feel entitled to do the workout moves even though they really aren’t doing them correctly.
They feel entitled because they believe they are in shape. Because they’ve been doing intense stuff for years. Because another trainer let them do it.
Well, I’m sorry, but you don’t just get to do an exercise, you have to earn it.
I mean think about it right now…Do you actually do a full push up? Is your push up perfect?
Is your body in a perfectly straight line? Do you touch your chest to the ground and then completely lock out at the top?
Or does your chin jut forward? Are you’re arms at 90 degrees from your body? Do your hips sag toward the ground or is your butt up in the air?

Be honest with yourself because I can tell you now after hours of watching push ups that 95% of the people out there can’t do a push up worth SHIT.
Sorry to curse, but seriously I am just fed up. I saw all these men and women deciding that they deserved to do the toughest push up progression when they honestly weren’t even near ready.
Is it pride or bragging rights or just that we want to be “bad-ass” that make people stupid enough to do something truly beyond their level?
Or do people really just not realize how bad their form is? Do they not equate their nagging injuries to the fact that they are trying to run when they haven’t even learned to crawl properly yet?
And the funniest part is that I don’t consider myself a stickler on form. I believe that there is a scale of “acceptable” form aka form that is good enough that the person won’t get injured, BUT that as the person gets stronger will be worked to be improved.
However, the form I’ve seen is just completely unacceptable especially since people keep pushing to do something harder than they should.
Why does everyone believe they are above progression!?!
SLOW DOWN PEOPLE!
FORM is important to the extent that it PREVENTS INJURIES! And usually correct form means that you are doing something in the most efficient and functional way possible – the way that will truly give you the most power and STRENGTH.
So why waste your time on incorrect form and just keep pushing ahead when you won’t get near as much out of the move as you could if you just slowed down and took the time to properly engage the correct muscles?
Maybe you never thought of it that way…huh?
Stop trying to run before you can walk and walk before you can crawl. If you take the necessary time at each stage, you are going to find that not only will your lifts be stronger but that you will also suffer from fewer injuries!
So try a push up. Before you do that hard variation you saw in the magazine, ask yourself if you can really even do more than one round of 20 perfect push ups in all of the levels leading up to that new variation.
If you can’t, spend some time EARNING that new variation! It may be a great way to motivate yourself to work hard over the next few weeks or months!
Check back soon for a post about how to do a perfect push up…And in the meantime learn how to do a pull up!
Track your progress
Yesterday I mentioned that one of the main reasons why people don’t accomplish their goals, like their goal of being able to do a pull up, is because they don’t track their progress.
And most people know they should keep track. But they don’t.
They don’t track their progress because it takes energy and time. Of course, in the end, it really takes way less time to outline and track a program than it does to flounder around for months with no clear idea of how to reach your goal, but whatever…right?
Just keep floundering and not tracking. Just keep wondering why you haven’t hit your goal even though you’ve been working hard trying all these diets and spending long hours in the gym.
Really is spending a few minutes each day keeping a food log or recording weights and reps really that awful? Is it really that big a pain in the butt?
Is it really harder/more time-consuming/more frustrating than not reaching your goal?

There are even APPS for tracking now which really gives you NO EXCUSE not to track your progress!
And I’m not saying it isn’t annoying. Because guess what? It kind of is…but it is also probably the single best thing you can do to keep yourself moving forward toward your goal.
If you don’t track your progress, you won’t know what worked and what didn’t work. There are so many different workout variables out there you need to consider when creating a program (intensity, duration of workout, rest periods, type of exercises, number of exercises, reps, sets, weights, body parts worked, movement patterns worked…). And if you don’t track which types of each thing you used, how can you possibly know what helped your or hindered your progress?
You won’t know.
You won’t know if you get better results with shorter workouts. You won’t know whether or not 5 or 15 reps works better for you. You won’t know what helped you finally do that pull up…or what kept you from even getting close!
You also won’t know if you’ve gotten closer to your goal until you’ve hit it.
And if you don’t hit it soon enough, you may give up because you don’t FEEL like you’ve gotten any closer.
I mean how many times have you started on a goal only to give up because you’ve spent time working toward your goal only to feel like you haven’t gotten any closer?
Probably more often than you’d care to admit.
BUT if you’d tracked your workouts and diet and TRACKED YOUR PROGRESS, you would have concrete evidence showing that you are closer to your goal now than when you started even if you don’t necessarily FEEL closer because you aren’t there yet.
Often we get down on ourselves and FEEL like we haven’t made progress just because we aren’t exactly where we would want to be.
But when we’ve tracked our progress, we can remind ourselves of all our hard work and show ourselves all of the victories we’ve had no matter how small. And even those small victories can be enough to keep us motivated.
No matter how we FEEL we can’t argue with concrete progress. And even when we feel down, seeing those results, seeing that progress toward our goal, will keep us moving forward.
It is way easier to give up when we don’t see any forward momentum.
Whether or not you admit it…seeing even the smallest victory can be motivating.
Heck, even the victory of TRACKING can be motivating. You want to give yourself small things each day that you can easily ACCOMPLISH and keeping a food log or recording your numbers is just such a task.
Tracking, while we complain that it is hard and time-consuming, really isn’t. It truly is a “low barrier to entry” task that you can do in a matter of minutes. It is a small, easy task that you can do each day which gets you moving in the right direction.
When we ACCOMPLISH things, even small, easy tasks, we feel successful. And when we feel successful, we feel MOTIVATED to continue working hard toward our goals.
And the final, and probably MOST IMPORTANT REASON, why you should track your diet and exercise programs is because you don’t see yourself, your habits and your daily activities clearly and you don’t hold yourself accountable for what you are actually doing.
I’m sorry…but you don’t.
I can’t tell you how many times I’ve had someone tell me they are eating well only to retract their statement when they actually keep a food log.
They aren’t aware of how often they take “just one bite.” They aren’t aware of how often they DON’T actually have fruits or vegetables with their meals. They aren’t aware of how quickly “handfuls,” “bites,” “pieces” added up.
They aren’t aware.
Tracking makes us aware and makes us hold ourselves accountable.
It makes us aware of what works and what doesn’t. It makes us aware of our progress, even the smallest of victories. It makes us aware that we are doing things each day that move us closer and closer to success.
So if you’ve been struggling to reach your goals, if you’ve given up on goals more than you’d care to remember, maybe you should start tracking your progress with food and workout logs….
Ladies…Do you want to learn how to do a pull up?
So we did testing the other day at the gym and one of the tests was a pull up test.
You probably aren’t surprised to hear the following statement, but we only had a couple of women who could do legitimate pull ups (by legitimate I mean no kipping…I have nothing against kipping, but it isn’t a TRUE pull up even if it does have its own benefits).
When I then asked all the women that didn’t do a pull up if they would like to be able to do one, most did say YES. Actually all said YES.
So then…why weren’t more women able to do one!?!
My theory is that most of the time, it isn’t that we don’t want to be able to do something, it is just that we don’t know where to begin so we don’t even start. Or we are intimidated by the move and don’t believe we can do it (again because we don’t know how to get there). Or we jump into something we think might help with no way to track our progress and then we fall off when we aren’t able to do a pull up within a few short workouts.
So below are some great tips to help you be able to do a full pull up!
Three great activation moves I like to use to warm up for a pull up workouts are:
- Scapular Wall holds – You’ve probably guessed by now that I LOVE these. They are great to improve posture and activate your upper back muscles. If you want to be able to do a proper pull up, you need to make sure that your lats activate and that you use the big muscles in your back. This move will help you do that.
- Scapular Push ups – This move does the same sort of thing that the wall holds do – It helps you get that scapular retraction that is necessary to do pull ups.
- Dead hangs – So at the beginning, I want you to just hang from the bar and get a feel for holding your body weight. Focus on tightening your core and even maybe tighten your back as if you are going to pull up. Then once you’ve done a few straight hangs, you will progress to a hang with a scapular retraction. You then want to press your chest out and pulling your shoulder blades down and together while you hang from the bar. If you can’t hold for long at the beginning, start with reps of retracting and then relaxing.
All three of these moves make you activate the muscles used to do a pull up and help you warm up your core!
Many people who can’t do pull ups will then turn to the lat pulldown machine and even simulate pull ups with bands for their “pull up” workouts. And while these moves are great to strengthen many of the muscles used by pull ups, they still aren’t the same as actually doing pull ups. They can be great supplementary moves, but if you want to be able to do pull ups…You’ve got to actually do variations of the pull up!
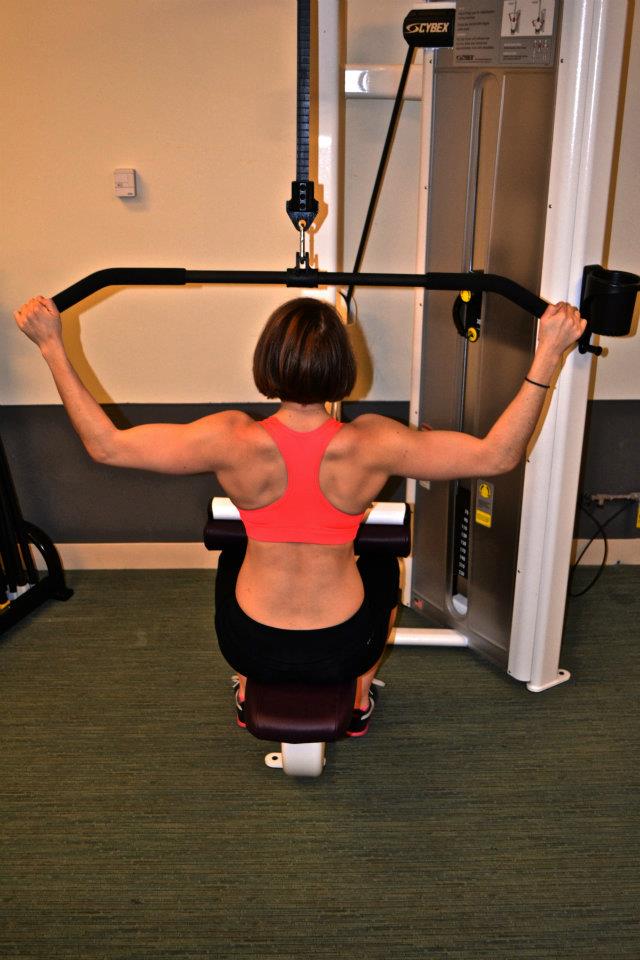
I haven’t used this machine now in over a year and some and guess what!?! By doing negatives and holds my pull ups have gotten WAY BETTER than they ever were doing lat pulldowns!
So once you’ve done the activation moves, try one of these assisted pull up variations and progress toward harder and harder variations until you can do one unassisted! If you have an assisted pull up machine, you can use that as well, but I personally like these better because they give you more control over the exact amount of assistance!
With both of the assisted variations below you can do three different things to progress or regress the move. You can do holds, negatives and full range of motion pull ups/chin ups.
- Holds – You can hold at the top, middle and/or bottom of the move. Each will work on strengthening the muscles at each piece of the motion. You can jump or push yourself into position and then hold once there for as long as possible.
- Negatives – With negatives, you work the eccentric part of the motion. To perform a negative, you will set yourself at the top of the pull up and then lower yourself down as slowly as possible.
- Full pull up – You will use assistance to perform a FULL pull up, which means chin above the bar to arms straight at the bottom.
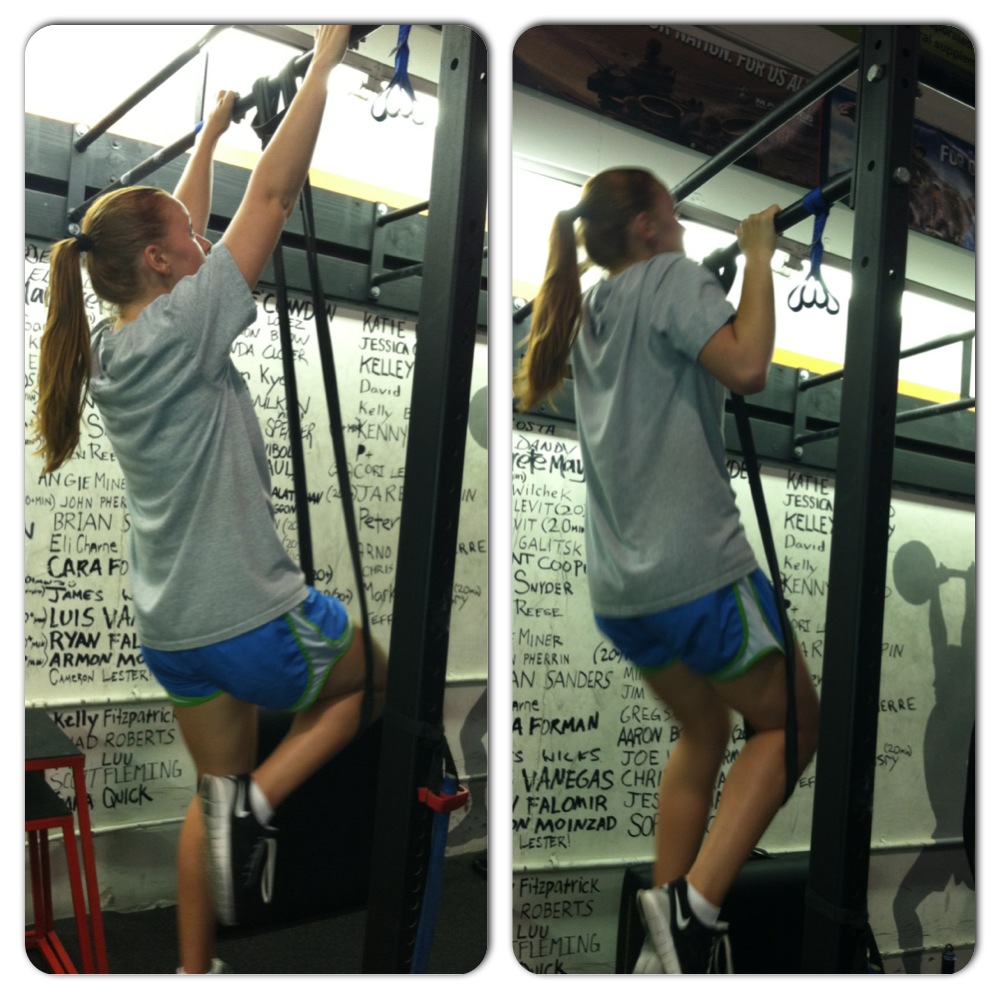
The two different ways you can get assistance to do these three variations are:
- Foot assisted pull up – Hang from a bar or use TRX/Jungle Gym straps. Place your feet on the ground underneath you. The more firmly planted your feet are, the easier the move will be. Your goal is to use your feet as little as possible. Your feet will assist only as much as you so that you can perform a hold, negative or full pull up.

Thanks Carla for demoing!
- Band assisted pull up – Hang from a bar with a band around your knee or knees (putting the band under both knees makes the move easier). The band will add assistance as you perform the move. The skinner the band, the harder the move. The more you control the move and don’t swing, the less the band will propel you up.

Thanks again Carla!

If you don’t need assistance to hold a pull up or chin up or to perform a slow negative, then you may move to the bar without assistance. Don’t use assistance if you can perform 10 3-5 count negatives (and not a fast count) or 30 second holds without assistance. Make sure you can perform the move correctly before advancing. But also make sure that you are always checking your progress to see if you can perform the moves without assistance.
Remember, your goal is to lower assistance as you master each move. Don’t just waste time on the lat pulldown machine trying to get stronger or by doing assisted pull ups on the machine. Work on each piece of the pull up and ween yourself off of the assistance!
So do you want to be able to do a pull up? What are you doing to get better at them?
Here is also a great workout to strengthen your back and biceps to help you get stronger so you can do a pull up.
NOTE: In this post I didn’t really go into grip variations. The easiest grips to do are usually the neutral or chin up (palms facing you) grips. The pull up grip and wide grip variations are generally more difficult.
Reasons why you should keep your workouts shorter
So I’ve been asked numerous times recently about how long your workout should last. In case you had the same question, my answer is…Keep it short! Maximize the time you have in the gym.
Honestly, your workouts really never need to go over an hour and here is why:
Many of us think that the more we do, the better our results will be.
But more isn’t always better.
Longer, harder workouts…extra reps…don’t always equal greater results.
People will even tell you that you aren’t doing enough if your workouts aren’t at least an hour or two.
But who is really focusing the entire time or working as hard as they can when they spend two hours in the gym?
NO ONE!
And if they are really working at 100% the entire time, they are probably overtraining and hindering their strength and size gains even further!
Sometimes too long, too hard, too much can end up hindering your progress and even cause you to go backwards – it may be the reason why you’ve been stuck looking the same way and lifting the same weight for the past few months or even years!
While hour-long or even two-hour long workouts have their place and time, most of your workouts shouldn’t last that long.
Sometimes less is actually more!
It is about being efficient in the gym, using compound lifts, shorter rest periods, heavier weights, and optimizing the time you spend there because the hormones that our bodies produce work to our advantage when we keep our workouts under 60 minutes and can actually hinder our progress when we go over.
When you start training, your body will boost testosterone levels significantly and around 30 minutes into your workout, testosterone levels in your body will peak. By about 45 minutes, your testosterone levels are returning back to normal.
So all those guys and gals spending two hours in the gym have been working without the aid of a key muscle-building hormone for about an hour and 15 minutes. They would have gotten more benefit out of 45 minutes of intense, compound, heavy lifting and optimal testosterone levels.
And on top of the fact that at about 45 minutes your testosterone levels are returning to normal, at about 60 minutes, your body will start producing more cortisol than testosterone and cortisol is a catabolic hormone, meaning it breaks down tissue instead of building it up!
When your workouts go over 60 minutes in length, you hormones are no longer helping you build muscle and burn fat. Your body is instead producing more cortisol, which breaks down muscle tissue, reduces protein synthesis, and increases body fat storage. Your body begins to fight against all of the hard work you are doing!
So instead of lifting heavy one set and wandering around the gym for five minutes “resting,” why not stay focused and get some high quality work done while your testosterone is raised?
Also, if you keep your workout shorter but more intense with compound movements, heavy weights and varied rest periods, you will optimize your hormone levels even more.
By lifting heavier with compound movements, you will maximize your testosterone response especially if you do enough volume. Working in the hypertrophy rep range of 8-12 reps for 4-5 sets at about 75% of your one rep max has been shown to result in significant increases in testosterone levels and other hormones that result in better protein synthesis.
And to get even more out of every rep, play with your tempo especially on the eccentric portion of your lifts. The eccentric portion of a lift, when the muscle lengthens, is where you can cause the most muscle damage. Studies also suggest that more protein synthesis happens after lifts with an emphasis on eccentric training. So between causing more muscle damage and more protein synthesis, focusing on the eccentric lift will cause bigger and better size and strength gains!
Also, while so many of the muscled guys and gals around the gym spend just as much time lifting as they do resting, long rest intervals may not be the best way to maximize your growth hormone response, a hormone that increases protein synthesis and muscle mass. Short rest intervals have been shown to create a strong growth hormone and testosterone response. Short rest intervals actually increase growth hormone levels higher than longer rest intervals.
However, don’t ignore the benefit of adding in some longer rest intervals especially when lifting super heavy and intensely. High intensity exercise does raise cortisol levels and longer rest intervals do allow for more complete recovery and also increase testosterone levels to counteract cortisol levels. Make sure to VARY your rest intervals.
So stop wasting your time in the gym doing two-hour, non-efficient workouts when your cortisol levels are working against you.
Not only are you not getting the most out of your time in the gym, but you are also causing yourself to not recover as well or as quickly.
Work SMARTER not LONGER!
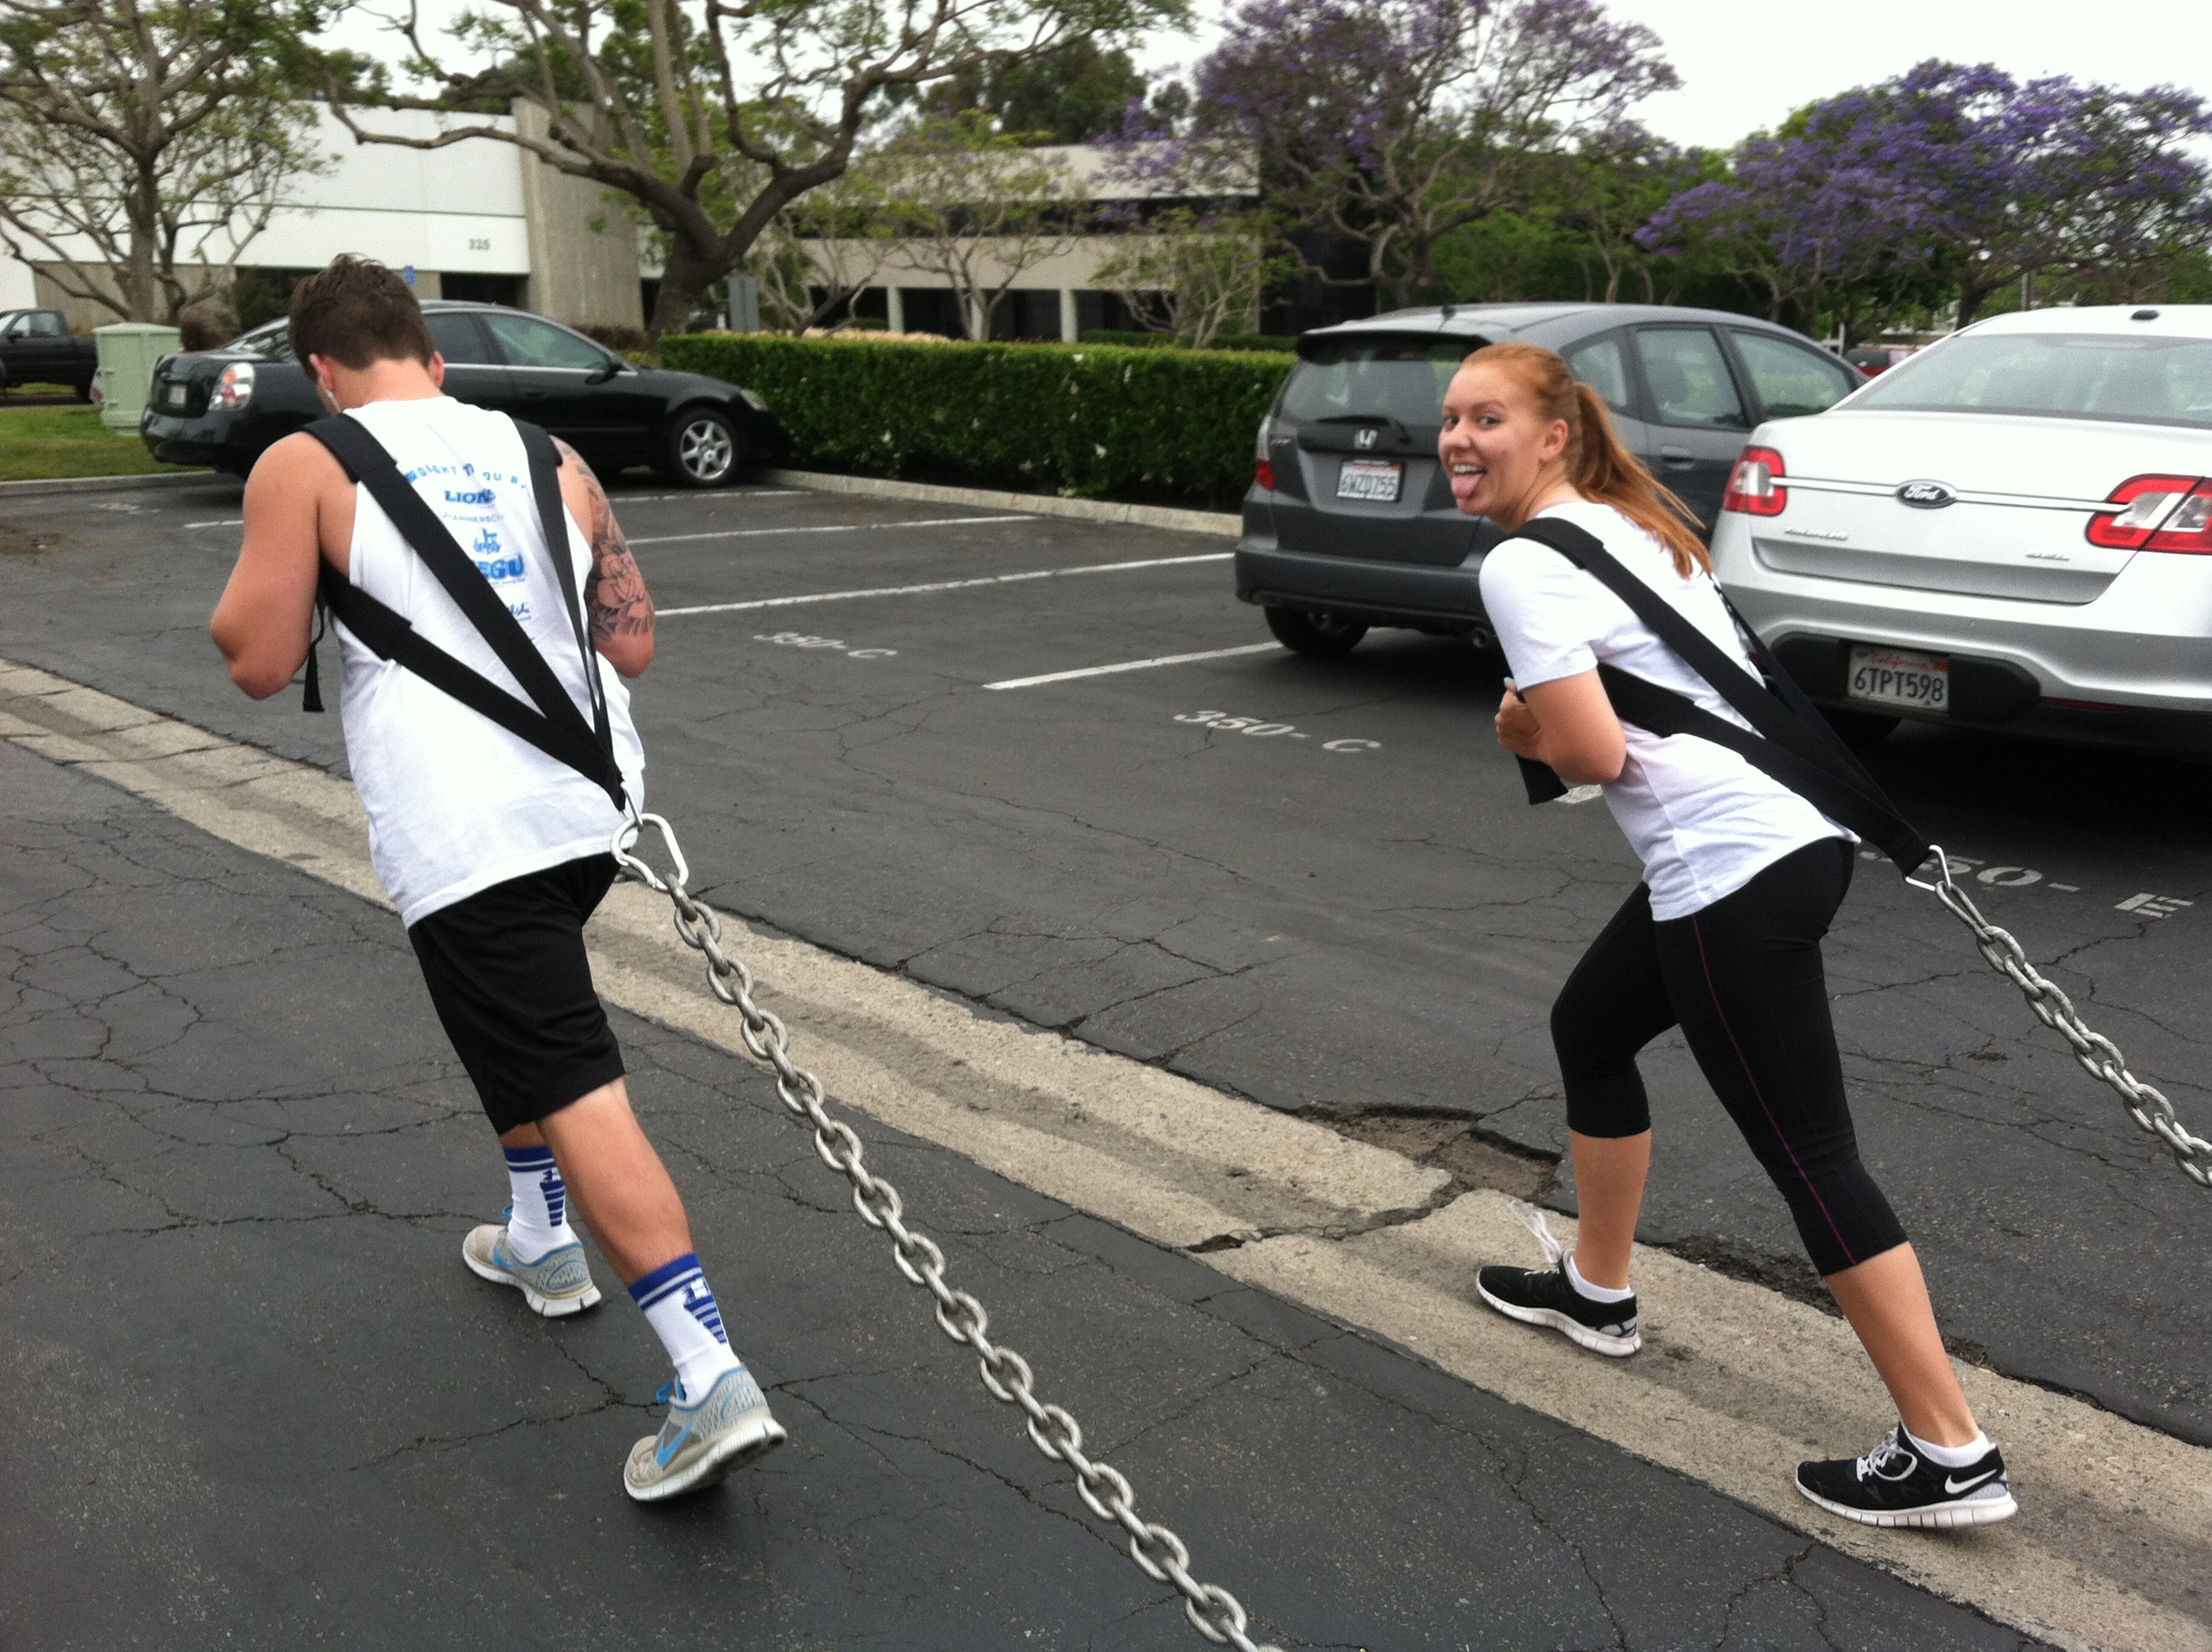
30 minutes and one killer workout…chain drags around the block…And one very happy Carla haha
So yea…That is my answer when it comes to how long your workouts should be.
Got another question? Let me know!
One less decision to make
So I had coffee with a great friend and inspirational woman today and we got onto the subject of females and personal training.
She mentioned that her significant other said to her the other day, “Why do you need a personal trainer still? You’ve worked with a whole bunch of different ones enough that you know a ton about working out already. You could easily design your own workouts.”
She said her response to him was, “But I don’t want to have to make the decisions. I don’t want to have to decide what exercises to do and what weight to use. I already have to make a bazillion choices every day!”
She then looked at me and said, “Having a personal trainer, having your workouts designed for you, is one less decision we, women, who are already overloaded with choices every day, have to make.”

Life is a balancing act…why add one more thing every day to our plate?
Working out for many women is their one chance during the day to really do something for themselves. A time when they don’t have to make any decisions or worry about what anyone else needs. It is a chance for them to focus on themselves- to have some ME time.
And while I know that not everyone is like me and that some women do, in fact, enjoy running, I think that many women turn to the cardio machines because it is an EASY decision. They don’t have to think about what they are going to do – they can just get on and go until they are tired.
Whereas coming up with a workout when you get to the gym (and figuring out what equipment to use when a lot of the weight room space taken over) is more challenging and not near as relaxing.
So some women either avoid lifting weights or they turn to classes and personal trainers.
And while, of course, I’m in favor of using a personal trainer, I do think that you CAN great your own workouts without adding in the stress of making a whole bunch of decisions when you get to the gym.
And one of those ways is to sit down and plan out your workouts for the week, or even the month, ahead of time.
I mean think about it…It is way less stressful when you plan out, and even cook, your meals ahead of time. Then when you are tired and stressed out during the week, you don’t have to figure out what to make and then spend time cooking it. You also don’t get the urge to just eat anything because you are too tired to care.
Same thing goes for working out. When you create your workouts ahead of time, and I don’t just mean earlier that day, you create workouts that will challenge you and help you grow.
Whereas a lot of the time when we have to design something in the moment, we design something based on how we feel – which sometimes can mean doing 10 push ups instead of 20…or using half the weight we should be using.
It can even mean that we skip the workout altogether because we just don’t have the energy to make another decision.
So take a second and think…After a long day at work, do you do the workout that requires the least amount of thought or the one that will get you the best results?
Maybe planning out your workouts ahead of time (or getting a personal trainer) may be just want you need to hit your goals!
Do you plan out your workouts?


