Category Archives: Recovery
When Pain Doesn’t Mean You Should Skip Your Workout
Rest when you have injuries is super important.
And time off may be just want your body needs.
HOWEVER, sometimes just sitting on your butt and not working out can cause your injuries and aches and pains to become worse and last way longer than they should.
Recovery isn’t all about time-off.
It is also about doing the correct things to increase, mobility, flexibility and stability to help the body become stronger and more balanced.

You can’t just “take it easy” on your ankle, or knee or hip the rest of your life! You can just “rest” ever day all day.
No, life requires you to move around.
And if you don’t rehab the injury, if you just rest until it “feels better,” you are going to end up re-injuring it very quickly OR have to live with never being able to return to your previous activity level.
Seriously…Who wants to be limited the rest of their life!?!
NOT ME!
That is why I’ve written a ton of posts about activation, stretching and foam rolling exercises.
You’ve got to STRENGTHEN the muscles around the injured area and CORRECT any imbalances.
So in case you’ve just been resting your injury and haven’t done any rehab, check out these articles this weekend and GET STARTED TODAY!
Shin Splints and Plantar Fasciitis
Ankle Injuries and Regaining Mobility
Mini Band Glute Activation Exercises
Foam Rolling and Stretching for Hip/Low Back Pain
Single Limb Exercises to Correct Imbalances and Prevent Pain!!!!!
Functional Core Strength to Prevent Injury
Plank Variations to Improve Core Strength and Reduce Low Back Pain!
Tips to Relieve Low Back Pain
Low back pain is one of the most common complaints I get from new clients who have a desk job.
And honestly, I’m not surprised. They sit hunched over a computer all day, which causes bad posture and muscle imbalances that can easily lead to injury and pain.
That bad posture contributes to low back pain because it causes tight hip flexors, hamstrings and even calves. It can also cause tight lats and poor thoracic extension.
Those tight muscles and poor extension cause imbalances. They cause you to overuse the low back. And the tight hip flexors and hamstrings especially inhibit the glutes and prevent them from activating, placing more pressure on your low back.
Because muscles aren’t working that should be working, your low back takes over when it shouldn’t, which causes further pain and injury.
Below are some great trigger point, stretching and glute activation techniques to help you relieve that low back pain and get more out of your workouts!
TRIGGER POINT RELEASE
For videos showing all of these trigger point release moves, sign up for the Redefining Strength video library!
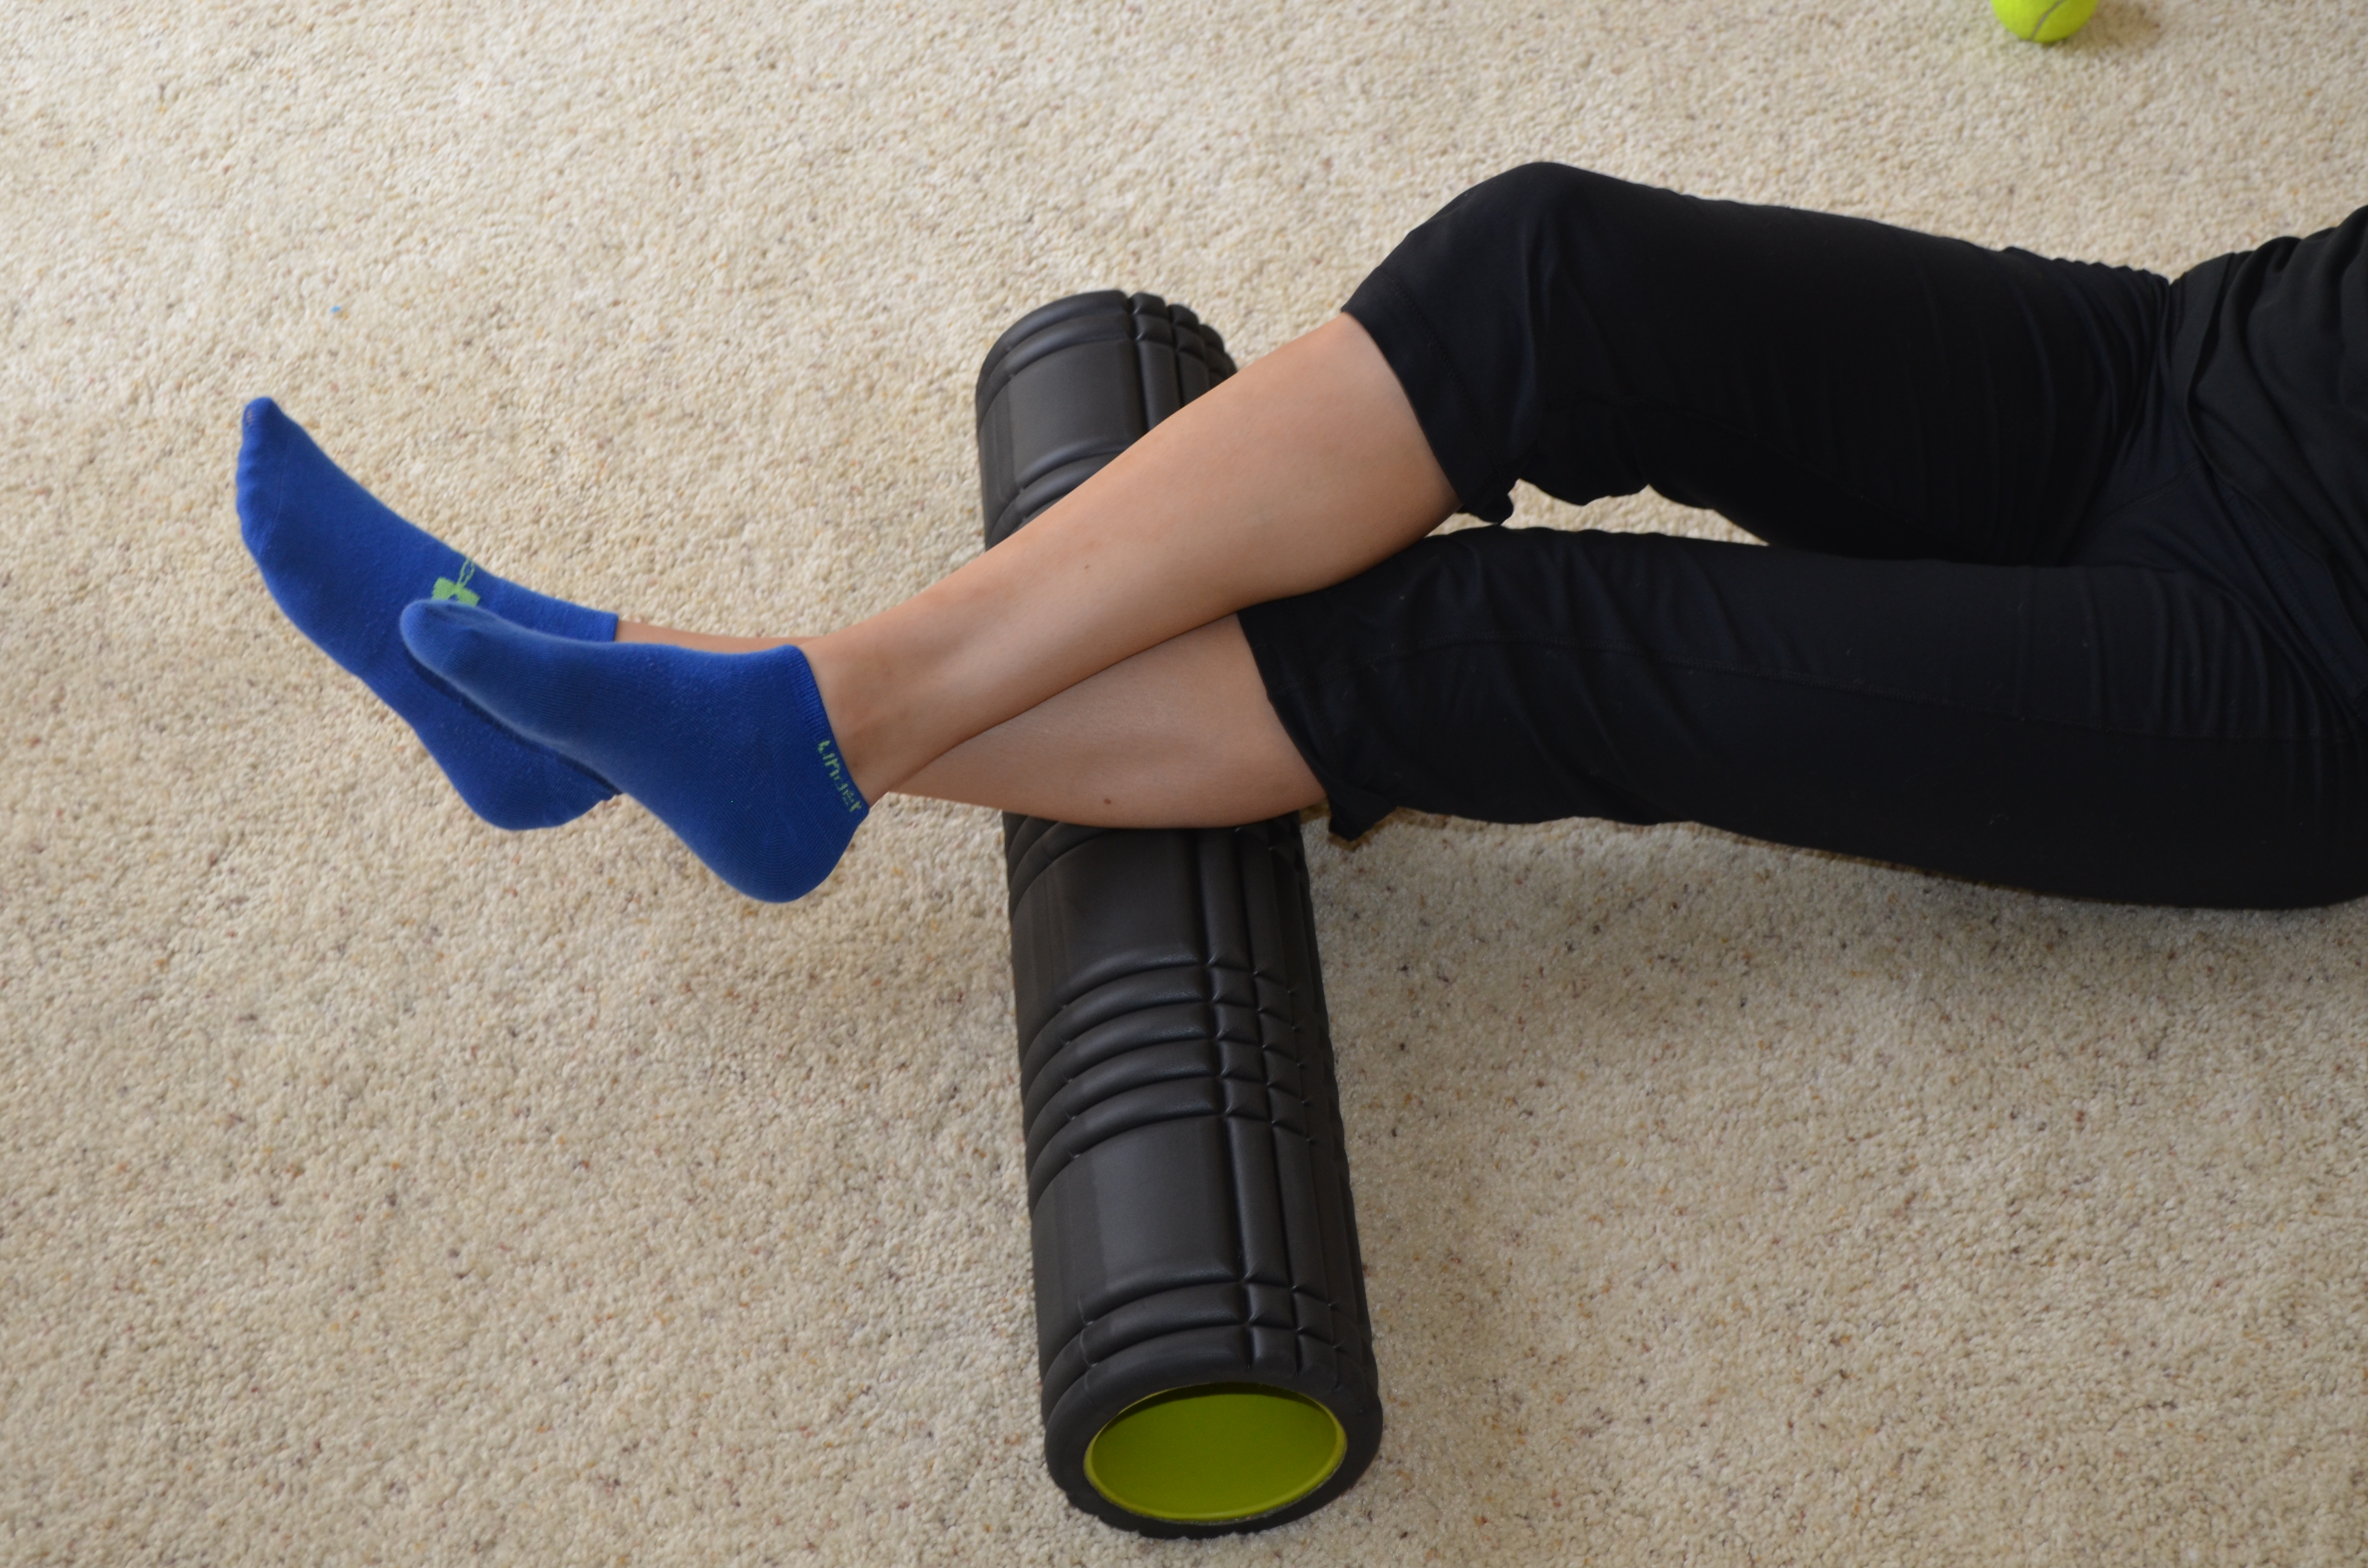
1. Calves – I love using either a rumble roller or a ball on a block (or books if you don’t have a block). I find it easier to really dig into knots using one of those tools. To roll out your calves, place one calf over the trigger point tool. Cross the other leg on top to apply more pressure. Rock the leg side to side to dig in more. You can also make circles with the foot and flex and relax the foot to apply more pressure and help release the trigger point. Move the ball or roller up and down the back of your lower leg, spending time on any tight spots you find.
2. Hamstrings – The best way to hit your hamstrings is using a ball or roller, but while seated on a chair, bench or table. You really can’t apply enough pressure while seated on the ground. Place the ball or roller right below your butt at the top of your hamstring and sit down on it. Roll it from side to side, holding on any tender spots. You can work your way down the length of your hamstring to right above the back of your knee. Do not roll out behind your knee.
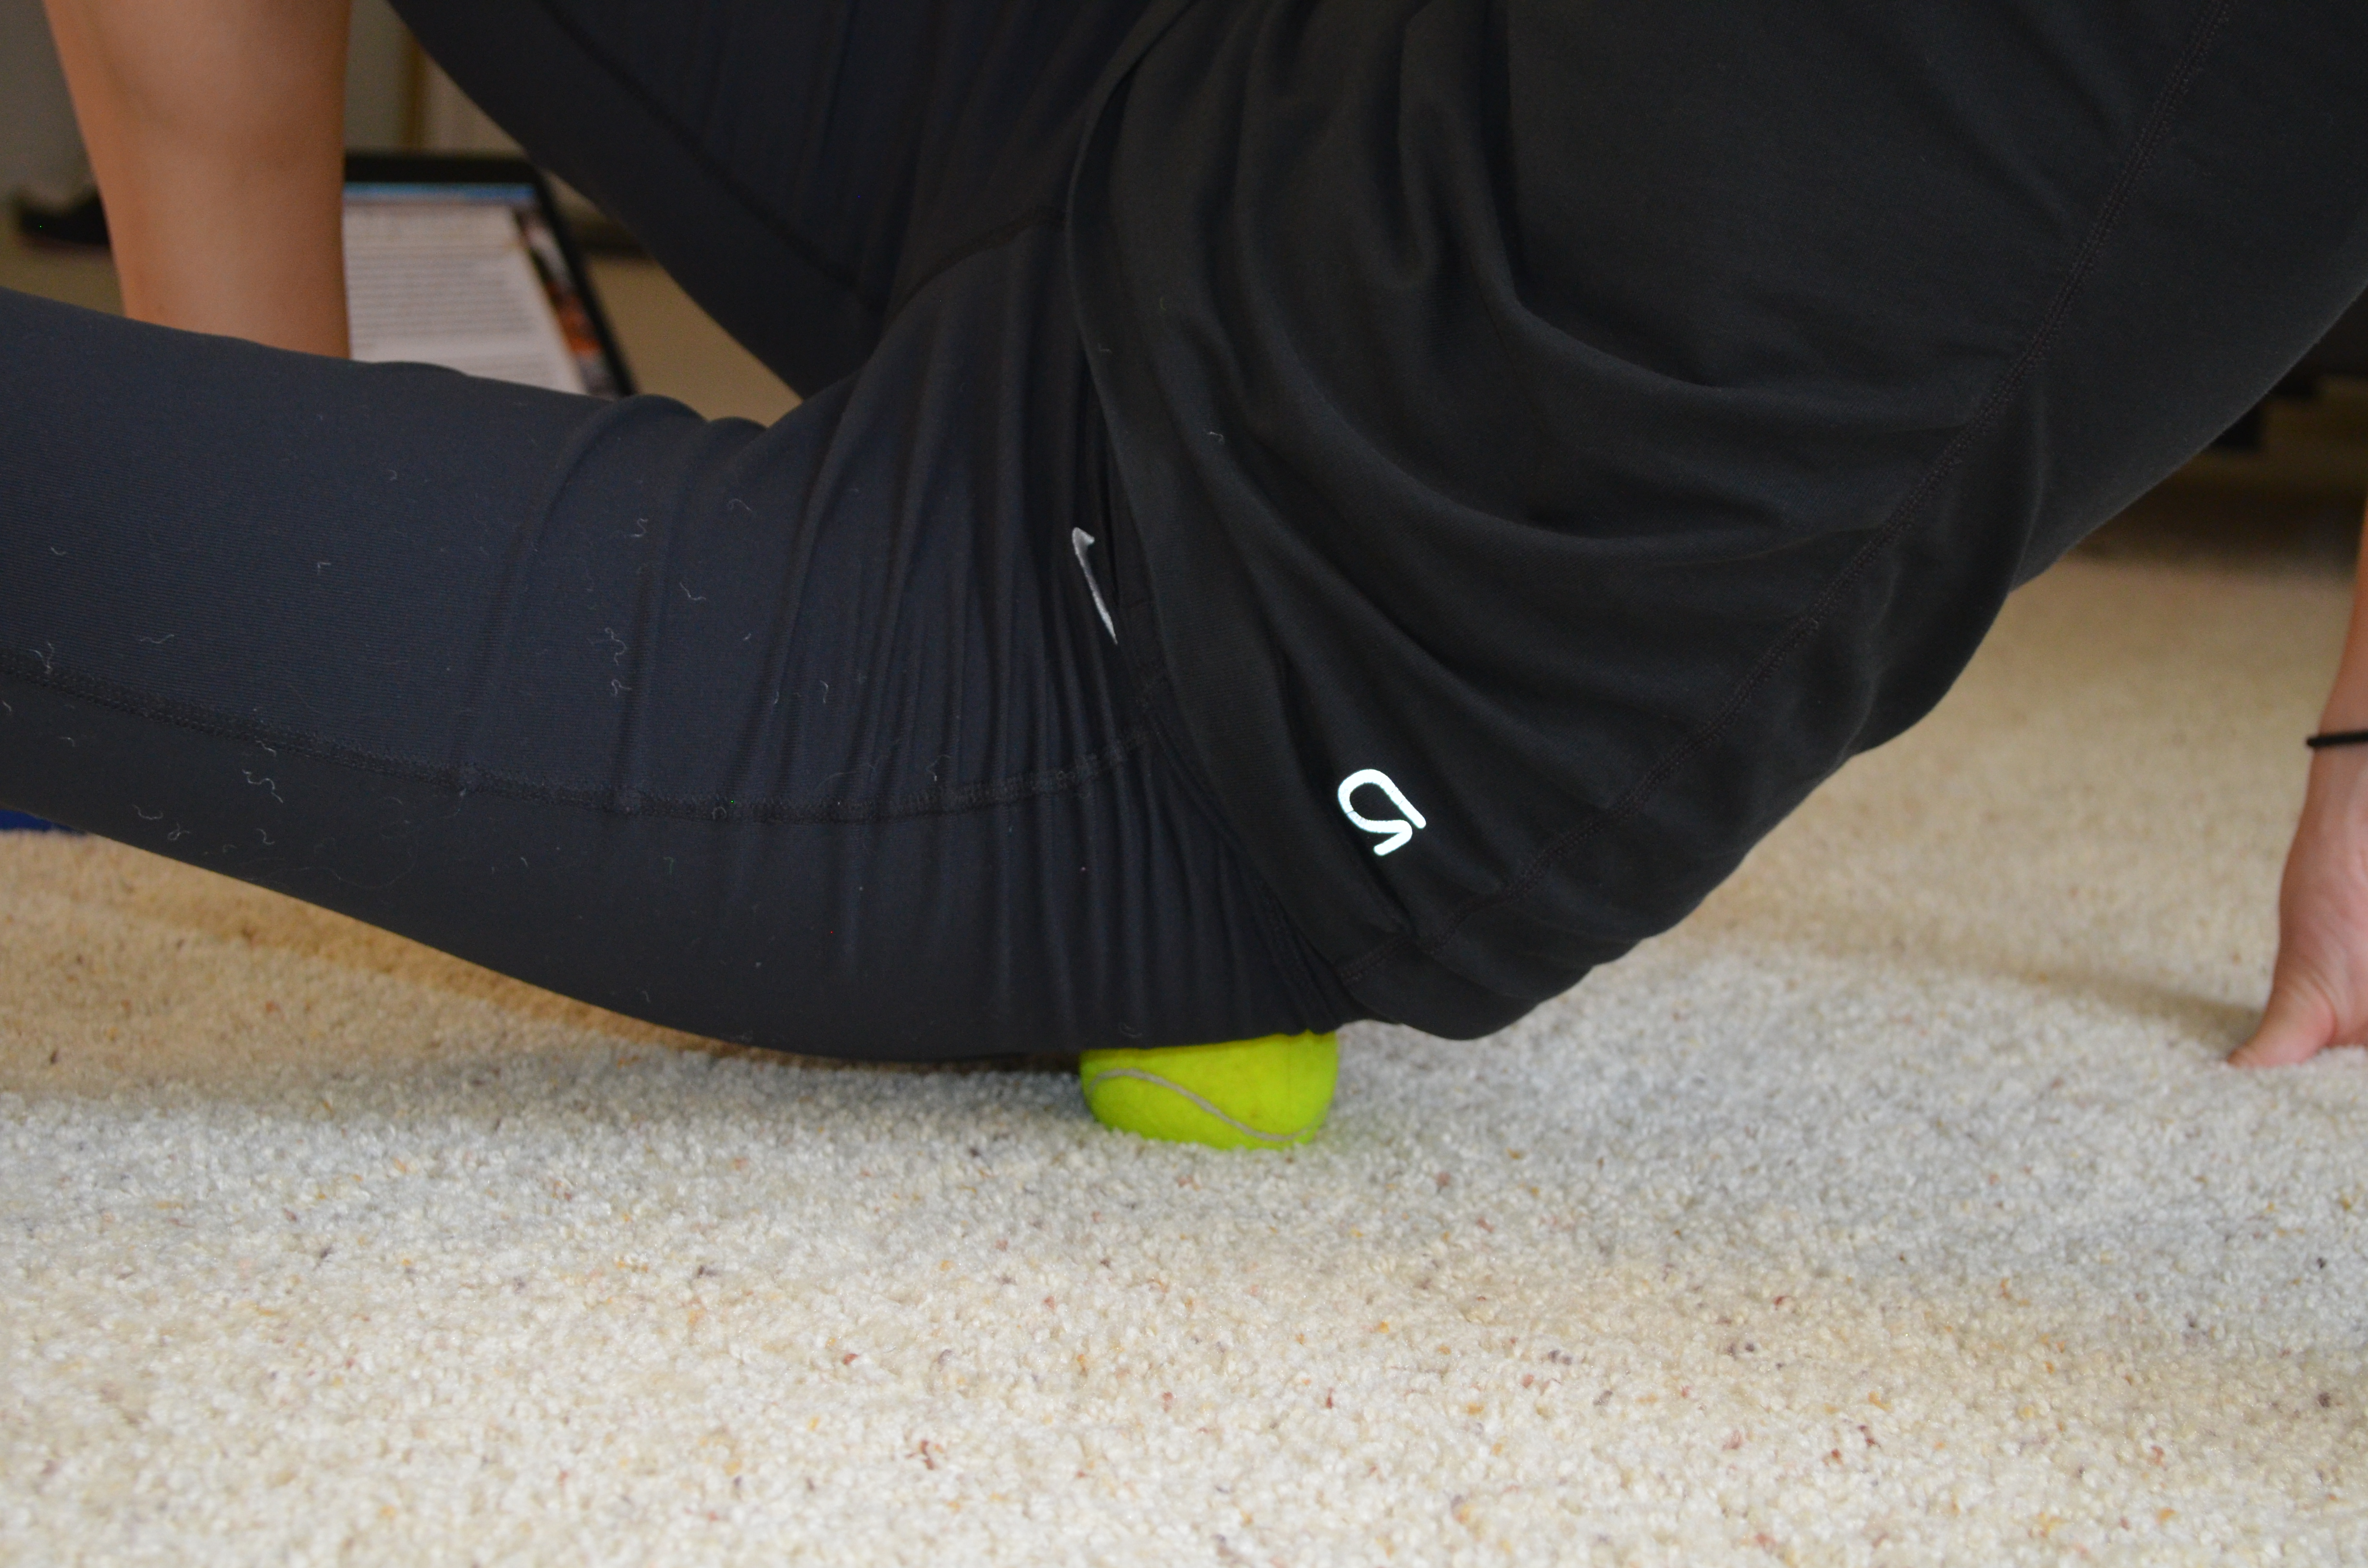
3. Hips/Glutes – The best way to target your hips and glutes is with a ball. The smaller and harder the ball, the more you will really be able to dig in. Start by lying face down on the ground with the ball at the top of one quad. Roll the ball toward your groin and then back toward your hip bone. Move it slightly up and down the top of your quad. Hold on any tight spots. After working out the front of your hip, move the ball around the side and to the back of the hip bone. Roll out the top of your glute, staying right below your low back. Hold on any tight spots. As you work your way down your butt, as you hold on any tight spots, lift and lower your leg. Also draw your knee in toward your chest and then straighten the leg back out. Those two moves will help you apply more pressure to any trigger points. Spend more time on the areas in your hips and glutes that are tight. If a spot doesn’t hurt, don’t spend time there!
4. Ab Release – This is best done with a larger ball although it can be done with a small ball on some books or a block. Lie face down on the ground with the ball under your belly. It should be to one side of your belly button and right beside/above your hip. So basically in one side of your abs. Relax over the ball, letting your body sink into the ground. This will help release your hips as well. You can also move the ball up higher to right below your rib cage to help release your abs. Our abs can be tight and shortened because we sit hunched over all day so we can’t forget to roll them out as well!
5. Peanut – The peanut (two balls tapped together) can be used to work all the way up your back along your spine. It is personally one of my favorite tools. Lie on your back with the peanut right above your butt and a ball on either side of your spine. Relax your upper back onto the ground and lift both knees into your chest. Repeat that movement a few times then move the peanut up higher on your back and repeat. Once the peanut is at about the middle of your back and you don’t feel like tucking your knees is applying more pressure, start performing an upper body crunch instead. Perform a few slow crunches and continue working the peanut up your back until you reach the top of your shoulder blades. Spend more time on any tight areas.

5. Lats – You can use a roller or a larger ball to roll out your lats. I prefer the roller because I feel like it is easier to work all the way up and down your side. Lie on your side with the roller under your armpit. Rock forward and backward then move the roller lower down your side. Continue to rock slightly forward and backward to dig in further to any trigger points. Work down the side of your back until you hit the bottom of your rib cage. Spend more time on the areas that are tight.

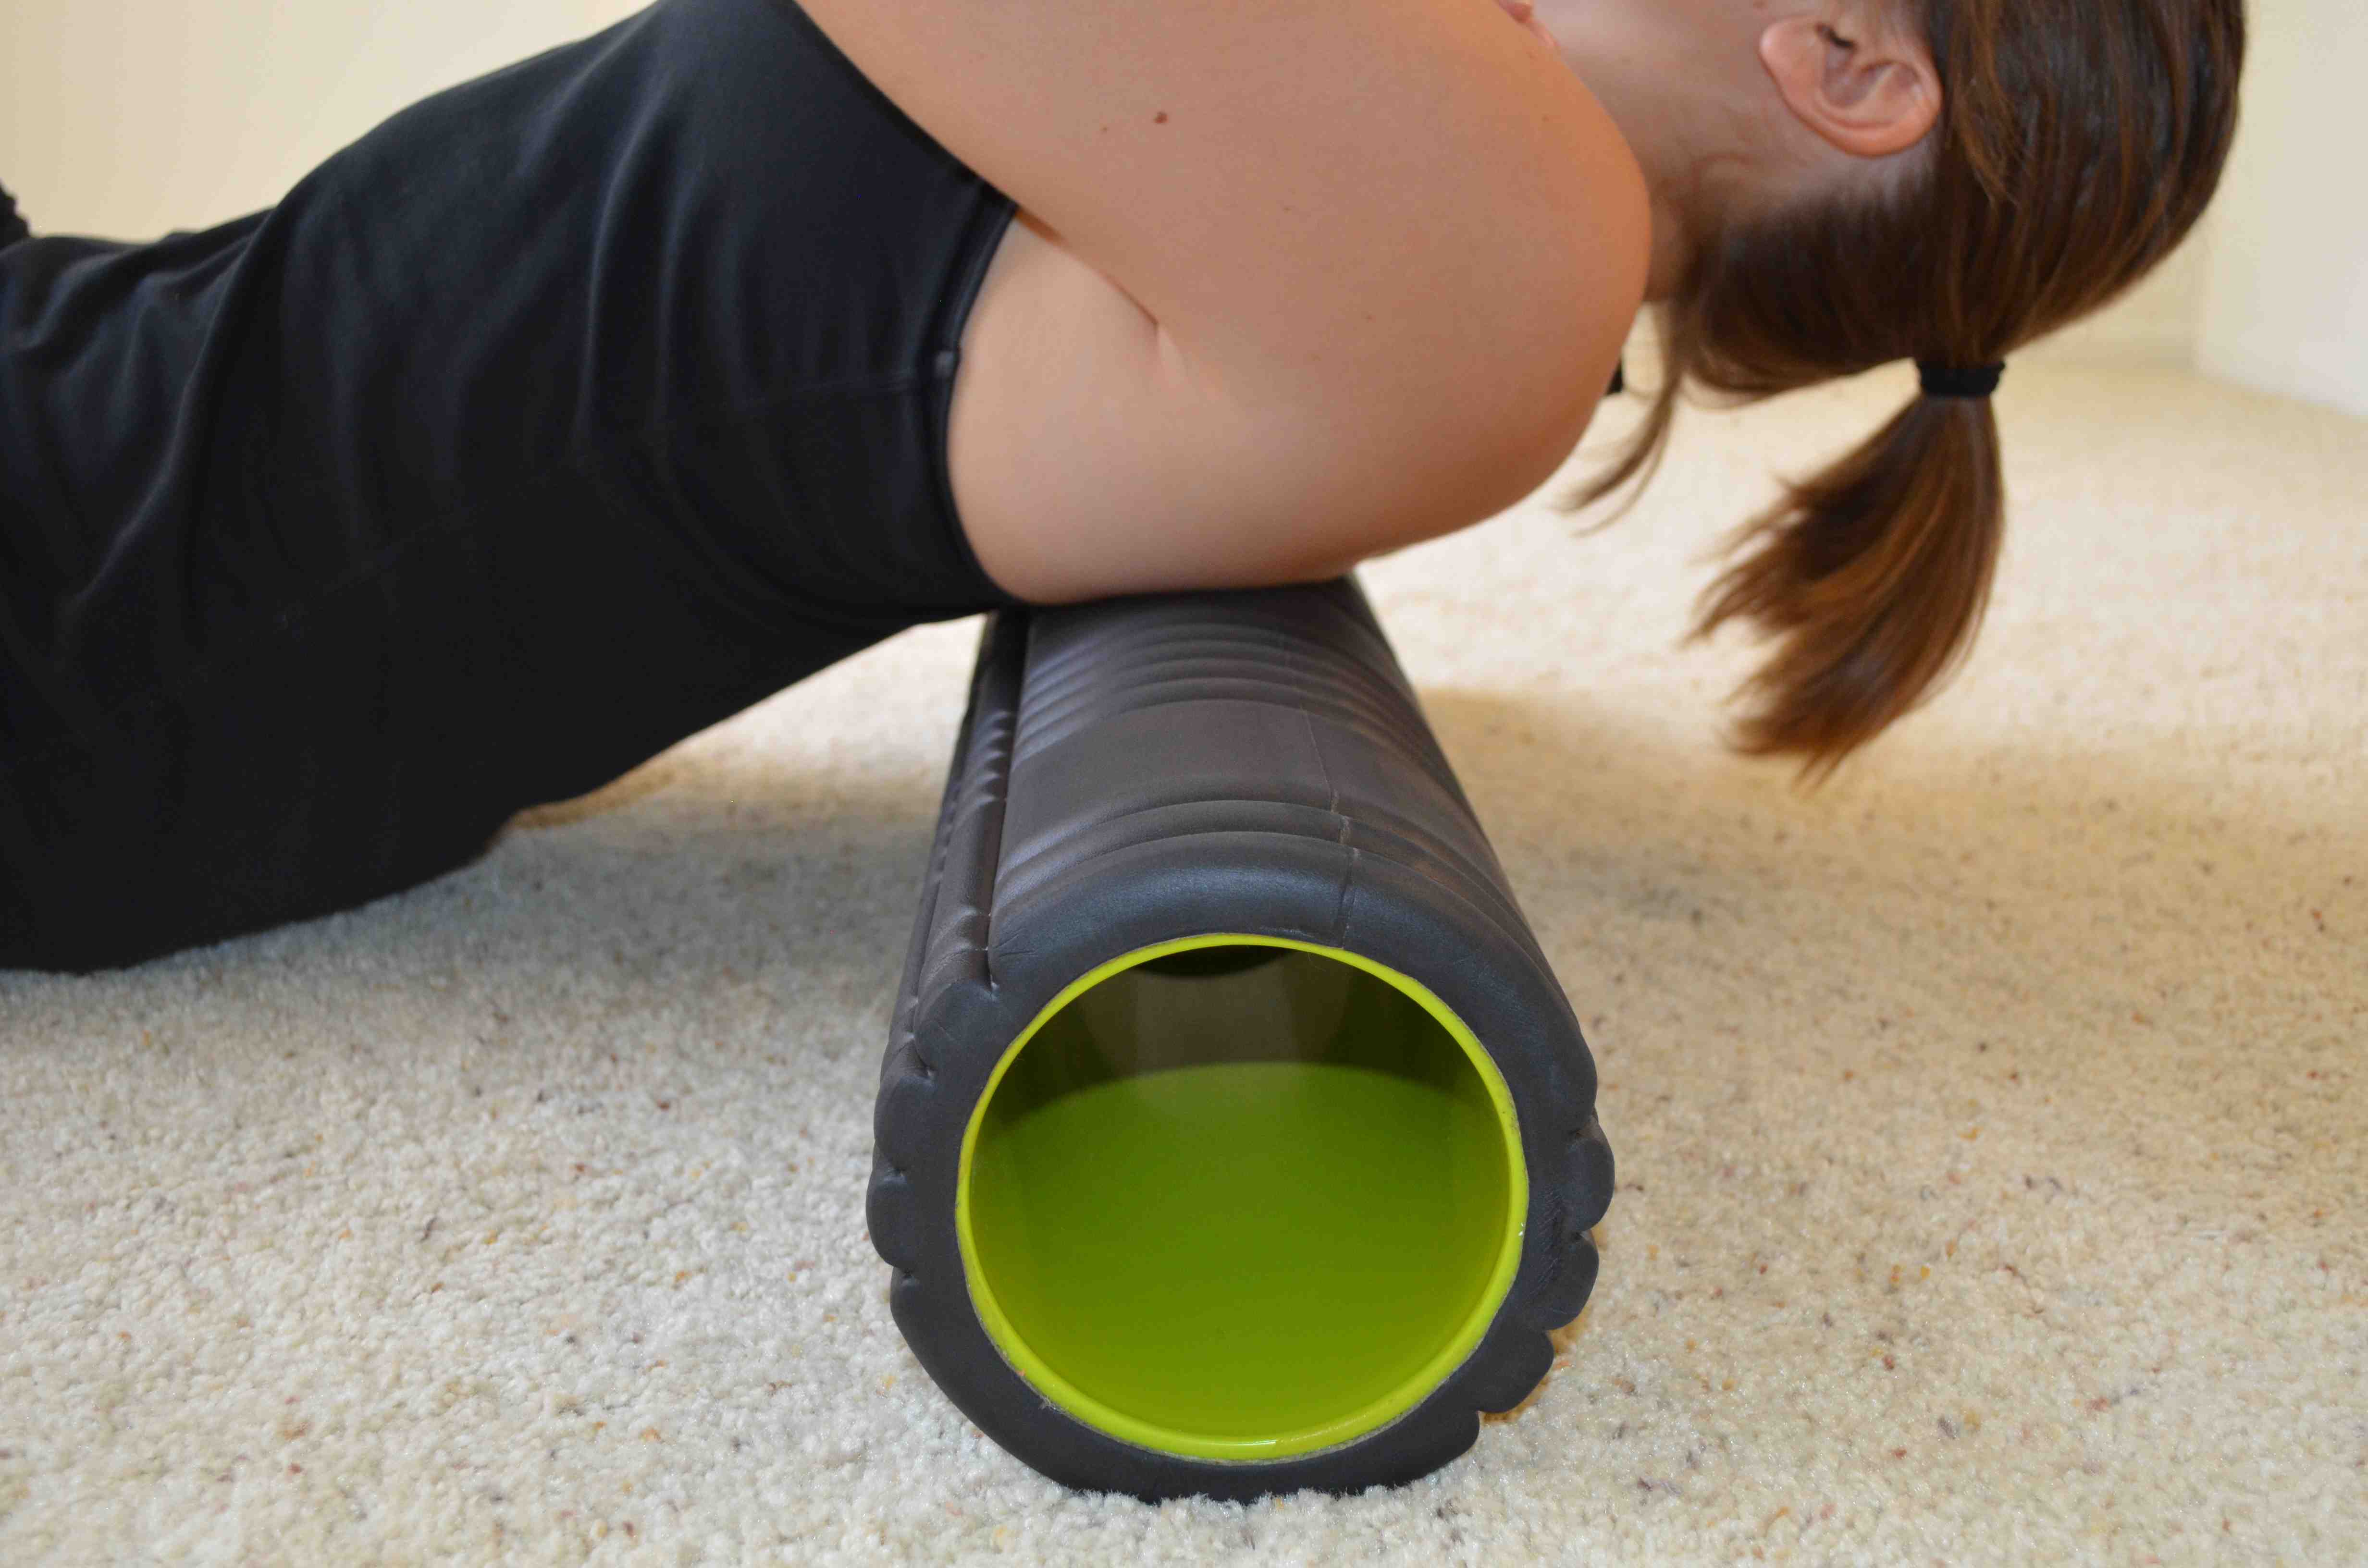
7. Thoracic Spine – You can use a peanut or a ball to work out your upper back. One of my favorite ways to roll out my upper back, and work on thoracic extension, is with the roller. Bend your knees and place your feet flat on the ground with the roller in the middle of your back. Keep your butt on the ground and extend your back over the roller, letting your head relax back over toward the ground. Move the roller up higher on your back and repeat. Every time you extend back over the roller, make sure to breathe and keep your butt on the ground. Work all the way up to almost the top of your shoulder blades. You can also simple roll up and down without the extension, but I love to add the extension in there as well.
STRETCHES
1. Bear Squat – Start kneeling on the ground. Place your hands down on the ground in front of you. The closer you place your hands to your knees, the harder the stretch will be. Press your butt up into the air, driving your heels to the ground. Feel a nice stretch down your calves and hamstrings. Hold for 1-2 seconds and then drop back down to your knees. If your feet feel locked up, you can do the bear squat with foot stretch.
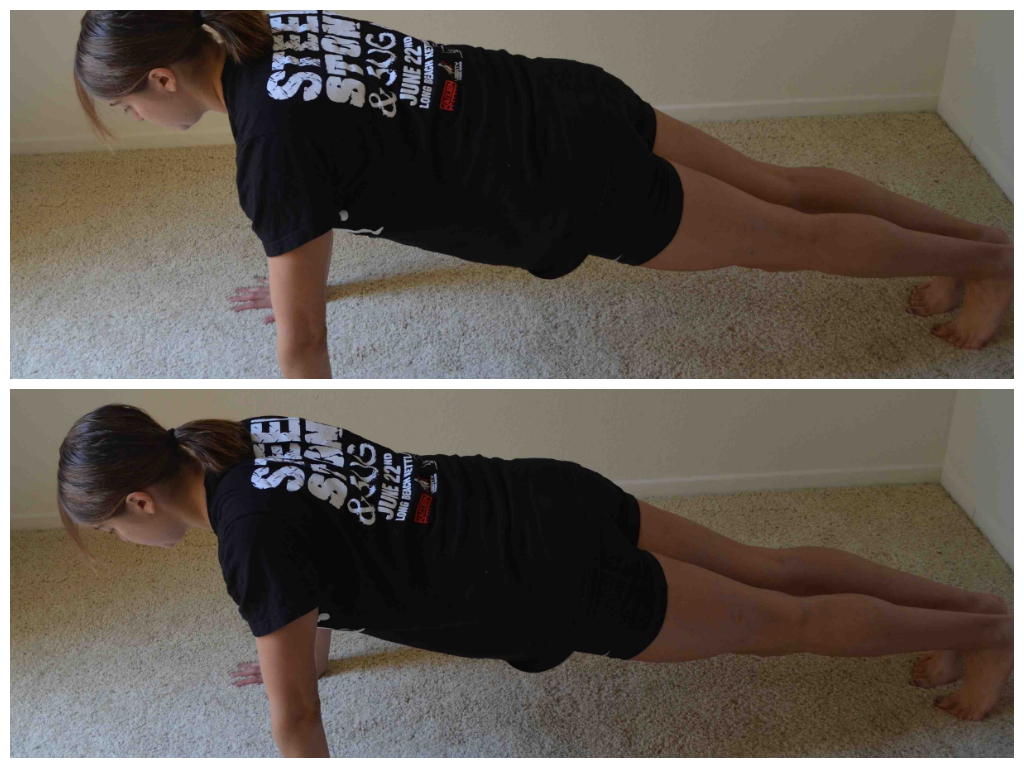
2. World’s Best Stretch with Hamstring – Start in a high plank position with your hands under your shoulders and feet together. Your body should start in a nice straight line. Step your right foot outside your right hand. Drop the right elbow down into the instep of your right foot. Then rotate open facing your right leg, stretching your right arm up toward the ceiling. Bring the right hand back down to the ground. Sit back on your left heel and straighten your right leg. Feel a stretch down your hamstring. Then bend the right leg and move back into the plank position with the foot outside the hand. Again drop the elbow and repeat the move on your right side. Complete all reps and then switch and do the stretch on the other side.
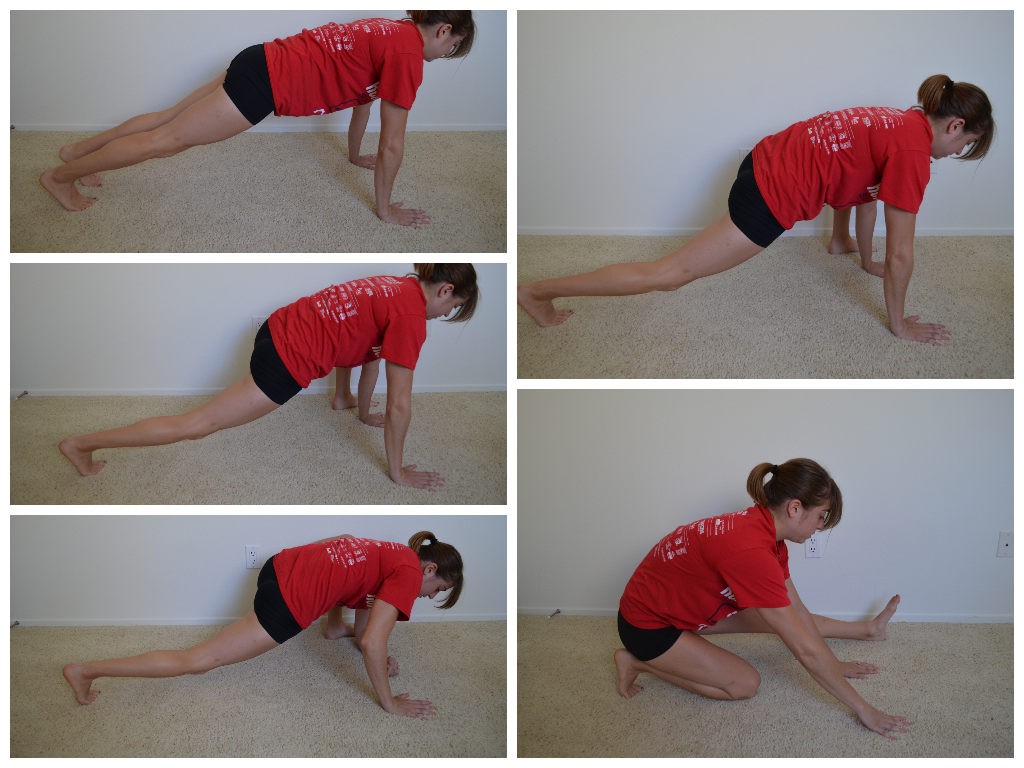
3. Lunge with Reach to Hamstring Stretch – This move kind of reminds me of crescent pose and a triangle pose in yoga…Not exactly but that is what it reminds me of. Start in a high plank position. Step one foot up between your hands. Lift your hands up off the ground and reach them back and overhead as you stay in a low lunge. Feel a nice stretch down the hip and quad of the back leg. Then bring the hands back down to the ground and hike your hips up to straighten your front leg. Feel a stretch down the hamstring of the front leg. Sink back into the lunge and reach up and back overhead again to stretch the hip and quad before repeating the hamstring stretch. Complete all reps on one side before moving back into the plank and switching to the other side.
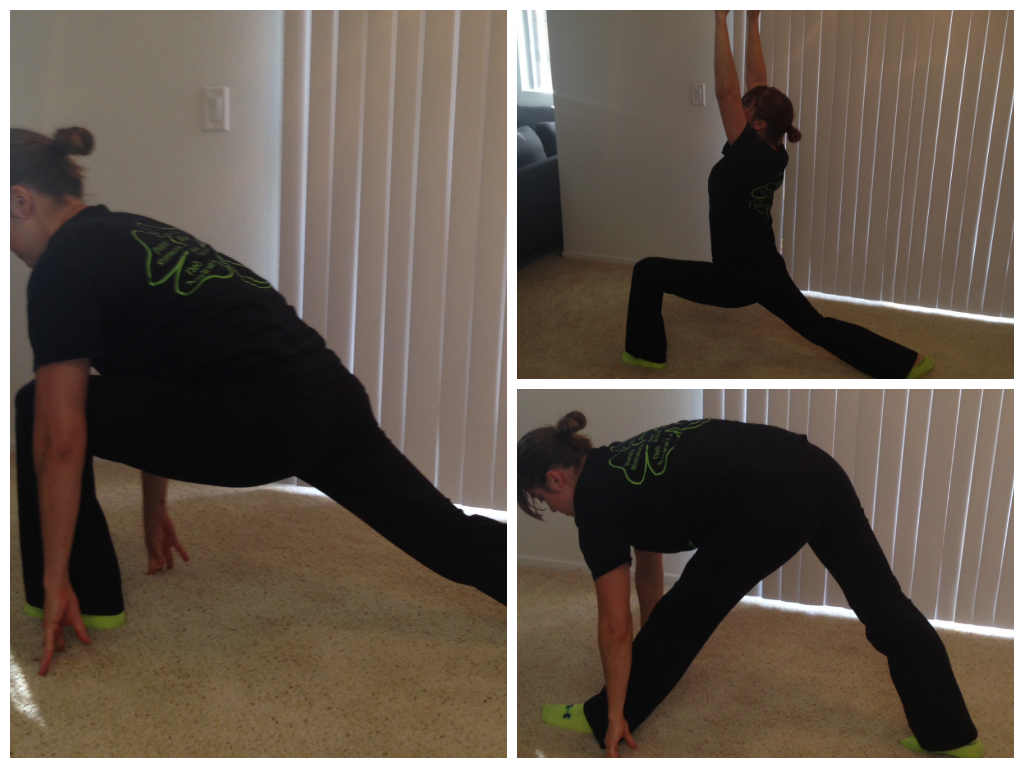
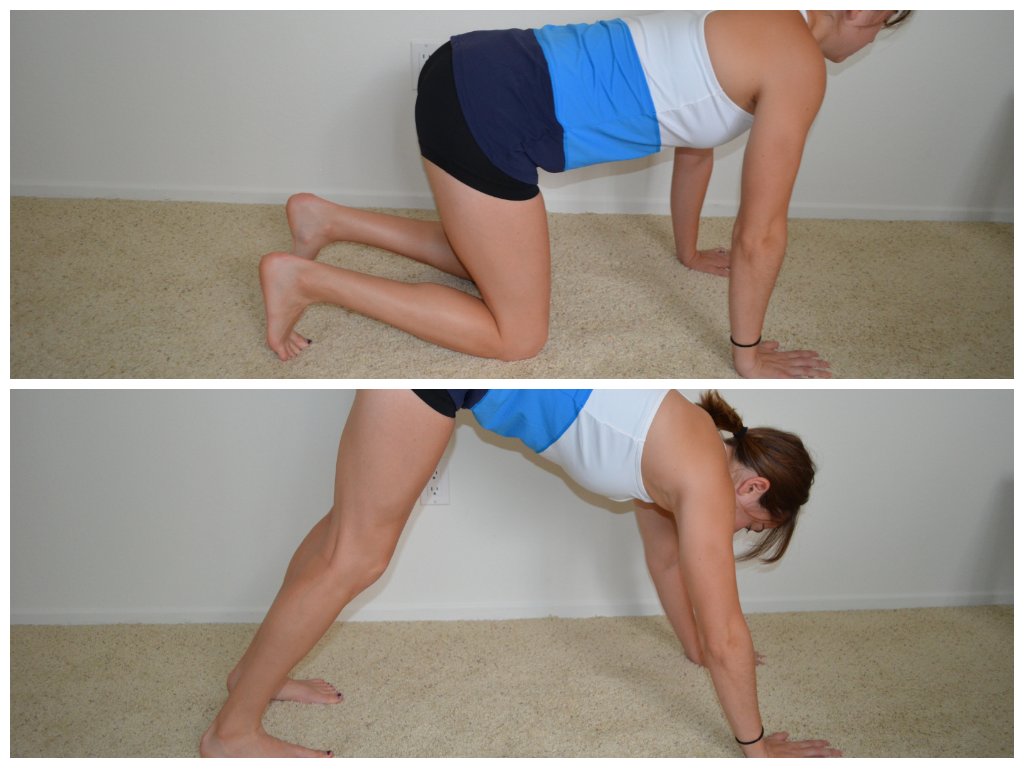
4. Frog Stretch with Rotation – One of the best groin and hip stretches out there in my opinion. Kneel on the ground and spread your knees as wide as possible. Lower yourself down to your forearms. Keep your feet in line with your lower leg and knees. Do not let your feet come together behind your butt. Sit your butt back between your knees as much as possible. As you come back forward, lower your body down to the ground and rotate your lower leg up and forward. Sit back again and then pivot the other hip. Keep alternating sides until all reps are complete.
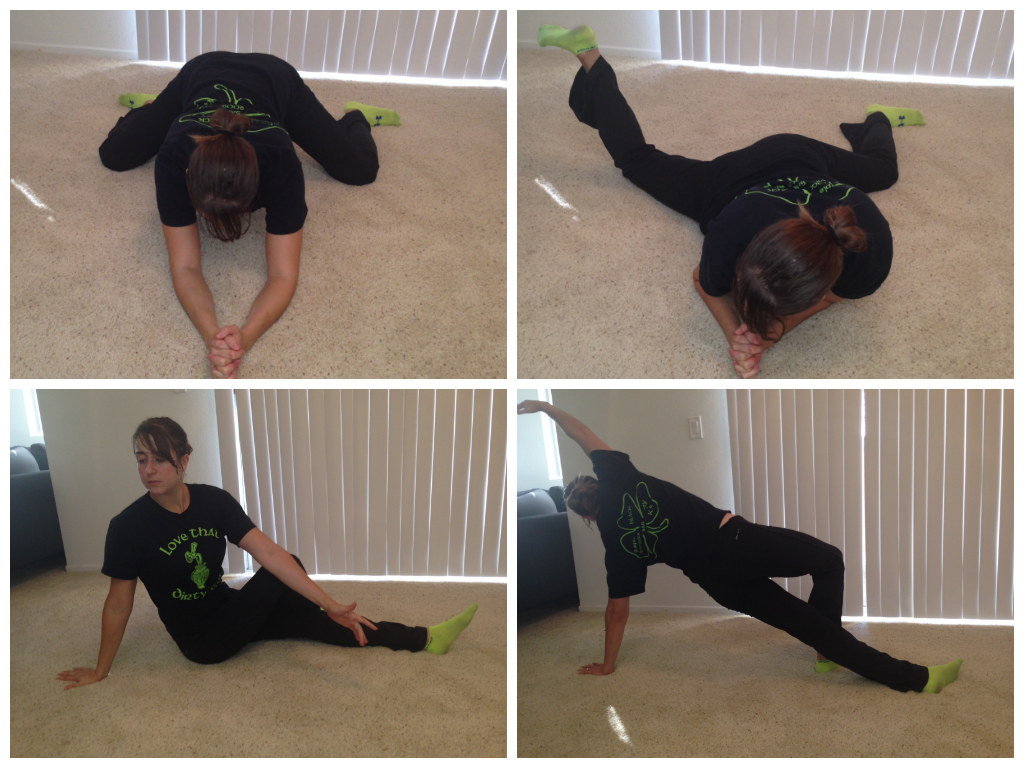
Top is frog stretch with rotation and the bottom is the seated rotation to plank reach
5. Seated Rotation with Plank Reach – Sit on the ground with both legs out straight. Bend your right knee and cross your right foot over your left leg and place it on the ground by your knee. Place your right hand on the ground behind you. Take your left arm and place your left elbow on the right side of your right knee. Press through your left arm and rotate your body to the right, keeping your chest up nice and tall. Do not slouch. Then rotate back around and place your left hand on the ground behind you. Press up into a side plank, driving through your right foot and the side of your left foot. Reach your right hand back and overhead. Then sit back down on the ground and rotate back to the right and repeat the whole stretch. Complete all reps on the right side before switching.
6. Child’s Pose with Lat Stretch – Kneel on the ground with your toes pointed. Sit back on your heels reaching your arms out on the ground overhead. Walk your hands out as far as possible. You can also walk your hands to the right and left to get more of a stretch down each side of your back. You should feel this stretch down your arms and the sides of your back. You should also feel the stretch in your low back if you are relaxing back onto your heels.

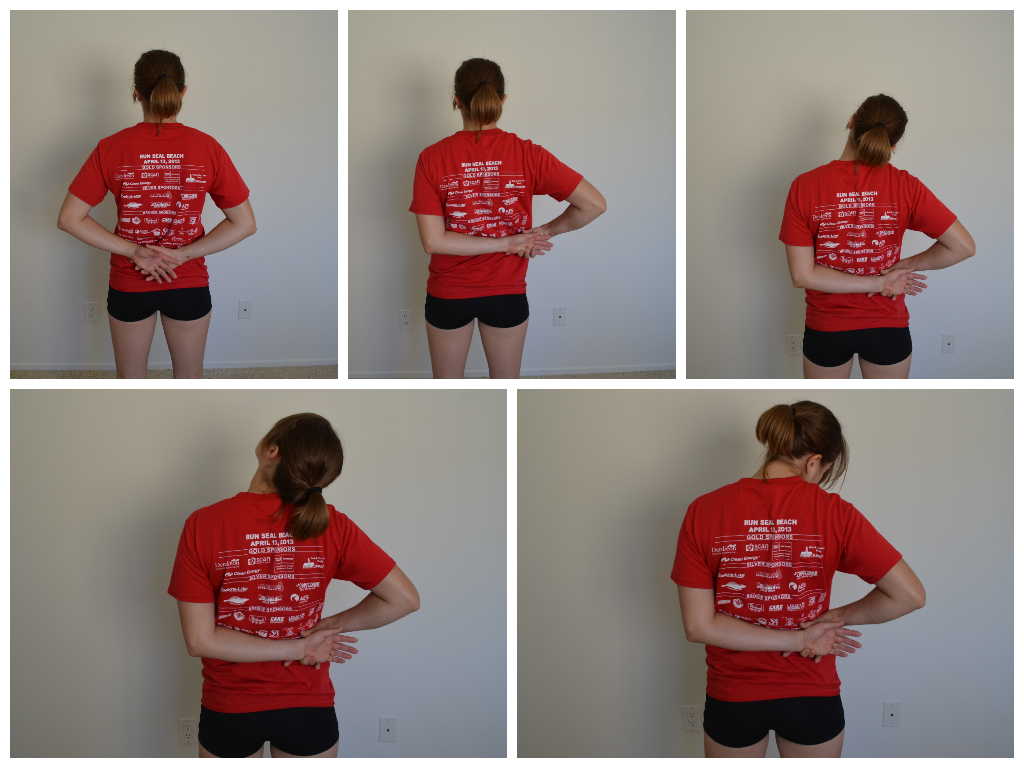
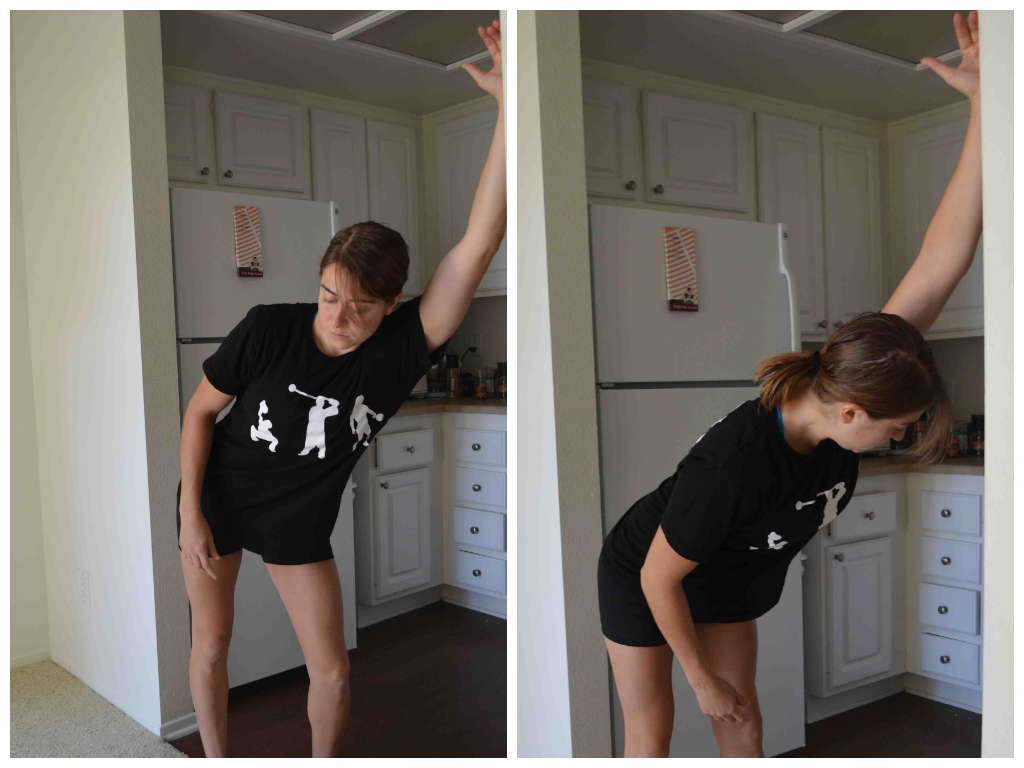
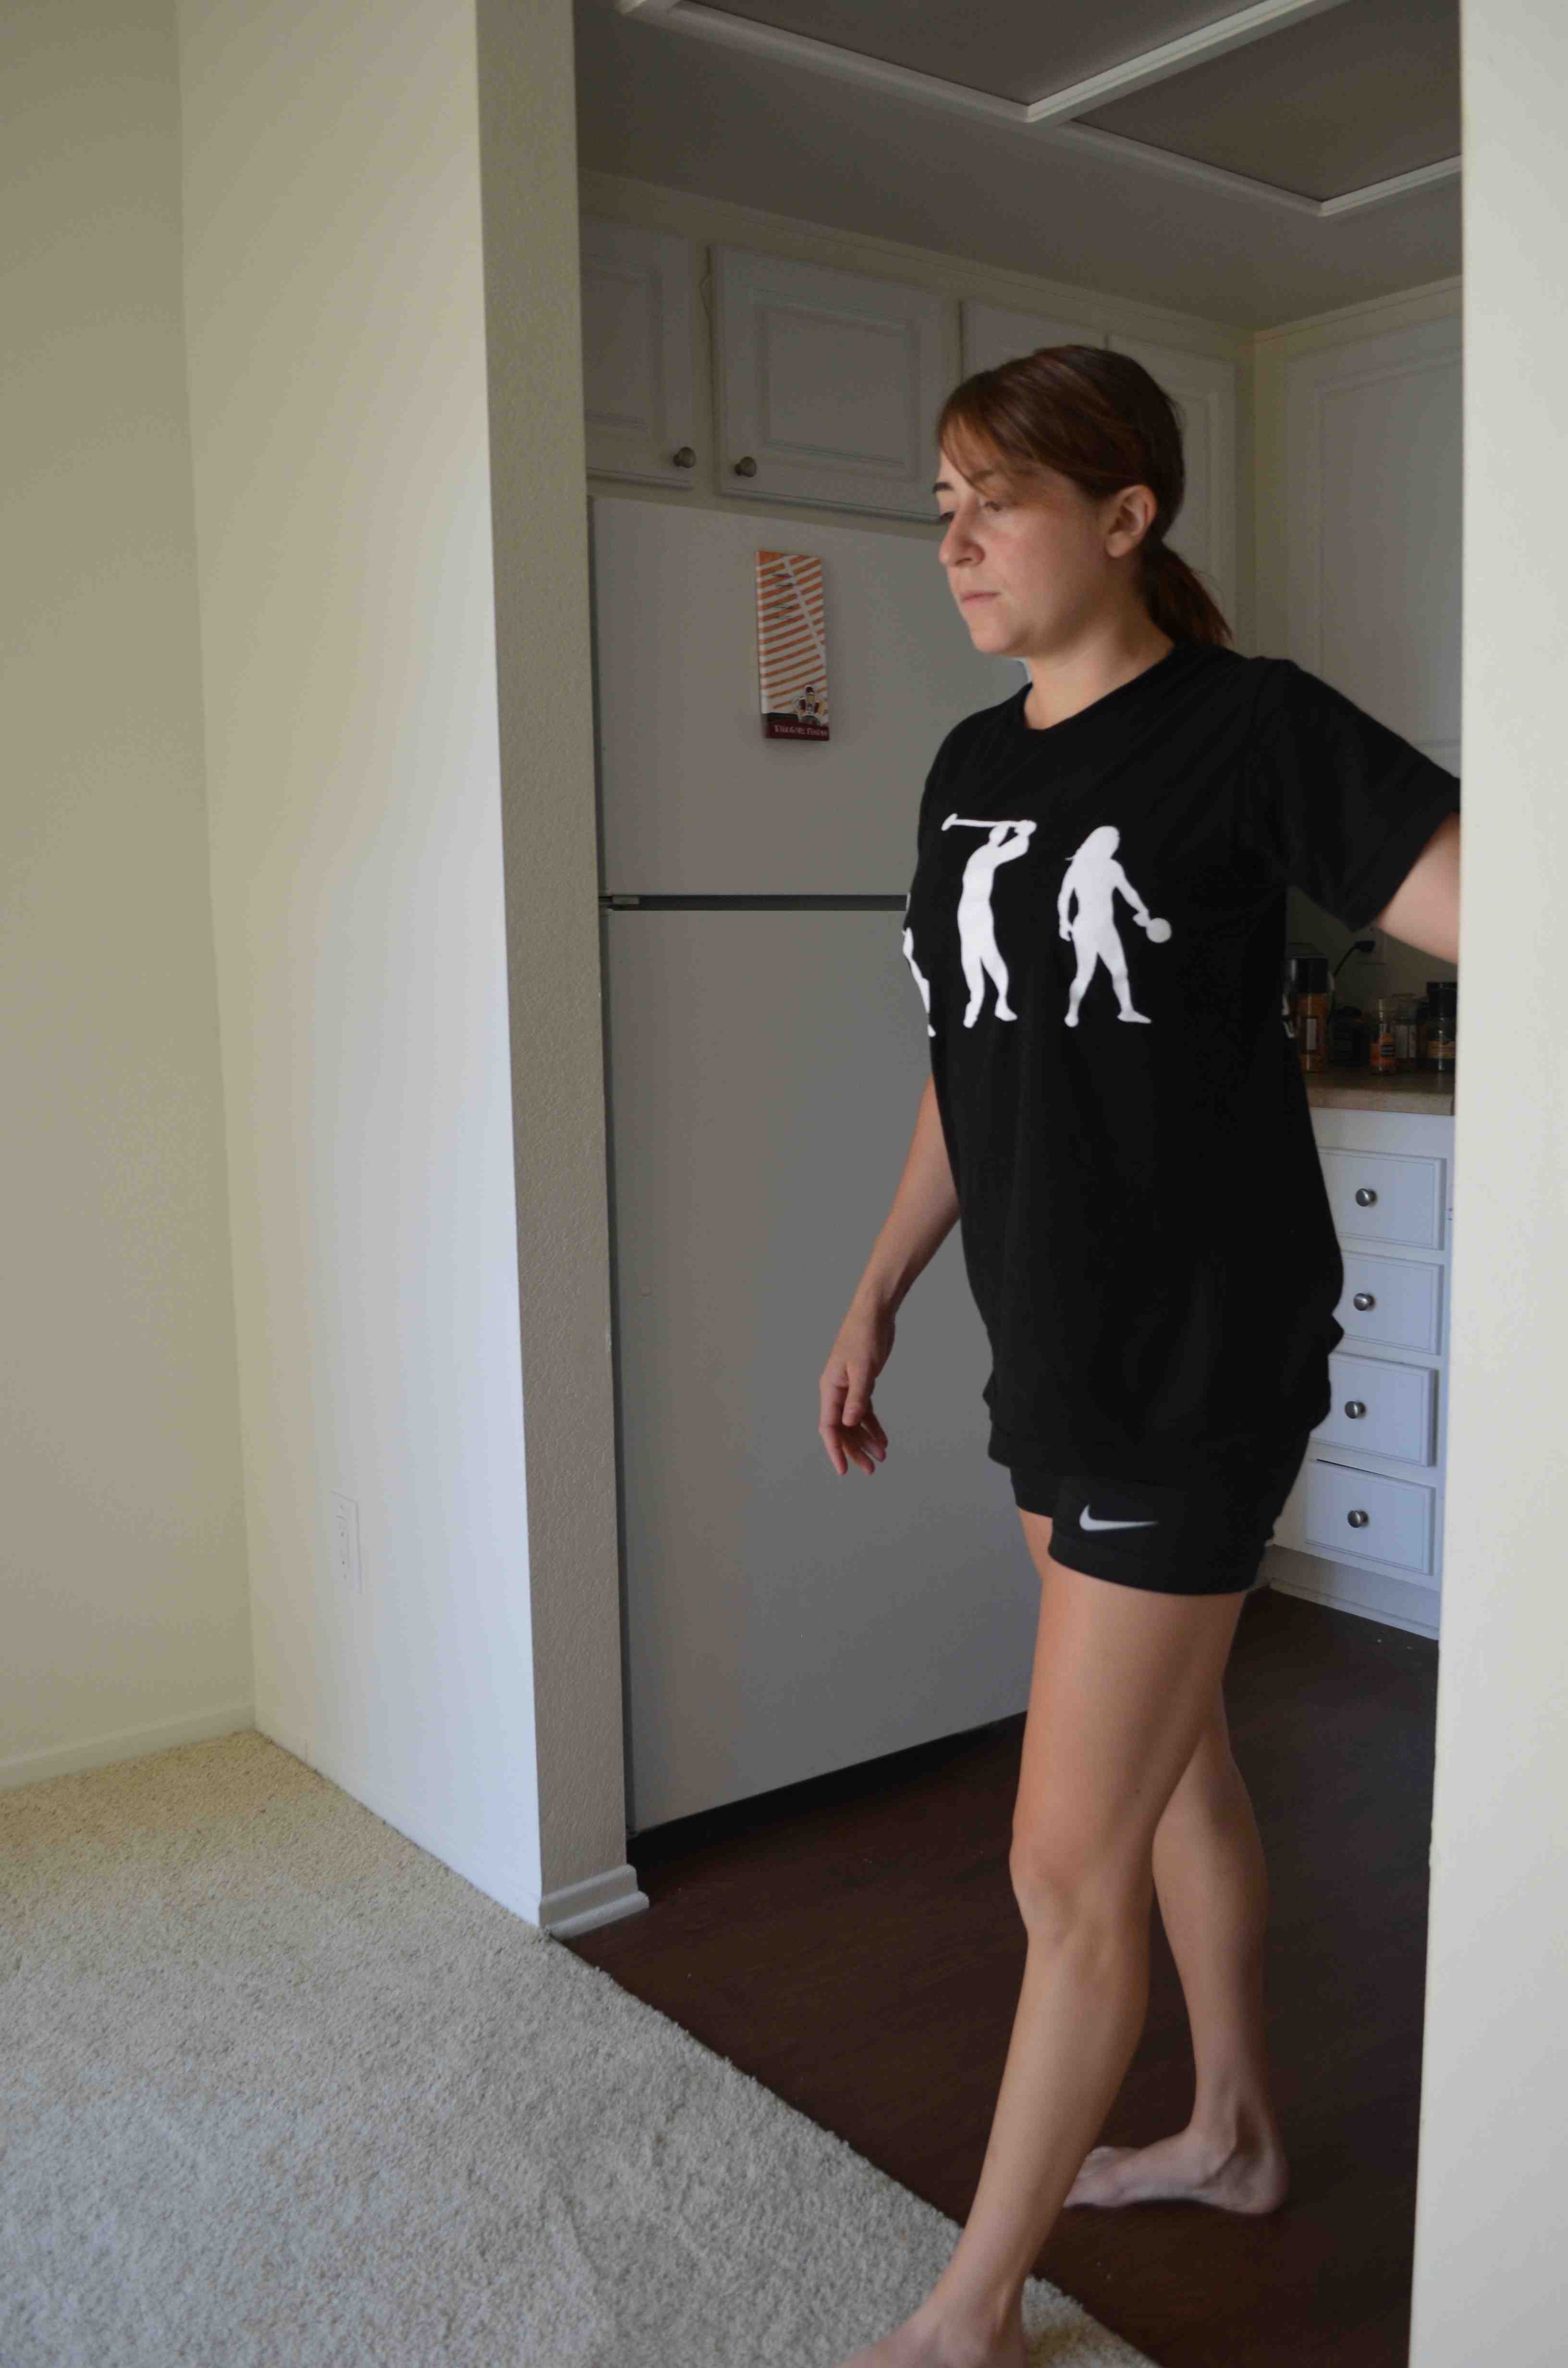
7. Standing Wall Lat Stretch – Most easily done in a corner, but can be done on a flat wall. Reach your arm up the wall and press your side as close to the wall as possible. You can also bend your elbow and relax your hand down your back. Breathe and relax into the wall as much as possible.
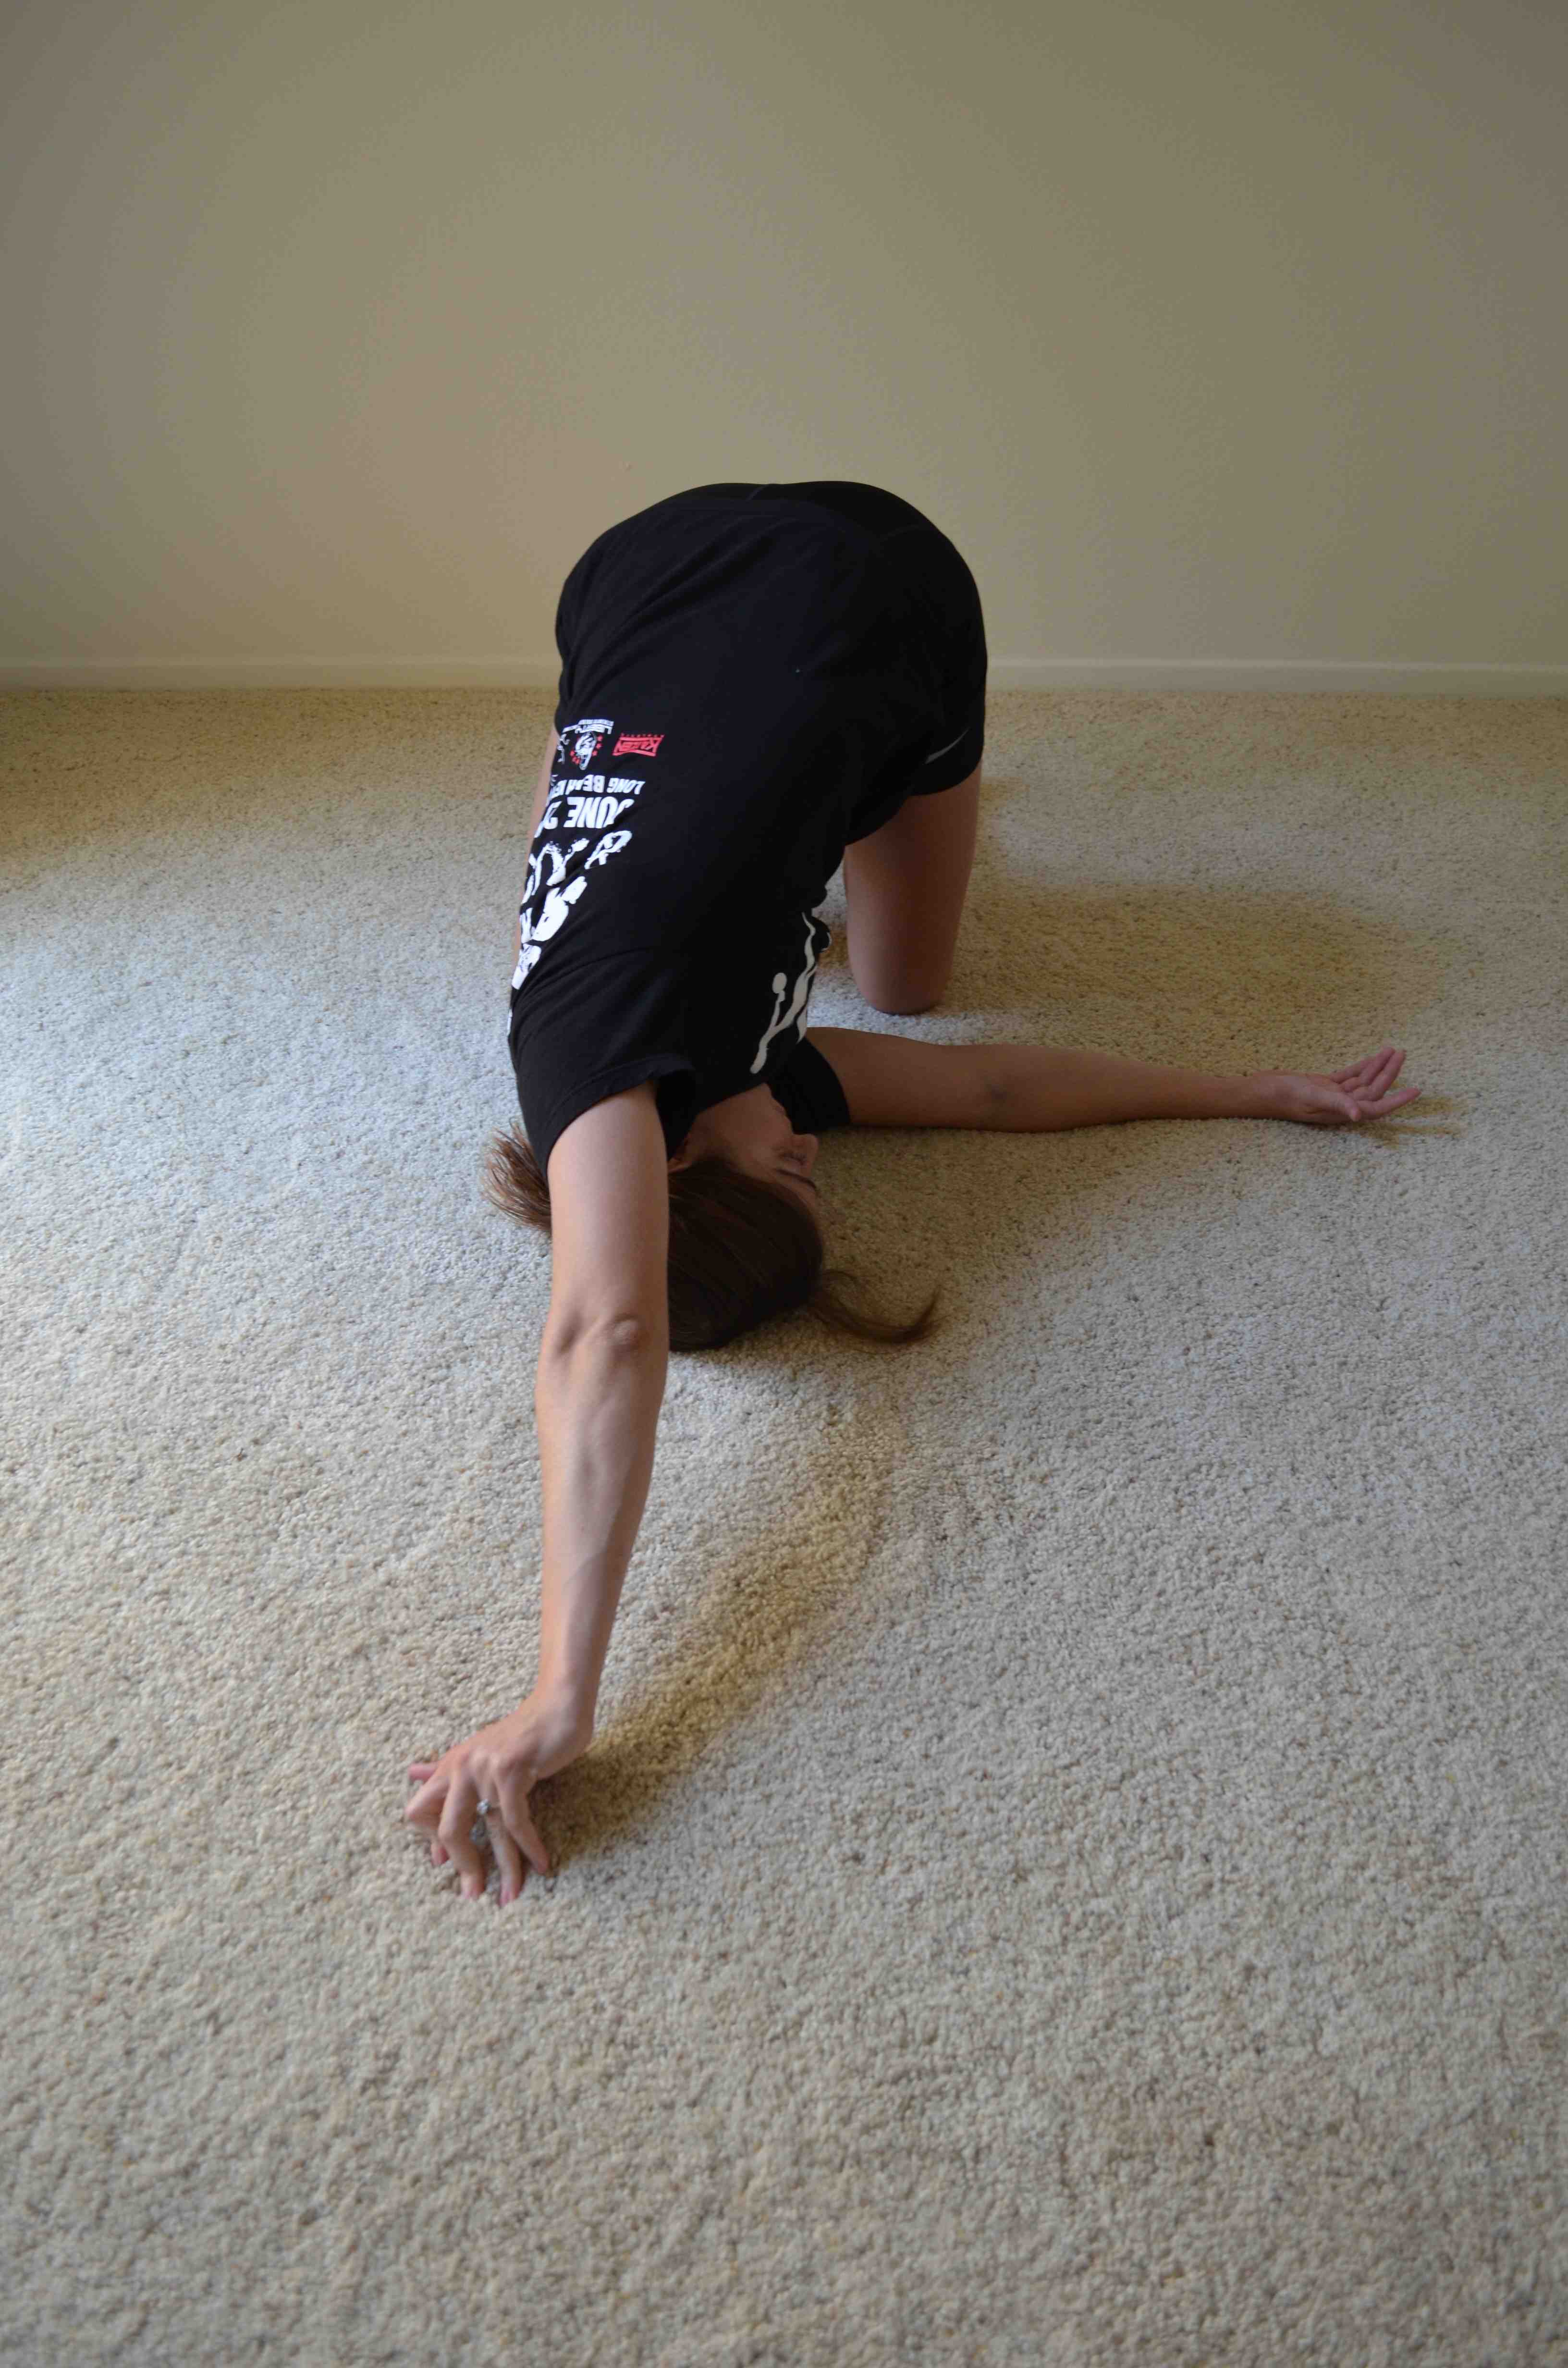
8. Kneeling Thoracic Extension – On your hands and knees, reach one hand down your neck and spine. Fingertips should be pointing down your back toward your butt. Then rotate your core so that your elbow goes under your arm on the ground. Then rotate open driving the elbow up toward the ceiling. Try to focus on just opening up your back and not really shifting your weight in your lower body. Then rotate back closed and repeat. For more Thoracic stretches, check out an earlier post on Neck and Upper Back Pain.
9. Cobra – Lie on your belly with your legs out straight. Prop yourself up on your forearms with your elbows under your shoulders. You can stop there or you can press up further. You can push yourself up higher and lift up onto your hands if the stretch from your forearms isn’t enough.
NOTE: To help correct upper body imbalances, you may also need to address tight pecs, which will improve your posture and can in turn even help reduce your low back pain!
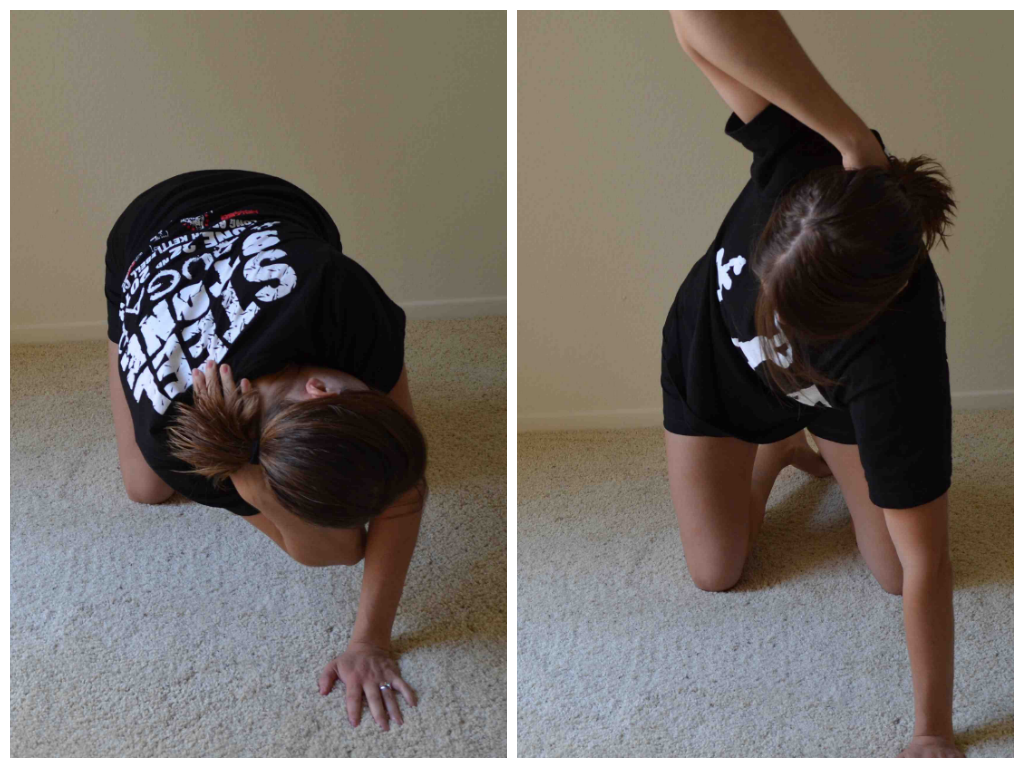
BONUS move….Kneeling Bridge. This is a great move to stretch out those pecs, work on thoracic extension and stretch your hips and quads! It is basically exactly the opposite of how your body is positioned while sitting all day. The only downside is many people struggle with the flexibility to truly do this move. You can always use a chair or bench and place your hands on top of that instead of your heels if you can’t reach your heels.
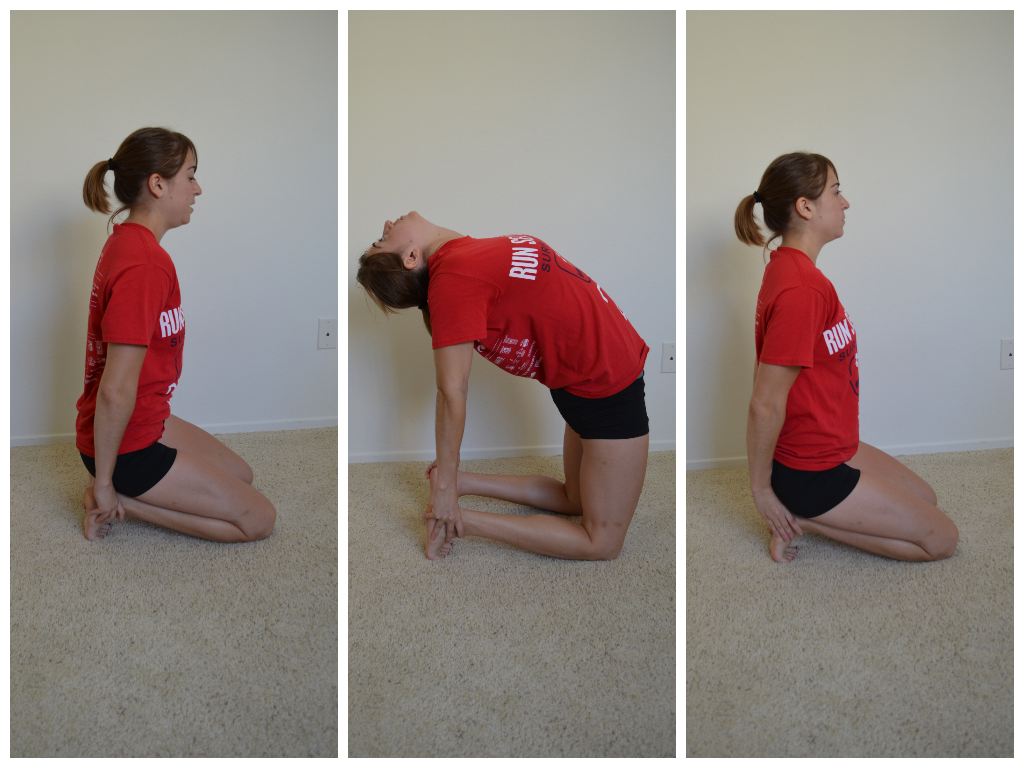
One of my favorite stretches to stretch everything made tight by sitting. A great one for days when you do front squats.
ACTIVATION
To reduce low back pain, you want to focus on activating your abs and your glutes.
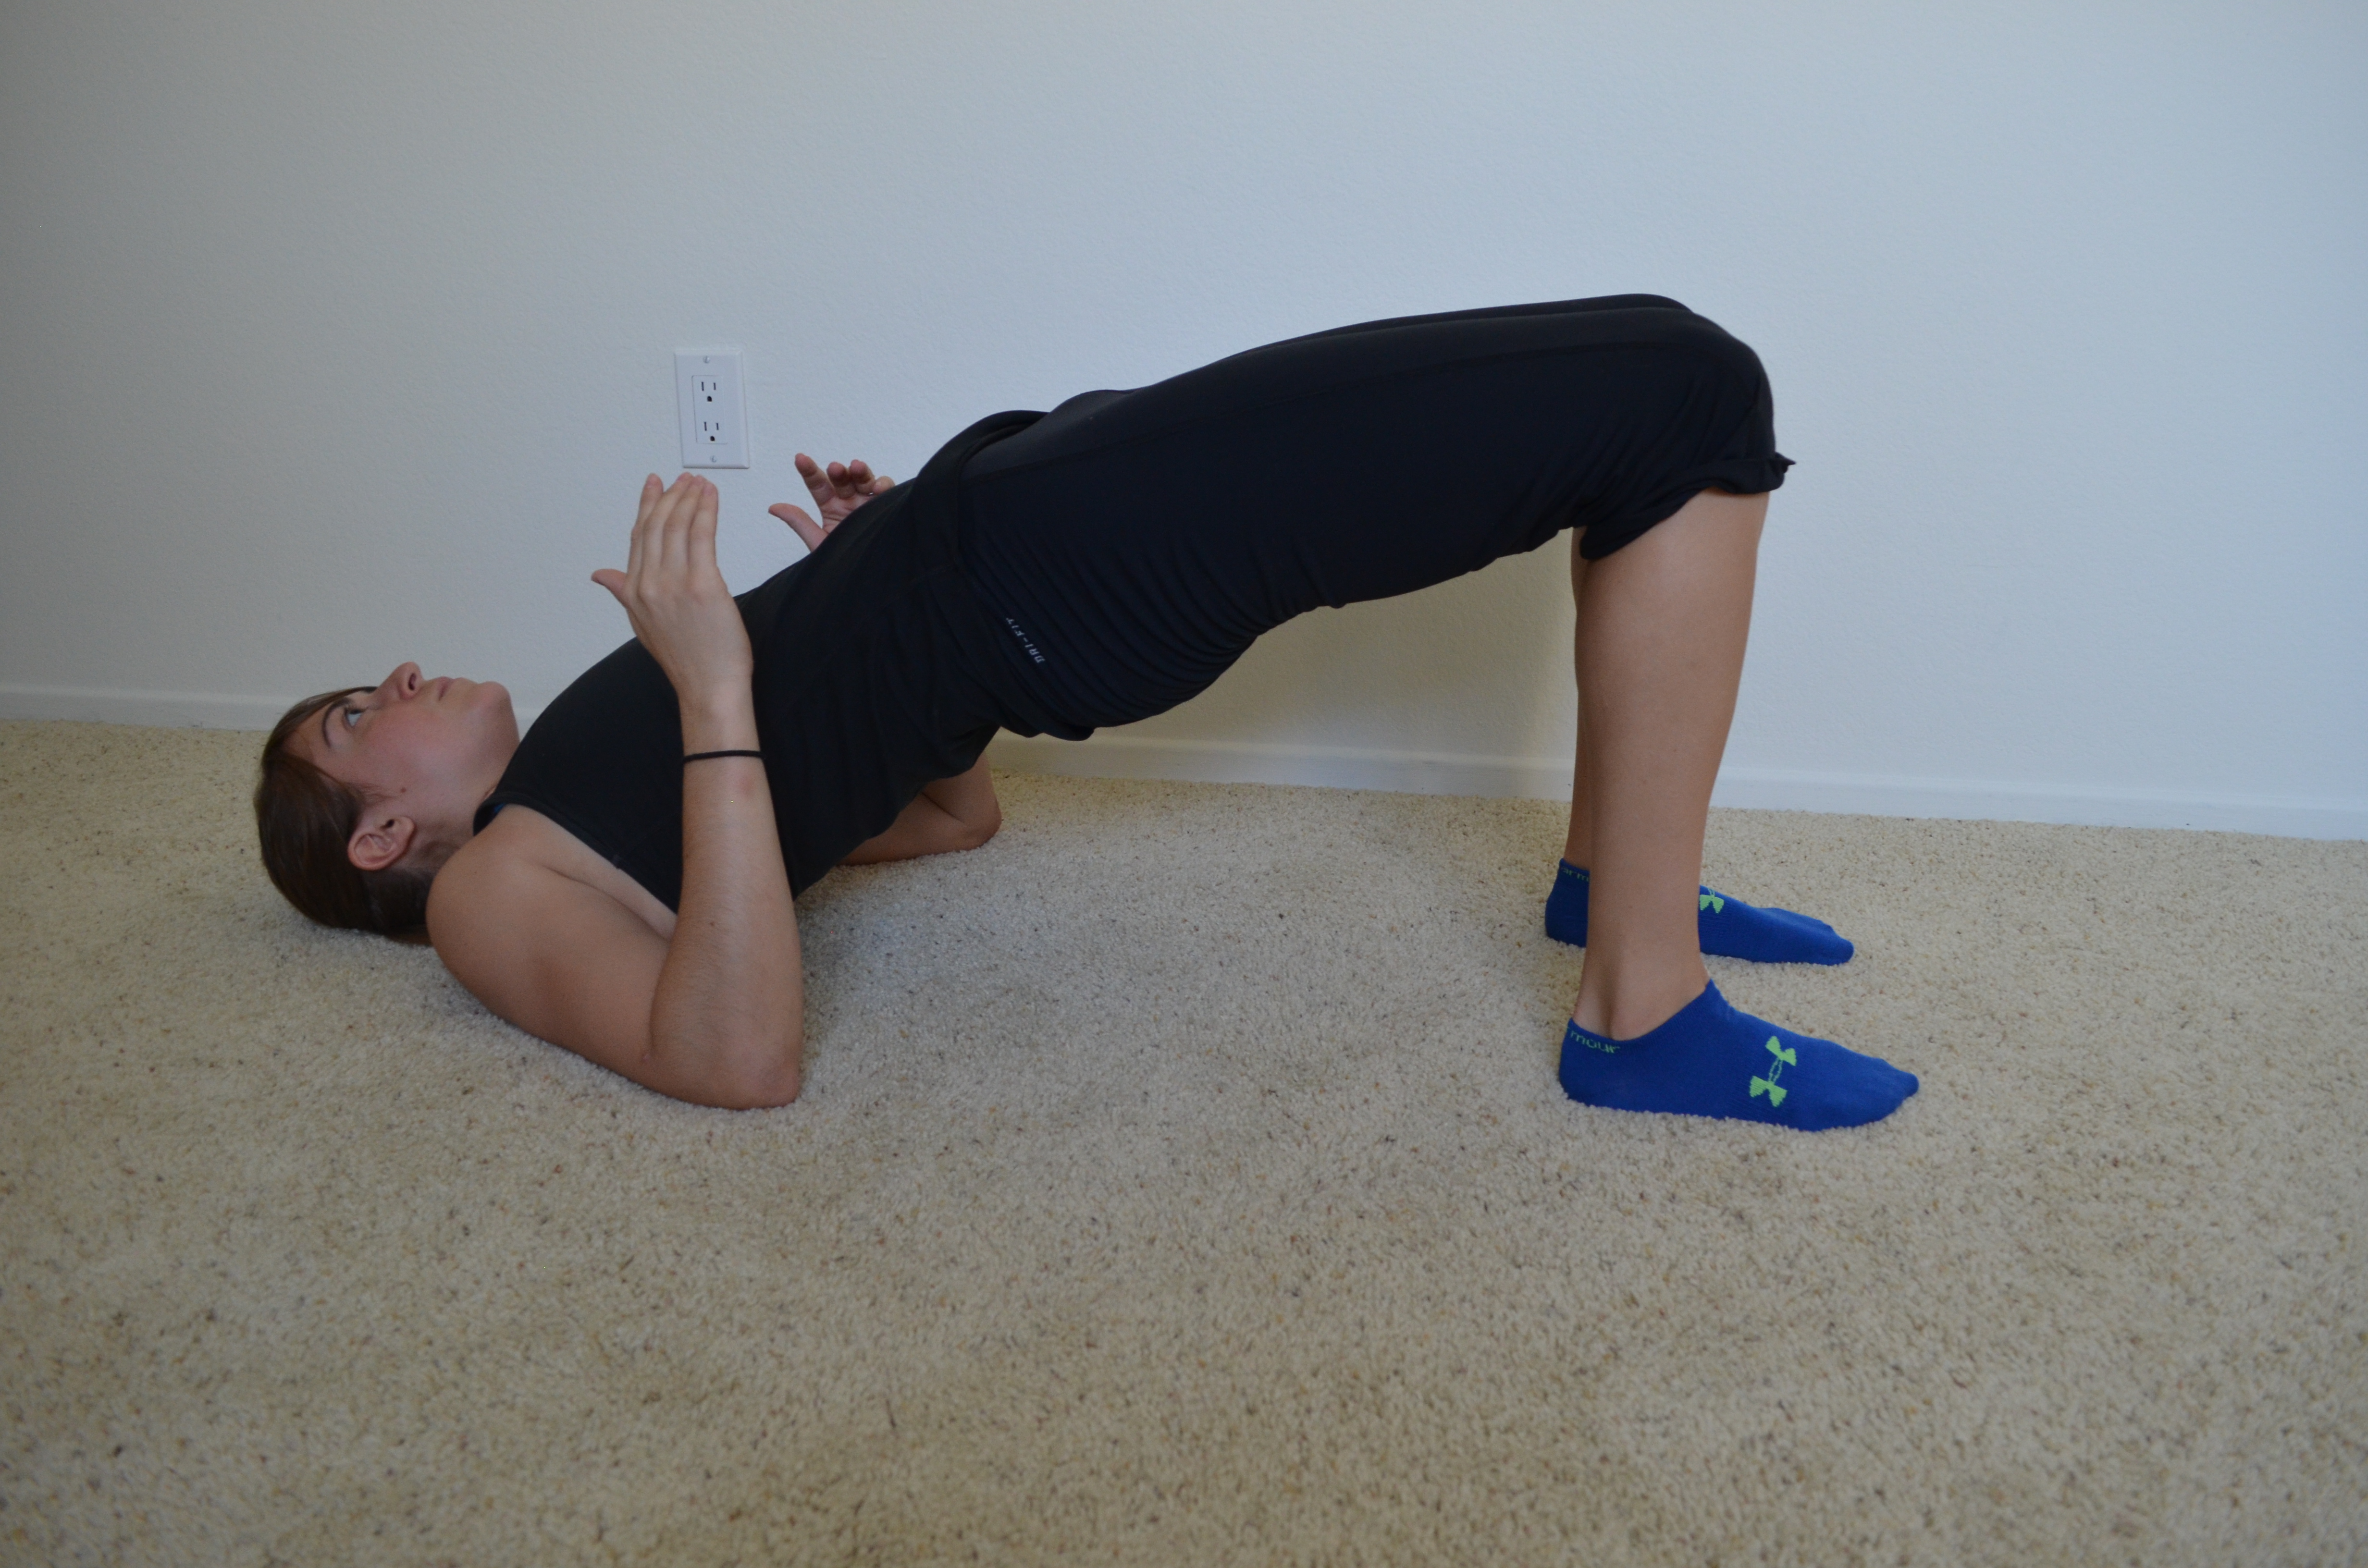
1. Glute bridge – Lie on your back with your feet about hip-width apart. You should basically be able to touch your heels with your finger tips. Then bend your elbows to 90 degrees. Drive your elbows, shoulders and heels into the ground as you drive your hips up. Make sure your knees do not fall apart. Actively squeeze your butt as you drive your hips up. If you only feel your hamstrings working, make sure that you aren’t driving off your heels backwards. You shouldn’t feel like you are driving back into your shoulders. You want to actual feel like you are driving your knees forward over your toes even though you are driving through your heels. Drive your hips straight up. You can either do a glute bridge hold and hold at the top or you can perform reps by lowering down and lifting your hips again.
2. Reverse Hypers – Lie face down on the ground to perform a Reverse Hyper or perform an IKEA table Reverse Hyper if you have a table that will support you. To do the hyper from the ground, lie face down with your legs out straight and squeezed together. Relax your upper body and squeeze your glutes to lift your legs up off the ground. Keep your legs straight and together as you lift. Hold for a second or two at the top and then lower back down. Make sure to squeeze your glutes tight so you don’t feel it in your low back.
3. Fire Hydrants – Place your hands underneath your shoulders and your knees underneath your hips. Flex your feet. Then raise one leg out to the side, keeping the knee at 90 degrees. Try to not let the foot get higher than the knee or the knee get higher than the foot. Really squeeze the butt cheek as you lift. Repeat all reps on one side before moving on to the other side.
4. Bird Dog – A great move to activate both your core and your glutes. Place your hands underneath your shoulders and your knees underneath your hips. Flex your feet. Kick one leg out straight as if kicking it into the wall behind you while you reach the other arm out straight toward the wall in front of your head. Don’t worry about lifting your leg or arm up high. Really try to drive your arm and leg toward opposite walls. Squeeze your glutes and keep your belly button pulled in toward your spine. As you lower your arm and leg, bend them and bring them together under your body. Try to touch your knee to your elbow before extending back out. Repeat all reps on one side before switching to the other side. All reps should be done in a slow and controlled manner. You should even hold for a second or two at the top of the move.

5. Pelvic Tilt – The best core engagement move. Lie flat on your back with your knees bent and your feet flat on the ground. There will be a space between your low back and the ground. Draw your belly button in toward your spine and press that space away. Hold your core tight for 5 to 10 seconds and then release. Feel the space again between your low back and the ground when you relax. There are progressions to the Pelvic Tilt, including marching and leg lowers. Check back soon for a post about ab engagement and pelvic tilt progressions on Redefining Strength’s blog.
6. Plank Series – Later this week, I will be posting a variety of plank variations. But here is a quick description of how to perform the basic forearm front and side plank.
To perform a front forearm plank, you should rest on your forearms with your elbows right below your shoulders. Beginners can start on their forearms and knees while more advanced exercisers will perform the plank from their forearms and toes. The longer you hold, the harder the move will be. Make sure to draw your belly button in toward your spine, tuck your hips under and keep your body in a nice straight line. Feet should be together and adductors, glutes and quads engaged. Do not let your upper back round as you hold. Breathe as you hold and don’t let your hips drop toward the ground or raise up toward the ceiling.
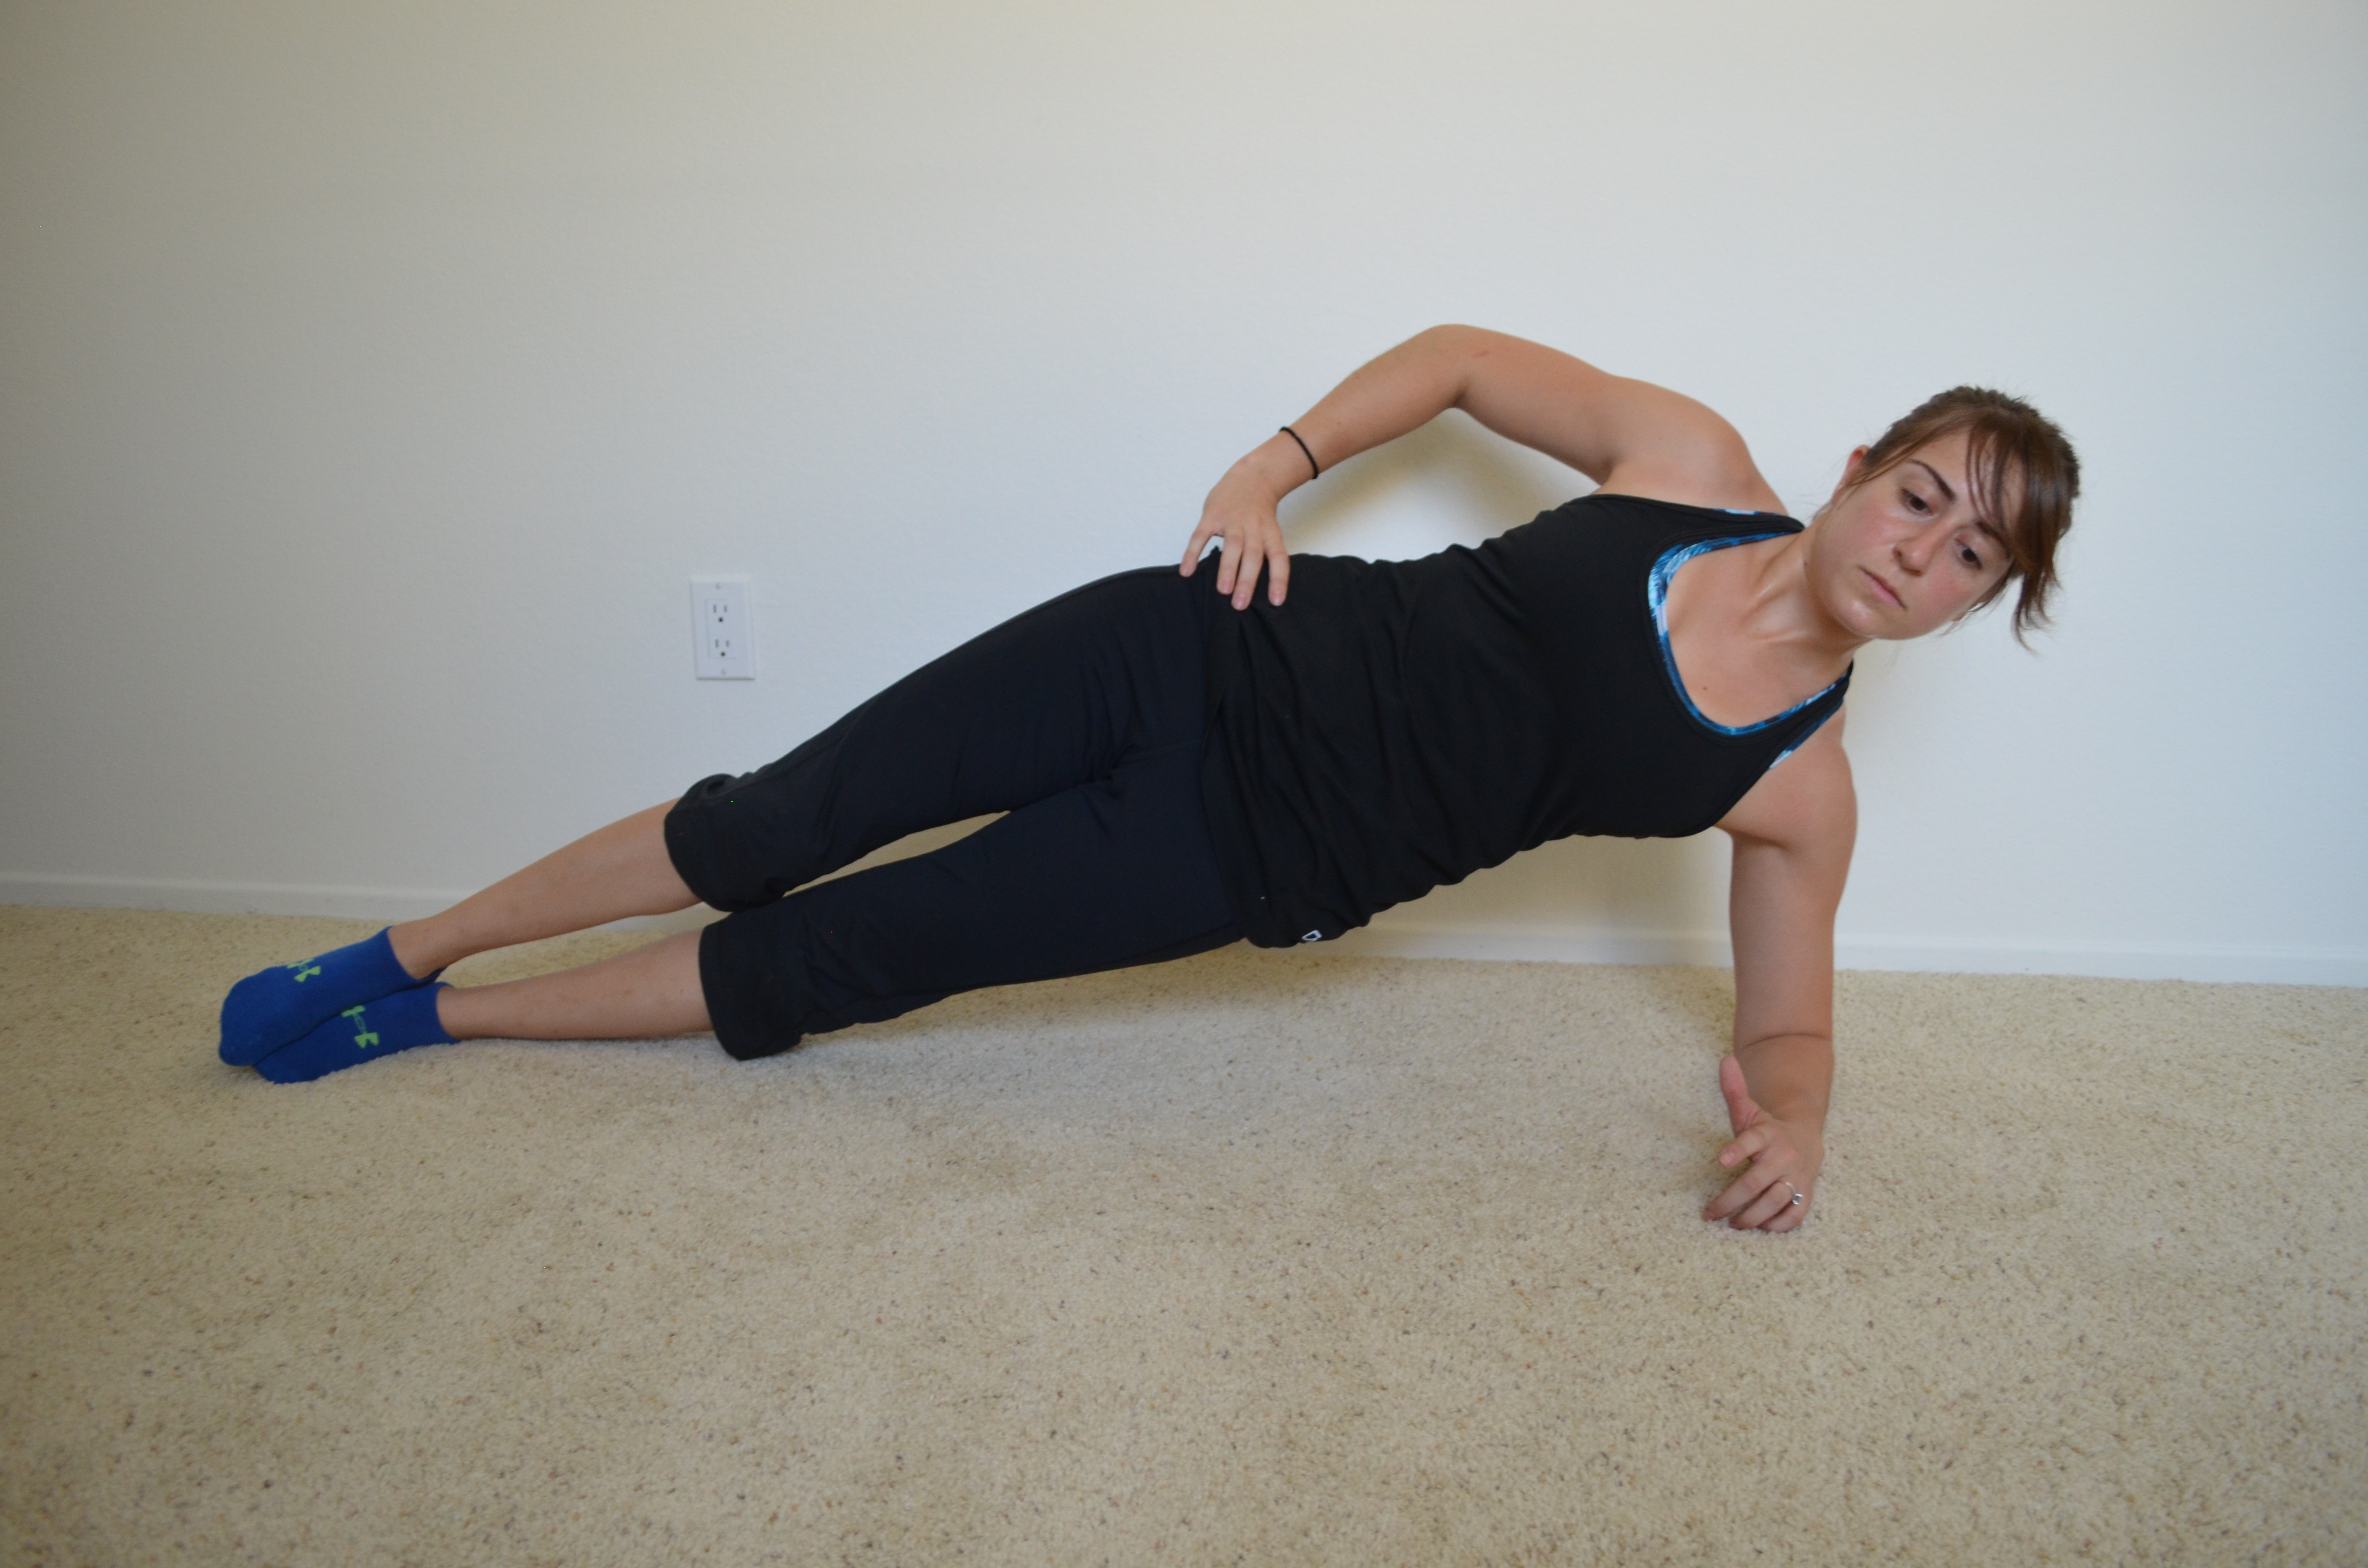
The forearm side plank variation is done on one forearm. Your elbow should be right below your shoulder. Beginners may do this from their knees. A modified plank can also be done with just the bottom knee down and the top leg straight.To advance the move, straighten both legs and rest on the side of your feet and your forearm. (Feet may be stacked or one may be in front of the other.) If that isn’t challenging enough, raise the top leg. Your top arm can rest on your hip or reach up toward the ceiling. Make sure to keep your body in a nice straight line. Squeeze your glutes and make sure your chest doesn’t rotate toward the ground. Drive your bottom hip up nice and high. Do not let your hip sag toward the ground.
7. Band Stability Press (anti-rotational) – Anchor a band in a door, around a pole or even use a cable-pulley machine. Step away from the anchor point as far as you can without allowing your body to rotate toward the anchor. You should be facing perpendicular to the band. Start with the handle at your chest. Push the band straight out from the center of your chest until your arms are straight. Do not let your arms rotate open and go back toward the anchor. Then slowly bring your arms back in. This move looks easy, but when you try it, you realize how much your entire body fights rotating back toward the band hook!
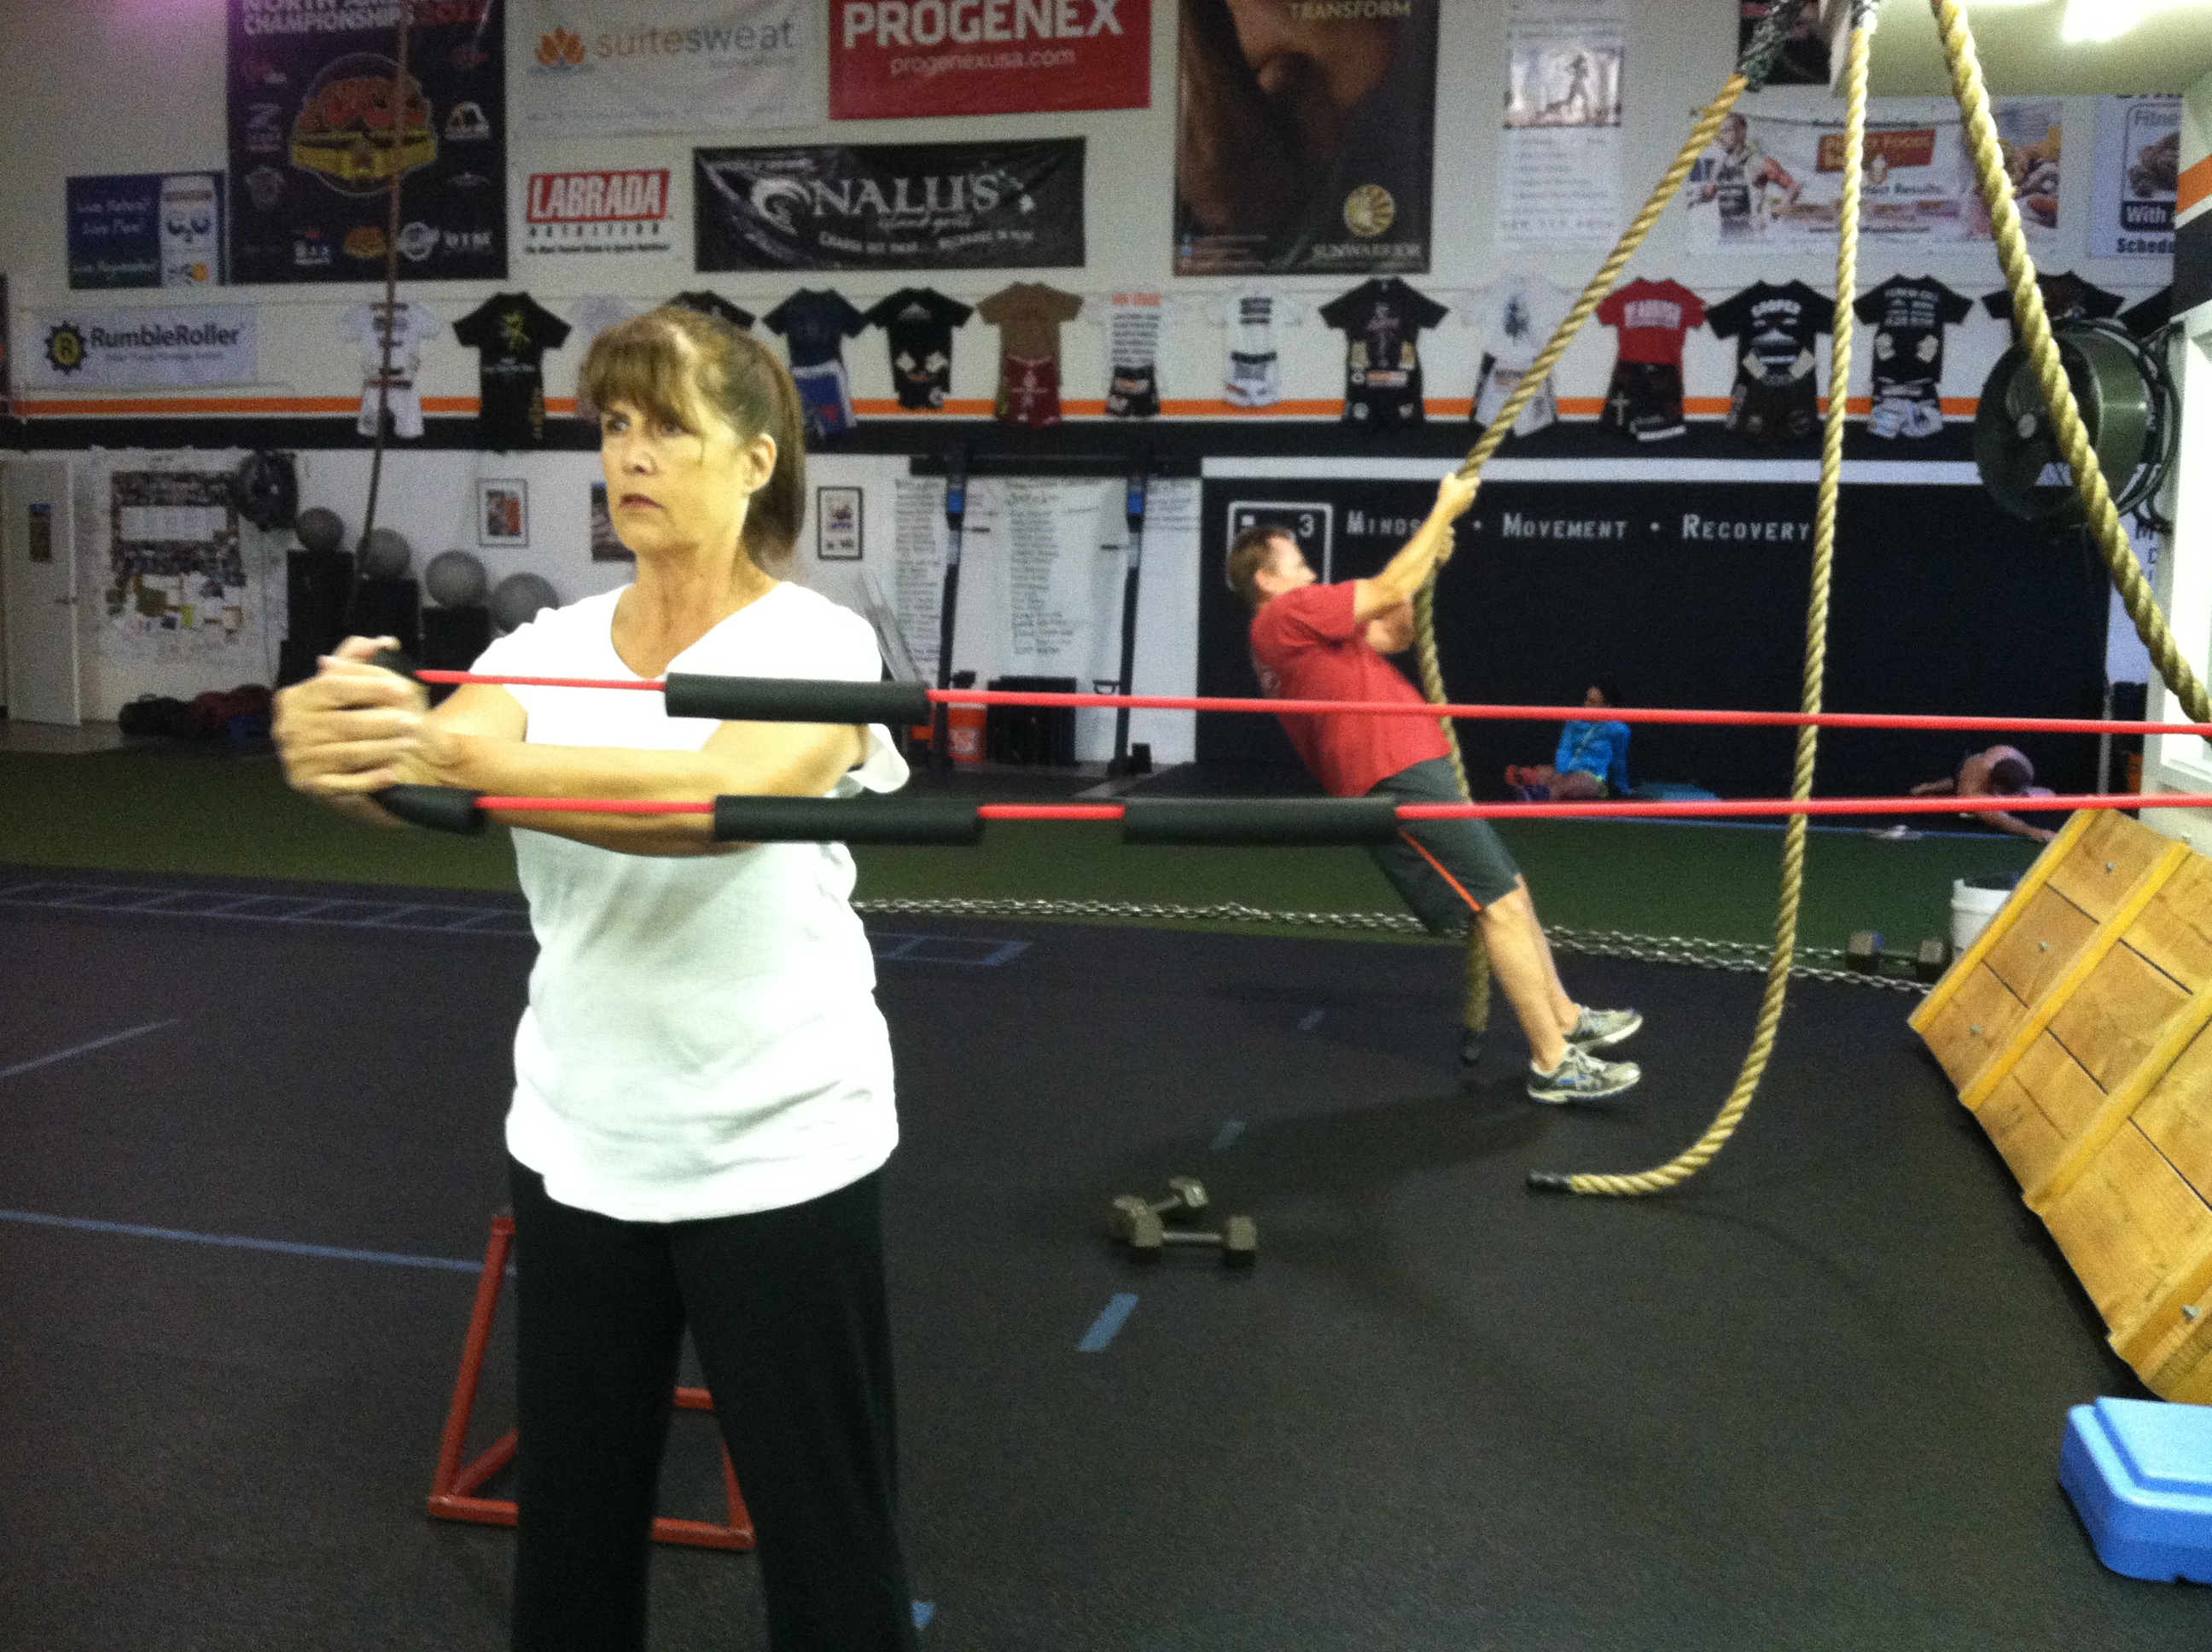
Joan demoing the stability press.
For more glute activation exercises, check out Part 3 of the Bootilicious series. And check back later this week for more great plank variations to help you engage your core.
Use the moves above to find the specific spots that are tight and inactive on you and then loosen and activate them! Just because you have low back pain doesn’t mean you will need to use all of the moves above.
You may find you only have trigger points around the front of your hips and that your hamstrings are fine. Don’t spend time on areas that are ok. Target areas of tightness or inactivity!
If your back pain is due to trauma, please consult a doctor.
Stop accepting chronic back pain and start doing something about it!
How to relax when STRESSED OUT
A week or so ago, I posted about how your brain is actually kind of stupid and can be tricked into having confidence in yourself.
Well…it is also possible to trick your brain into feeling relaxed even when you are completely and utterly stressed out.
And the best part is…
All you need to do is BREATHE!

When we get stressed or anxious or panicked, we breathe shallow and quickly, which makes our brain feel even more stressed out and makes our body tighten up.
When we are relaxed, our breathing is deep and slow and our body is loose.
If we control our breathing by slowing it down and breathing deeply, we can force our body and mind to believe we are actually relaxed – we can get ourselves to CALM DOWN.
It can be done before an important competition or in the heat of a match. It can be done before going to bed or when you are simply stressed out sitting at your desk.
It can be done anywhere, at any time and it will help you refocus and relax.
And trust me…It works…especially if you are stress thinking in bed and can’t fall asleep. Like ten focused breaths (if you even make it that far) and you will be out like a light!
So how do you do this deep relaxing breathing?
- It can be done standing, seated, lying down. It can be done with eyes open or closed. Obviously the more relaxing a position you can put yourself in physically (aka the closer to eyes closed and lying down you can get) the quicker and easier it will be to relax. That being said though, I’ve made this work while bouncing a ball before serving in a match.
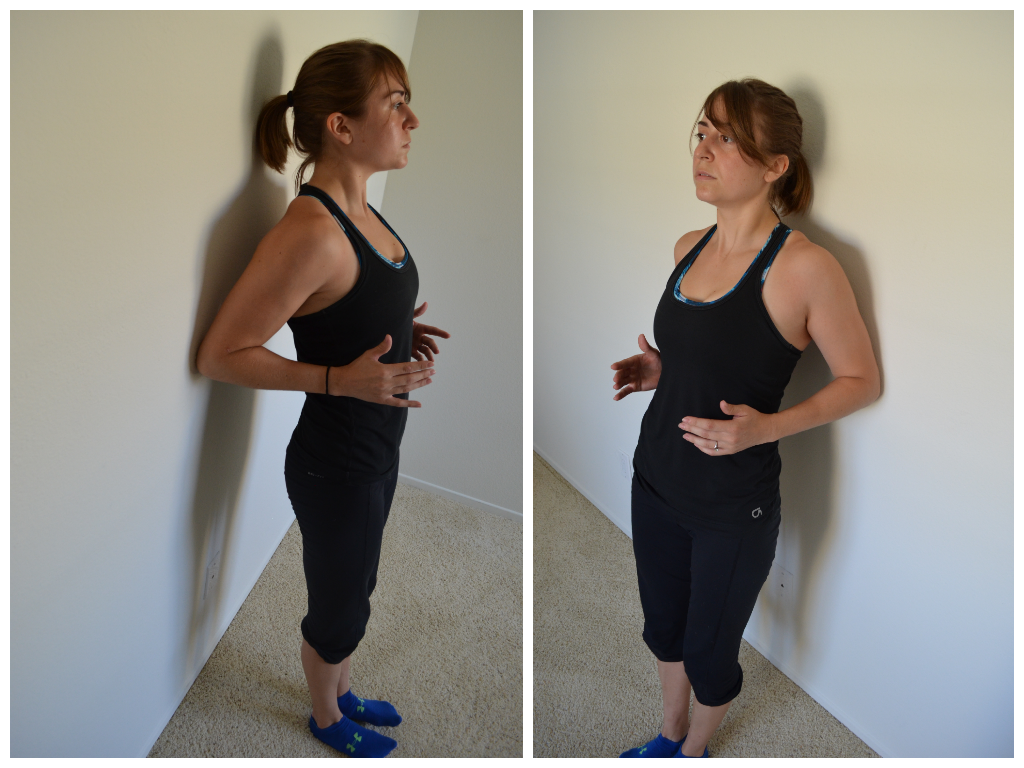
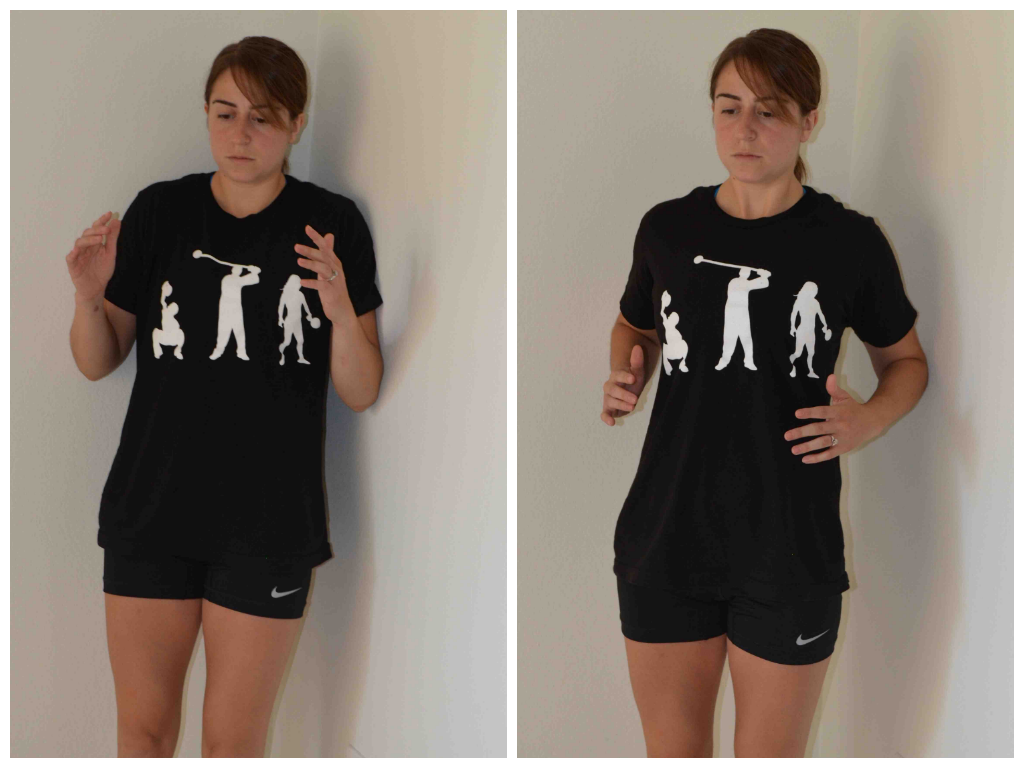
- The most important part is to breathe deeply. Don’t just fill your lungs with air – breathe deep into your belly. When first starting out, it can even help to place your hand on your belly to FEEL your deep breaths.
- SLOW breathing is also very important. You want to slowly breathe in deeply, hold that breath for a count or two and then very very slowly exhale. There are many different counts you can use. I’ve found ones that have you inhale for a 4 count, hold for a 7 count and exhale for an 8 count; HOWEVER, it doesn’t even need to be that slow to help you relax. I’ve found that even freaking inhaling for a 3 count, holding for a 3 count and exhaling for a 3 count can help. The most important part is to SLOW down your breathing!
To sum up the most important parts – Pick as relaxed a pose as possible to start loosening up the body. Breathe deeply into your belly. AND breath as slowly as possible.
Next time you get stressed or feel anxious or panicked, try taking a deep breath (or two). It may just be what you need to calm down and refocus!
Recovery Week Workout
Last week was my Recovery week from all my super heavy lifts and my 10-7-3-1 workouts.
Sometimes my “recovery” workouts aren’t easy at all. Sometimes they are simply DIFFERENT exercises and “lighter loads” than what I’ve been doing.
Sometimes they simply require my body to move in a different way than it’s been moving for the last 3-5 weeks.
I also love doing single limb movements and more bodyweight moves during my recovery workouts. These moves aren’t EASY though. I just find they really force me to work more on activation and correcting imbalances.
Recovery doesn’t always mean time off and it doesn’t always mean EASY.
Here is my far from easy (and actually made me super super sore) recovery Glute Workout from this past week.
Recovery Glute Workout
WARM UP:
Foam roll – lower legs, hamstrings, hips, back
Stretch – Calves, hamstrings, hips
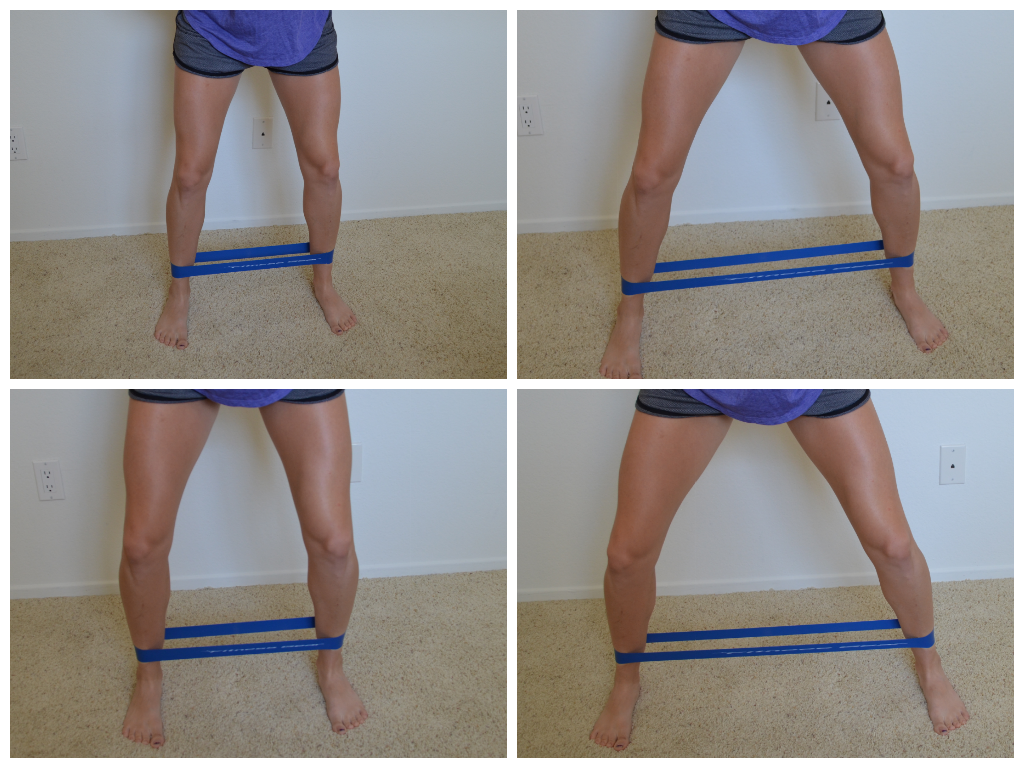
Activate – Glutes with lateral and monster band walks
STRENGTH:
4 rounds:
8-12 reps each side Single Leg Deadlift holding double kettlebells
(Increase weight with each round if possible unless 8 rep max hit. Keep standing leg slightly bent and back flat as you hinge over. Hold one kettlebell in each hand by your side. Do not let your back round as you hinge over.)
8-12 reps each side Single Leg Glute Bridge Off Box
(Heel up on box and bridge up. If you can’t get up as high as with a two leg bridge then stick with a single leg bridge off the ground)
4 rounds:

8-12 reps each side Curtsy Lunge holding double kettlebells
(Increase weight with each round if possible unless 8 rep max hit. Make sure as you lunge back and come to standing that you are in full control of the lunge and driving off the heel of the front leg. Really cross behind and keep your chest up as you lunge. Hold each kettlebell down by your side.)
8-12 reps each side Single Leg Step Down
(Start standing on the box as if doing a lateral step up. Step down to the side of the box, hinging over a bit as you lower down. Lower down slowly. Do not let the foot going down fully touch the ground. Only let the toe lightly graze the ground and then press quickly back up to standing. Only go as low as you can control. DO NOT push back up off the ground!! The higher the box the harder the move.)
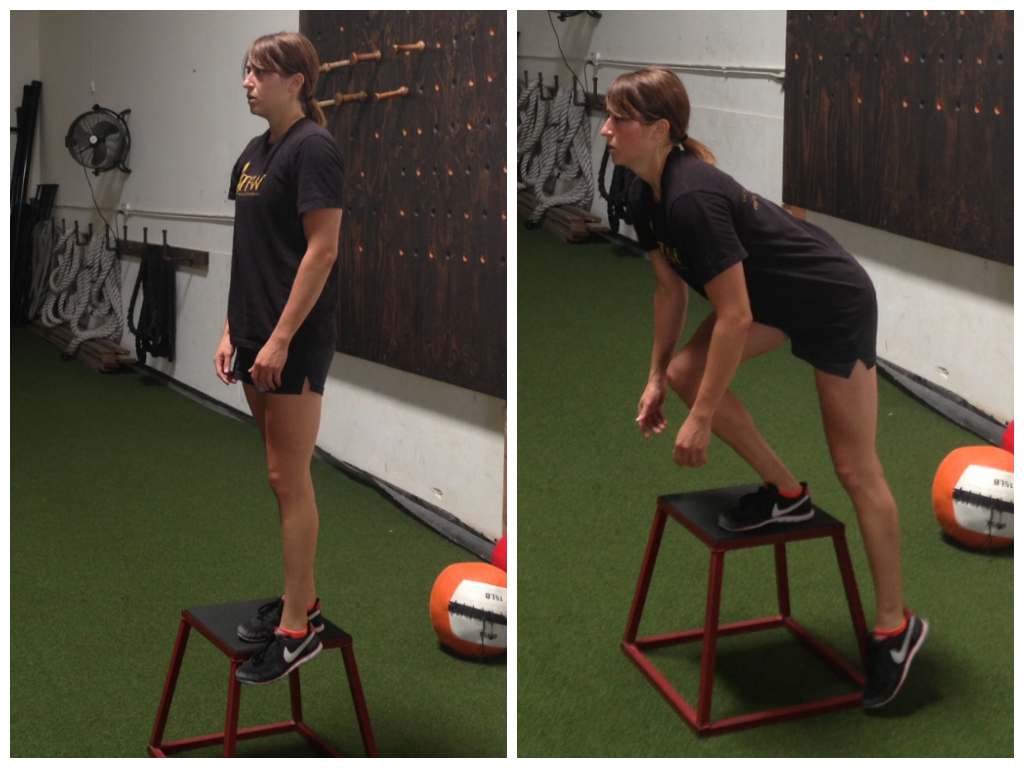
Make sure to sink back into the heel on the top of the box. Don’t be afraid to lean forward just keep the core tight.
CONDITIONING:
3 rounds:
40 seconds of work, 20 seconds of rest
Heavy Kettlebell Swings
While these moves didn’t use the heavy loads that many of my lifts have required recently, the loads were still heavy and CHALLENGING for the moves I did.
And the bodyweight bridges and bodyweight step downs were far from easy.
These moves all challenged my glutes to work and stabilize to become stronger for my heavy lifts. Since they were also single limb movements my dominate leg couldn’t take over and compensate. My weaker leg was forced to work equally hard, which helps to correct any imbalance that may exist.
And my butt was sore for days actually and my glutes were definitely shaking a bit during the workout.
My rest periods were also very short during the workout since I wasn’t trying to lift my max, making it a rather quick workout. However, I did rest enough that I could still use CHALLENGING weights and give a good work output each and every round.
The little conditioning blast at the end was also short and sweet. It worked on grip strength and power. It also got my heart rate up a bit while working my glutes that last little bit to utterly fatigue them.
What do your recovery week workouts look like? Do you simply take the week off or do you do workouts to work on your weak points?
Develop Workouts to Move Better and Feel Better
Yes, lifting makes you feel strong and empowered. Yes, working out makes you healthier and helps you lose weight.
Yes, taking on new physical challenges can be fun and invigorating.
But the real reason most people workout is because they want to MOVE BETTER AND FEEL GOOD.
That is what HEALTH is. That is what YOUTH is.
And whether or not you recognize it as your motivation to workout, moving well and feeling better is the underlying goal of a diet and exercise program.
The question then is, “How do you develop workouts to help you move better and feel better?”
Too often these days I hear about people getting injured when training. About people feeling more worn out or broken down.
While it can be fun to do “brutal” workouts where you feel absolutely destroyed, this shouldn’t be an everyday occurrence.
If you want great results (be healthier, fitter, stronger), if you want to FEEL BETTER AND MOVE BETTER, you can’t just beat yourself down each and every workout.
Here are 5 tips to help you develop workouts that will make you move and feel better!
1. WARM UP – A good warm up consists of MORE than just walking or jogging on a treadmill or elliptical for five minutes. A good warm up is key to preventing injuries, which is key if you want to feel better and move better!
A proper warm up with loosen up overactive and tight muscles through foam rolling and dynamic stretches. It will also activate weak and/or inhibited muscles through activation exercises.
A proper warm up is important because it will make sure your body is truly ready to move so that you don’t get injured during your workout!!
Here are 15 great dynamic warm up moves.
Before you workout, you don’t need to stretch and roll out every area of your body. You just need to focus on the areas you will be using during the workout. You will also want to target areas that are perpetually tight or are prone to problems and injuries.
2. Build Up Slowly – Just because you CAN lift something or DO something, doesn’t mean your body is truly READY to do it. You’ve got to build slowly so that you don’t push your body too quickly and too far.
Injuries often occur when our body is forced to do something it isn’t mobile or strong enough to do.
If we build up slowly, making changes over time, we can prevent injury while getting great results!
Slowly build up and adjust your loads, speeds, intensity and repetitions. Don’t up everything all at once!
For example, if I have a new client who hasn’t really ever worked out before, I’m not going to have them doing jump squats on their first day (even if other people are doing jump squats). And maybe the client can technically do the jump squats.
But because the client has never done them and the client doesn’t even have much of a workout base, I’m not going to have them do jump squats.
I’m going to have them first start out with bodyweight squats. Then bodyweight squats quickly. Then bodyweight squats where they raise up onto their toes as they come back to standing.
Then I will finally have them perform a very VERY small jump off the ground. Then a bigger jump and finally a bigger, quicker jump.

Everything can be progressed or regressed to help someone build. This move helps you build toward a single leg squat!
They will BUILD UP SLOWLY because their body needs to learn the movement pattern and adjust to the load and explosiveness of the move.
An important part of working out isn’t just to do it…It is to do QUALITY movements!
Build up slowly and prevent undo stress being placed on your body which will lead to injury.
3. Work to Correct Imbalances – While my goal is to get everyone moving and having fun as quickly as possible, you can’t ignore the need to do all those supposedly boring corrective exercises.
Muscle imbalances lead to injury or may even be the result of an injury and can lead to further future problems.
Muscle imbalances usually mean that a muscle is doing work that it shouldn’t be doing because something is overactive, underactive, weak and/or tight.
Foam rolling, stretching and activation and strengthening exercises are all essential to correct the imbalances so that you can properly perform exercises during your workout and move better in everyday life.
When you start an exercise program, corrective exercises and stabilization exercises will make up the bulk of your workout.
However, even an advanced exerciser needs to do some corrective and stabilization exercises. Foam rolling, stretching and activation moves should be included in every warm up, especially if you have or have ever had an injury or imbalance.
And stabilization exercises are great for even elite athletes to do as recovery and to ensure that their movements are correct when they move onto some of their more demanding workouts.
Don’t wait to deal with your muscle imbalances until after you’ve become injured. Address the problem before serious symptoms arise!
A glute activation exercise since a very common weak and underative area is our glutes!
4. RECOVERY – Your body can’t handle working out intensely ever single day. If you workout too much and too intensely, your body may be overtrained and you may stop seeing progress. Also, if you never cycle your workouts, you may find yourself plateauing because your body is no longer challenged by the workouts.
PROGRESSION is key. And a huge part of PROGRESSION, is proper RECOVERY.
Not only do you want to slowly build up and constantly challenge yourself by mixing up your workouts, but you also want to make sure that you cycle back through weeks of RECOVERY no matter your level.
Recovery is when our bodies rebuild. Recovery weeks though don’t have to mean that we completely take the week off.
Recovery workouts are a great time to do those exercises that help us prevent injury and correct any imbalances that may have developed during our intense training. Recovery weeks are also a great time do to injury prehab and to work on our weakness.
I also use recovery weeks as chances to improve my mind-body connection with exercises that require more stabilization and less load. The better the communication between our mind and body, the better our movements will be.
Also, if you’ve suffered an injury in the past, it is especially important to include exercises that really work on improving our mind-body connection since injuries can damage that connection. And a damaged mind-body connection can lead to further injury!
Recovery weeks are necessary to give our body a chance rebuild so that we don’t become injured. They are also a great chance to add in all those boring exercises that keep us moving well!
And recovery allows us to unwind…Be it a full week or just a day off. RELAXING is not only good for the body but also for the mind. Move better and FEEL BETTER.
Basically recovery is essential.
All of your hard work will be for nothing if you don’t take enough time for your body to rebuild. During our workouts we break down our body. When we RECOVER, we rebuild the damaged muscles. No recovery means perpetual breakdown.
Perpetual breakdown leads to feeling bad and injury!
Here is one of the types of recovery workouts that I do. It is all isometric holds, which is far from easy, but puts a different strain on the body. I also love doing workouts with single limb movements during recovery weeks.
5. Focus on Your Goals – Workout with a goal in mind.
When we workout with a goal in mind, we develop a program and a progression to get us there. When we workout with direction, we are more likely to do things that will help us move better.
We are more likely to include warm ups. To include recovery.
We are more likely to pick exercises with a purpose, not just because they are hard.
We are less likely to just throw together workouts with the hardest variables we can think of so that it will be BRUTAL.
Each exercise variable (how many exercises, types of exercises, reps, sets, rest, load, speed, intensity…) all can be manipulated to help us reach or goals.
We can’t just randomly throw them together. We must consider HOW they will HELP us reach our goals.
If your goal is to deadlift 500lbs, pick exercises and variables to match that.
Don’t waste time doing workouts with a bazillion burpees just because you know they will make you exhausted!
And on top of that, whatever your goal is, whether it is to be the best at your sport, lose weight or bench press four adult human beings, you first need to move well to accomplish it.
Therefore, when you focus on your goal, no matter what it is, you are going to work to move better!
Your plan to help you reach your goal is going to need to include all of the four other tips above even if that means not every workout you do will be so hard you have to lie on the ground completely exhausted.
Not every workout can be the hardest thing you’ve ever done!
Stop wasting your time being so focused on making every workout hard! Stop ignoring how important it is to move well!

I know lots of people have become obsessed with doing BRUTAL WORKOUTS and therefore skip the boring prehab stuff in favor of doing gnarly crap.
But I’m sorry…All that does is lead to injury.
While hard workouts are fun, working out is about more than being gnarly.
Start working out to move better and feel better!
You may find that once you start working out for those reasons, you may actually start hitting some of your other goals more easily (and feeling even better while you do it!).
Neck and Upper Back Pain Fixes
Let’s face it…Even if we are pretty active, we spend a great deal of time hunched over a computer. Which generally leads to bad posture and upper back and neck pain.
Because most people sit looking at a computer screen all day, muscles get out of their proper alignment. For instance because you hunch over the computer, your upper traps may become active (aka you may be tense a lot with your shoulders up by your ears). If your upper traps are overactive, most likely your lower traps will be underactive. Muscles therefore aren’t working the way they should be.

When muscles aren’t properly aligned and working the way they should be, other muscles compensate, leading to injury.
Below are some great trigger point release, stretches and strengthening moves you can do to alleviate minor aches and pains in your neck, shoulders and upper back. These moves will release and stretch any muscles that would be tight from sitting all day. They will also strengthen those muscles that are underactive.
NECK – Be careful when rolling out your neck. Use a very softer ball and stand against a wall with the ball between the wall and your neck. Do not go over your vertebrae. Dig in lightly to any tight spots. Look side to side and up and down to release any trigger points.
UPPER TRAPS AND SHOULDER BLADES – Stand with your back to a wall. Place a tennis ball right behind your trap (just to the side of your neck). Roll the ball out toward your shoulder and then back in. Then roll it down your shoulder blade and back up. Hold on any tight spots. You can even stretch your neck away from the side of the ball and then relax to help dig out the trigger point. As you work your way down your shoulder blades, you may even cross one arm (the arm on the side with the ball) across your chest to allow you to really work under the shoulder blade. Hold on any tight spots and relax and breathe.
CHEST – A big foam ball works best if you do this on the ground. Take the foam ball and place it in your chest near the shoulder joint, but not on the shoulder joint. Lie face down on the ground with the ball in your chest. Reach your hand overhead and then bring it back down by your side. You can even reach out to the side and then bring your hand back in. Hold on any tight spots. You can also do this standing with a smaller ball against a pole, door frame or corner of a wall into a hallway. Place the ball on the wall in your chest near your shoulder joint. You should put it in the side of your chest that isn’t blocked by the wall so you can stretch your arm out in front of you. Stretch your arm out in front of you at shoulder height. Then raise it over head and lower it back down to the ground. Move the arm around to help dig out any trigger points.
LATS – You can use a foam ball or a ball. I prefer the roller because I can hit my lats and also roll out my upper back and work on thoracic extension. Lie on your side with the roller under one armpit. Rock forward and backward and then move the roller down your side toward your belly button. Work down your lat to about the end of your ribs. Rock forward and backward as you move to really dig out the lats. If you use the blue ball, you can actually start in your chest and then roll the ball under your armpit and up between your shoulder blades. It is a great move if you want to hit your back, lats and chest all in one!

THORACIC EXTENSION – Take a roller and roll out your upper back. Let it roll from about your ribs to your shoulders. You can lean a bit to either side to change exactly where the roller hits. You can also use a ball to roll out your upper back. I like the roller though because after your roll out your back you can do a nice little stretch. With the roller in your upper back, drop your butt down to the ground and then lean back over the roller, trying to drop your head to the ground behind you. Change where the roller is in your upper back and then drop your butt to the ground and extend back over again. Really works on thoracic extension since we seem to be in thoracic flexion for 8 hours a day while sitting in front of the computer screen!
For more great foam rolling techniques, check out the Redefining Strength video library.
STRETCHES
THREE WAY STRETCH – You can do this move seated or standing. Reach one hand behind your back and then grab that wrist with the other hand. Pull the arm behind your back toward the opposite side. Then lean your head to the side you are pulling to. Do not tense your shoulders and bring them up toward you ears. Relax into the stretch. Then change the direction of your gaze. Look up and hold for a second or two. Then look straight ahead. And then look down. Move your chin as you look and not just your eyes. Changing the direction of where you look, will change exactly which muscles in your necks and upper back that you stretch.
HEAD NODS — There are three types of head nods I like. The “yes” head nod where you look down toward the ground then lean your head back and look up at the ceiling as if doing a big nod yes (move slowly trying to open up your range of motion). The “no” nod where you look side to side, trying to look as far both ways as possible as if you doing a big slow no nod (do not move to quickly and make yourself dizzy). And the “rooster” nod where you pull your chin back in toward your chest as if trying to create a double chin and then you extend your chin back out (it kind of reminds of the rooster head movement). All should be done slowly and with the shoulders relax. If you feel your shoulders creeping up by your ears, stop and relax them. You may even want to slightly reach down toward the ground with your hands to keep them relaxed.
WALL SLIDES – An oldie but goodie, this one works on thoracic flexibility. Stand against a wall with your core tight and your butt and upper back firmly against the wall. Place your forearms against the wall with your elbows bent. Then try to reach your forearms and hands up the wall as far as possible without losing contact with the wall. Don’t let your head, butt or upper back move from the wall either and try to keep your core tight. Slide your hands up and down, increasing the range of motion if you can with each rep.

KNEELING THORACIC EXTENSION – On your hands and knees, reach one hand down your neck and spine. Fingertips should be pointing down your back toward your butt. Then rotate your core so that your elbow goes under your arm on the ground. Then rotate open driving the elbow up toward the ceiling. Try to focus on just opening up your back and not really shifting your weight in your lower body. Then rotate back closed and repeat.
CAT/CAMEL – You can do this move standing or on your hands and knees. The basic move is that you round your back as much as possible and then you extend back the other way as much as possible. So on your hands and knees. Round your back up toward the ceiling. Then drop down and arch your back driving your belly button toward the ground and even looking up toward the ceiling with your head. If you do this standing, you will round forward as if hunching over your desk. Even bring your hands and arms forward as you round. Then extend open, opening your arms and even looking up toward the ceiling. Really exaggerate the extension if you can.

UPPER BACK AND LAT – Probably my favorite stretch of all time shown to me by Mark at the gym. Kneel on the ground. Then lean forward and rotate onto one side. Drop the side of your head and shoulder down to the ground. Reach the bottom arm out in front of you. Then reach the top hand back and overhead. Really try to rotate your chest open toward the ceiling. Hold and then repeat on the other side.
LAT STRETCH – Child’s pose can be a great way to stretch your lats and your upper back. You can also simply place the side your hand on a bookshelf or desk and then straighten your arm and bend over (if needed) and walk away. Even rotate a bit so you are looking under the arm on the desk or wall and then away from the arm. Feel a nice stretch down your arm and into the side of your back. Hold and repeat on the other side.
CHEST STRETCH – A doorway, pole or corner is great for this stretch. Place your hand or forearm on the side of the doorway. Step through the doorway until you feel a stretch down your chest and into your shoulder. Do not rotate toward the arm in the doorway. Try to face straight ahead. Hold and then switch.
STRENGTHENING
SCAPULAR PUSH UPS – These are hard for many people to do so you may want to have someone watch your form the first time. This is a very small range of motion. Set up in a push up position from your knees or toes. Create a nice straight line with your body. Then pinch your shoulder blades back and together and press your chest out. Then relax. It is really only a few inches of motion. DO NOT ALLOW YOUR CORE TO MOVE. Many people will drop their hips and move their core or bend their elbows. All you are doing is pinching your shoulder blades back and together. Do not let your shoulders shrug up by your ears.
SCAPULAR WALL HOLD – An essential move if you sit at a desk all day. Stand with your back to a wall. Bend your elbows with your arms at your side. Drive your chest out and pinch your shoulder blades down and together. Do not let your shoulders shrug. Lean back into the wall. Only your elbows and maybe your head should touch the wall. Walk your feet away from the wall only if needed to increase the resistance. Press your chest out and draw your shoulder blades together as you hold. You create the tension and this move will only be difficult if you really activate the muscles.
CORNER ROW – A dynamic scapular hold. Stand in a corner in the same position as the scapular hold. Place one elbow on each side of the corner. Drive up into the scapular hold and then relax back into the corner and repeat. Do not let the shoulders shrug up as you row out. Also the farther from the wall your feet are, the harder the move will be.
LAT TOWEL PULLDOWN – You can do this move with or without a towel. It is very much like the wall slides except you aren’t against a wall. Reach your hands up with your elbows bent. Your hands should be on either side of your chest with your palms facing forward. You can hold a towel tight between your hands. This sometimes helps to remind you to keep tension between your shoulder blades and activate your lats. Reach your hands up overhead, keeping tension on the towel. Then pull the towel back down, pulling with your lats as you pinch your shoulder blades down and together. Repeat, keeping tension between your shoulder blades and using your lats to pull.

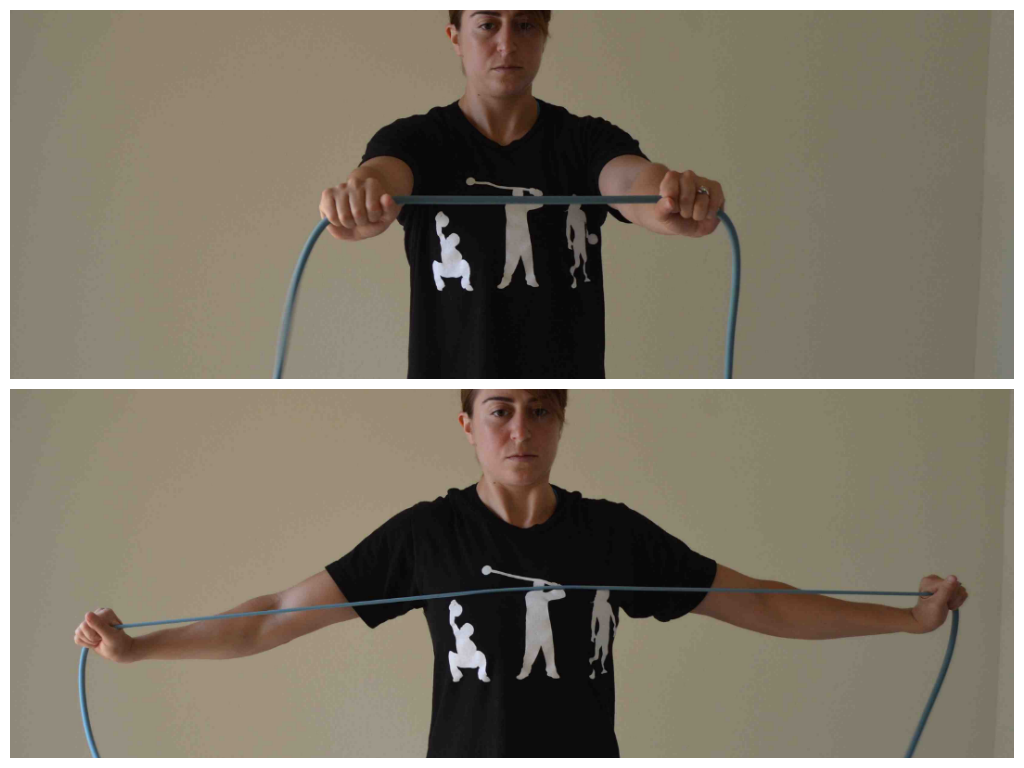
BAND SCAPULAR FLY – For this one you need a light resistance band. Hold the resistance band with your hands about shoulder-width apart. Arms should be straight out in front of you at about shoulder height or right below. Keeping your arms straight, open your arms out to the side. Pinch your shoulder blades together as you open. Do not let your shoulders shrug up. Then once you open the band to your chest with your arms straight, bring your arms back together so your arms are about shoulder-width apart again and there is no slack in the band. Repeat.
Many of these moves can even be done in your office when you need a quick break from looking at the computer screen. I tell clients all the time that at least every hour or so they should get up and do a couple quick stretches and a scapular hold for a minute or two. Great way to reverse the effects of hunching over AND a great way to become even just a little bit more active!
Here is actually a great move to extend EVERYTHING that is basically flexed all day at the computer.
Kneeling bridge
NOTE: Anyone love…I mean hate…burpees? Look out for some cool burpee variations to come later this week!
Wrist and Elbow Pain
Many of us sit at a computer for hours at a time, maybe even whole days, typing.
Which means our wrists are bent and flexed in an unnatural position for HOURS. And then when we are done typing, we go and “grip” things.
We carry grocery bags or go to the gym and lift weights or hold pencils and pens. We hold spoons to stir the dinner in the pan that we are also holding. (And it’s funny because most of us need to work on grip strength, which while important to improve, can also add to our pain).
Our hands and wrists are constantly in flexion (even our elbows are flexed a lot).
And this leads to a lot of hand, wrist, forearm and even elbow pain. (Shoot even if you play a sport like tennis and have some elbow pain…THIS CAN HELP!)
So what are some tips to help you alleviate the pain?
Where ever there are muscles, you can foam roll and probably should be foam rolling.
Take a golf ball and place it under your hand on a table or flat surface. Roll the golf ball around the palm of your hand. You can add a little bit of extra pressure by pressing down with your other hand.
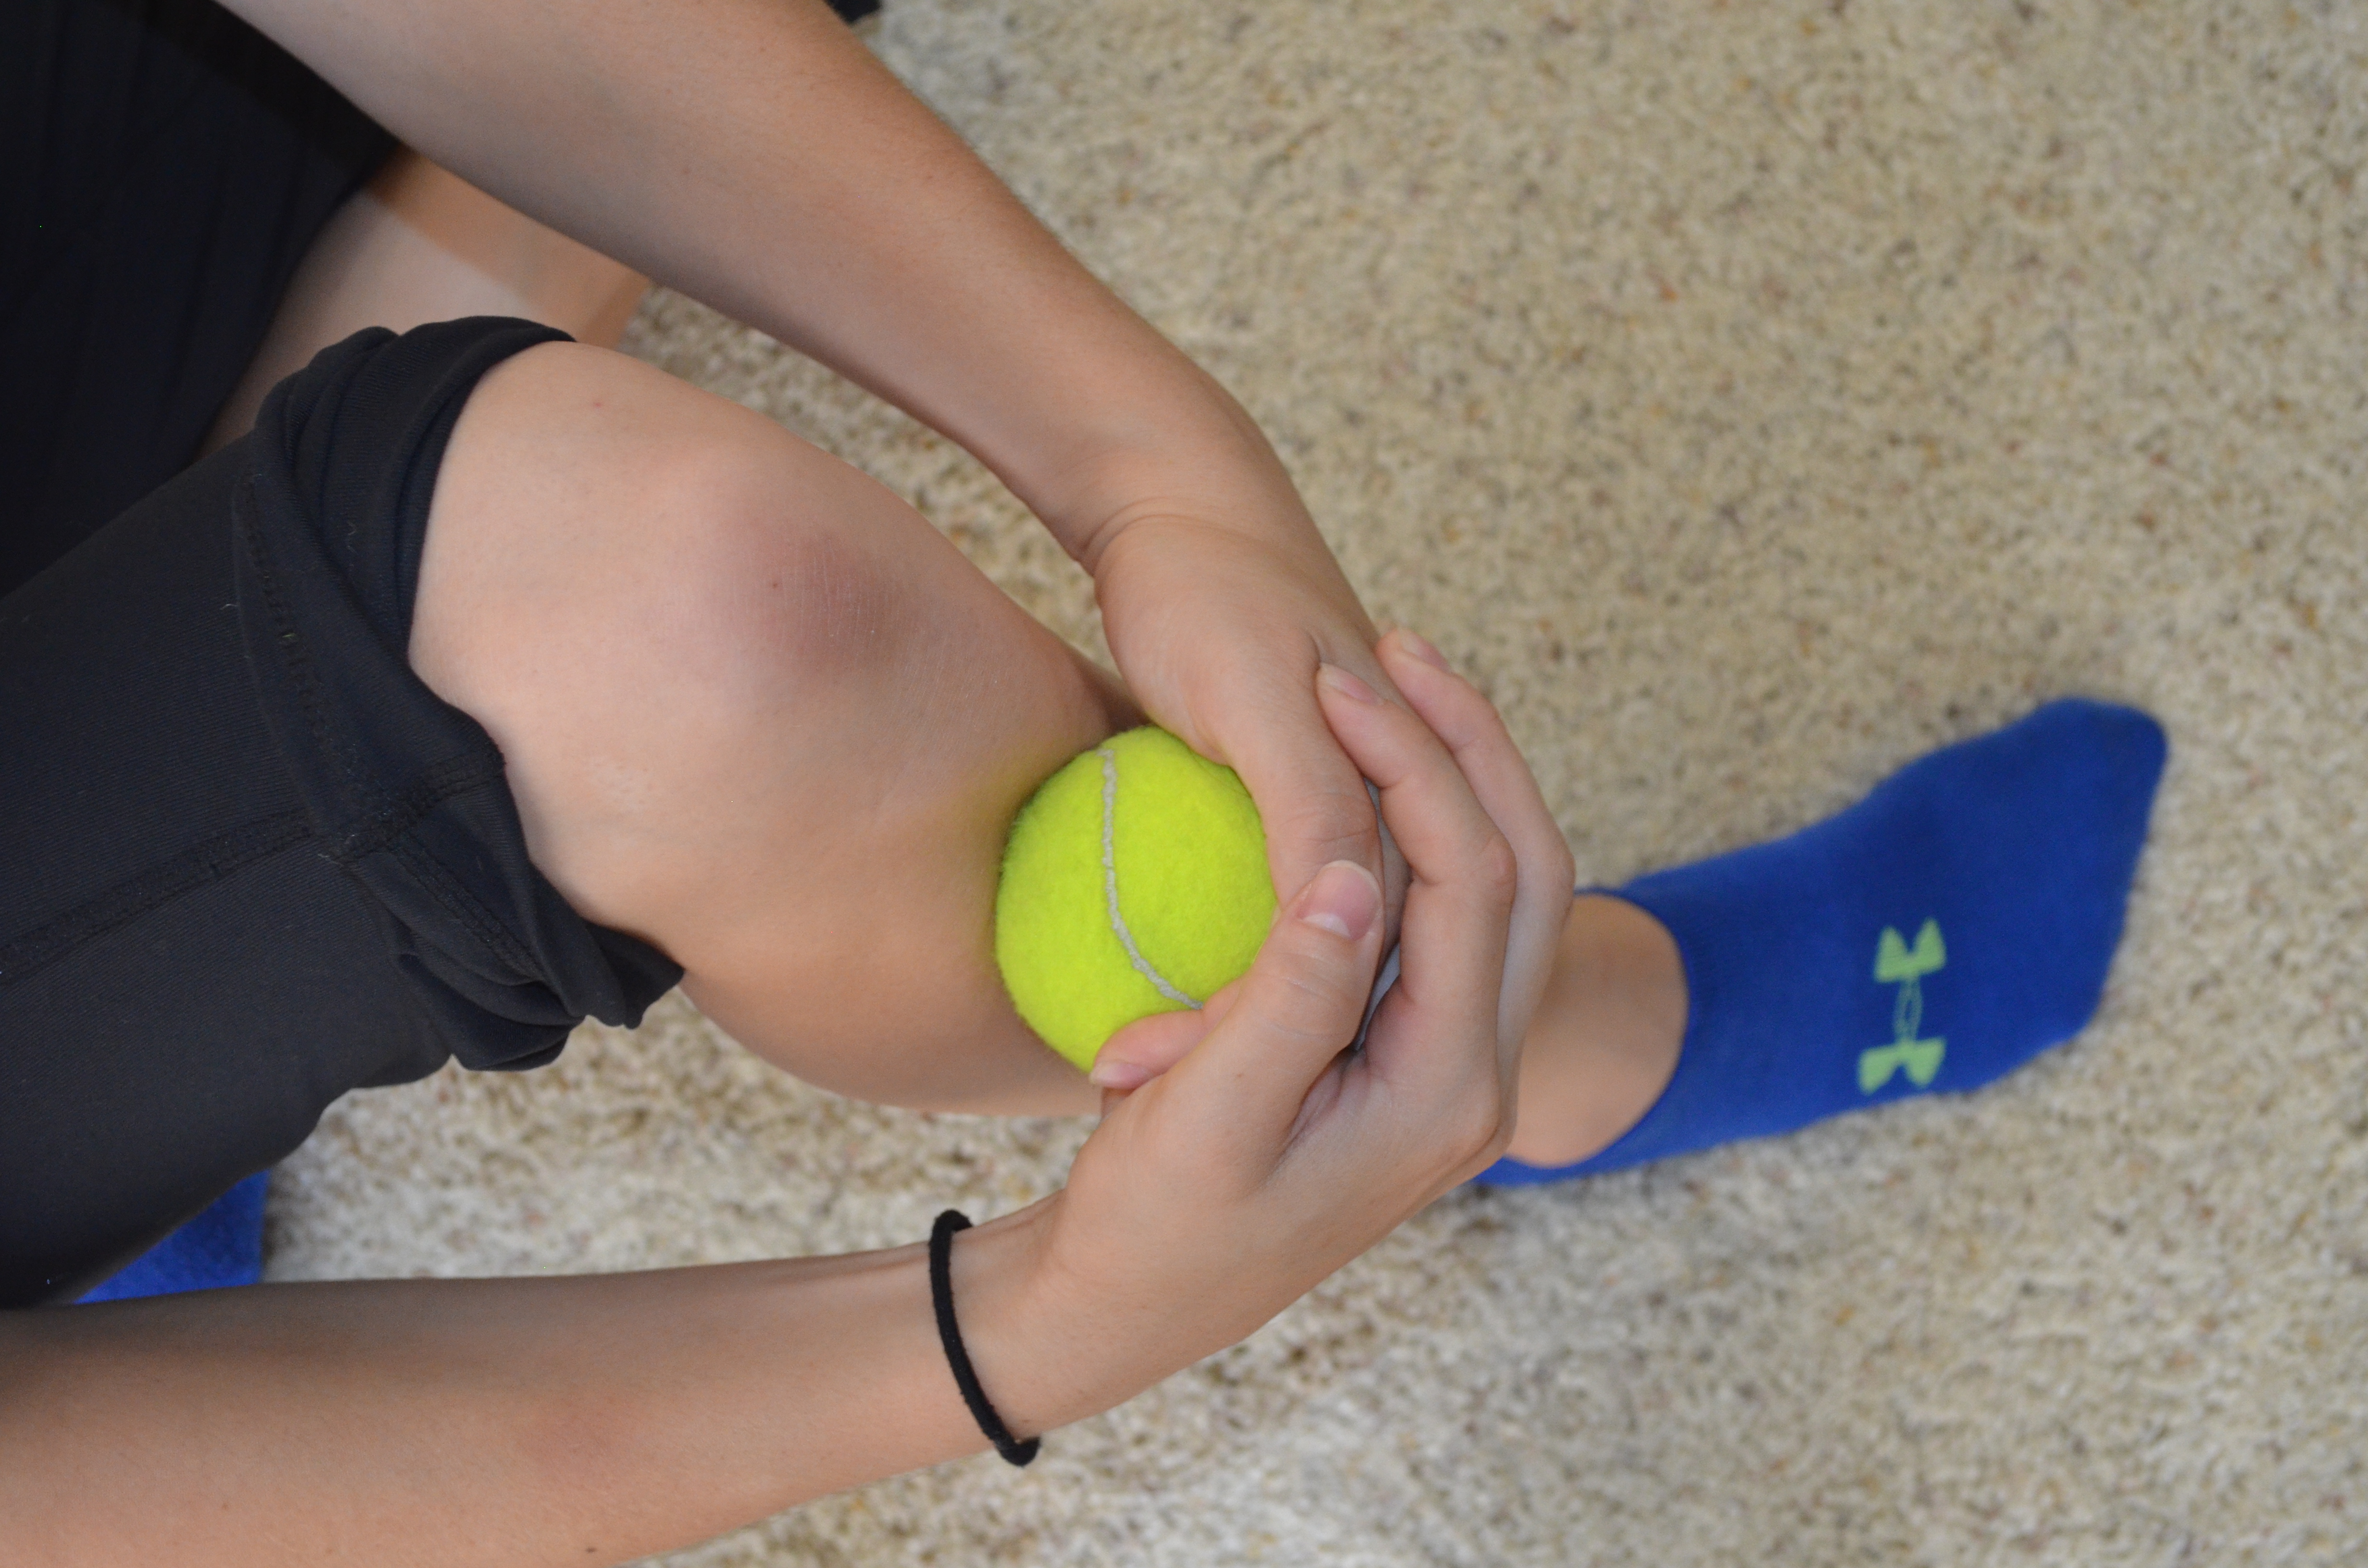
You can then take the golf ball or a tennis ball (or small trigger point roller or foam roller) and roll out all of the muscles from your wrists to your elbow. Make sure to get the top and bottom of your forearm. To dig in deeper as you roll out, you can tense and relax your forearm on the ball or roller. To tense, make a fist and then relax over the roller. You can also dig in deeper by applying pressure with your other hand.
If you are suffering from elbow pain, you may also want to roll out your tricep and bicep right above your elbow. You can take a roller or ball and place it on a low table and roll your arm out on it. You can also place the roller or ball against a wall and press your arm into it (this works well for the tricep but not as well for the bicep unless you are in an opening or doorway). Again, you can apply more pressure and dig in deeper, by pressing down with your other hand. Make sure to rock back and forth and not only move the roller up and down.
STRETCHES
Wrist (and Hand) Stretches:
- Hand Circles – Clasp your hands together and draw circles and figure eights both ways with the hands together. Try not to tense your hands, but relax them through the range of motion.

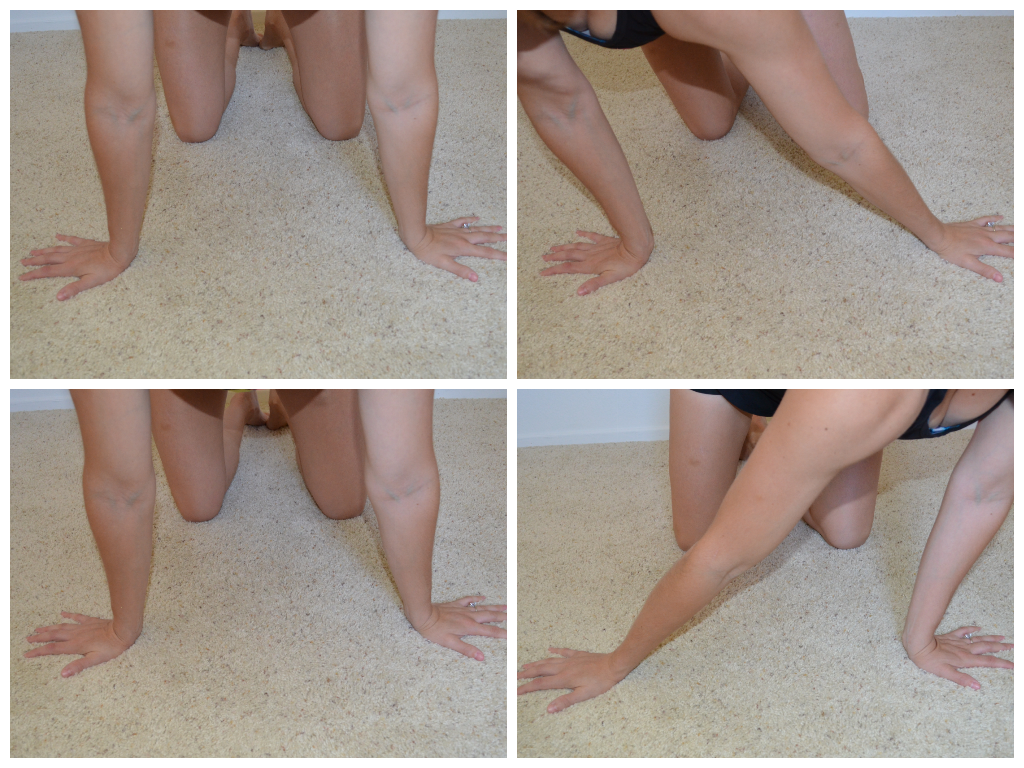
- Under Forearm stretch – Kneel on the ground and place your palms down on the ground. Turn your fingertips back toward your knees. Then sit back on your heels and feel a stretch down the inside of your forearm. Sit back as far as you can without letting the heel of your palms come up. Rock back and forth. Do not hold the stretch but move slowly.

- Inside/Outside Stretch – Kneel on the ground with your palms on the ground and your fingertips pointing out away from each other. Lean forward a bit into your hands so that there is some pressure on your palms and wrists. Keeping the pressure on the hands, flip one hand and then the other so that the finger tips are pointing in and the back of your hands are down. Then, one at a time, flip the hands back out.

- Side to Side Extension – Kneel on the ground with your palms down and hands about shoulder-width apart. Fingers should be pointing outward away from each other. Then rock side to side slowly and smoothly.
- Prayer Stretch – Place your hands together. You can do this with the fingertips pointing up or down (do both if you have time). Press the fingertips together. If your fingers are pointing up, you are going to try to press the hands down as low as possible without the heels of the palms coming apart. If your fingertips are pointing down, you will try to raise your hands up as high as possible without your hands coming apart.

Tricep and Bicep Stretches:
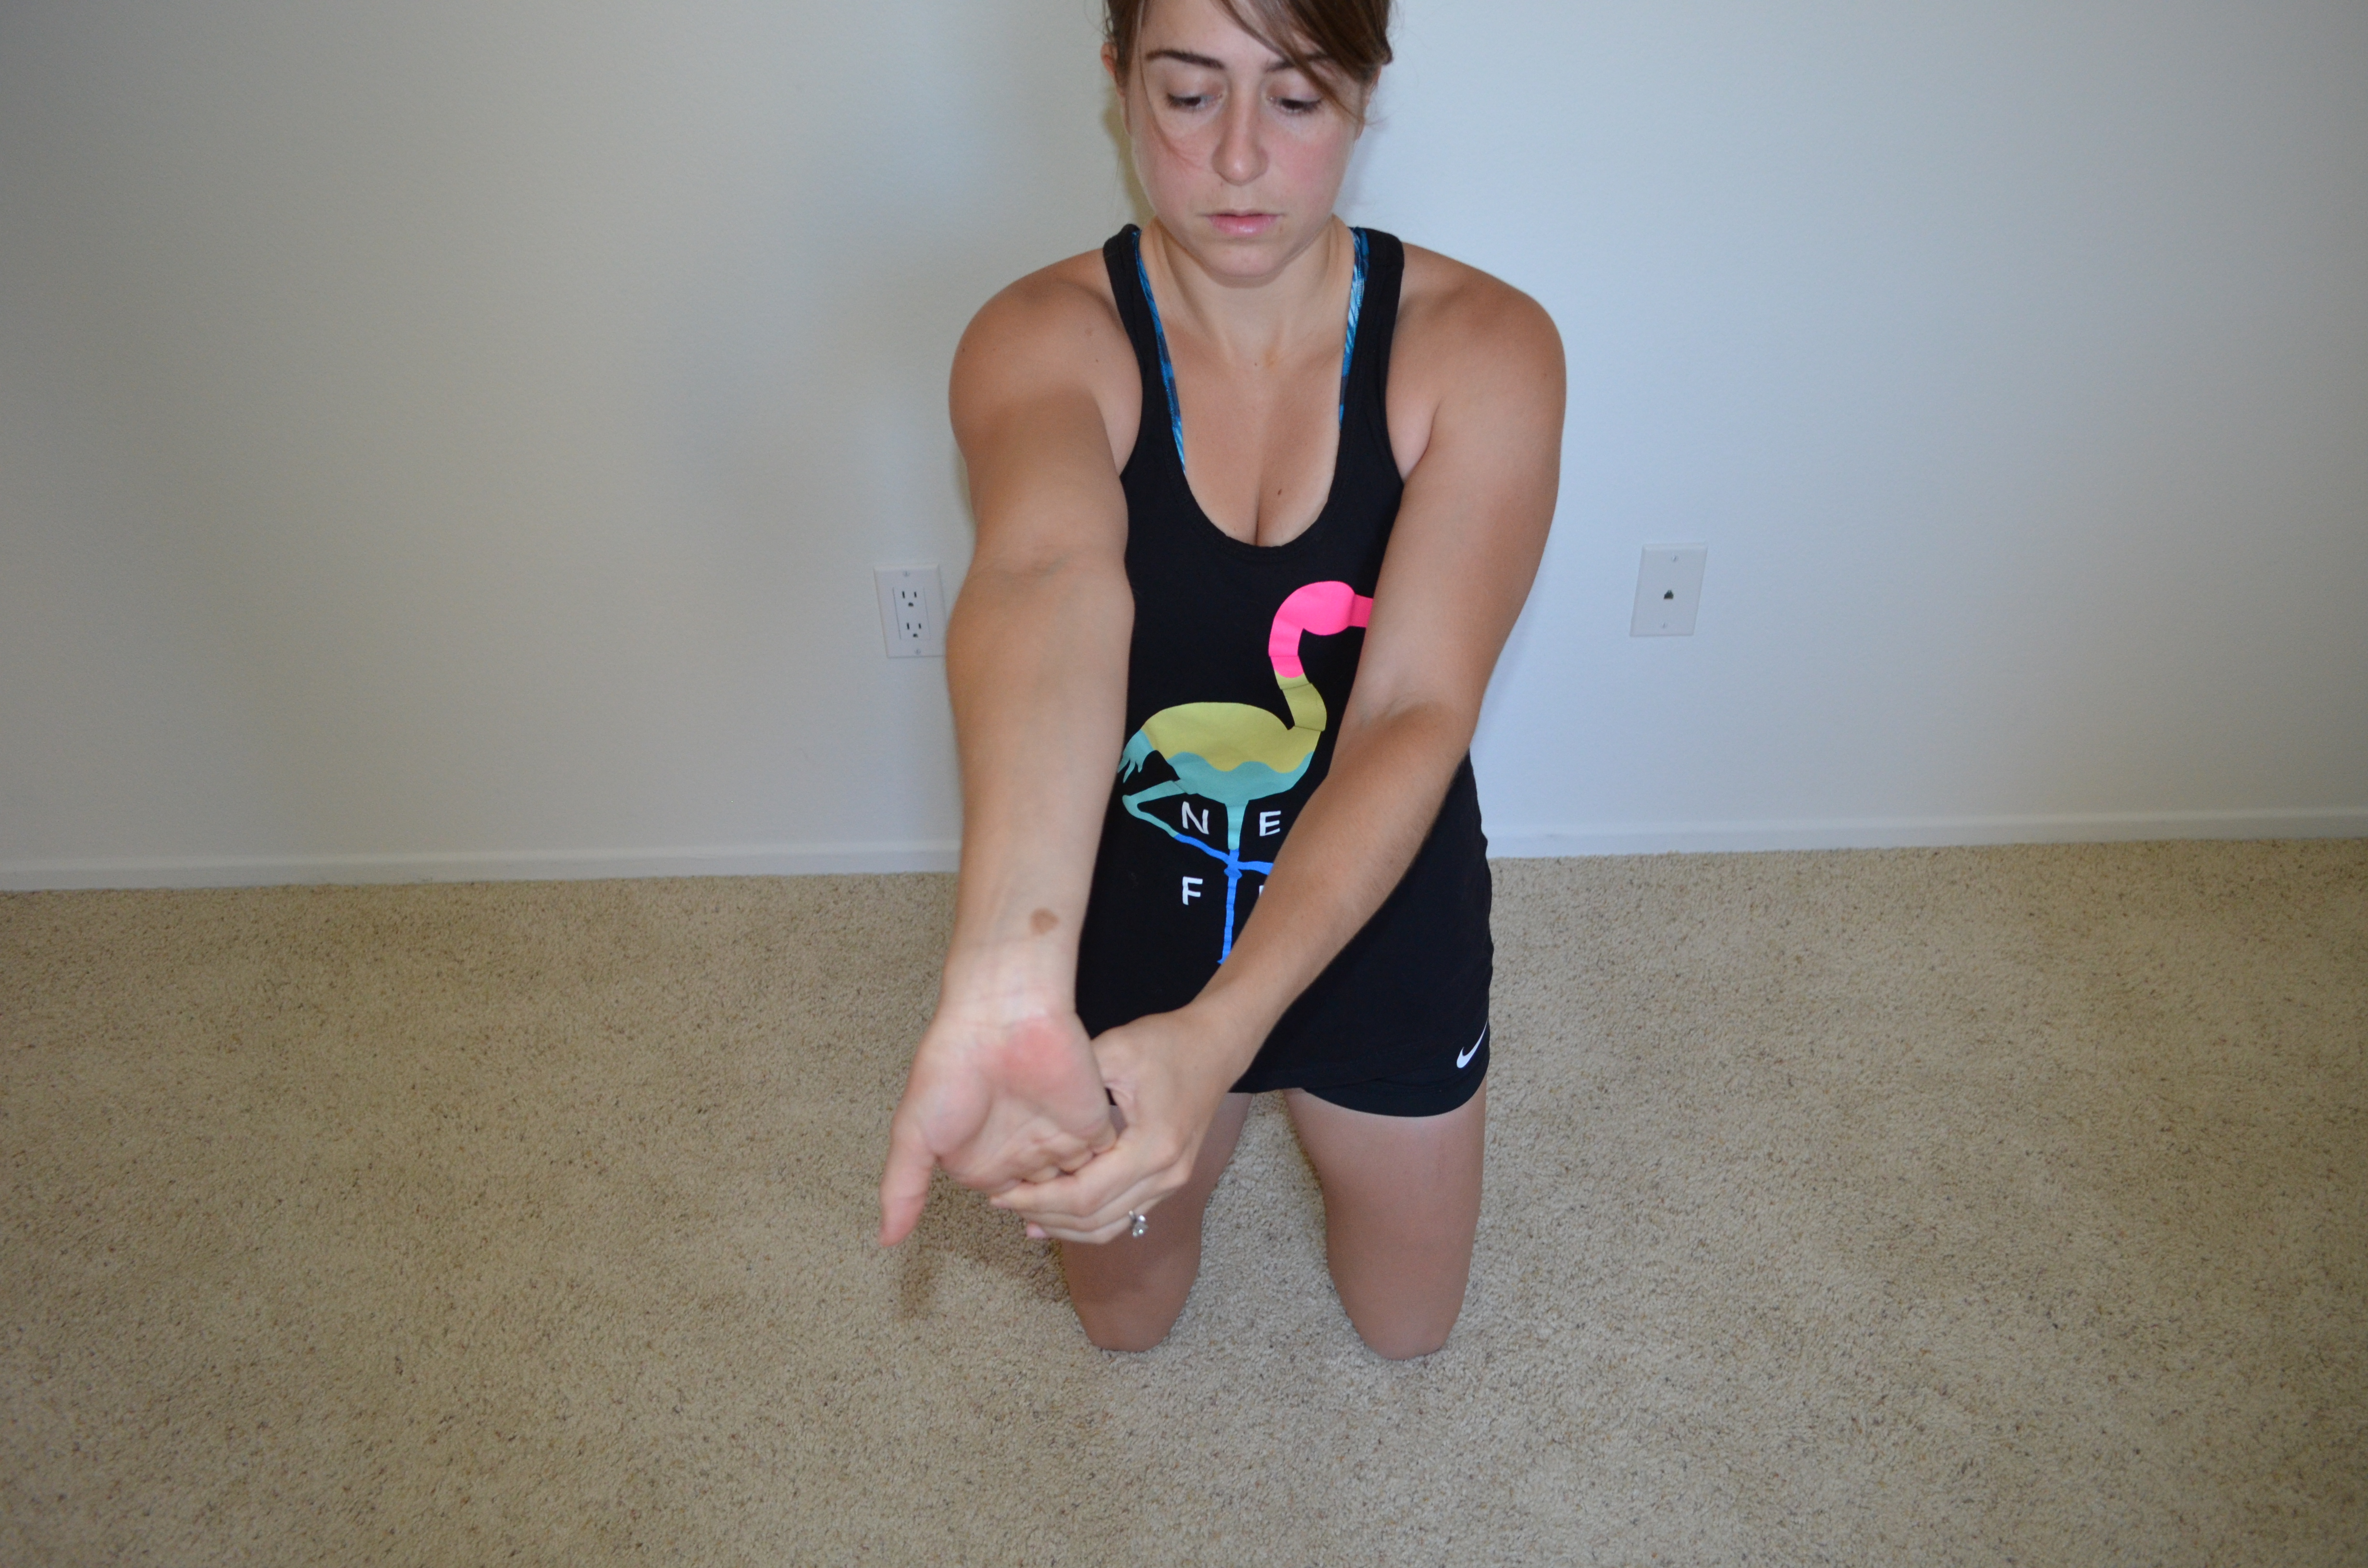
- Wrist and Bicep Stretch – Stretch one arm straight out in front of you. Take the other hand and press down on the fingertips, pointing them down toward the ground. As you press down, you should straighten your arm more so you feel a stretch down your forearm and up into your bicep.
- Hugs – Swing your arms open as wide as you can to feel a stretch through your chest and biceps. Then swing your arms across your body as if you are hugging yourself. Reach your hands around back as far as possible and then open up again as wide as possible. Repeat never really holding in one position.
- Overhead Tricep Stretch – Reach one hand up overhead and then down your back. Reach as far down your back as possible and then take the other hand and press down on the elbow to increase the stretch. Try not to arch your back as you do this stretch. You can also do this with a towel. Reach one hand over and down the back from the top. Hold a towel in that hand and then reach up the back to grab the other end of the towel. Pull down on the towel to increase the stretch.
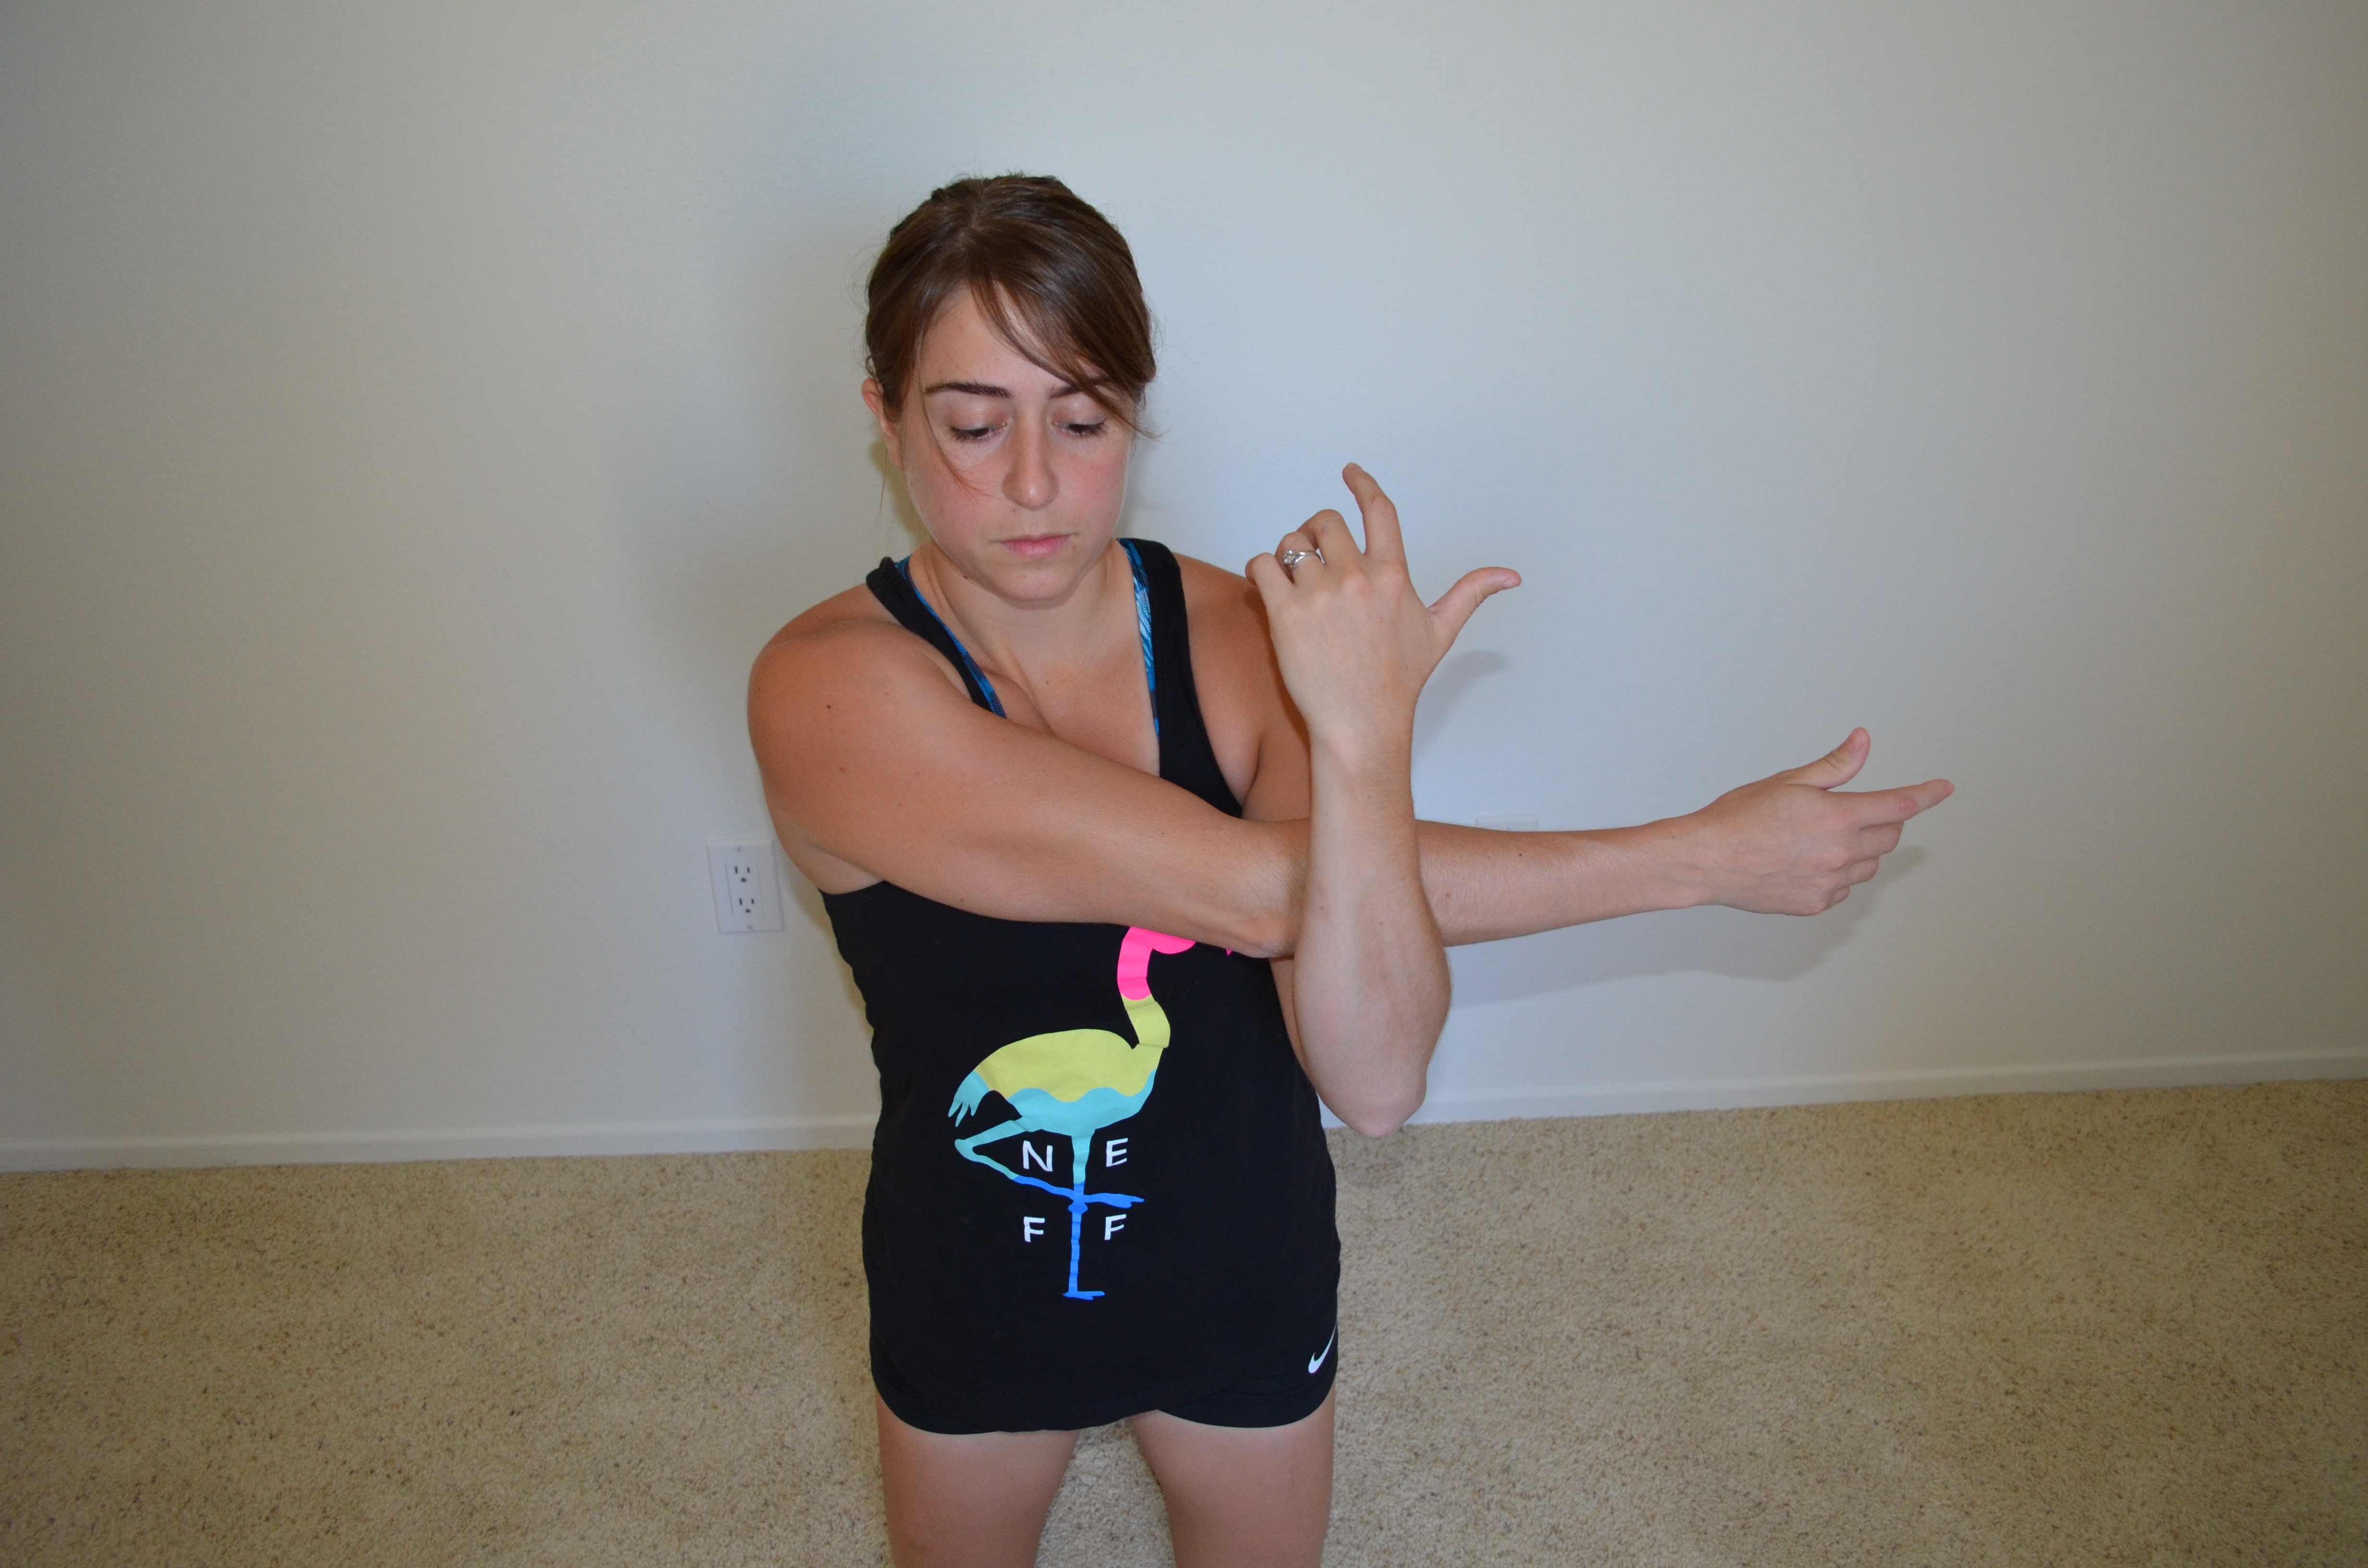
- Across the Chest Tricep Stretch – Reach one arm across your chest and take the other arm and pull it tighter to your chest. You can relax the arm across your chest down into the bent elbow of the other arm. Make sure to keep the shoulder of the arm across the chest relaxed down and back.
STRENGTHENING
Probably one of the best simple cure-alls for the lower arm is the rubber band finger extensions. It works all the way up your forearm to loosen everything that is constantly flexed.
To do it, get a rubber band (you can use a basic rubber band or get one of the thicker ones designed for this) and place it around the outside of your fingers. Place it around that middle knuckle. Then extend your fingers open as far as possible before bringing them back together. Do a number of reps (I recommend starting with like 30-50 depending on the tension of the band).

These are all quick fixes you can do to alleviate hand, wrist, forearm and elbow pain. None of them take a lot of time and can even be added to your workout warm ups.
If you sit at a desk all day, you can easily do some of these every few hours when you get up for a break. You could even add in the scapular hold and some neck and trap stretches too!…Hint…hint…
NOTE: If you have sever pain please see a Physical Therapist. These are meant to alleviate minor aches and pains. Ice can also be a great tool if an area is super inflamed.
Common Injuries – Shin Splints and Plantar Fasciitis
I’ve gotten a ton of people recently coming to me with shin splints and plantar fasciitis.
There is a close relationship between the two so I’m not surprised when runners end up having troubles with both. They can be due to improper footwear, over-pronation of the foot, incorrect running/walking form or just plain-old OVERUSE.
Below is a quick breakdown of each injury and then some prehab/rehab stuff you can do to make the pain go away!
Shin Splints
Shin splints are not your bone splintering apart. Shin splints are actually pain in either the anterior or posterior tibialis, the muscles of your shin.
Shin splints can occur from improper footwear, improper gait mechanics (overstriding), over-pronation (when your foot rolls inward) and just plain-old overuse. (Today I will not get into proper gait mechanics or discuss the shoes you should wear, but you should be aware that these two things MAY be a potential cause of your pain.)
Here are some ways you can help alleviate the pain and even start correcting the muscle imbalances that may be occurring because of one of the issues above.
How many of you runners that suffer from shin splints roll out the muscles of your lower legs, other than potentially your calves?
Don’t lie. I know not many of you do.
The fronts and sides of our shins are often forgotten when we roll out.
To roll out your shins, sit on the ground with one foot flat on the ground and your knee bent. Take a tennis ball or other small ball and dig it into the muscle down the front of your shin. Start right below your knee. Make small circles, digging the ball in as much as you can. After making circles in one spot, move the ball down lower on your leg toward you ankle. Work your way all the way down your shin.
You can also use a roller or tennis ball to hit the outside of your shin. Place the roller or tennis ball on the side of your lower leg right above your ankle. Press your leg down into the roller and roll up toward your knee and then back down. Hold on any tight spots and rock your leg side to side to dig in deeper to those spots.
Here is a link to a full video library that includes a few different ways to roll out your shins and your entire lower leg.
STRETCHING
Stretching can also help alleviate the pain of shin splits by lengthening potentially overactive muscles.
You can hit your shins from a couple of different angles using one basic stretch. Standing, point your toe. Place your big toe on the ground and let your foot fall forward, pressing the top of your foot toward the ground. You can change exactly what angle you hit based on how you point your toe. Your big toe can point straight ahead or out to the side or even inward.
You can also make circles with your foot in that position to loosen up your shin and improve ankle mobility.
You should also make sure to stretch your calves as they me tight and part of the problem!
STRENGTHENING
A good way to stretch and help strengthen is by doing heel walking. Flex your feet and walk around on your heels. This could be a great part of your pre-run warm up.
Also, ABCs are a great ankle mobility and lower leg muscle strengthening exercise. Sit or lie down and point your toe. Draw the alphabet with your big toe.
If you do have shin splints from overuse, make sure to also rest up and then start a rehab program.
If you have shin splints from over-pronation, you may also need to loosen up other muscles like your adductors while strengthening your glutes.
Ice and anti-inflammatories can also help alleviate pain BUT they will not “cure” the problem.
The best “rehab” program is a prehab one. If you know you are going to be upping your mileage and have suffered from shin splints in the fast, stop the problem before it happens. Foam roll before and after workouts and make sure to stretch and warm up properly. Work on your ankle mobility even if you aren’t having pain at the moment. Also include the proper strengthening exercises in your program.
Take care of your body BEFORE you have pain so that an injury doesn’t sideline you later!
Plantar Fasciitis
Plantar Fasciitis is pain on the bottom of your foot and can occur along with heel spurs or even because of heel bone spurs.
It is a common overuse injury in runners and has a lot to do with over-pronation and lack of calf flexibility. You are more at risk if you are overweight, have high arches, do repetitive high-impact activities or suddenly start or up your activity level.
Usually your plantar fasciitis feels the worst when you wake up or after you’ve been sitting for a while. It tends to feel better when you’ve warmed up.
The quickest way to get rid of plantar fasciitis is by rolling out all the tight muscles involved.
Roll out your calves with either a tennis ball or roller. Start at the base of your calf right above your ankle. Rock side to side and then move the roller or ball up higher on your calf. Hold on any tight spots.
You can also flex and relax your foot to dig in deeper to any trigger points. Or you can make small circles with your foot. Both help apply more pressure to the tight area.
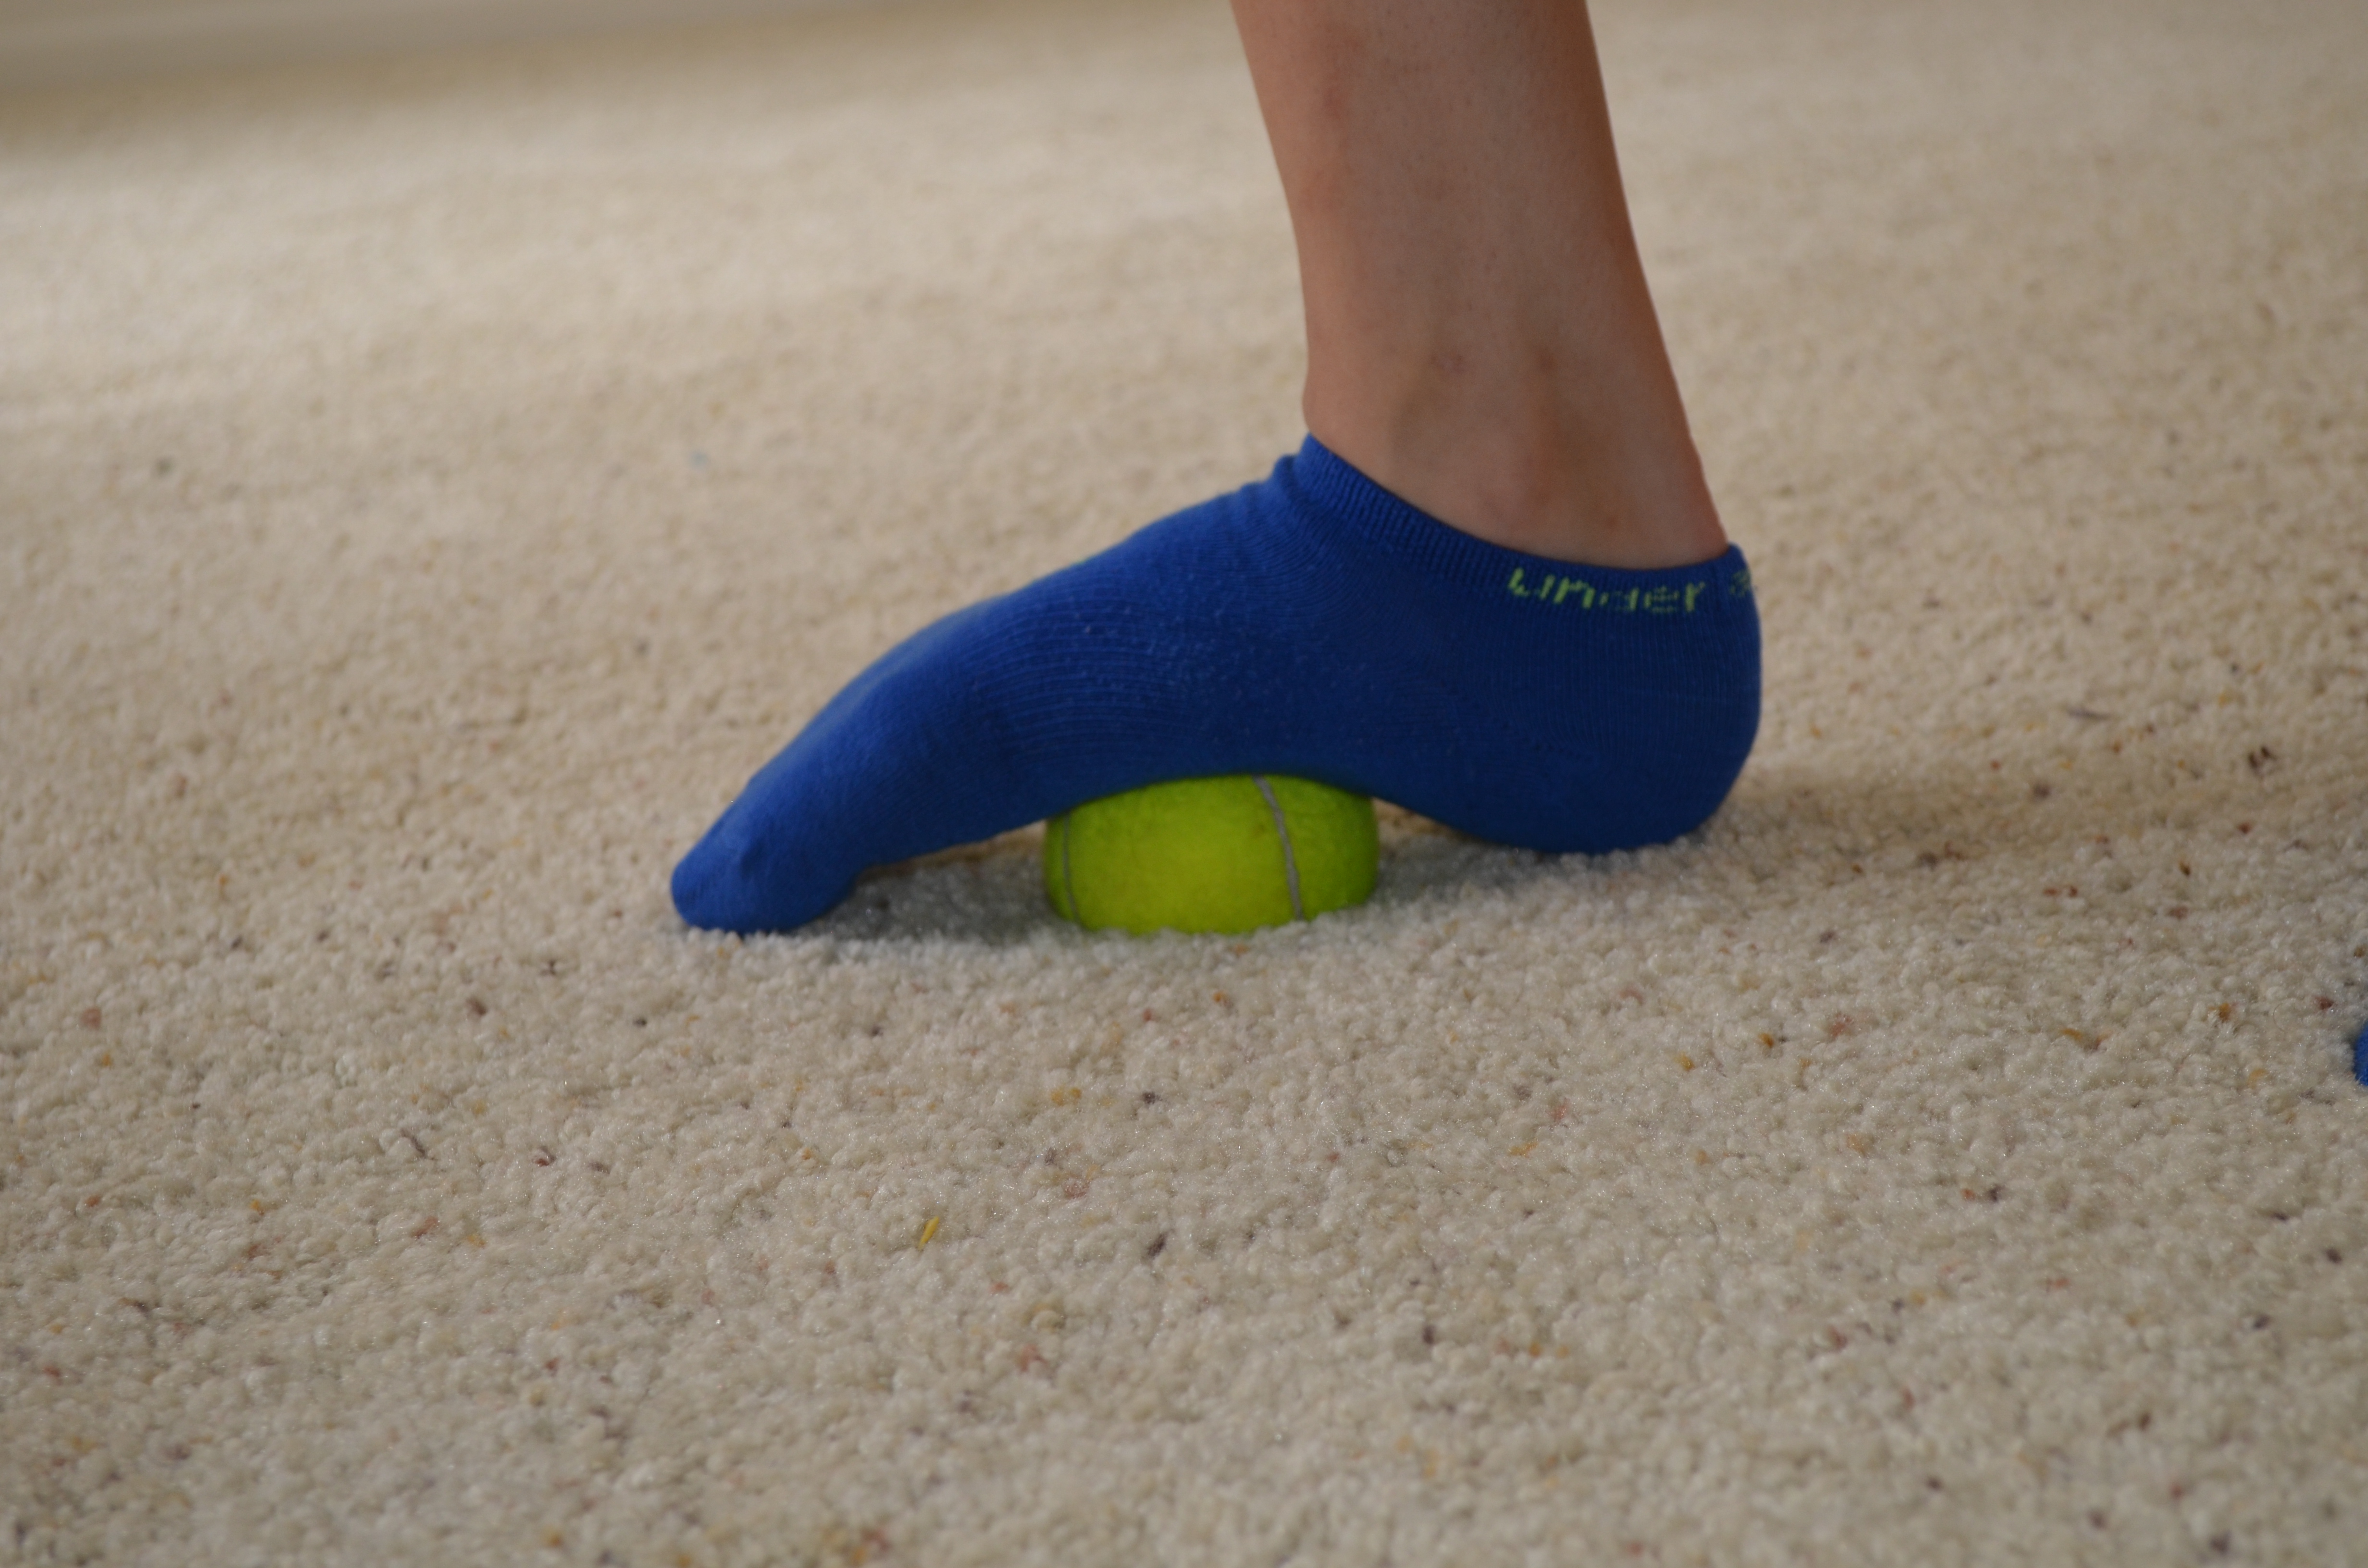
You also need to roll out the bottom of your foot no matter how much it hurts. The smaller and harder the ball you use, the more you dig in and the quicker you will get everything loose (AKA the quicker everything will feel better!).
Standing, place the ball under your arch. Press down into the ball and roll it all along the bottom of your foot. Hold on any tight areas. BONUS: Take a small water bottle in the refrigerator and freeze it. Then use the cold bottle to roll out your foot! The cold really helps alleviate the pain (both from the injury itself and the actual rolling out haha).
STRETCHING
You must stretch your calves AND the bottom of your foot.
To stretch your calves you can do Bear Squats or more traditional static calf stretches. To do a bear squat, start on your hands and knees. Then press back off your knees, driving your butt up to the ceiling and your heels down into the ground. Hold for a second and then relax back down to your hands and knees. Repeat for 10 to 20 reps. A great dynamic warm up stretch!
To stretch your feet, you can put your toes against a wall while keeping your heel on the ground. Lean forward into the wall.
Or you can flex your feet and sit back on your heels while kneeling on the ground. This stretch can even be added to the beginning of the bear squat so that you can stretch both your feet and your calves.
STRENGTHENING
A great foot strengthening exercise requires only a towel. Place a towel on the ground. Using your bare foot, scrunch the towel with your toes. You can also practice picking up the towel with your foot.
Doing these moves always remind me of the movie Die Hard….when the guy tells Bruce Willis to take off his shoes and makes fists with his toes. (Am I weird? Probably.)
For both of these injuries, you will want to use a lot of the stretches and mobility exercises outlined in the Ankle Mobility post (This post shows the stretches discussed here)! They will help you strengthen and stretch your feet and lower legs so you can move pain-free!
For more foam rolling techniques, check out this Trigger Point Video Library. And for a great recovery workout for runners, click here! This workout will help you prevent injuries and develop great strength to run further, faster.
NOTE: This post doesn’t include all of the prehab/rehab options out there. It also doesn’t address all the causes of these two injuries. See a PT if your pain is sever or persists without lessening while trying some of these easy home remedies.
Ankle Mobility – Move Better, Feel Better, Perform Better
You never really hear about people working on the mobility of their ankles.
Heck no one even really seems to talk about their ankles unless their ankles are injured.
But our ankles, and our feet for that matter, play a huge role not only in our ability to move, but also in our ability to move well.
You may not realize it, but some of your injuries may be caused by your lack of ankle mobility. Ankle mobility can restrict movement and lead to compensations. If you have poor ankle mobility, you may not be engaging your posterior chain…aka your glutes and such. So when you do leg movements your quads may have to compensate, which can lead to knee problems, among other issues, AND can hinder your progress during your workouts.
Our feet and ankles are our base, and if something isn’t right at our base, how can we expect everything up the kinetic chain to perform well?
If the foundation of your house wasn’t solid, would you really expect the rest of the building to hold up well?
Of course not!
So how can you expect to perform well if your base isn’t solid?!?
You can’t!
So here are 10 great ways to improve your ankle mobility and foot and ankle strength so that you can squat better, run better, and suffer from fewer pains and injuries!
1. Foot foam rolling – A great way to roll out your foot and increase your foot and ankle mobility is using a tennis ball. Standing, put the tennis ball under the arch of your foot. Press down into the ball and roll up and down and side to side. You can also use a lacrosse ball or golf ball. The smaller and harder the ball, the more you will be able to dig in.
2. Lower Leg foam rolling – There are a number of different ways to roll out your calves and your shins. I show a few on Redefining Strength. You have to make sure to roll out your entire lower leg. Most people will do the calves but forget about the shins and even the side of their lower leg. You must hit your lower leg from every angle if you want great mobility. Using a roller, you can hit every part of your lower leg. To get the calf, sit over the roller with it right above your heel. Rock side to side and up and down as you move the roller toward the back of your knee. To hit your shin, kneel on top of the roller almost as if you were going to hold the pigeon pose. Do not foam roll the bone. By rocking to the side after hitting the front of your shin, you can get the outside of your lower leg.
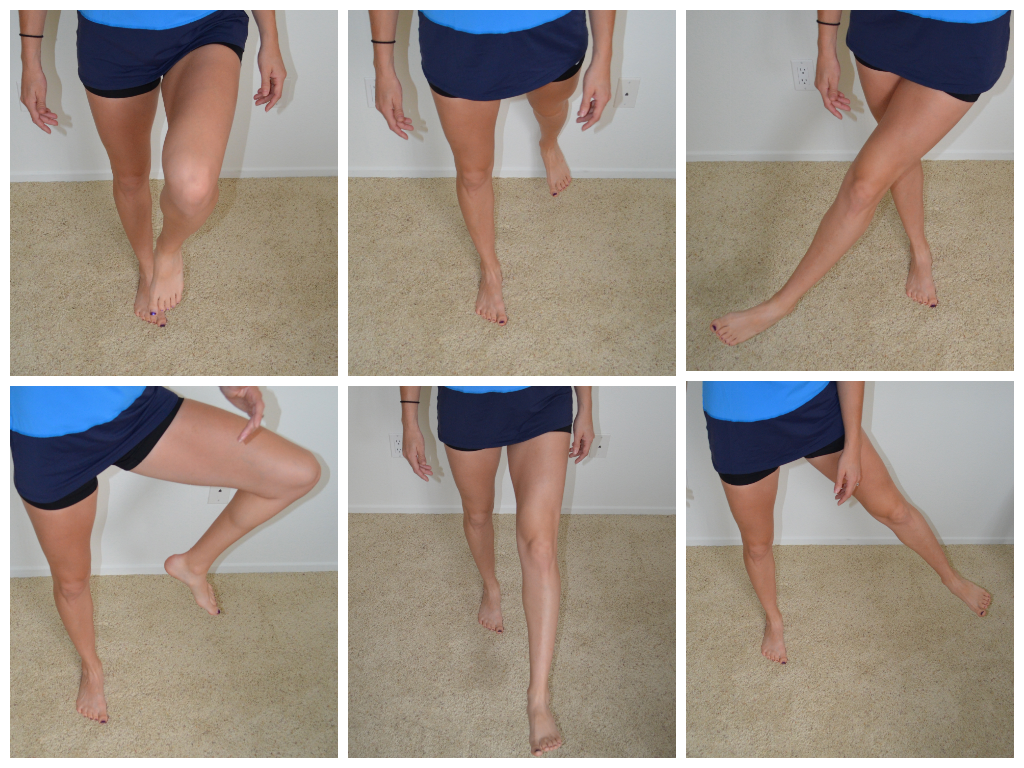
3. Standing 3-way ankle mobility – One of the ankle mobility drills I use most often is a standing three-way drill. This drills is great and hits the ankle from different angles; HOWEVER, if you have knee problems, this move may not be for you. Number 7 may be a better fit if you are suffering from knee pain. To do this mobility move, standing facing a wall. You can put your hands on the wall for balance or support. Have one foot in front. This foot is the one working. Try to drive the knee straight forward over the toe and into the wall. Do not let the heel of the foot come up. Do that 10 times and then take a step out a bit wider and repeat. Then step across in front and repeat 10 more times. Make sure that your toe is always pointing directly toward the wall and that you are keeping the heel down as you drive your knee forward.

4. Bear Squat – The Bear Squat is one of my favorite ankle mobility moves because it is a great calf stretch and even gets my hamstrings sometimes. To do this move, start on your hands and knees as if you were about to crawl. Then drive up off your knees onto your toes and hands. Drive your heels as close to the ground as possible and then return back to kneeling. You can make this an even better warm up by not returning all the way back to kneeling but instead just to the bulldog position!
5. Single Leg calf and ankle stretch – Very similar to the Bear Squat although this really targets one ankle and calf at a time. Start in a plank like at the top of a push up. Cross one ankle over the other calf. Then pushing your butt up in the air, drive the heel of the foot down into the ground. Then move back toward the plank position and repeat about 10-15 times each side. Do not hold the stretch.

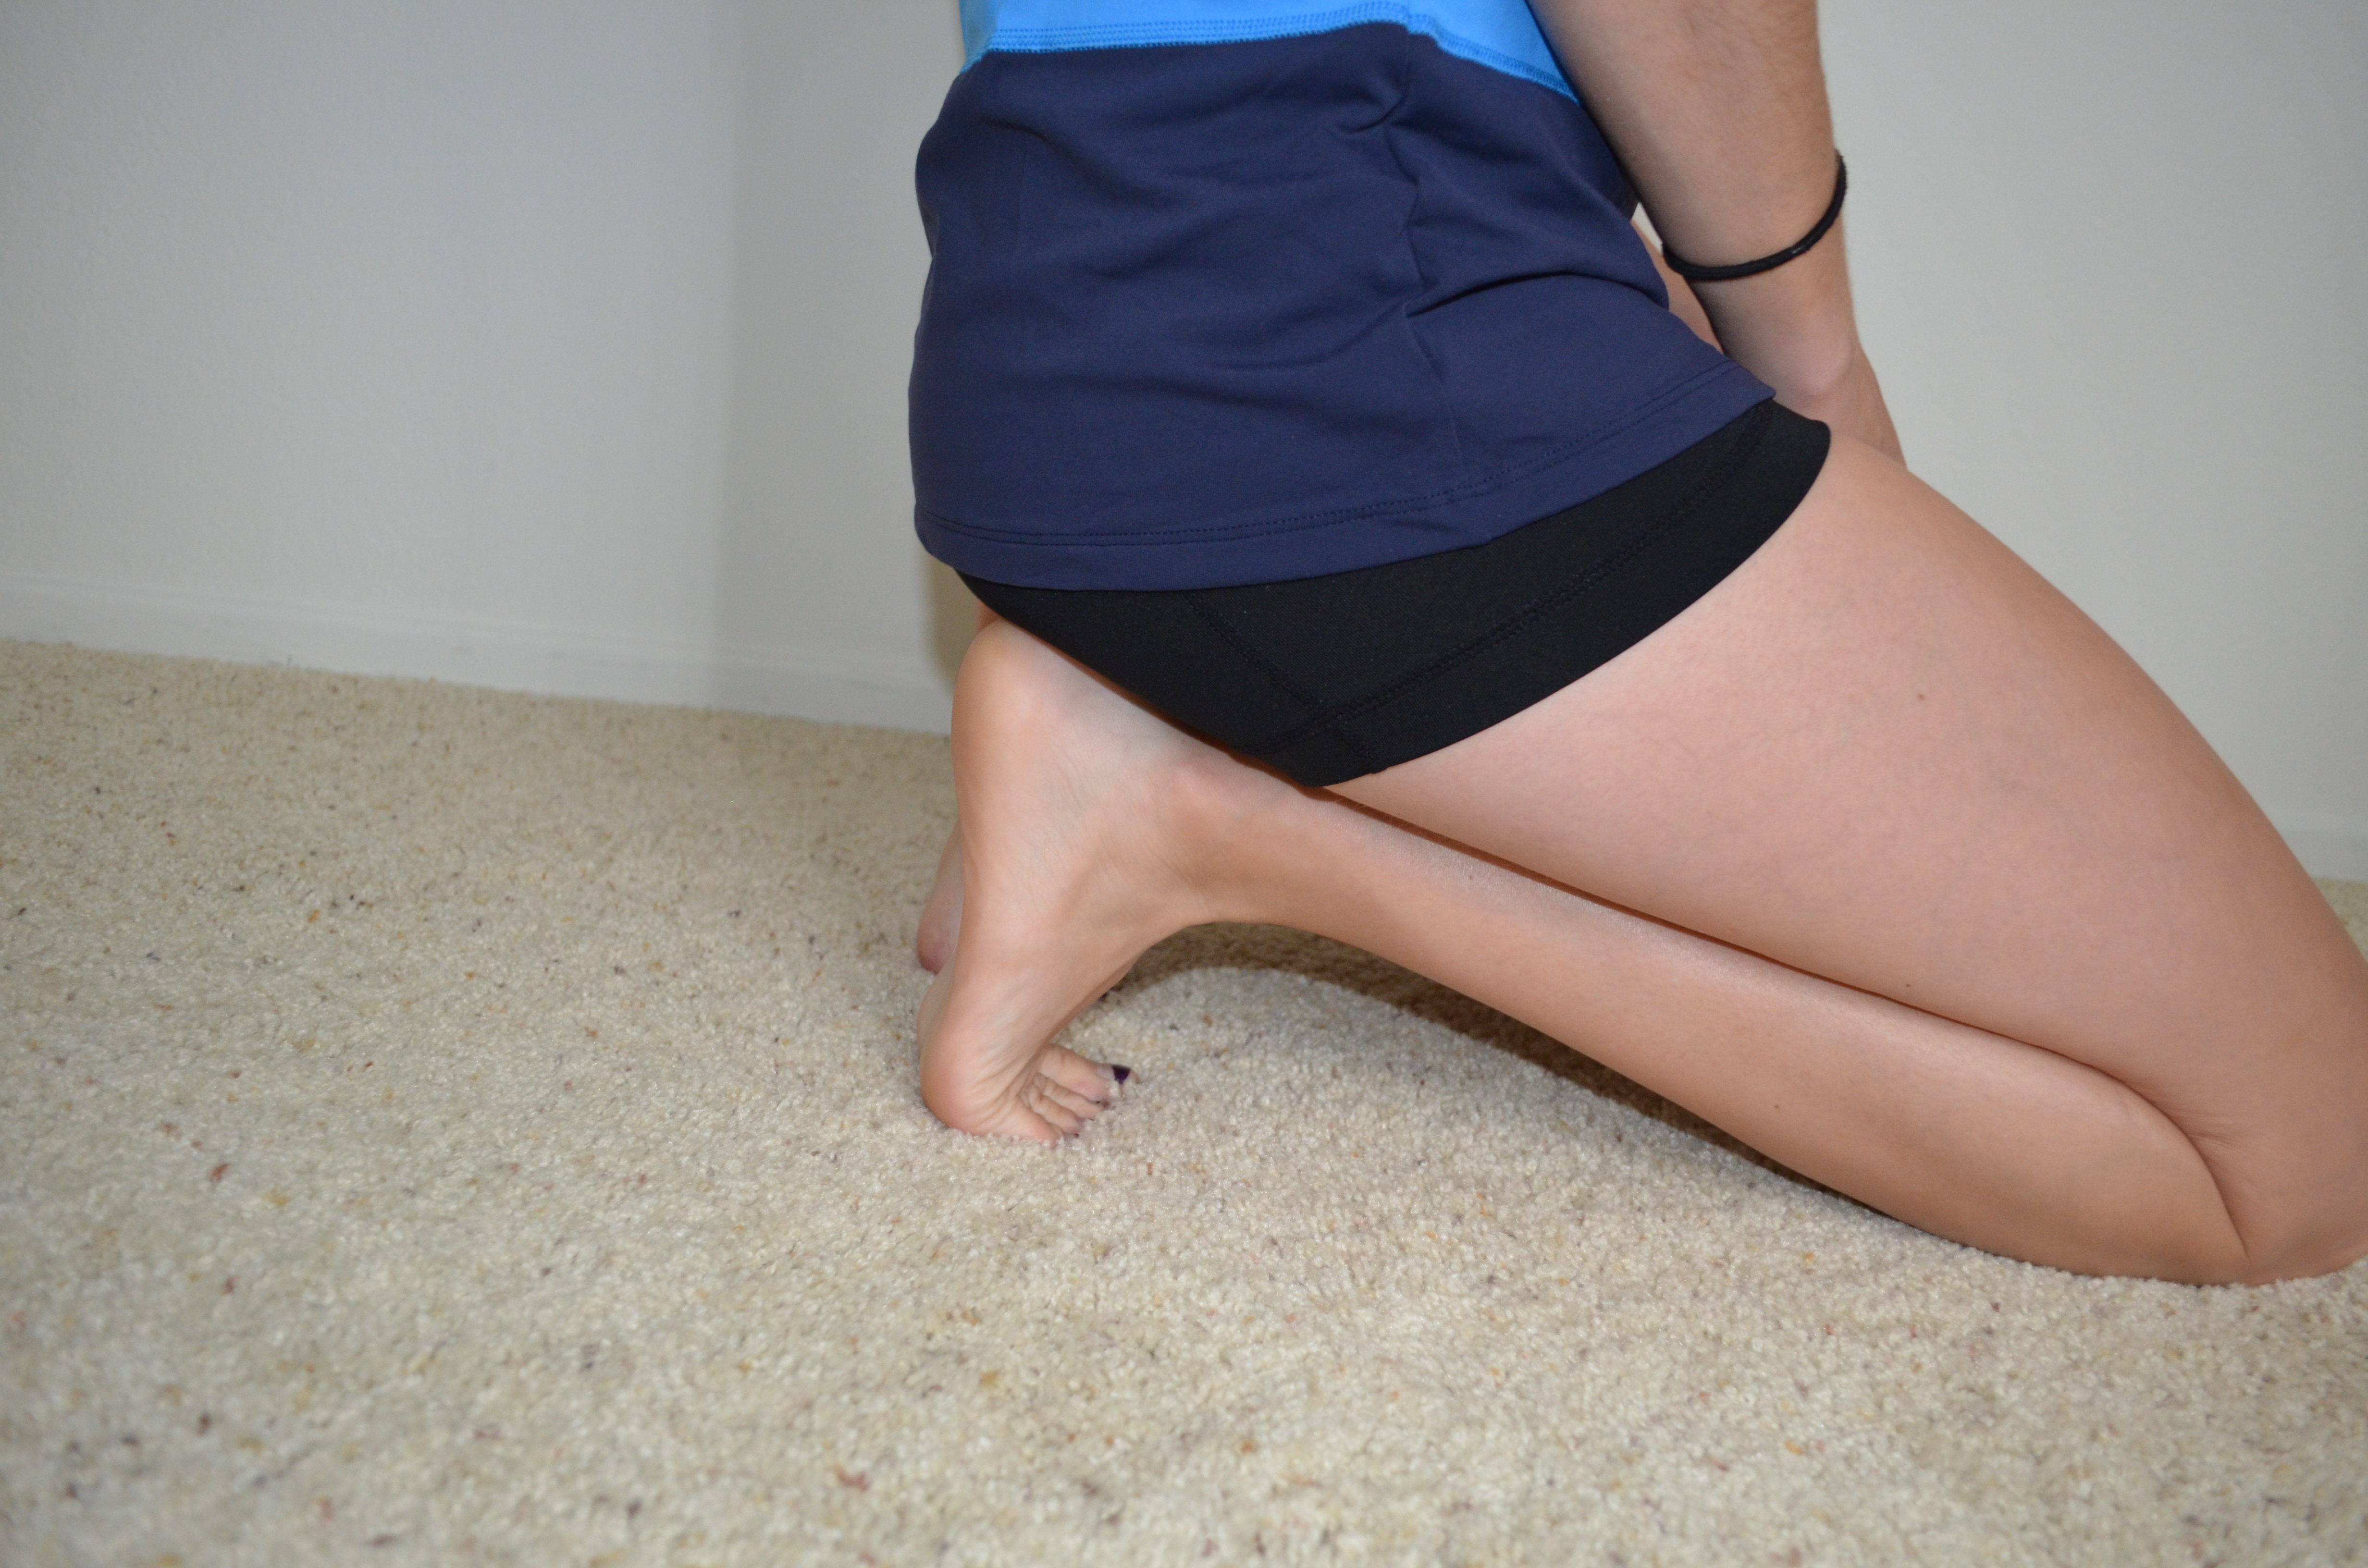
6. Kneeling foot stretch – (can be combined with bear squat) – I like to combine this one with the Bear Squat, but it does take a bit more mobility especially in the quads. To perform this move, kneel on the ground. Flex your feet with your toes tucked under and then sit back on your heels. If you combine this with the Bear Squat, you will sit back on your heels then move into a crawling position before pressing your hips up and your heels into the ground. Then return back to the kneeling position.
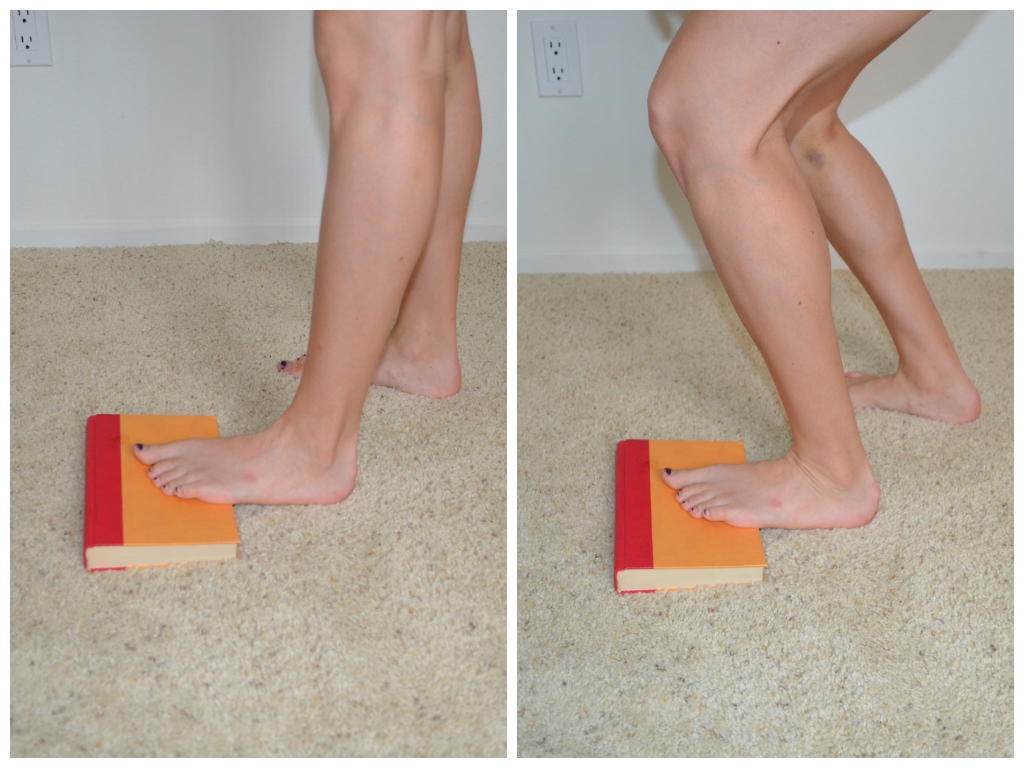
7. Elevated Toe Standing Dorsiflexion (foot “flexed”)- This is a great one for anyone with knee issues. Elevate your toes on books or plate weights or anything that is an inch or two higher than the ground. Place your toes up on the book and your heel on the ground. Then “squat” down a bit keeping your heels on the ground. You may sort of go forward instead of truly squatting down when doing this move. Just make sure to keep your heel on the ground. This move creates ankle dorsiflexion without you having to let the knee go over the toe.
8. Toe circles – This is a great move that you can do a variety of ways. You can sit, or even lie, on the ground and make circles with your toes. Make circles both clock-wise and counter clock-wise. You can also do this standing. Point your back foot with your big toe on the ground and the top of your foot facing the ground. Draw circles keeping your big toe in one spot.
9. ABCs – This one is a great rehab/prehab one to do right when you wake up or even right before you go to bend. Straighten one leg toward the ceiling while you are lying down. Draw the letters of the alphabet with your big toe.
10. Single Leg Balance with Swings– Working on your balance is key to having great ankle strength and mobility. You can stand and balance on one leg. You can balance on your toes. You can balance on a foam pad. Or you can even balance on an incline on your toes. Whichever way you choose to do, balancing is beneficial. One of my favorite balance moves because it also really warms up the knees and hips, is a single leg balance with leg swings. Stand on one foot and swing the other leg forward and backward. Make the swings bigger as you go. Then swing the same leg side to side, making the swings bigger as you go. Finally, do a rotational swing. Bend your knee to 90 degrees and rotate the leg open and close as if it were almost a door on a hinge.
All the moves above are great for ankle mobility, but you don’t need to do all of them every day or even every time you do a sprint or leg workout. Choose a couple to use when you warm up. And if you have suffered any ankle injuries, make sure to stay consistent with your prehab/rehab so that you restore your ankle to full mobility!
Recovery Workout
So on days where I don’t feel like doing yoga and my body isn’t really ready to do a full workout, I will do a “Recovery workout.”
These workouts are usually hard but focus more on postural strength and balance then on developing maximal strength or burning a ton of fat. They work on activating all the correct muscles as you work on perfecting form.
These workouts are the prep that most people need to do so that they can move well and really get the most out of their metabolic or strength training workouts.
The recovery workout below can be done on its own or shortened into a warm up for a full body workout day.
The good part about the workout too is that you can easily do it at home with no equipment even when you don’t have much time!
Workout
3-5 rounds of all the exercises below. Perform a 1 minute hold of each exercise. Try not to rest between each exercise. Try only to rest after each round is complete.
Balance on toes (So literally stand up on your toes and hold. If this is easy, balance on your toes on one foot for 30 seconds and then switch to the other foot. Stay as high on your toes as you can and don’t rock to the outside of your foot.)
Squat Hold (Squat down to parallel, not below, and hold. Focus on keeping your chest up and not leaning forward. Push the butt back and really sit into your heels. This is a great time to really assess and work on your squat form.)
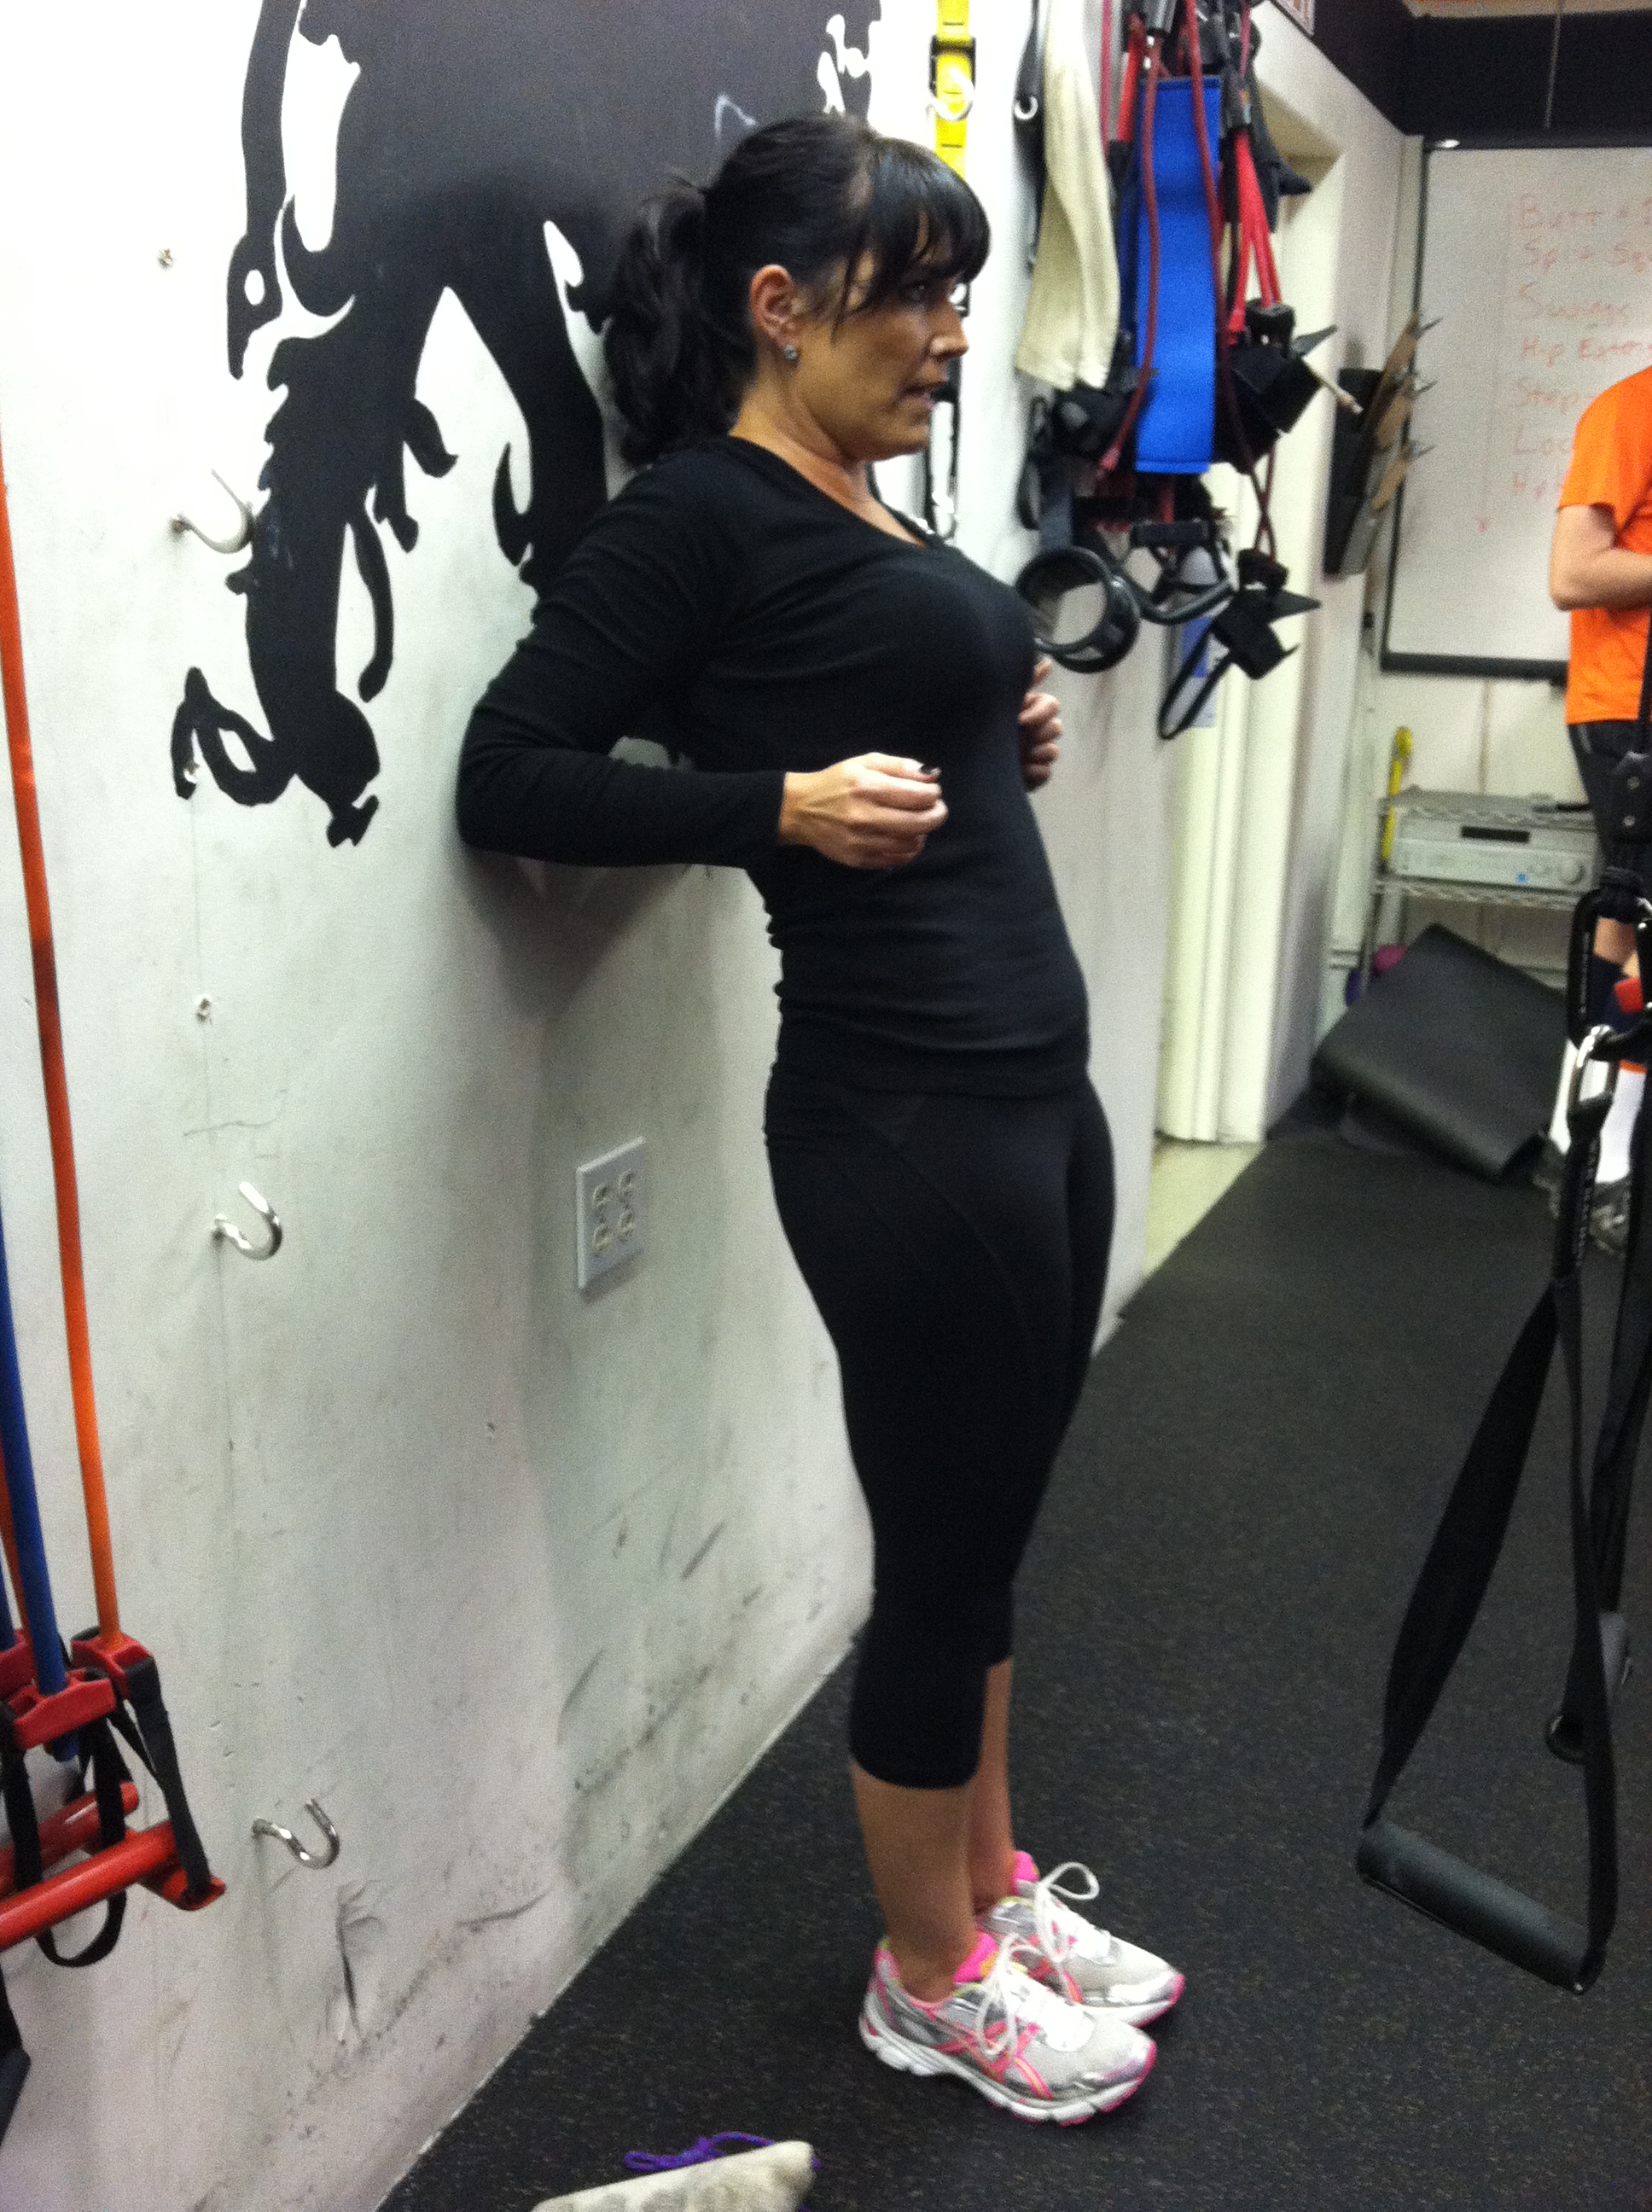
Scapular Hold (So you will “lean” back against the wall with only your elbows touching the wall. The further out you walk your feet away from the wall, the harder the move will be. As you lean back with only your elbows against the wall, you really want to press your chest out and pull your shoulder blades down and together.)
High Plank Hold (So hold at the top of the push up from your hands and toes if possible. You can make this easier by doing it from your knees. Make sure to brace your abs by pulling your belly button into your spine and tucking your hips under. Don’t arch your low back or round your upper back. Keep the shoulder blades retracted and everything tight from your shoulders to your core, butt and quads.)
Glute Bridge (Lie on your back with your knees bent and feet flat on the ground. Lift your hips up as high as you can and squeeze your butt cheeks. You shouldn’t feel this in your low back. You should feel it in your glutes and a bit in your hamstrings.)
With all of these moves, you should struggle within the first 20 seconds if you are really challenging yourself. Fight to squeeze as hard as you can as you hold the moves!


