Healthy Deviled Eggs Recipe
I LOVE deviled eggs.
They always seem like such a treat to me even though they are pretty easy to make and can easily be made to fit in your healthy diet.
They can be an appetizer for a party if you don’t want to cheat on your diet or just a fun little side dish for your lunch or dinner. (Shoot you can even save leftovers and eat them for a breakfast!!)
I also find it can help people starting out on a new diet to occasionally be able to indulge in healthy variations of the “treat” or “party foods” they used to love!
Buffalo Blue Cheese Deviled Eggs
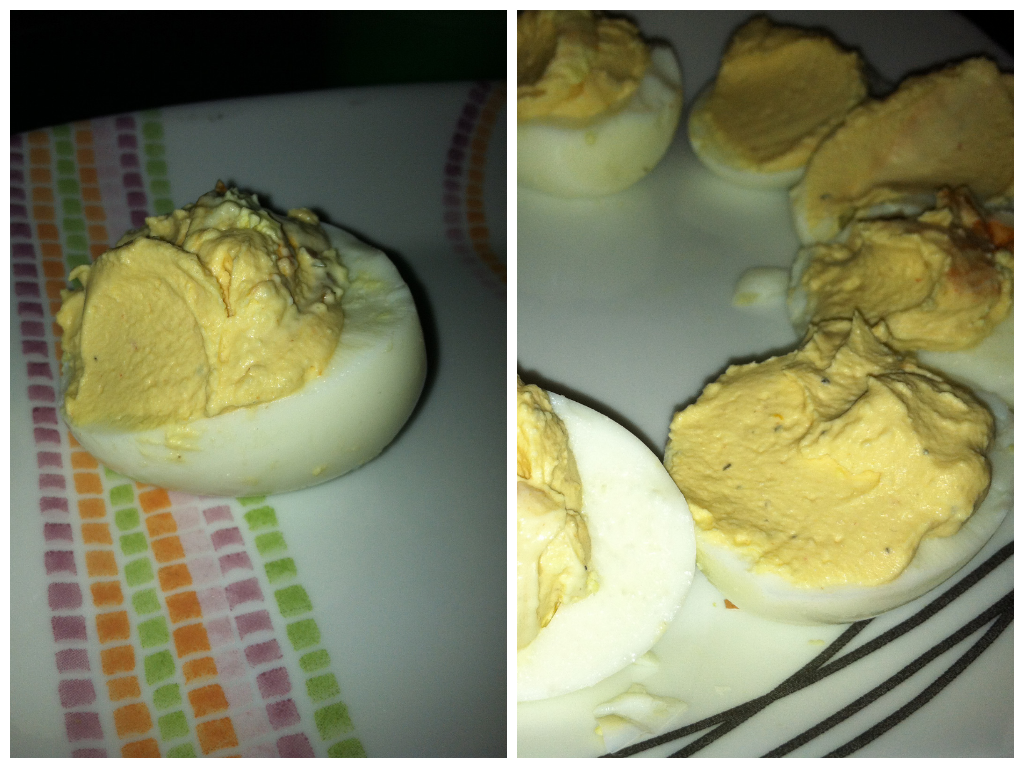
Sorry not the best photo…And if Ryan and I weren’t just chowing down alone we probably would have made them look prettier!
Ingredients:
7 eggs
1/2-1 tbsp Frank’s Hot Sauce (or other hot sauce)
1 oz blue cheese
1/2 tbsp cream
1 tsp dill
Place eggs in cold water in a pot (to make them easier to peel, put vinegar and salt in the water). Heat the pot on high heat until the water boils. Leave the eggs boiling for about 8 minutes.
Remove from heat and place eggs in cold water.
Once cool, peel the eggs and cut in half.
Scoop out yolks and add to a food processor with cream, cheese, dill, and hot sauce. You can add each ingredient to taste. Blend until smooth.
Place mixture back in eggs and serve!
You can also make jalapeno bacon deviled eggs this way as well! That is one of our other favorites!
What are some other “traditional” party foods or “treat” foods that you love that you’ve made healthy variations of?
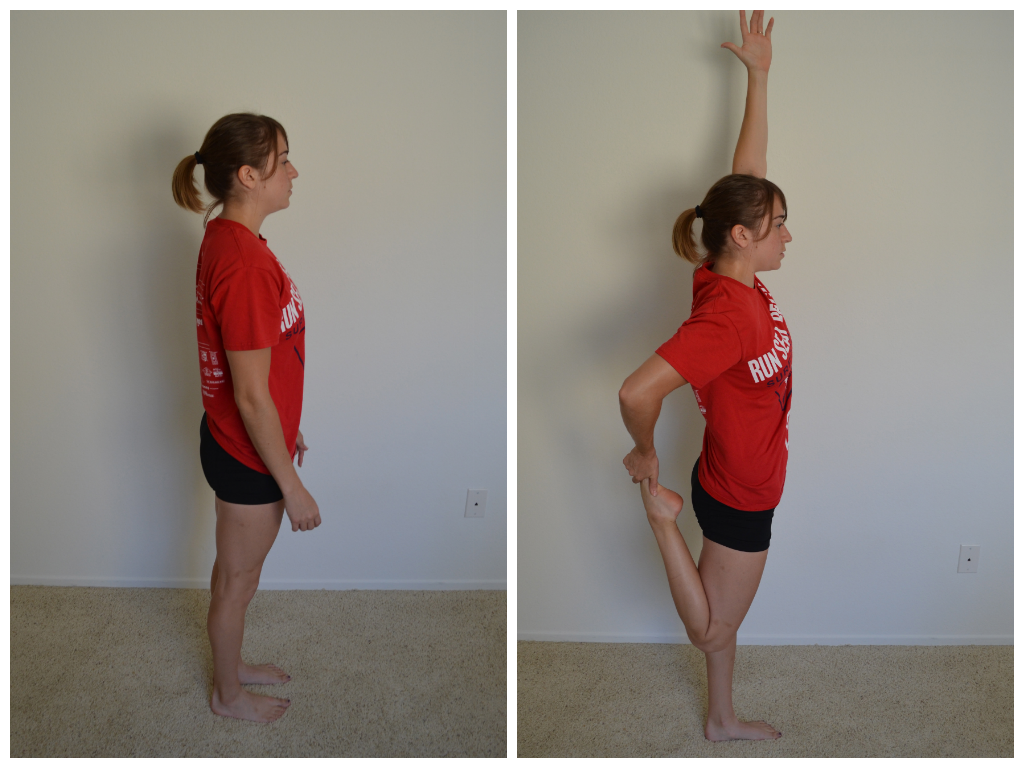
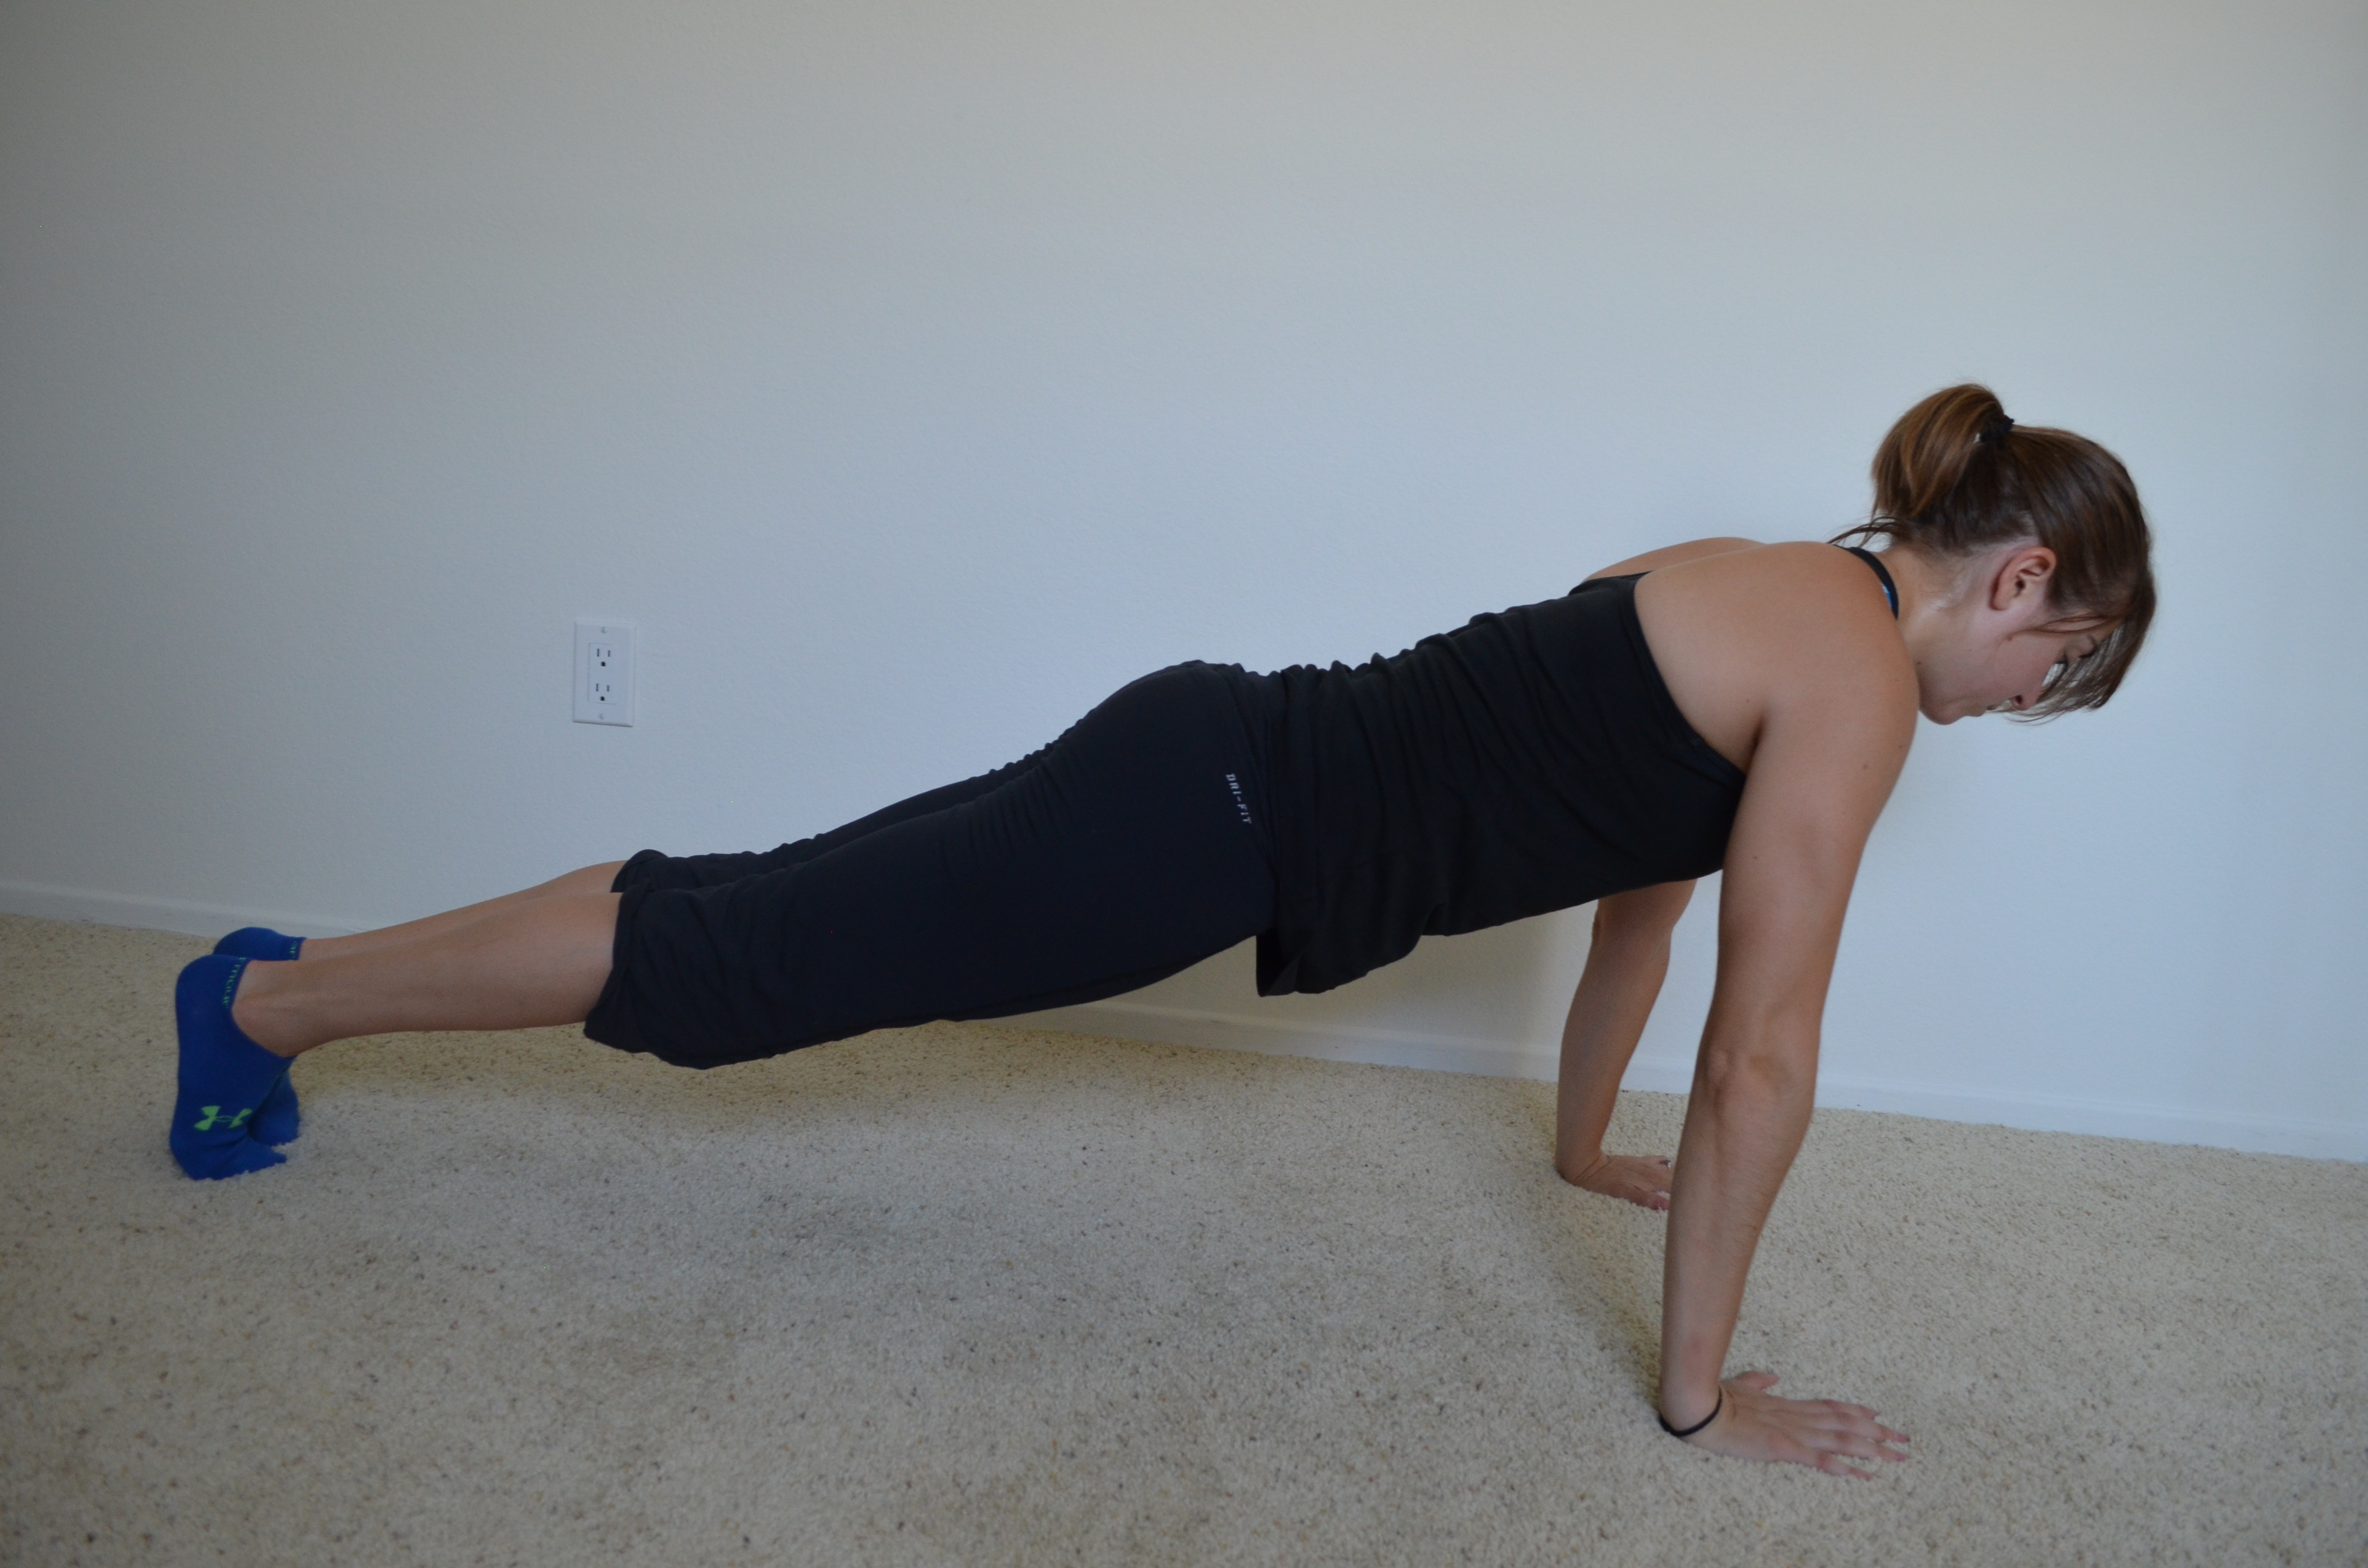
Flexin’ Friday Workout
There are lots of workout formats that work.
There are a ton of variables out there to play with to make a great workout.
And since I’ve been overwhelming you all with talking about the variables recently, I just wanted to show you how I manipulated some of them into a great squat workout the other day.
Squat Workout
WARM UP (15 minutes-ish):
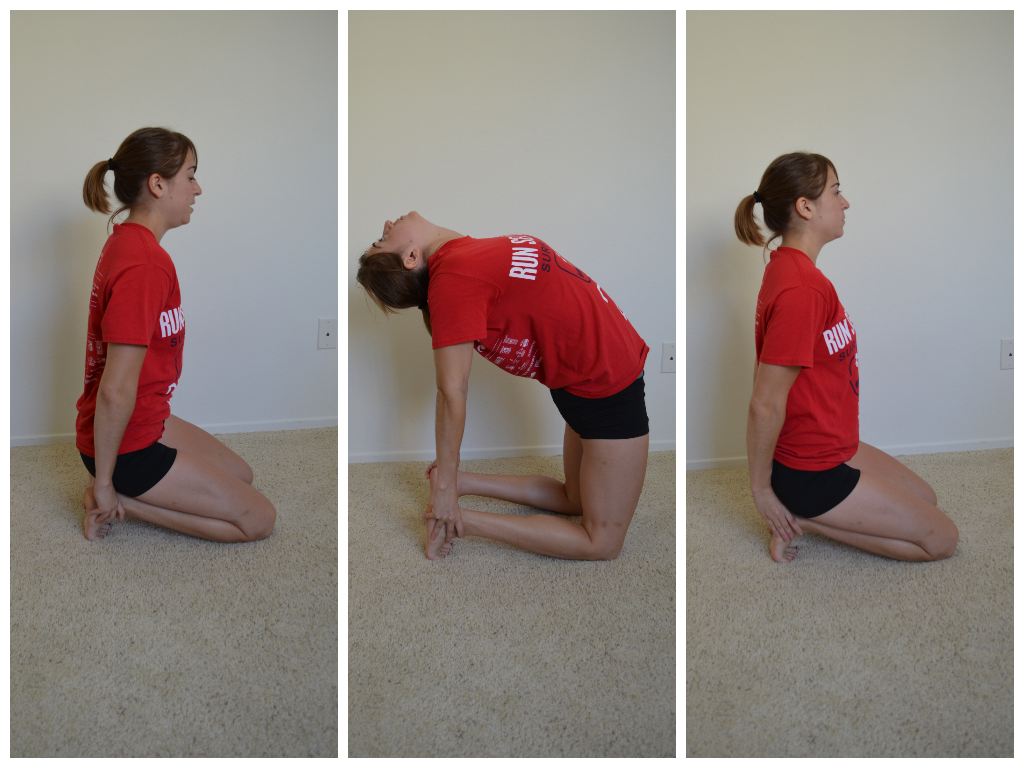
Foam Rolling (Picked out places that will be used and could be tight. Quickly moved on if an assessment showed no trigger points. Spent time on areas with trigger points.)
Calves (couple of trigger points)
Hamstrings (focused on the area right under my butt since tight from other workout)
Quads (tight around knees)
Hips (TFL and glutes a bit tight)
Back (not too bad a bit tight in middle back..loosened up traps for holding KB a bit)
Adductors (good..quick sweep over cause no trigger points found but felt a bit tight)
IT Bands (good…quick sweep..no trigger points found)
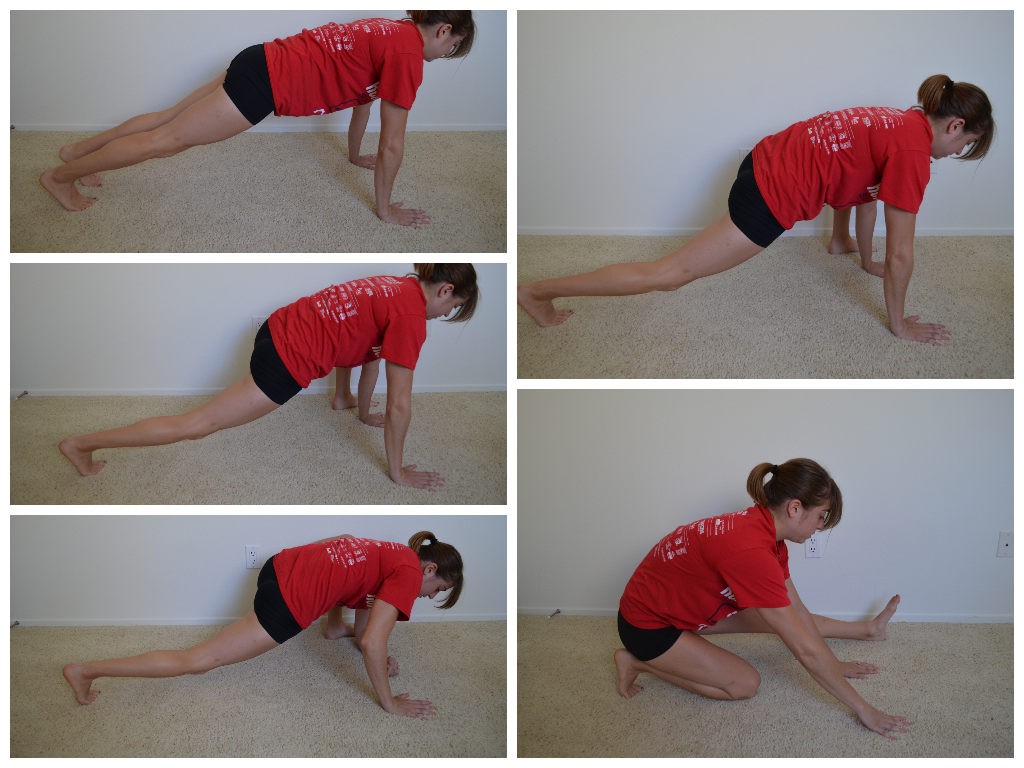
Dynamic Stretches (10-15 reps each one round through all)
3 Way Ankle Mobility

Bear Squat (calves)
Hip Hurdles
Dynamic Hamstring Stretch
Dynamic Quad Stretch
Dynamic Squat Stretch
Side Lunges
Activation (1 round through 45 second holds each)
Squat Hold
Scapular Hold
High Plank Hold
Glute Bridge
STRENGTH:
1.
5 rounds of the following 1 minute on, 1 minute off:
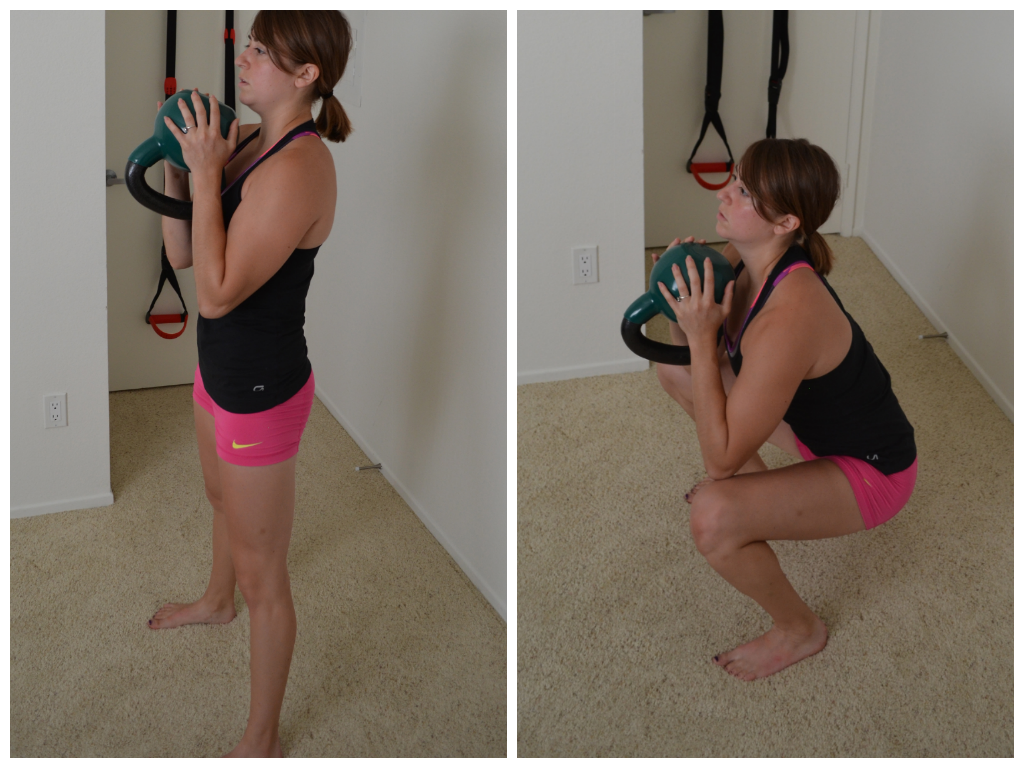
Heavy KB Goblet Squat
(Use the heaviest KB possible, but make sure to get no fewer than 20 reps in the minute. Hold weight up at your chest and squat down to at least parallel. Do not lean forward or let the chest fall to the ground. Keep the core tight and drive up off the heels.)
Rest 2-3 minutes.
2.

5 rounds of 8-12 reps with about 1 minute of rest between:
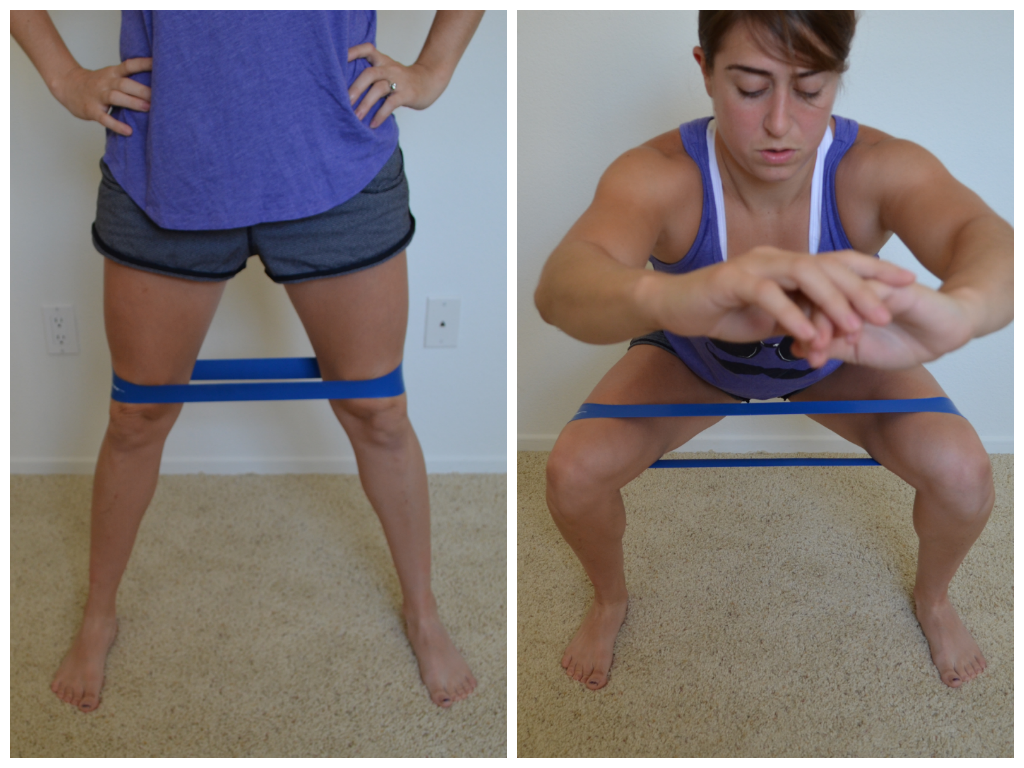
Weighted Jump Squats
(Can hold dumbbells by side or place a bulgarian bag around your shoulders like I did. Choose the heaviest weight you can while still being super explosive and getting high off the ground. Do not make it so heavy that you are quick and explosive with the move. Beginners may not want to make the move as explosive. They can regress to a squat or a squat then come up to their toes. They could then progress to a jump where they only slightly leave the ground. If your landings aren’t soft you need to regress! Super important to have good landing mechanics if you are adding weight!!!!)
CONDITIONING:
5 rounds, 50 ft sprints about 45 seconds to 1 minute rest between:
Sled Sprints
(Lighter weight so that you can sprint the entire distance, but challenges you. You don’t want it to be a jog!!)
COOL DOWN
Walked to let my heart rate come down and everything relax.
Stretched out a few areas that felt tight and rolled them out (calves, quads, hips were main focus)
Workout Breakdown
Above is just one way to manipulate the variables.
While I worked quickly when I worked, the workout itself wasn’t a quick circuit. I completed all rounds of one exercise before moving on. I took my time and rested and recovered in between sets.
It wasn’t a race to the finish with me trying to get everything done as quickly as possible.
It was about quality reps and getting myself to create the same quality output each and every round. I wasn’t afraid, especially with the jump squats or sprints to take more time if I needed even though I was trying to go as quickly as I felt recovered. (With the KB squats I did force myself to go on the 1 minute intervals.)
If you notice, I also only included 3 exercises. Not every workout has to have 10 or 20 different moves.
And if you also notice, I chose all movements in the same place of motion – the sagittal.
While I’ve mentioned before that you don’t only want to work in one plane of motion, there are times when you can choose to manipulate your workouts so that you really are only working in one plane of motion. The point is that you are aware of what you are doing.
And not all exercise have to be done for reps.
My squats were based on time. I had to move as quickly as possible the entire minute to perform as many squats as possible. I used my goal of around 20 reps (25 was fine but meant I should try to go up in weight) as a guide to choose a challenging weight while still keeping myself moving quickly the entire time.
I also didn’t mix up rep tempo very much. I did quick squats and then some explosive moves. So the explosive moves were quicker, but there wasn’t a huge tempo change. Didn’t want to…Didn’t need to. Not every variable needs to be used or manipulated into something crazy every workout.
The point is you can play around with workout variables and combine them in a lot of different ways. This is just one example (and one that shows an example of my warm ups too…).
Hopefully this highlights some of the ways the workout variables I’ve talked about in the past can be used and makes considering them seem a bit less daunting.
It’s even a great workout if you need one for this beautiful Friday!
The Importance of Progress
I want all my clients to see progress immediately.

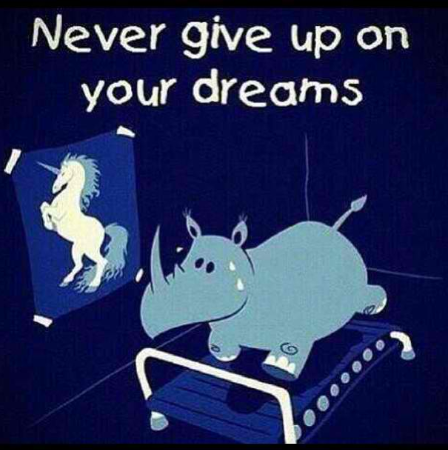
Confused as to why I have a picture of a turtle on a skateboard? Read on! 😛
But sometimes change is slow to happen. If you slowly make changes to your diet or slowly build your exercise program, results aren’t going to happen immediately.
And while I think that slow steady changes can be best when trying to create new habits, there are times when I recommend clients take an all or nothing approach.
Not seeing the results you want can be frustrating. It can make you feel down. It can make you want to give up.
It can completely derail the healthy lifestyle habits you are trying to instill because you believe they aren’t working.
Forward progress is motivating. Results create excitement and build momentum. They make you even more dedicated to what you are doing because you know it is working.
Progress builds confidence.
So sometimes it is worth suffering through a few really strict weeks or even months to build that forward momentum – to create great progress.
While I’m a huge proponent of slow steady changes, of making realistic changes that you know you can maintain, I do think there are times where you might just have to suck it up and do something that is more intense, more strict, than you would like to maintain. Sometimes there are periods where you have to do something slightly more drastic, slightly unsustainable to get the ball rolling and the momentum moving in the right direction.
This conversation actually came up when I was actually talking to a client yesterday who was frustrated by her very slow progress.
I told her the truth – Her diet wasn’t strict enough and her workouts simply weren’t yet consistent enough to see the drastic changes she wanted as quickly as she wanted them. Her expectations weren’t unrealistic. They were just unrealistic if she made the changes as slowly and inconsistently as she was making them.
I told her she needed to start eating cleaner, cutting her carbs and really focusing her diet on meat, vegetables and fruits.
She then told me that a diet like that simply wasn’t sustainable in the long run for her.
And then I told her something I don’t say very often, “Well it doesn’t need to be!”
She gave me a surprised look because it definitely wasn’t the answer she was expecting.
Sometimes you need to take it back to basics and just cut out everything but the cleanest of clean.
I told her that for the next few months she should focus on just meat, veggies and fruits. If she does that, she will start to see way more progress over the next few weeks.
I told her that once she really got the ball rolling, that forward momentum would start to build on itself and help her keep moving in the right direction.
And as she builds momentum and really gets things rolling then we can slowly start adding back in the foods she enjoys until we’ve created a sustainable diet that doesn’t leave her feeling super deprived.
Because deprivation can derail your diet. There are no ifs, ands, or buts about it.
HOWEVER, if you only deprive yourself for a very short amount of time with a clear end date in mind, it is easier to push through those feelings. It is easier to push through when you know there is a light at the end of the tunnel – when you know this isn’t meant to be the diet you follow for the rest of your life.
And the progress you will see if you choose to buckle down for a few months or a few weeks, will be a huge motivator.
In my opinion it is well worth the few weeks of deprivation to get the momentum rolling in the right direction.
While slow steady changes are great, while I definitely feel like in many cases the tortoise wins out over the hare, if occasionally the tortoise could move just a little bit faster, I don’t think she’d turn down the opportunity.
Stricter periods in your diet and exercise program can help you see results quicker and can reinforce your dedication to your healthy lifestyle.
You aren’t going on a crash diet and expecting it to be the program you follow for the rest of your life. You are just choosing to be a bit stricter for a few weeks to get the momentum going or even just simply to get over a plateau.
You are creating progress with the intention of then slowly developing habits and changes that you can maintain.
You are simply being a tortoise that stumbled on a skateboard and could roll awhile downhill before returning to its steady climb up and over the next hill!

And another one!?! At least you get why I put a turtle on a skateboard now!
Meal Prep – The Key To A Healthy Diet
Being successful when creating a healthy lifestyle change is about more than KNOWING the right foods to eat, the right things to do.
It is about DOING the right things.
And DOING is definitely not near as easy as KNOWING.
The question then arises of HOW to make the lifestyle change and how to get it to stick. How do you eat healthy food when you hate cooking? How do you force yourself to eat the right thing when you get home exhausted and have to cook?
What is the KEY to making a healthy diet stick?
If I could tell you one tip to make following a healthy diet easier, I would say it was all about…
MEAL PREP!
If you want to succeed at creating a healthy lifestyle change, you need to plan ahead. And meal prep is all about planning ahead.
It is about preparing food so that you make it easier for yourself to make the healthy choice day in and day out.
Meal prep is about more than making healthy meals. It is even about more than prepping meals for the week.
It is about preparing yourself for success when it comes to eating healthily even when you are stressed and exhausted.
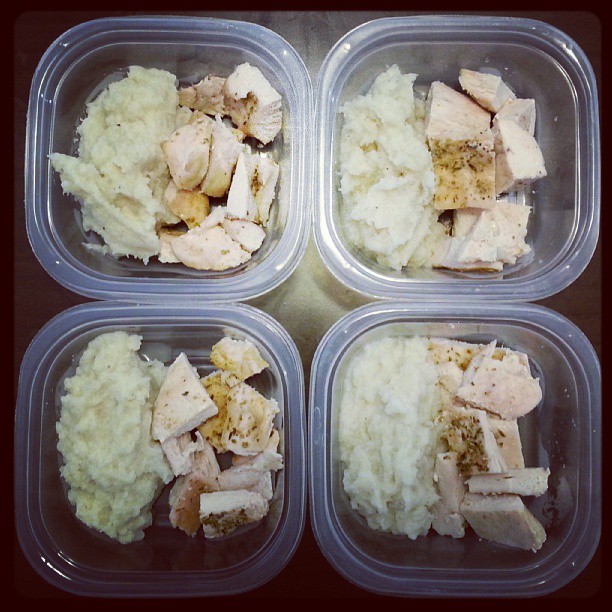
Prepping for the week like this might be the way to make adhering to a healthy diet easier, especially at the beginning! Thanks Starla for a great meal prep photo.
Meal Prep Keys To Success:
- Choose recipes that use the same basic ingredient and then make a grocery list based on these recipes. Choosing recipes that use the same basic ingredients will make your grocery shops easier. It will also ensure that you almost always have what you need to cook healthy meals on hand.
- Prepare a grocery list before you go to the store off of the recipes you plan to use. That way you won’t forget anything and you won’t have any excuse not to cook. It will also make it easier to avoid buying those tempting foods. It is easier to make excuses if you don’t have your plan of attack written down.
- Choose recipes that make leftovers! Leftovers are key. A big complaint about switching to a healthy lifestyle is the fact that people have to cook all the time….And they are too tired. Too exhausted…Don’t have enough time to do that. But if you choose recipes that make leftovers, you don’t need to cook every day. You can actually just take an hour or two on your day off and prep food for the entire week. You can make food for easy lunches. For quick dinners when you get home stressed.
- Keep It Simple! Don’t add in too much variety. Use the same basic recipes over and over. It may sound boring, but sometimes, at the beginning especially, we have to keep things simple so we don’t have to think too much about the change. We only have so much self-control. We can’t use too much of it thinking about our diet if we want to be able to maintain our heathy lifestyle over the long run.
- Get the proper tools. Sometimes you have to spend money to make things simple – aka sometimes you have to spend some money to get the proper cooking tools to make things easier. A crockpot, a blender…both are worth the money because they allow you to make meals with less hassle. Smoothies are a great quick meal. And if you have a crockpot, you can simply throw in some ingredients and then come home from work with a fully cooked meal. These tools are worth the cost because they make life easier. And if something is EASY, you are way more likely to continue doing it!
Eating well doesn’t have to be difficult. You just need to plan ahead. Proper meal prep is the key to making a healthy lifestyle stick because it makes things easier and gives you less room to make excuses!
How do you prep meals for the week? What are your favorite healthy recipes? Do you use a crockpot or just make tons of leftovers?
Warm Up – Always Ask Questions
Yesterday on my post, I got the following questions. Generally I try to respond in the comment or by email, but I thought this comment by Jill posed some interesting questions and raised some interesting issues. (It actually made me think of a post by 43 Fitness about questions and how sometimes we, fitness professionals, don’t always realize all the questions that need to be answered to really help others on their journey). That being said….
Cori, I really like your blog and the way you approach workouts in a sensible way. I just sometimes feel a bit overwhelmed reading it and wondering how to incorporate these things. Basically, you are WAY smarter and stronger than me and it sounds really complicated to get to where you are at. How many activation and strengthening exercises do we need in our warmup? Should we always be doing the same warmup? How do we know what to focus on? Usually I just do a dynamic warmup with many of the exercises you linked that I found in a book (New Rules of Lifting for Abs or something similar). What are some corrective exercises? I don’t really know what my imbalances are, other than that I always seem to injure my right quad when doing exercises like step-ups so I’m obviously not using good form. How long do you recommend the warmup should be? You don’t have to take the time to answer all these questions…they are just a few that come to mind as I read your post. I’m moving from my running “season” back into weight training and want to do it right. (The good news is I did achieve my goal I set at the beginning of the year to run a half marathon under 1:35 and now I feel like I can take a break from running.)
For one, congrats Jill on achieving your half-marathon goal!
Two, it doesn’t matter how much you know. All that matters is that you question and seek out knowledge. We all have to start somewhere and have to grow from there. It doesn’t matter our starting point just how hard we work to learn and grow!
When it comes to health and fitness, especially, there really are a ton of different “correct” answers. You’ve got to do your own research and come to your own conclusions.
And three, health and fitness is, but isn’t complicated. There are a ton of workout variables you can manipulate to make your workouts good. BUT you can’t freak out about manipulating each and every one every single workout.
The point is more to know that all of them matter and can affect your results. When you know the variables that matter, you can better track your progress and figure out what works and what doesn’t work.
It is good to know the details just don’t get bogged down in them.
Anyway…Let’s see if I can break some of this down so that it not only answers your questions, but questions I’m sure others have as well!
Warm Up
How many activation and strengthening exercises do we need in our warmup?
I’m sure you all will love this answer…IT DEPENDS!
I usually pick out about 6 or 7 moves for my warm up although I have spent longer on days when my body is super tight.
Some are stretches and some are activation moves. The exact number and breakdown of what I do depends on the workout and how my body feels. I generally do one or two activation moves during the warm up although I can do up to 4 or 5 with a butt workout.
I generally base my warm up on how I feel during foam rolling. Don’t get me wrong…I have some stretches planned out based on the workout, but I may lengthen or shorten the warm up based on how loose my body feels when I foam roll.
If I find a ton of trigger points and am super tight I may add in a stretch or two more or do more reps of the stretches I planned to do.
For example…with a back workout I may do:
1 or 2 Forearm stretches (depends on how tight my forearms are and how much computer work I did that day…or grip work I did the workouts earlier that week)
2 or 3 Thoracic mobility moves (Here is a link to a post with a few. I may do more or less depending on how tight my back feels and how much I’ve been seated and hunched over recently)
1 or 2 Lat stretches (See the link above for options)
1 or 2 Chest stretches (See the link above for options.)
2 or 3 rounds Scapular Holds for activation
There is no set number of exercises you should do. I generally wouldn’t do more than 10 moves in a warm up. I usually do fewer exercises and just more reps.
I pick out those moves based on what my workout is going to work.
The MOST IMPORTANT RULE when it comes to warming up is to make sure that your body FEELS loose and ready to work. You want the muscles you are going to use to be warm and mobile. You don’t want to be forcing a range of motion when you start using weights!
Should we always be doing the same warmup?
I like mixing up my warm up so that I can stretch the muscles in different ways. Let’s face it…Our bodies do adapt to whatever movements we do.
HOWEVER, if you pick out moves that create the mobility you need for your workout, it isn’t that important to mix it up.
I probably mix it up more than most people because I’m constantly experimenting with new mobility moves I learn to see if there are better ones out there than the ones I’m currently using (because then I’ll use those with my clients).
Find moves that create mobility around your joints….So that you have proper thoracic extension, shoulder mobility, hip mobility…ankle mobility…
I must say…Those 15 moves I listed are some of my favorites and staples in my warm ups.
Also, different types of workouts require different warm ups. An upper body workout shouldn’t have the same warm up as a lower body day. Chest workouts should have different warm ups than back workouts.
Shoot cardio or metabolic workouts should have a different warm up than strength warm ups.
Focus on your workout and use that to figure out what your warm up needs to do to get you ready!
How do we know what to focus on?
Your focus in warm up is always to get your body prepared for the work it is going to do during the workout.
If you are doing an upper body workout, don’t worry about warming up your lower body. Focus on what you plan to use during your workout and the movement patterns you plan to do.
What is the goal of your workout? What muscles are you working? Is it cardio oriented or strength oriented? What movements are you going to be doing?
Once you answer these questions, stretch out the areas and activate the muscles that are going to be used.
For instance, say you are doing a Squat Day.
You need to warm up your hips to be able to squat. Dynamic squat. Hip flexor stretches. Low back stretches. Quad and hamstring stretches. Think
You will also need to warm up and stretch your ankles so that you have the mobility to squat. (Many people can’t squat very low because they don’t have much dorsiflexion…Their calves and even the sides of their shins are tight). Ankle mobility is key during a squat workout warm up.
You may also want to warm up your core and back on squat day, especially if you plan to do front squats.
Think about that movement. You need to make sure you work on your thoracic extension because you don’t want your back to round forward as you perform squats. You want a nice tall posture. You want to remain upright while holding the weight.
Focus on the muscles and movements used during the workout and what needs to be activated.
Then also consider what feels tight on you. If I’m going to squat and I’ve been sitting a lot and know my hips are tight, I may spend extra time stretching my hips and working on hip extension.
One of my favorite stretches to stretch everything made tight by sitting. A great one for days when you do front squats.
Remember the whole point of a warm up is so you can do the workout movements correctly and prevent injury!
What are some corrective exercises?
Ok corrective exercises ARE NOT squats on a bosu. They don’t need to be overly complicated or confusing.
Corrective exercises are moves that make the body develop stability, a better mind-body connection and PROPER MOVEMENT PATTERNS.
Corrective exercises work to activate inactive muscles and inhibit overactive muscles. So foam rolling, stretching and activation exercises are all part of a corrective exercise program.
It’s really hard for me to tell you that this or that exercise is a corrective exercise.
Glute bridges, bird dogs, band walks, squats with a band, planks, YTWLs…They can all be corrective exercises.
Makes sure you activate the glutes and is great if your knees tend to cave in when you squat.
The point is to do moves that strengthen and improve your movement patterns.
If you’ve had an ankle injury, balance exercises or single leg deadlifts may be the corrective exercises you need.
Corrective exercise CORRECT imbalances.
These are generally best prescribed by someone after an assessment. However, you can pick out exercises to work on your weak points and do those to “correct” your problems.
I don’t really know what my imbalances are, other than that I always seem to injure my right quad when doing exercises like step-ups so I’m obviously not using good form.
Ok here are a few things to do/questions to ask yourself to figure out your imbalances…
Do you have a dominate side?
Have you ever had any injuries?
Do an assessment. Watch yourself squat or have someone else watch you. How low can you go? Do your toes point out? Do your heels come up? Do you lean forward? Do you arch your low back? All of these hint at potentially tight/underactive areas. (I recommend getting a trainer or outside party to assess you since they can see your movement from different angles.) The assessments I like to do are squat, push up and row. You can tell a lot by just watching these three movements.
Heck you can learn a lot by looking at someone standing there. Are they rounded forward. Do they slouch to one side. Is there head forward or pelvic tilted?
We all have imbalances…
If you don’t have someone else to assess you, you can tell a lot by just foam rolling. Take a day and roll out your body from head to toe. Where are your trigger points? Are they all on one side? Are they only in specific areas? Trigger points mean that an area is probably tight and may be causing problems in other areas close by.
Once you know the tight areas, stretch them out!
That is at least a start!
And once you know the tight areas, you can work on strengthening their opposite. Like if your hips or low back are tight, strengthen your glutes. If your chest is tight, strengthen your back. If your upper traps are tight, strengthen your lower traps.
While I explain this, I do want to note that it is best to have a fitness professional perform an assessment and give you some guidance.
In terms of your quad and step ups. My recommendations:
Roll out and really stretch your quad, low back, TFL and IT Band before you do them. Then do some glute activation exercises to make sure your glutes are firing. A great warm up move for you could be hurdles (stepping back and forth as if stepping back and forth over a little fence).
Then try a lower step up. Start close to the step, place one foot on top and drive through the heel to come to standing on the box.
Watch yourself in the mirror. Do you lean forward as you step up? Or do you go straight up. Does your weight go forward onto your toe? Or do you drive through your heel?
If everything looks fine (aka you don’t lean forward and you drive through your heel) and you feel it in your glute, move to a higher step up.
Take it back a bit and regress the move until you can do that perfectly and feel it in the correct places. Then move forward.
How long do you recommend the warmup should be?
My warm ups last about 10-15 minutes depending on what I’m doing and how tight that area of my body feels that day.
If I’m just going for a leisurely walk, I may not really warm up at all. However, if something feels super tight I may take a second to roll out before.
For harder workouts though, especially more cardio workouts, I generally spend longer on warm ups and make sure I do enough to “pre-fatigue” my body.
I may not “warm up” as long for strength workouts if my first few sets will be lighter and build since that will also warm me up and get me past that first little fatigue hurdle.
While answering these questions, I realize that in some areas I’ve just given you more variables to consider.
Take a deep breath and don’t get overwhelmed.
Don’t stress about length. Or about doing new warm up moves every time. Don’t even worry about corrective exercises or imbalances.
Lots of different things can work!
These variables that I discuss are all just things to be aware of.
The best thing you can do is to look at your workouts and feel what is tight and then pick out a few moves that you feel like hit your tight areas.
If you have any other specific questions, or if this creates new questions for anyone, please let me know and I will try to address them.
Hope this helps!
Develop Workouts to Move Better and Feel Better
Yes, lifting makes you feel strong and empowered. Yes, working out makes you healthier and helps you lose weight.
Yes, taking on new physical challenges can be fun and invigorating.
But the real reason most people workout is because they want to MOVE BETTER AND FEEL GOOD.
That is what HEALTH is. That is what YOUTH is.
And whether or not you recognize it as your motivation to workout, moving well and feeling better is the underlying goal of a diet and exercise program.
The question then is, “How do you develop workouts to help you move better and feel better?”
Too often these days I hear about people getting injured when training. About people feeling more worn out or broken down.
While it can be fun to do “brutal” workouts where you feel absolutely destroyed, this shouldn’t be an everyday occurrence.
If you want great results (be healthier, fitter, stronger), if you want to FEEL BETTER AND MOVE BETTER, you can’t just beat yourself down each and every workout.
Here are 5 tips to help you develop workouts that will make you move and feel better!
1. WARM UP – A good warm up consists of MORE than just walking or jogging on a treadmill or elliptical for five minutes. A good warm up is key to preventing injuries, which is key if you want to feel better and move better!
A proper warm up with loosen up overactive and tight muscles through foam rolling and dynamic stretches. It will also activate weak and/or inhibited muscles through activation exercises.
A proper warm up is important because it will make sure your body is truly ready to move so that you don’t get injured during your workout!!
Here are 15 great dynamic warm up moves.
Before you workout, you don’t need to stretch and roll out every area of your body. You just need to focus on the areas you will be using during the workout. You will also want to target areas that are perpetually tight or are prone to problems and injuries.
2. Build Up Slowly – Just because you CAN lift something or DO something, doesn’t mean your body is truly READY to do it. You’ve got to build slowly so that you don’t push your body too quickly and too far.
Injuries often occur when our body is forced to do something it isn’t mobile or strong enough to do.
If we build up slowly, making changes over time, we can prevent injury while getting great results!
Slowly build up and adjust your loads, speeds, intensity and repetitions. Don’t up everything all at once!
For example, if I have a new client who hasn’t really ever worked out before, I’m not going to have them doing jump squats on their first day (even if other people are doing jump squats). And maybe the client can technically do the jump squats.
But because the client has never done them and the client doesn’t even have much of a workout base, I’m not going to have them do jump squats.
I’m going to have them first start out with bodyweight squats. Then bodyweight squats quickly. Then bodyweight squats where they raise up onto their toes as they come back to standing.
Then I will finally have them perform a very VERY small jump off the ground. Then a bigger jump and finally a bigger, quicker jump.

Everything can be progressed or regressed to help someone build. This move helps you build toward a single leg squat!
They will BUILD UP SLOWLY because their body needs to learn the movement pattern and adjust to the load and explosiveness of the move.
An important part of working out isn’t just to do it…It is to do QUALITY movements!
Build up slowly and prevent undo stress being placed on your body which will lead to injury.
3. Work to Correct Imbalances – While my goal is to get everyone moving and having fun as quickly as possible, you can’t ignore the need to do all those supposedly boring corrective exercises.
Muscle imbalances lead to injury or may even be the result of an injury and can lead to further future problems.
Muscle imbalances usually mean that a muscle is doing work that it shouldn’t be doing because something is overactive, underactive, weak and/or tight.
Foam rolling, stretching and activation and strengthening exercises are all essential to correct the imbalances so that you can properly perform exercises during your workout and move better in everyday life.
When you start an exercise program, corrective exercises and stabilization exercises will make up the bulk of your workout.
However, even an advanced exerciser needs to do some corrective and stabilization exercises. Foam rolling, stretching and activation moves should be included in every warm up, especially if you have or have ever had an injury or imbalance.
And stabilization exercises are great for even elite athletes to do as recovery and to ensure that their movements are correct when they move onto some of their more demanding workouts.
Don’t wait to deal with your muscle imbalances until after you’ve become injured. Address the problem before serious symptoms arise!
A glute activation exercise since a very common weak and underative area is our glutes!
4. RECOVERY – Your body can’t handle working out intensely ever single day. If you workout too much and too intensely, your body may be overtrained and you may stop seeing progress. Also, if you never cycle your workouts, you may find yourself plateauing because your body is no longer challenged by the workouts.
PROGRESSION is key. And a huge part of PROGRESSION, is proper RECOVERY.
Not only do you want to slowly build up and constantly challenge yourself by mixing up your workouts, but you also want to make sure that you cycle back through weeks of RECOVERY no matter your level.
Recovery is when our bodies rebuild. Recovery weeks though don’t have to mean that we completely take the week off.
Recovery workouts are a great time to do those exercises that help us prevent injury and correct any imbalances that may have developed during our intense training. Recovery weeks are also a great time do to injury prehab and to work on our weakness.
I also use recovery weeks as chances to improve my mind-body connection with exercises that require more stabilization and less load. The better the communication between our mind and body, the better our movements will be.
Also, if you’ve suffered an injury in the past, it is especially important to include exercises that really work on improving our mind-body connection since injuries can damage that connection. And a damaged mind-body connection can lead to further injury!
Recovery weeks are necessary to give our body a chance rebuild so that we don’t become injured. They are also a great chance to add in all those boring exercises that keep us moving well!
And recovery allows us to unwind…Be it a full week or just a day off. RELAXING is not only good for the body but also for the mind. Move better and FEEL BETTER.
Basically recovery is essential.
All of your hard work will be for nothing if you don’t take enough time for your body to rebuild. During our workouts we break down our body. When we RECOVER, we rebuild the damaged muscles. No recovery means perpetual breakdown.
Perpetual breakdown leads to feeling bad and injury!
Here is one of the types of recovery workouts that I do. It is all isometric holds, which is far from easy, but puts a different strain on the body. I also love doing workouts with single limb movements during recovery weeks.
5. Focus on Your Goals – Workout with a goal in mind.
When we workout with a goal in mind, we develop a program and a progression to get us there. When we workout with direction, we are more likely to do things that will help us move better.
We are more likely to include warm ups. To include recovery.
We are more likely to pick exercises with a purpose, not just because they are hard.
We are less likely to just throw together workouts with the hardest variables we can think of so that it will be BRUTAL.
Each exercise variable (how many exercises, types of exercises, reps, sets, rest, load, speed, intensity…) all can be manipulated to help us reach or goals.
We can’t just randomly throw them together. We must consider HOW they will HELP us reach our goals.
If your goal is to deadlift 500lbs, pick exercises and variables to match that.
Don’t waste time doing workouts with a bazillion burpees just because you know they will make you exhausted!
And on top of that, whatever your goal is, whether it is to be the best at your sport, lose weight or bench press four adult human beings, you first need to move well to accomplish it.
Therefore, when you focus on your goal, no matter what it is, you are going to work to move better!
Your plan to help you reach your goal is going to need to include all of the four other tips above even if that means not every workout you do will be so hard you have to lie on the ground completely exhausted.
Not every workout can be the hardest thing you’ve ever done!
Stop wasting your time being so focused on making every workout hard! Stop ignoring how important it is to move well!

I know lots of people have become obsessed with doing BRUTAL WORKOUTS and therefore skip the boring prehab stuff in favor of doing gnarly crap.
But I’m sorry…All that does is lead to injury.
While hard workouts are fun, working out is about more than being gnarly.
Start working out to move better and feel better!
You may find that once you start working out for those reasons, you may actually start hitting some of your other goals more easily (and feeling even better while you do it!).
How To Build Strong Legs With Knee Pain
Knee pain.
It sucks. Plain and simple.
And there are a ton of reasons why you could be suffering from knee pain (reasons I will be getting to at a later date).
But no matter why you have the pain, it generally causes you to avoid leg exercises that could help you develop stronger, more powerful legs.
Lunges and squats generally cause pain. And even traditional deadlifts or sumo deadlifts may be uncomfortable.
But just because you have knee pain doesn’t mean you can skip leg day.
Actually when you have knee pain, you NEED to develop stronger legs, especially stronger glutes. Strengthening your glutes can often help alleviate knee pain (even though weak glutes are not necessarily the direct cause of knee pain).
Single leg deadlifts and straight leg deadlifts can both be great options. If your knee pain is a result of a previous ankle injury, single leg deadlifts can be a great way to also work on and improve your balance.
HOWEVER, I have found that one of the most torturous standing glute exercises isn’t a variation of the deadlift, it is the Anterior Reach Lunge by Nick Tumminello.
This move is so great that I love using it even with uninjured people. It seriously is a deceptively hard move and one that is sure to make your butt SO SORE the first time you do it.
How to do the Anterior Reach Lunge:

1. Start standing with your feet together. Beginners should start with bodyweight while more advanced lifters can hold weights by their sides. Intermediate lifters or people suffering from low back pain may want to do the lunge with a front reach instead of adding weight.
2. Step forward with one foot. Beginners can keep the step forward smaller. A bigger step forward will make the move more difficult.
3. Step forward and bend the front knee slightly as you hinge over. All of your weight should basically be in your front leg with your back leg used for balance and support.
4. While you are stepping forward, your weight shouldn’t continue to go forward as you hinge over. Your front heel should be firmly on the ground while your back leg stays straight.
5. Your back should also be flat as you lean/hinge over.
6. The more you lean over, the harder the move. DO NOT ROUND YOUR BACK TOWARD THE GROUND. It doesn’t matter if the weights touch the ground or if you can only lean over a little bit. It only matters that you push the butt back, keep the core engaged and the back flat as you hinge over.
7. If you do the reach instead of holding weights, you will reach your hands overhead and in front of you as you hinge over. Do not round as you reach.
8. Feel a nice stretch in your glute and hamstring as you hinge over. Make sure your weight isn’t going forward into your front toe. The heel of the front foot should be firmly planted on the ground. After you hinge over, stand up and step back.
9. You can choose to complete all reps on one side or alternate legs as you go.
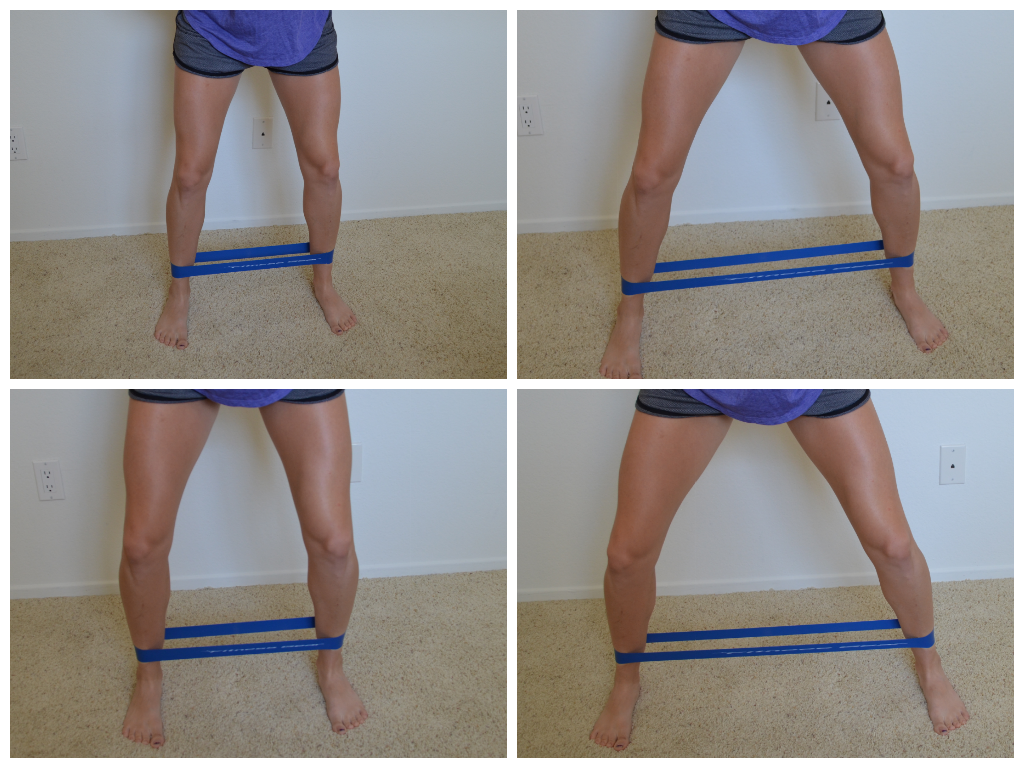
Knee pain is no excuse to skip leg day, especially GLUTE DAY. For more great glute strengthening moves that could help alleviate your knee pain, check out these 10 Mini Band Moves.
P.S. For some reason this move does really make me think of the bend and snap…Anyone else get that!?!
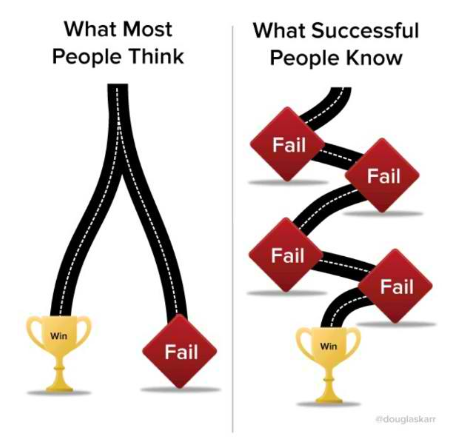
Striving For Success – How do we get there?

There are two reasons why most people fail at hitting their goals:
A. They give up because they get impatient that they aren’t there yet and feel like they will never be there.
or..
B. They never take a look at where they are at and end up going down with a sinking ship (AKA they stick with a program that doesn’t work because they are too afraid to make changes and someone else told them it worked).
These seem pretty obvious right? You wouldn’t do either of these…right?
WRONG!
Take a look at all the goals you’ve set over the last few years. How many of them have you really hit?
Looking back, you probably haven’t hit that many. And yes, some may not seem important now and you may not even remember why you wanted to set that goal in the first place, but the point is…YOU DIDN’T FOLLOW THROUGH. You didn’t COMPLETE the goal.
You didn’t reach your goal, your dream, for one of the two reasons above.
You didn’t reach your goal because you didn’t track your progress and you didn’t take time to ASSESS.
If you feel like you aren’t making progress or ever going to get there, don’t give up! Look at what you’ve tracked!
For one, when you look at what you’ve done, you may find you’ve actually have made more progress than you are giving yourself credit for even if you haven’t yet reached your goal.
And two, if you aren’t making progress than change what seems to be holding you back! Don’t just give up!
The problem is, most people don’t track. They don’t realize what they are doing day in and day out.
Most people only see where they are not.
We are obsessed with BEING THERE. (Yes…even those people who cling so hard to a failing program are truly so obsessed with being there that they can’t let go of something that is supposed to work.)
And rarely do we enjoy the process or even take chances to step back and assess.
Success doesn’t just happen. It is earned.
It takes hard work, dedication, and lots of failures.
Reaching your goal is going to have its ups…And a tons of downs.
You just can’t let the downs, the failures, derail you. But you also can’t ignore them.
Don’t put on blinders. Don’t rush in with no thought about the process.
Take a second today if you are struggling…Whether you are truly struggling to reach your goal or just struggling to feel like you are making progress…and assess the process.
Don’t put the blinders on and just tell yourself that everything is going ok when it isn’t. But don’t tell yourself everything is horrible just because you had a minor set-back!
Step back. Take a deep breath. And truly take a look at where you are and where you started.
I can’t say this enough, but tracking your progress is key. It motivates and allows us to honestly assess where we are and truly how hard we’ve worked and how dedicated we’ve been about getting to our goal.
Tracking allows us to look at what is working and what isn’t working.
Here are some other great articles with tips to help you reach success. These articles are focused on setting powerful GOALS. Because without SMART goals, motivational goals, you aren’t going to achieve success!
While I agree, you want to have the “never give up” attitude, you DO want to have REALISTIC goals.
It’s Easier For You – 10 Ways To Break Bad Habits
It’s Hard Work…Period (goal setting tips)
A Complete Guide to Goal Setting (leading you through the step by step process)
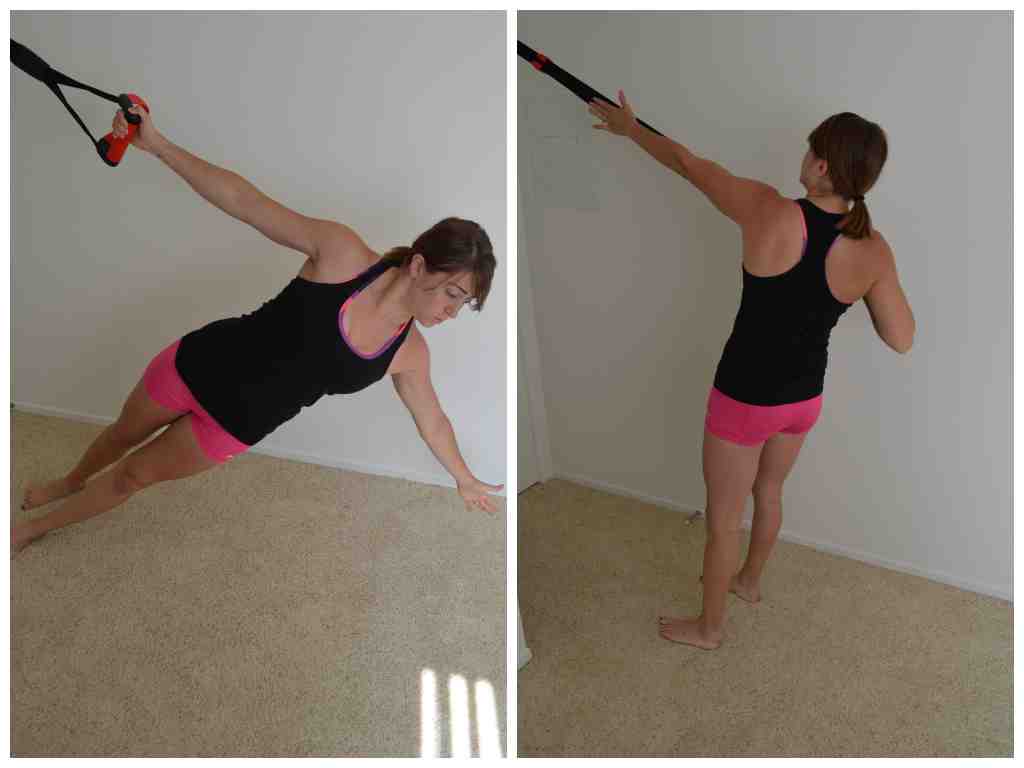
Build a Strong Back for Better Posture (And More Pull Ups!)
Because of sitting all day, we tend to hunch forward. Our chest and lats can become tight and often the muscles in our back, especially our lower traps, are weak.
And then on top of that, people spend way more time on their chest shoulders and triceps than they do on their back and biceps. This only adds to the imbalance and creates worse posture.
It can also hinder you from being able to do pull ups! (Which recently I’ve gotten asked a lot about!)
Here are some great stretching and foam rolling moves you should do before beginning your back workouts and using the exercises below. The exercises in the post above can also be great activation moves!
These back exercises will help correct your posture and can also help you improve your pull ups!
1. Inverted Row variations:
You can perform a two arm inverted row or even a rotational or anti-rotational single arm row. All three develop great back and core strength to improve your posture and build your back strength so that you can work up to a full pull up (or add to the number of pull ups you are currently able to do)!
Make sure with all three that you are keeping your core tight.
For the basic inverted row, you will hold an XT strap in each hand. Walk your feet out so you are leaning back. The closer to parallel to the ground you get, the harder the move will be. Squeeze your core and glutes and press your chest out so there is tension behind your shoulder blades. Then row up, keeping your body in a nice straight line. Row until your chest comes up to the handles and then lower yourself back down. Don’t let your hips sink as you lower back down. Also, keep your chest pressed out the entire time (do not let your low back arch though).

Do do a single arm anti-rotational row, you are going to do basically the exact same thing just with one hand. You want to keep your shoulders even just like you are holding the strap in the other hand. Do not let the shoulder of the arm not holding anything rotate toward the ground. As you row in, also make sure the shoulder of the arm rowing doesn’t shrug up by your ear.
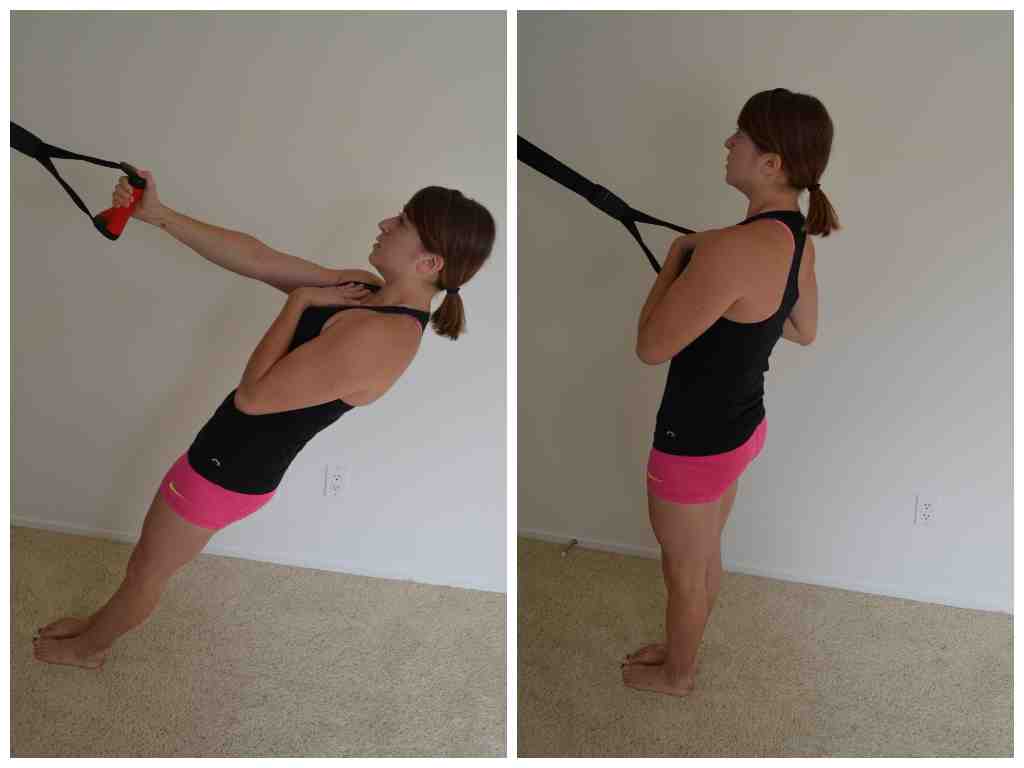
With the rotational row, you are going to open up as if almost doing a hanging side plank. Do not let your hips dip toward the ground. As you row up, keep your core tight and rotate toward the strap, reaching as high up the strap as possible. Then rotate back up and repeat.
2. Row variations:
You can do a barbell row or a single arm dumbbell row. You can do a row with or without rotation. These are also a great way to develop back strength and improve posture.
Here are two great row variations using a band.
Two-arm Row – Lean forward and loop the band over itself and stand on the point where the band crosses over itself. Make sure there is tension even when you are fully extended if possible. Lean over, creating a nice straight line from the tip of your head all the way down your tailbone. Your chest should be pressed out and shoulder blades pulled down and back. Keeping your arms in by your sides, row up on the bands. Bend your elbows and pull the bands to your chest. Control the bands as you relax back down. Keep your core tight and tension in your back. Do not let your back round as you do this move! You want to make sure you are pressing your butt back and away and creating a nice straight line with your back.
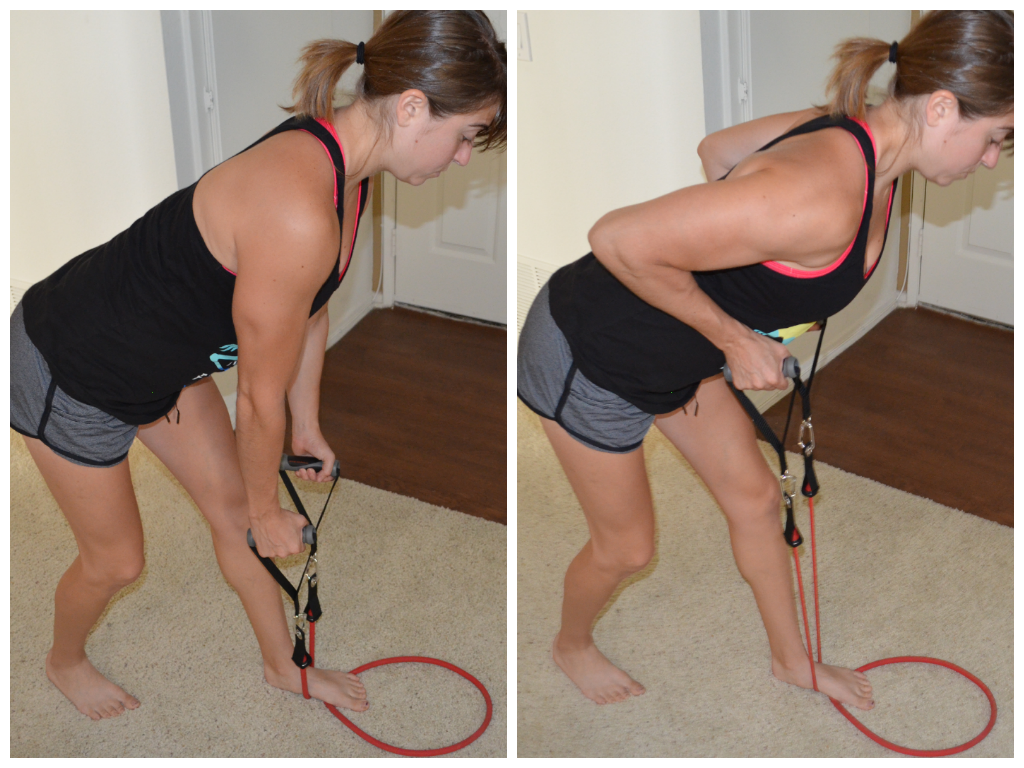
Lawn Mower Row – This is a rotational row, but could also be done without the rotation. I call it the lawn mower row because it kind of looks like someone starting a lawn mower (apparently this is the midwest girl in me as many people I say that to now just kind of stare at me blankly…). Again loop the band and stand on the place where it crosses over. Reach down and then pull the band up toward your chest. As you row up, rotate open toward the band so that you can actually row up past your chest. Then control the band back down to the start and repeat.

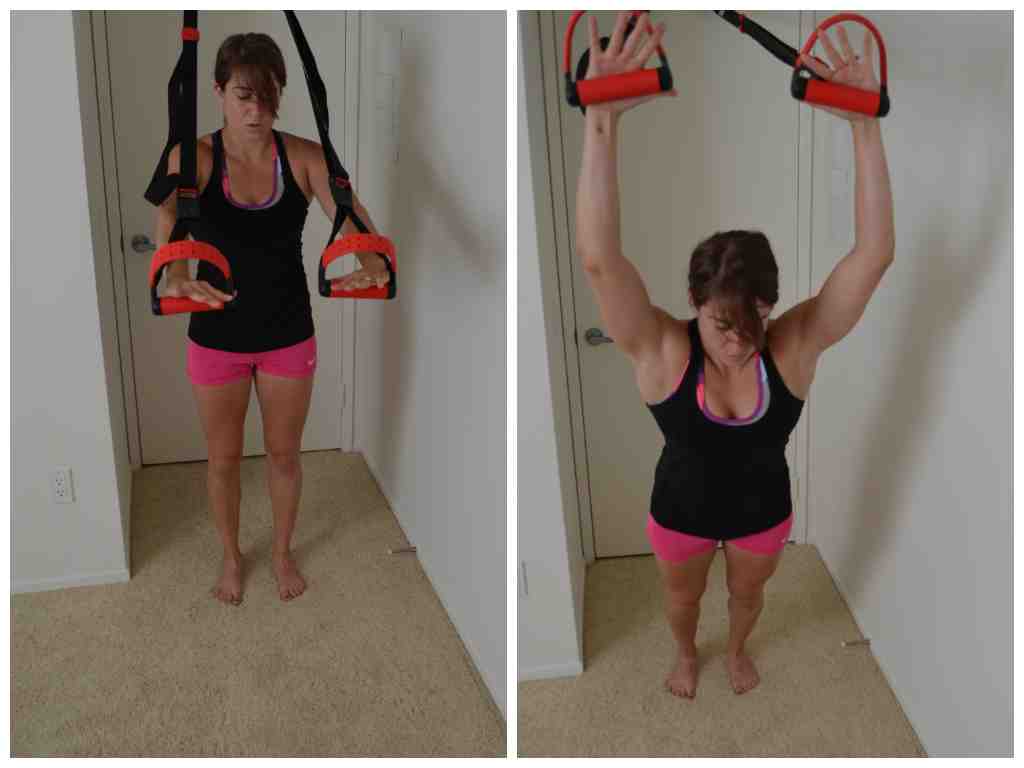
3. Scapular Hold variations:
As you all know, I love the scapular wall hold. But there are other variations out there that are great. Basically a scapular hold is just the top hold of a row. You can do it on XT straps by holding at the top. Or you can do it by lying face down on a bench and rowing up and holding at the top. You could even just hold at the top of the two-arm band row.
Scapular holds are great at creating that scapular retraction that we need to be able to do pull ups. They are also great at strengthening our lower traps so that we have less neck and shoulder pain AND BETTER POSTURE.
Honestly, these are one of the few exercises that I have no problem if you almost do them every day. If you are sitting for a long time at your desk, get up and do them. They should be apart of your warm ups when you do deadlifts or back days. Shoot you may even include them on chest days just to get in a little extension in your back since it is so often in flexion!
These are great for injury prevention especially if you’ve had back, neck or shoulder problems!
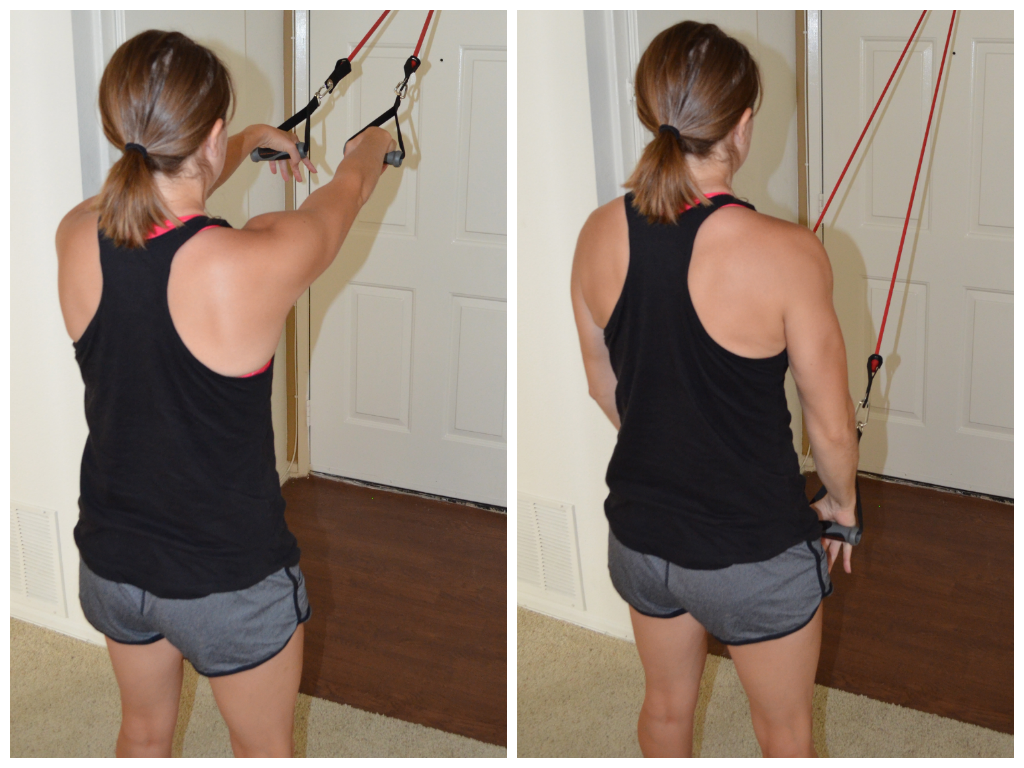
4. Pulldown variations:
These are great subs if you can’t do full pull ups. While I love assisted pull ups, pull up holds and deadhangs, these are also useful in developing strong lats for pull ups.
You definitely want to make sure though that you’ve rolled out your lats and chest before doing these moves.
Bands or even a cable machine can be used for these moves.
Kneeling Pulldown – Kneel on the ground. You can even sit back on your heels. Place a band in a door or looped over something higher off the ground. Hold a handle in each hand and reach your hands up overhead. If the band isn’t straight above you, you will want to slightly lean forward so that your upper body is inline with your extended arms. Then pull the band down toward you. You can do variations with your palms facing toward you (chin up), palms parallel or even palms facing away (pull up). Keep your core tight and your arms in by your body as you pull down. Do not let your elbows flare way out.

On the left is the pivot prone grip and the right is the parallel grip.
One of my favorite variations of this move is the Pivot Prone Pull shown by Nick Tumminello. It really works on lower trap strength.
Straight Arm Pulldown – While I don’t use this move that often, it can be another great way to strengthen your core and lats.
You can use a cable machine or a band for this exercise. Anchor the band or cable above your head so that there is a little tension when you hold your arms out straight at shoulder height. Keep your core tight and your arms straight as you press the band down toward the ground and then back toward your legs. Keep your chest up nice and tall and do not round forward. Feel your back and lats engage as you press down. Control the band back up to shoulder height.
If pull ups really are your focus, this is a great move to use.
5. Pullover variations
Pullovers are also a great move to use to strengthen your lats.
You can do these with a weight or on the XT straps. This move is very core intensive. Do not let your low back arch!
Weighted Pullover – Lie on a bench or table. Set up so only your upper back in on the bench and your feet are on the ground. Bridge up and extend the weight up over your chest with your arms out straight. Keeping the elbows slightly bent, reach the weight back and overhead, extending back as far as possible. Keep the hips high and the core tight. Then pull the weight back over so that it is above your chest and repeat.

XT Pullover – Face away from the XT strap anchor point with one strap in each hand. The closer to parallel you get to the ground, the harder the move will be. Extend your arms out at about shoulder height. Slowly let your hands extend overhead, keeping your arms pretty straight. Keep your body in a nice straight line. Do not let your hips go up in the air or sag toward the ground. Then press down on the straps and bring your arms back down to about shoulder height.
All of these moves are great to improve your posture and build a stronger back so that you can do more pull ups.
HOWEVER, in your desire to do more pull ups, do not do a back workout every day. Muscles get stronger when they have time to rebuild…AKA you need rest days! If you constantly break your back down, you won’t get any stronger. So DON’T do these exercises every day!
Low Carb Shepard’s Pie Recipe
As you’ve probably all now noticed…Ryan does a lot of the cooking. And he is superb at it (follows in his father’s footsteps…Yea…Just a little sucking up…)
You’ve also probably noticed…I’m obsessed with cauliflower! (Getting sick of me repeating that, huh?)
Combine those two things and you are bound to end up with one great meal! Which Ryan did indeed do this past weekend. He created the LOW CARB SHEPARD’S PIE!
If you double the recipe, you could easily make this dish tonight and have dinner or lunch for almost the rest of the week!
Casseroles like this are great if you don’t have the time to cook or simply don’t enjoy cooking each and every night.
I have lots of clients complain that eating well is so hard because they have to cook when they get home and are exhausted from a long day of work. But when you make a meal like this Shepard’s Pie on a Sunday or Monday, you end up with HEALTHY leftovers you can easily reheat when you get home late, tired and drained from work!
Healthy eating doesn’t have to be difficult or even extremely time-consuming. You just need to plan ahead a little.
So here is a great recipe to use when meal prepping for this week!
Low Carb Shepard’s Pie

Ingredients:
1lbs grass-fed ground beef
1/2 head cauliflower
2 tbsp pasture butter
2 oz Grass-fed Cheddar Cheese
1 egg
1/4 cup beef broth
Spices (Cumin, garlic) and Salt and Pepper to taste
Steam cauliflower in water until softened a bit. While cauliflower is steaming, heat a little oil in a skillet on medium-high heat.
Add beef and broth to skillet. Cook allowing the broth to reduce and the beef to brown.
Take steamed cauliflower and add to food processor with butter and egg.
Turn the broiler on your oven on low.
Once broth has reduced and beef is basically cooked through, add to a casserole dish. Place beef on bottom and then scoop cauliflower mash on top. Place in the oven under the broiler and allow the cauliflower mash to brown slightly.
Remove from oven and top with sliced/grated cheese and place back under broiler. Allow cheese to slightly brown and crisp up.
Then scoop out the shepard’s pie and enjoy! You can easily refrigerate the leftovers as the recipe above makes about 4 servings (although if you are Ryan and I on a Saturday afternoon after a morning fast and workout, you will eat the entire thing).
P.S. Posted this one for you *la. Just another meathead you are following on IG for meal prep ideas! 😛


