Wrist and Elbow Pain
Many of us sit at a computer for hours at a time, maybe even whole days, typing.
Which means our wrists are bent and flexed in an unnatural position for HOURS. And then when we are done typing, we go and “grip” things.
We carry grocery bags or go to the gym and lift weights or hold pencils and pens. We hold spoons to stir the dinner in the pan that we are also holding. (And it’s funny because most of us need to work on grip strength, which while important to improve, can also add to our pain).
Our hands and wrists are constantly in flexion (even our elbows are flexed a lot).
And this leads to a lot of hand, wrist, forearm and even elbow pain. (Shoot even if you play a sport like tennis and have some elbow pain…THIS CAN HELP!)
So what are some tips to help you alleviate the pain?
Where ever there are muscles, you can foam roll and probably should be foam rolling.
Take a golf ball and place it under your hand on a table or flat surface. Roll the golf ball around the palm of your hand. You can add a little bit of extra pressure by pressing down with your other hand.
You can then take the golf ball or a tennis ball (or small trigger point roller or foam roller) and roll out all of the muscles from your wrists to your elbow. Make sure to get the top and bottom of your forearm. To dig in deeper as you roll out, you can tense and relax your forearm on the ball or roller. To tense, make a fist and then relax over the roller. You can also dig in deeper by applying pressure with your other hand.
If you are suffering from elbow pain, you may also want to roll out your tricep and bicep right above your elbow. You can take a roller or ball and place it on a low table and roll your arm out on it. You can also place the roller or ball against a wall and press your arm into it (this works well for the tricep but not as well for the bicep unless you are in an opening or doorway). Again, you can apply more pressure and dig in deeper, by pressing down with your other hand. Make sure to rock back and forth and not only move the roller up and down.
STRETCHES
Wrist (and Hand) Stretches:
- Hand Circles – Clasp your hands together and draw circles and figure eights both ways with the hands together. Try not to tense your hands, but relax them through the range of motion.

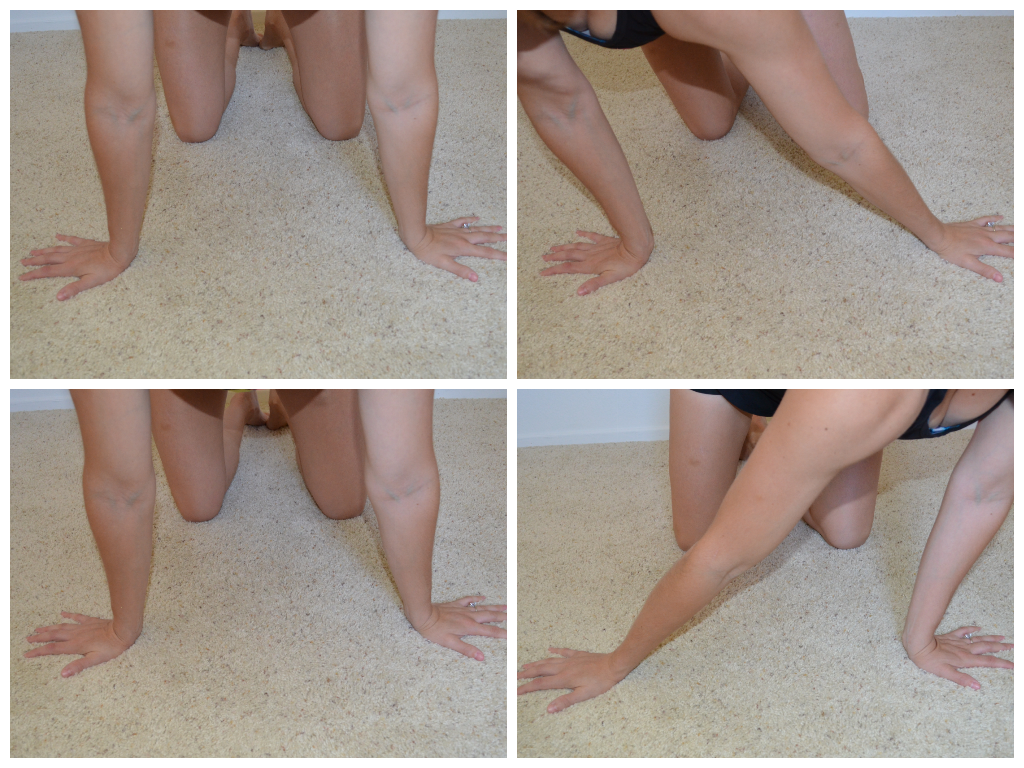
- Under Forearm stretch – Kneel on the ground and place your palms down on the ground. Turn your fingertips back toward your knees. Then sit back on your heels and feel a stretch down the inside of your forearm. Sit back as far as you can without letting the heel of your palms come up. Rock back and forth. Do not hold the stretch but move slowly.

- Inside/Outside Stretch – Kneel on the ground with your palms on the ground and your fingertips pointing out away from each other. Lean forward a bit into your hands so that there is some pressure on your palms and wrists. Keeping the pressure on the hands, flip one hand and then the other so that the finger tips are pointing in and the back of your hands are down. Then, one at a time, flip the hands back out.

- Side to Side Extension – Kneel on the ground with your palms down and hands about shoulder-width apart. Fingers should be pointing outward away from each other. Then rock side to side slowly and smoothly.
- Prayer Stretch – Place your hands together. You can do this with the fingertips pointing up or down (do both if you have time). Press the fingertips together. If your fingers are pointing up, you are going to try to press the hands down as low as possible without the heels of the palms coming apart. If your fingertips are pointing down, you will try to raise your hands up as high as possible without your hands coming apart.

Tricep and Bicep Stretches:
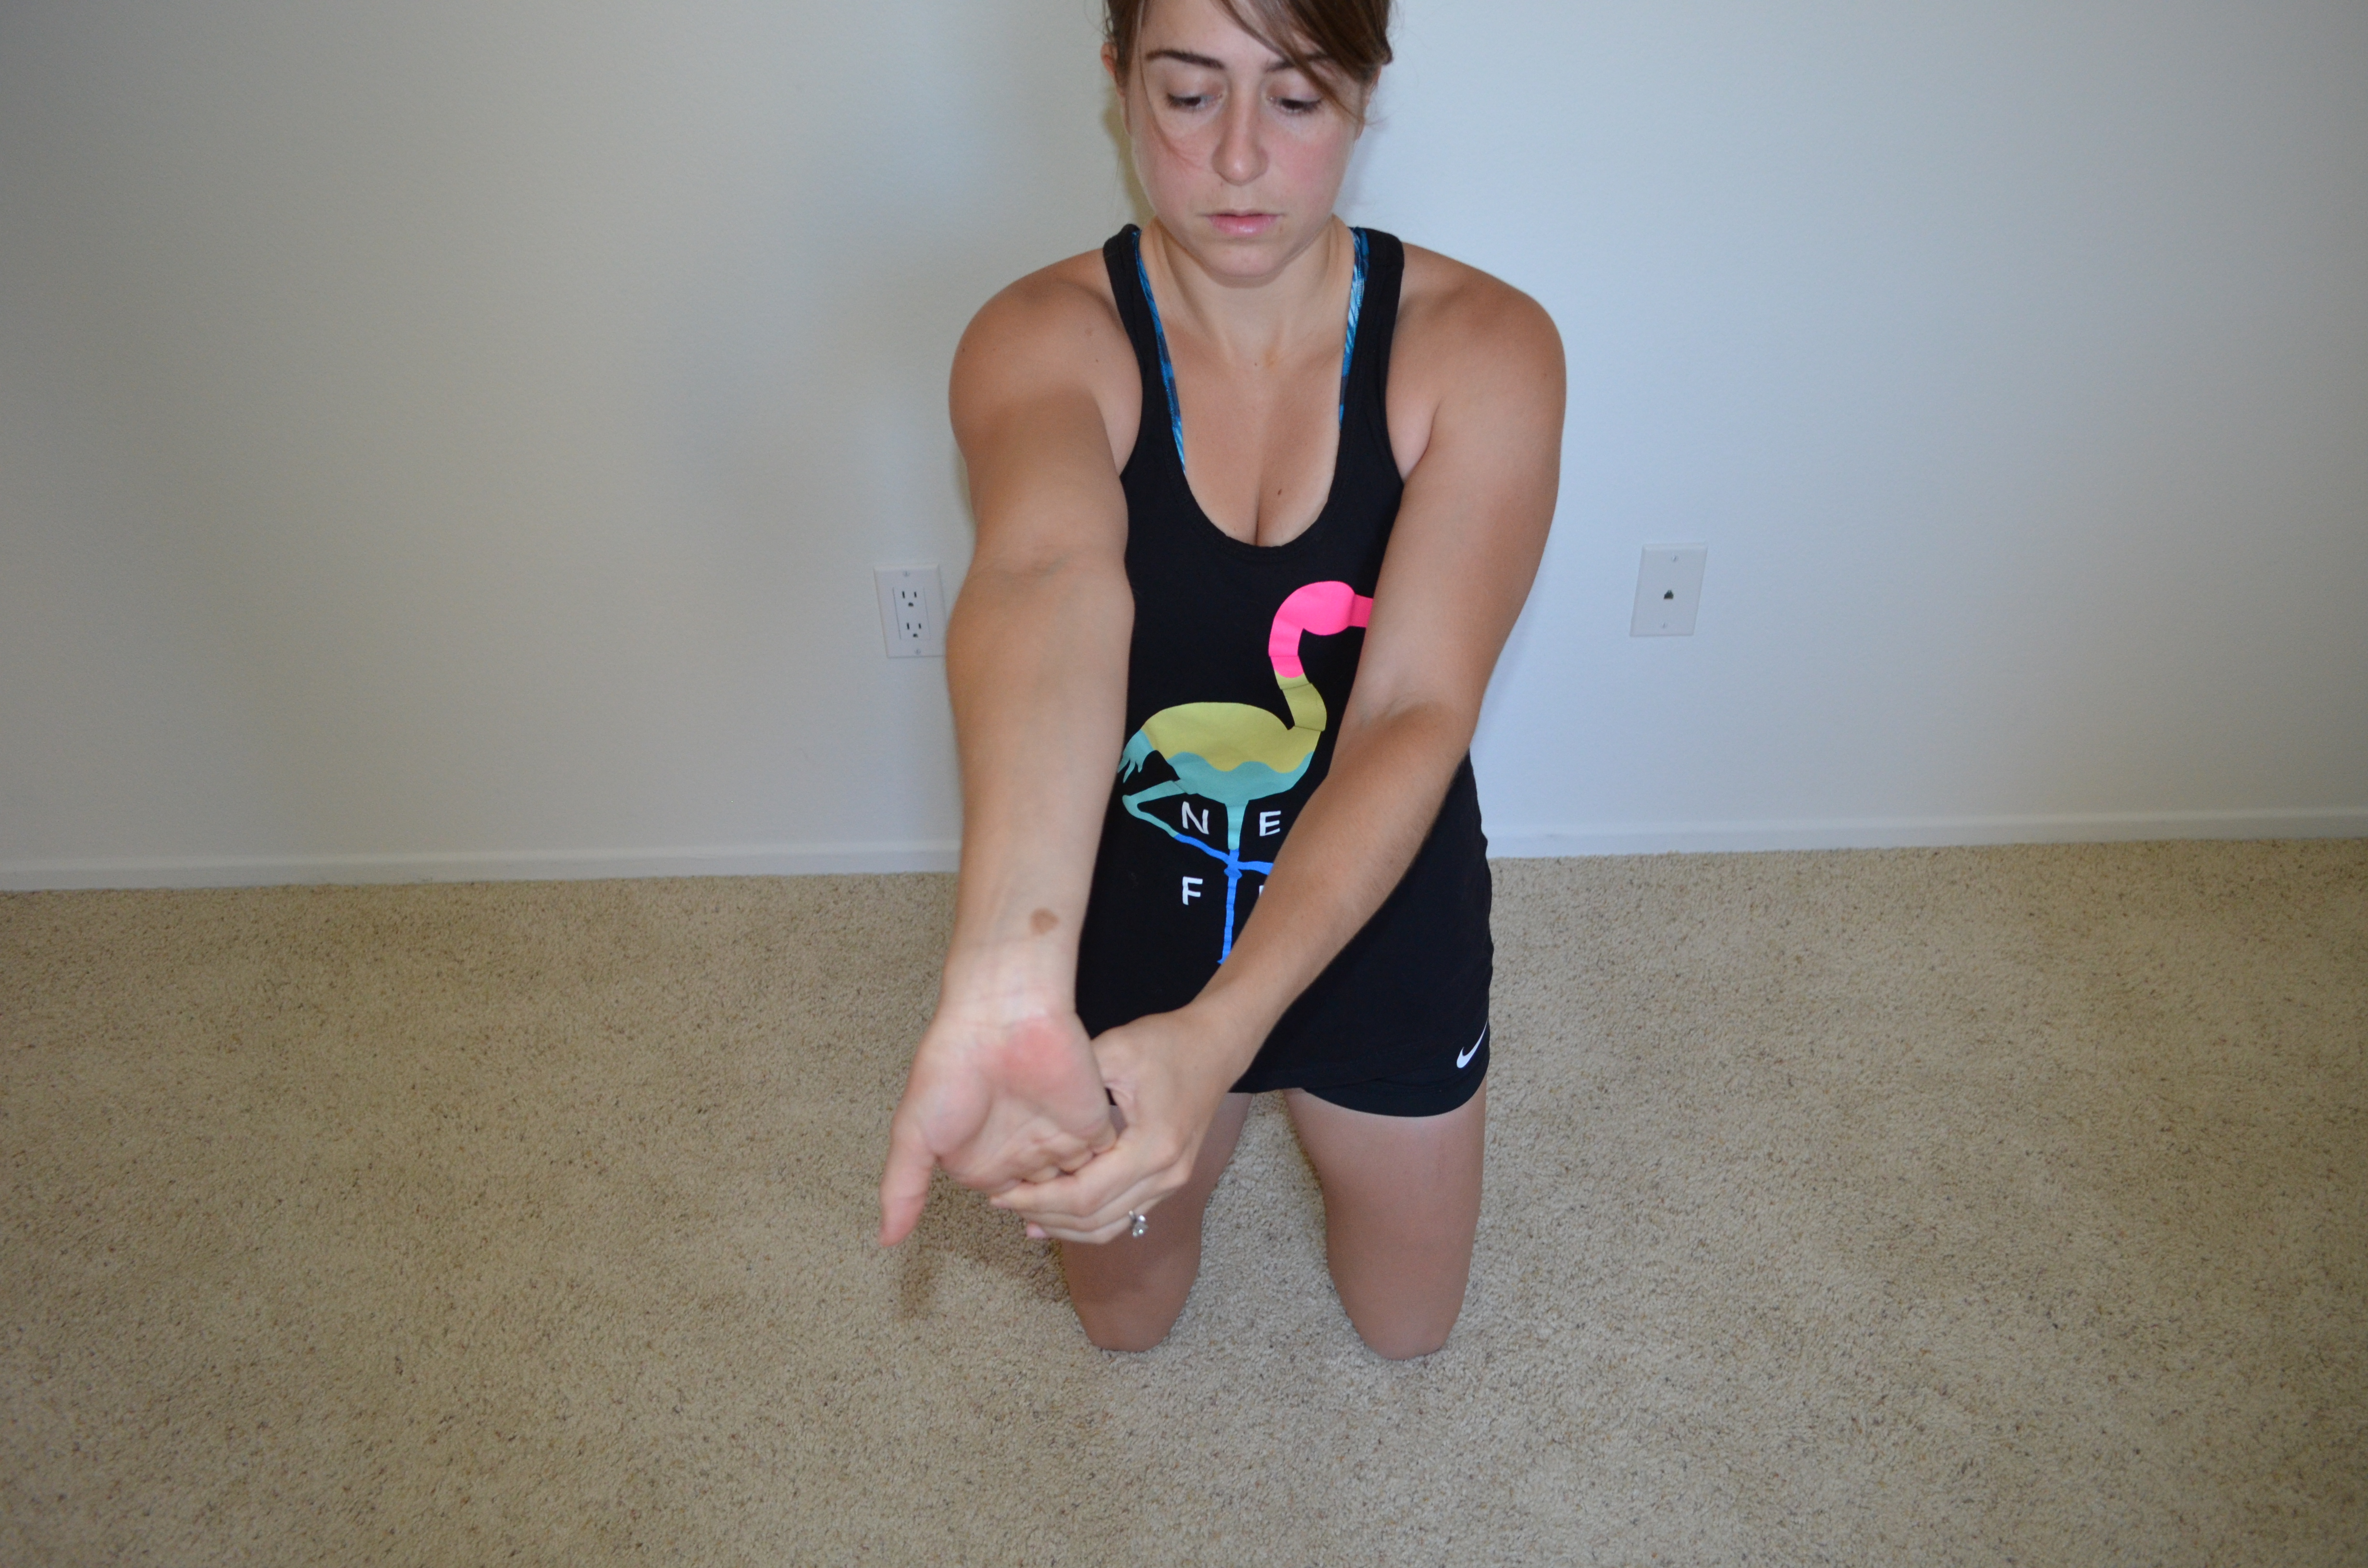
- Wrist and Bicep Stretch – Stretch one arm straight out in front of you. Take the other hand and press down on the fingertips, pointing them down toward the ground. As you press down, you should straighten your arm more so you feel a stretch down your forearm and up into your bicep.
- Hugs – Swing your arms open as wide as you can to feel a stretch through your chest and biceps. Then swing your arms across your body as if you are hugging yourself. Reach your hands around back as far as possible and then open up again as wide as possible. Repeat never really holding in one position.
- Overhead Tricep Stretch – Reach one hand up overhead and then down your back. Reach as far down your back as possible and then take the other hand and press down on the elbow to increase the stretch. Try not to arch your back as you do this stretch. You can also do this with a towel. Reach one hand over and down the back from the top. Hold a towel in that hand and then reach up the back to grab the other end of the towel. Pull down on the towel to increase the stretch.
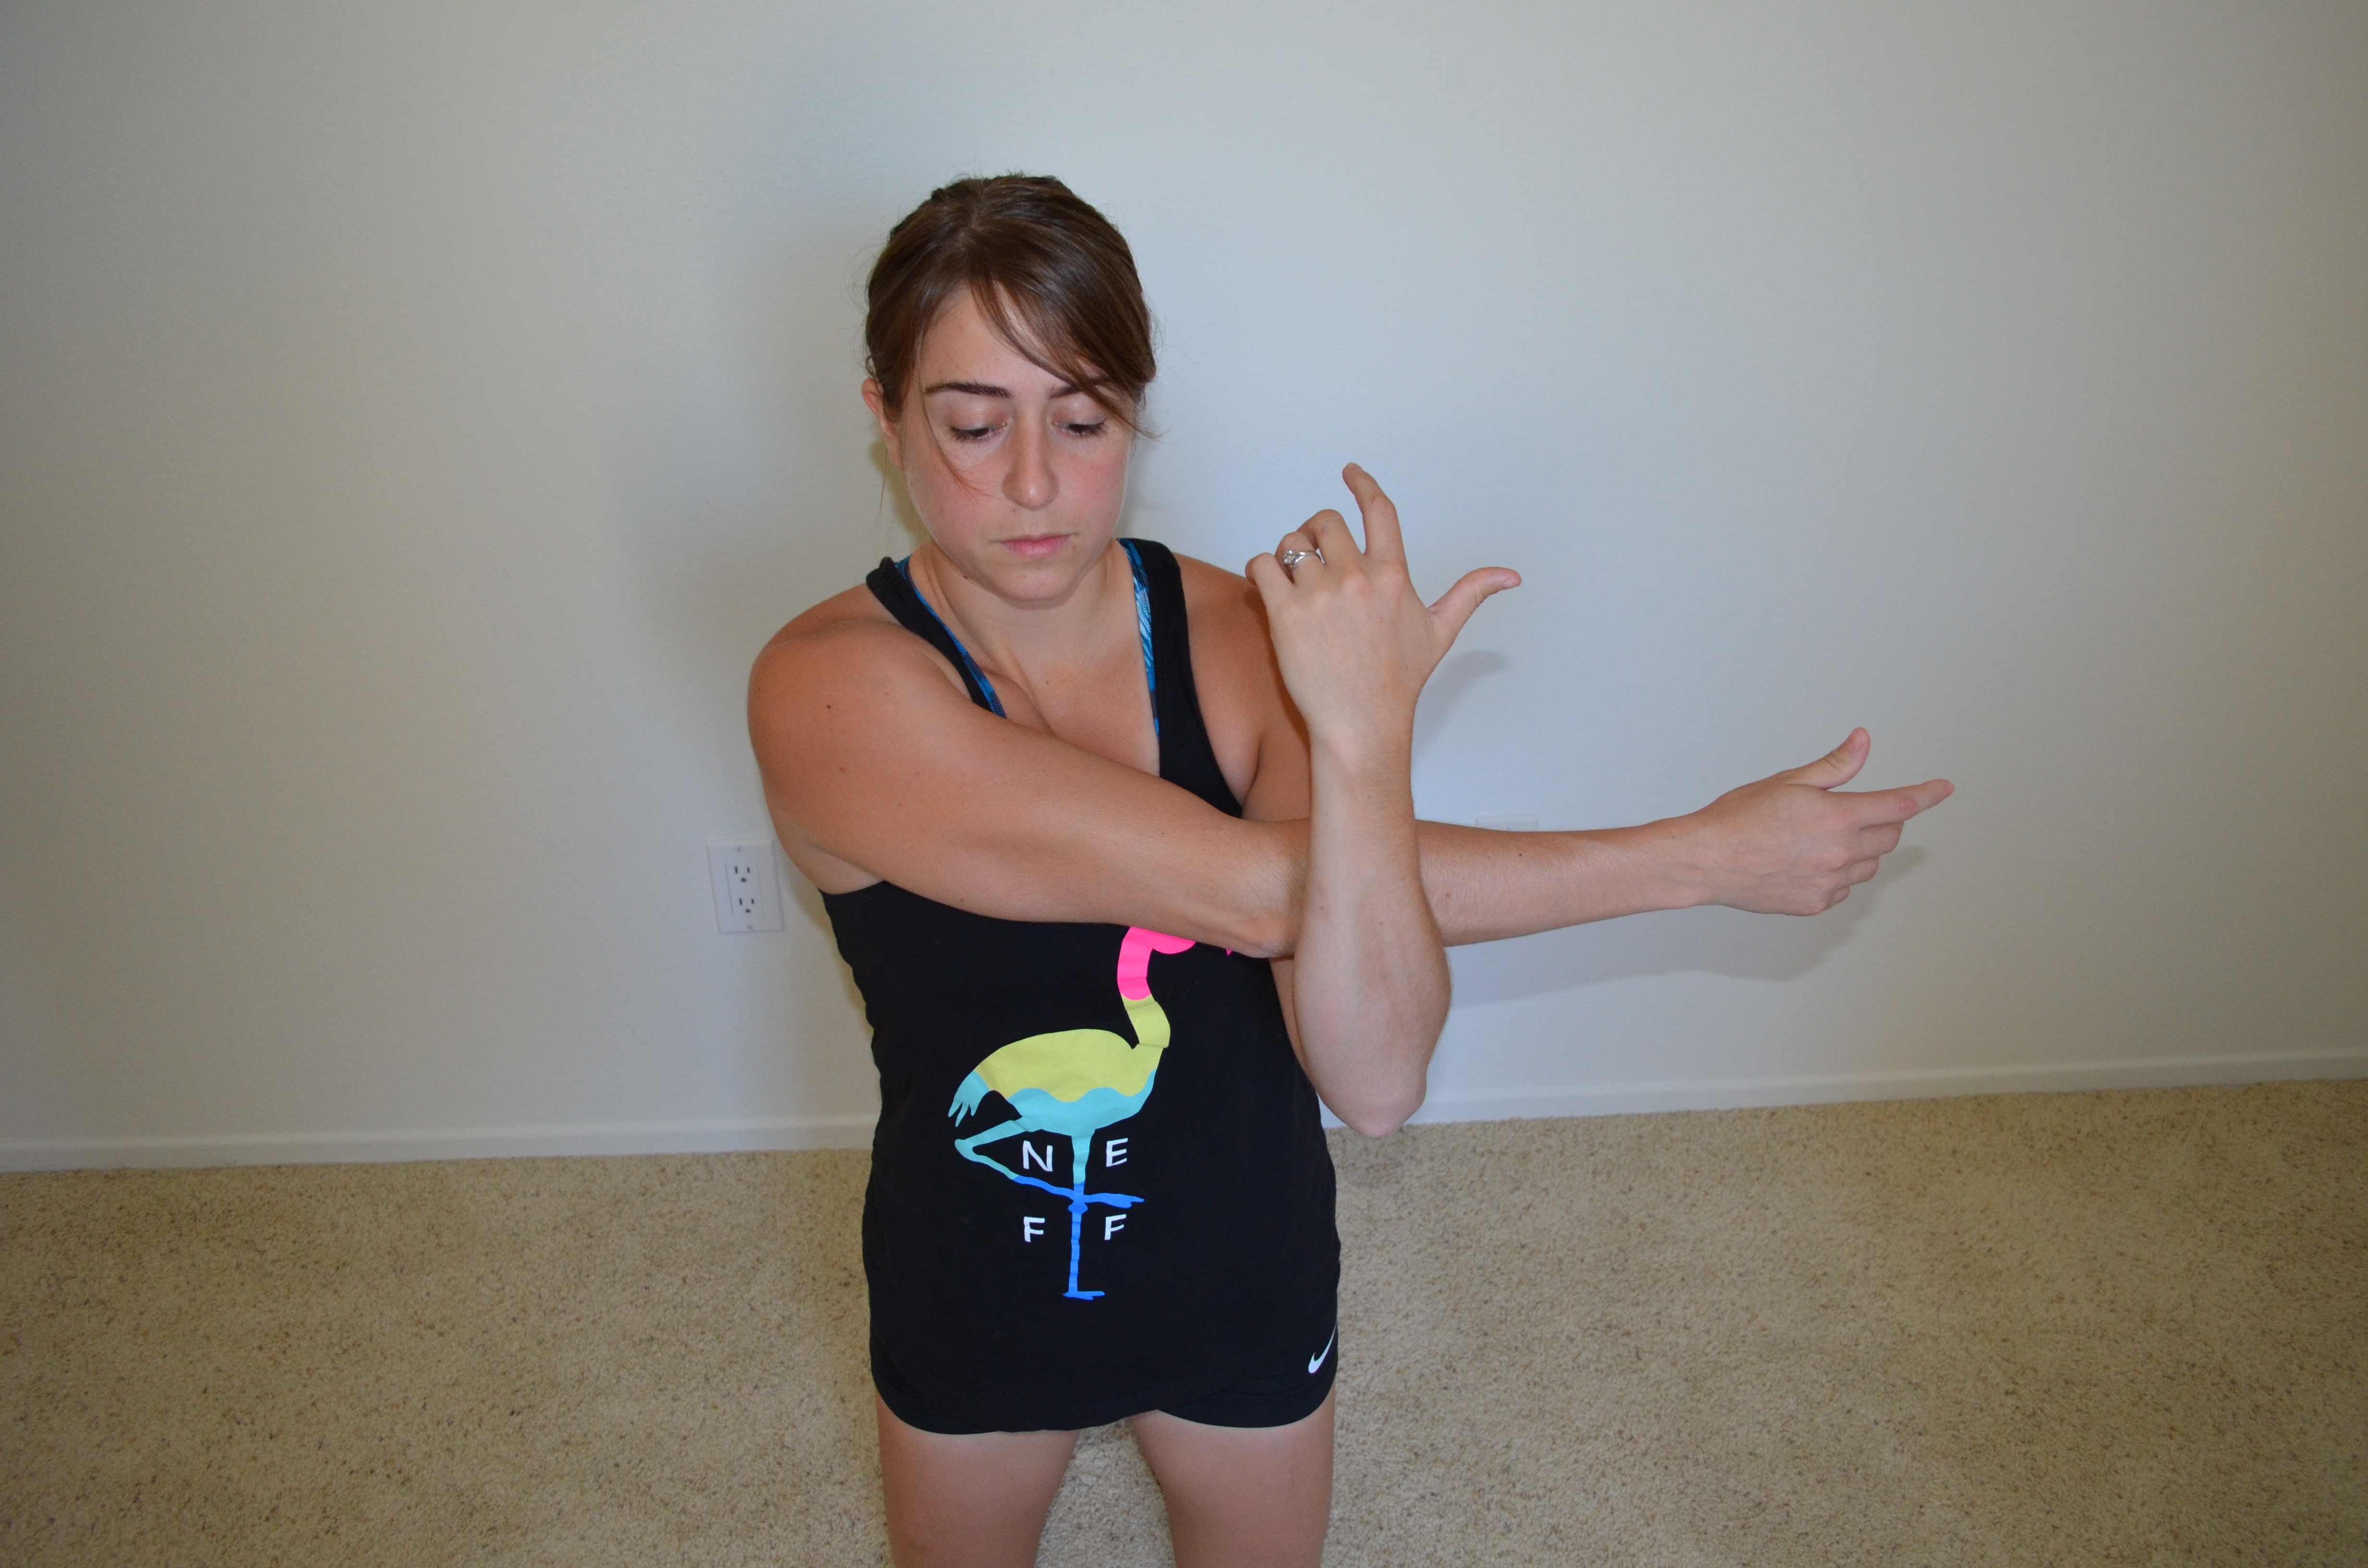
- Across the Chest Tricep Stretch – Reach one arm across your chest and take the other arm and pull it tighter to your chest. You can relax the arm across your chest down into the bent elbow of the other arm. Make sure to keep the shoulder of the arm across the chest relaxed down and back.
STRENGTHENING
Probably one of the best simple cure-alls for the lower arm is the rubber band finger extensions. It works all the way up your forearm to loosen everything that is constantly flexed.
To do it, get a rubber band (you can use a basic rubber band or get one of the thicker ones designed for this) and place it around the outside of your fingers. Place it around that middle knuckle. Then extend your fingers open as far as possible before bringing them back together. Do a number of reps (I recommend starting with like 30-50 depending on the tension of the band).

These are all quick fixes you can do to alleviate hand, wrist, forearm and elbow pain. None of them take a lot of time and can even be added to your workout warm ups.
If you sit at a desk all day, you can easily do some of these every few hours when you get up for a break. You could even add in the scapular hold and some neck and trap stretches too!…Hint…hint…
NOTE: If you have sever pain please see a Physical Therapist. These are meant to alleviate minor aches and pains. Ice can also be a great tool if an area is super inflamed.
Forced Reps – Getting that little bit extra out of your workout
All too often we give up at the first sign of fatigue or shake-age (that is my very technical term for when a muscle starts to fatigue and it gets hard to press /pull/squat/whatever the weight).
If we want results, we have to push. And that doesn’t mean working out for a lot longer or doing a ton more.
But it does mean forcing ourselves to push just a little bit harder.
It does mean forcing out those couple of reps that we really don’t want to do because they hurt.
Forced reps can be done in a variety of ways, but the point of doing them is to “force” a couple of reps that our body really doesn’t want to do so that we cause growth and change.
We aren’t going to get stronger and fitter if we just continue to do the same comfortable weight for the same comfortable amount of reps.
You need to push yourself.
Most likely your “discomfort” is more mental than it really is physical. And pushing yourself to do an extra few reps will not only push your body, but also your mind.
If you push your mind, in the future you will be able to work harder, which will lead to even more progress.
This doesn’t always mean going to failure or even past failure although going to failure isn’t a bad thing.
It just means doing a couple more than your body THINKS it can do.
So how can you force out those extra couple of reps?
Well for one, you can just do them. Sometimes by just telling yourself, “I’m going to do 8 this week because I could only do 6 last week” will be enough to make you do the extra reps.
But sometimes we really feel like we can’t eek out any more.
This is when you can use a couple of different options. Below are three techniques I like to use to make my body do just those couple of reps past discomfort.
1. Drop Sets – Drop sets are great if your goal is muscle hypertrophy. Drop sets, where you complete reps with one weight and then drop to another weight and force out more reps, really helps you recruit more muscle fibers so that you cause more muscle gains.
Let’s say you can only do 8 single arm rows with a 40lbs dumbbell. You could either choose to stop there or you could force out extra reps by quickly dropping the weight and doing more reps with that lighter weight.
With drop sets, you do reps with a certain weight and then lower the weight and do more reps and continue to do reps and lower the weight until you’ve either completed the allotted sets or you’ve hit failure.

Start heavier and get lighter. You may find that five pounds feel like 100 by the end haha
You can either do bigger drops in weight and try to increase the reps you do with each round OR you can only slightly decrease the weight, which means your reps will actually go down with each round.
With drop sets, do not rest between rounds. Try to quickly drop the weight and go right back into the exercise. The lack of rest is key to complete fatigue of the muscle.
You will probably not do more than one set of a drop set with an exercise since it will take you basically to failure. Make sure that the weight you start with is heavy for about 6-12 reps.
2. Rest-Pause – So I actually just learned the technical name for these kinds of sets after reading an article about Rest-Pause Technique by Colin over at Uber Beast Mode.
Rest-pause technique means that basically you bust out as many reps as possible, take a short little break and then go back and bust out as many more as possible until the number of reps or sets you set out to complete are done (or you’ve hit complete failure).
There are a number of ways to do the rest-pause technique.
In his article, Colin mentions one way to do it:
…[O]ne example of a rest-pause set would be to pick a weight you can do 6 times. Perform the exercise as many times as you can, (6 seems like the most likely number here don’t you think?) then set the weight down and rest for 15-20 seconds. Lift as many as you can again and repeat this process until you can no longer lift the weight. Now you can work to failure here, but let’s be smart people. You don’t want to go to actual failure on lifts where you can end up with weight on top of you unless you have a spotter. Although that is another benefit of rest-pause training. If you don’t have a spotter this is how you can get those extra reps you couldn’t safely do before as the brief rest periods will give you enough stamina to do more.
As Colin states, not needing a spotter to go near failure is definitely an upside to the rest pause technique.
Two other variations I love are:
- Do as many rounds as needed to complete a certain amount of reps. So say your goal is 30 reps on squat. Pick a weight you can do for no more than 10 reps the first time. Perform as many squats as you can with that weight and then rest. Rest no longer than 30 seconds, then pick the weight up again and perform as many more reps as you can. Continue resting and performing reps until all 30 are completed with a weight that you technically could only do for 10 reps!
- 10-7-3-1. For this rest-pause set, you will pick a weight that is challenging for 10 reps. You will perform 10 reps then rest for 10 seconds before performing 7 reps. After seven reps, you will rest for 7 seconds before performing 3 reps. After three reps, rest for 3 seconds before performing 1 rep. Then rest for a couple of minutes before performing another 1-3 sets.
3. Assisted Reps – So this one is only doable if you happen to workout with someone or there is someone there who can assist you.
But basically how assisted reps work, is that you complete as many reps as possible without assistance and then when you’re about to hit failure or can’t do any more on your own without resting, your partner jumps in and assists you with the lift.
This can be done with almost anything – squats, bench…Probably not deadlift…But the point is that someone else helps you raise a weight you couldn’t get up on your own.
One of my new “favorite” ways to use it is on push ups (Jeff at my work showed me this one…It is a combination drop set and assisted reps technique).
To do this on push ups, perform as many as you can from your toes aka go to failure from your toes and then instantly drop to your knees and keep going. When you can’t do any more from your knees, have someone then assist you with push ups from your knees until you can’t do any more without them basically having to do all the work.

Assisted push ups
OUCH!
All three of these techniques will help you get more out of your workouts without necessarily spending more time in the gym. They will also push your muscles to work harder in the time allotted so that you get great results more efficiently.
The great part about the techniques above is that they can be combined to mix things up or force yourself to work even harder.
You can do rest-pause drop sets. Or drop sets with assisted reps.
Anyway, whatever technique you chose to use, the point is to bust out those couple of extra reps that your mind and body are telling you that you can’t do.
What is your favorite way to get yourself to do those extra couple of reps?
Cardio At Home
It’s kind of interesting, but I hear all the time that people can’t really do cardio at home.
They have this idea that they either have to go outside and run or have some sort of cardio equipment (like a treadmill or bike) at home to be able to do cardio, especially aerobic endurance, longer duration cardio (jogging).
But that isn’t the case.
There are plenty of ways to get in cardio at home without any equipment. And you don’t just have to do short, intense intervals to make these exercises work. You can work on your aerobic endurance as well!
Well this is my idea of cardio! It does make the point that you don’t need a treadmill to do your cardio!
Here are 5 great Indoor Cardio Options that you can do at home:
1. Towel Taz – One of my favorite ways to do cardio at home because EVERYONE can do it and feel challenged by it. And you don’t need any equipment or really any space to do it!
This move is great to use to do intervals of 30 seconds or longer. If you do 2 minute intervals with shorter rest, you can really build your aerobic endurance.
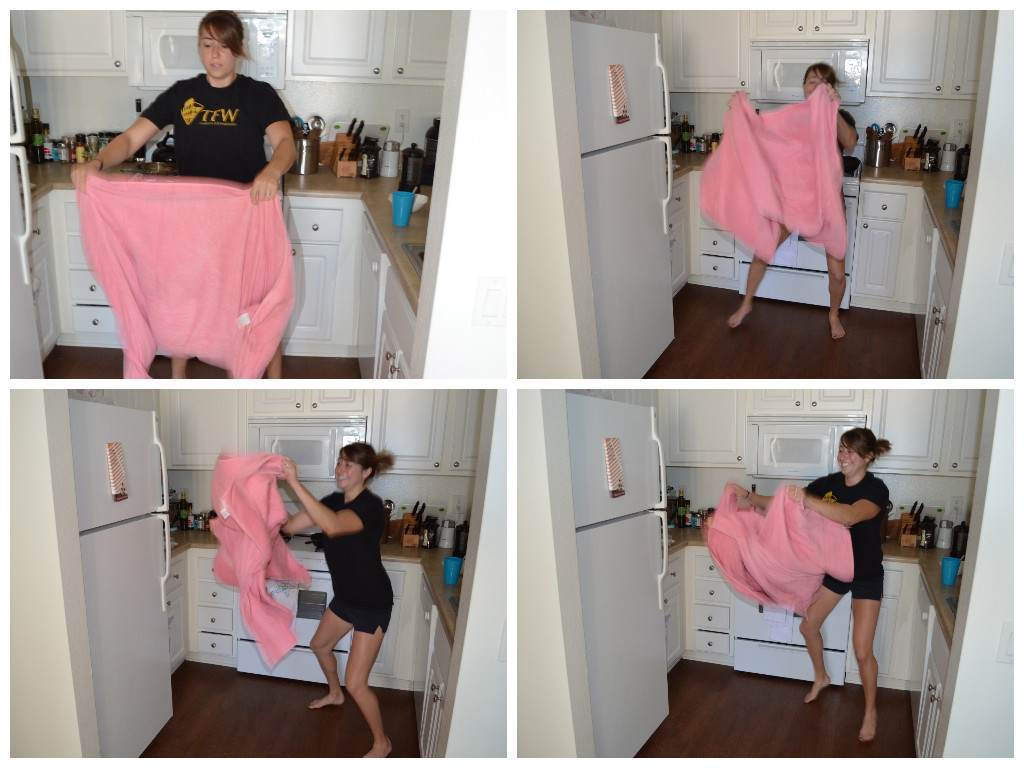
To do the towel taz, take a bath or beach towel. Hold one corner of the towel in each hand. Move side to side and all around quickly, shaking the towel up and down and forward and back. Your movements should be quick.
2. Plyometrics – Commonly known as jump training. While plyometric training is better for shorter intervals, it is still a great cardio option.
Jump squats, split squat jumps, skater hops…There are a ton of options that allow you to work your legs from every angle.

Skater Hops
But what if you are older and/or your knees won’t allow you to jump quickly and explosively off the ground? Plyometric training can be regressed.
For example: With the squat jump, you can start with a quick bodyweight squat. Then you can progress that and do a squat and come up to your toes at the top of the squat instead of exploding off the ground. Next you will just do a very very little jump off the ground, pausing after every rep. Then you will try to get higher and more explosive off the ground, still pausing or going more slowly between reps. Finally you will be as explosive and quick as possible with the jump squat.
Also, plyometric training is about training muscles to be explosive. It isn’t restricted to lower body exercises. Plyo push ups, bobcats, medicine ball throws are all examples of upper body plyos.
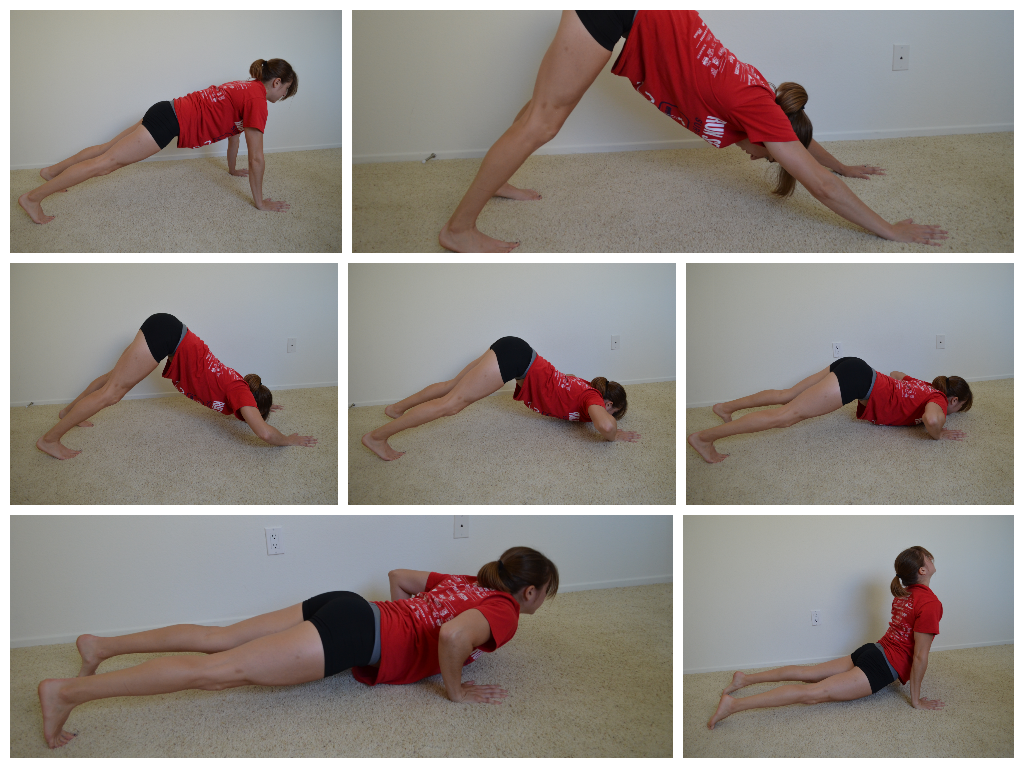
Actually bobcats are full body and a great way to develop a mind-body connection.
To do a bobcat, start in the crawling position on your hands and toes. The first level of this move is to just bend your elbows and drop your knees to the ground quickly and explosively. Your goal is to make sure your upper body and lower body move TOGETHER as quickly as possible. Once you start to get everything to move together, you are going to explode off the ground. Go slowly at first, focusing on everything leaving the ground and hitting the ground together. So explode up off your hands and toes and then land on your hands and toes at the same time, staying in that crawling position. As you get more comfortable, start to move as quickly as possible.
This move is super tough. It is hard to get your upper body and lower body to move together quickly!
So this is actually a video that Aaron did. This only shows a little bit of the bobcat while used in knife fighting but it will give you an idea since pictures don’t really cut it. (And actually knife fighting is another option if you have a partner. Just be careful you don’t get to into it if you are in a confined space!)
3. Crawling – Not all cardio has to be done from your feet. Crawling is a great way to get your heart rate up and it can be done as sprints or as longer, slower, endurance cardio. You can do bear crawls or gorilla crawls or even crab walks. There are a ton of different ways to crawl! Crawling is great too because it really is fully body and you don’t need much space to do it. As long as you can take a couple of steps forward and back or even just move in a circle, you are all set!

I mean shoot…you can even crawl like an alligator! Talk about tough on the core and upper body
4. Metabolic Circuit Training – If you do exercises quickly with little or no weight and little to no rest, your heart rate is going to go up.
I mentioned the other day in my Squat Variations post that you could do 5 minutes of bodyweight squats. Trust me, that definitely gets your heart rate up.
You can also do different intervals. Tabata intervals of 20 seconds on/10 seconds off can be great as long as you pick exercises that challenge you within 20 seconds.
For example, while you can use the bodyweight squat when working for 5 minutes, you may want to use a squat jump if only working for 10 seconds.
Metabolic circuits can really use any exercise.
That’s right…Any exercise can be CARDIO. Push ups when done quickly definitely get your heart rate up. Not to mention they kill your upper body!
You can easily choose exercise options that fit the space you have and your current fitness level and turn them into a great cardio circuit. Remember the key here is to move quickly not use the heaviest weight possible.
5. Cone Drills – Cone drills are a great way to improve your mind-body connection AND get your heart rate up.
And you really don’ need much room to do them…or even need cones for that matter. You can use books, pieces of paper, underwear….Really anything to just mark off the spots. Obviously, if you do have a bit more room, it is easier to set them up.
They can be great to do at a park as well!
You can do quick side shuffles to cones. You can go back and forth for time. The shuffles don’t have to be long. Two or three shuffles each way is really all you need!
You can do star drills or even four point drills. Actually there is one four point drill I love to use from my tennis days.
Set up four “cones” in a diamond. Start in the center. Sprint forward to the cone in front of you. Then go back to center. Back pedal to the cone behind you and then come back to center. Side shuffle to one side cone and then go to the other.
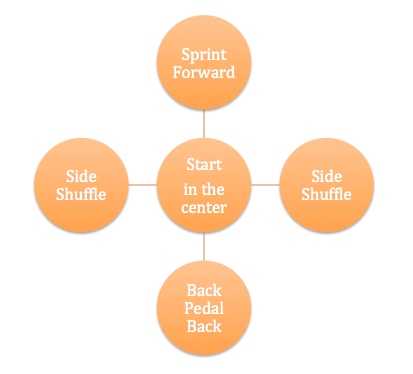
Hopefully this gives you a picture of what I’m talking about.
You can mix up exactly what direction you go. Try to not just follow the same pattern, but make your movements quick to each cone. Just remember to go back to the center after going out to each cone.
Cone drills are one of my favorite forms of cardio because they really do improve that mind-body connection which is so key for not only athletic performance but also proper functioning in EVERY DAY LIFE!
So there you have it. Five cardio options you can do at home no matter your fitness level. And the best part is – THEY REQUIRE NO EQUIPMENT!
What is your favorite way to do cardio?
To Strong Women Everywhere

Yes…I do realize it is funky punctuation.
I think most women are way stronger than they give themselves credit for.
I think we are taught from a very young age, intentionally or unintentionally, to be very humble, to be almost shy or even ashamed of our strength and abilities. We are almost taught to keep our strength to ourselves.
Far too often I hear females brush off compliments and downplay their abilities (sometimes they even completely deny them).
But we need to embrace our strength – we need to acknowledge our awesomeness!
It’s funny, but I really started thinking about all of this when one of my male clients said to me, “You are freaking awesome!” after we were discussing some sort of feat of strength.
Instead of blushing and denying it, I said, “I know, right!?!” (I was partially joking, but at the same time, I was PROUD of what I had accomplished).
And guess what? He didn’t roll his eyes or think I was cocky or conceited. He actually laughed and start to say to the client next to him, “Notice how she didn’t….”
I then interrupted him and said, “Didn’t deny it?”
He laughed again and said, “Yea!”
And I said, “Well I’m proud!”
And he said, “You should be!”
YOU SHOULD BE!
Ok…I’m not suggesting that we walk around saying, “I know!” when someone gives us a compliment. I’m just saying that we should start believing in ourselves and in our abilities.
We should start being proud of our STRENGTH.
Because, guess what!?! IT IS OK TO BE PROUD AND STRONG!
And right now you may be thinking, “Well I’m strong and I don’t have to go around bragging about it to be proud of it.”
Uhm well for one, I’m not suggesting your brag. And two, are you really proud of it if you can’t accept a compliment?
Are you really proud if you have to downplay your abilities?
Are you really proud if you are apologizing and excusing your strength?
Personally, I don’t think so.
Because how much can you truly BELIEVE in yourself if you keep telling yourself and other people you really aren’t that wonderful and strong?
We do start to believe what we tell ourselves and others. Our minds do hear the words coming out of our mouths. And our mind can be tricked into believing the lies….
I’ve seen a change over the years as I’ve gone from excusing and downplaying my strength, my abilities, to embracing them and maybe even, in some people’s eyes, bragging about them.
Heck, if saying “Yes. I am indeed strong” is bragging….GUILTY AS CHARGED….And very proud of it.
My point is that when I stopped denying and downplaying, I started to become even stronger because my mind wasn’t ever hearing that I wasn’t strong enough.
So take a second right now and think about it.
Are you truly proud of your strength?
How often do you recognize and appreciate your abilities when someone gives you a compliment? Or do you generally downplay what you’ve accomplished?
P.S. This post is dedicated to all of you wonderful women that inspire me every day with your strength inside and out of the gym!
Cajun Shrimp and Cauliflower-Avocado Mash
Every Thursday Ryan and I go to the farmers market. While I love so many of the things we get there, I’m by far most excited when the fresh seafood stand has SHRIMP! These are the BEST shrimp I’ve ever had. Always so yummy.
So of course….we had to eat them last night!
AND on top of the fresh shrimp, we had a ripe Reed Avocado (the BEST, most buttery avocados) from the market as well. They are in season right now! YAY!
We also of course had to get cauliflower. Because as you all know…I LOVE CAULIFLOWER!
Ryan took all of our fresh farmers market finds (Shrimp, Avocado, Cauliflower) and turned them into one great meal. He created a Cajun Shrimp with Avocado Cream and Cauliflower-Avocado Mash.
Cajun Shrimp with Avocado Cream and Cauliflower-Avocado Mash

Ok yes…the mash is a bit green, BUT YUM!
Ingredients:
1 lb Shrimp
1/2 head of cauliflower
1 Reed Avocado
2 tbsp Pasture-raised Cream
1/2 tbsp Chili
2 tsp Cumin
1/2 tbsp Paprika
Salt and Pepper to taste
Cut up cauliflower and steam it until it gets a bit softer.
While cauliflower is cooking, add avocado and cream with salt and pepper to a food processor. Blend until creamy.
Heat a skillet with olive oil. Coat shrimp in spices and add to the hot pan. Get a nice sear on the shrimp as you start to make the cauliflower mash.
Spoon avocado cream into a bowl, leaving some behind in the food processor. Add cooked cauliflower to the processor and blend with the avocado cream left behind.
When shrimp has finished cooking, remove them to a plate and spoon out the cauliflower mash. You can serve with the avocado cream or leave the cream on the side.
A great fresh farmers market meal!
What are your favorite meals to make with your farmers market loot?
Squat Variations – Mixing it up without weight
The basic bodyweight squat is a great move and often overlooked because it seems so simple and well….easy.
Most people add weight to the squat to make it more challenging.
But what if you don’t have weights at home yet have progressed past the basic bodyweight squat for reps?
Here are some variations of the squat that can help you work your legs in different ways that may just be the challenge you need even without adding weights
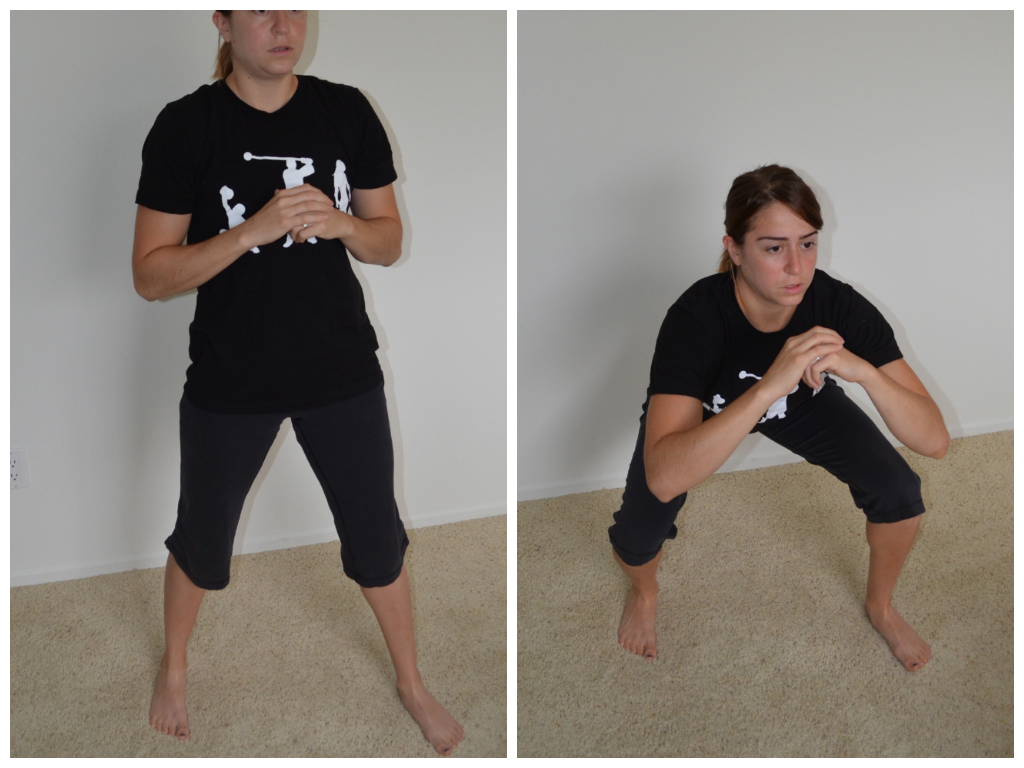
1. Bodyweight Squat Hold – Holding a basic bodyweight squat at the bottom (aka when your thighs are parallel to the ground and your knees are bent to 90) isn’t by any means easy even if you can squat with quite a bit of weight. Try holding for 30 seconds to 1 minute…or maybe even 2 minutes. Do not let your chest fall forward (aka do not lean forward) and make sure your weight is in your heels. Do not sink below 90 as that makes the squat easier. Beginners may need to perform a shorter hold or hold up a bit higher.
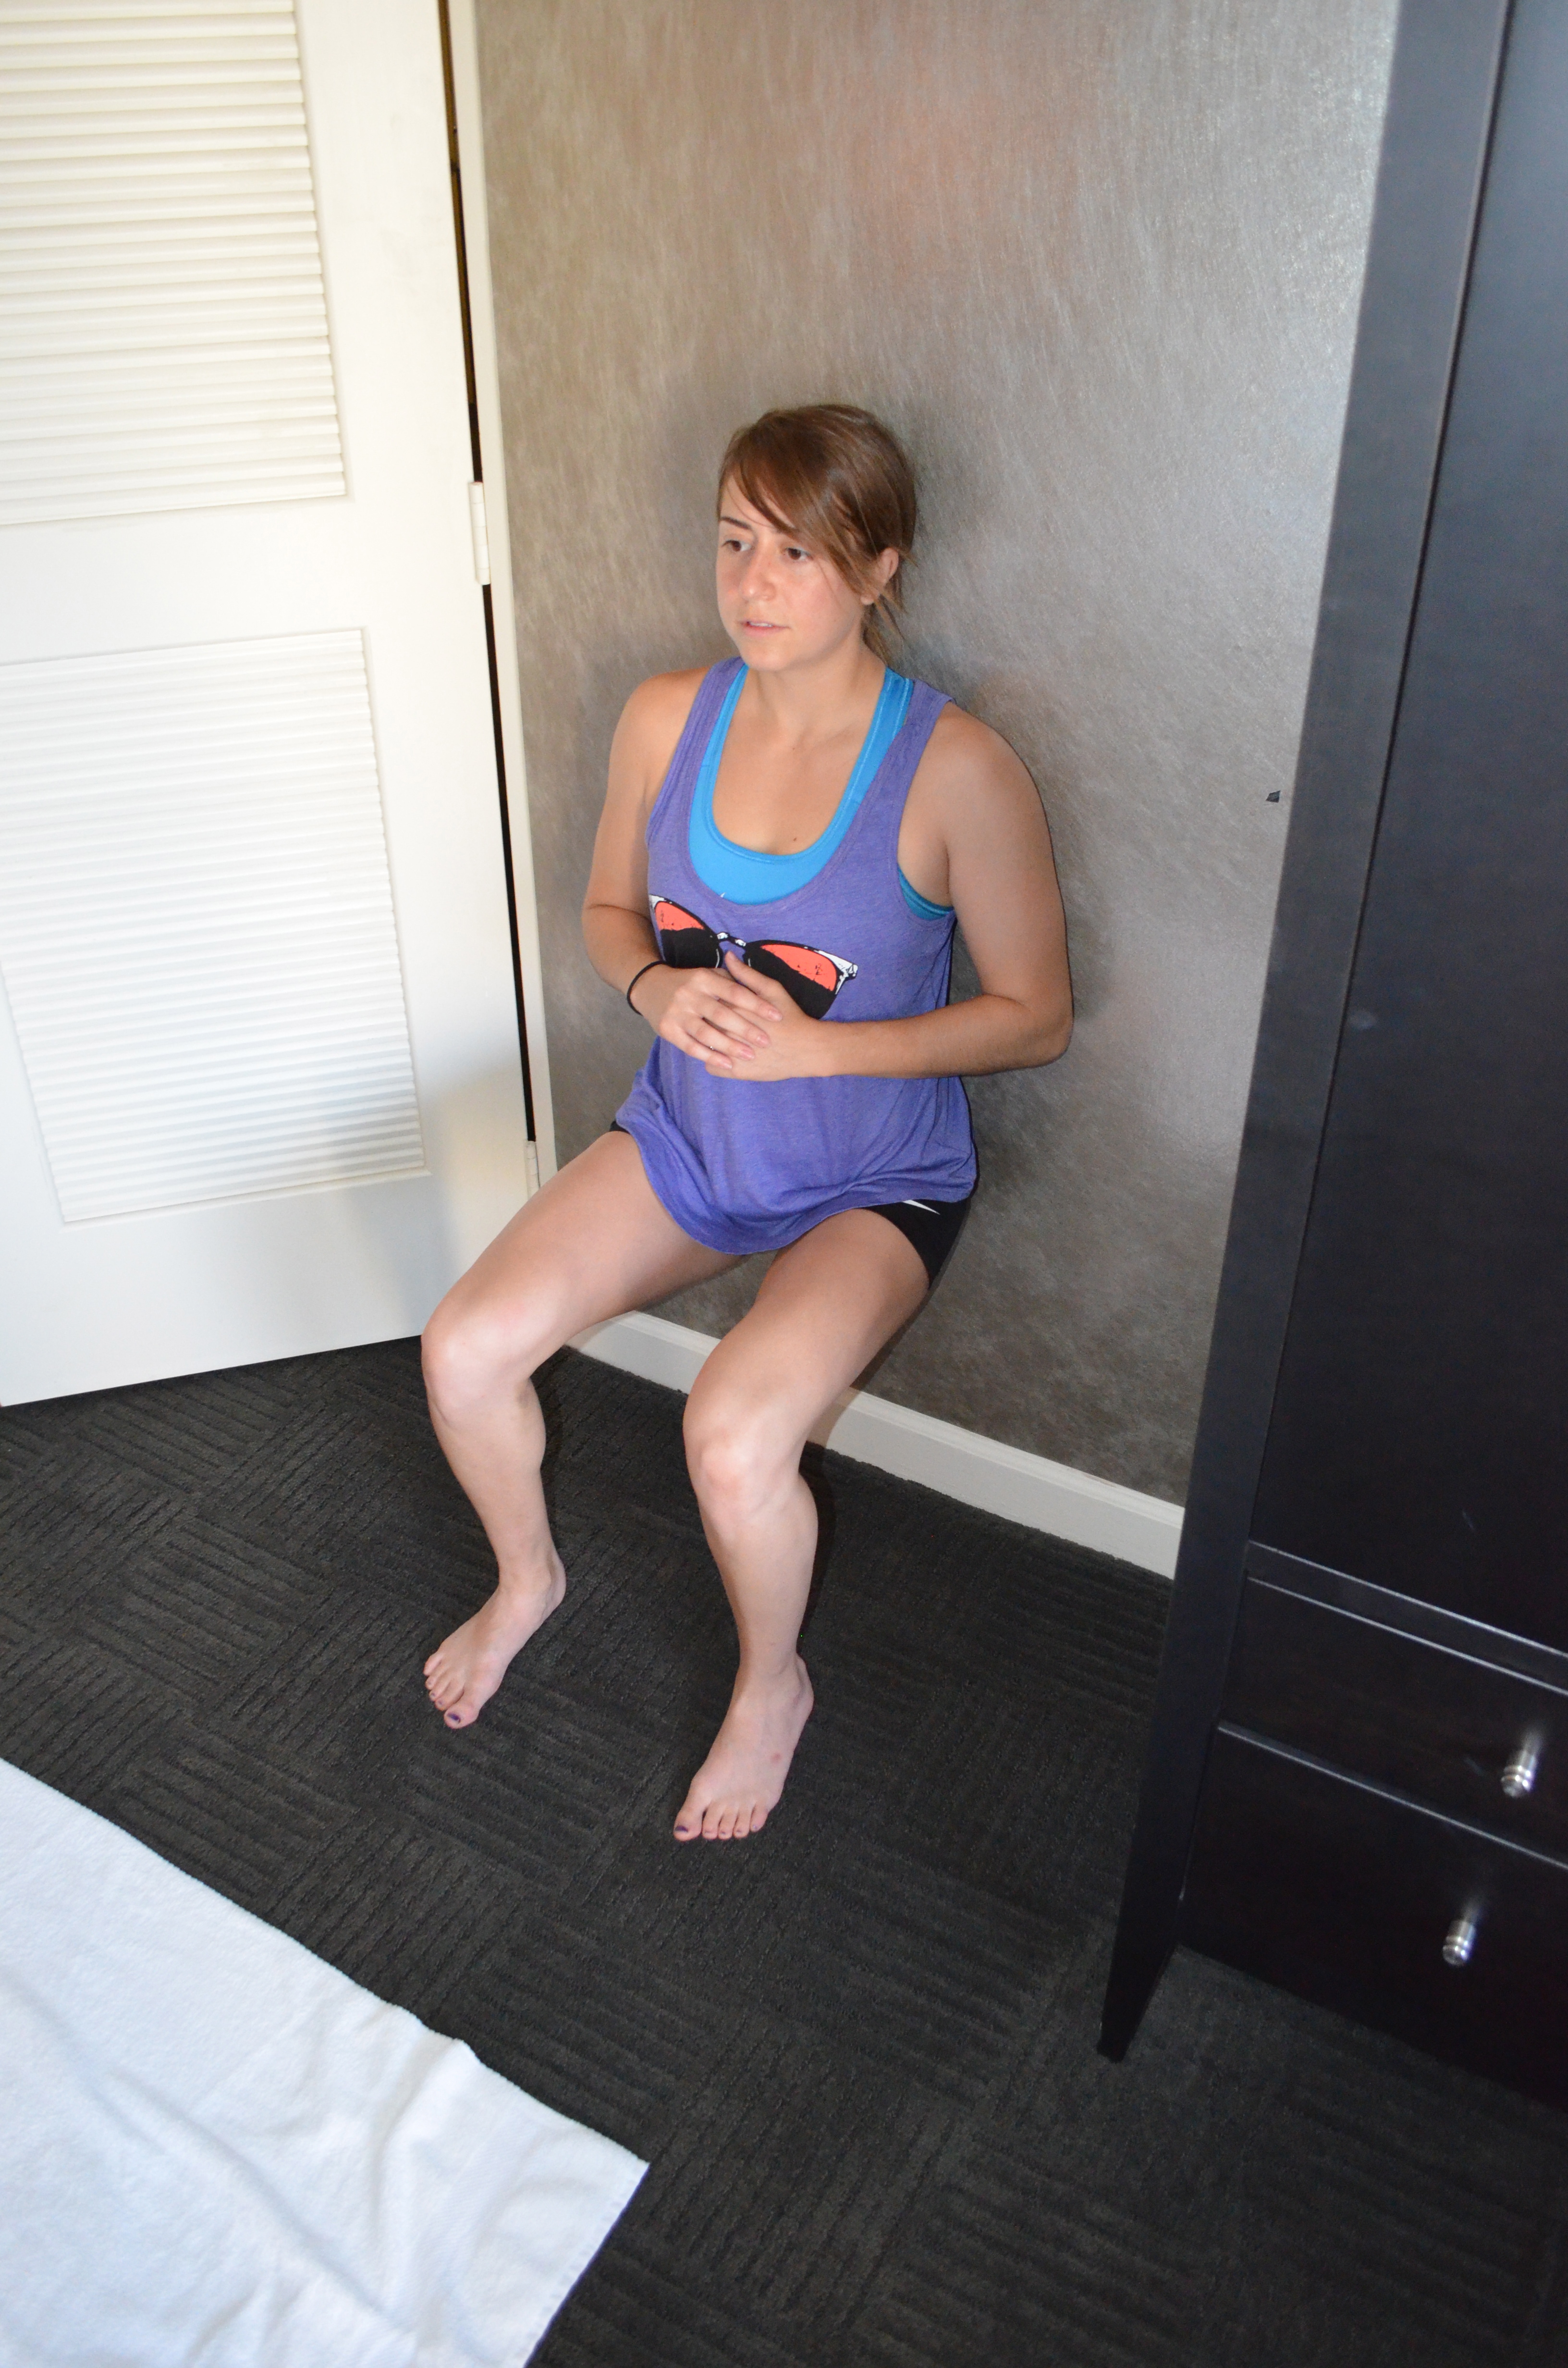
2. Wall Sit – This is a variation of the Squat Hold and equally as torturous. If you have trouble holding at 90 during the Squat Hold or if you lean forward, a wall sit will be the best option for you. Sink down to 90 and drive through your back into the wall. Sit up nice and tall. Hold for 30 seconds to 1 minute. If this doesn’t feel incredibly challenging, you can do a single leg wall sit. Raise one leg off the ground and hold it straight out in front of you (the straighter out in front of you that you hold the leg off the ground, the more you will work that quad as well). Try a 30 second to 1 minute hold on each side.
3. Squat Hold followed by reps – While bodyweight reps alone may not be challenging, bodyweight reps after a squat hold will be. Hold until your legs feel tired (30 seconds to 1 minute for most people). The longer you force yourself to hold before the reps, the harder the reps will be. Then do 10-20 reps after the hold and repeat. You can even advance this move further by doing a hold followed by reps of jump squats. (And to make this move extremely tiring, you can do a hold followed by basic reps followed by jump squats. OUCHIE!)
4. Slow Reps – Everyone always wants to go faster. No one ever wants to SLOW DOWN. And why is that? Because slow reps are AWFUL…aka REALLY HARD AND TORTUOUS! Try taking 5 seconds to lower down to the bottom of your squat before exploding back up to the top. Or try a 2-3 second lower, 5 second hold at the bottom and then a 2-3 second press back to the top. Mix it up. There are a ton of ways you can slow down the tempo. Just slow it down. Shoot you can even go quickly down, hold at the bottom for 5-10 seconds and then pop right back up!
5. Jump Squats – Just like slowing something down makes it harder, so does making something more powerful and explosive. With jump squats, it isn’t about performing a super deep rock bottom squat. You actually want just a little squat/hinge to load so that you can explode up. Squatting too deep can actually hinder your ability to be super explosive and jump high. So perform a more shallow squat and explode as high off the ground as possible. Beginners may need to rest between each rep. To make the move harder, jump up and sink right back into the squat to repeat. Really focus on a soft landing. You should never land with your legs completely locked out unless you want to hurt your knees. SOFT KNEES! Bend your knees to help you absorb the impact of landing.

6. 90 Degree Hops – A variation of the squat jump where you not only explode up, but also rotate 90 degrees to each side. With this move you can either focus on getting high off the ground OR on staying low and moving quickly. Both can really make the legs burn. I love this move because it isn’t just a simple sagittal plane squat! Just like the basic jump squat, you need to remember to focus on a soft landing.

7. Staggered Stance Squats (and or Jumps) – A great way to work each leg individually without doing a single leg movement, is the staggered stance squat. Place one foot in front and the other foot about hip-width to shoulder-width apart and a bit behind the front foot (the back toe should be about even with the instep of your front foot). Squat down as low as possible, keeping your weight in your front heel. Do not worry if the back heel comes up. Do not lean forward or let your back round. Complete all reps on one leg and then switch to a staggered stance on the other side. To make this move harder, you can do one of two things – you can do a staggered stance squat jump or you can do a slow tempo staggered stance squat.
8. Single Leg Squats to Bench – This is a progression toward a pistol squat and a great way to correct any imbalances because the legs work individually. I did it with my IKEA table, but you can use a chair or bench or well…a step stool. Anything that is the proper height that you can sit down to. The lower the “box,” the harder the move. Start by sitting on the bench. Place one foot solidly on the ground with your heel right under your knee. Lift the other leg off the ground. I like to hold it out straight to make the quad work. Stand up straight. Try not to lean forward as you stand. Sit back down, controlling your decent as much as possible. As with all squat variations, you can slow down the tempo to make this move harder!

9. Single Leg Squats Using a Wall – This is more challenging than the squat to bench unless you have a super low box and have great control over your decent. Stand in a doorway with your hands on the each side. Straighten one leg out. Sit back into your heel and walk your hands down the wall as you squat as low as possible. Once you go as low as possible, walk your hands back up and drive through the heel back up to standing. Try to pull up with your hands as little as possible. Use the wall for support only as much as needed. Do not rock onto your toe. Drive off the heel as much as possible. Really keep your core engaged as you perform the move. Do not worry about your back being completely straight.

10. Pistol Squats – Basically this is a single leg squat with no support! Go as low as possible, holding the other leg out straight. Drive up through the heel to come back to standing.
Bonus:
5 minutes of bodyweight squats – A great way to get in some cardio and work the legs using the BASIC BODYWEIGHT SQUAT is to set a timer and do as many reps as possible in the time allotted. I like five minutes. It is just long enough to be awful, but not so long that you need to take long rests. Work your way up to five minutes if you are a beginner!
What is your favorite squat variation without weight?
One Exercise For The Rest of Your Life
A while back I did a post about what I thought were the five foundational exercises for health.
I said, “Deadlift, Squat, Push Up, Pull Up and Sprints.”

An oldie but goodie photo…Ah deadlift….I love you…
I started thinking about this list after the wealth of new information I’ve learned over the last year since writing that post.
What would I change about that list now that I’ve experienced so much more and learned so many new exercises?
The crazy part is….
Nothing.
Those to me still hit everything.
Although the Turkish Get Up was a tempting one. Super functional. A great way to get total body strength. A great way to help older adults strengthen their core and create a stronger mind-body connection. A GREAT move. Probably the closest one to making the list. But would it make the list…No…It would be #6.
Same goes for the hip thruster or glute bridges. While the hip thruster is arguably the BEST glute exercise out there and glute bridges are great for glute activation, which is essential, they just wouldn’t make the list. They just aren’t as complete to me as the five moves I chose.
Honestly, deadlift, pull up, push up, squat and sprints hit EVERYTHING. Almost all the moves work the entire body. And they are functional. They are also movement patterns that I think everyone should be able to do.
I guess the only thing that made me hesitate about committing to the list above is the fact that all of them are sagittal plane movements and I really do believe it is important to move in every direction. I guess for that reason the only thing I might at some point do is switch out squats for lunges…but at this place and time, that just isn’t happening.
So if you every wanted to know what I think the five best foundational moves are:
Deadlift
Squat
Pull Ups
Push Ups
Sprints
Every workout progression should include some variation of these moves, if not these moves in their purest form.
Now the only other comment I would make about this list, is that BEGINNERS may have VARIATIONS of these moves to start. BUT the intent and purpose of those moves would be to get them to these five.
NOW….
Last night while we were doing a glute workout, I got asked, “If you could only do one move for the rest of your life, what would it be?
I didn’t even have to think…Actually it was easier than picking five moves…

I liked this picture and thought it really hit the basics of form.
Why do I think the deadlift is the queen/king of exercise moves?
Because it hits everything down the entire back side of your body, which honestly is generally highly underactive in a society that sits all day hunched over a computer.
It works a ton of big muscle groups. It strengthens areas that are weak on post people, their back, their core, their glutes…
And it is functional. Think about how many times a day you have to freaking pick things up off the ground.
People tell you, “You need to squat down to pick stuff up!”
But actually you DON’T need to squat down!
You need to DEADLIFT!
The deadlift is not a squat. Your chest does not stay back. You HINGE forward. And when you pick something up, you generally ned to lean forward to get it.
And on top of all that, DEADLIFTS ARE EMPOWERING.
I’m sorry, but there is nothing like picking something super heavy off the ground to make you feel strong and confident.
For me conquering any other task, even the 300ft on the Versa Climber which made me want to throw up 12 hours later and made me want to cry for my mommy, didn’t feel near as empowering. It didn’t make me feel near as strong. (Actually it just made me feel sick and like I never wanted to step on the Versa Climber again….)
To me deadlift is queen…or king….end of story. I could list a bazillion more reasons, but those should give you the gist of why I think that.
So my question to you is, “What do you think are the five foundational exercises?” And if you could only pick one, “What do you consider to be the best of the best?”
There are no right or wrong answers. Every list has great points and every list has flaws. I even showed you what I thought were a couple of the flaws in mine. (The great part/bad part about fitness is that there really are no right and wrong answers…Ok…maybe there are a few wrong answers…But those are generally when people do stupid things with bad form….)
Anyway, looking forward to reading some other lists! Hope you share yours!
Diet Essentials – 15 Staple Foods
I get asked a lot about what my grocery list includes – about what I have in my fridge and kitchen cabinets.
If you were to look in our fridge and cabinets, you would see basically the same thing every time.
As I mentioned before, I am a creature of habit. And part of habit is having the same basic foods around every week.
Here are the 15 groceries I make sure I have around the house every single week. (Note some are seasonal…Berries I have around the house during the summer but not once they go out of season.)
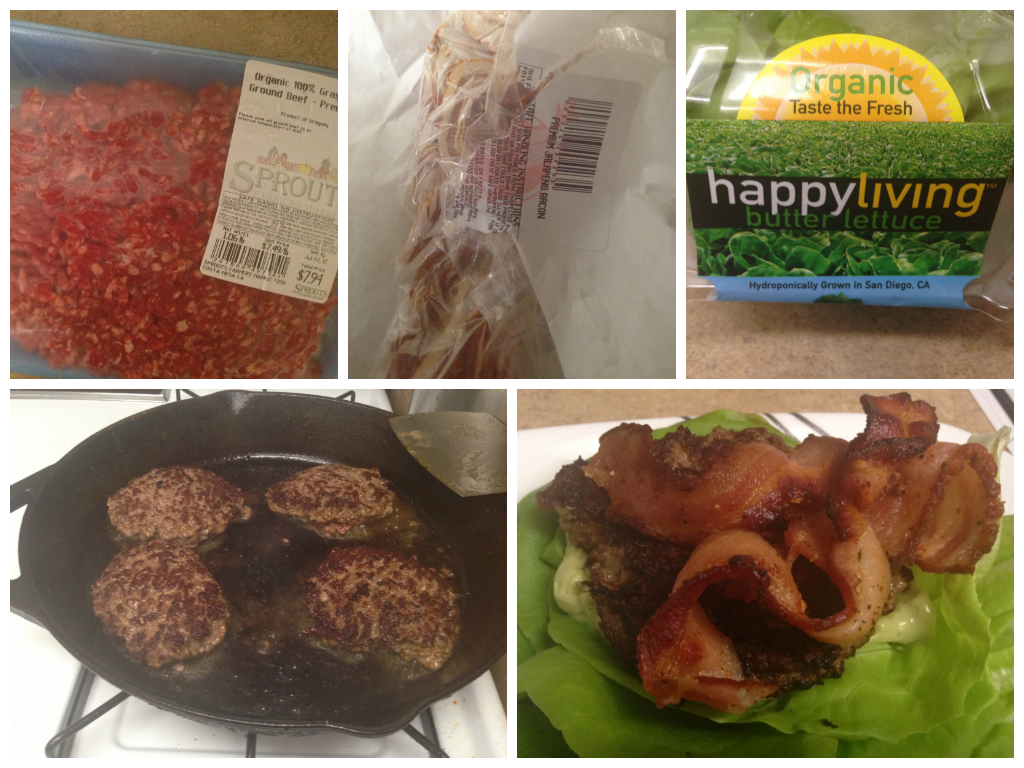
1. Grass-fed Beef – We always have grass-fed ground beef around the house. Occasionally we will have some sort of steak as well, but we ALWAYS have ground beef. Bunless burgers, chili, meatballs, meatza pie (meat pizza), stir fry….you can make a ton of different things EASILY. So if we ever need a last-minute meal, ground beef is the go-to. It can easily be cooked in a skillet OR thrown in a crockpot and just left to simmer and cook (this is where the tomatoes come in handy for a quick and easy chili). Plus grass-fed, naturally raised beef is leaner than conventionally raised beef (unless you get the like 90/10) and has a much better omega ratio. HEALTHY FAT! And it freaking just tastes SO GOOD! (Sorry vegetarians and vegans reading this…BUT IT DOES!)
2. Cage-free Eggs – Eggs have been considered healthy than unhealthy than healthy again all because of the cholesterol they contain, but EGGS ARE GOOD FOR YOU! Especially eggs from free-range, naturally raised chickens which have way more good fats than conventional raised chicken eggs (the proof is in the color of the yolk!). Eggs are such a versatile protein. They can be eaten for any meal of the day and can easily be made ahead for the week and then transported anywhere for a snack anytime. Hardboiled eggs, egg muffins, omelets, protein pancakes, healthy deviled eggs…and that is only just a bit of what you can use them for! You could even put them in your coffee….Hmm….
3. Free-Range Chicken – On high carb days we use the lean white meat to stay under 50 grams of fat for the day while on low carb days we eat all that delicious dark meat and skin. Sometimes we buy pieces of chicken, legs and thighs and then breasts separately OR sometimes we get the whole chicken, slather it in pasture-raised butter and bake it in the oven and then have our protein source already cooked for numerous days. (You can even throw it in the crock pot and just let it simmer away no matter what pieces of chicken you buy) While chicken doesn’t have as good an omega ratio as the grass-fed beef by itself, it can easily be made even better by cooking it in a healthy fat like coconut oil or pasture butter. Plus it is really perfect for those carb days – my favorite use of it is in my homemade chicken fried rice! (Eggs can also be a great way to thicken sauces so that you don’t have to use any fake or processed crap to hold things together.)
4. Avocados – A great source of healthy fat to improve your omega ratio AND SUPER YUMMY AND DELICIOUS. I could seriously just eat avocados by the spoonful….oh wait…I actually do that…So creamy and delicious. Often people think that eating healthy means eating bland food with no sauce or toppings. But slice a few strips onto your burger or mash into a guacamole to put on your chili or salad…YUM! I never miss dressing when I top salads with avocados or guacamole. Avocados can also be added to other condiments to make sauces and dressings creamier without having to use bad processed things…like miracle whip…..While we can easily get avocados all year around here, this will be one of those seasonal things in many places (and we do tend to eat more during the summer when we can get really great ones at the farmer’s market). The more you can eat locally and/or seasonally, the better off you are going to be.
5. Berries – Another seasonal food, but super delicious. When I want fruit, berries (strawberries, blueberries, raspberries…even cherries) are my go-to. They are lower in carbs and antioxidant filled. Plus…THEY ARE JUST SO GOOD! You can eat them plain for a low-calorie snack or you can blend them into a smoothie, which is super refreshing after a workout on a super hot day. They are also delicious frozen. A nice little cold treat to satisfy those frozen yogurt cravings. You can even take it a step further and mash the slightly frozen berries up with a bit of coconut milk (or cream) and some dark chocolate chunks if you really want frozen yogurt…Delicious and addicting!

6. Coconut Oil – Good for sauces, cooking, dressings, skin care….Why wouldn’t you have it around? While we don’t need to buy it every week (since one jar can last awhile) it is most definitely a staple. It can easily be added to smoothies and even protein pancakes for a source of healthy fats (and to keep you feeling fuller for longer since that is what fats do).
7. Raw, Pasture, Grass-fed Dairy – Raw Milk, pasture-raised cream, pasture-raised butter, even some raw milk cheese can be found in our fridge. While we don’t tend to keep a ton of cheese around, we do have a bit to occasionally sprinkle on top of things. A little blue cheese on a burger or a little cheese melting in your chili just makes everything taste that much better. However, don’t go overboard with the cheese. And your cheese should never come in a bag or be shredded. It should also be as minimally processed as possible. Just as all of your dairy should be. The pasture-raised butter we get, we use daily to cook in. It holds up well in the heat and helps create a great omega 3-6 ratio in any meal that we cook. Just make sure your butter is truly healthy. Just found out the Kerrygold has some processed crap in it! The cream, Ryan uses in his coffee each day…yuck…coffee…While I more often eat it in dressings and sauces. The raw milk, we drink straight or add to protein shakes. So rich and creamy with a ton of health benefits NOT found in pasteurized milk. (Most people also don’t realize there really isn’t that much more fat in whole milk than in skim. Don’t get me wrong, there is more fat. Just not as much as you would think. Especially not enough in my opinion to consume something MORE processed.) I have no problems with dairy and really enjoy it. But it should still be used in moderation. While we have it around every week, it isn’t something we go overboard with. It is more used as a sprinkling to make every meal taste delicious.
8. Leafy Green Vegetables (Spinach, Broccoli, Spring Mix, Romaine, Arugula) – We most often have some sort of organic lettuce mix around so that we can make side salads to go with our meals because if I’m not eating a side salad, I’m probably forcing Ryan to eat cauliflower since I LOVE IT! Leafy greens are a necessity though in any form that you choose. Really meat and vegetables make up the base of almost every meal for us especially on low carb days. Leafy green vegetables are a great source of nutrients AND they make you feel full and satisfied after eating. And if you are like me and need a certain amount of “content” on the plate to feel like you’ve eaten enough, getting to cover your plate in vegetables is very satisfying.
9. Cauliflower – Did I mention before that I LOVE cauliflower? And now I’m pretty sure Ryan does too! Since we’ve found a great place to get cauliflower at the farmer’s market, we’ve been getting a couple of heads every single week. You can eat it raw or steamed or baked or as “rice” or “mash!” We’ve riced it and put it in chilis. We’ve also been super into making it into a mash and eating it along with our protein. Seriously LOVE the cauliflower mash. You can add cream or butter or a little cheese even. The other day, Ryan threw in garlic chives we found at the farmer’s market, a couple of farm-fresh eggs and CHICKEN LIVER! We got a whole chicken straight from the farm and it had the innards in it still so Ryan decided to throw the liver into the mash since liver is so good for you (and I really really don’t like the taste). In the mash you couldn’t even taste it yet it added some great nutritional benefit to the meal! You of course don’t have to get that crazy with your mashes, but you can get a ton of nutrients into your meal by mixing them in. Cauliflower is also super low-calorie, which I love because that means I can eat like a whole head of it myself…Just kidding…sort of…
10. Tomato Sauce – Tomatoes are great for you in any form as long as a ton of crap hasn’t been added to them. We generally get an organic sauce with no additives in a BPA free can, which is great to pull out when we want to make a last-minute chili or sauce. And the best part about using tomatoes in a sauce is that more lycopene is actually released as the tomatoes are cooked! As I said though, we always have this around just so we can make that quick healthy meal. I do also love fresh little cherry tomatoes though with a little bit of green onion, garlic and olive oil as a nice little summer salad (Sometimes I add in cauliflower too!).
11. White Rice – Our carb day staple. Replenish your glycogen stores quickly and efficiently. Plus white rice is just so tasty! No it isn’t nutrient dense, but that is what the veggies, fruits and meats are for! And while it isn’t nutrient dense, it doesn’t have the phytic acid that brown rice does. This article basically sums up why I choose white rice over brown rice aside from the fact that I enjoy it more and that the whole purpose of the carb refeed is to get your muscles glycogen FAST. So while this isn’t a daily indulgence, it is consumed 2-3 times per week on refeed days. Remember, if you are looking to cut that last little bit of fat, you may need to ADD IN carbs on some days not cut out more stuff. Cutting out foods isn’t always the answer!
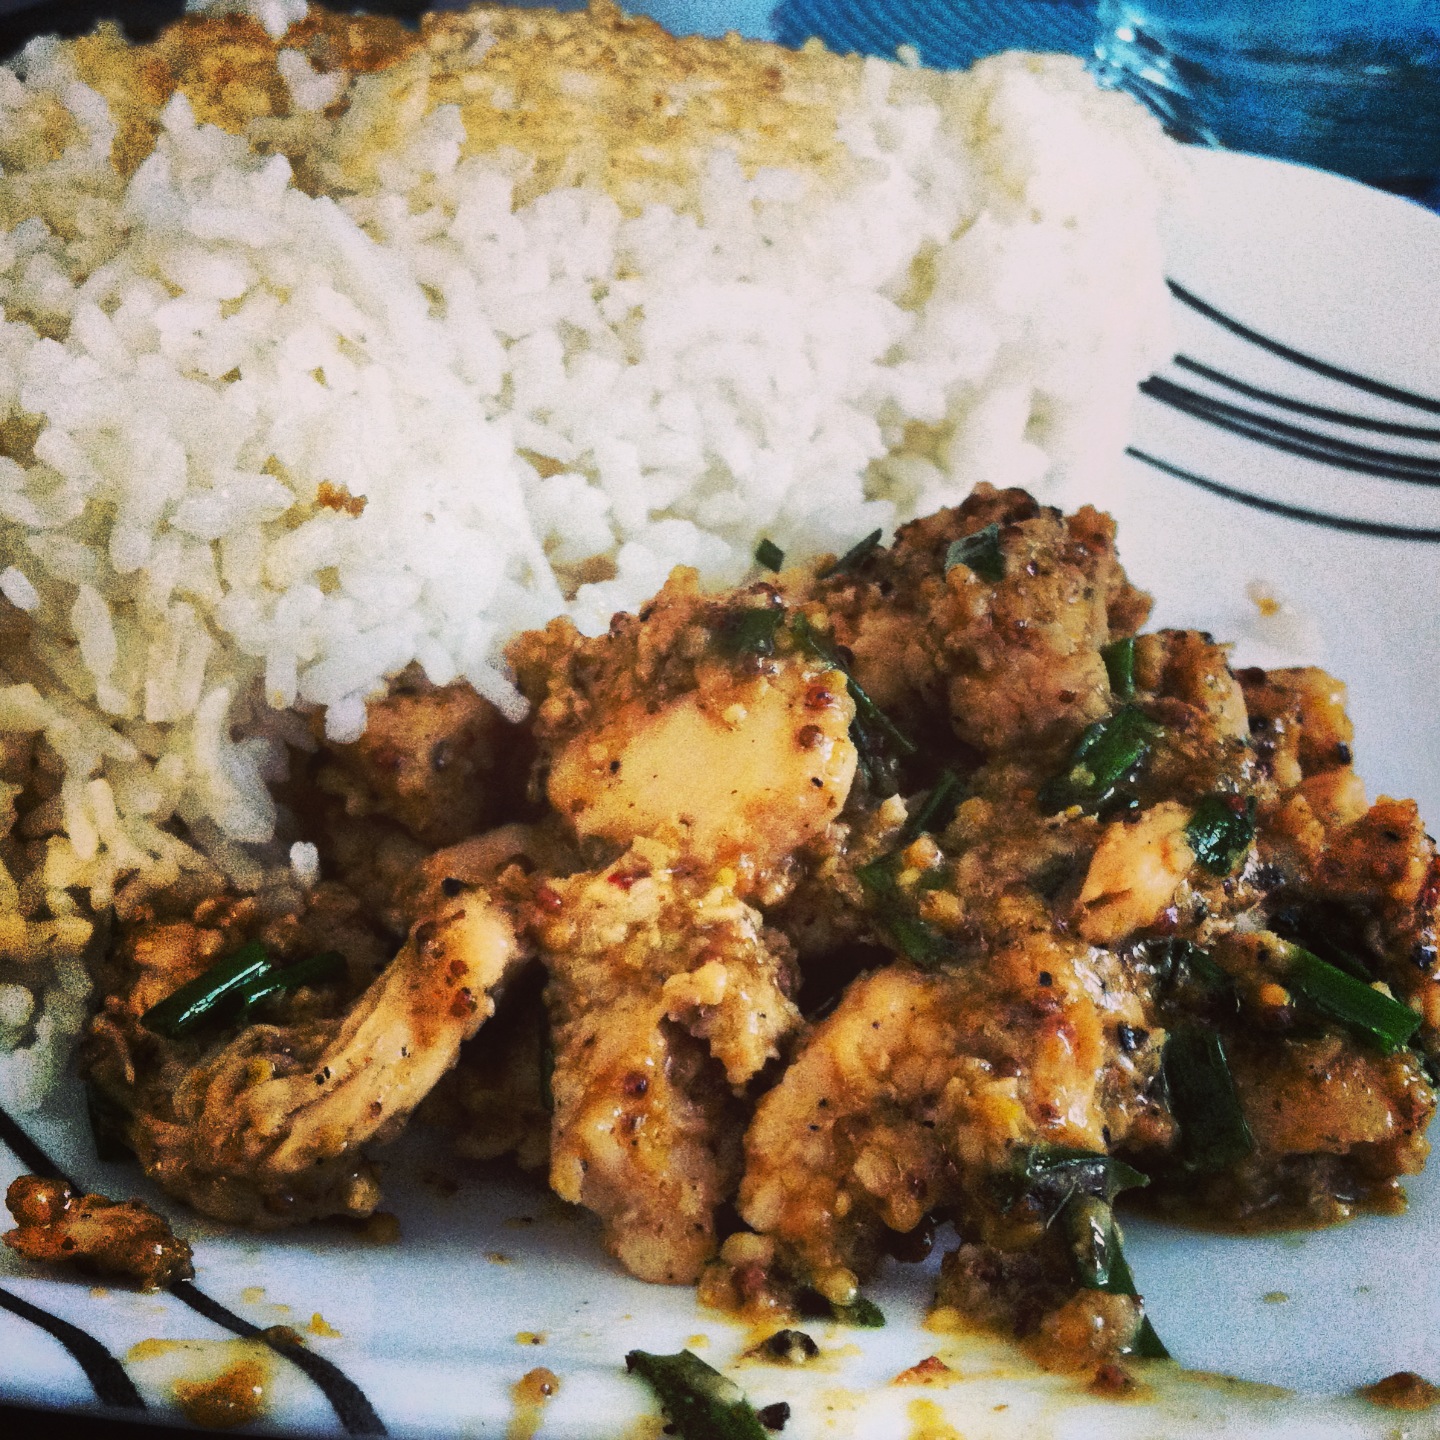
Mustard chicken breast and white rice. YUM!
12. Balsamic and Olive Oil – We don’t often cook with olive oil, but both olive oil and balsamic vinegar are condiments you always need to have around. They are the quickest and easiest way to make simple and healthy sauces and dressings. Get good ones too. Get a nice thick balsamic and a California Olive Oil.
13. Salsa – You must be careful when picking out salsas. You don’t want to get one with a ton of extra crap in it (you can also make your own salsas if you feel so inclined!). But all-natural salsas can be a great way to add flavor to any meal without adding a ton of calories (most salsas are very low-calorie). I also love to use them on salads since I don’t like dry lettuce. Plus, if the salsa really is all natural, it will add more than just flavor to your meal since many have vegetables, or even fruits, in them!
14. Whey – I’ve wavered on whether or not this one is a staple food, but I’ve come to the conclusion that it is in our busy and sometimes hectic lives. While it shouldn’t be used every day as a meal replacement, it can be a quick and easy protein source to keep you on track if you don’t have time to make a meal or prepare a snack. It is much better than eating cookies or any other crap we give ourselves permission to eat when we get super hungry and there isn’t a super easy and quick healthy option around. Whey at least has nutritional benefit AND can be combined with other ingredients in protein pancakes or smoothies to make it even better for us. A good thing to have around especially if you are always on the go and not the best about cooking. It can be a quick replacement. Just make sure you get one that has as little extra stuff in it as possible.

15. Wild Caught Seafood – We have some form of seafood basically every week. While we are better about this in the “warmer” months when we go to the farmer’s market every week, we do try to eat seafood at least once a week. We shy away from larger fish and anything farm-raised. We eat shrimp and salmon most often. Fish is a great source of healthy fats. And depending on the fish you get, it can be a super low-calorie protein source. Plus when fish is fresh, it just tastes so good! And it can be super quick to cook so is great for a last-minute meal. It can also be cooked the night before and then thrown on a salad or into an omelet the next day!
BONUS: On occasion foods….These are foods we will have around and use maybe once a week at most. They are also foods we can go awhile without replacing.
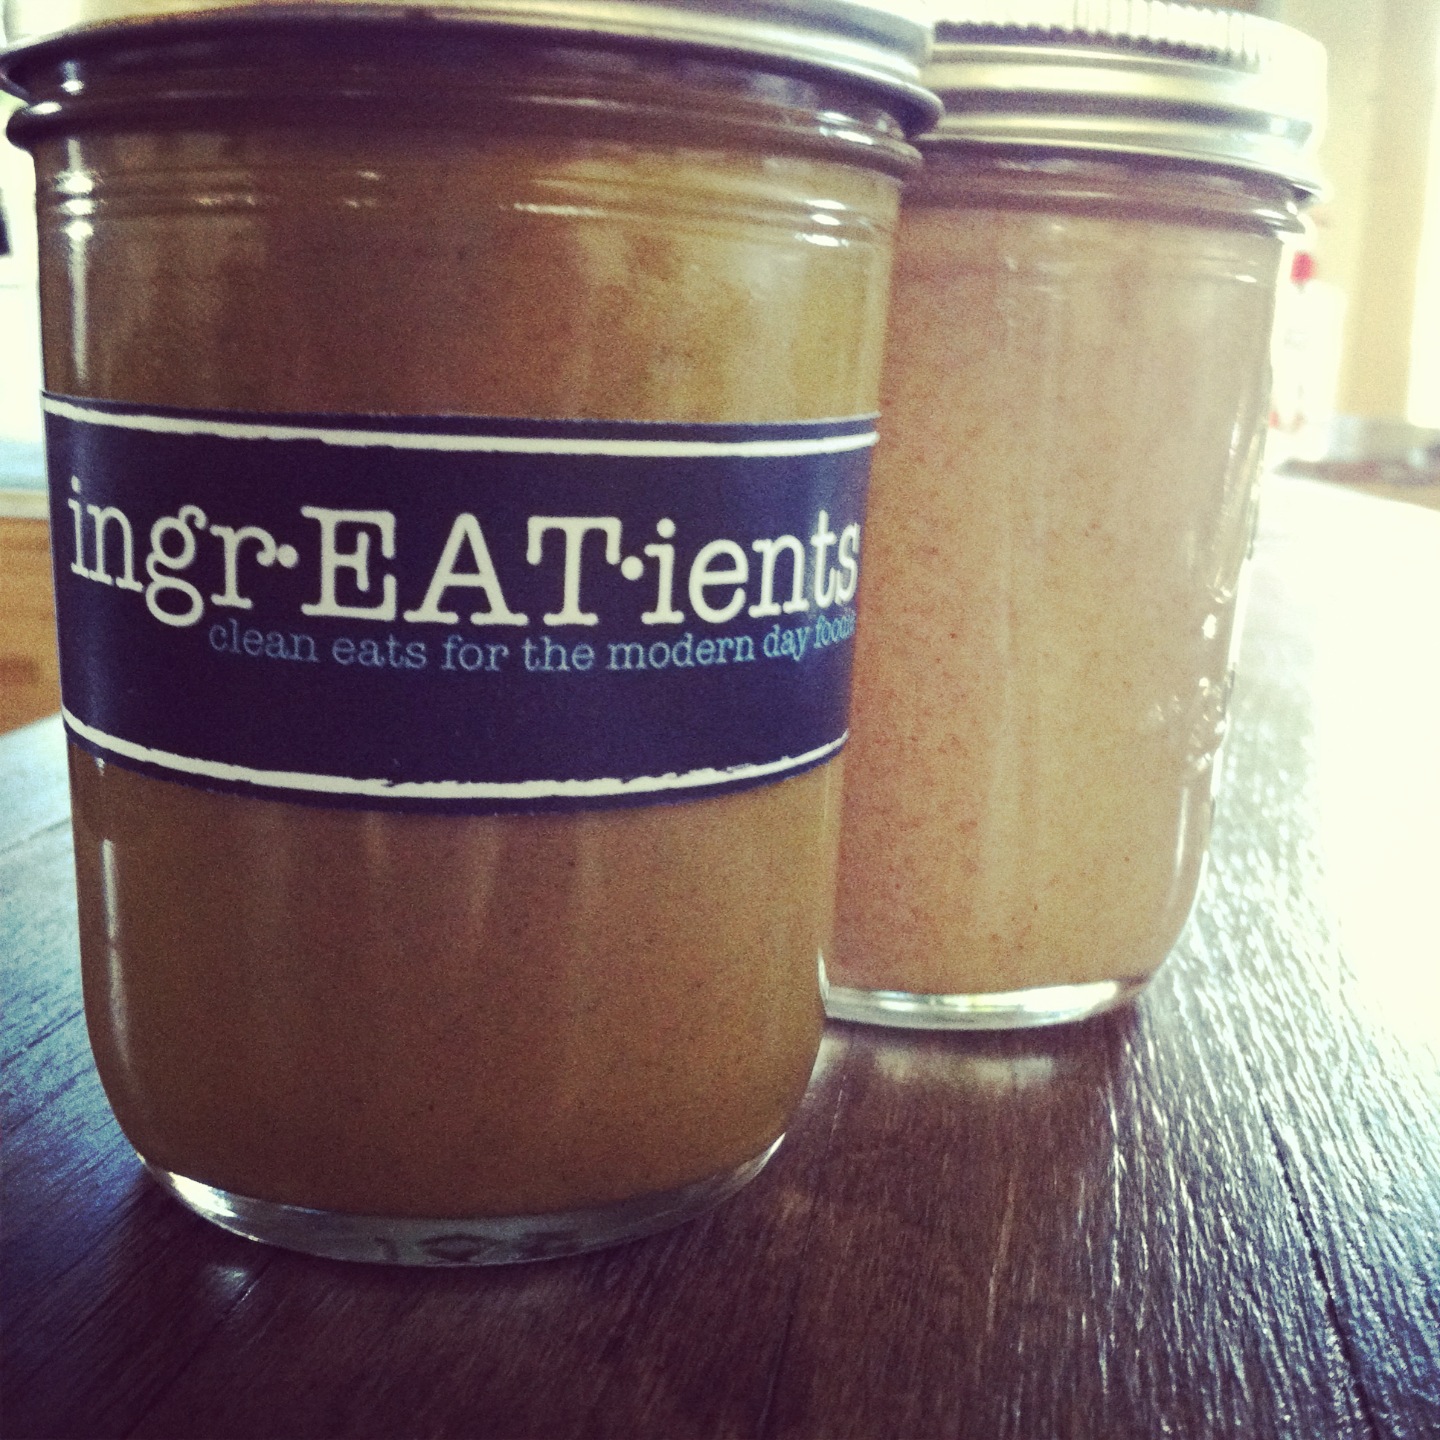
Nut butters – I love nuts. But they have phytic acid and I have problems consuming them in moderation. We don’t usually keep whole nuts around unless they are macadamia nuts but we do generally have a nut butter or two around. I will put them in protein pancakes or occasionally on fruit. They are a nice little treat, but should be eaten in moderation!
Bacon – I love bacon. LOVE IT! But we’ve gotten away from eating it often just because it is hard to find truly good bacon. We do have it around though on occasion and then use a piece or two to top burgers. We also use the grease to cook in. So if we’ve made bacon for burgers, we usually cook the burgers in the bacon grease right after. Waste not!
We also have a TON of spices. Spices are really key to making great tasting meals. Healthy food doesn’t have to be bland. You just need to learn how to spice it! Here are the grinders and spices we always have around – Garlic Salt grinder, Pepper combination grinder, Paprika, Chili Powder, Cumin, Oregano, Dill, Cayenne Pepper, Basil, Salt, Pepper, Garlic Powder, Cinnamon, Nutmeg. Just make sure you get ones that don’t have additives!
So that is what we have in the kitchen. What are your Diet Staples?
Can I also just ask a question…Why does everyone love almond milk and think it is so healthy? For one, almonds have phytic acid, which prevents your body from absorbing minerals especially if you eat a ton of them. And two, almonds don’t have milk so processing has to go on for you to have almond MILK.
Give Yourself a Break
We are not perfect.
No matter how much we may strive to be, we simply aren’t.
And that isn’t a bad thing…even though we often treat ourselves like failures when we don’t live up to our own expectations.
The bad thing is when we hold ourselves back for longer than the failure itself does because we keep berating ourselves and preventing ourselves from moving on.
I say all this as a person who can be very very tough on herself when she doesn’t accomplish things exactly how and when she planned to.
I say this as a person who is incredibly demanding of herself and can bring herself to tears because she beats herself up over a “failure.”
I also say this as a person who is working to correct this and learn how to “give herself a break.”
Because mistakes AREN’T failures unless we don’t learn from them. And the harder a time we give ourselves about our mistake, the longer we stay in that failure mentality and hold ourselves back from moving forward.
Random (but not so random)…Have any of you read “Oh The Places You’ll Go?” (If you haven’t I suggest you do as it probably is one of the best “life lesson” books out there.
Here is just a little excerpt:
I’m sorry to say so
but, sadly, it’s true
and Hang-ups
can happen to you.You can get all hung up
in a prickle-ly perch.
And your gang will fly on.
You’ll be left in a Lurch.You’ll come down from the Lurch
with an unpleasant bump.
And the chances are, then,
that you’ll be in a Slump.And when you’re in a Slump,
you’re not in for much fun.
Un-slumping yourself
is not easily done.
It’s all right there in that children’s book – Shit happens. Mistakes happen. “Failures” happen.
But the worst part isn’t that failure, but the “slump” you are in after it.
Because generally that slump is what TRULY holds you back.
And as the book says, “Un-slumping yourself is not easily done.”
Why is it not easily done?
BECAUSE WE EXPECT PERFECTION! Even though we know it isn’t possible.
So today stop stressing over little mistakes, little slip ups, little failures.
Take a deep breath and release all the tension all the anger.
Let the mistake go and get out of the funk. Don’t let a slump hold you back for longer than is necessary!
Learn from your mistake and move on!
On a side note….
Here are a couple of fun workout memes to hopefully make you smile and a couple of cool links to check out! (Plus a whole WARM UP GUIDE I just created with pictures!)

The toilet seems so low after leg day!

I love the minions
haha
Dedication vs. Motivation – by Colin at Uber Beast Mode
Liar, Liar, Legs on Fire: Deception and Other Mind Games to Help You Keep Running When You Feel Like You Can’t Go Another Step – by Charlotte at The Great Fitness Experiment (Thought this was interesting after reading some of Jen’s recent posts at Wine to Weightlifting…and after having to run lots of long distances…. BLEH)
Thoughts on Rest Days – by Abby at Back at Square Zero. Rest days are important but aren’t always easy to take. Interesting little discussion on them…
Taking another whack at the Olympic distance triathlon – by Caitlin at Fit and Feminist. Liked this a lot….So much of what we do is out of pride and to prove something to ourselves. It isn’t about whether or not anyone else knows but about showing ourselves we can do it! It is about working hard because WE will know if we slack off.
AND a few of my own in case you missed them:
Fixes for two common running injuries – Shin Splints and Plantar Fasciitis
(Included these last two because they are legitimately two of my all-time favorite moves and ones I think everyone should be able to do)
And finally….My new post about how to warm up…. 15 Simple Dynamic Moves for a Full-Body Warm Up
A Rant About Runners – Proper Running Form

Saw this on Fit and Feminist’s post about loving your running pictures, which you should all check out.
Recently I’ve had to do way more running than I would ever have liked to have done in my lifetime.
I don’t regret a second of it though because I’m running with Jodie and she is one strong and amazing woman. (And her half marathon is August 18th! GO JODIE!)
HOWEVER, I have noticed one thing…Everyone thinks they can run.
And honestly….
MOST PEOPLE HAVE THE WORST RUNNING FORM EVER!
People who have never worked out before in their life often turn to running as their first exercise option.
But what people don’t realize is that RUNNING ISN’T EASY!
Yes, running SHOULD BE a natural movement pattern.
But it isn’t for most adults anymore because we sit hunched over a computer screen for 8 hours a day.
And that sitting over the computer causes postural distortions that then hinder us from properly executing movements that should be natural…aka RUNNING.
I don’t know if Jodie has ever noticed this when we are running, but occasionally I will have like sensory overload where there are just too many runners with incorrect form ahead of us and I have to pass them or I will go insane. I speed up and run around even if I had to step off the path because I just can’t handle it.
And when I say all of this, I’m not trying to be mean or judgmental. I think it is great that people are getting out and being active and doing SOMETHING.
I’m just trying to get across the point that there is proper FORM to running and that if you don’t have decent form you are probably going to get injured.
And injury hinders us from really reaping the benefits of a healthy lifestyle, which are to FEEL BETTER and MOVE BETTER.
So what is proper running form? (And note here I’m talking about longer distance running and not sprinting although many of these things apply to both.)
Well I can tell you it isn’t the knock-kneed running you see so often occurring on the trails. Boy does that annoy me.
And many of those people wonder why they have knee, hip or low back pain!
AH!
Anyway, proper running form and common problems….
First off, your upper body should be RELAXED.
Your head shouldn’t be flexed or extended, but should be in line with your spine. This means your eyes should be focused slightly ahead and/or slightly downcast.
Your shoulders shouldn’t be up by your ears. I call this the “turtle” position. No hiding your head in your shell! You don’t want to hold tension anywhere that isn’t necessary. Your shoulders being elevated may have to do with sitting at the desk all day and tension in your upper traps. Try a scapular hold to help you activate your lower traps and roll out your upper traps to alleviate this problem.
Your shoulders may also be elevated because you are forcing too much arm movement. Your arms should be relaxed and swing loosely. If you even notice many long distance runners don’t have much arm movement at all. Their upper bodies are simply relaxed. (This doesn’t mean your arms should just hang by your sides. Your elbows should be bent to about 90.)
Your hands and wrists should be neutral. No weird flexion or extension. AND you shouldn’t be holding your hands in a death grip. RELAX!
You also need to be conscious of how much you rotate. Too much rotation is bad. While running does work your abs, you shouldn’t be doing russian twists while you are running. If your hands are crossing the midline of your body then you are rotating too much. (This could mean you have a little lack of coordination or poor hip flexion aka the movement when you bring your knee to your chest.)
Also, do not have excessive lean or rounding forward. While sprinters will lean forward during the acceleration phase, once they hit maximal speed (or when you are jogging) you should be near perpendicular to the ground.
Now your lower body…
Your low back shouldn’t be arched and you should not waddle (aka have excessive hip sway from side to side)! This means weak core and glute muscles as well as tight hip flexors that need to be taken care of before you just pound away the miles. (If you have lots of rotation this can also mean your hamstrings and adductors are tight as well.)
I’ve also noticed that there are a number of people with a slight hip hike when they run (one hip is higher than the other). This means different problems are occurring on each half of our body, which guess what? LEADS TO INJURY! Roll out your entire hip complex if this is occurring and search for tight spots on each side. You are also going to need to work on adductor and glute medius (your side butt) strength on the side opposite the hip tilt up.
You should also have a good range of motion around your hip and be able to produce force with each ground push off. I see it all the time…Runners bobbing up and down. Don’t waste your energy going up and down! PUSH FORWARD. While you shouldn’t consciously have to think about going forward, each time you push off you should propel forward NOT UP. If you don’t move forward fluidly but do bob up and down, you need to work on your ankle mobility, hip flexibility and posterior chain strength (aka glute, hamstring…whole back of your body….).
Your knees…THEY SHOULDN’T COLLAPSE IN! I see this so often when I’m out running with Jodie. If your knees collapse in, you need to work on your ankle mobility….great thing I have all a lot of the info you need RIGHT HERE. You also need to roll out your inner thighs, hamstrings and strengthen the outside of your leg and glutes. Some single leg balancing would also be a great way to help correct this problem. Also, just a slight side note…But if your IT Bands are always tight and hurt, you may want to have someone see if your knees are collapsing in!
Your feet may also be part of the problem. Take a look at your shoes. Do you run on the inside of your foot or the outside. Many people I’ve seen run on the inside, which makes sense since many of those same people run with their knees collapsing in. All of it is connected and can lead to shin splints, knee problems, plantar fasciitis and even low back pain! If you run on the inside of your feet roll out your lower leg and not just your calf. You will actually want to do a number of the exercises I outline in a post about how to get rid of shin splints and plantar fasciitis!
If your feet turn out that is also a problem to address. It can mean spots in your calves and hamstrings are tight while your glutes and even muscles in your hips are weak.
And last but not least…Don’t overstride. Don’t try to reach with the leg. Let the legs SWING. It all goes back to relaxing and being mobile, which is hard when you sit for 8 hours a day!
Sorry if this is a bit more technical than the usual post, but I want people to start thinking about how they run since so many people turn to running as their exercise of choice.
The whole point of working out is to feel better, to move better. To feel stronger and fitter.
And honestly, bad movement patterns do the exact opposite even if you don’t feel the negative effects yet.
This doesn’t mean you have to give up running.
It just means you should do some strengthening and mobility work so that you can do the thing you love without injury. And you may find you even do it better if you do some of the mobility and strengthening required to have proper running form!
NOTE: I did not discuss heel strike. Interesting read about foot strike.


