Challenge Yourself With VOLUME
There are so many ways to challenge yourself with your workouts.
But all too often people only focus on lifting more weight.
You can do longer or shorter workouts. You can change up the intensity. You can change up the exercises and the equipment you use. You can vary your rest. You can change up your repetition tempo.
You can also vary the VOLUME that you do.
And by “volume,” I mean changing up the number of reps and sets you do during your workout. HOWEVER, increasing your workout volume doesn’t have to mean longer workouts.
It does, however, mean you won’t be able to lift the heaviest weight you’ve ever used.
That being said though, you do want to use a challenging weight that won’t cause you to go to failure, but will create muscle shake-age (that is my very technical term for feeling your muscles start to fatigue as you lift).
You want to challenge yourself while allowing yourself to move from one exercise to the next with little to no rest between.
And even though you aren’t going to failure or using the heaviest weight you can handle, the sheer volume of work you are doing will create muscle gains.
Using heavy weights and low reps isn’t the only way to develop strength and gain lean muscle mass!
Higher volume with slighter lighter weights can also cause great gains.
For example, the forced reps variations I discussed a few months ago can be a great way to increase your workout volume, challenge yourself and help you progress toward your fitness goals WITHOUT just focusing on always lifting heavier weights or doing lower rep counts.
Another great way to increase your workout volume is by doing density sets. One of my favorite ways to do density sets is by setting a timer and then trying to do as many rounds of two or three exercises in that allotted time as possible.
During these sets, you will use a lighter weight and stop before reaching failure so that you never really need to rest more than 30 seconds at any time.
These density set workouts can also be a great way to get in a little extra “cardio” and can be a great way to give your body a break from the low rep, heavy lifting while still helping you to move forward! And if you’ve plateaued with your low rep, heavy lifting workouts, a high volume workout may be just what you need to get over your plateau.
(Shoot, I also love these workouts because I can get in a high volume of work done WITHOUT having to do 20 reps at one time…Since for some reason my brain, in general, hates counting up to 20….)
Below is a sample high volume workout to get you going this week!
Glute Density Set Workout
WARM UP
Stretch and Roll Out:
Calves
Hamstrings
Quads
Hips/Glutes
Groin
Back
WORKOUT
Set a timer for 15 minutes for each circuit. Perform as many rounds of each circuit as you can in that 15 minutes. Rest 2-3 minutes between circuits. Try to rest no more than 30 seconds at one time during each circuit if you rest even that long.
Mark down how many rounds of each circuit you get in 15 minutes so next time you have something to compete against and show progress!
CIRCUIT #1:
15 minute timer
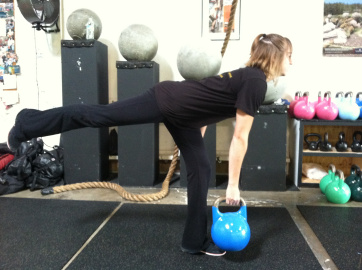
8-12 reps each side Single Leg Deadlift
10-25 reps Reverse Hypers
Rest 2-3 minutes
CIRCUIT #2:
15 minute timer
5-10 reps each side Backward Rotational Lunge to Front Lunge Across
8-12 reps each side Single Leg Glute Bridge
COOL DOWN
Stretch and Roll Out:
Calves
Hamstrings
Quads
Hips/Glutes
Groin
Back
EXERCISE DESCRIPTIONS:
Single Leg Deadlift – For this move, you can hold dumbbells or kettlebells, but remember DO NOT GO TO FAILURE. Beginners should start with bodyweight. Stand on one foot with the knee of that standing leg slightly bent. Hinge over at your hips, sweeping the other leg back toward the wall behind you. Pretend you are driving the heel of that foot straight into the wall behind you. Lean forward with your upper body as you hinge forward, keeping the back nice and flat. Make sure that as you hinge, you are sitting into the heel of your standing leg. Do not lean forward and come up onto your toes. To stand back up, drive through the heel of your standing leg and squeeze your glute at the top. Try not to tap the other foot down at all or at least not till you are fulling standing. Complete all reps on one side before switching to the other leg.
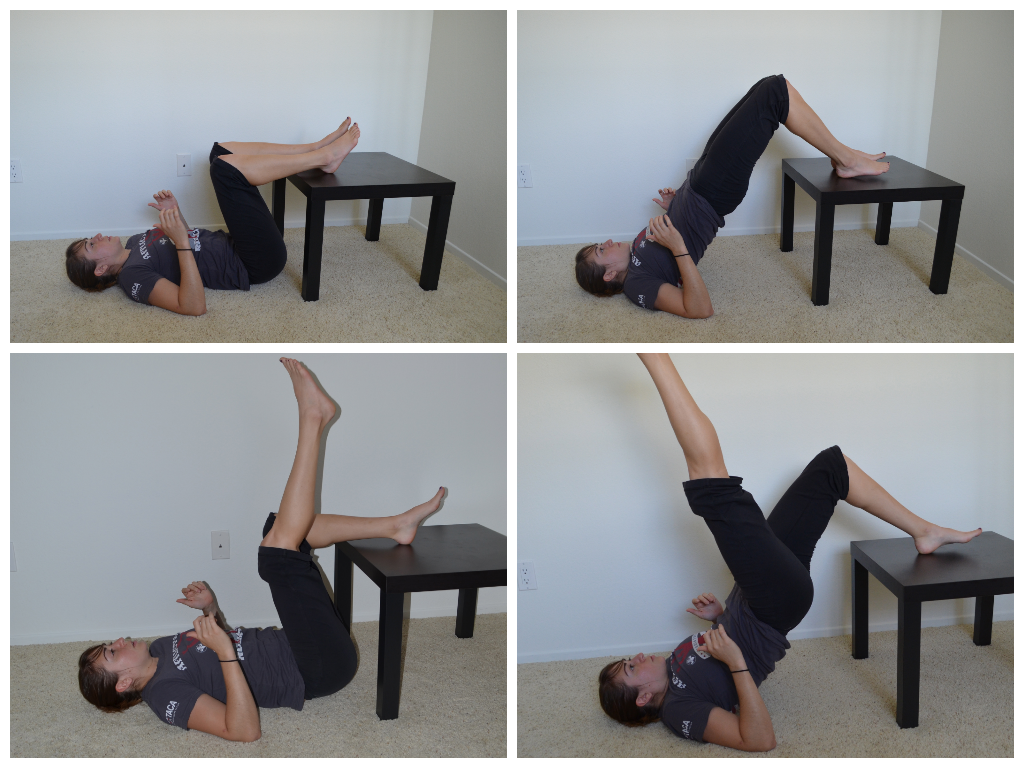
Reverse Hypers – Click here for a description and pictures of me using a small side table I have at my house to do the Reverse Hypers. You can also use a box step or do this move from the ground; however, I do prefer the range of motion the table or box step provides.

Backward Rotational Lunge to Front Lunge Across – This move is actually two lunges, which means that 1 rep is actually 2 lunges. On one you rotate back and open and on the other you come forward and across. Start with both feet pointing toward “12” on a clock. Performing the lunge first with the right foot moving, take the right foot and move it back toward “5” on the clock. As you reach your foot back toward “5,” you will pivot that toe so that it is perpendicular to the front foot which is still pointing toward “12.” Lunge down, bending the right knee while keeping the left leg straight. You are sinking your weight back into that right foot. Then drive up off the right heel and come back to standing. Beginners may need to pause in the middle between lunges while more advanced exercisers can go right from the back rotational lunge into the forward cross lunge. After driving the right foot back to center, bring it forward and across the body toward about “10/11” on the clock. Your right foot will again turn so it is perpendicular to your left foot which is pointing toward “12.” Sink down into a lunge, bending both knees and then drive off the right heel to come back to standing. Repeat those two lunges and then switch to the other side. Beginners will want to use bodyweight while more advanced lifter may front load with a kettlebell or dumbbells.
In this I show the backward rotational lunge and the front lunge across but without turning the toe. Not turning the toe on the front lunge can reduce the stress on the knee if you are new to these lunges and/or have knee problems.
Single Leg Glute Bridge – Beginners will perform a single leg glute bridge from the ground (however, if you can’t get your hips up as high as with the two leg glute bridge, stick with the two leg variation for now). More advanced exercisers may put their foot up on a box or advance the move further by putting your back and your foot up on benches/boxes. Remember though, you can’t go to failure during these density sets.
Do you pay attention to the volume of work you are doing?
How do you challenge yourself without just adding more weight?
NOTE: Not every workout should contain a ton of reps and sets. Do not go overboard with volume and/or intensity. Not every workout has to be the hardest thing you’ve ever done. Varying your volume and intensity is key to getting results while preventing overuse and injury. Workout variables need to be manipulated to help you work toward your goal.
When Pain Doesn’t Mean You Should Skip Your Workout
Rest when you have injuries is super important.
And time off may be just want your body needs.
HOWEVER, sometimes just sitting on your butt and not working out can cause your injuries and aches and pains to become worse and last way longer than they should.
Recovery isn’t all about time-off.
It is also about doing the correct things to increase, mobility, flexibility and stability to help the body become stronger and more balanced.

You can’t just “take it easy” on your ankle, or knee or hip the rest of your life! You can just “rest” ever day all day.
No, life requires you to move around.
And if you don’t rehab the injury, if you just rest until it “feels better,” you are going to end up re-injuring it very quickly OR have to live with never being able to return to your previous activity level.
Seriously…Who wants to be limited the rest of their life!?!
NOT ME!
That is why I’ve written a ton of posts about activation, stretching and foam rolling exercises.
You’ve got to STRENGTHEN the muscles around the injured area and CORRECT any imbalances.
So in case you’ve just been resting your injury and haven’t done any rehab, check out these articles this weekend and GET STARTED TODAY!
Shin Splints and Plantar Fasciitis
Ankle Injuries and Regaining Mobility
Mini Band Glute Activation Exercises
Foam Rolling and Stretching for Hip/Low Back Pain
Single Limb Exercises to Correct Imbalances and Prevent Pain!!!!!
Functional Core Strength to Prevent Injury
Plank Variations to Improve Core Strength and Reduce Low Back Pain!
Turkey Day Workout
I love doing a quick workout in the morning before all the celebrating begins.
It can be fun to be active with friends and family before you all sit down for a big meal.
It also just always makes me feel better to get moving on a day when I’m doing a lot of sitting and feasting.
So because I love a quick, fun and social workout on Turkey Day, here is a great cardio blast you can do anywhere.
Happy Turkey Day!

Turkey Day Workout
WARM UP
Stretch and Roll Out:
Calves
Hamstrings
Quads
Groin
Hips/Glutes
Back
Chest
WORKOUT
You will end up completing 10 rounds. Start with just the first exercise. Then repeat the first exercise and add in the second exercise. Then return to the beginning, doing the first, second and third exercise. After adding in a third exercise, return to the top and go down the list again adding in the fourth.
Each round, add another exercise until on the final round you do all 10 exercises.
CIRCUIT:
5 reps Super Crunch
10 reps Frog Hops
5 reps each side Sit Thrus
10 reps Burpees
5 reps Plank Jacks
10 reps each side Ski Hops
5 reps Dive-bomber Push Ups
10 reps each side Oblique V ups
5 reps each side T Push Ups
10 reps Tuck Jumps
COOL DOWN
Stretch and Roll Out:
Calves
Hamstrings
Quads
Groin
Hips/Glutes
Back
Chest
NOTES:
Take only as much rest is needed. Complete the 10 rounds as quickly as possible.
This is a great workout to make into a friendly competition. The first one to complete all the exercises wins. Of course that doesn’t mean sacrificing form to win!
EXERCISE DESCRIPTIONS:
Super Crunch – Lie on your back with your legs out straight. Crunch your upper body up as you draw your knees in. Come up so that you are sitting on your butt. Reach your hands to outside one knee. Then lie back down. Then crunch up and reach through your knees. Lie back down. Then crunch up and reach outside the other knee. Those 3 crunches equal one rep.

Frog Hops – Basically a squat jump except you are propelling yourself forward instead of up. So squat down and launch yourself forward, landing softly in a squat so you can repeat. Try not to rest when you land. Try to go right from one jump into another. If you don’t have room for these though, you can perform squat jumps instead.
Sit Thrus – Click the link for a description and pictures.
Burpees – You can do either modified burpees (aka no push up) or full burpees. If you do the push up, make sure it is a full good push up. Also only do the push up if you can continue to move quickly.
Plank Jacks – Start in a high plank on your hands and toes. Hands are under your shoulders and your feet should be together. Then jump your feet apart and then quickly back together. Repeat quickly until all reps are complete.
Ski Hops – Keep your feet together and squat down. Then with your feet together, jump side to side. Try to jump as far to each side as quickly as possible. Beginners may want to pause in a squat after each jump to balance.
Dive-bomber Push Ups – This move can be done from the knees by beginners or from the toes by more advanced exercisers.To do this from the knees, set up at the top of a push up with your hands outside your chest and your body in a straight line down to your knees. Sit back onto your heels as if doing a child’s pose stretch. Keep your hands in their original position. Then start to move forward back into the push up position, but keep your head and chest close to the ground as you go forward. Keep your upper body as close to the ground until your chest is in between your hands. Arch, opening your chest up toward the ceiling as if you are doing upward facing dog. Get a nice stretch at the top, making sure to press down through your palms and elongate your neck. Do not let your shoulders shrug up by your ears. Hold for a second and then sit back into the child’s pose stretch and repeat.

Modified Push Up
Oblique V ups – Lie on your side with your legs straight and together. Bring them to a slight angle in front of you. Lie with your bottom arm out in front of you at an angle. It will be under your body like you are going to prop yourself up on your side using it. Crunch up reaching your top hand toward your toes as your raise your legs up toward the ceiling. You will sort of prop yourself up on your arm on the ground to “v up.” Complete all reps on one side before switching to the other side.
T Push Ups – See link for description and pictures.

Tuck Jumps – Stand with your feet together. As you jump up, tuck your knees in toward your chest. Then shoot your legs back out to land softly on the ground. You are not squatting with this jump, simply tucking your knees.
Fitspo, Eternal Optimism and Reaching Your Goals
The other day I encountered the fitspo below.

I had mixed reactions to it.
One reaction was, “Yea f@#! all those people who don’t believe!”
Another other was, “Yea but that is crappy external motivation. You have to do it for you.”
And a third was, “How long does that motivation truly last? I mean it doesn’t help you find your internal motivation and confidence…”
While beating the odds and defying others expectations can fire us up, it isn’t truly lasting motivation.
It isn’t motivation we can count on.
Because even though it motivates, criticism isn’t positive.
It plants a negative seed in our mind. It plants doubts and fears even if it drives us to prove them wrong.
And in times of doubt, those seeds will grow, potentially causing us to fail.
True success depends on us being positive because plateaus and hiccups and even failures are going to happen. Wanting to defy someone else’s doubts isn’t going to keep you going when the going gets rough.
Because wanting to defy someone else’s doubts is almost like admitting you have them too. When reaching your goal means believing in yourself, knowing you can do it, even when setbacks occur.
I heard a quote awhile back about how successful entrepreneurs must be eternal optimists.
The same could be said, in my opinion, about anyone who is successful at reaching their goals.
This eternal optimism is a key trait that helps them to persevere as the inevitable complications appear when they start to build their vision into a reality. – Marcos Galperin
External optimism.

Believing, hoping, KNOWING, you can and you will make yourself and your world a better place.
Knowing you will do what it takes to reach your goal.
Knowing that even when life/people/whatever get you down, you are going to get right back up and persevere.
Success isn’t about not getting knocked down. It is about getting back up and never giving up.
People may make fun of you for your external optimism. People may put you down and tell you that you can’t. People may doubt because they never had the positivity and drive to do it themselves.
But it doesn’t matter what other people think. It doesn’t matter if you prove them right or wrong.
It only matters that you BELIEVE you can be better…That you want to be better. And that you never give up on your goal.
And when I say this, I say this as a person who knows it isn’t easy to pull yourself back up. As a person who has fallen more times than I can count. As a person who has always gotten back up no matter how bruised, bloodied and destroyed I am.
Because even though I may be bruised and battered. Even though my self-confidence and attitude may seem like they are in the gutter….I always believe I can make things better.
Somewhere deep down inside there is always that burning flame, that drive, to make myself and my world a better place.
And while I may mope around for a day after a big blow, after I feel my world seems to be collapsing around me, there is always that glimmer of hope.
A glimmer of hope shining not from without, but from within.
That external optimism, that eternal belief that you CAN, which simply makes failures a learning experience NOT the end to your goals and dreams.
Be thankful this week for all those failures. For all those times you managed to pull yourself back up.
Be thankful for all those bad times because those bad times showed you how strong you could be. Those bad times that showed you that somewhere, deep down, you really do believe in yourself to be able to get back up.
Be thankful this week and remember that you are your own best fitspo not some stupid picture telling you to prove someone else wrong.
Because let’s face it….

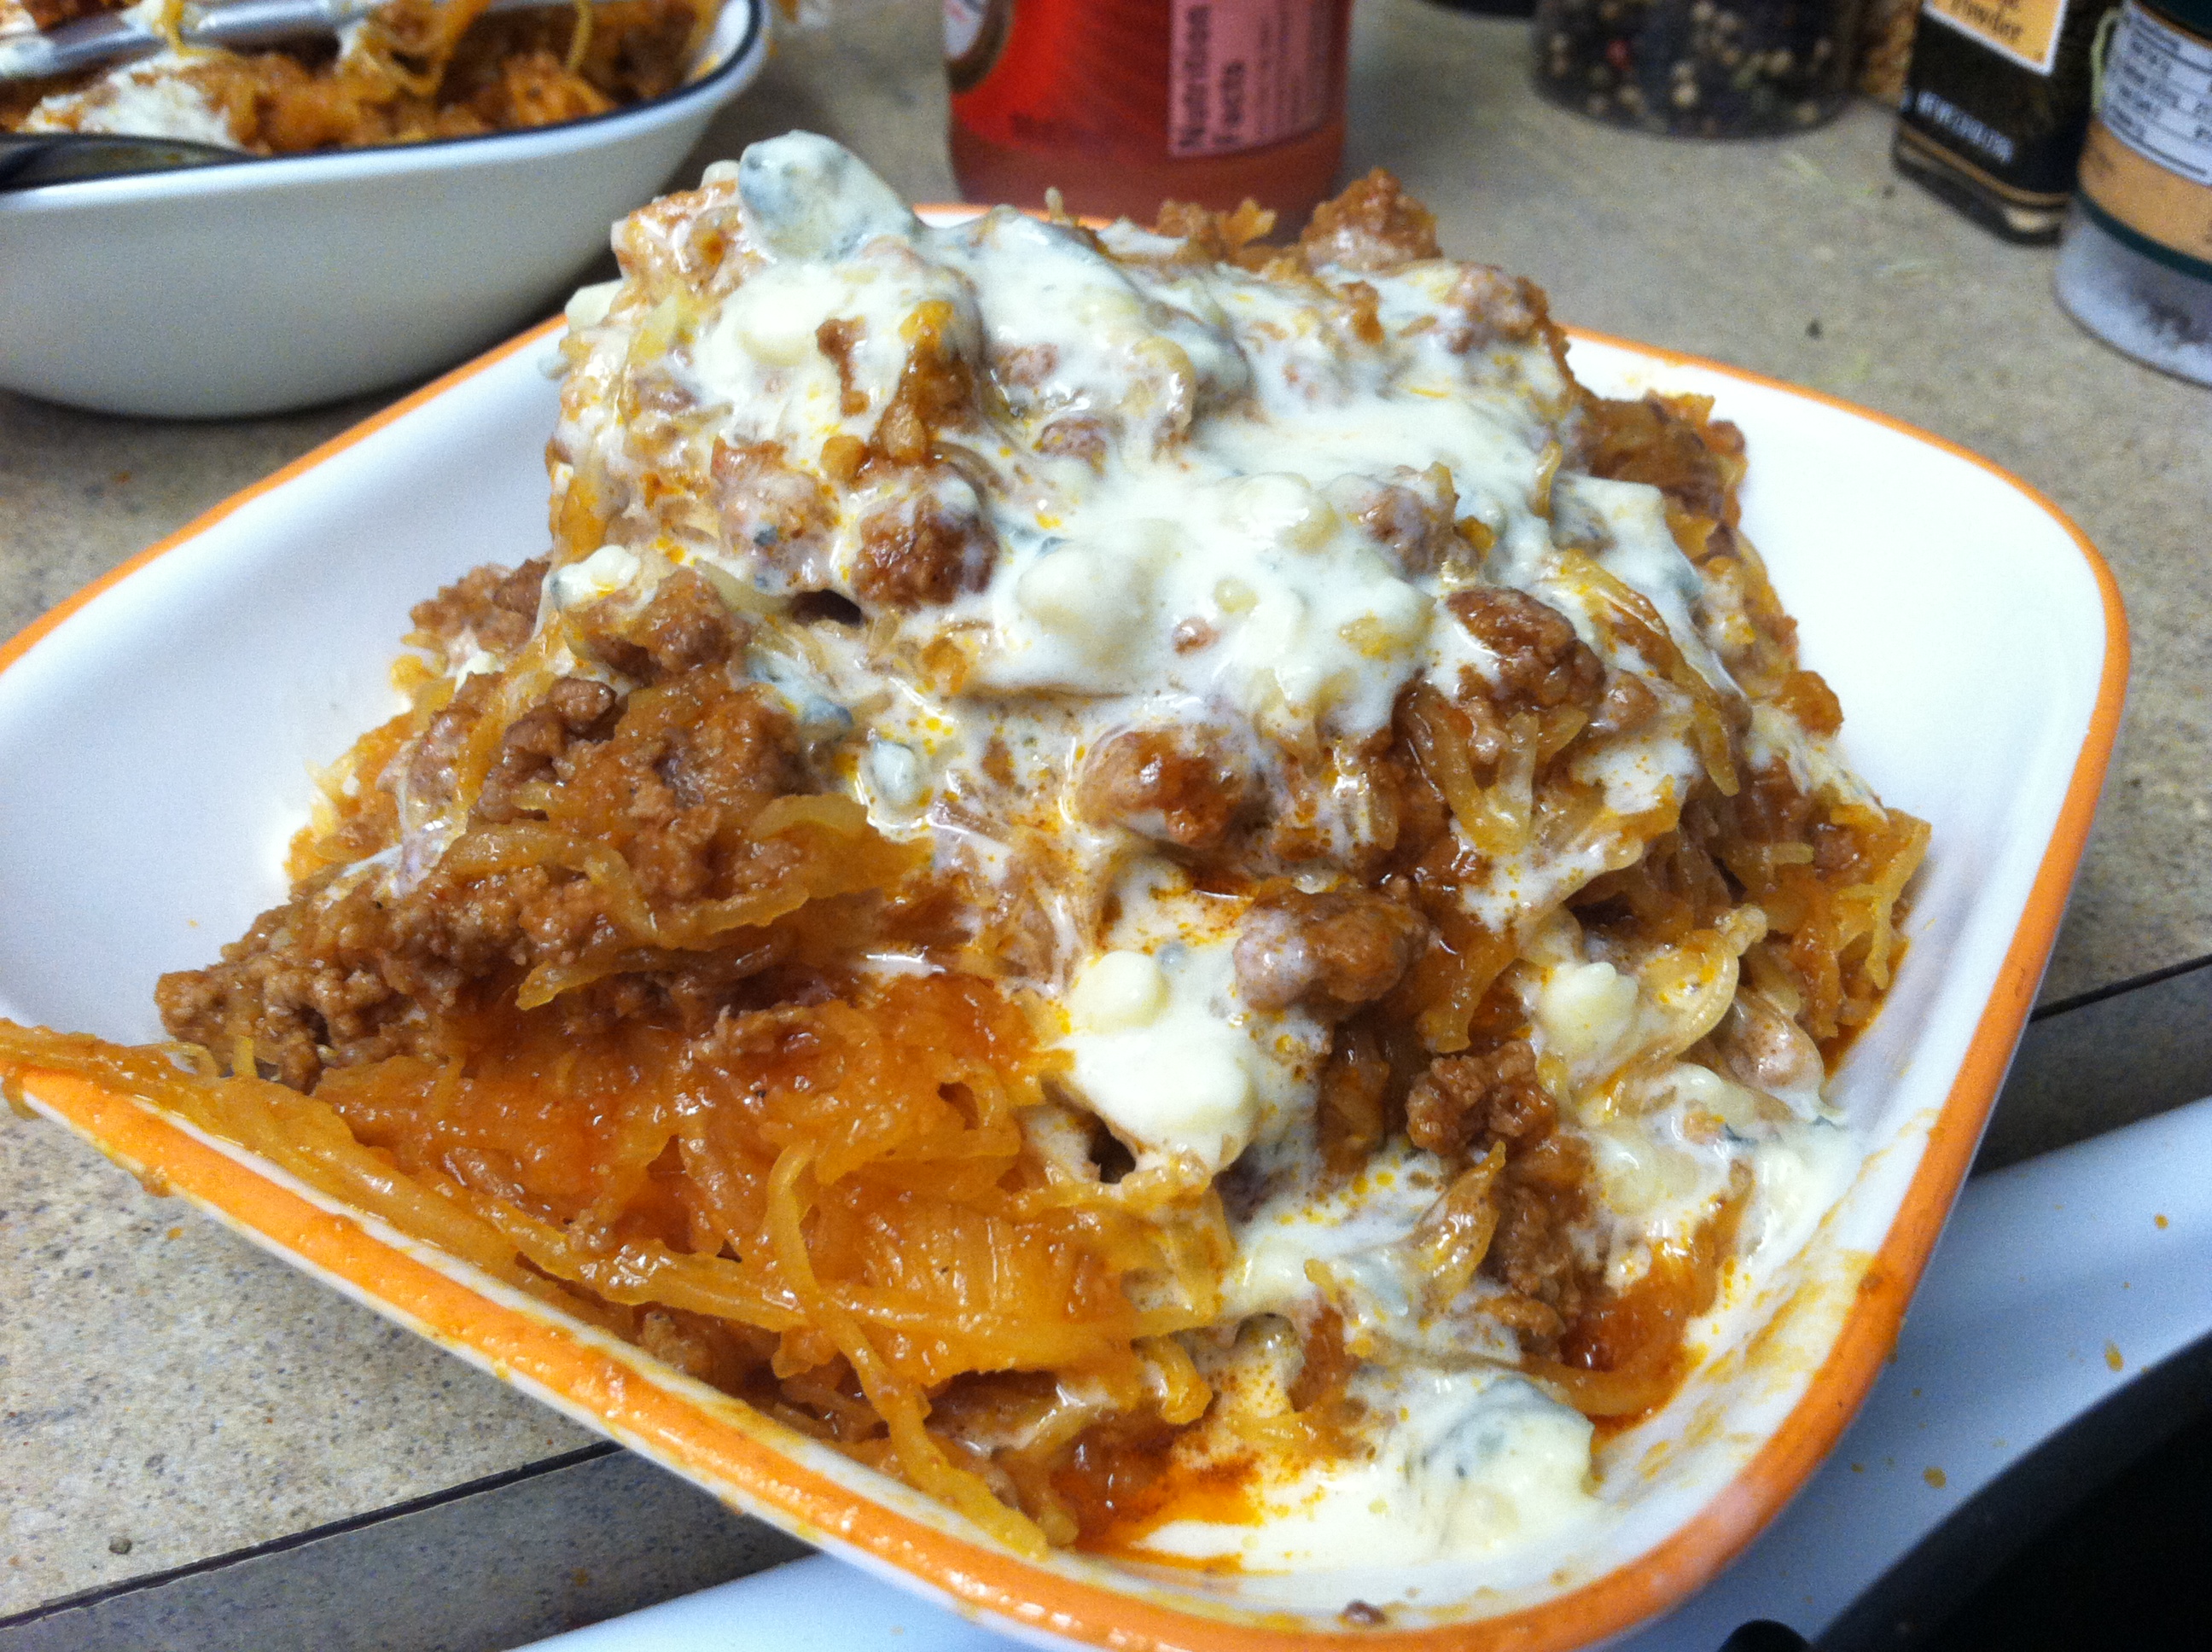
Buffalo Beef Spaghetti Squash Pasta Recipe
I’ve always loved anything with buffalo sauce on it.
I make buffalo wings and even buffalo cauliflower all the time. Actually I’m not sure which I love more…buffalo sauce or cauliflower!
While I wasn’t feel cauliflower today, I thought it would be delicious to make Buffalo Chicken “Pasta” using spaghetti squash since I was in the mood for spaghetti squash AND buffalo sauce.
However, I quickly realized we didn’t have any chicken…only some ground beef.
So instead of a Buffalo Chicken “Pasta” recipe, Buffalo Beef “Pasta” was born. And boy was it delicious!
Buffalo Beef Spaghetti Squash “Pasta”
Ingredients:
1/4 can Tomato Sauce
2 tbsp Frank’s Hot Sauce
1 medium Spaghetti Squash
1 lb Ground Beef
1 clove garlic
Salt and Pepper to taste
1 tbsp heavy cream
2 oz blue cheese
Preheat oven to 375. Slice spaghetti squash in half and coat with olive oil, salt, pepper and some garlic powder. Bake for 40 minutes to 1 hour.
Once spaghetti squash is done, let cool and then scrap out with a fork. Place in a bowl and save until meat and sauce are done.
Heat a skillet on high. Place meat in skillet and begin to brown. Add garlic, salt and pepper.
Once meat begins to brown, add tomato sauce and hot sauce. Cook on high until meat is browned. Then simmer for a few minutes on low.
While meat is simmering, add spaghetti squash and mix well.
In a microwave, combine cream and blue cheese. Melt blue cheese.
Once spaghetti squash and the beef sauce are combined, top with a bit of the melted blue cheese sauce.
Serve. Should make about 4-5 servings.
Thinking about this meal now….It could be yummy after Thanksgiving when you have leftover turkey to use up!!! GOING TO HAVE TO TRY THAT! YESSS!
Thanksgiving – To Indulge Or Not To Indulge…INDULGE
I’m a firm believer in practicing what I preach.
And one thing I believe in is “cheat days/meals” (or whatever you choose to call them).
A day, a meal, to indulge and simply enjoying any foods I want, in any quantities I want.
I especially believe in doing this over the holidays.

BAHA!
While I believe that all too often our social gatherings are centered around food, there are certain holidays where food is part of the tradition and where food is a big part of what truly makes the day special.
So if food is a big part of what makes the day special, why miss out? Why deprive yourself of that once-a-year-meal if it is truly meaningful to you and you really enjoy it?
Because you are trying to be healthy? Because you are trying to lose weight?
There are over 300 other days a year you can worry about that.
Thanksgiving is not the time to start.
But today…This week…BEFORE Thanksgiving…This is a good time to worry about eating well.
Eat clean in preparation.
Eat extra clean so that the day or two of indulgence doesn’t truly have any affect on your progress. Eat extra clean so you feel ready to fully relax and indulge. Eat extra clean to strengthen your resolve to return to your healthy lifestyle after the day or two of enjoyment.
And then on Thanksgiving, STOP WORRYING. One day, even two days, won’t really matter.
Health is a LIFESTYLE! It is about eating well and living well a majority of the time, not every single day.
A couple of days of bad eating won’t matter especially if you eat well before and return to eating well right after.
Actually especially if you return to eating well right after.
So instead of depriving yourself of the Thanksgiving meal you love just don’t indulge for days or even weeks right after or before.
Days like Thanksgiving don’t cause you to gain weight.
Not getting right back on track is what adds up and causes us to truly gain weight.
So if you are searching for tips to help you diet on Thanksgiving or eat clean at holiday parties, you won’t find them here.
Nope…I say eat those stupid holiday cookies at the holiday party.
Just don’t eat them for days and weeks before and/or after the celebration.
If you want to be healthy over the holidays, start eating well today.
Then forget about your healthy lifestyle on Thanksgiving IF you will feel deprived if you don’t indulge. Because deprivation causes way more problems than one day of bad eating.
For me Thanksgiving isn’t a day to diet. Eat well before. Eat well after.
But on Thanksgiving…ENJOY!
Do you do the eat clean “sandwich” aka eat clean before, indulge and eat clean after? Or do you search for tips to help you eat well even on Thanksgiving?
Where do you feel it?
When you do an exercise, do you just go through the motions? Or do you actually think about where you should be and actually are feeling the move?
Hopefully you are thinking about where you are feeling the move because that will not only make sure you are doing it correctly but will also allow you to figure out if certain muscles are tight or overactive or underactive.
AND it will build that very important mind-body connection.
One of the first questions I always ask clients when they do a new move is “Where do you feel it?”
It really makes you focus on the move and really makes your mind have to connect and think about your body and the movement.
I also prefer asking that to even telling them where they should feel it because then they have no notion of where they “should” feel it and instead truly consider where they DO feel it.
Because when we consider where we are feeling the move instead of just going through the motions, we may realize we actually aren’t feeling the correct muscles working.
Like when squatting down…if we feel the squat a lot in our low back it may be because our abs aren’t engaged or our hips and even calves are tight. It also probably means our glutes aren’t engaged and firing.
And yes that means we need to do some core engagement exercises and roll out and stretch our calves and hips. And yes, it also even means we need to do some glute activation exercises.
But more importantly it means we need to THINK about the move and focus on engaging the proper muscles to make sure we feel the exercise working the correct muscles.
We can do all the proper activation exercises and learn how to activate and engage the muscles in isolation, but still not have that translate to compound moves IF we don’t focus on doing it during the movement.
Here are some quick tips address some of the most common form problems people have with a few common exercises. These tips help build that mind-body connection along with proper stretching, rolling and activation exercises. These exercise variations and adjustments help you learn to what it feels like to do the movements correctly so your mind knows how to focus on activating the correct muscles so that when you do any variation of the exercise and are asked “Where do you feel it?”, you will feel it in the correct places.
Squats:
- You feel it in your low back – Try a bear hug squat with a sandbag. By hugging the sandbag to your chest, you will force your abs to engage throughout the squat movement. A good next progression from this is even a light front squat with a kettlebell (aka a goblet squat) since front squats require more core engagement. Then you can move into heavier back squats once you’ve learned to focus on engaging your core during the movement.
- You lean forward and feel it in your low back – Stand in front of a wall and perform the squat. Sometimes we may have done enough to loosen up muscles so that we should have proper form yet still repeat the same bad movement patterns because they are so engrained and our mind doesn’t stay focused on controlling our body. The best way to make the new movements muscle memory and get that mind-body connection is by sometimes giving our body no way to compensate. If you lean forward during your squats, stand in front of a wall close enough that you can lean forward and instead have to sink your butt to get closer to the ground. Make sure, however, that you don’t compensate by coming up onto your toes!
- Your heels come up – Many people actually don’t realize their heels come up or that they are coming forward in the squat and that is why they only feel the squat in their quads and not at all in their butt. A great way to correct this is by doing a squat to a box or bench. Stand enough in front of the box that you have to REACH your butt back to sit down on the bench. This will force you to sit back on your heels and then drive up through your heels, engaging your glutes and keep you from injuring your knees and coming up on your toes.

While this is a single leg squat, it shows you that a box forces you to sit back.
Deadlift variations
- Your back rounds as you hinge over – The most common one and often one of the hardest to focus on and correct since so many people are so used to rounding forward over their desks. A great way to ingrain the correct movement pattern is by starting your hinge with a pole or stick down your back. Keep the stick in contact with your head, upper back and butt at all times throughout the exercise. This insures that you have a flat back and do not round. Next move to just keeping your hands behind your back. The hands behind the back reminds you to keep your chest open which in turn keeps your back flat.
- You don’t feel your glutes working – I’ve found a great way to train the hinge motion and driving up through the glutes is by standing 2 or 3 inches from a wall, facing away from the wall. Lean forward and reach the butt back toward the wall. If you only lean forward and put all the work in your back, your butt will not move closer to the wall.But if you only lean forward to counterbalance your butt reaching back, you will feel a stretch down your hamstrings and you will feel your butt touching the wall. If you are working on a straight-leg hinge, you will not bend your knees as much. If you are working toward a conventional deadlift, stand a bit farther away and allow your knees to bend as you reach your butt back and lean forward (keeping your back flat) to counterbalance your butt reaching back to touch the wall. This move should make you aware of how it feels to sit back and the “stretch” you will feel if you are doing the move correctly. Advance to using a band around your hips while trying to reach your butt back to a pole or wall.
- Your low back is feeling it – Doing a light weight front-loaded good morning is a great way to get the core really activated while hinging. Too often when we are holding a barbell or kettlebells while lifting we are more focused on the hinge and keeping our back flat than our core engaged. But a front loaded move like the good morning is a great chance to really focus on the core. Hold a dumbbell, sandbag or kettlebell at your chest. Perform a straight two-leg deadlift, sitting your butt back and hinging forward. Because of the weight in front you will really need to focus on engaging the core so your low back doesn’t feel it. If you just rush through this move, you can easily irritate your low back. BUT I like to use it because it does really seem to make people more aware of how engaged their core should be.

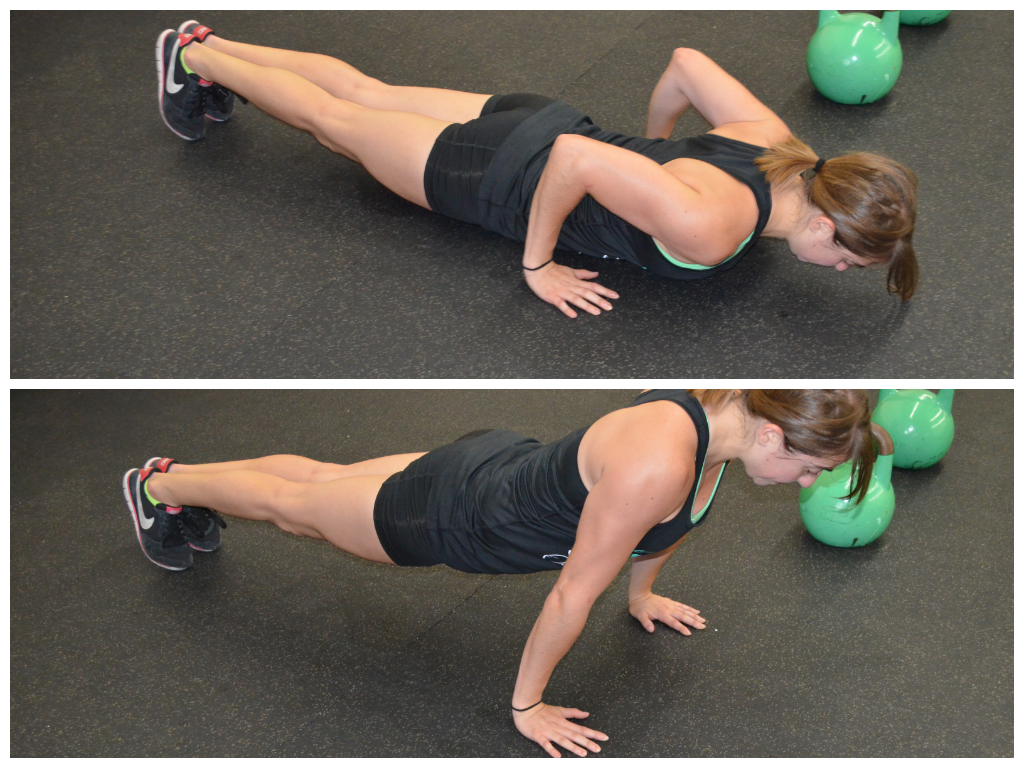
Push Up
- Push ups are one exercise everyone thinks they can do and hardly anyone actually does correctly. One of the best ways to train correct push ups is to make them as easy as possible to start with. INCLINE PUSH UPS should be done to start. Heck use a wall and do almost completely standing up straight push ups if you need to. By making it super easy, you allow yourself to focus on correct movement patterns….Like everything moving together and you not tucking your chin and your elbows not flaring out toward you head….
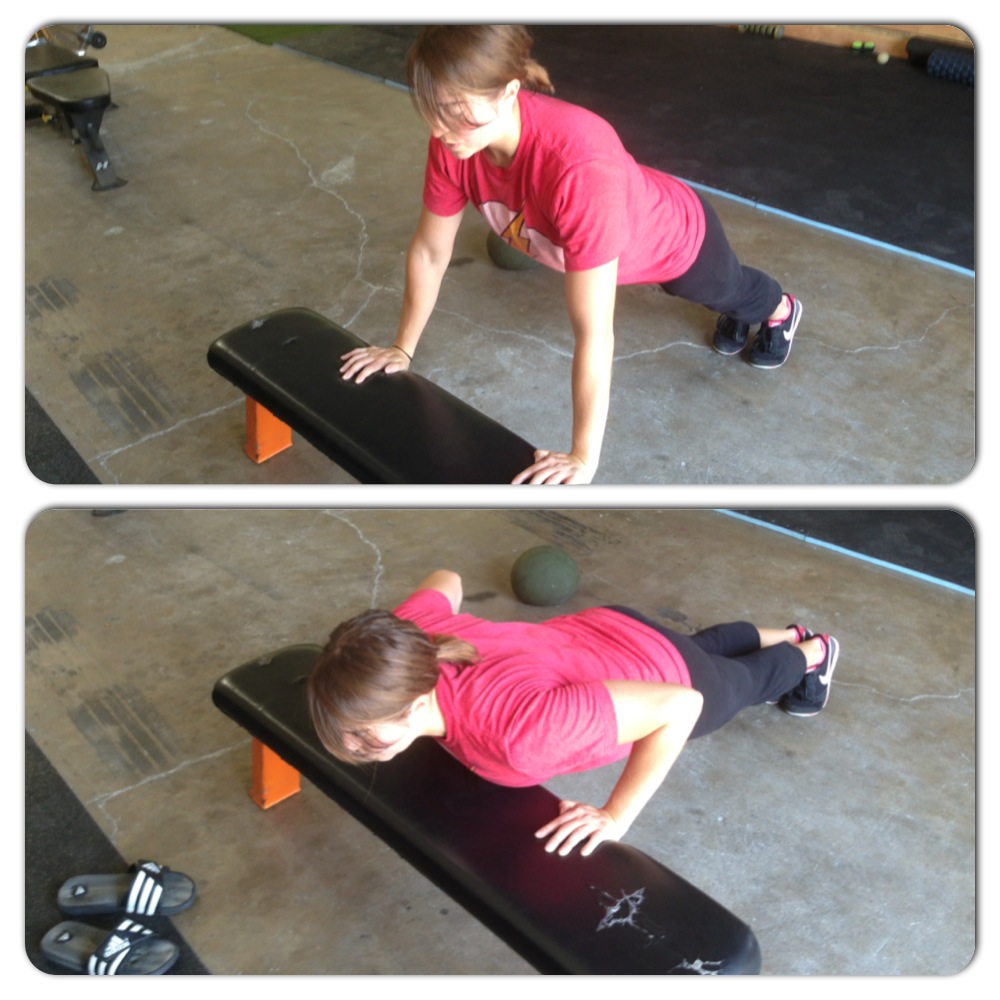
- You feel it in your low back – This means your core isn’t engaged. Try placing yoga blocks under your body. Make sure everything hits the yoga blocks at the same time. If your hips hit it before your chest then your hips are sagging and your core isn’t engaged…aka you are going to feel it in your low back! This may just make you aware enough to correct it or you may need to do some pelvic tilts and plank holds!
- You feel it in your traps and neck – You are shrugging your shoulders and not engaging your lower traps or lats. A great way to train yourself to keep your shoulders down is by doing a push up with your hands low down like toward your hips. Because this is a difficult push up, you may need to do a modified push up or even an incline variation.
Row
- You feel it in your neck and traps – I find this is super common especially during inverted rows. It means you aren’t activating your lower traps. It is also easily corrected by focusing on pressing the chest out and by rowing LOWER on your chest. So instead of even focusing on engaging a muscle, focus on just rowing the strap or bar to lower on your chest…like below the nipple at least.
- Your back is rounded – Just like with the deadlift, a pole or rod can be used down your back to keep your spine in alignment. Make sure your head, upper back and butt all maintain contact with the pole throughout the move. This will also prevent you from rotating so that you actually feel the move in your lower traps and lats! (This isn’t great for keeping a straight line during the inverted row but during the bent over row or even a row supported on a bench.)
- You only feel it in your biceps – While any back exercise does work your grip and your biceps, you should feel the move in your back. Focus on driving your elbows up toward the ceiling and not letting your forearms curl toward your chest when you row. To learn this, it actually works best to stand up straight. Stand with your back to a wall. The wall should be only a few inches away. Standing up nice and tall, drive your elbows back to touch the wall. If you “curl” instead of “row,” your elbows won’t touch the wall. But if you pinch your shoulder blades down and back and row, your elbows will touch the wall. This is the exact motion you will use when performing an actual row and rowing your elbows up to the ceiling!

Row low on the chest. Do not let your forearms curl toward your chest.
These are only some very basic cues and variations to help you develop that mind-body connection. But if you use them they will help you become more AWARE of your body so that you can keep the correct muscles engaged and working even during other variations.
Now ask yourself, “Where do you feel the (insert exercise here)?” Are you using the correct muscles or just going through the motions?
Home Workouts – 15-Minute Lower Body Blast
Recently, I’ve been super into creating home workouts.
While I love going to the gym (heck I’m there almost every day anyway), there are just some days when even I don’t feel like making the special trip in if I’m not there to work.
But I don’t like skipping workouts.
And I really don’t think there is ever any reason to skip a workout other than your body truly needing a break because you’ve been pushing it hard. (Although hopefully you’ve scheduled in rest days so you aren’t technically “skipping” a workout when you take a day off since rest days are important to your success too!)
Actually the times when we want to skip our workouts the most, are the times when we need to do them the most – because workouts will improve our moods and release all that pent-up stress, frustration and even anger that we have.
Plus workouts can actually make us less fatigued and more focused.
But anyway, since one of the most common reasons, aka excuses, I hear for skipping a workout is that people don’t have time nor do they want to make a trip to the gym, I’ve created another quick home workout.
The other week I did one for the upper body and just this past week I did a home cardio workout.
Today is a great Home Lower Body Workout using only bodyweight exercises.
So if you are short on time and feel like skipping your workout, give this a try instead!
And “gasp” it only has two exercises in it! You don’t need to do 50 exercises to really work your body!
15-Minute Lower Body Blast
WARM UP (linked out to some stretches)
Stretch and Roll Out:
Calves
Quads
Hamstrings
Groin
IT Bands
Hips/Glutes (linked out to some great moves to loosen up the lower body and low back)
WORKOUT
Set a timer for 15 minutes. Complete as many rounds as possible in that time.
CIRCUIT:
5-10 reps per side Curtsy to Angled Front Lunge
8-12 reps per side Skater Hops
5-10 reps per side Standing Glute Stretch (or as needed)
COOL DOWN
Stretch and Roll Out:
Calves
Quads
Hamstrings
Groin
IT Bands
Hips/Glutes
EXERCISE DESCRIPTIONS:
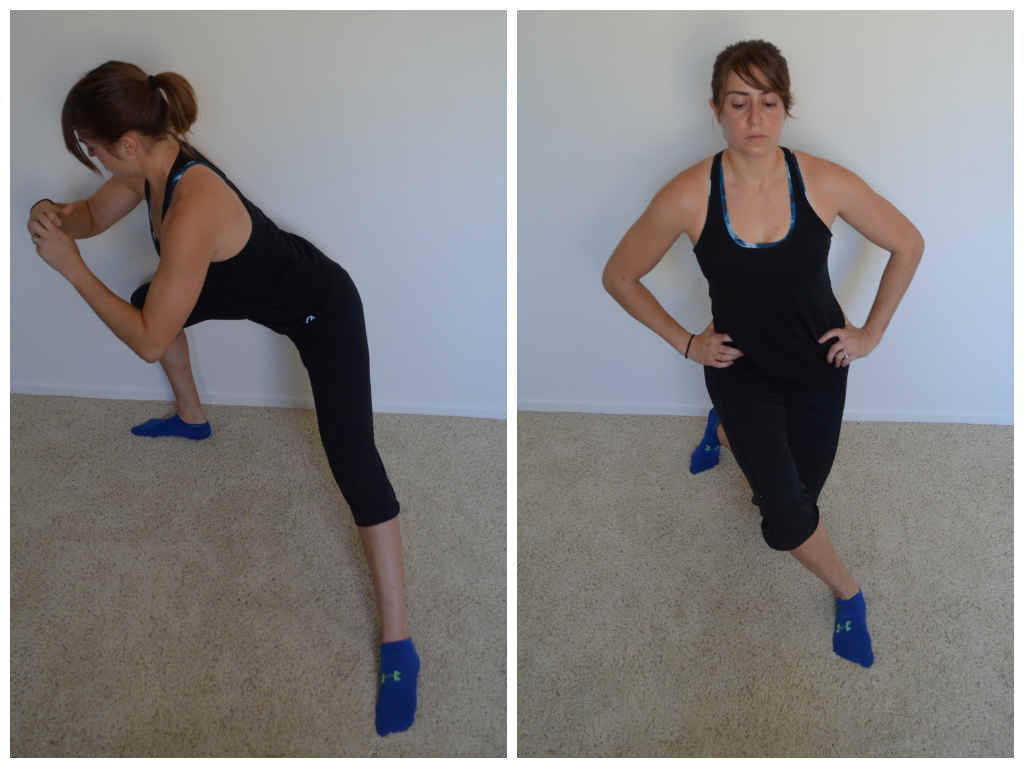
Curtsy to Angled Front Lunge – Start standing tall with both toes pointing straight ahead to “12” on a clock. Start with your right foot. Cross your right foot back behind your left foot into a “curtsy” lunge. Your right foot will move back between “7” and “8” on a clock. Then beginners may need to come back to standing while more advanced exercisers will go straight from the curtsy lunge into the angled front lunge. So coming up out of the curtsy lunge bring the right foot forward and out into a front angled lunge. When you move into the front angled lunge, your foot will come to between “1” and “2” on the clock. Repeat the lunges, trying not to rest in the standing position. Complete all reps on one side before switching. One rep is both the curtsy AND the angled lunge.
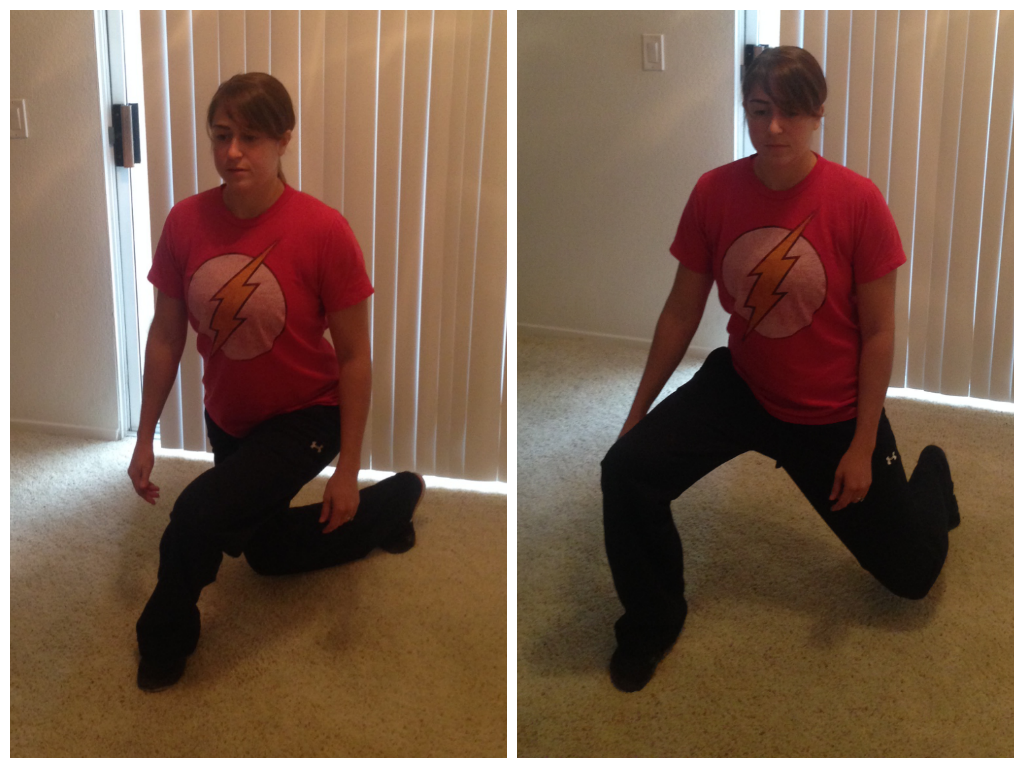
While it may look like I’m lunging straight ahead, I’m stepping my right foot out between “1” and “2” on the clock.
Skater Hops – Start standing to one side. Hop laterally with one leg. Land and balance on that leg letting the other leg swing back behind. Try not to touch the other toe to the ground. Then jump back to the starting position. Try to jump as far as you can each way while still moving quickly. The faster and farther you jump, the harder the move will be. Beginners should start by jumping and balancing for a second before repeating.

Skater Hops
Standing Glute Stretch – Standing grab one of your lower legs with your knee bent to about 90. Pull from under you knee and foot/ankle. Pull your lower leg in toward your chest. Hold for a second and then repeat on the other side. You do not want to perform a static stretch. This move is meant as “active rest.” Perform only as many as needed to feel recovered enough to repeat the circuit. If none are needed, go right back into the Curtsy to Angled Front Lunges. You may also sub out this move to stretch out your groin or hip flexors if those are tight instead.
Your Go-To Healthy Dish
I think everyone needs at least one dish that they just always have the ingredients for lying around.
Those ingredients that you always have stocked in your cabinets or buy each week at the store just to make sure you never run out of them.
A dish, while maybe not the most delicious dish you’ve ever eaten, is something you can enjoy every time and not be so bored with that you would rather go eat out then quickly make it.
A dish that you can quickly make if you haven’t been able to do any meal prep and have no leftovers to quickly heat up.
For us, omelets (or scrambled eggs) and chili are our healthy go-tos (and I don’t mean the super long cooking chili…I mean the dump everything into the cast iron and let it simmer for 10 minutes and then devour chili).
We always have ingredients for both around – eggs, tomato sauce, some sort of vegetable and ground beef.
Since we usually have at least a pound of ground beef lying around, if we make a quick chili, there are even leftovers to eat later!
Below is the basic quick chili we make along with a link out to my favorite cauliflower chili (which is a bit more time-consuming).
Quick and Basic Beef Chili

While a few basic spices are listed below, you can add in others like chipotle powder.
Ingredients:
1lb grass-fed ground beef
1 can organic tomato sauce
1 tbsp chili powder
1/2 tbsp paprika
1/2 tbsp cumin
1 tsp garlic powder
Salt and Pepper to taste
OPTIONAL…AKA if we have them around:
Onion, broccoli, cauliflower, peppers, sausage, bacon, olives
Heat a skillet, we use our cast iron, over high heat and add the ground beef. Add some salt and pepper and break the beef up. (Can add in sausage and onion at this time if you are putting them in.)
When the beef is still a little pink, add in tomato sauce and spices. Stir.
Add in any vegetables and bacon if you are adding any. (Cook bacon before adding beef to the skillet. Let bacon cool and then crumble.)
Mix vegetables into the sauce and then lower heat to low. Let simmer another minute or two, stirring everything together occasionally.
Serve with maybe some grass-fed or raw milk cheese on top. If we have the ingredients for guacamole, we will also usually top it with that.
This basic chili recipe can also easily be served over spaghetti squash as a “spicy” meat sauce if you have any lying around!
And if you happen to love cauliflower as much as I do and have a bit more time to cook, try this chili variation – Cauliflower Chili.
What is your go-to healthy dish? What ingredients do you always have lying around?
Reaching Your Goals – Focus on one thing at a time
I’ve frequently talked about the story of the tortoise and the hare – about how small steady changes over time lead to great, LASTING results.
About how sometimes, if you go all in, you end up feeling too deprived, which leads to failure and you possibly even ending up worse off than when you started.
BUT going slow and steady isn’t always easy and it doesn’t always mean moving forward.
Sometimes it means admitting you just can’t handle more than one change at that time even if that means your progress stalls for a bit.
I’ve actually had this discussion with a number of clients recently. They are busy, stressed and want to make changes, but mentally just can’t handle more on their plate.
That’s when you just have to give yourself a break and pick one thing to focus on.

Sleep deprived? Diet not where you would like it to be? Can’t seem to get in a rhythm with your workout routine?
Pick one and focus on it and leave the other problems for another day….Even if it isn’t the biggest or most “important” change you need to make, it is a change!
Sleeping more may not seemingly give you as quick or as direct a result as say dieting would in progressing toward your weight loss goal, but it will eventually move you forward.
It is a step in the right direction, no matter how slow the direct results may be.
And that step, even if it is small, will create forward momentum.
Forward momentum because you know you did something toward your goal. Forward momentum because you gave yourself some breathing room and only one thing to focus on. Forward momentum because you took the stress away of having to do everything all at once.
Forward momentum because one change spurs more change and often gives you the energy you need to keep moving forward.
There is nothing wrong with admitting you can’t do everything at once.
Most of us can’t even though most of us want to.
Give yourself a chance at success. Be patient and don’t rush your goals.
Focus on one thing at a time!!


