Category Archives: Workout
Bodyweight Home Exercises – Best Upper Body Moves
Recently I’ve heard too many complaints about people not being able to fit in their workouts.
And when I tell them, “Well just set a timer and do a 15 minute workout AT HOME.” (Because, let’s face it, all of us have 15 minutes we can spend working out especially if we don’t have to waste any time on travel!)
They tell me, “But I don’t have any equipment at home!”
Well that is no excuse! While I’ve written numerous articles with bodyweight exercises you can do at home, today I would like to focus on some of the best UPPER BODY moves you can do.
Many people can think of a ton of lower body moves to do (squats, squat jumps, lunges, chair step ups), they often can’t think of a variety of upper body moves to do.
So here are some great Bodyweight Upper Body Moves that you can easily do at home that will challenge everyone from the beginner to even the most advanced lifter.
There are honestly more than 10 listed here since I think we often forget about all the options out there and skip our workouts because we are bored doing the same 3 moves over and over again.
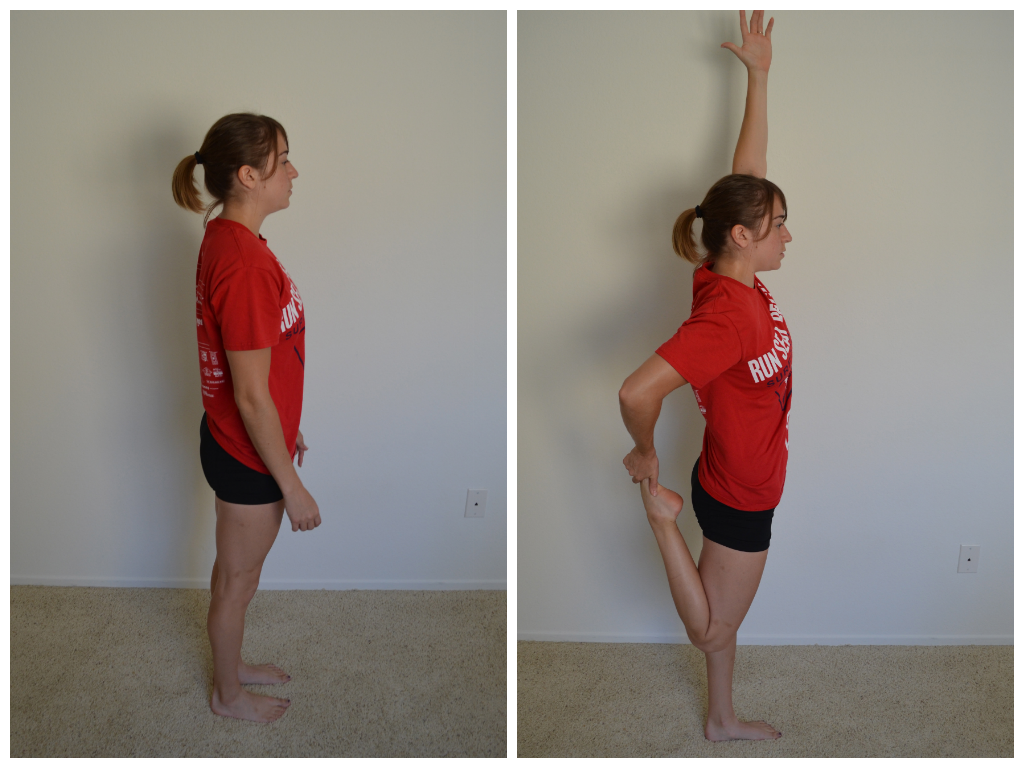
1. Handstands – Whether you are new to handstands and need to start with a modified downward dog or you can hold a handstand without any support, handstands are a GREAT upper body move. They work your shoulders, triceps upper back and core. They are also FUN and can easily be made to challenge any level. Go to Redefining Strength and download the bodyweight guide for more handstand variations!

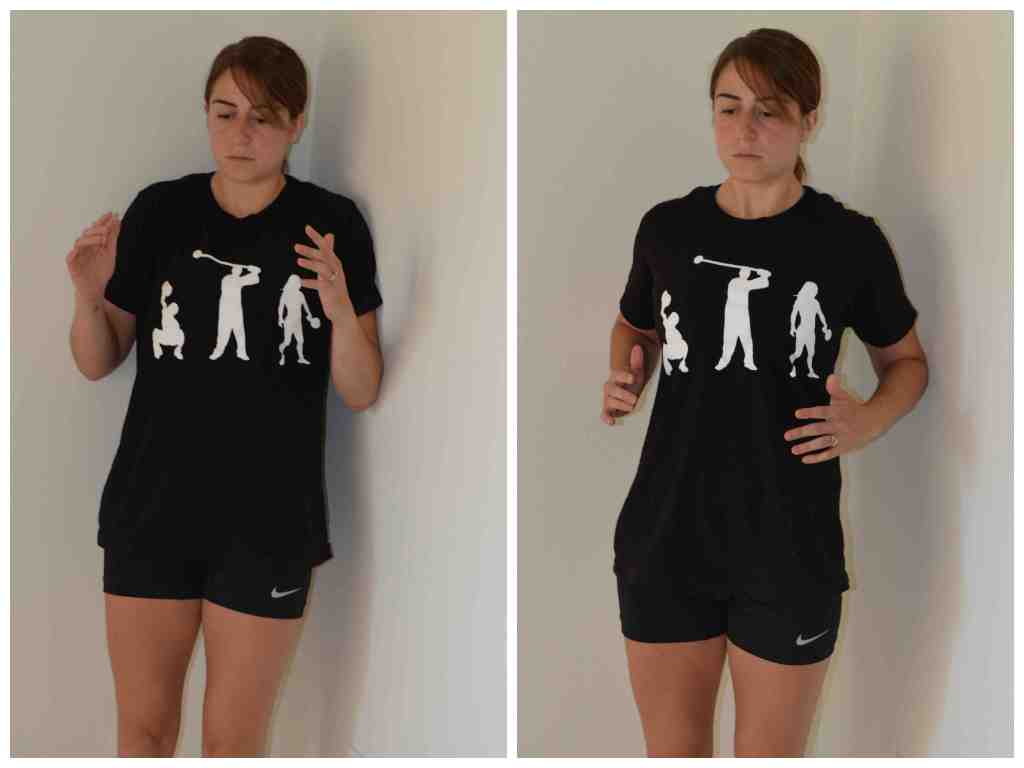
2. Scapular Hold – If you’ve read more than one article on this blog, you know by now that I LOVE scapular holds or Batwings. These are a great way to work your back and improve your posture (and lessen neck and shoulder pain!). The basic variation of scapular holds is done against the wall. You can also do this against the ground if you are really up for a challenge; HOWEVER, progressing down to the ground isn’t really necessary if you really focus on activating the correct muscles while against the wall. The scapular hold can also be made into a dynamic move called the Corner Row. The corner row works the same muscles although I do find it challenges the core a bit more since you must hold your body in a straight line while moving. Both are essential for less pain and better posture!
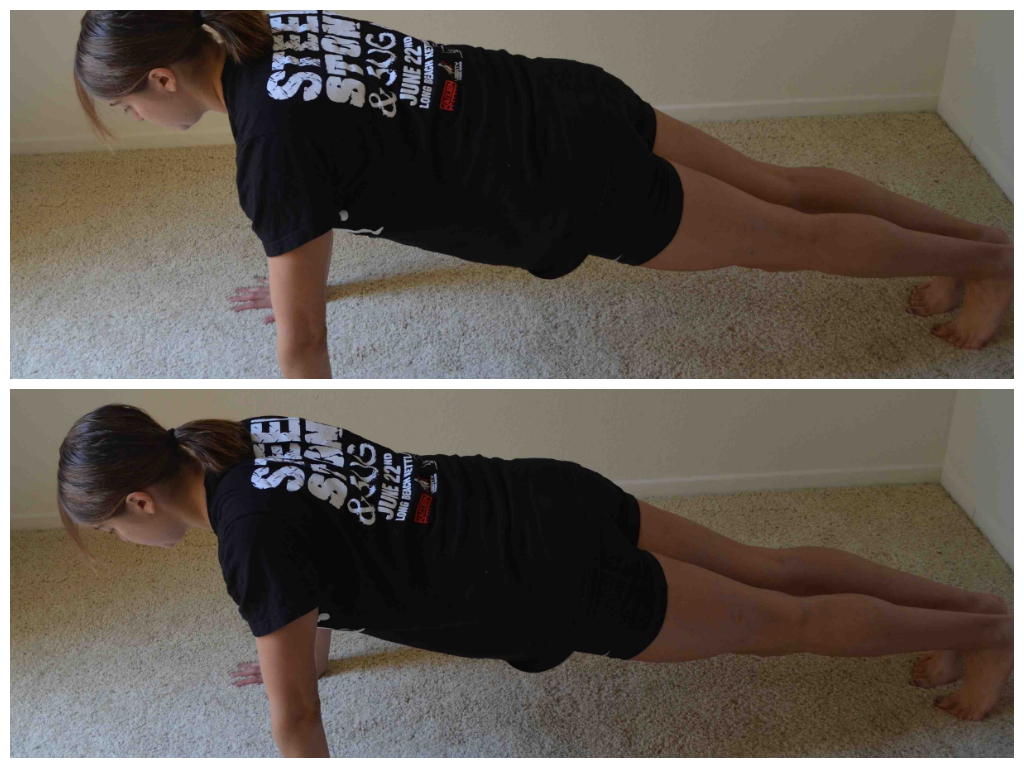
3. Push Up variations (T-push ups, incline, close grip, wide grip, push up to fly, push up to dip, divebombers…) – Push ups can be made easier for the beginner (incline) or more advanced for the experienced exerciser (decline). They can also be made to focus more on the shoulders, chest or triceps. They are a great move to work your chest, shoulders and triceps as well as your core. Here are even more push up variations if you are bored with the ones you’ve been doing.
Remember the push up to fly!?!
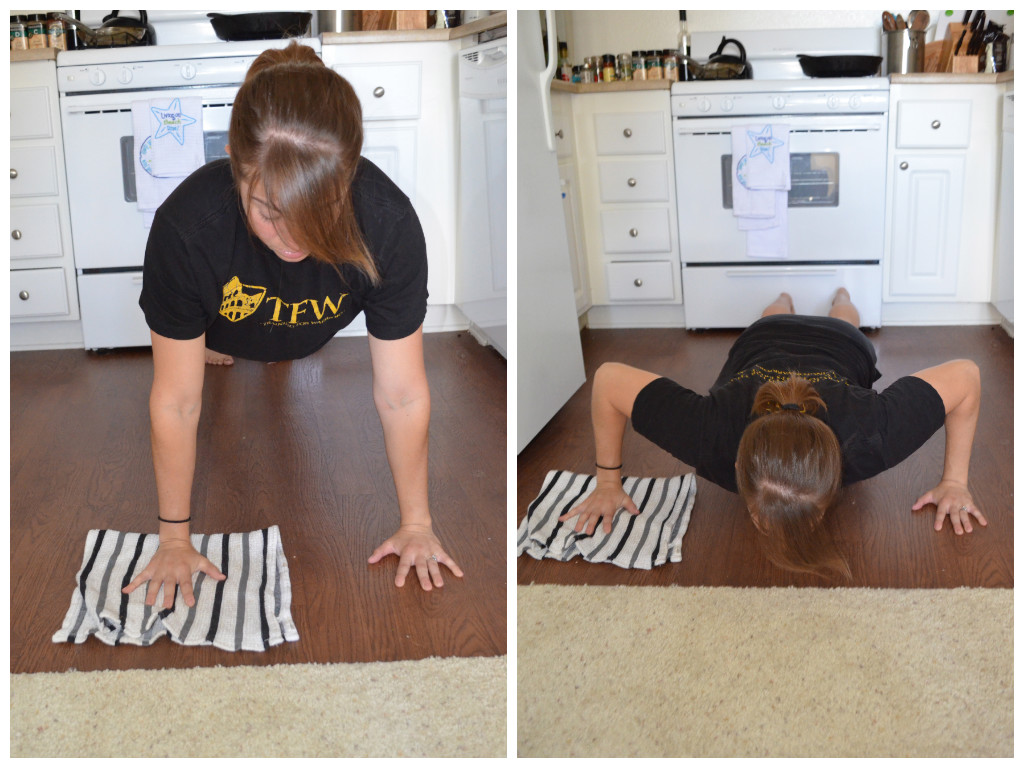
4. Scapular Push Ups – A great push up variation to work your upper back. While you may only perform an inch or two of movement, this is a hard move that really works the lower traps. Great to improve posture and alleviate neck and shoulder pain! You can make this easier by doing it from your knees. You can also change it up by doing this move from your forearms instead of your hands.
5. Crawls – Forward, backward, sideways, circles… Bear crawls, alligator crawls, crab crawls, gorilla crawls…All these crawls work your shoulders, triceps, core and even your quads. PLUS they are a great way to get in some cardio! With crawls I often hear the excuse that people don’t have enough room to do them, but all you need to be able to do is take a step or two forward and a step or two backward. And you can keep things interesting by mixing up the type of crawl you do. Shoot, sometimes simply doing crawls for your workout is enough!
6. Plank variations (plank with reach through, plank with reach out, plank holds, climbers) – Planks don’t just work your core. They are a great way to develop shoulder stability and work your upper body as well as your abs. Planks are more than the basic isometric hold we see done so often. They can also be a dynamic movement like climbers or plank with reach out.

7. Posterior Plank – A great move for your entire backside, the posterior plank works everything from the back of your shoulders down to your ankles. You can advance this move by doing a single leg variation or you can make it easier by bending your knees a bit instead of having them out straight. Every time I do this move, I can’t help but think of Flash Dance.
8. Towel Lat Pulldown – A great way to work on those pull ups even when at home without a pull up bar (although I do think a doorway pull up bar is a great investment!). This move helps work on scapular retraction and lat activation. It is also great if you have overactive upper traps and suffer from shoulder and neck pain!

9. Towel Taz – One of my favorite cardio moves that also works the shoulders and can be done at home, or in your hotel room, with something we all have…A TOWEL. While you want to make sure you aren’t in a place where you can knock things over, you don’t actually need much room to do the Towel Taz. Flap the towel up and towel or press your arms in and out. Both will work your upper back, shoulders, triceps and core. (Plus if you move around quickly, your legs and cardiovascular system are going to get some great exercise as well!)
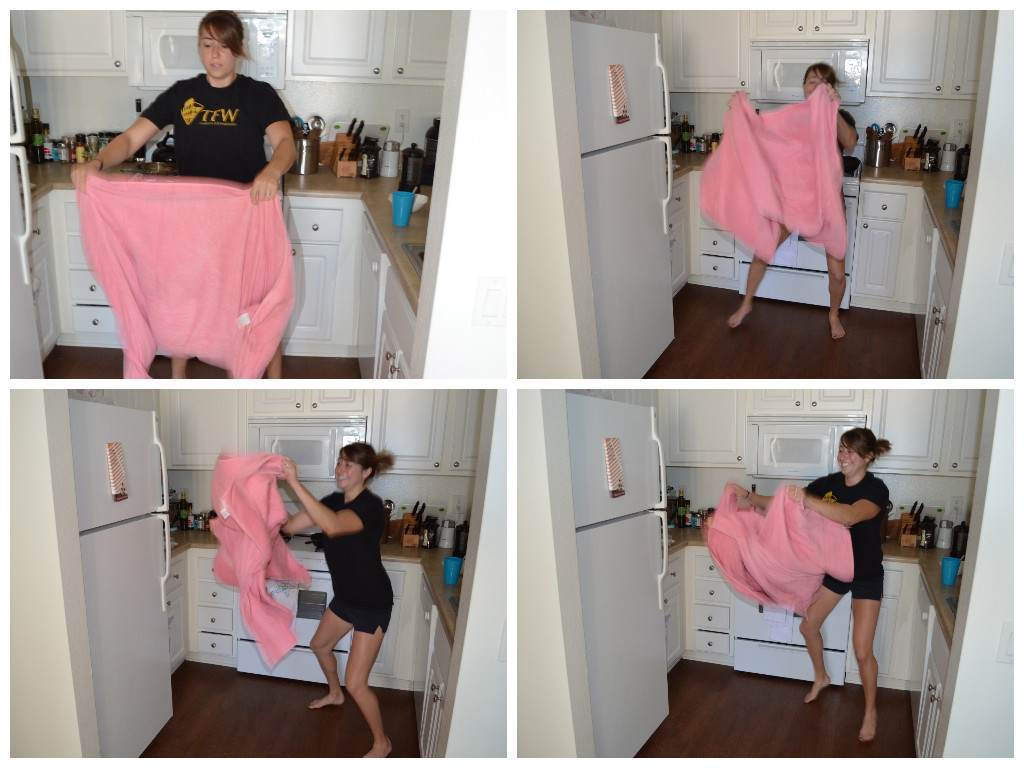
Cardio in your home!
10. Glute Bridge with Reach – This move is a great way to work your back, butt and core as well as get a nice stretch in. It can be a great dynamic warm up and activation move as well as a challenging move to add to your workouts. Since I haven’t really ever mentioned this move before….To do this move, set up in a glute bridge. Drive through your heels and get your hips up as high as you can. Keeping your core and glutes tight, reach one arm across your body and overhead as if you are reaching for something over your shoulder and behind you. You will bridge up onto one shoulder, keeping your hips up. Come back to center, lower the hips down and then bridge back up and reach across and back over the other shoulder. Repeat alternating sides and rotating the core while in the glute bridge.

I will extend my arm a bit more and really bridge up on the one shoulder while keeping the other arm down by my side, but this gives you a basic variation.
So there are at least 10 Upper Body moves you can do at home….Maybe you can even use them today to help you stay on track this weekend….
How many of these had you forgotten about?
Being a Butthead and a Quad Killing Squat Workout!
There are definitely times when we go against our better judgement and do a workout we know we shouldn’t – when we push ourselves harder than we know we should.
Like when we haven’t worked out for weeks….We all know we should go a bit lighter to ease back in.
Or when our nutrition hasn’t been on point and we know we won’t be able to push as hard but we still do.
And then we suffer the consequences.

Can’t…bend…to…get…it….
And I’m not talking about a little bit of soreness the day after…I’m talking about debilitating soreness for the entire week after.
Yea…
If you do that, you are a butthead.
And I…I am a butthead!
I am a butthead because I decide to do a heavy leg day on Monday and go heavier than I’d ever gone before.
Because even though I knew I hadn’t done a heavy leg day in about 3 1/2 weeks, even though my nutrition was just getting back on track after a week of vacation, even though my sleep was just getting back on track and my stress level was elevated after about two weeks away from work, I felt good when I started my workout so why not take advantage and push it right!?!
WRONG!
My body wasn’t ready to handle the stress of such an intense workout and now I’m still not able to walk like a human without super intense focus and pain.
And this isn’t something I’m proud of. I’m actually angry at myself because I ignored all the sides and pushed my body beyond what it was ready to do and now my workouts have been thrown off for the entire week.
By being cocky and stupid, I’ve hindered my own results. For what? For a little bit more weight!?!
AH!
This is one of those few times where I will say, “Do as I say, not as I did!”
Don’t be stupid.
If you are coming back from time off, remember your body will not be ready to handle the load EVEN if it feels like you could push harder during your workout. BUT remember you are building so that you can get back on track. You don’t want to make yourself so sore that you can’t get back into your workout routine!
Same goes for diet. Whenever you have changed your diet, remember your body may not have the energy to push as hard as you would like. And it may not recover as quickly especially if your nutrition hasn’t been on point.
BE PATIENT! Ease yourself back into things and you will find you actually get results faster!
Anyway, that is my little rant about my own stupidity and why you shouldn’t do the same.
Don’t let cockiness get in the way. BE SMART and EASE YOURSELF BACK INTO YOUR ROUTINE!
And in case you want a quad killing workout (but one that shouldn’t incapacitate you the entire week), try the one that murdered me on Monday…Just use an appropriate weight or even start with bodyweight!
Quad Killer
WARM UP
Roll out and dynamically stretch
Calves, hamstrings, quads, hips, glutes, low back, core and thoracic spine
STRENGTH:
Front Squats:
1 minute on, 1 minute off for 5 rounds
I like to pyramid down. I start with the heaviest weight I can handle and must complete at least 20 reps. If I don’t, I drop to the next weight. I stay at that weight for as many rounds as possible as long as I complete 20 reps in the minute. I drop down as needed, completing all 5 rounds. If this is your first time, START LIGHT and focus on completing more reps instead of doing more weight. I also like to use kettlebells for the front squats although you will find you are limited by how much your upper body and core can handle (which isn’t a bad thing!!!)
Circuit:
4 rounds:
10 reps each side Single Leg Squats (Can squat to bench if a beginner. Can use TRX or XT to advance)
10 reps each side Walking Lunges with weight (keep your chest up tall and do not swing the weights. Step from one lunge into the next lunge, driving off your front heel)
20 reps Jump Squats
COOL DOWN
Stretch and roll out quads, calves, hips, hamstrings and any other tight spots.
Enjoy!
Bodyweight Workout Routine – Slowing Down The Tempo
Ok so I’m tired of people telling me that they don’t have time to go to the gym and, therefore, they don’t have time to go to the gym.
Here is a workout that DOESN’T require the gym…aka it doesn’t require ANY equipment. And it will challenge even the most advanced lifter!
I’ve mentioned before that there are a ton of ways to advance moves WITHOUT using weight. I’ve shown you more difficult variations of moves…like single limb moves. I’ve shown you how to challenge yourself using a towel.
And now I’m going to show you how to create a challenging workout by slowing down the tempo of your repetitions. Each exercise is done SUPER SLOW. While all the tempos are slow, the emphasis is put on different parts of the movement so pay attention to what the tempo says!
Total Body Bodyweight Workout!
WARM UP
Roll out any particularly tight spots and do dynamic stretches for calves, hamstrings, hips, core, chest, shoulders, and upper back.
STRENGTH
Perform 3-4 rounds of each superset. Complete all rounds before moving on to the next superset. Rest for 1-2 minutes between each superset.
Superset #1
TEMPO 5/0/1 8-12 reps each side Single Skater Lunge (5 count squat down toward ground, no pause at bottom and quick push back up. Like a single leg deadlift EXCEPT that as you lean forward and hinge toward the ground you are actually going to bend that standing leg as low as you can. So it is a combination deadlift and squat. The back leg doesn’t need to stay straight.)
TEMPO 1/5/1 8-12 reps Posterior Plank (Quick up, 5 count hold at top and quick back down. To do this move sit on the ground with your legs out straight and your hands behind you. Point your finger tips toward your butt. Lift up onto your heels and hands, keeping your legs straight and leaning your head back at the top. Get your hips up as high as possible. To even advance further, keep the tempo slow and perform a single leg plank.)
Superset #2
TEMPO 5/1/5/1/5/1 5-10 reps Push Ups (Hold 5 seconds at the top of the push up. Lower down to midway of the push up and hold 5 seconds. Lower down to the bottom and hold 5 seconds. Do not relax on the ground at the bottom. Push quickly back up to the top. You can do an incline push up or push up from your knees to regress. Choose a variation that you can do for at least 5 solid form push ups!)


TEMPO 5/1/5 Slow Skater Side Lunges (Sink down into a low side lunge. You are going to move slowly from side lunge to side lunge. Do not let your butt come up in the middle. The tempo will be a five count to move from one side to the other. Do not pause more than a second on each side.)
Superset #3
TEMPO 1/3/5 8-12 reps each side Single Leg Glute Bridge (Quick 1 second up, hold 3 seconds at the top and slow 5 count lower down to the ground. This move can be regressed to a two-leg bridge OR progressed to a bridge with your feet up on a table. Keep the tempo no matter which you do!)
TEMPO 1/5/1 8-12 reps Corner Row (Quick press out, hold 5 seconds in scapular hold and lower back down. This is basically a scapular hold with movement. Set up in a corner with an elbow on each wall as if you are going to do a scapular hold. Relax against the wall and then press up into a scapular hold on your elbows. Hold there in the scapular hold and then lower back down to the wall.)
COOLDOWN
Stretch out and roll out hamstrings, hips, glutes, chest, shoulders and upper back.
All of these moves are challenging…both physically and MENTALLY. It is always a mental challenge to force yourself to move slowly when your muscles are burning and you just want to get it over with!
Enjoy! And even try slowing down the tempo on some of your other favorite moves!
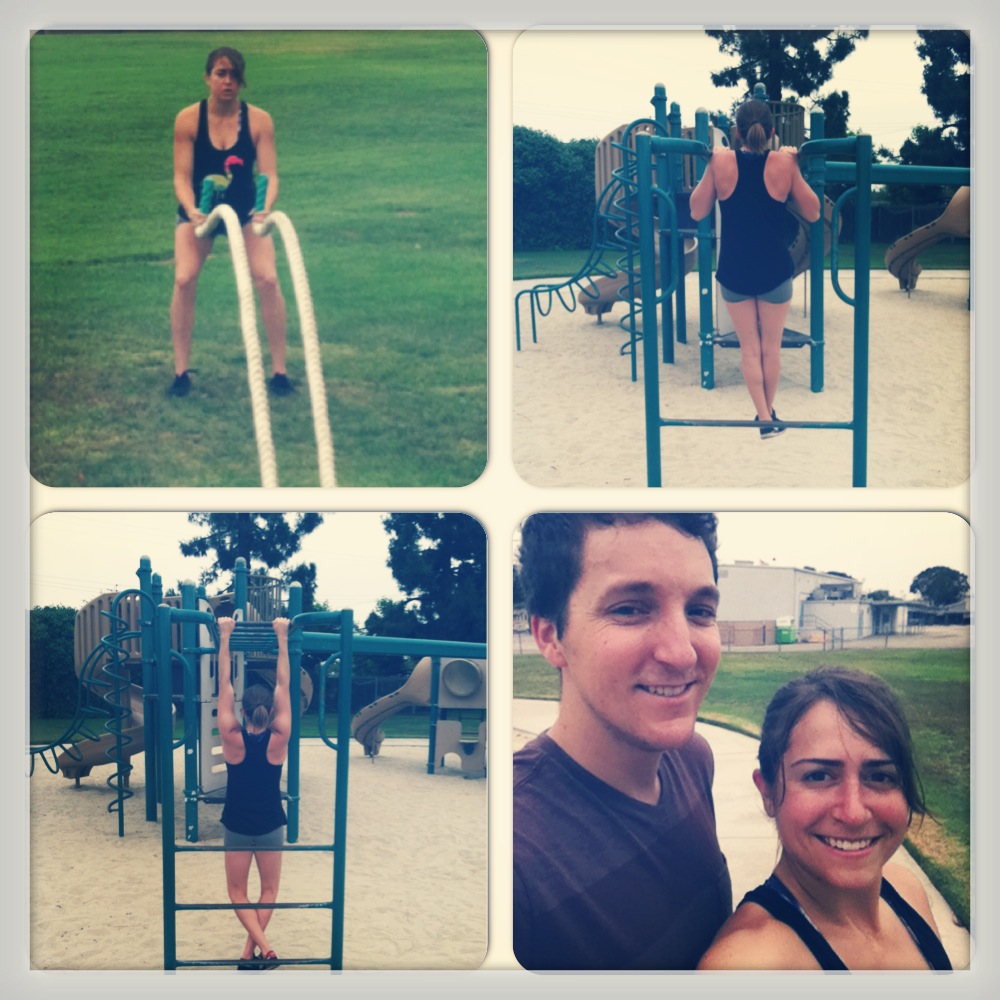
Wedding Week Part 1 – Wedding Weekend Workout
This past Saturday, I married my best friend. I married the person that, even when he makes me so mad I want to punch him, I still want to run to him to make it better.
I married a man who accepts me completely – He accepts me in all of my Type A-ness, which sometimes even includes an inability to let go of work (this is honestly the longest I’ve gone without posting since the inception of Man Bicep AND I have still texted clients who’ve told me to stop texting them and get back to my vacation.)
I just love what I do…And he accepts that because he is AMAZING.
He even accepted (and took pictures in fact!) that I needed to teach a little wedding bootcamp at the house the day before the wedding. Which was a TON of fun!
Taught everyone some new moves they could do at home with no traditional equipment. (Monkey Knuckles, one of my best friends and a client from Boston, was even there. Miss you Juliana!)
With the workout, we got a good little sweat going and had some fun in the process (plus I think we ended up cleaning the floor with our towel moves!)
Here is our fun little workout if you want to give it a try! (Wouldn’t usually do so many different exercises, but wanted to give them lots of new stuff to leave with!)
Wedding Weekend Workout:

Post workout bicep pose!
Warm up (stretches for calves, hamstrings, glutes, hips, shoulders and back)
Circuit #1:
3 rounds:
8-12 reps Towel Glute Bridge with Curl (Do a single leg curl to regress)
3-4 Circle Crawls each way
Circuit #2:
3 rounds:
15-20 each side Towel Mountain Climbers (Do not use a towel under your feet to regress)
8-12 reps each side Single Leg Deadlifts (3 count lower down)
5-10 reps Gorilla Crawls forward
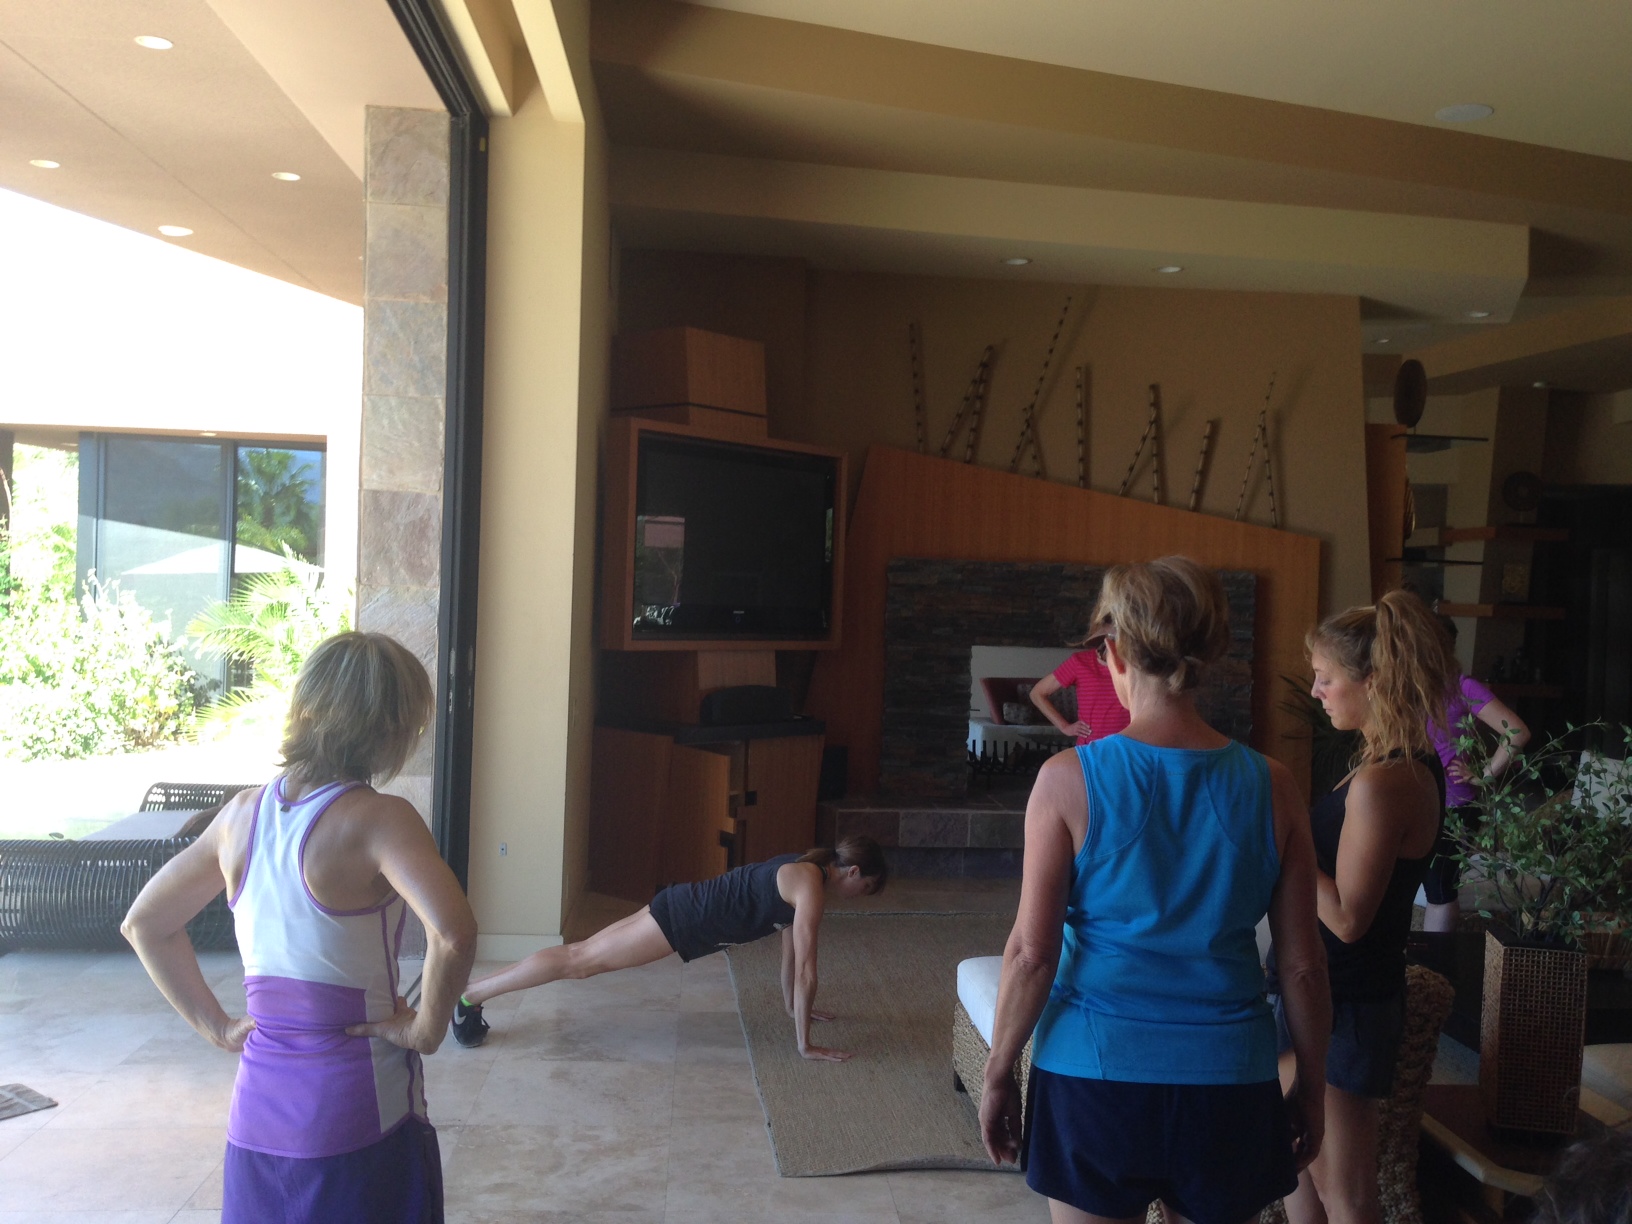
Demonstrating!
Circuit #3:
3 rounds:
8-12 reps each side Curtsy Lunge on Towel (Take out the towel to regress)
30 second Scapular Hold
8-12 reps Push Up (5 second lower to progress. Incline to regress)

Best move ever!
Circuit #4:
3 rounds:
20 second holds
Front Plank
Side Planks
Plank Hip Dips (Hold front plank and rotate side to side touching the hip down on each side)
This is a great total body workout you can do with no equipment. The workout doesn’t take very long and you can also easily simplify it if you are shorter on time!
And the best part was, everyone was challenged no matter their fitness level or exercising experience!
Stay tuned for more wedding week posts to come shortly!

Pre-workout workout…practicing walking in heels…And in case you can’t tell…They are wonder woman heels!

My wedding heels.
Grip Strength – Farmer’s Walk
If you can’t hold the weight, you can’t use the weight so as obvious as it sounds…We are only as strong as our weakest link.
Often we ignore grip training in favor of lifts that are more fun and that, we feel, give us more bang for our buck.
But there really is no better full-body, functional lift than the farmer’s walk.
You could actually argue this is the MOST functional exercise. I mean just think about how often you need to hold something and walk with it!
And guess what!?!
IT REALLY WORKS YOUR GRIP! Along with your arms, back, shoulders, core and legs…So just about EVERYTHING!
Basic Farmer’s Walk Variations:
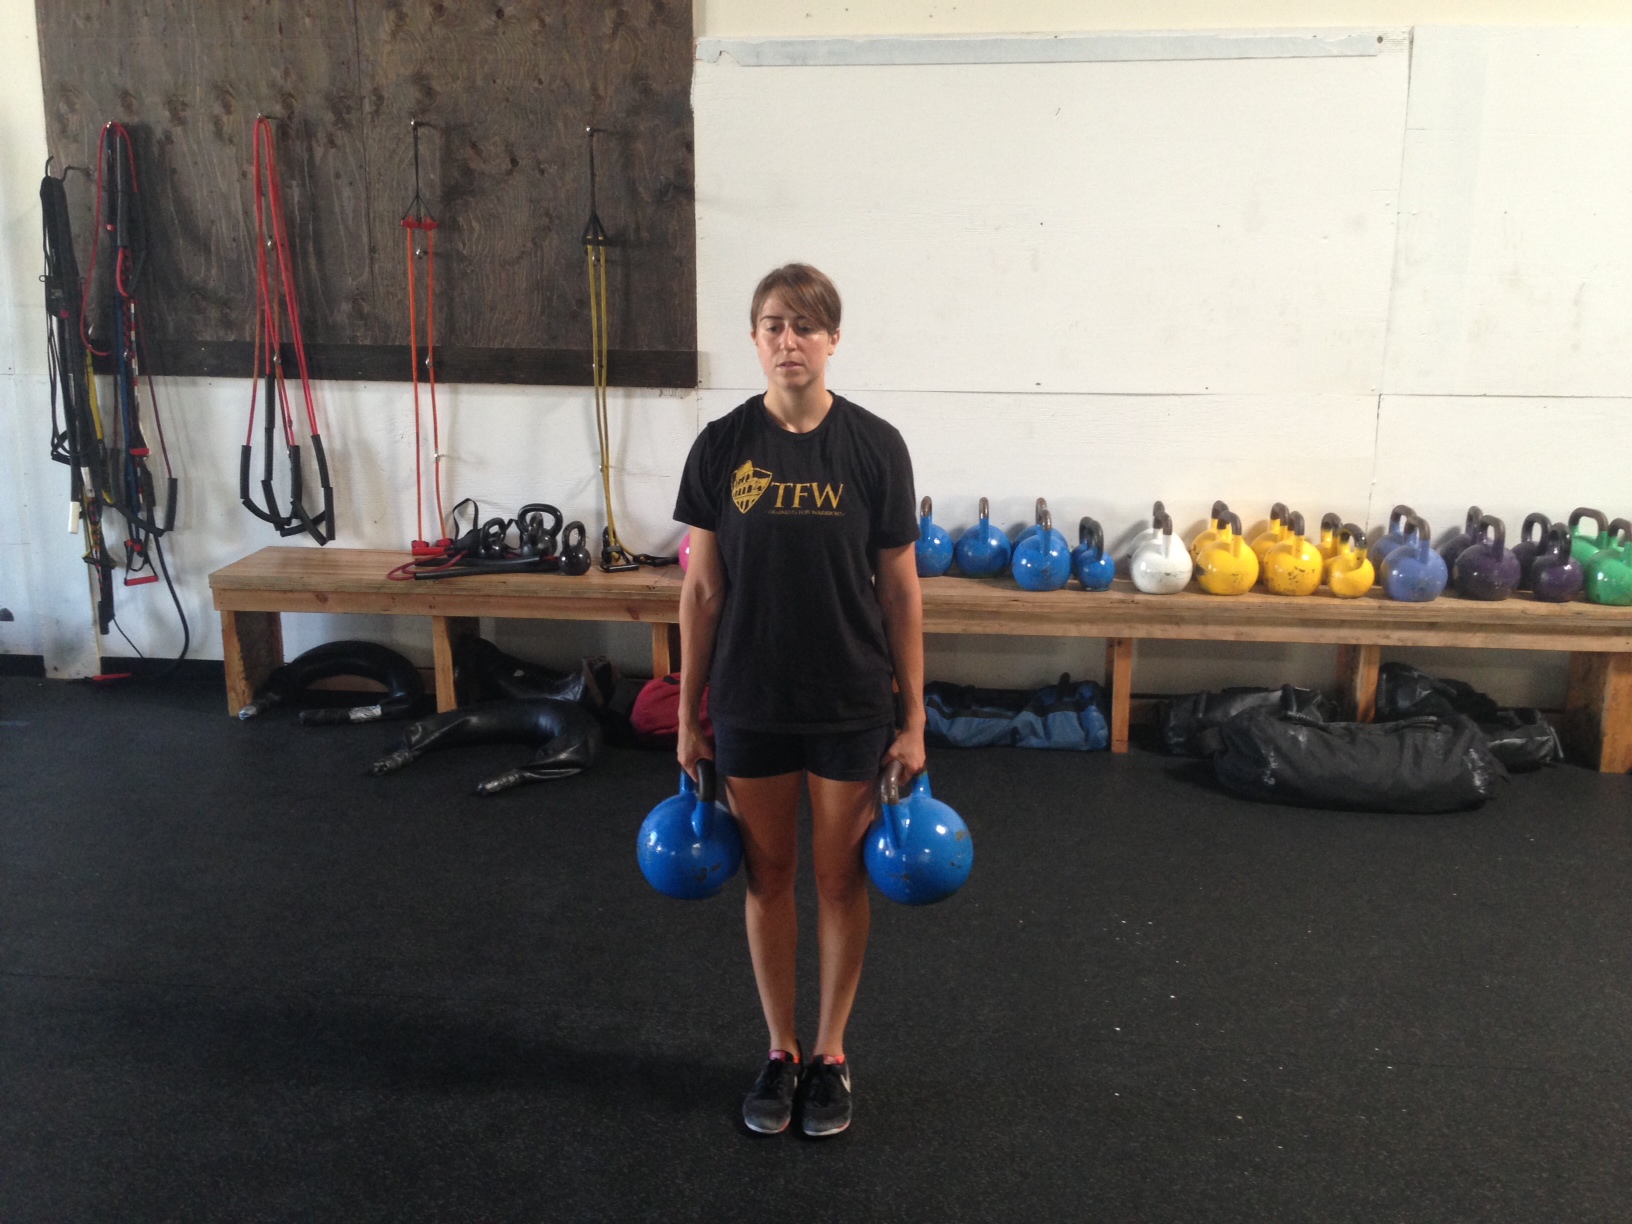
Nice tall posture and walk holding the weights down by your side but don’t let them rest on your legs.
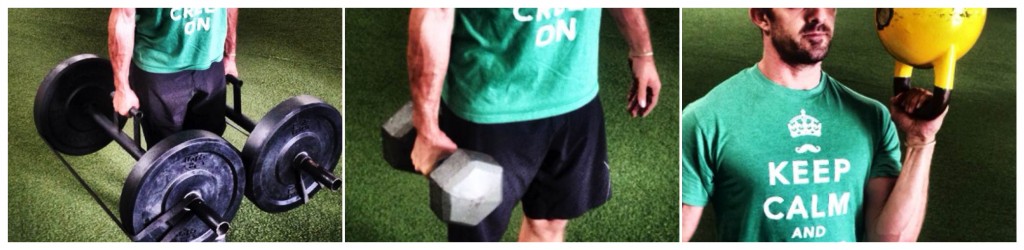
1. Two-handed Dumbbell or Barbell Farmer’s Walk:
Basically, you hold heavy weights in each hand and you walk to set points or for a set amount of time, maintaining perfect posture. You want to use weights that CHALLENGE YOU and make you want to drop them just before your round is done.
Do not let your head jut forward or your shoulders round forward.
Do not let the weights rest on your legs. Hold them just a teeny bit away from your body or at least so they aren’t RESTING on your body.
Keep your core tight and walk with your shoulders down and back and your head up.
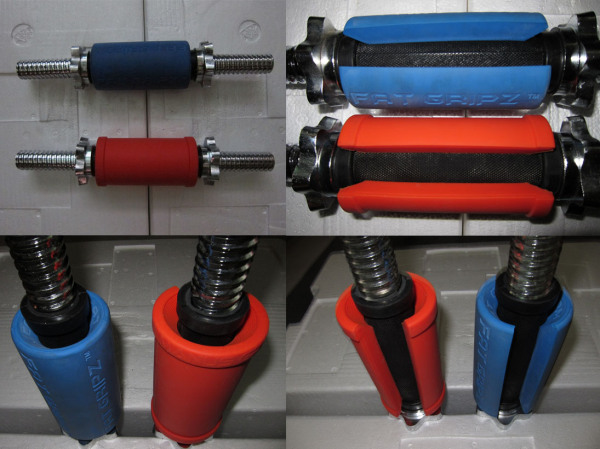
2. Two-handed Fat Grip (or Kettlebell) Carry:
This is the exact same as the two-handed Farmer’s Walk except you are challenging your grip even more by making the grip itself BIGGER.
Fat grips are a great way to challenge your grip because they make the handle bigger and more awkward to hold. The more awkward an object is to grip, the more it challenges your strength!
When you do carries with dumbbells that have fat grips on them, really focus on not letting the dumbbell slant forward or backward toward the ground. Make sure you carry the dumbbell so that it is level with the ground.
I also use competition kettlebells instead of dumbbells to challenge my grip more because their handles are bigger than the handles of dumbbells. This can be a great option if you don’t have fat grips.
Kettlebells are also great for carries because the bell wants to hug your legs and you have to lift them out a bit more from your body, which challenges your upper body and core even more.
The point though is…THE LARGER, MORE AWKWARD, THE GRIP THE MORE YOUR FOREARM AND HAND STRENGTH WILL BE CHALLENGED!
3. Unilateral Carry (with or without fat grips):
Fat grips can be placed on any dumbbell…or even a kettlebell….
Whenever you load down one side, your core is forced to work harder to stabilize. Plus I just love unilateral exercises because they force each side to work individually and help you correct any imbalances.
When doing a unilateral carry or farmer’s walk, you are going to hold a weight on one side. The more awkward the weight, the harder the move will be.
You are then going to walk forward. Do not allow yourself to either lean away from the side with the weight or toward the side with the weight.
The challenge is to PREVENT ROTATION. This is an anti-rotational move. You want to walk as if you have either no weight or at least equal weight in both hands even though you are only weighted down on the one side.
Keep a nice tall posture and make sure your shoulders stay level and you don’t lean. Keep the weight off of your leg as well. You do not want to rest it on your hip or thigh.
4. Uneven Farmer’s Walk:
I find that I’m often carrying something in both hands; however, those two items are usually different weights.
One of the most functional farmer’s walks, in my opinion, is the uneven carry.
To do this move, carry a lighter weight in one hand and a heavier weight in the other. Make the difference noticeable.
Just like with the unilateral carry, the challenge is to not rotate and to act as if the weights in each hand are even. Keep a nice tall posture and your core tight. The weights should not be resting on your legs and you should not be leaning to one side. Your shoulders should be level and your head should be held high, not looking toward the ground or jutting forward.
5. Overhead Carry (unilateral or two-handed):
While this farmer’s walk (I think it is also known as a waiter’s walk) is not as grip intensive, it is a really REALLY great stabilization exercise and is super core intensive.
This move can be done carrying a weight in both hands or as a unilateral movement.
The goal of both moves is to press the weight straight overhead and keep your core tight and your low back from arching. Try to get your bicep by your ear and your arm(s) locked out straight with the weight overhead. Try to relax your shoulders down and back as you carry and not shrug too much.
REALLY REALLY focus on keeping your core tight.
If you do a unilateral overhead carry, remember to not rotate or compensate for the fact that you have a weight only on one side. You want to walk as if you have an even weight in both hands.
Slosh pipes or awkward weights are great for overhead carries IF you’ve developed the shoulder and core stability. These unstable weights, or uneven weights, can be a great way to progress the overhead carry.
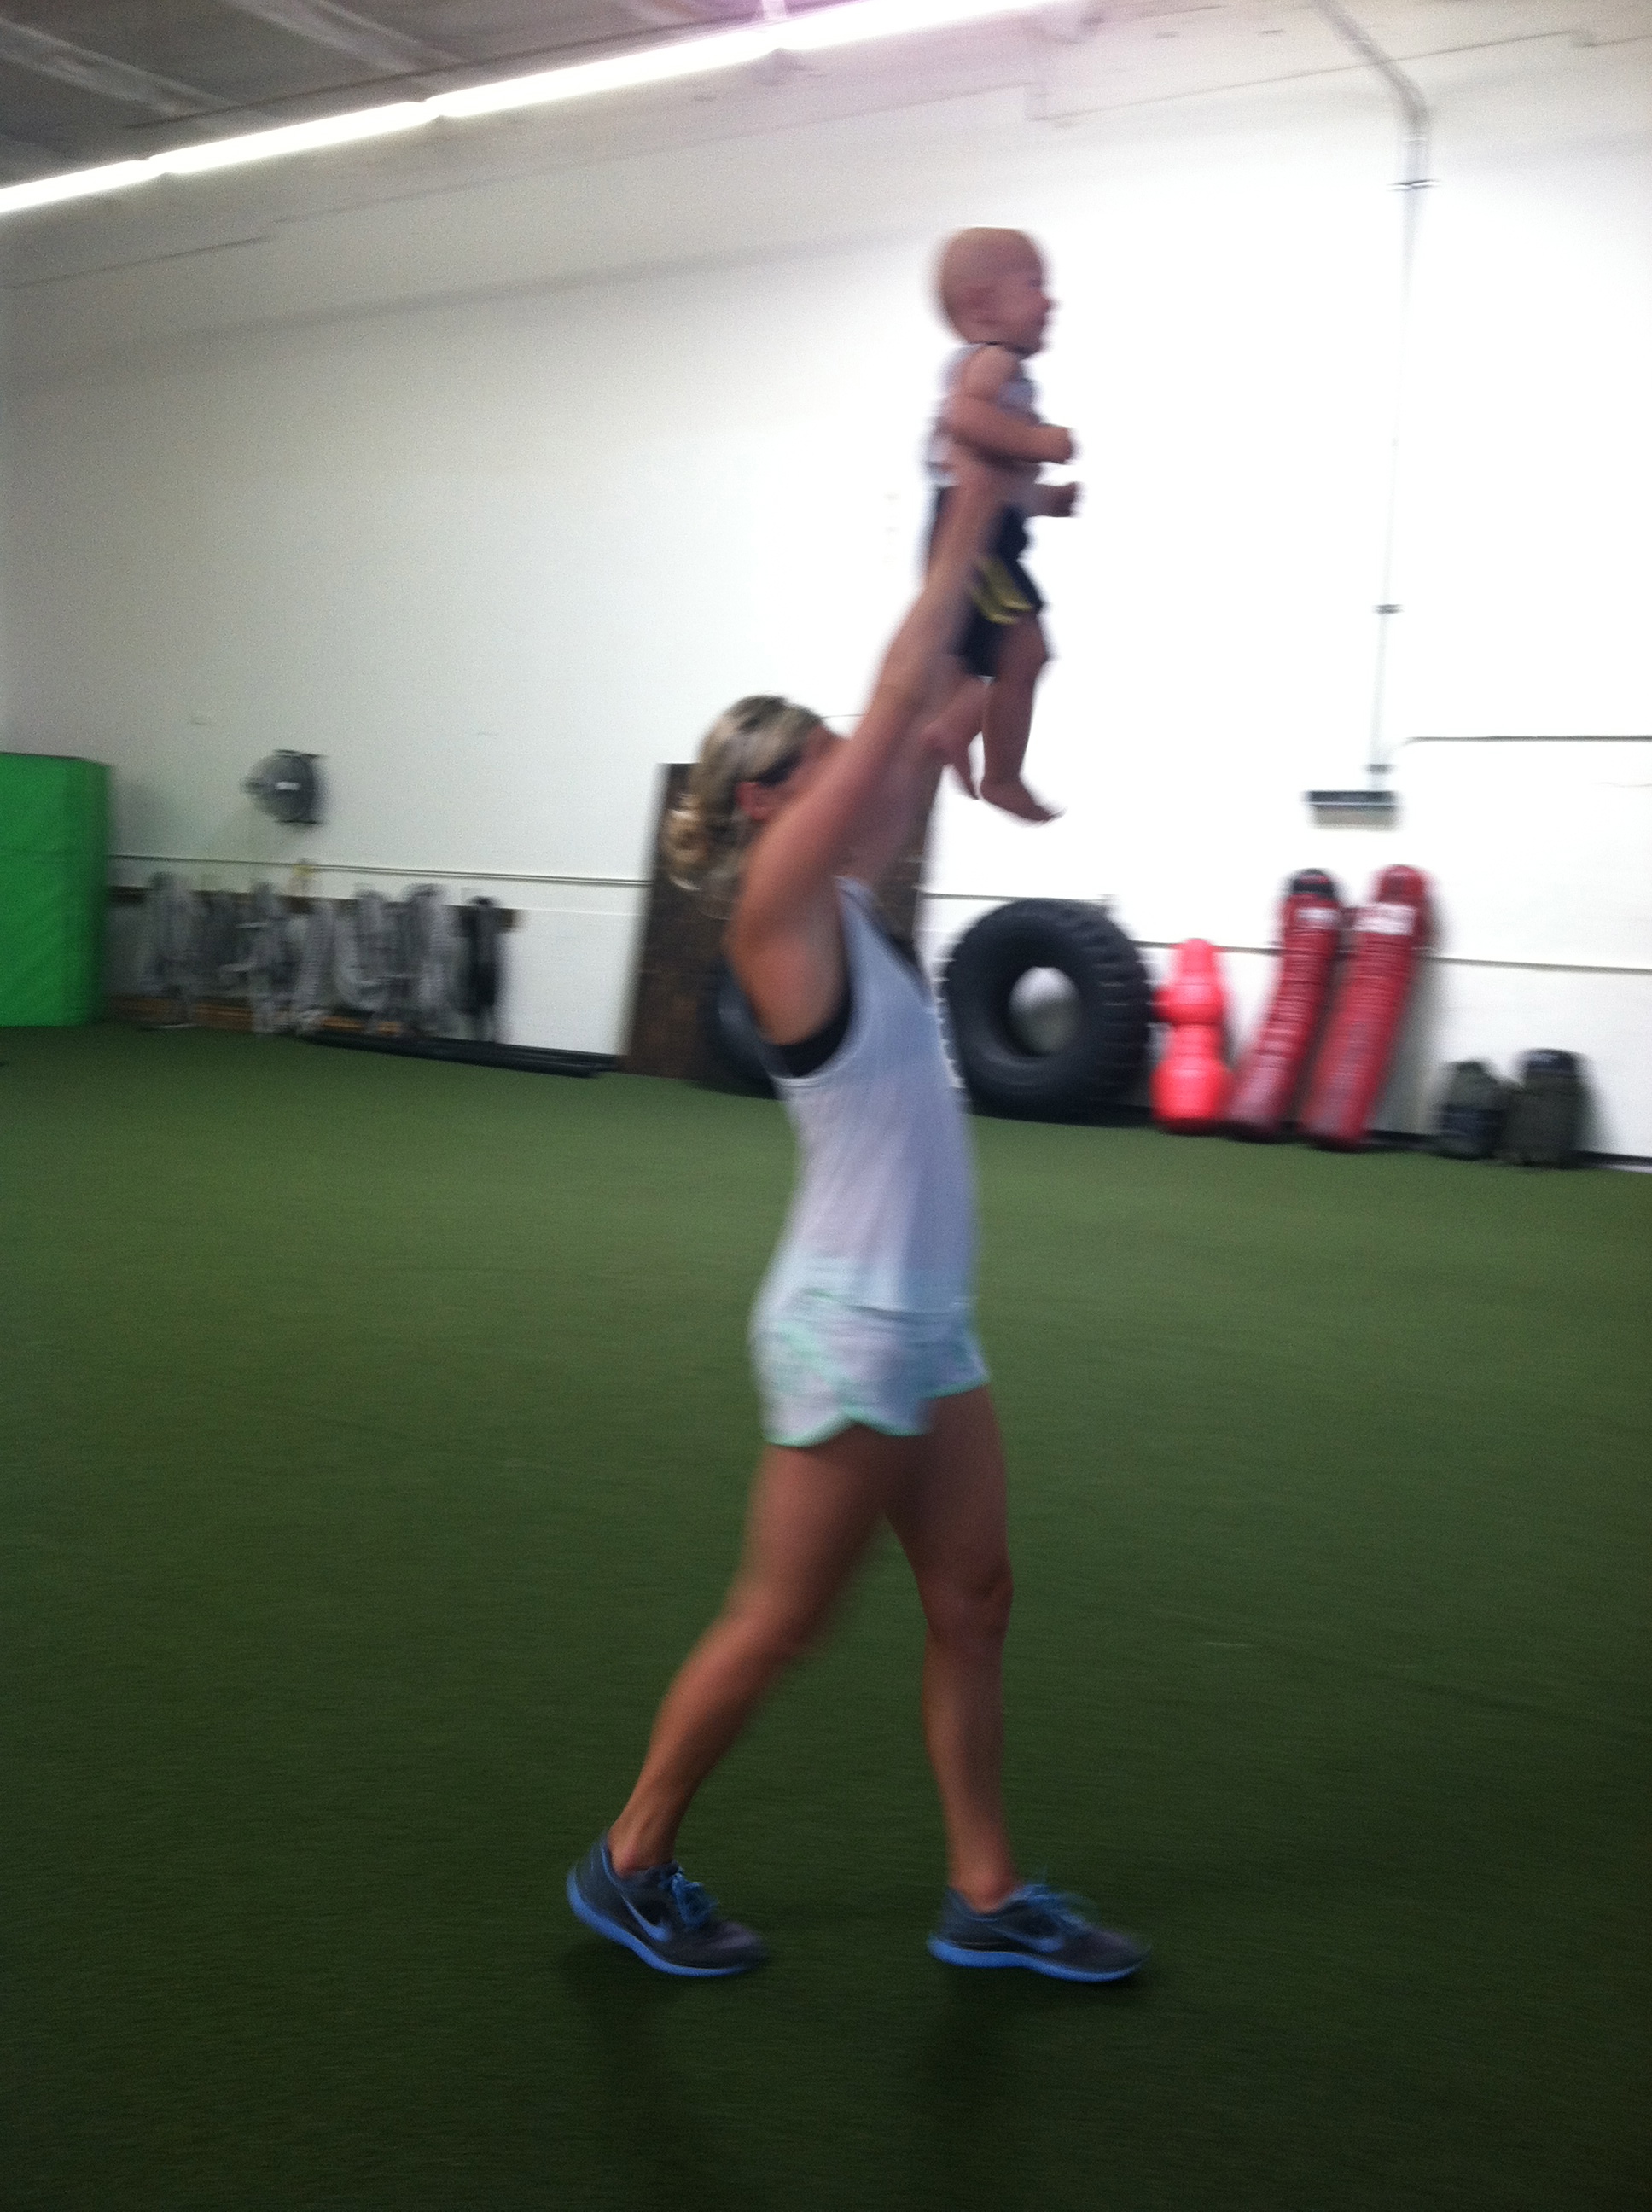
Heck you could even do an overhead baby carry!
However, if you are a beginner or have had shoulder injuries in the past, you may want to be careful with this move. This move requires good shoulder stability and both lat and chest flexibility.
Start slow with this move if you have limited shoulder mobility or have suffered from shoulder injuries. While this can be a good way to re-develop shoulder strength you do not want to force mobility and stabilization that isn’t there yet!
Stop letting your grip strength limit how much you can lift. Your are only as strong as your weakest link! Start using farmer’s walks today to strength your grip and get a full body, FUNCTIONAL workout!
AND…While Farmer’s Walks and Carries are probably the best ways to develop grip strength because they also develop full body FUNCTIONAL strength, there are other exercises you can do to develop grip strength (especially if it is your weakest link!).
Check out these 10 grip strength exercises by Fight Camp Conditioning for more ways to strengthen your grip. And the best part about these 10 exercises is that some of them can be used to create even more farmer’s walk variations (like a farmer’s walk with the pinch or claw grip or even a bottoms up carry!).
Fight Camp Conditioning gives even more carry variations!
Recovery Week Workout
Last week was my Recovery week from all my super heavy lifts and my 10-7-3-1 workouts.
Sometimes my “recovery” workouts aren’t easy at all. Sometimes they are simply DIFFERENT exercises and “lighter loads” than what I’ve been doing.
Sometimes they simply require my body to move in a different way than it’s been moving for the last 3-5 weeks.
I also love doing single limb movements and more bodyweight moves during my recovery workouts. These moves aren’t EASY though. I just find they really force me to work more on activation and correcting imbalances.
Recovery doesn’t always mean time off and it doesn’t always mean EASY.
Here is my far from easy (and actually made me super super sore) recovery Glute Workout from this past week.
Recovery Glute Workout
WARM UP:
Foam roll – lower legs, hamstrings, hips, back
Stretch – Calves, hamstrings, hips
Activate – Glutes with lateral and monster band walks
STRENGTH:
4 rounds:
8-12 reps each side Single Leg Deadlift holding double kettlebells
(Increase weight with each round if possible unless 8 rep max hit. Keep standing leg slightly bent and back flat as you hinge over. Hold one kettlebell in each hand by your side. Do not let your back round as you hinge over.)
8-12 reps each side Single Leg Glute Bridge Off Box
(Heel up on box and bridge up. If you can’t get up as high as with a two leg bridge then stick with a single leg bridge off the ground)
4 rounds:

8-12 reps each side Curtsy Lunge holding double kettlebells
(Increase weight with each round if possible unless 8 rep max hit. Make sure as you lunge back and come to standing that you are in full control of the lunge and driving off the heel of the front leg. Really cross behind and keep your chest up as you lunge. Hold each kettlebell down by your side.)
8-12 reps each side Single Leg Step Down
(Start standing on the box as if doing a lateral step up. Step down to the side of the box, hinging over a bit as you lower down. Lower down slowly. Do not let the foot going down fully touch the ground. Only let the toe lightly graze the ground and then press quickly back up to standing. Only go as low as you can control. DO NOT push back up off the ground!! The higher the box the harder the move.)
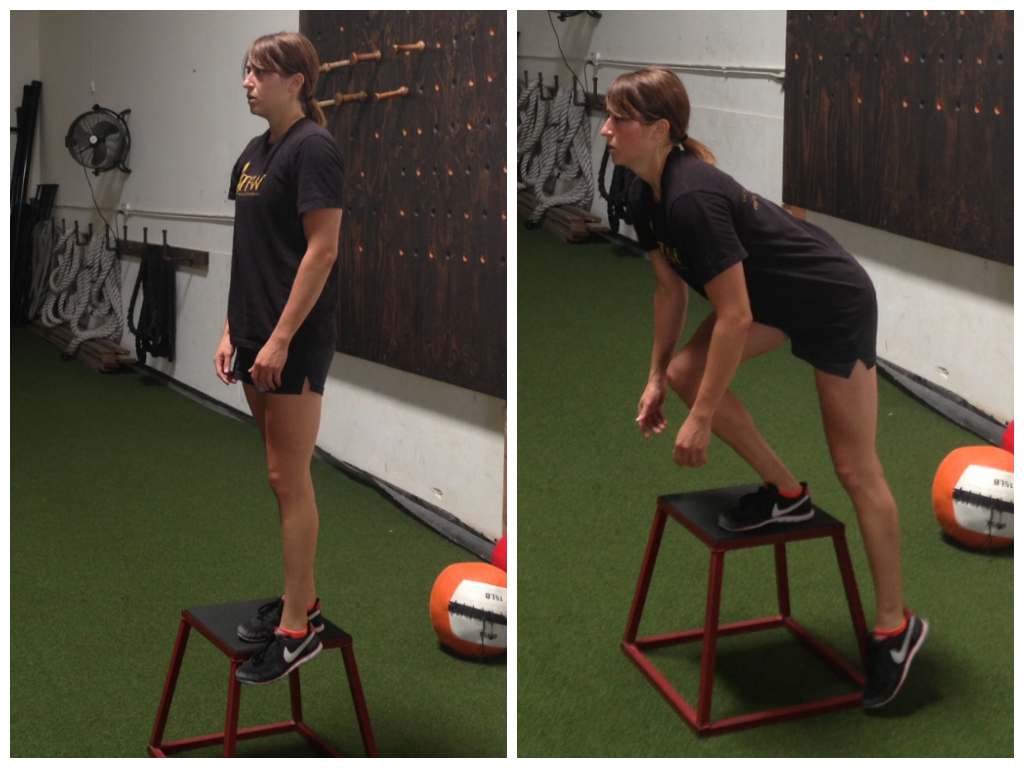
Make sure to sink back into the heel on the top of the box. Don’t be afraid to lean forward just keep the core tight.
CONDITIONING:
3 rounds:
40 seconds of work, 20 seconds of rest
Heavy Kettlebell Swings
While these moves didn’t use the heavy loads that many of my lifts have required recently, the loads were still heavy and CHALLENGING for the moves I did.
And the bodyweight bridges and bodyweight step downs were far from easy.
These moves all challenged my glutes to work and stabilize to become stronger for my heavy lifts. Since they were also single limb movements my dominate leg couldn’t take over and compensate. My weaker leg was forced to work equally hard, which helps to correct any imbalance that may exist.
And my butt was sore for days actually and my glutes were definitely shaking a bit during the workout.
My rest periods were also very short during the workout since I wasn’t trying to lift my max, making it a rather quick workout. However, I did rest enough that I could still use CHALLENGING weights and give a good work output each and every round.
The little conditioning blast at the end was also short and sweet. It worked on grip strength and power. It also got my heart rate up a bit while working my glutes that last little bit to utterly fatigue them.
What do your recovery week workouts look like? Do you simply take the week off or do you do workouts to work on your weak points?
Flexin’ Friday Workout
There are lots of workout formats that work.
There are a ton of variables out there to play with to make a great workout.
And since I’ve been overwhelming you all with talking about the variables recently, I just wanted to show you how I manipulated some of them into a great squat workout the other day.
Squat Workout
WARM UP (15 minutes-ish):
Foam Rolling (Picked out places that will be used and could be tight. Quickly moved on if an assessment showed no trigger points. Spent time on areas with trigger points.)
Calves (couple of trigger points)
Hamstrings (focused on the area right under my butt since tight from other workout)
Quads (tight around knees)
Hips (TFL and glutes a bit tight)
Back (not too bad a bit tight in middle back..loosened up traps for holding KB a bit)
Adductors (good..quick sweep over cause no trigger points found but felt a bit tight)
IT Bands (good…quick sweep..no trigger points found)
Dynamic Stretches (10-15 reps each one round through all)
3 Way Ankle Mobility

Bear Squat (calves)
Hip Hurdles
Dynamic Hamstring Stretch
Dynamic Quad Stretch
Dynamic Squat Stretch
Side Lunges
Activation (1 round through 45 second holds each)
Squat Hold
Scapular Hold
High Plank Hold
Glute Bridge
STRENGTH:
1.
5 rounds of the following 1 minute on, 1 minute off:
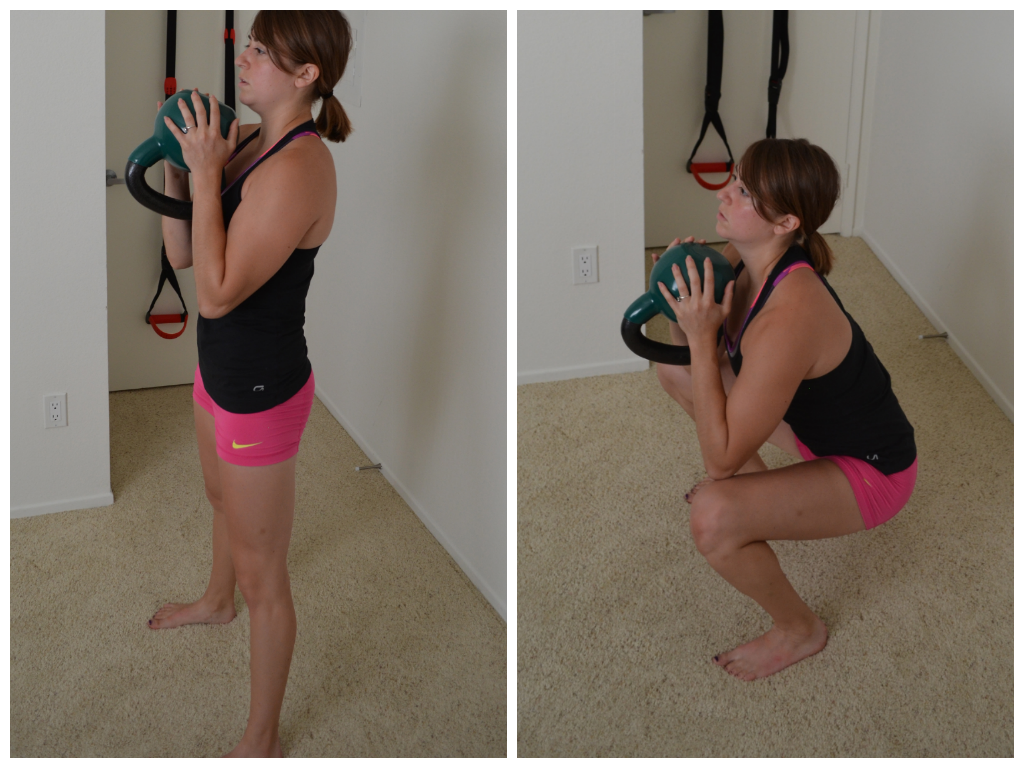
Heavy KB Goblet Squat
(Use the heaviest KB possible, but make sure to get no fewer than 20 reps in the minute. Hold weight up at your chest and squat down to at least parallel. Do not lean forward or let the chest fall to the ground. Keep the core tight and drive up off the heels.)
Rest 2-3 minutes.
2.

5 rounds of 8-12 reps with about 1 minute of rest between:
Weighted Jump Squats
(Can hold dumbbells by side or place a bulgarian bag around your shoulders like I did. Choose the heaviest weight you can while still being super explosive and getting high off the ground. Do not make it so heavy that you are quick and explosive with the move. Beginners may not want to make the move as explosive. They can regress to a squat or a squat then come up to their toes. They could then progress to a jump where they only slightly leave the ground. If your landings aren’t soft you need to regress! Super important to have good landing mechanics if you are adding weight!!!!)
CONDITIONING:
5 rounds, 50 ft sprints about 45 seconds to 1 minute rest between:
Sled Sprints
(Lighter weight so that you can sprint the entire distance, but challenges you. You don’t want it to be a jog!!)
COOL DOWN
Walked to let my heart rate come down and everything relax.
Stretched out a few areas that felt tight and rolled them out (calves, quads, hips were main focus)
Workout Breakdown
Above is just one way to manipulate the variables.
While I worked quickly when I worked, the workout itself wasn’t a quick circuit. I completed all rounds of one exercise before moving on. I took my time and rested and recovered in between sets.
It wasn’t a race to the finish with me trying to get everything done as quickly as possible.
It was about quality reps and getting myself to create the same quality output each and every round. I wasn’t afraid, especially with the jump squats or sprints to take more time if I needed even though I was trying to go as quickly as I felt recovered. (With the KB squats I did force myself to go on the 1 minute intervals.)
If you notice, I also only included 3 exercises. Not every workout has to have 10 or 20 different moves.
And if you also notice, I chose all movements in the same place of motion – the sagittal.
While I’ve mentioned before that you don’t only want to work in one plane of motion, there are times when you can choose to manipulate your workouts so that you really are only working in one plane of motion. The point is that you are aware of what you are doing.
And not all exercise have to be done for reps.
My squats were based on time. I had to move as quickly as possible the entire minute to perform as many squats as possible. I used my goal of around 20 reps (25 was fine but meant I should try to go up in weight) as a guide to choose a challenging weight while still keeping myself moving quickly the entire time.
I also didn’t mix up rep tempo very much. I did quick squats and then some explosive moves. So the explosive moves were quicker, but there wasn’t a huge tempo change. Didn’t want to…Didn’t need to. Not every variable needs to be used or manipulated into something crazy every workout.
The point is you can play around with workout variables and combine them in a lot of different ways. This is just one example (and one that shows an example of my warm ups too…).
Hopefully this highlights some of the ways the workout variables I’ve talked about in the past can be used and makes considering them seem a bit less daunting.
It’s even a great workout if you need one for this beautiful Friday!
Summer Sprint Workout
I’ve mentioned this numerous times before, but the only running I enjoy doing is sprinting.
And when the sun is out, I love getting outside to workout.
So in honor of this beautiful Thursday, here is a great sprint workout to do outside!
This workout is also one of the few that I do that includes crunch-like moves. They are almost like an active break between the sprints.
The key with this workout is to go all out when you are working and make sure your take time to recover. Start with two or even three times the rest and work your way down to equal rest to work. Doing this workout with a partner is a great idea because you can rest while they complete all the exercises and then you can work while they rest!
Below is a video demonstrating all of the crawling and crunch exercises for the sprint workout.
Summer Sprint Workout:
Complete 3-5 rounds of each circuit. Beginners may need 2-3 times the rest while more advanced exercisers should keep an equal work to rest ratio.
Sprint Circuit #1:
3-5 rounds of the following 3 exercises. Do not rest between the 3 exercises! Rest once all three are completed!
4 cone suicide, 1 round (farthest cone should be about 50ft away from start)
Forwards Crawl, Backwards Crawl (down to farthest cone and back)
Cherry Bombs, 10 reps
Rest and repeat. These rest intervals should be as close to equal work to rest as you can make them although beginners may need more rest to start.
Rest for 1-3 minutes after completing 3-5 rounds of the circuit above. Then move onto the second circuit.
Sprint Circuit #2:
3-5 rounds of the following 3 exercises. Do not rest between the 3 exercises! Rest once all three are completed!
4 cone suicide, 1 round (farthest cone should be about 50ft away from start)
Lateral Crawls (down to farthest cone and back)
Plank Hip Dips, 10 each side
Rest and repeat. These rest intervals should be as close to equal work to rest as you can make them although beginners may need more rest to start.
Rest for 1-3 minutes after completing 3-5 rounds of the circuit above. Then move onto the third and final circuit.
Sprint Circuit #3:
3-5 rounds of the following 3 exercises. Do not rest between the 3 exercises! Rest once all three are completed!
4 cone suicide, 1 round (farthest cone should be about 50ft away from start)
Circle Crawls, 3-5 circles each way (Beginners do 3, advanced do 5. Make sure to alternate directions each time or you will get very dizzy. Pretend your belly button is attached by a string to the ground and circle your hands and feet around that spot.)
Sit Thrus, 5-10 reps each side (5 for beginners, up to 10 per side for advanced)
DONE!
Enjoy!
The Burpee And The 100 Day Challenge
The other day I was talking to Erin, one of my beautiful Boston lifting ladies, and she mentioned THE 100 DAY BURPEE CHALLENGE.
Generally I don’t participate in challenges like that because they require you to do the same move day after day after day and I feel like they can interrupt your other training. And they really don’t get you any specific results except that you are moving every single day.
However, I couldn’t pass up the opportunity to do a fun challenge with friends especially since I will be seeing them shortly and we can do a few days of the challenge together.
While challenges like these won’t help you reach weight loss or strength goals, they can occasionally be fun. And shoot, if they get you moving well then by all means, do them! (Just don’t make them the basis of your training program…PLEASE!)
Anyway, when starting this challenge, I began to think about the other burpee variations out there that I use. While I could probably name about 100 variations (including the box jump burpee and the pull up burpee), I’ve chosen five to highlight below that I like to use.
5 Burpee Variations
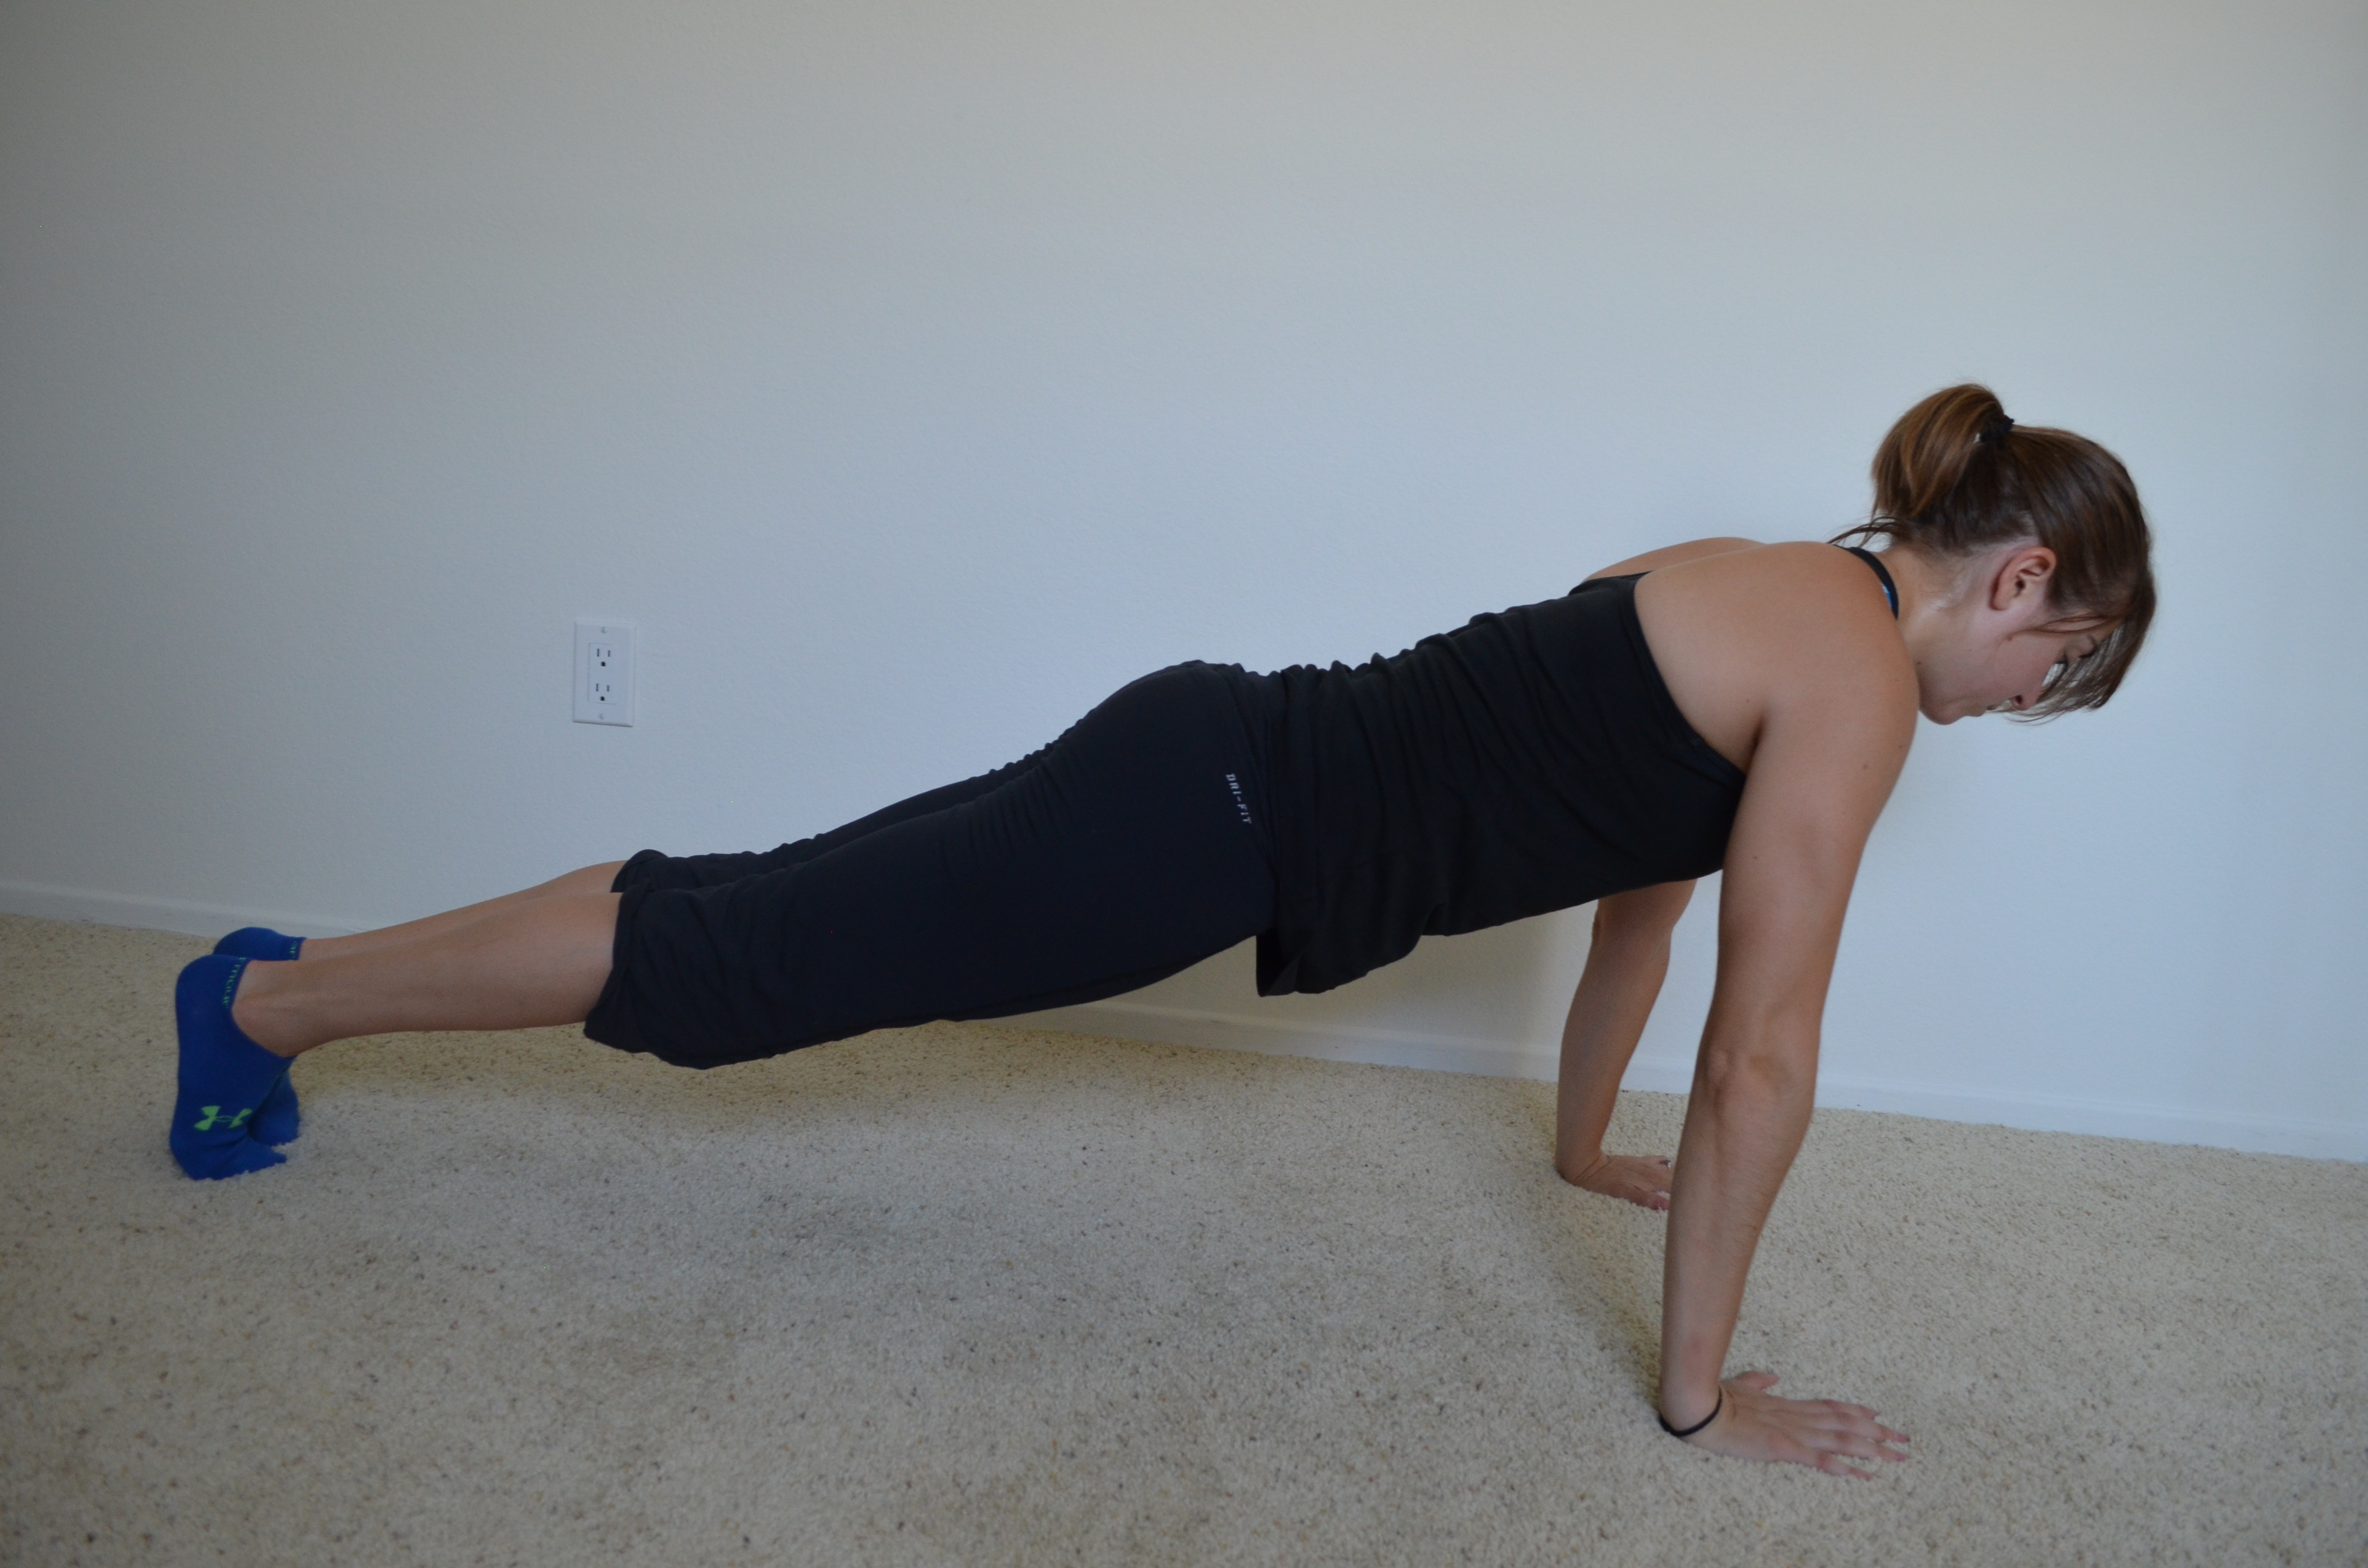
1. The Modified Burpee – This is a beginning variation of the burpee. To do a modified burpee, stand up nice and tall to start. Then bend over and place your hands on the ground right in front of your feet, which are a few inches apart. Jump your legs back so that you are in a high plank (top of the push up) position. Jump your feet back into your hands, stand up and jump up in the air. The beginner burpee does not include a push up at the bottom. To regress this move further, you can step back into the high plank and then step back forward. You can also remove the jump up at the top and instead just stand up nice and tall and reach your hands overhead.
2. The Full Burpee – This is a full burpee with a push up. To do a full burpee, stand up nice and tall. Then bend over and place your hands on the ground about hip-width apart a slight bit in front and to the side of your feet. Jump your legs back and then perform a push up, dropping your chest to the ground. Push back up to the high plank and then jump your feet back in and come back to standing. Jump as high as you can at the top. If you are going to add in the push up, PERFORM A PERFECT PUSH UP! No worms or butts up in the air during the push up.
3. The Burpee Sit Thru – I like doing this variation without the push up since it allows you to move faster and do more sit thrus. Stand up nice and tall. Bend over and put your hands on the ground and just jump your feet back a little so that you are in a nice crawling position (hands about under shoulders and knees about under your hips). Then perform one sit thru to each side. To perform the sit thru, lift one hand and kick the opposite leg through so that you are basically sitting on the ground. Swing back to the crawl position and repeat on the other side. Then stand up and jump up at the top and repeat.
4. The Slider Burpee – This is your basic burpee just done on sliders. To do the slider burpee, place a slider under each foot. Bend down and put your hands on the ground. Slide your feet back to the high plank position. Perform a push up and then slide them back in and stand up. Do not jump at the top. Just stand up and raise your hands overhead. Repeat. To make the move easier, remove the push up. To make the move harder and a bit slower, perform a push up followed by bringing the knee in to the outside of the same elbow and then another push up followed by the opposite knee. Then slide the feet in and come back to standing.
5. The Beast Mode Burpee – I generally do lower reps with these than I do with the other burpee variations because you are using weights. To do the Beast Mode Burpee, hold a dumbbell in each hand up at your shoulders. Stand with your feet between hip-width and shoulder-width apart. Squat down and then press the weights overhead. After the squat to press, bend over and place the weights in your hands on the ground and jump your feet back into the high plank position. You can then either do a push up and then two plank rows or you can do a push up, row, push up row. Then jump your feet back in and come back to standing. Do not jump up at the end. Just stand up and go back into the squat to press. Please make sure you aren’t lifting the weights back up with your low back as you stand up.
At the top is a video with each of the variations. Thank you Ryan for the music.
Do you use burpees in any of your workouts? If so, what’s your favorite variation?
Have you ever taken on The 100 Day Burpee Challenge?
Sandbag Workout
So Sarah over at Shh…Fit Happens wrote a post about working out with sandbags the other day and it got me to thinking about all the exercises that I use sandbags for.
Sandbags are a great way to add weight to any move because the weight is AWKWARD. They aren’t like barbells and dumbbells. They aren’t easy to grip and the weight can shift from side to side as you lift it. They are super functional and force your core to really engage to stabilize.
They are a great way to add variety to the same basic moves that you are already doing. Like I mentioned in my post Sunday…Mix up your resistance to make moves more challenging.
So below is a great Sandbag Workout:
WARM UP
Dynamic stretches and locomotion to get the entire body warm. Don’t forget to foam roll any tight areas!
STRENGTH:
3-5 rounds of each superset. Complete all rounds of each superset before moving on to the next one.
Reps: 5 for maximal strength (advanced lifters), 8-12 for hypertrophy (advanced and intermediate), 15-20 strength endurance (beginners, recovery week or just working on strength endurance)
1.
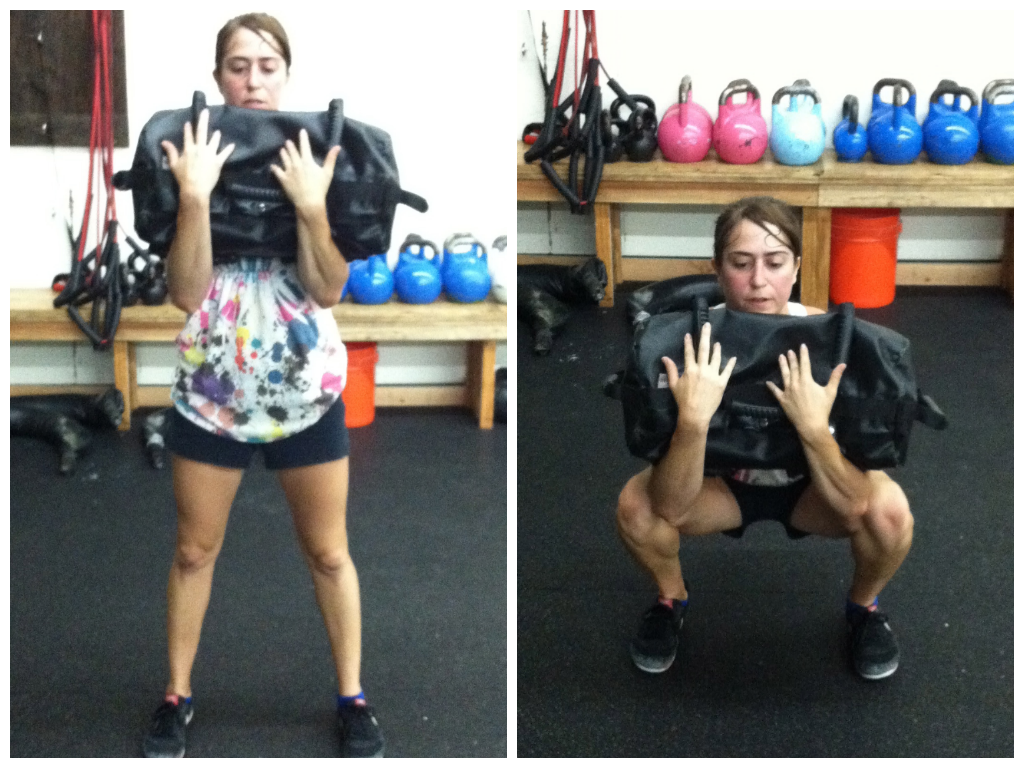
Squat (Do not round forward with the front loaded weight!)
Overhead Press (Do not arch your low back)

2.
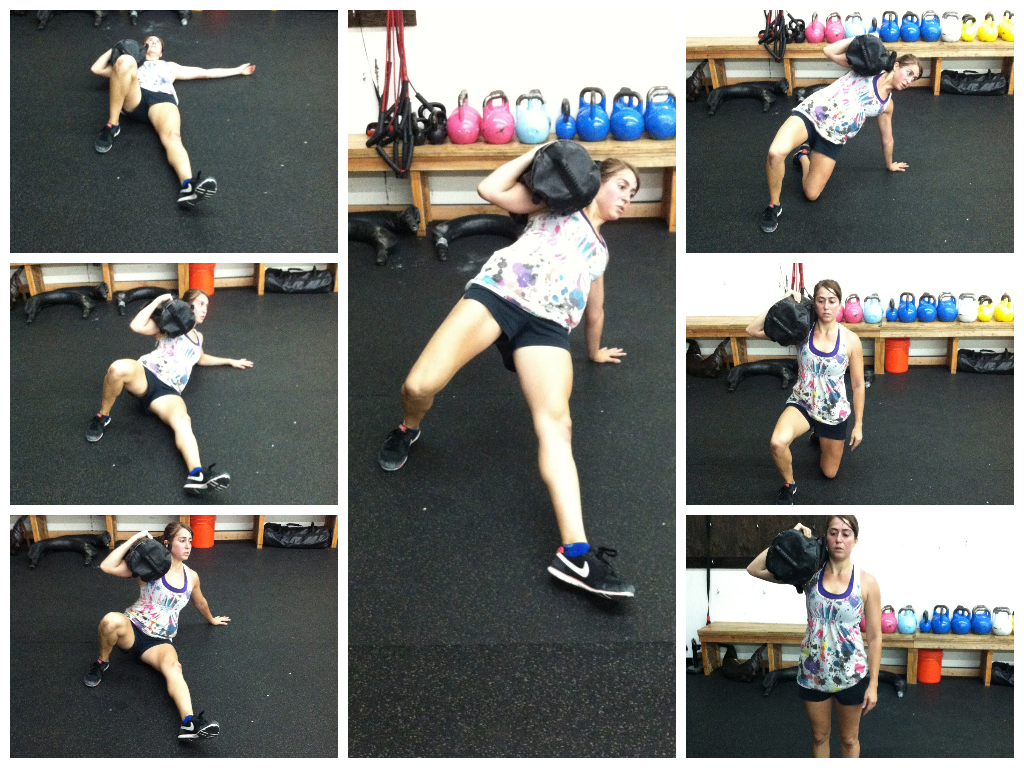
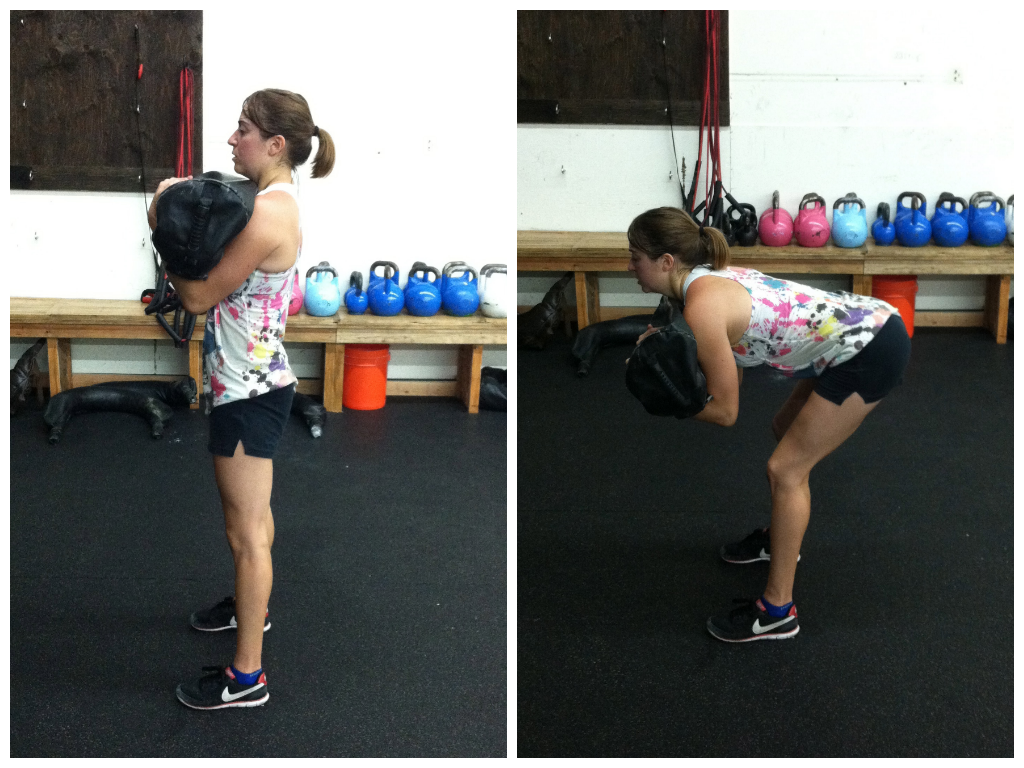
Lunge with Rotation (Do not let the sandbag go back too far on each side or it will catch and do not ROUND forward. Start on one side step the back foot forward and swing the bag to the other side as you lunge back.)

Row (Nice flat back. Knees soft.)

3.
Sandbag Get Up (Will want to do 1-5 reps per side for everyone. The Get Up is doing all the steps to stand up and then following all the same steps to go back down.)
Plank with Pull Thrus (Keep hips from rotating or going up or down)
COOL DOWN
Stretch and foam roll all tight areas!
Bonus Moves:
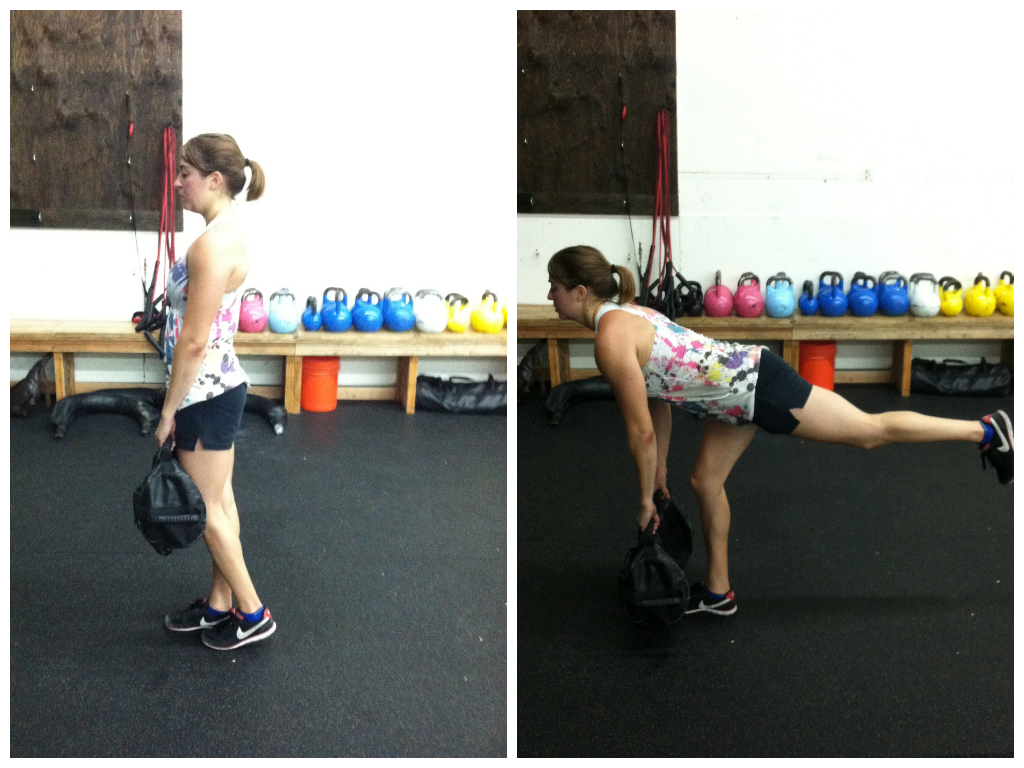
Single Leg Deadlift (Keep the standing leg soft and your back flat)
Goodmorning (Keep a flat back)
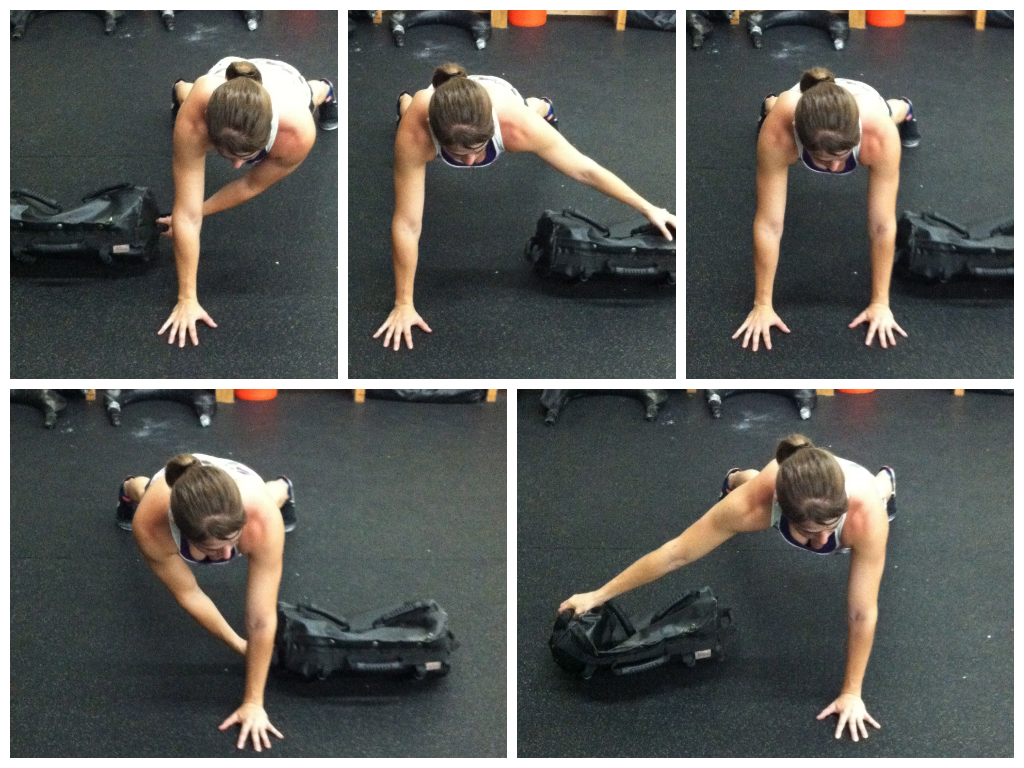
Crawling with Sandbag Pull (Sit back into your heels and perform a hip hinge to drive the sandbag forward. Don’t just pull with your arm.)

I also want to note that I’ve only demonstrated one variation of these moves. Squats can be done with the sandbag held the long ways up and down (Bear Hug) or even on one shoulder. Loading on one shoulder forces the core to engage even more (which as I mentioned on Sunday, asymmetrical loading is a great way to keep your workouts challenging!).
Deadlifts can also be done in a “suitcase” style where you hold it on one side. This is a great way to progress the single leg move (again ASYMMETRICAL LOADING!).
Note: Sorry for the pictures. I do not “glow” or “glitter” when I workout….I SWEAT!
BONUS WORKOUT:


