Achieving Your New Years Resolutions – It’s All In the Preparation
The other week I wrote about goal setting so that you can achieving your goals this coming year.
But setting proper goals is only the first step.
The next step is planning out how you are going to achieve your goals. And the more detailed your plan, the more likely you are to succeed.

Most people really skip this part.
They set goals. And then they start working out and eating healthy according to something they read or some vague idea of what they should be doing.
But they don’t really have a PLAN.
They really aren’t sure exactly what they are going to do from day-to-day. They really don’t know what is paying off and what isn’t. They really aren’t consistent enough with one thing to truly track what is working and what isn’t.
And while they may work really hard for a month to try to achieve their goals, they probably aren’t going to stick with it in the long run EVEN if they see progress.
Because at some point their haphazard program isn’t going to get them results. And when they plateau, they won’t know where to go because they will have no idea what worked and what didn’t.
But if they had a plan not only would they have direction to begin with, but they would also know what worked.
They could adjust the plan as they realize what benefits them and what doesn’t. As as they tweak their plan, they would continue to see progress.
Whereas if they had no plan, they would almost have to completely start over to continue getting results. And starting over with no idea of what works….Well that by no means guarantees you results.
Plus a plan is a great way to get you motivated and keep you motivated once you’ve set your goals!
Often we set our goals and those keep us motivated for a week or two.
But once that week or two is up, we lose that initial motivation.
If we’ve done enough to get results in those first couple of weeks, that may provide us with motivation for a few more. But if we haven’t seen great instant results, we may give up.
A plan though would help us stay motivated because we have something clear to follow and accomplish.
Accomplishing and completing the program you lined up, while it might not get you to your ultimate goal, is an achievement in and of itself.
It keeps you motivated to have something clearly laid out in front of you. It is harder to give up on something tangible, something you’ve spent time and energy already to develop, than it is to give up on something that is just a vague goal in your head.
There is something staring you in the face, letting you know you didn’t do it, when you write out a plan.
A PLAN.
That is why programs like P90x get results. They have clearly laid out plans. They have ways to progress and regress the program so that you can adjust it to fit you as you work through it. They even have slightly different variations of the plan to help you reach your specific goals.
You don’t have to play a guessing game to figure out what works.
YOU HAVE A PLAN.
So this year if you want results, create a plan. Set great goals and then map out how you are going to get there.
The next step after creating the plan is to do it and track it. After that, you just can’t be afraid to tweak it!!
NOTE: I’m not telling you to get a program like P90x (although you can if you want!). I’m simply saying that if you want to achieve your goal, the more you can think through all the variables like a program like that does, the more likely you are to achieve your goals!
Isometric Moves – Include Them In Your Workout
I’ve written before about how much I love isometric moves.
Holding an exercise is not only a great way to develop physical stability and strength but also a great way to develop mental toughness.
They can be a great workout on their own or they can be used to help you warm everything up and get the correct muscles activated.
Isometric moves are essential for everyone from the elite athlete to the person stuck at their desk for nine hours a day.
They help create stability and get the correct muscles activated. They can also help us create mobility and flexibility all while making us stronger.
For some great isometric moves and some workouts do to with them, check out the two links below:
10 Isometric Moves and a great Isometric Workout
Also, if you caught my post on Thursday about stretches to alleviate desk job aches and pains, you may also want to check out my post on Redefining Strength about ESSENTIAL isometric moves for anyone with a desk job!
Isometric Moves You NEED To Do If You Have A Desk Job
Isometric moves are also a great way to get in a workout over the holidays if you don’t have any equipment and very little space to work with!
Desk Job Aches And Pains? Try these stretches!
Sitting hunched over a computer all day can leave you feeling stiff, sore and in pain.
Muscles get tight from our hunched-over seated posture, which not only causes us pain, but can also cause us to get injured during our workouts.
If we want to live injury free AND get the most out of our workouts, we need to take time to roll out and stretch those tight muscles.
Below are some great stretches to help you alleviate those desk job aches and pains.
10 Essential Stretches For Anyone With A Desk Job
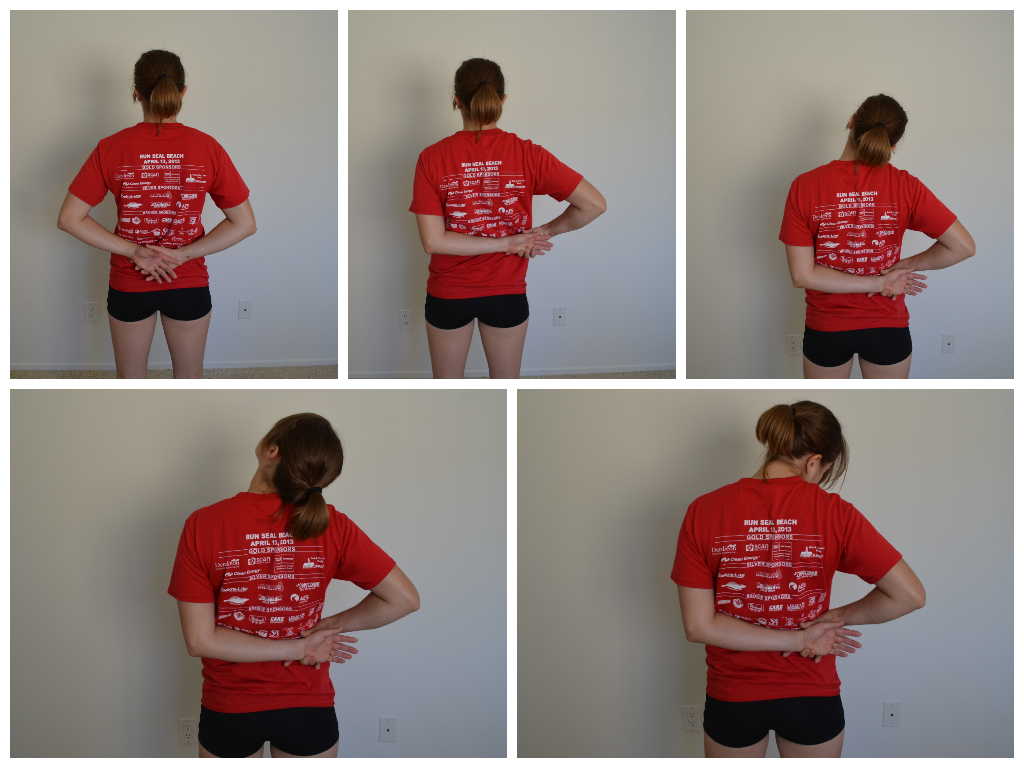
1. 3 Way Neck Stretch – Bend your elbow and reach one hand behind your back. Then grab that wrist with the other hand. Pull the arm behind your back toward the opposite side. You want to create a “chicken wing” with the arm that is pulling. Then lean your head to the side you are pulling to. Do not tense your shoulders and bring them up toward you ears. Relax into the stretch. Start by looking straight ahead. Then look up and hold for a second or two. Then look back straight ahead. And then look down. Move your chin as you look and not just your eyes. Changing the direction of where you look, will change exactly which muscles in your neck and upper back that you stretch.
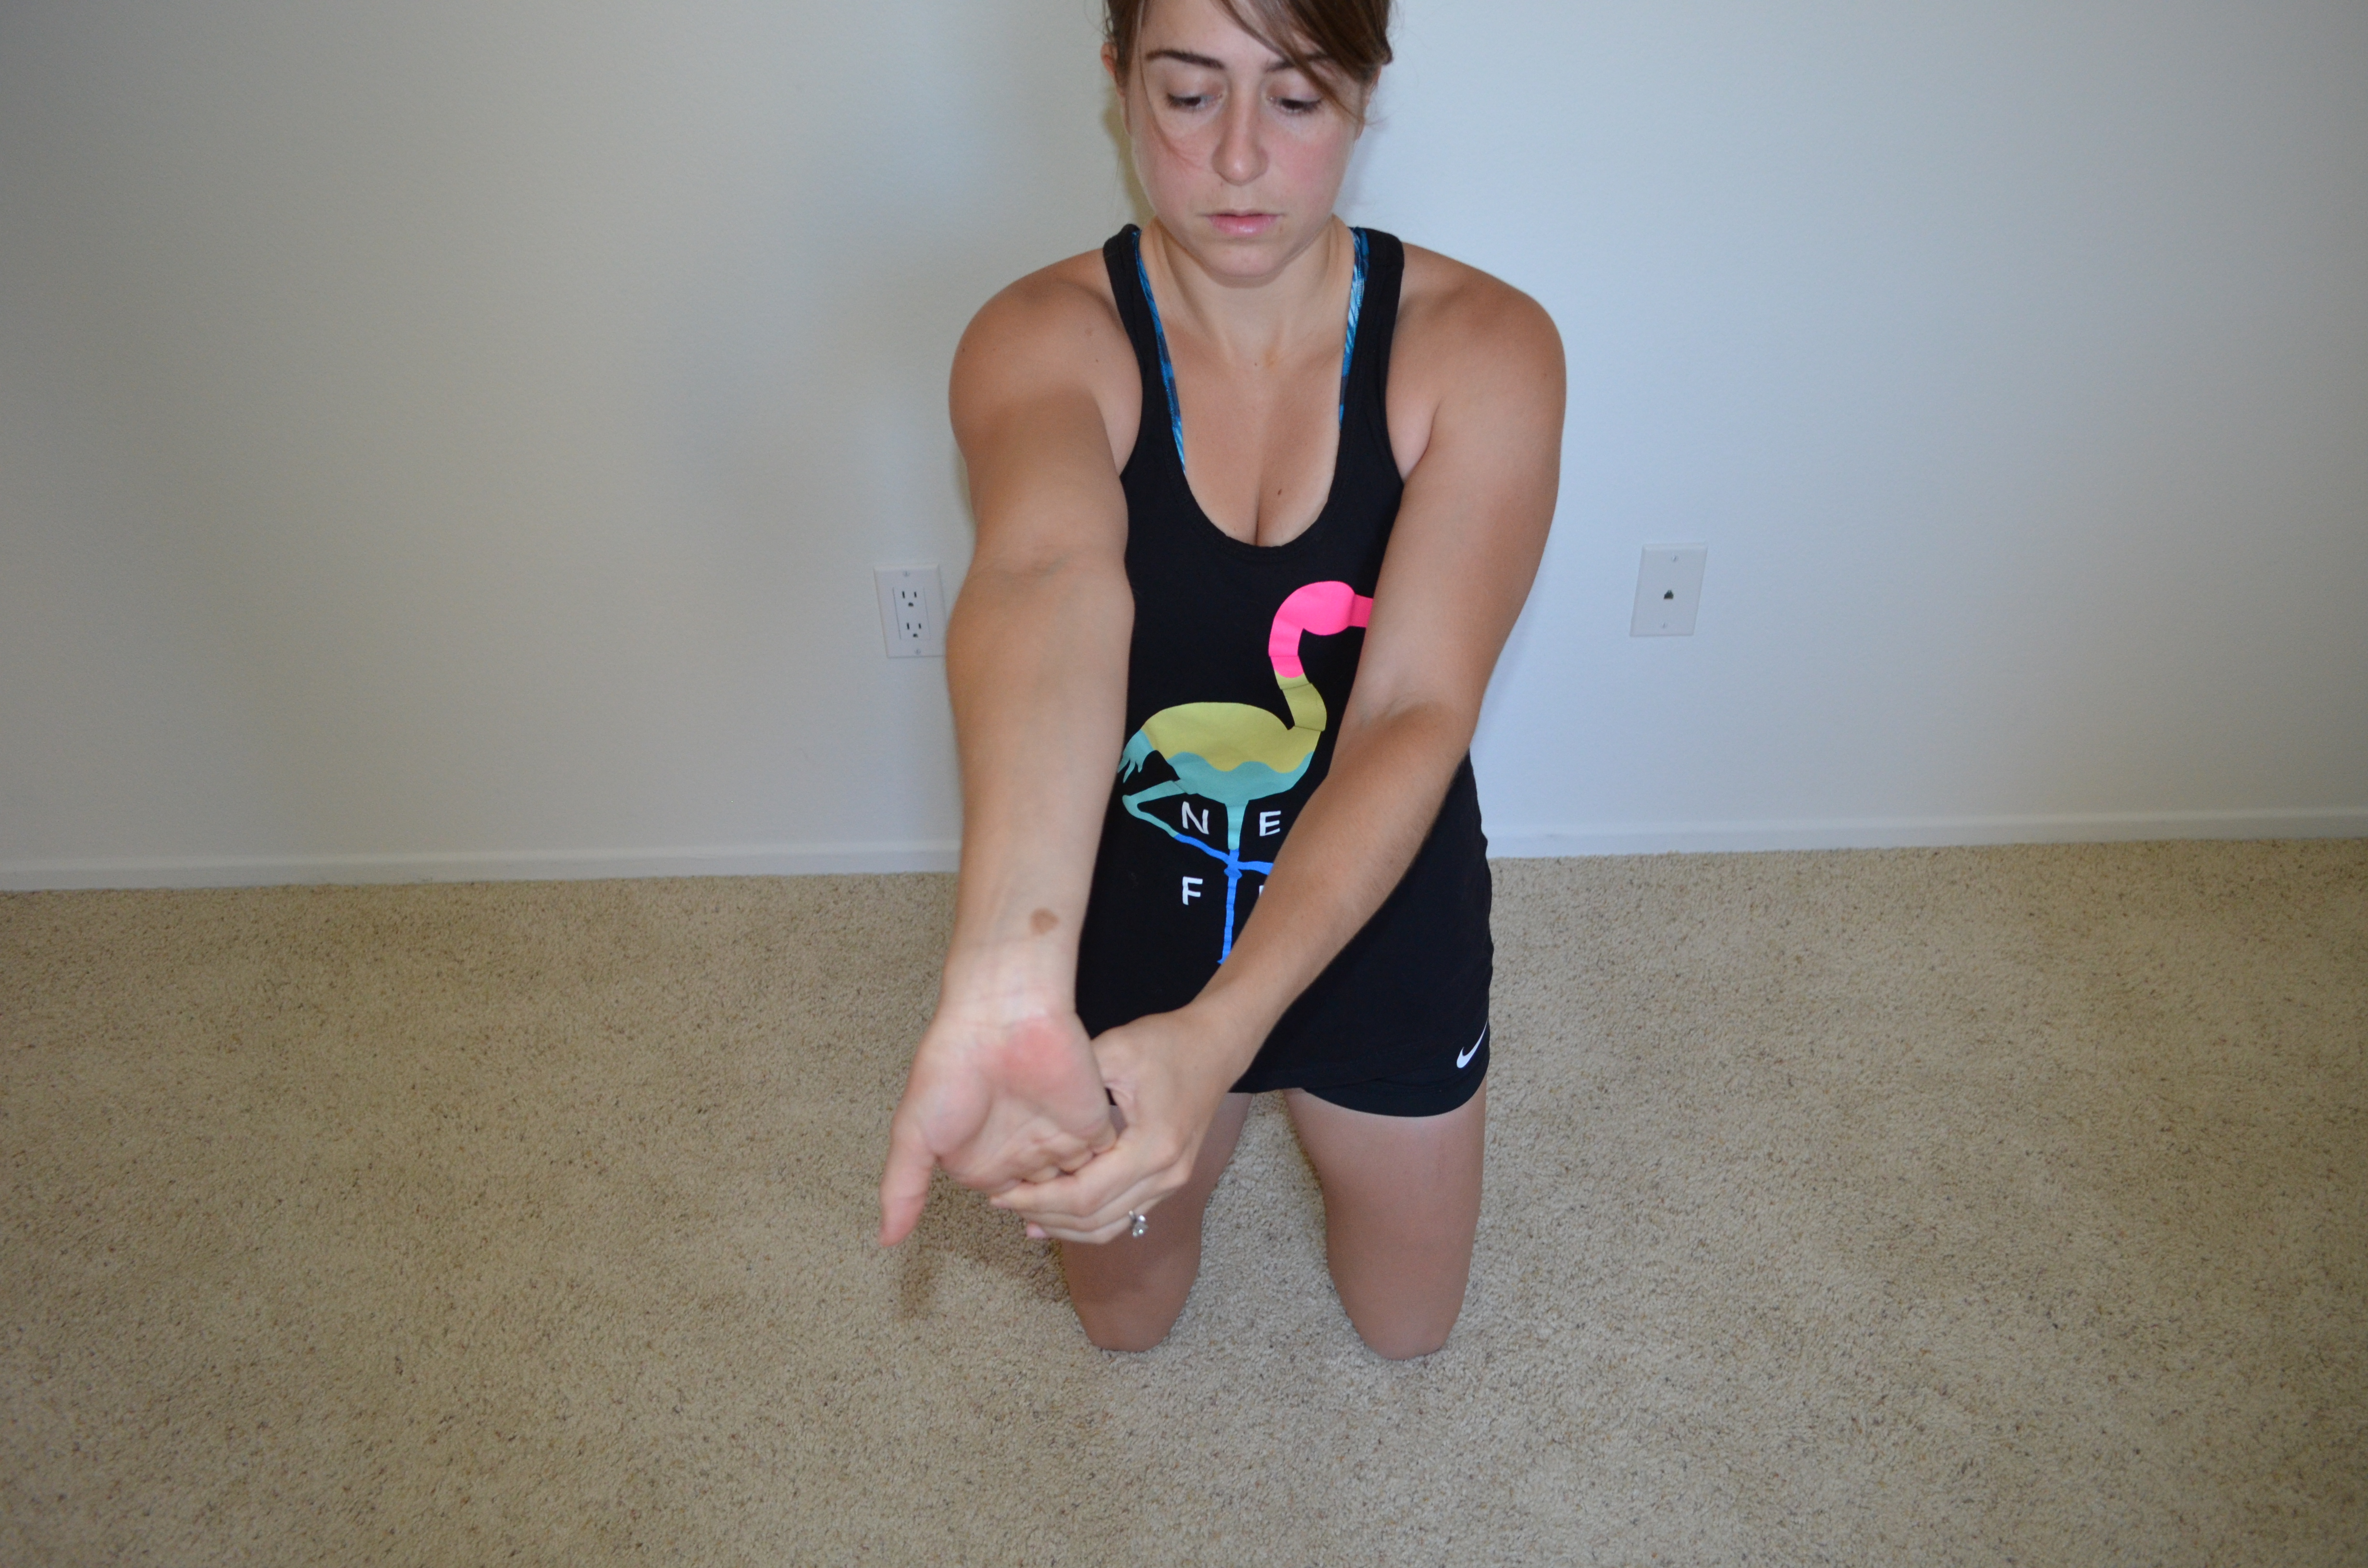
2. Forearm, Wrist and Bicep Stretch – Stretch one arm straight out in front of you. Point your finger tips down toward the ground. You can do one stretch with your palm facing away and one with your palm facing toward you. Take the other hand and press down on the fingertips, pushing them back toward your body As you press down, you should straighten your arm more so you feel a stretch down your forearm and up into your bicep.
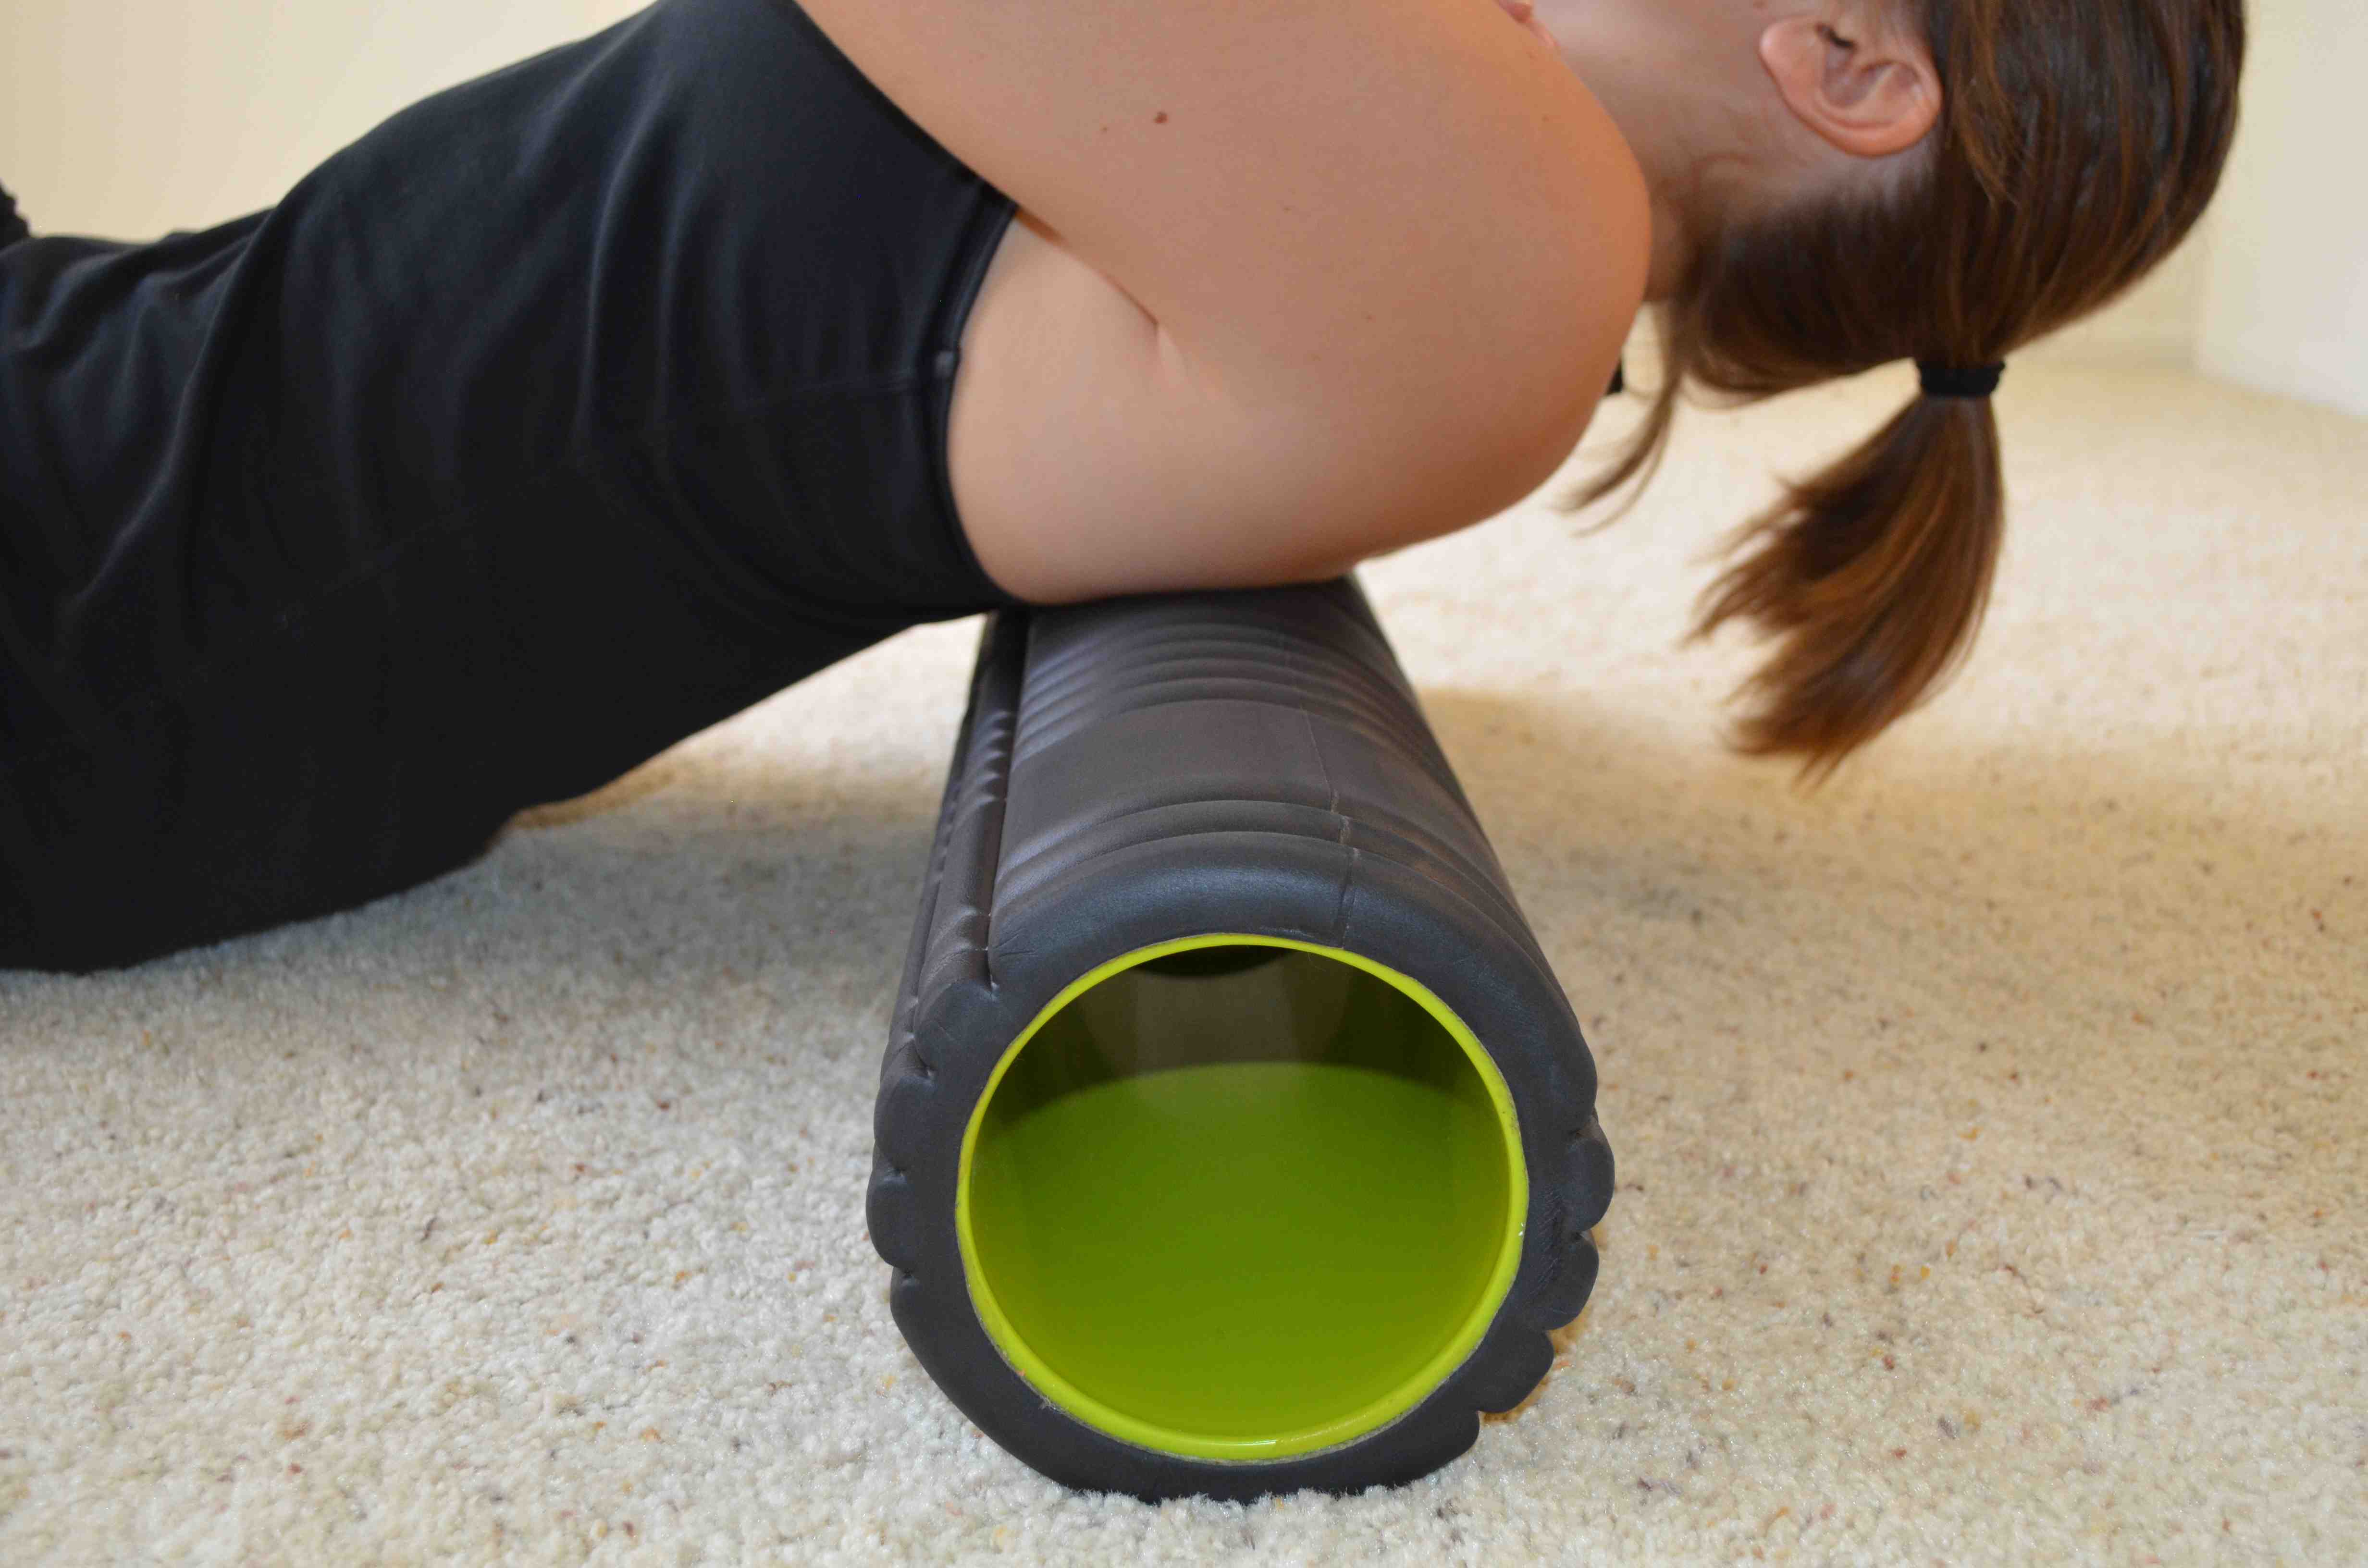
3. Thoracic Extension on a Roller – Lie on your back with the roller at the bottom of your upper back. Bend your knees and place your feet flat on the ground. Drop your butt down to the ground and then lean back over the roller, trying to drop your head to the ground behind you. Move the roller up higher on your upper back and then drop your butt to the ground and extend back over again. Work all the way up and down your upper back. Extend back over the roller and breathe deeply while keeping your butt on the ground.
4. Scorpions – Lie on your belly with your arms out straight at shoulder height. Your legs should be out straight behind you. The swing one leg up and kick it behind you. As you kick it back over your body, bend the knee and reach your toe over and behind you back a bit toward your head.. Kick your leg back over your body, trying to touch your toe back behind you. Tap it down then bring that leg back down and then reach the other leg over your back. Alternate reaches, bringing your toe back over your body and toward your head.
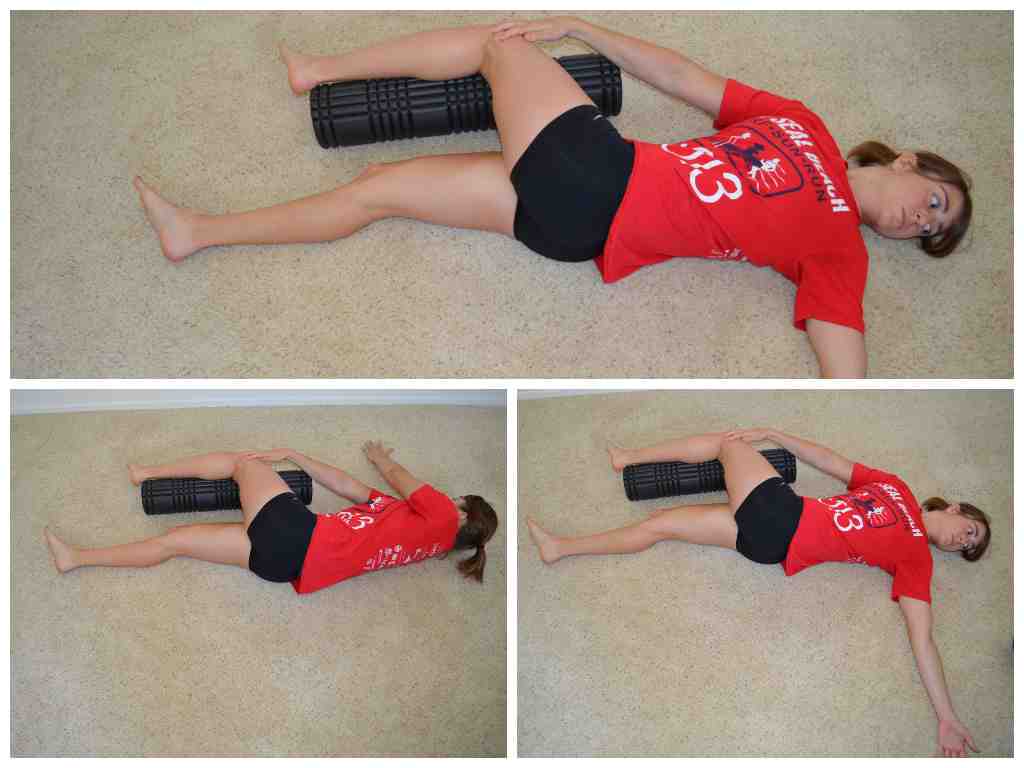
5. Star Stretch – Lie on your back with a foam roller or ball to your right side. Bend your left knee to about 90 degrees and pull it across your body so that your left knee is resting on the ball/roller. Place your right hand on top of your knee to hold your knee onto the ball or roller. Reach your left hand across your body and touch the floor on the right side with your palm. Then open that arm back up to the left side, trying to touch the back of the hand down to the ground. Relax the arm open, trying to drop the shoulder to the ground. Try to open up the chest as much as possible without letting the knee move from the roller or ball. Hold for a second or two and then bring the hand back across and repeat. Complete all reps on that side before switching.
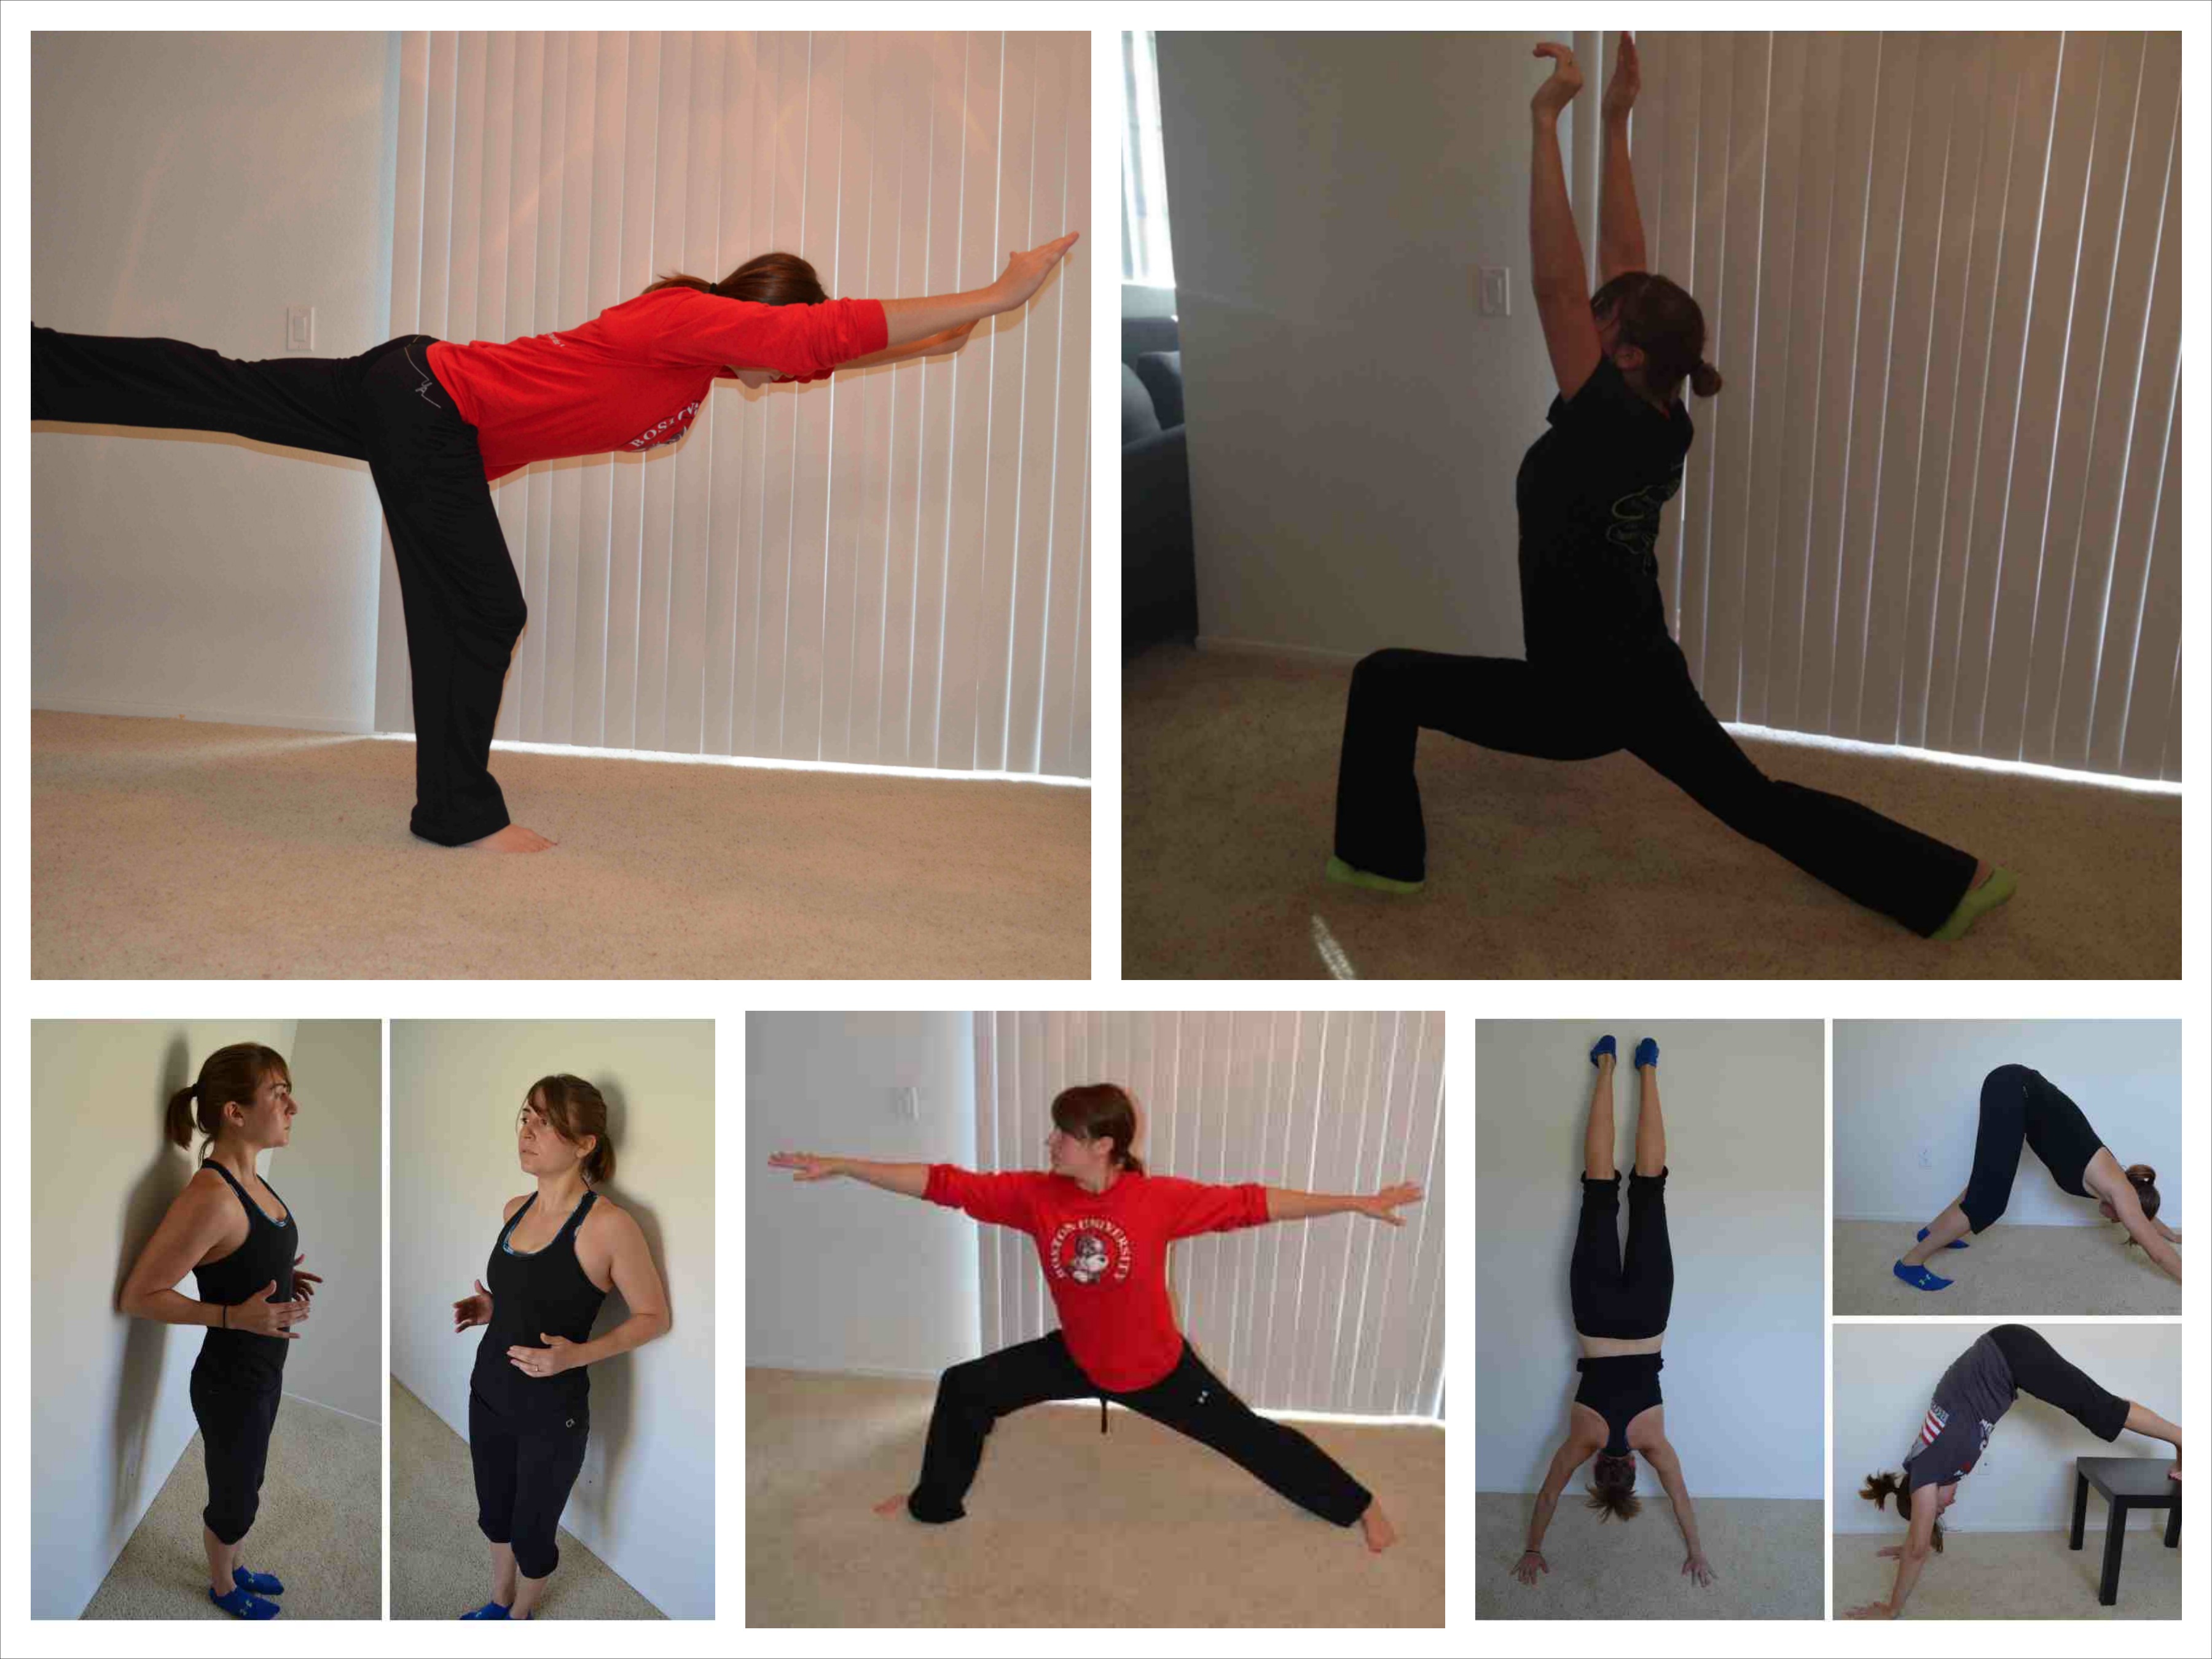
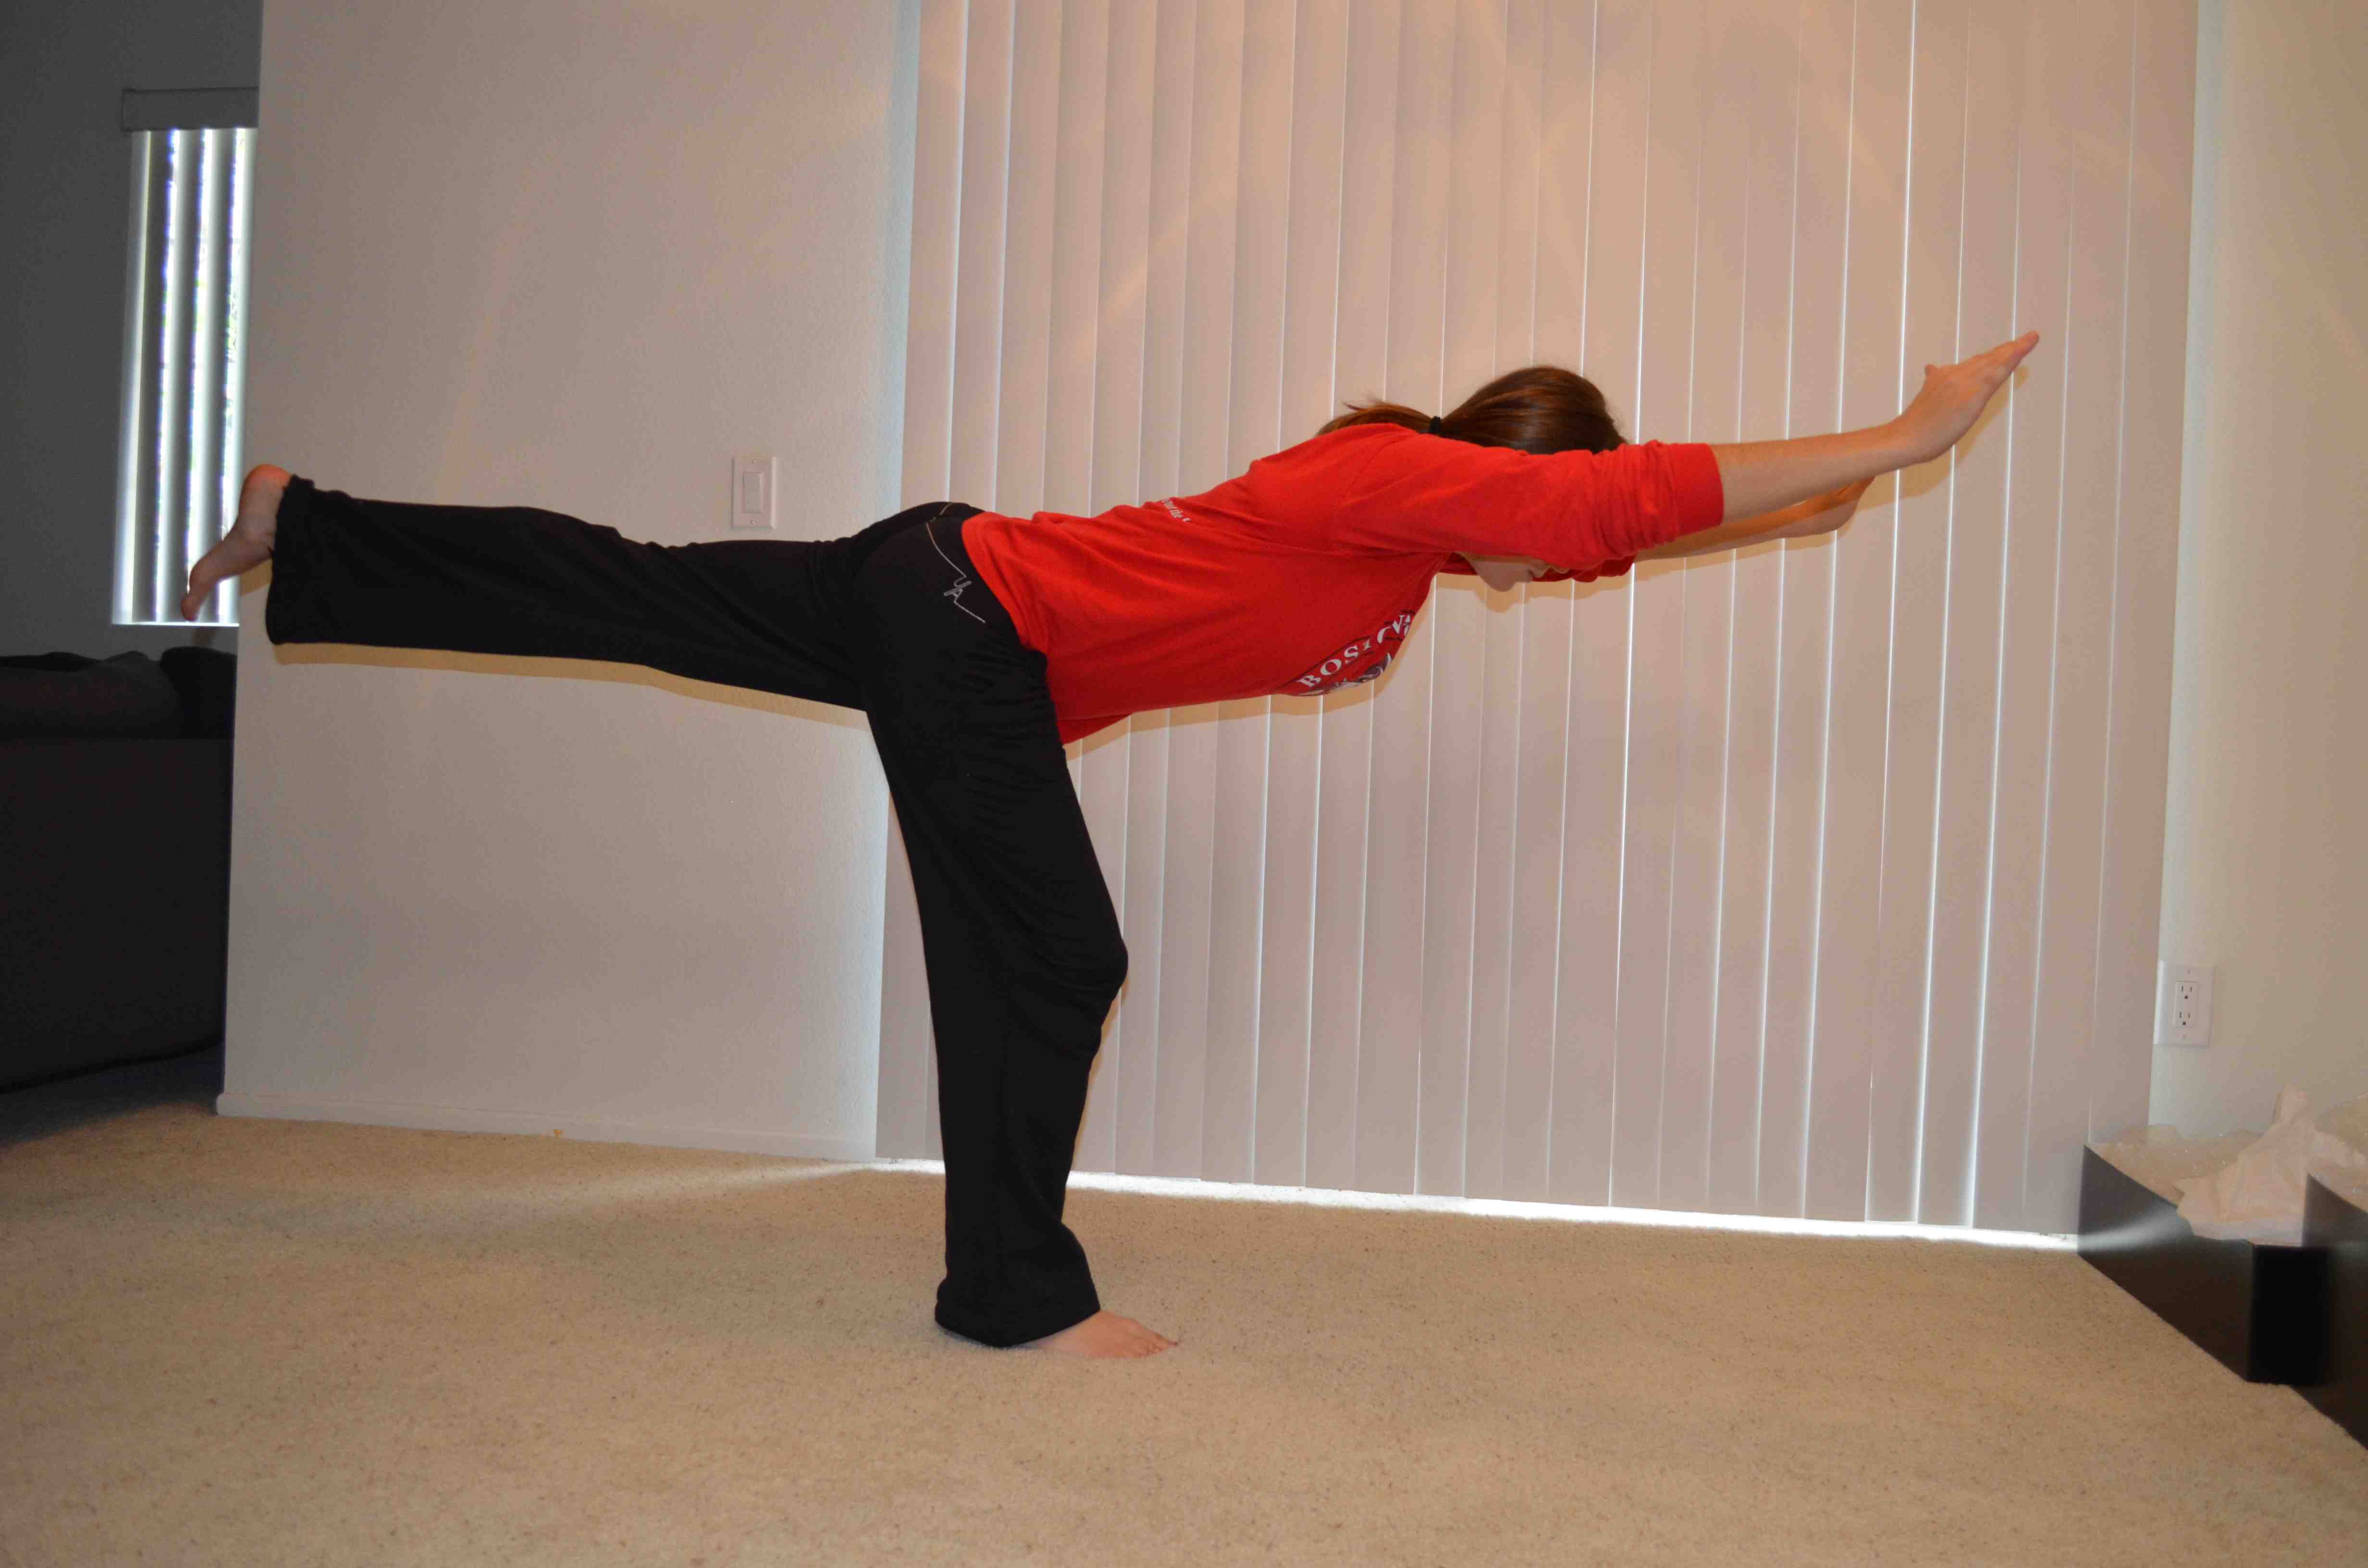
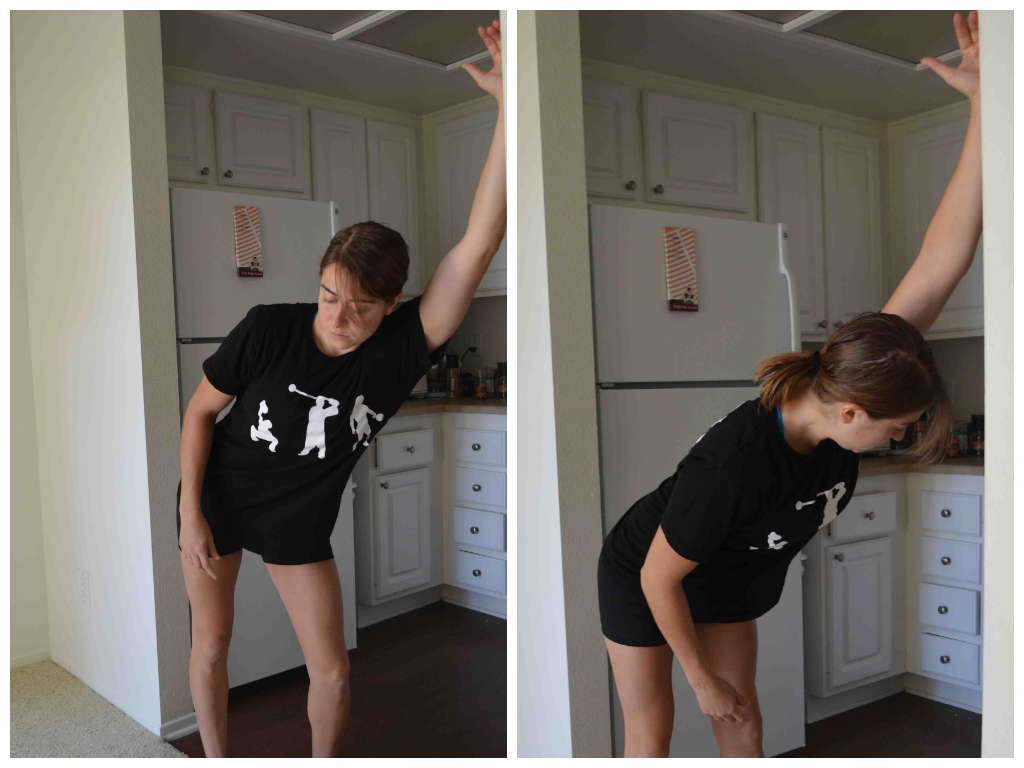
6. Standing Lat Stretch – Place the side your hand on a wall, bookshelf or desk and then straighten your arm and bend over and walk away. You want to push your butt back and lengthen from your hand all the way down your side. Even rotate a bit so you are looking under the arm on the desk or wall and then away from the arm. Feel a nice stretch down your arm and into the side of your back. Hold and repeat on the other side. Child’s pose can be another great way to stretch your lats and your upper back as well as your lower back.
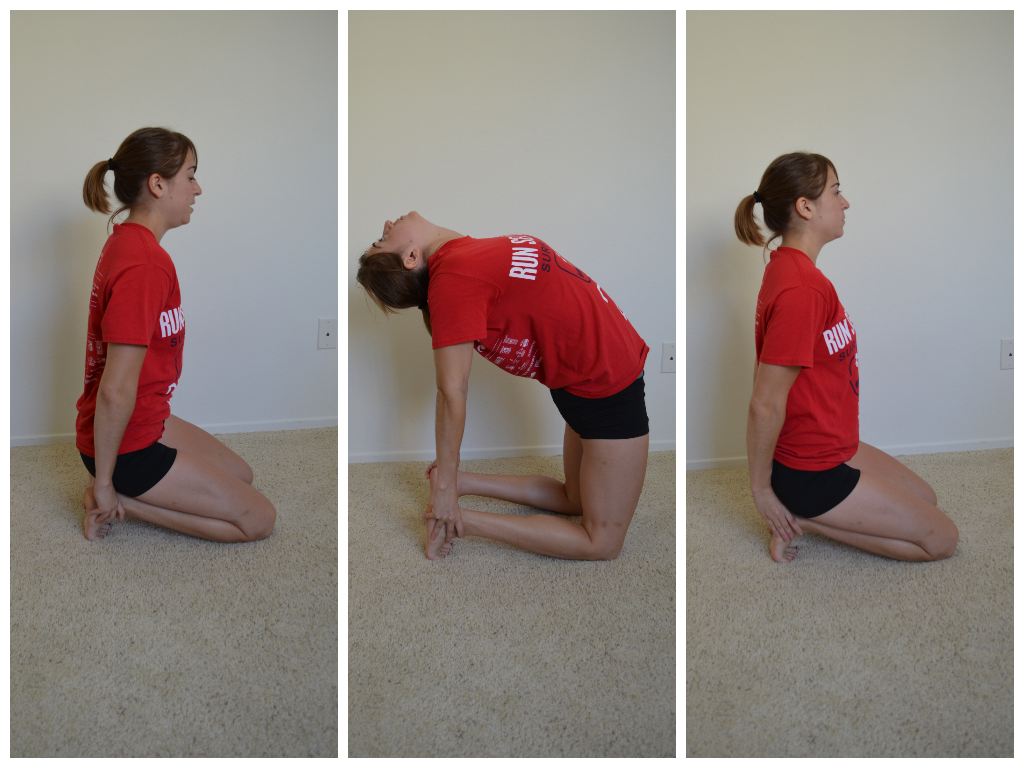
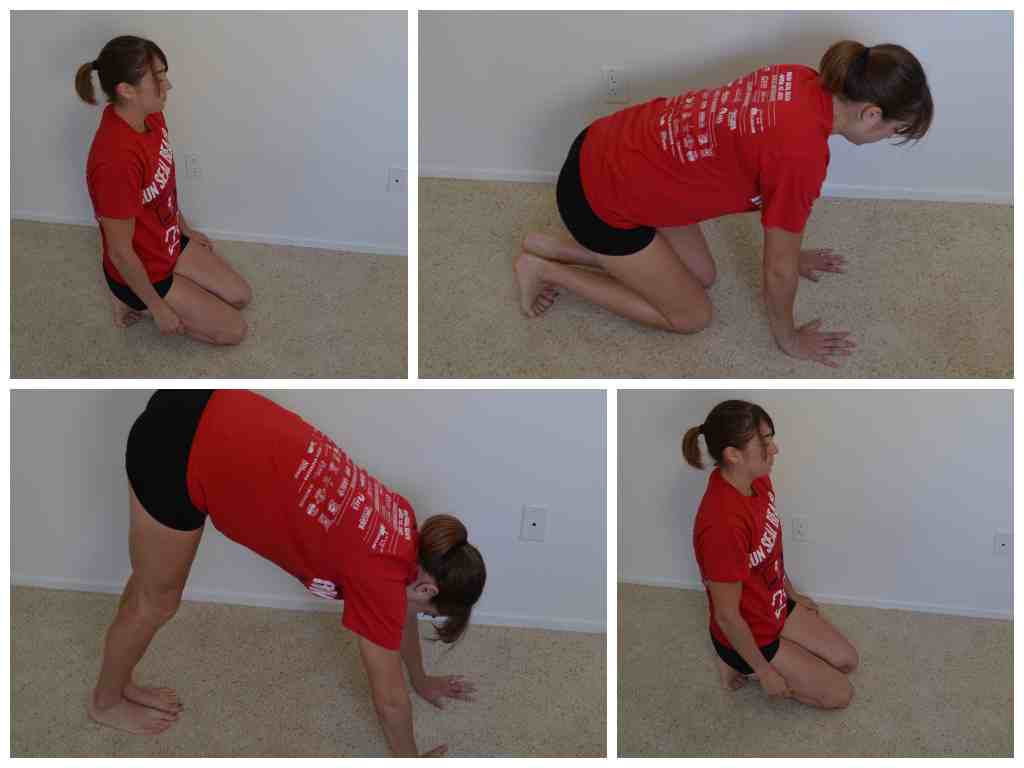
7. Kneeling Bridge – Start by kneeling on both legs with your feet flexed and toes tucked under. Sit back and place your hands on your heels. Then arch up off your heels, driving your hips forward and chest out, keeping your hands on your heels. Relax your head back and arch as much as you can, getting a nice stretch down your chest, core, hips and quads. Hold for 1-2 seconds and relax back down. Repeat. If you are less flexible, do this stretch with a couch, chair or table behind you. Kneel down and place your hands back behind you on the couch or table. Press your chest out and arch as much as possible away from the piece behind you while leaning your head back. Then relax back down and repeat.
8. Kneeling Hip Circles – Come to your hands and knees on the ground. Place your hands underneath your shoulders and your knees underneath your hips. Lift one leg out to the side, keeping your knee bent to about 90 degrees. Lift your foot back and then bring your knee up around and forward. Then drop the knee down and around back to the starting point. Make big circles with your hip, going clockwise and then counterclockwise. Keep your arms straight as you circle.
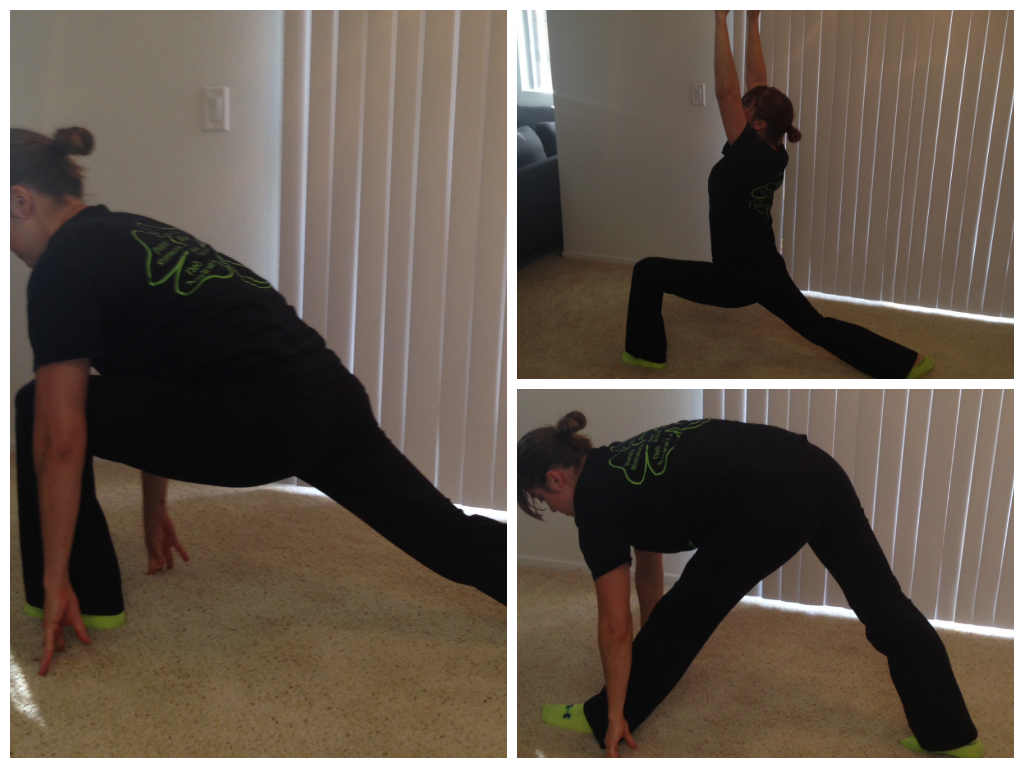
9. Crescent Pose to Hamstring Stretch – Start in a high plank position. Step one foot up between your hands with that front knee bent and your back leg straight behind you. Your front heel should be down while your back heel will be up. Lift your hands up off the ground and reach them back and overhead as you stay in a low lunge. Feel a nice stretch down the hip and quad of the back leg. Then bring the hands back down to the ground and hike your hips up to straighten your front leg. Lean your chest over and feel a stretch down the hamstring of the front leg. Sink back into the lunge and reach up and back overhead again to stretch the hip and quad before repeating the hamstring stretch. Complete all reps on one side before moving back into the plank and switching to the other side.
10. Bear Squat – Kneel on the ground with your hands on the ground in front of you. The closer you place your hands to your knees, the harder the stretch will be. Press your butt up into the air, driving your heels into the ground. Feel a nice stretch down your calves and hamstrings as you try to get your legs as straight as possible. Hold for 1-2 seconds and then drop back down to your knees before repeating.
Have nagging aches and pains from sitting all day? Want help to get rid of them? Comment below and I’ll get back to you with suggestions!
Bacon Ribeye Tacos with Avocado Salsa
There is this local, family-owned restaurant called Taco Mesa here that has amazing Alambre Steak Tacos.
We are like OBSESSED with them.
These Alambre tacos are corn tortillas filled with steak, bacon, onions, peppers and cheese.
AND THEY ARE AMAZING.
They are even better with Taco Mesa’s amazing Avocado Salsa.
So yesterday Ryan decided he was going to try to make a variation of them and the salsa.
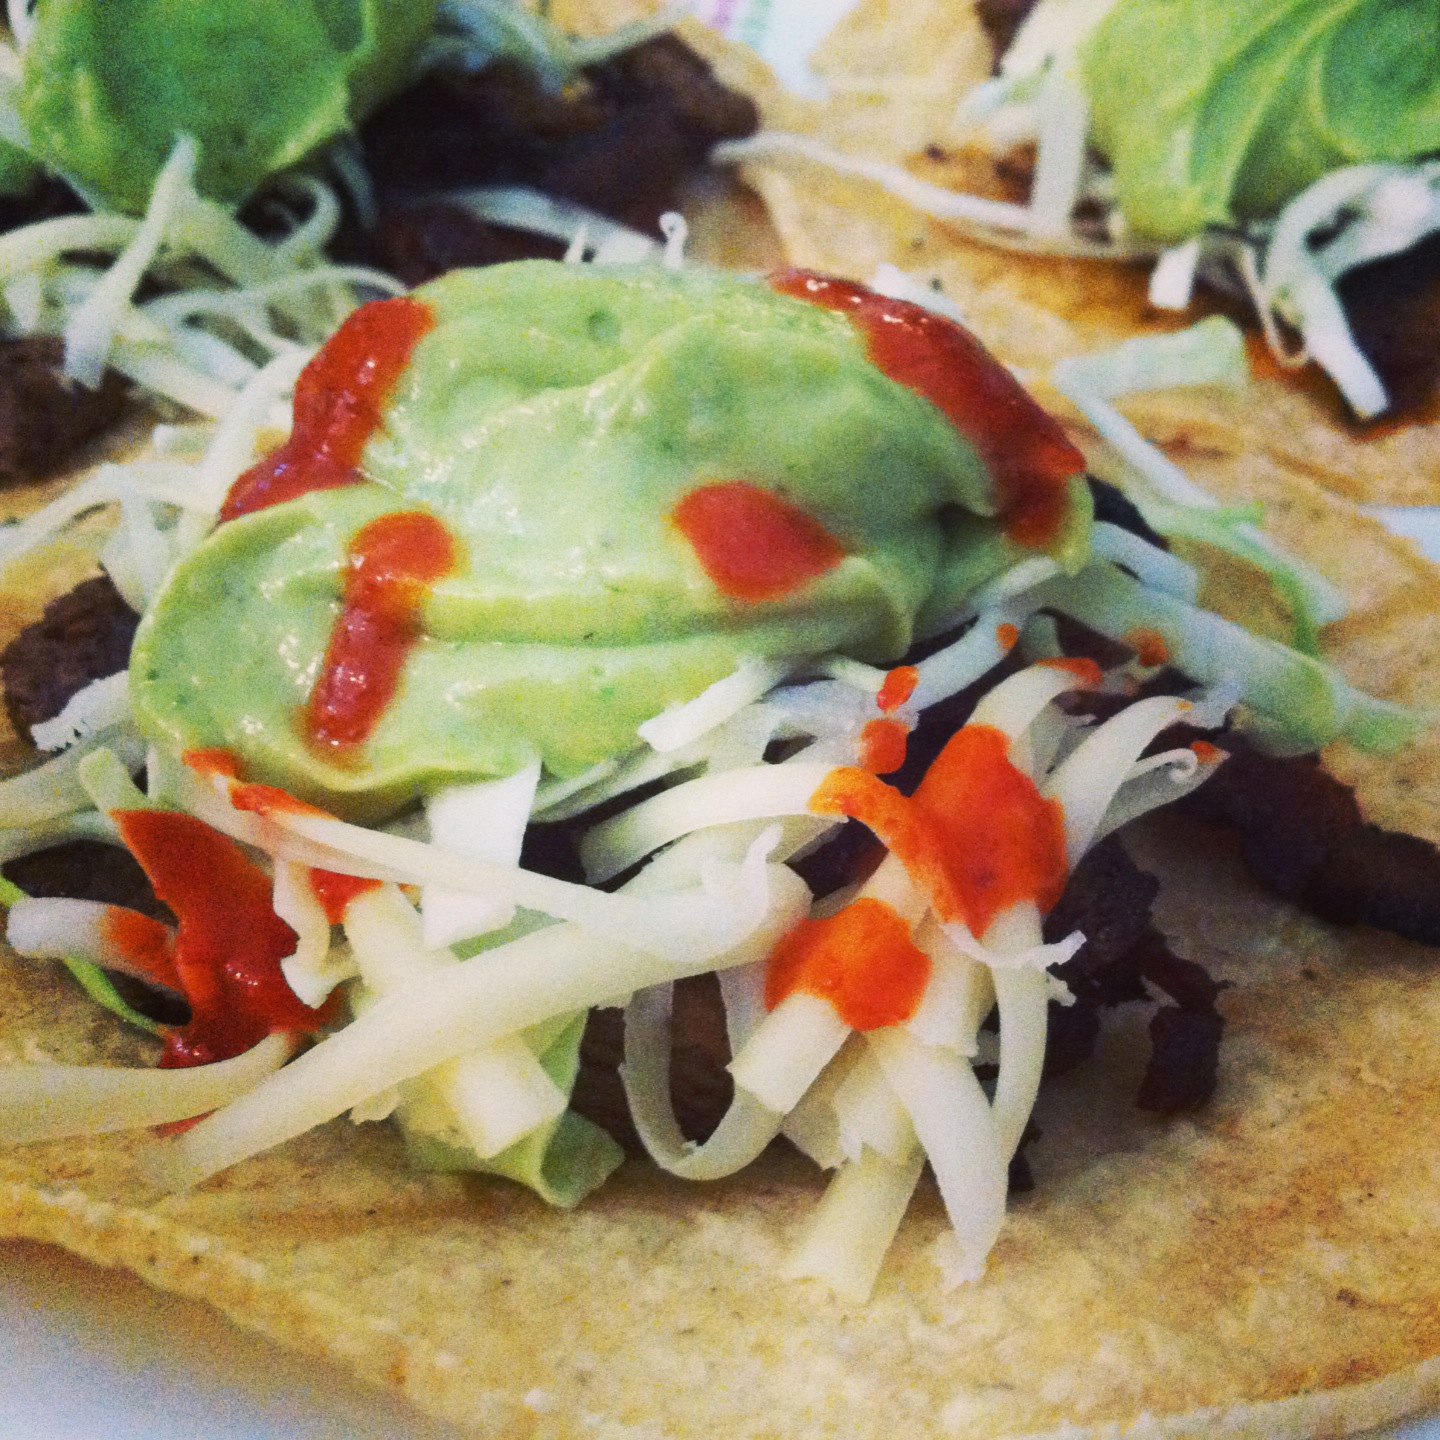
Here is his Bacon Ribeye Tacos with Avocado Salsa.
Ingredients:
TACOS:
3/4 lbs Ribeye Steak
5 pieces of nitrate-free bacon
2 tsp Cumin
2 tsp Paprika
1 tsp Chili Powder
2 tbsp Tomatillo and Roasted Yellow Chili Salsa (from TJs)
1 tsp Jalapeno Pepper Hot Sauce (TJs)
7-8 Corn Tortillas (Homemade recipe here otherwise buy ones that are only corn, water and lime!)
1/2 cup Shredded Cabbage
1/4 cup Raw Milk Cheddar Cheese
AVOCADO SALSA:
2 Avocados
2 tbsp Cream
2 tbsp Salsa Verde (TJs)
2 tsp Olive Oil
2 tbsp Cilantro
Cook the bacon in a skillet on high. Once the bacon has browned, remove to a plate. Place the chopped ribeye into the pan with the bacon grease. Add cumin, paprika, chili powder, hot sauce and salsa to the steak in the skillet.
Lower the heat and let the steak simmer in the salsa and spices. Add back in the bacon.
While the steak is cooking, add the avocados, cream, salsa verde, olive oil and cilantro to a food processor. Process until smooth. Then put the salsa into a bowl.
Once the steak mixture is almost ready, heat the tortillas in a skillet or microwave to warm them.
Shred the cheese and cabbage.
Then divide the steak mixture between the 7-8 tortillas. Top with cabbage, cheese and avocado salsa. Sprinkle with more hot sauce if you would like.
Enjoy!
Makes 7-8 tacos and lots of leftover Avocado Salsa.
What restaurant meals do you enjoy making variations of at home?
Short Workouts Are All The Rage
I’ve been excited to see mainstream media and even mainstream fitness companies promoting shorter workouts.
Even P90X is coming out with a P90X30 (Even though Tony Horton and I have very different views on nutrition, I think he is a workout/exercise genius and always love seeing what he comes up with.)
And while some may think short workouts are just the newest fitness “fad,” there is actually a lot of evidence to prove that they may just be what you need to get truly great results.
That many of us are actually working out for too long.
That short workouts aren’t simply “better than nothing.”
That 15-30 minutes may actually be better for your health and help you reach your goals faster than your hour-long workouts 5 days a week.
Here are some reasons why you should keep your workouts shorter and some ways to maximize your time in the gym.
Just to highlight the some key parts:
- Hormone levels are optimized with shorter workouts. After about 45 minutes of working out, your testosterone levels return back down to normal and your cortisol levels begin to rise. That means less muscle-building hormone is available AND more catabolic hormone (aka a hormone that breaks down muscle tissue) is starting to circulate.
- Mentally you just can’t keep your intensity up for an hour or longer. At some point you lose focus and really can’t push yourself to work as hard as you need to for great results. However, if you keep your workouts shorter, you will stay focused and work hard the entire time.
- It is easy to get a lot out of a short workout by playing with a few workouts variables like shorter rest, heavier weights, more volume, slower/faster repetition tempo…And many of these variables have great health and fitness benefits of their own that aren’t really capitalized on with longer workouts.
Here are also some great 30 minute workouts you can do anywhere.

In case you need something even shorter, you can get great results in just 15 minutes.
Just the other day, I posted a great 15 minute Lower Body Blast. Click here for this great lower body workout.
And below is an upper body 15 minute workout (just so you have a lower body AND upper body option)!
15-Minute Upper Body Blast
WARM UP
Stretch and Roll Out:
Chest/Shoulders
Back/Traps
Lats
WORKOUT
Set a timer for 15 minutes and complete as many rounds as possible in that time. Your goal is to get as much work done as you can in that time. Pick a variation of each exercise that challenges and fatigues you yet doesn’t cause you to go to failure so that you have to spend a lot of time resting.
CIRCUIT:
5-10 reps Dips
5-15 reps Inverted Rows
10-30 reps Battling Ropes Sidewinders
COOL DOWN
Stretch and Roll Out:
Chest/Shoulders
Back/Traps
Lats
EXERCISE DESCRIPTIONS:
Dips – Beginners may do an assisted variation off of dip bars or parallel bars. They may also do these off of kettlebells or a bench. Advanced exercisers will do full dips and may even add weight to challenge them.
To do a full dip, place one hand on each bar. Press up to the top so that your arms are fully extended. Then slowly bend your elbows and lower your body down. You want to lower yourself down until your upper arms are parallel to the ground. If you can’t get a full range of motion, regress the move so that you can. Then drive back up through your hands until you are fully extended at the top. Keep your core tight so you don’t arch your low back. Do not lean too far forward.
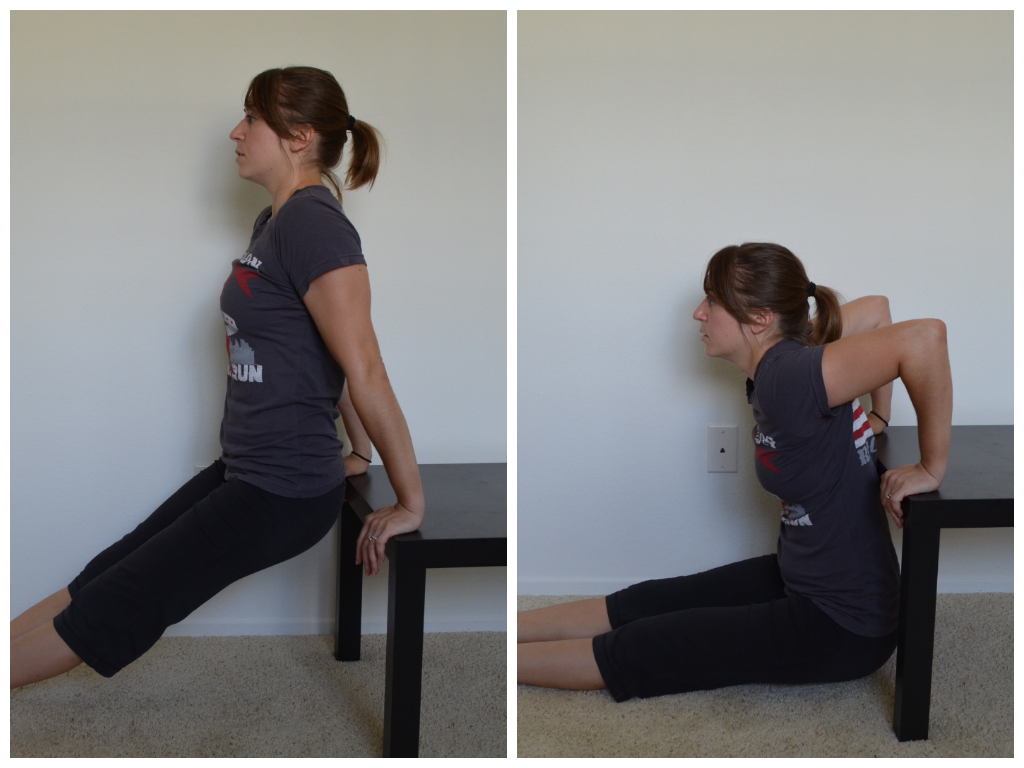
To do this move from the bench, place both hands on the bench behind you. Your finger tips should hang over the bench and face you. Stretch your legs out then in front of you, keeping your butt and back right up against the bench. The straighter your legs are and the further your heels are from your butt, the harder the move will be. To make the move easier, bend your knees and walk your heels back toward your butt and the bench. Bend your elbows and drop your butt toward the ground. Drop so your upper arms are parallel to the ground then press back up. Keep your butt and back right up against the bench. Do not let your body drift forward.
Inverted Rows – Hold a suspension trainer strap in each hand. Walk your feet out so you are leaning back. The closer to parallel to the ground you get, the harder the move will be. Squeeze your core and glutes and press your chest out so there is tension between your shoulder blades. Then row up, keeping your body in a nice straight line. Row until your chest comes up to the handles and then lower yourself back down. Don’t let your hips sink as you lower back down. Also, keep your chest pressed out the entire time (do not let your low back arch though). When you pull back up, don’t bounce off the bottom. If you don’t have a suspension trainer, you can use a smith machine bar or barbell set up low. If there is no bar or XT/TRX on which to do rows, do scapular push ups or corner rows.

Battling Ropes Sidewinders – Loop the rope around an anchor and hold one side in each hand. Keep more slack in the rope than you would with other battling ropes moves. Relax your arms down straight and stand with your feet between hip-width and shoulder-width apart. Bend your knees slightly and don’t be afraid to hinge forward a little. Then sweep your arms to the right, rotating through your core even pivoting a little up onto your left toes. Do not pull to far around. Then quickly sweep your arms to the left. You want to quickly push and pull with your abs to sweep the rope back and forth. Keep your arms more relaxed and only slightly bent. Your arms and the rope should stay out in front of you. The ropes should make snake-like waves on the ground and swish side to side. They should not move up and down off the ground. Make sure you do not round your back as you create the waves. Keep your chest up even if you slightly hinge forward as you create the waves.
If you don’t have a rope or the space to do sidewinders, you can do rotational med ball throws or even a russian twist. You want to pick a move that will work your core and, preferably, get your heart rate up just a teeny bit.
What are your favorite quick workouts?
Have you started integrating shorter workouts into your routine more often or do you feel like a workout doesn’t count if it isn’t at least an hour?
Bodyweight Home Exercises – Best Lower Body Moves
A bit ago I did a post with the 10 Best Bodyweight Upper Body Moves and today I wanted to take a second and go over 10 of the best lower body moves.
Bodyweight exercises are great to have on hand this time of year – when we are traveling, busy with family and the holidays and generally a little bit lazier about going outside on the weekends because it is cold.
The 10 Bodyweight Lower Body Exercises below don’t require much space and can easily be done in the comfort of your own home! (Shoot…they could even easily be used to create a home workout that the whole family can do together while gathered around for the holidays!)
1. Single Leg Deadlift (with slow eccentric) – Stand on one foot with the knee of that standing leg slightly bent. Hinge over at your hips, sweeping the other leg back toward the wall behind you. Pretend you are driving the heel of that foot straight into the wall behind you. Lean forward with your upper body as you hinge forward, keeping the back nice and flat. Make sure that as you hinge, you are sitting into the heel of your standing leg. Do not lean forward and come up onto your toes. To stand back up, drive through the heel of your standing leg and squeeze your glute at the top. Try not to tap the other foot down at all or at least not till you are fulling standing. Complete all reps on one side before switching to the other leg. To make the move harder, slow down your hinge over. Take 3-5 seconds to hinge over before you quickly stand back up. You can even slow down the stand back up or hold for a second or two while hinged over.
2. Single Leg Deadlift Hop – Stand on one leg. Hinge over, pushing your butt back and leaning your chest forward. Swing the leg off the ground back toward the wall behind you. Keep your back flat as you hinge over. Hinge over quickly, bending the standing leg just a little. Then quickly drive back up to standing, bringing your chest up nice and tall. As you drive up, explode up off the ground and drive the back leg forward, bringing the knee up. Then land back on the same leg and hinge back over before jumping back up. As you hinge over and drive up, you may want to swing your arms as if running with the opposite arm and leg working together. Make sure that as you hinge over your weight is in the heel of your standing leg. You want to also drive off that heel to really power your hop up.
3. Balance Lunge – Place your back foot up on a table, bench, chair or box. Hop your front foot out so you are in a nice wide stance with your back foot up on the bench or table. Then sink down, dropping your back knee toward the ground. Really sit back into the lunge. Make sure you aren’t going forward and that your weight is in your front heel and your front knee is not going past your toe. You should feel a nice stretch in the front of the leg that is back when doing this move. Beginners may want to use a super low box or do the move from the ground as a split squat.

4. Single Leg Squat – Choose a variation of the single leg squat that is right for you. Beginners may use a table or chair while more advanced lifters may use a doorway or a super low table or chair. If you can do a full pistol squat or use a plate weight to counter balance you, do that variation. Choose as hard a variation as you can do. To perform the basic single leg squat to a table, you will start by standing on one leg. Hold the other leg straight out in front of you. Lower yourself down until you are sitting on the table. Then driving off the heel on the ground, stand back up. Do not lean way forward or touch your raised foot to the ground. If you use a table, the more you allow yourself to sit down, the easier the move will be. The more you just lightly touch the table and come right back up, the harder the move will be. Also the lower the table you use or the lower down you go on any variation, the harder the move will be.

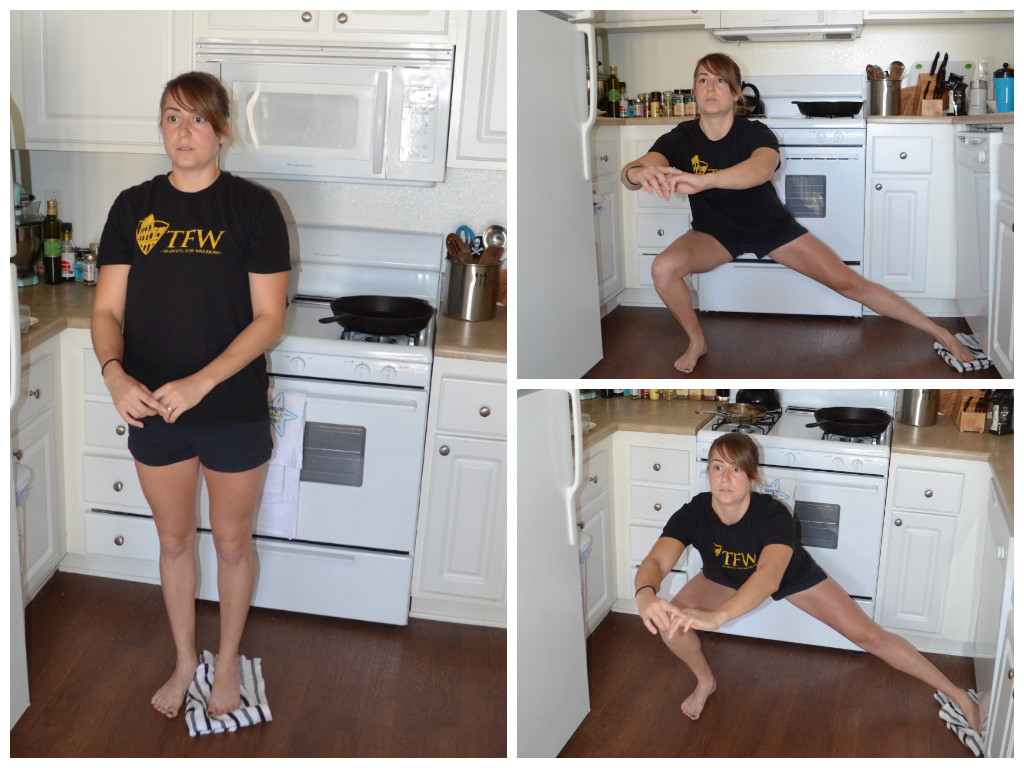
5. Towel Lunges – Side Lunges, Reverse Lunges, Curtsy Lunges…All can be made more difficult by putting a towel under the foo that is moving. For more details about the towel lunges, click here (and some other great towel exercises!).
6. Skater Series – You can do a hold, side touches or even backward touches. For the hold, place your feet no more than a couple of inches apart. Sink down as low as you can, sitting your butt back while keeping your chest up. This squat is very similar to the chair pose in yoga. Do not let your back round and try to sink as low as possible, getting as close to parallel as possible. Hold in that low squat. To do the touches, once you sink down as low as possible with your chest up, you are then going to tap one toe at a time out to the side. You should stay low in the squat and not shift your weight. Keep your weight centered over the standing leg. Straighten the other leg out to tap the toe to the side. Do not let your weight shift as you touch. All your weight is in the standing leg. Alternate toe touches to each side until the time is up. For the backward touches, you are then going to tap one toe at a time backward. You should stay low in the squat and not shift your weight backwards as you lunge back. Keep your weight centered over the standing leg. Straighten the other leg back and just tap the toe. Do not let your weight shift into the foot touching back as you touch. All your weight is in the standing leg as if you are holding the isometric squat still. Do not come out of the squat as you touch back.
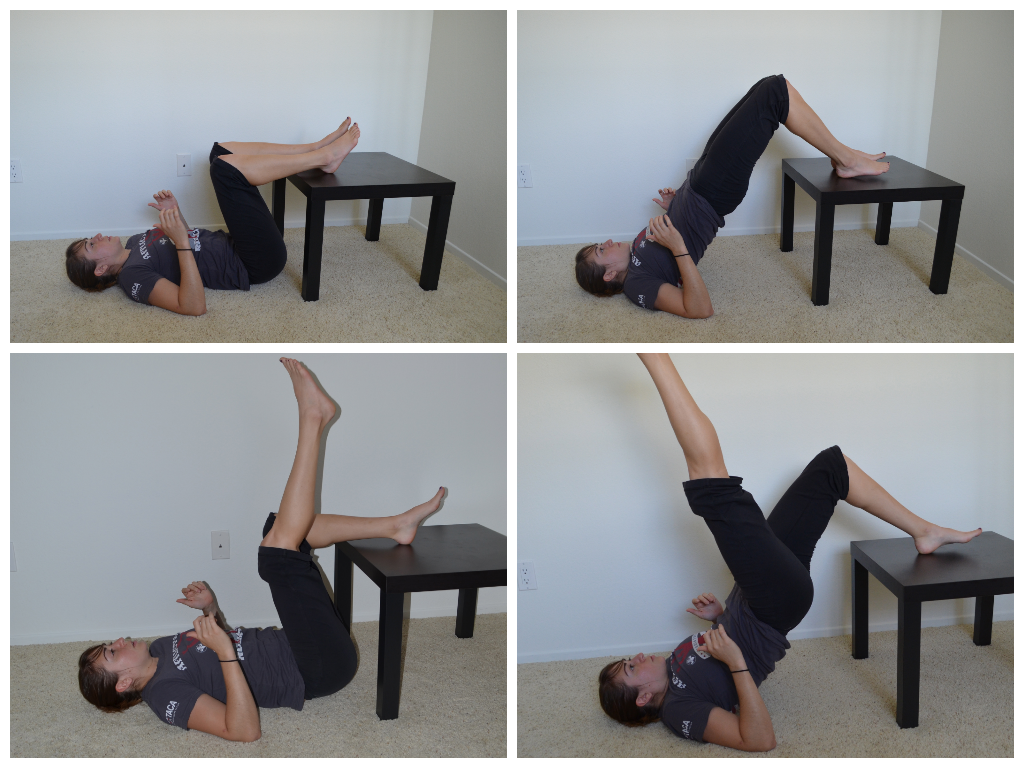
7. Glute Bridge (Off Table/Chair) – Beginners should do a single leg bridge from the ground or even a two leg bridge if they can’t get their hips up as high with the single leg bridge. Intermediate exercisers may want to do a two leg glute bridge with their heels up on the table. The single leg glute bridge off the table is an advanced progression. To do the glute bridge off the table, place your heels up on the table. Your butt should be right against the edge of the table. Bend your arms to 90 degrees with just your upper arm on the ground. Lift one leg up and point the toe toward the ceiling. Do not bend that leg or use it to help you bridge up. Drive through the heel on the table and press your hips up as high as you can. Squeeze your glutes and keep your core tight as you bridge up. Hold for a second or two and then lower down. Complete all reps on one side before switching.
8. Kneeling with Jump to Squat – This is an advanced move. It may be a challenge for many beginners to even do a step up from kneeling. To do the kneeling jump to squat, start on your knees with your knees about hip-width apart. Flex your feet. Sit your butt back and swing your arms back a bit so you are slightly hinged over. Hinge back and launch yourself from your knees up onto your feet in a low squat. Then stand all the way up. Once you are standing tall, step one foot back and come back to kneeling. As soon as you are kneeling again, hinge a little and jump back up to your feet. If you have a nice mat, you can jump back to kneeling, but this is not recommended unless you have a really nice mat.
9. Reverse Hypers – Lie face down on a table. Make sure your hips are right at the edge. Hold on to something in front of you if you want. Keep your upper body relaxed. Squeeze your legs together and point your toes out. Lift your legs to basically parallel to the ground, keeping your legs straight. Do not hyperextend your back and lift way higher than parallel. You do not want to feel this in your low back. Hold for 2-5 seconds and then lower down. Keep your core tight and really squeeze your glutes as you lift. If you don’t have a table to lie on, you can do this from the ground. Lie on the ground and relax your upper body. With your legs straight and heels together, lift your legs up as high as you can. Squeeze your glutes and get your quads off the ground.

10. Lunge Matrix (or part of it) – The lunge matrix basically tells you that you can lunge in every direction – forward, forward at an angle, to the side, back at an angle, straight back, back and crossed behind and even forward and crossed in front. If you think as yourself as lunging on a clock, you can literally lunge all the way around the clock. Sometimes I like to combine two or three lunges in a sequence. Or you can do a 360 lunge series, combining all seven and lunging around the clock!
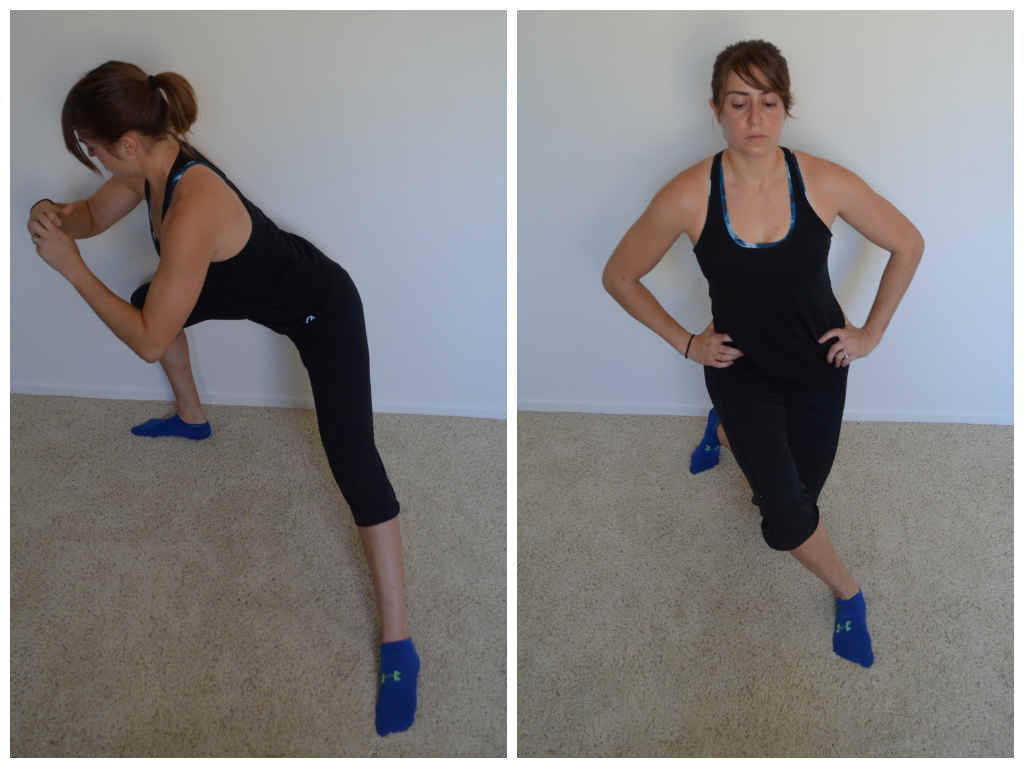
This is a backward angled lunge and a front lunge across.
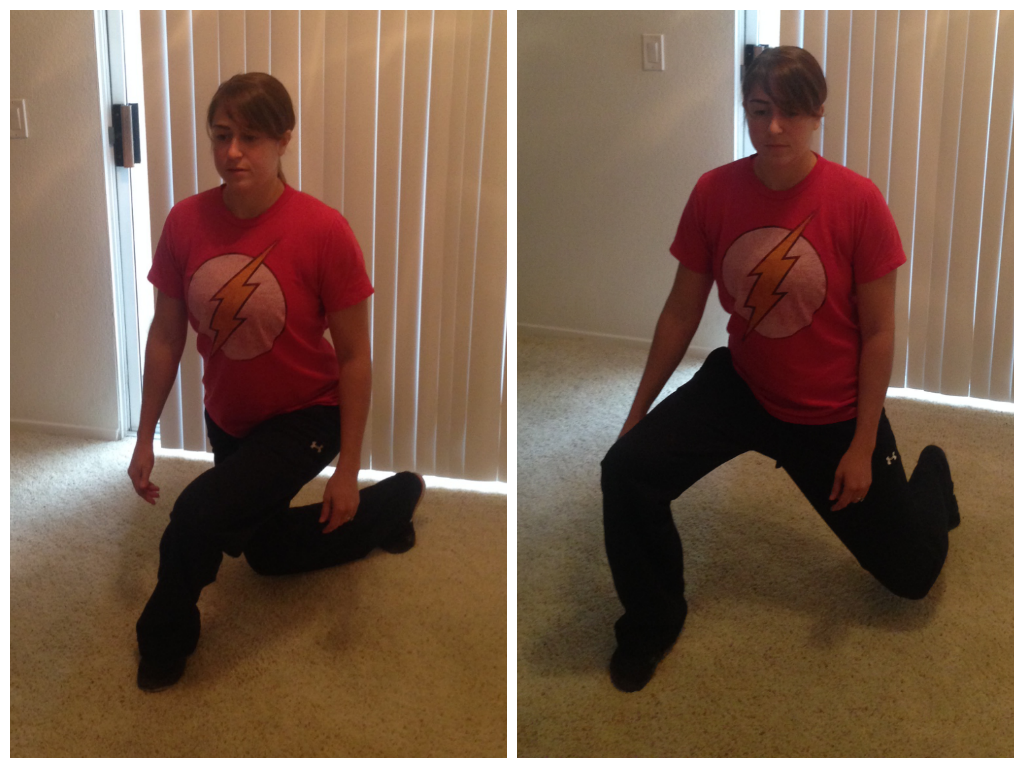
This is a curtsy lunge and front angled lunge. Two other lunges in the matrix
Bonus Moves:
Of course any jumping moves are also great options to help you challenge yourself without any weight. Squat jumps, skater hops, split squat jumps, tuck jumps are all also great options!
What are your favorite lower body moves to do at home?
Tips To Help You Master The Pull Up
The other day I asked clients and my Facebook followers, “What move would you like to master in the New Year?”
It seems that the pull up is the tough move that everyone would love to master.
But it isn’t like bench press or squats or deadlifts where you just start with a lighter weight and work your way up.
Heck, even simply doing assisted pull ups doesn’t always even get you there.
But where there is a will, there is a way. Just like with any other fitness goal you have, you have to TRAIN to be able to do the pull up.
So here are some great strengthening moves to add into your training routine that will help you to master that elusive pull up in this coming year!
HOWEVER, you must be consistent in your training for these moves to work. You can’t simply do them a couple of times one week and then expect to be there!
1. Work on your scapular retraction.
Here are three moves to help. You can add these into your warm up routines any time you do an upper body workout. They are also great rehab moves if you’ve suffered from any neck or shoulder injuries. These moves also help you activate the correct muscles so you can use all those strong back muscles to help you do the pull up!
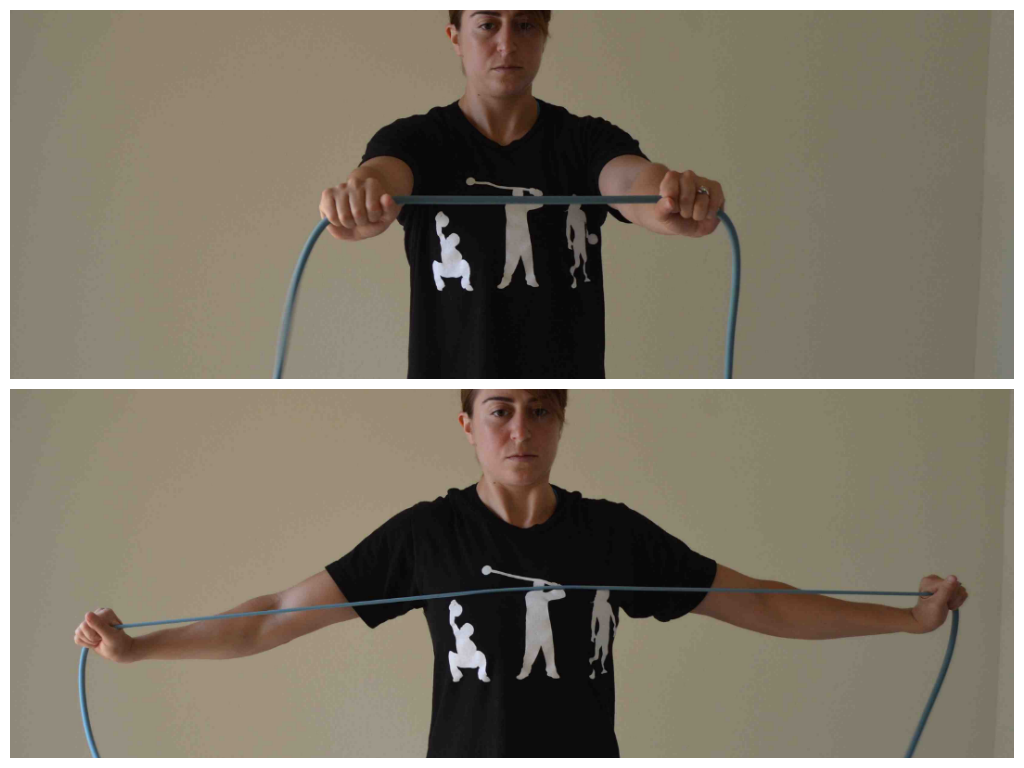
Scapular Band Flyes – Hold the resistance band with your hands about shoulder-width apart. Arms should be straight out in front of you at about shoulder height or right below. Keeping your arms straight, open your arms out to the side. Pinch your shoulder blades together as you open. Do not let your shoulders shrug up. Then once you open the band to your chest with your arms straight, bring your arms back together so your arms are about shoulder-width apart again and there is no slack in the band. Repeat.
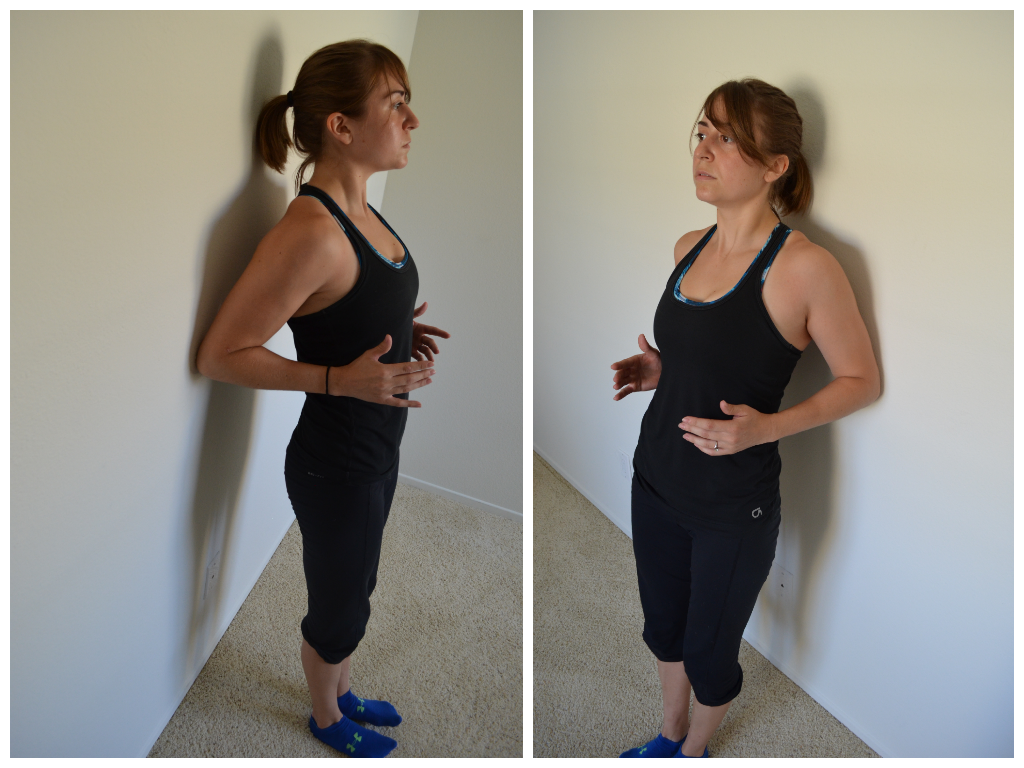
Scapular Wall Hold – Stand with your back to the wall. Step a couple of inches away and bend your arms to 90 degrees. Keep your elbows in by your sides and drive them back toward the wall. Lean onto your elbows on the wall. Do not let your upper arms or back touch the wall. Relax your head back. Pinch your shoulder blades down and back while keeping your core tight as you lean into the wall. You should feel this move low between your shoulder blades. To advance the move, move your feet a bit further from the wall.
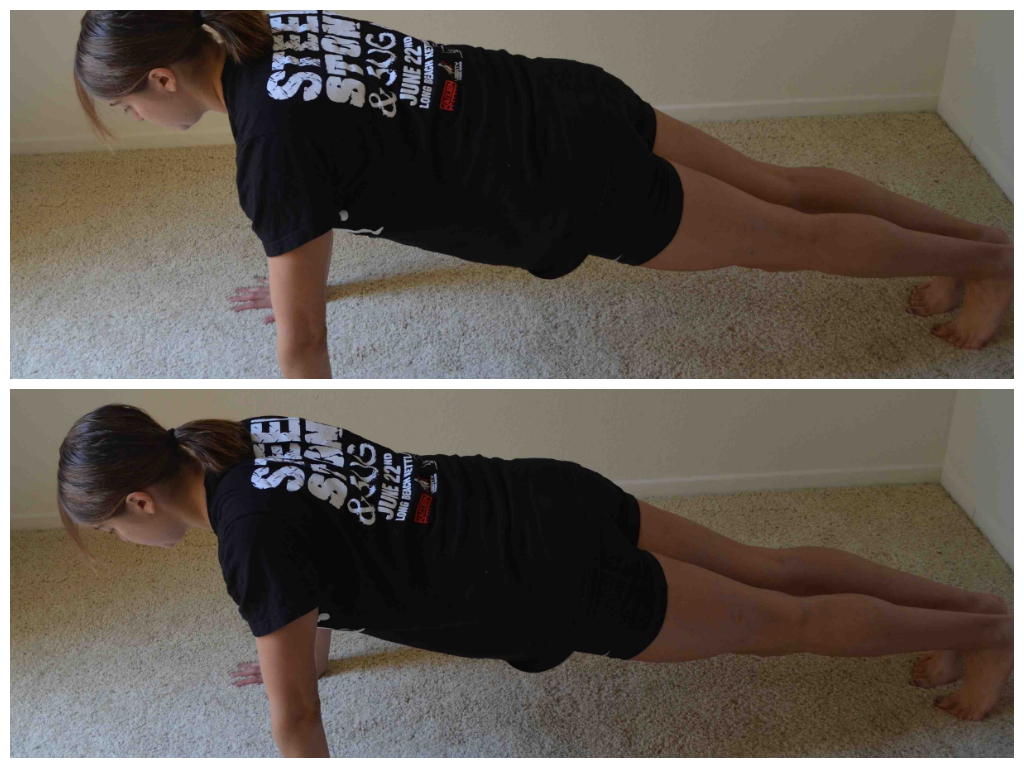
Scapular Push Ups – This move has only a very small range of motion. Set up in a push up position from your knees or toes. Create a nice straight line with your body. Then pinch your shoulder blades back and together and press your chest out. Then relax. It is really only a few inches of motion. DO NOT ALLOW YOUR CORE TO MOVE. Do not bend your elbows or allow your hips to sag. All you are doing is pinching your shoulder blades back and together. Also, do not let your shoulders shrug up by your ears.
2. Use isometric holds to strengthen your pull up.
Isometrics are a great way to strengthen the muscles used during pull ups without you having to be able to do a pull up. Here are three isometric holds that I love to use to work on each part of the pull up. The dead hang is an isometric at the bottom of a pull up and the pull up hold is at the top. The mid-pull up hold is exactly what it sounds like – a hold in the middle of a pull up.
Dead Hang – Hold on to a pull up bar or suspension trainer and hang from the bar. Your hands can be facing toward you or away from you. As you hang, do not let your shoulders shrug up. Keep your chest pressed out and your core tight. Your legs should hang down toward the ground. Do not tuck your knees up toward your chest.
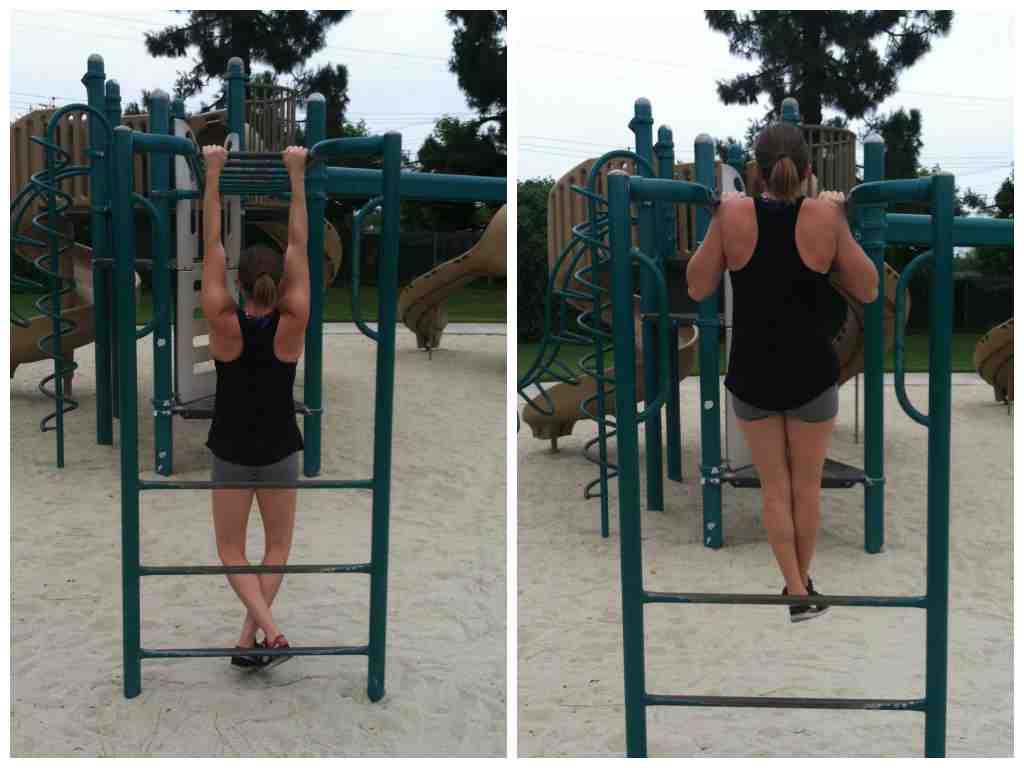
The first is a dead hang. The second is a pull up hold.
Pull Up Hold – You can do this as a chin up or pull up. You can do it off a bar, off a peg board and/or off of XT/TRX straps. Whichever you use pull to the top of a pull up or chin up and HOLD. The less stable the appliance, the harder this move will be. Keep your legs straight down toward the ground and your chin above the bar. Keep your chest should be pressed out and your shoulder blades should be down and back. Squeeze your belly button in toward your spine and keep your glutes tight. Hold there until time is up.
Mid-Pull Up Hold – Hold on to a pull up bar or suspension trainer. Your hands can be facing toward you or away from you. You can either jump or pull yourself so that you are half way up a pull up. If the bar is low enough, you can simply set yourself a mid-pull up then hang from there. You arms won’t quite be bent to 90 degrees. As you hang, do not let your shoulders shrug up. Keep your chest pressed out and your core tight. Your legs should hang down toward the ground. Do not tuck your knees up toward your chest. Try to keep your arms bent as if you are halfway up or down the pull up and do not let them lengthen.

3. Strengthen the muscles of your back.
Once you’ve got everything activated (and before that even you will want to roll out your chest and traps to make sure no overactive muscles are trying to take over), you will want to work on making the big muscles even stronger.
Inverted rows are a great move to help you work toward the pull up because they also force you to work on grip strength and lifting your own bodyweight.
Inverted Rows – Hold a suspension trainer strap in each hand. Walk your feet out so you are leaning back. The closer to parallel to the ground you get, the harder the move will be. Squeeze your core and glutes and press your chest out so there is tension between your shoulder blades. Then row up, keeping your body in a nice straight line. Row until your chest comes up to the handles and then lower yourself back down. Don’t let your hips sink as you lower back down. Also, keep your chest pressed out the entire time (do not let your low back arch though).If there is no bar or XT/TRX on which to do rows, do scapular push ups or corner rows.
One arm weighted rows and T-Bar Rows are also great options. When you do any weighted row, really focus on not rotating or using your legs to help you lift the weight. Focus on keeping a nice flat back and not rotating. You want your back to have to really work to row the weight up.
Doing pull ups are another great way to strengthen your back, but we will get into those with the next point….
4. Use different pull up variations to work on your weak points.
I’ve found that people get super stuck on one pull up variation and never mix it up.
Here are some ways to vary your pull ups to strengthen all the muscles needed to do an unassisted pull up:
- Mix up the grip you use. Don’t always hold with a pull up or chin up grip. Also try a neutral grip (palms facing each other and hands parallel). You can also place your hands wider or closer together. Each grip activates/uses the muscles in slightly different ways. For instance, a chin up engages a slight bit more bicep while a wide grip pull up uses a lot of lat!
- Do assisted variations. The key word there is VARIATIONS. Don’t just always hop on that assisted pull up machine. Try doing a pull up assisted by a jump. Or set up a bar so that your feet can help you push up by pushing off the ground. Or use a band. Vary the assistance you use to force your body to work in a few different ways. Also make sure you are always using as little assistance as possible. Just because something is hard doesn’t mean you can’t try using just a little less assistance. Find your point of failure and then move backward until you can just barely do one or two. Don’t just allow the move to be easy and depend on the assistance.
- Use tempo to strengthen your pull up. Slowing down the tempo of your pull up or down also helps strengthen your pull up. Do an assisted pull up, but pull up for a 3-5 count instead of pulling up as quickly as possible. OR jump to the top of the pull up, hold for a second then lower down as slowly as you can. All of these strengthen muscles in different ways to help you build toward the full pull up.
All of these moves and tips will help you master the pull up. While you need to be consistent in using them, you don’t have to use every single one every time you do an upper body workout. Mix a few in a couple of times a week.
Maybe during your metabolic use a pull up hold or even jumping pull ups. Or the next time you do a strength circuit do a weighted row and maybe some assisted pull ups.
Mix up the techniques you use, focusing on the moves that strengthen your weakest points. There is always a limiting factor to the weights or amount of reps we can do. Find that limiting factor, that weak link, and strengthen it.
And in case you aren’t sure what your weak link is, feel free to comment below and I can help you incorporate these tips into your training!
ALSO, while I didn’t discuss foam rolling above, make sure to roll out and do dynamic stretches before any strength training routine. A huge part of mastering these killer moves is getting the overactive muscles loosen and the correct muscles ready to work!
How do I avoid gaining weight during the holidays?
Eating well this time of year is far from easy.

While that is a lot, there are still over 300 other days a year to create and instill healthy habits!
It is doable, but not easy.
People are constantly bringing in treats to work. You have tons of holiday parties to go to. And everyone seems to always want to go out and eat and drink.
Because this seems to be the season of eating, I then see a ton of clients stop tracking their food and complete give up on all the great habits they’ve developed.
But honestly the worst part is, they start making excuses and feel guilty every second of every day.
Which just makes them stress more and enjoy themselves even less, keeping them in a negative downward cycle that leads to binging and completely giving up on their goals.
So of course at some point someone will say, “Well there just is no way to continue to lose weight during the holidays.”
And yea…losing weight during the holidays can be difficult to do. It most definitely takes a lot of planning and self-control.
But reaching your goals and staying on track during the holidays doesn’t mean you have to continue to move forward by leaps and bounds.
Too often we only think of success as moving forward.
But maintaining the progress we’ve already made is also a victory, especially during times when it is tougher for us to strive for perfection.
So when it comes to holidays, healthy eating and weight loss, I think the proper question to consider is , “How do I avoid gaining BACK the weight during the holidays?”
(Notice I’m not talking about losing more OR about starting a healthy diet during the holidays. Sorry but I’m just not big on trying to start creating new habits at a time when most people can’t even stick with well ingrained habits…)
How do you balance life with your goals to MAINTAIN the progress you’ve already made?
Well for one….If you’re going to cheat…ENJOY IT!
Even worse than the bad food is the stress and guilt that accompanies breaking with our plan or diet.
So just don’t feel guilty. If you make the decision to cheat, ENJOY IT!
For two, just because a food, a treat, is there, doesn’t mean you have to eat it. Pick and choose the things you truly want to eat and don’t feel obligated to eat the other things just because they are there.
You don’t have to deprive yourself of every treat or avoid eating at every holiday party; however, all too often people just eat because it is there even though they don’t truly want it.
Don’t do that. Eat the foods you truly want and exercise the self-control to avoid the foods that are “just there.”
That will help you control your portions to prevent weight gain AND prevent you from entering a downward negative spiral.
It will give you something to enjoy AND BE PROUD OF. You will not feel deprived because you got the food you wanted; however, you will also be able to be proud of the fact that you didn’t let a little treat completely derail all your progress.
For three, life interferes all the time and we have to learn how to deal with it.
We have to find the balance.
If we want to reach our goals, we can’t constantly be like, “Well there is just too much going on right now.” We can’t just say that every time something comes up…Because let’s face it, something comes up like every week!
We have to learn how to balance life with our goals.
We have to understand that our mental attitude is more important even than the foods we eat.
We have to know whether even a small indulgence will lead to us falling off the wagon or if it will keep us from feeling deprived.
We have to learn to deal with the unexpected and not only make choices, but not dwell on them.
If you want to avoid gaining weight during the holidays, and please note I’m talking about MAINTAINING the progress you’ve already made not about losing more weight or starting a healthy diet, you have to remember that reaching your goals isn’t about perfection – that every day you don’t need to be moving forward.
That sometimes it is simply about not doing too much damage to the progress we’ve already made so that we keep our healthy habits intact.
Enjoy the holidays. Don’t stress over a cookie. Just don’t feel obligated to eat everything you see!
Goal Setting For The New Year
Around this time everyone begins setting goals for the New Year.
Unfortunately, 90% of those goals never get accomplished.

Don’t let this be you!
And it isn’t because they aren’t meaningful. It isn’t because people don’t want to accomplish them. It isn’t because they aren’t doable.
It is because the goals aren’t clear, aren’t measurable aren’t WELL PLANNED.
The goals that never get accomplished are vague. Like I want to be healthier.
I want to be healthier. That is your goal!?!
Way to set yourself up for failure.
I mean…What is your definition of healthier? How are you going to measure that? What specific things are you going to do to get there? How will you even know if you’ve gotten there?
Heck…Why do you even want to be healthier? Because you are supposed to be healthier? Because you are supposed to WANT to be healthier?
And I’m not saying that being healthier can’t be what you truly want, your overall goal. I’m just saying that if you want to move toward being healthier, you must have specific things to accomplish, things you can measure.
You have to understand WHY you truly want it and what it means to you.
You need to be able to see and measure your progress.
So here are some great tips to help you take that vague goal and turn it into something meaningful that you will actually accomplish this next year!
Goal Setting Tips:
- Focus on one thing at a time
- 10 tips to help you break bad habits
- How to set SMART goals
- Track your progress
- Know the WHY behind your goal
What are your goals for the New Year? What moves would you like to master?
Stop Comparing and Focus On Yourself
I hear all the time “I’m not as in shape as (insert person’s name here) so I’m probably not in-shape enough yet to train.”
I also hear all the time, “I’ve been here as long as (insert person’s name here). Why can they lifting more than me?”
STOP COMPARING YOURSELF TO OTHERS PEOPLE!
No one is ever in the exact same place as another person or starts at the same point; therefore, you can never compare yourself to another person and their accomplishments.
We all come into the gym, we all start working out, at different starting spots – at different places in our fitness journey.
And no one place is the RIGHT place to begin.
No matter what your level, it is a good time to get started on your journey to a better, fitter, healthier lifestyle.
But what better, fitter or healthier will mean to you, won’t be the exact same thing it means to someone else.
When you start, you can’t look at someone else and compare yourself to them. You can’t compare your progress to theirs or even their current accomplishments to yours.
We each start at different points and are going to have different journeys to success.

Everyone progresses in different ways. And it doesn’t really matter where you are in comparison to anyone else.
All that TRULY MATTERS is that you are making progress toward your OWN individual goals.
So stop thinking about how you compare to someone else and start thinking about how your current situation compares to where you started.
Have you made progress from your starting point to your goals?
Have you learned? Have you grown from where YOU started?
That is what matters.
I mean…Do you truly care if you are better than someone else if it means you haven’t gotten any closer to your dreams?
I don’t….
If you want something to compare yourself to, compare it to where YOU started. Track your goals. Track your progress. Work to make yourself better in comparison to where you started and where you want to be!


