Metabolic Typing
While I enjoy ripping on vegetarians quite frequently (sorry vegetarian readers), I do just as often admit that there is no “one size fits all” when it comes to dieting.
Different diets are going to work for different people.
End of story.
And while I don’t think this means that there is truly someone out there that can eat junk food and be healthy, I do believe that there is a range of things that will work for different people.
The diet industry thrives on trying to sell you a magic diet solution…it wouldn’t exist if everyone just kept it simple and ate WHOLE, NATURAL FOODS instead of looking for a quick fix!
Which is why I was interested in attending our nutritional workshop about Metabolic Typing today at the gym.
“One man’s food is another man’s poison.” – Hippocrates
What works for you may not work for your friend or family member.
Had that happen to you before, right? Had a friend say to you, “I followed ______ diet and felt great and lost 20lbs!” And then you went and tried the diet only to find out that you felt crappy and gained weight.
And it wasn’t that you didn’t do the diet correctly. It wasn’t that you didn’t follow the directions to a T.
It’s just that each of us have slightly unique nutritional requirements and different environmental factors that affect our gene expression. Our genetic make-up and our environment play a huge role in determining what “diet” works well for us.
There are a ton of studies out there about cultures that have a high number of centenarians. Researches have looked for that perfect diet that promises a long and healthy life.
But what they found wasn’t one diet. It was a variety of diets.
Of course there were some commonalities between the diets, like a lack of crap processed foods, but each diet was DIFFERENT.
Because there is no magic prescription, no one size fits all.
Trust me, I know. I had to test out a few different diets that have worked for other people before I found the one that worked best for me.
Over the last few years, I’ve experimented with a variety of diets and macronutrient breakdowns. I’ve done low-fat and high carb. Low-fat and low-carb. High fat, high protein and low-carb. Carb and fat cycling…
I’ve messed around with grains, dairy, fruits, nuts, organic, local, grass-fed. I’ve experimented with a ton of different variables.
Some things have worked. Some….some well…didn’t.
But instead of worrying about what SHOULD work, about what worked for other people, I focused on what actually worked for me.
And the things that worked, I kept. And the rest, I discarded without looking back.
By running my own experiments, I’ve found a diet that works for me. That doesn’t mean, however, that I’m not constantly learning and still always making micro-adjustments.
Because let’s face it, your environment doesn’t always stay the same.
And my perfect diet isn’t the same as Ryan’s perfect diet. I’ve found that I need more carbs than Ryan. Be it my genetic requirements or the way my body reacts to my workouts or a variety of other factors, I need more carbs.
As the guy who came in today and did the Metabolic Typing workshop said, “We are as individual as our fingerprint.”
Each of us will have slightly different nutritional requirements.
And while I do believe that if we all live by the principle “eat whole natural foods” we will all be pretty darn healthy, I do think that to reach our full potential we need to consider our own unique needs.
Have you done any self-experiments? What diet works for you? Ever tried a friend’s diet and had it completely backfire?
NOTE: Now whether or not I agree with the whole questionnaire that supposed reveals your metabolic type is another question and a post for another day. Dr. Oz has a four question metabolic typing quiz that shows you how it works. I do, however, believe that your genetic make-up does affect exactly what variation of a “whole, natural foods diet” is right for you and that genetic testing can be valuable. I just don’t know if a questionnaire can really determine it….
Whey Protein Powder Recipes
A week or so ago I wrote a post about a great protein shake I made. I mentioned in that post that while I prefer to mainly eat whole natural foods, protein, and even BCAAs for that matter, can be useful tools to maintain a healthy diet when you are busy and on the go.
But while I believe in using protein for snacks and even the occasional meal replacement, I don’t believe in making protein snacks that have a bazillion ingredients in them.
I’m sorry…protein “fudge” with almond flour, honey (or other sweeteners) just isn’t healthy any more. Nuts have phytic acid in them and should only be consumed in moderation not as flours where you can end up consuming double or even triple the proper serving size.
Anyway, I do like certain whey protein powder recipes…simple ones…like certain protein pancakes. I use an egg…maybe a little raw milk, protein and water. I usually cook in coconut oil and may add a coconut butter or the occasional teaspoon of almond butter if we even have it around.
I try to keep it as natural and whole foods-y as possible. Because let’s face it…Nothing is as good as whole foods for you.
However, if you are on the run, here are a few good protein powders and the pancake recipes I used them with. I got the protein powders from BestPriceNutrition.com.
They sent me samples to try as I’m a creature of habit and otherwise just get the Gold Standard whey every time. They also sent me a couple BCAA packets to try.
Branch chain amino acids are the building blocks of protein.
If you do any sort of Intermittent Fasting, BCAAs can be a great thing to take before your workout. Lean Gains talks about BCAAs in his IF diet. I do like BCAAs and highly recommend them if you are lifting heavy and doing IF although I’m a bigger fan of the unflavored ones than the watermelon Metabolic Nutrition one that Best Price Nutrition sent me.
It tasted great…But again, I’m all about less crap and more natural even if it doesn’t taste as good.
Anyway, the whey protein powder pancake recipes!
Banana Creme Pancakes
I’ve never had a banana protein powder before. I usually keep it simple as the stranger protein flavors generally taste chemically.
This protein, however, tasted amazing and I loved that it was low carb. It wasn’t at all chemically, but did have a few more ingredients in it than I would have liked.
For me, the protein itself tasted delicious enough that I could make my super quick version of the pancakes. Tasted like banana pancakes although a bit more dense just because I only included two ingredients. You could add some baking soda if you really wanted them fluffier. But for something you can cook quickly and throw in a bag and eat cold whenever you need it later, these were delicious.

Ingredients:
1 Scoop ProtiZyme Banana Creme
Water
I mixed water and the protein powder to a desired thickness. I don’t like mine too watery so it was only a tbsp or two of water.
Heat a skillet with a tsp of coconut oil. Cook pancakes on medium/low heat for a minute or two each side.
Eat hot or let cool and save for later!
The best protein and water pancakes. Quick, easy and simple! Tasted great although a bit dense in texture, which may bother some people.
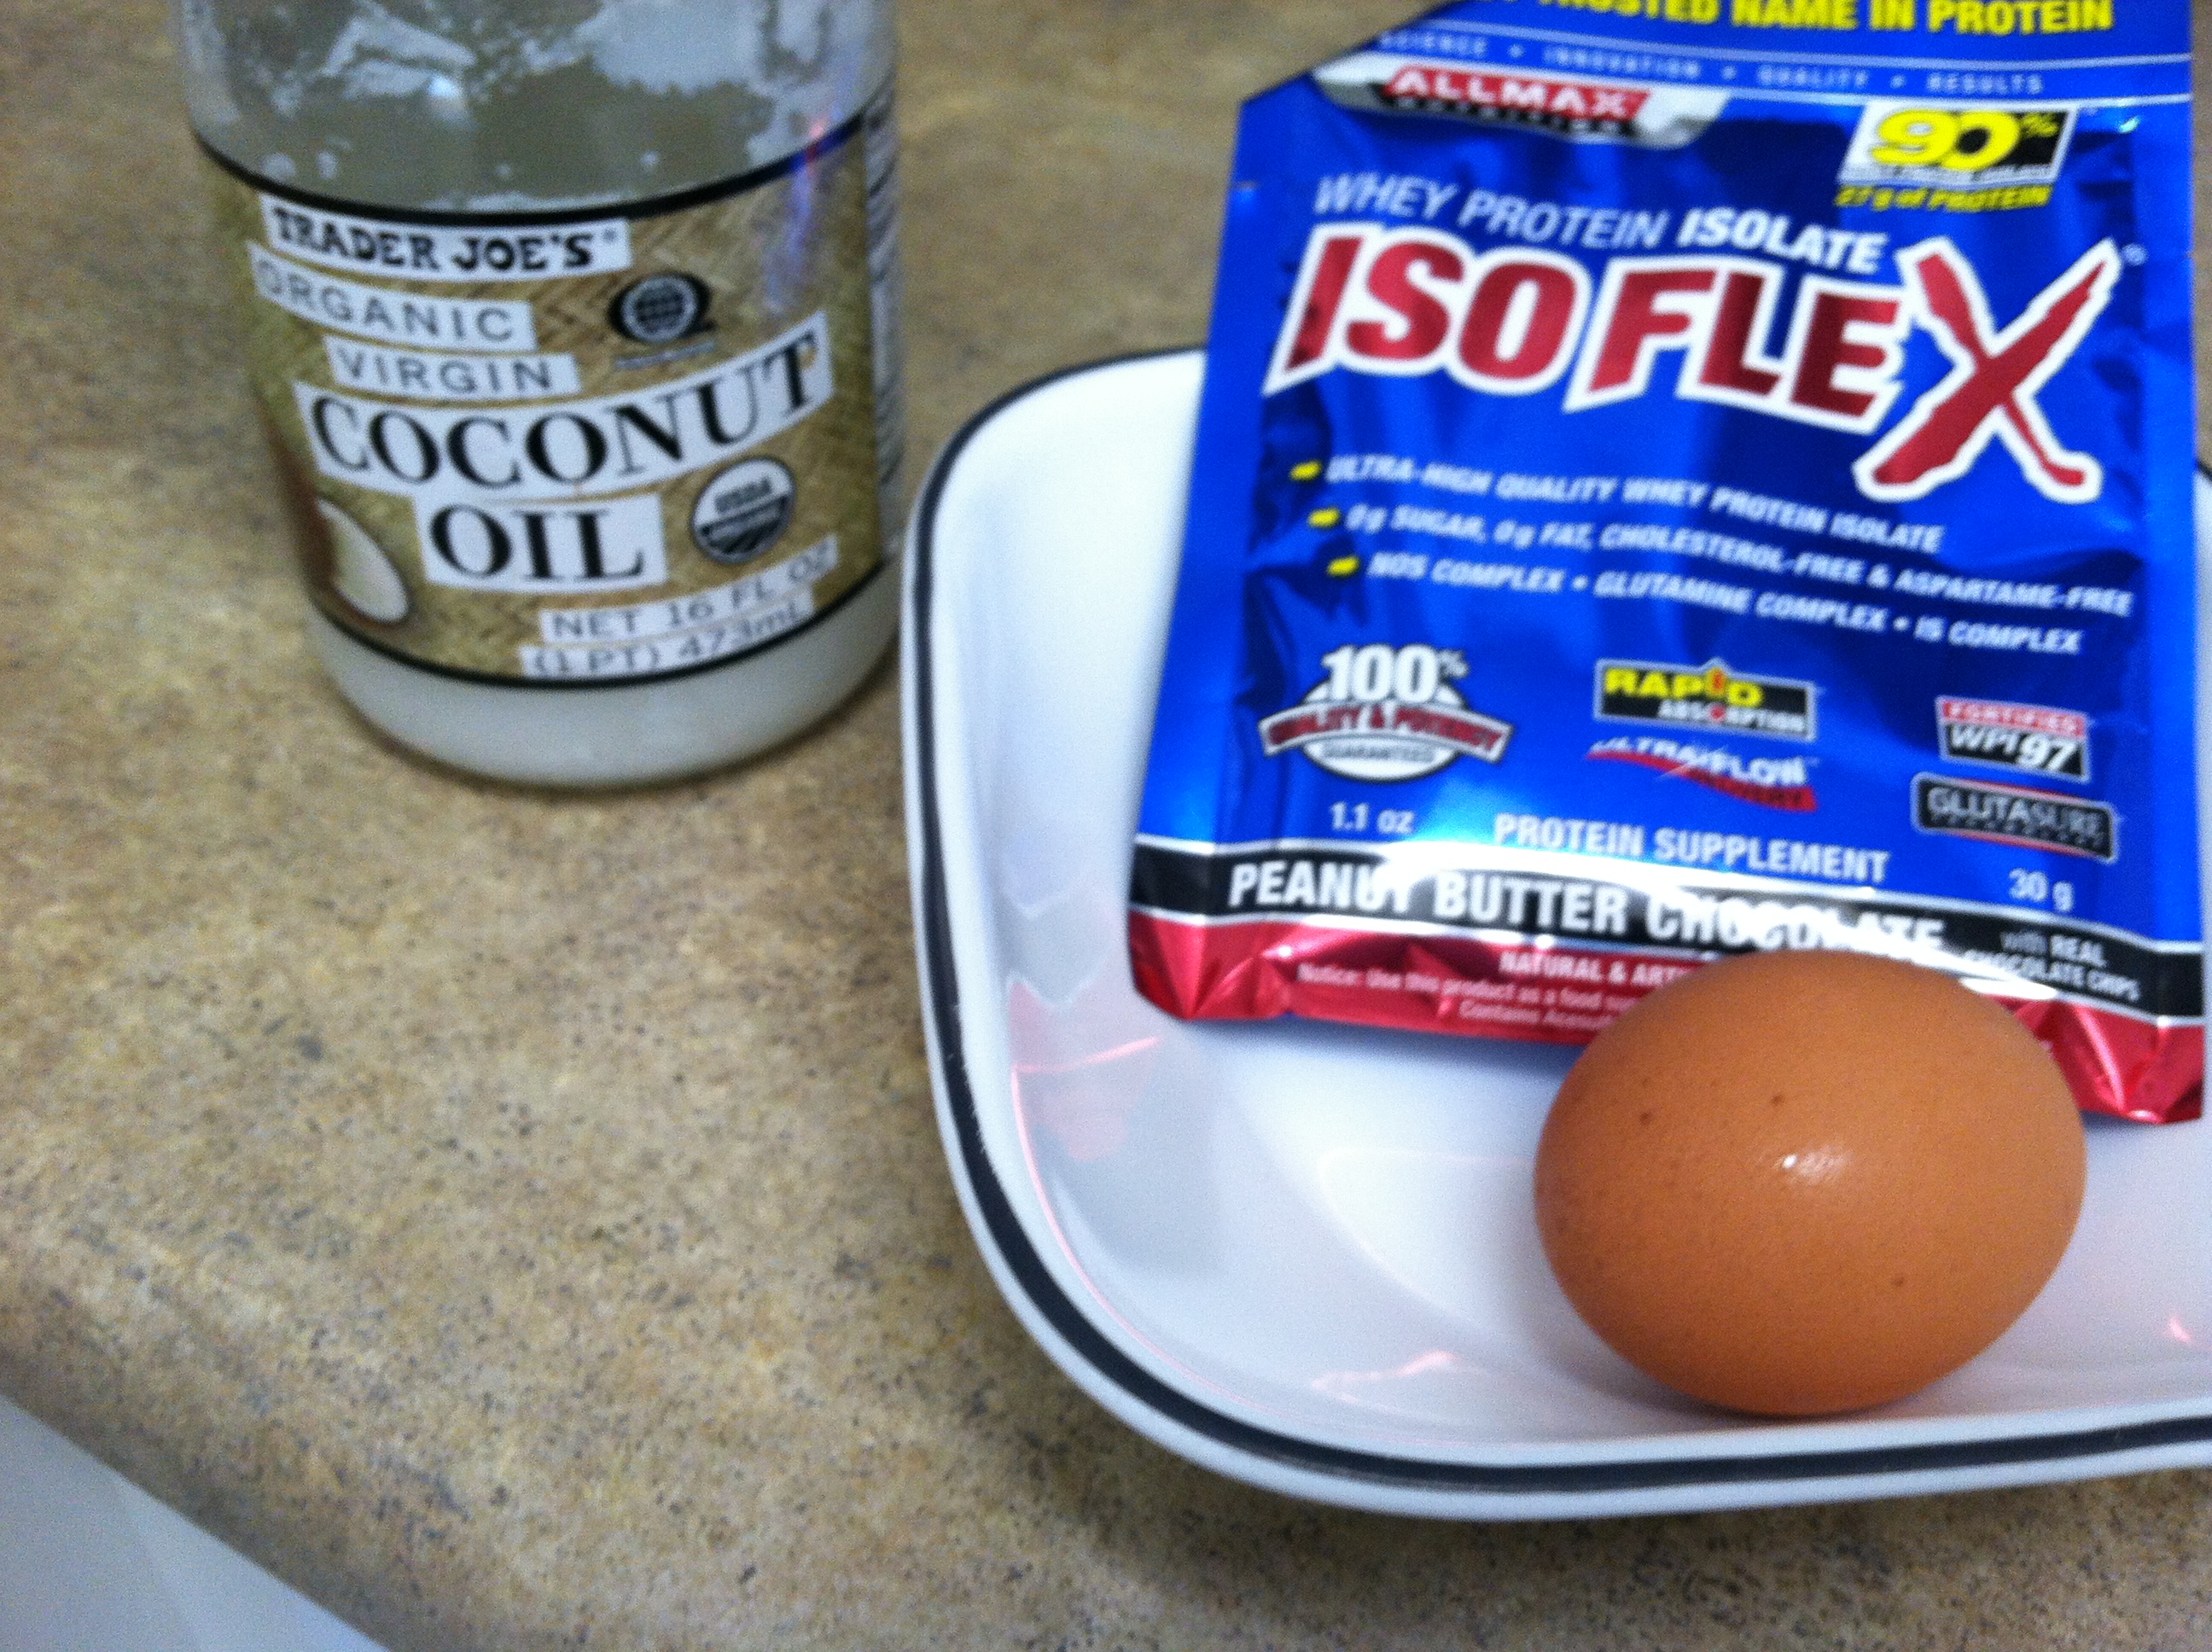
Peanut Butter Chocolate Protein Pancakes
The Peanut Butter Allmax IsoFlex protein was probably the best protein I’ve ever tasted AND it was an isolate, which is saying a lot. (Here is a great post by Mark’s Daily Apple about the difference between concentrate and isolate).
However, it did have peanuts and a few more ingredients than I would like in it so I will probably not get it again. But if you eat peanuts and love peanut butter, I would suggest you try this protein. (I may give another flavor a shot though as they have a variety!)
Ingredients:
1 egg
1 scoop protein powder
1 tbsp raw milk
Water to taste
Mix egg, protein, milk and water to desired consistency. Cook with 1 tsp coconut oil over medium/low heat. Cook about 1-2 minutes per side.
Seriously probably the most delicious protein pancakes EVER, but Reese’s are one of my favorite cheat day treats!
What is your favorite protein powder? Do you make any protein powder recipes?
NOTE: Best Price Nutrition did send me products for free to review. My review is brutally honestly and if you have any further questions about the products or supplements in general, let me know by email at manbiceps@gmail.com.
Ankle Mobility – Move Better, Feel Better, Perform Better
You never really hear about people working on the mobility of their ankles.
Heck no one even really seems to talk about their ankles unless their ankles are injured.
But our ankles, and our feet for that matter, play a huge role not only in our ability to move, but also in our ability to move well.
You may not realize it, but some of your injuries may be caused by your lack of ankle mobility. Ankle mobility can restrict movement and lead to compensations. If you have poor ankle mobility, you may not be engaging your posterior chain…aka your glutes and such. So when you do leg movements your quads may have to compensate, which can lead to knee problems, among other issues, AND can hinder your progress during your workouts.
Our feet and ankles are our base, and if something isn’t right at our base, how can we expect everything up the kinetic chain to perform well?
If the foundation of your house wasn’t solid, would you really expect the rest of the building to hold up well?
Of course not!
So how can you expect to perform well if your base isn’t solid?!?
You can’t!
So here are 10 great ways to improve your ankle mobility and foot and ankle strength so that you can squat better, run better, and suffer from fewer pains and injuries!
1. Foot foam rolling – A great way to roll out your foot and increase your foot and ankle mobility is using a tennis ball. Standing, put the tennis ball under the arch of your foot. Press down into the ball and roll up and down and side to side. You can also use a lacrosse ball or golf ball. The smaller and harder the ball, the more you will be able to dig in.
2. Lower Leg foam rolling – There are a number of different ways to roll out your calves and your shins. I show a few on Redefining Strength. You have to make sure to roll out your entire lower leg. Most people will do the calves but forget about the shins and even the side of their lower leg. You must hit your lower leg from every angle if you want great mobility. Using a roller, you can hit every part of your lower leg. To get the calf, sit over the roller with it right above your heel. Rock side to side and up and down as you move the roller toward the back of your knee. To hit your shin, kneel on top of the roller almost as if you were going to hold the pigeon pose. Do not foam roll the bone. By rocking to the side after hitting the front of your shin, you can get the outside of your lower leg.
3. Standing 3-way ankle mobility – One of the ankle mobility drills I use most often is a standing three-way drill. This drills is great and hits the ankle from different angles; HOWEVER, if you have knee problems, this move may not be for you. Number 7 may be a better fit if you are suffering from knee pain. To do this mobility move, standing facing a wall. You can put your hands on the wall for balance or support. Have one foot in front. This foot is the one working. Try to drive the knee straight forward over the toe and into the wall. Do not let the heel of the foot come up. Do that 10 times and then take a step out a bit wider and repeat. Then step across in front and repeat 10 more times. Make sure that your toe is always pointing directly toward the wall and that you are keeping the heel down as you drive your knee forward.

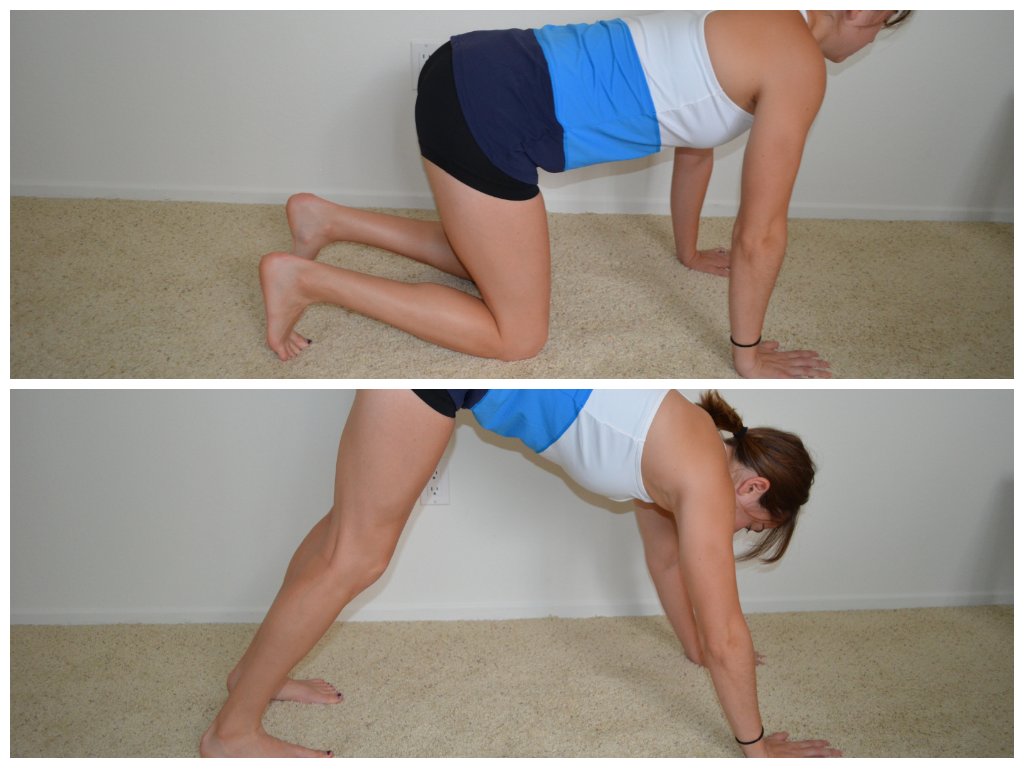
4. Bear Squat – The Bear Squat is one of my favorite ankle mobility moves because it is a great calf stretch and even gets my hamstrings sometimes. To do this move, start on your hands and knees as if you were about to crawl. Then drive up off your knees onto your toes and hands. Drive your heels as close to the ground as possible and then return back to kneeling. You can make this an even better warm up by not returning all the way back to kneeling but instead just to the bulldog position!
5. Single Leg calf and ankle stretch – Very similar to the Bear Squat although this really targets one ankle and calf at a time. Start in a plank like at the top of a push up. Cross one ankle over the other calf. Then pushing your butt up in the air, drive the heel of the foot down into the ground. Then move back toward the plank position and repeat about 10-15 times each side. Do not hold the stretch.

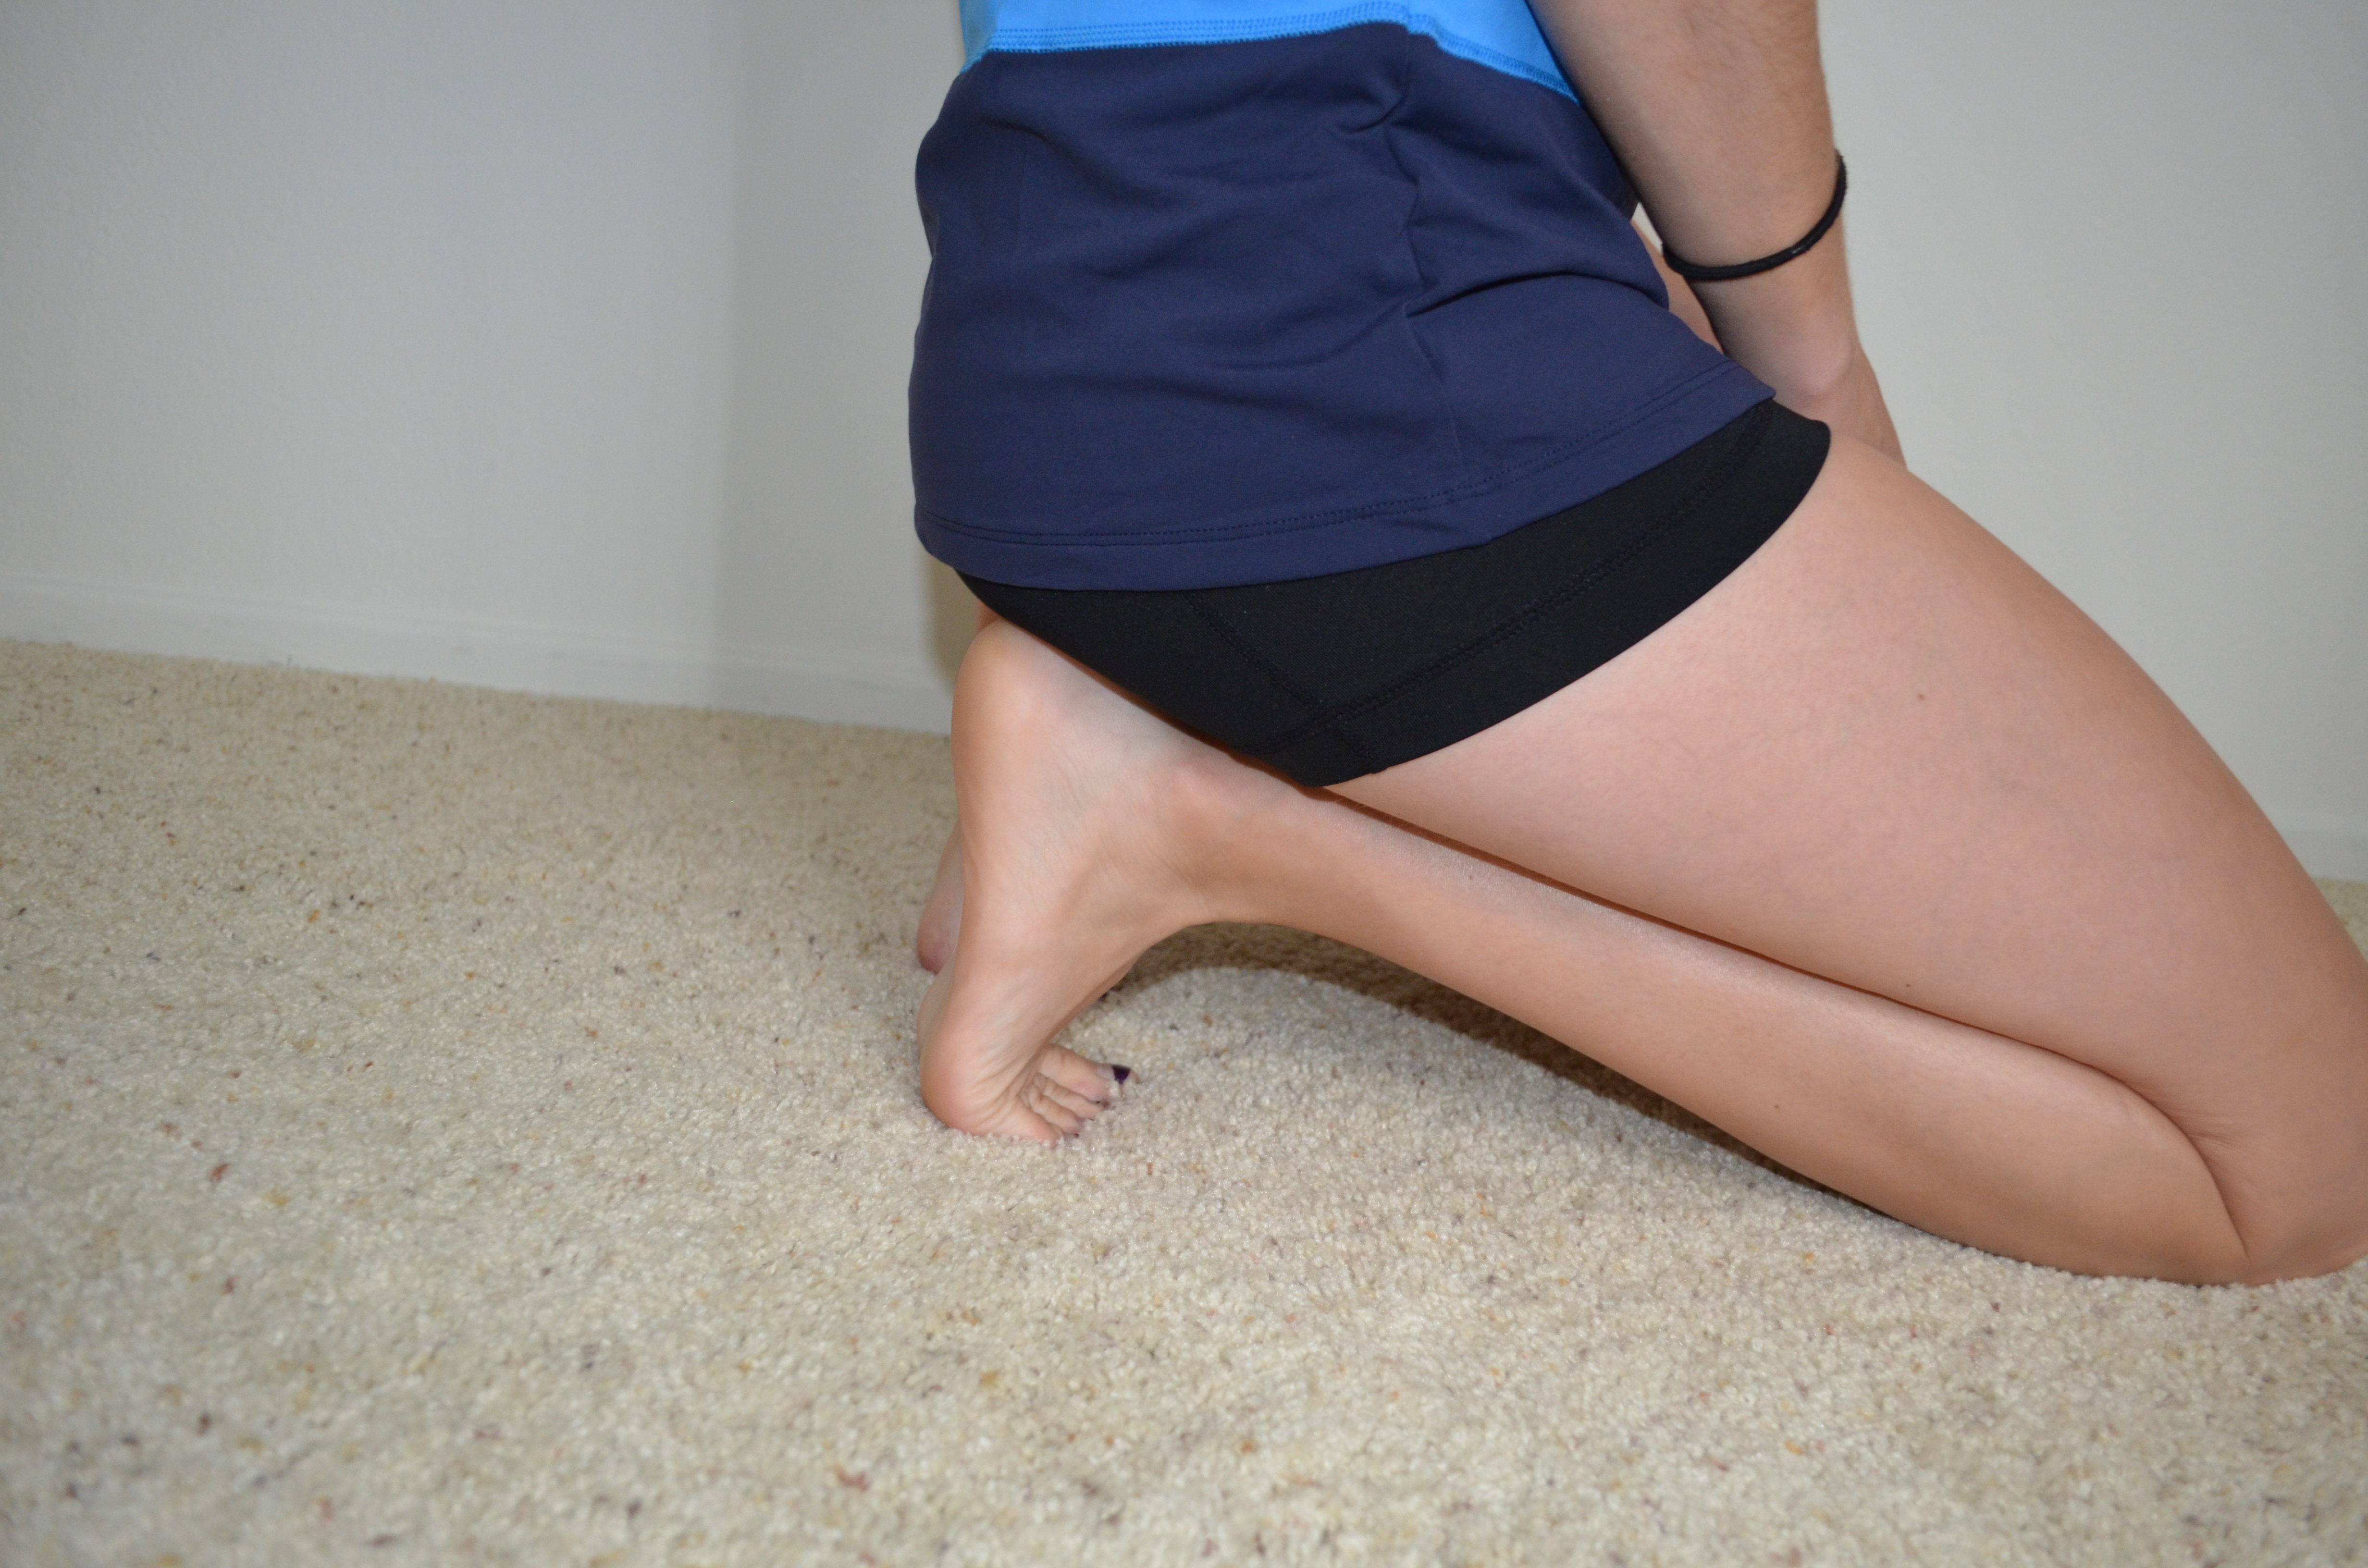
6. Kneeling foot stretch – (can be combined with bear squat) – I like to combine this one with the Bear Squat, but it does take a bit more mobility especially in the quads. To perform this move, kneel on the ground. Flex your feet with your toes tucked under and then sit back on your heels. If you combine this with the Bear Squat, you will sit back on your heels then move into a crawling position before pressing your hips up and your heels into the ground. Then return back to the kneeling position.
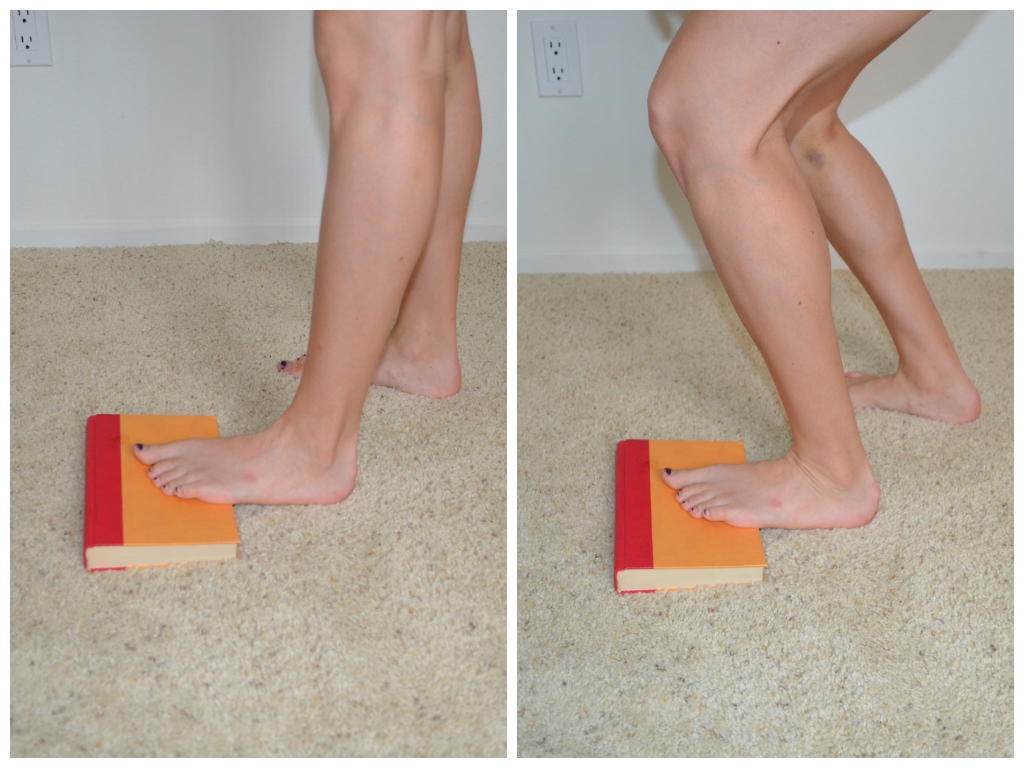
7. Elevated Toe Standing Dorsiflexion (foot “flexed”)- This is a great one for anyone with knee issues. Elevate your toes on books or plate weights or anything that is an inch or two higher than the ground. Place your toes up on the book and your heel on the ground. Then “squat” down a bit keeping your heels on the ground. You may sort of go forward instead of truly squatting down when doing this move. Just make sure to keep your heel on the ground. This move creates ankle dorsiflexion without you having to let the knee go over the toe.
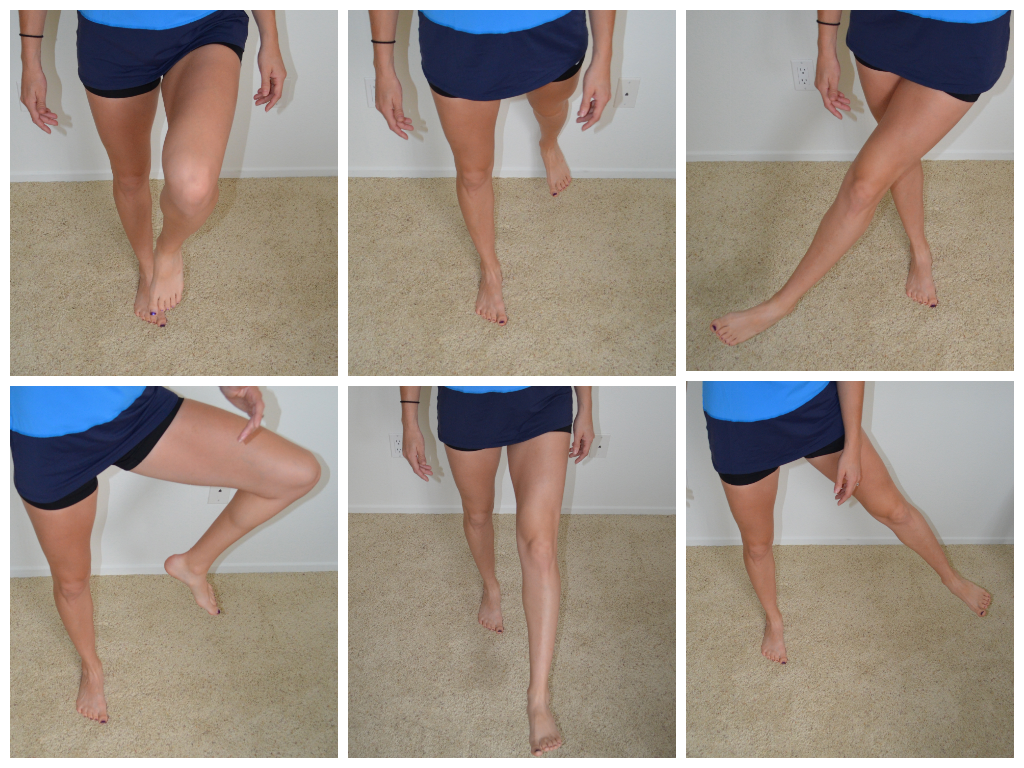
8. Toe circles – This is a great move that you can do a variety of ways. You can sit, or even lie, on the ground and make circles with your toes. Make circles both clock-wise and counter clock-wise. You can also do this standing. Point your back foot with your big toe on the ground and the top of your foot facing the ground. Draw circles keeping your big toe in one spot.
9. ABCs – This one is a great rehab/prehab one to do right when you wake up or even right before you go to bend. Straighten one leg toward the ceiling while you are lying down. Draw the letters of the alphabet with your big toe.
10. Single Leg Balance with Swings– Working on your balance is key to having great ankle strength and mobility. You can stand and balance on one leg. You can balance on your toes. You can balance on a foam pad. Or you can even balance on an incline on your toes. Whichever way you choose to do, balancing is beneficial. One of my favorite balance moves because it also really warms up the knees and hips, is a single leg balance with leg swings. Stand on one foot and swing the other leg forward and backward. Make the swings bigger as you go. Then swing the same leg side to side, making the swings bigger as you go. Finally, do a rotational swing. Bend your knee to 90 degrees and rotate the leg open and close as if it were almost a door on a hinge.
All the moves above are great for ankle mobility, but you don’t need to do all of them every day or even every time you do a sprint or leg workout. Choose a couple to use when you warm up. And if you have suffered any ankle injuries, make sure to stay consistent with your prehab/rehab so that you restore your ankle to full mobility!
Redefining Strength – Empowerment through exercise
So over the last year, I’ve thought a lot about what Man Bicep stood for in my life and the life of my clients.
It wasn’t about powerlifting. It most definitely wasn’t about running. And it wasn’t even about a specific diet.
It was about doing something….anything…that made you feel healthy and strong. It was about working out to feel empowered.
It was about taking on new challenges and feeling like you COULD do anything.
It was about redefining what strong really means.
And so I started considering what could really make us feel more empowered. And I began developing workout programs based around this principle.
I believe that working out can be an outlet, a release. I believe it can help us build confidence in a way few other things can. Overcoming physical challenges – lifting more or running further than we thought possible – is just about the most empowering thing you can do.
So I created “Redefining Strength.”
Right now the site has a few products that I’m giving away. I spent a lot of time considering what would be most helpful and supplement everything that I post here, on Man Bicep.
If you go over and subscribe, you will get 4 different reports. One is bodyweight exercises that can be done by beginners and advanced a like. They are basically exercises you can do anywhere and get a full body workout.

Handstand progression…I show you ways to progress up to one!
You will also get a list of 10 Simple Diet Changes. Be you vegetarian or Atkins dieter, there are tips on there that EVERYONE needs to follow.
I also spent a lot of time creating a foam rolling video library and cheat sheet. I believe that foam rolling is one of the most important things when it comes to moving well and feeling great. I even included some foam rolling videos that show you how to roll out even if you don’t have any of the fancy trigger point equipment.
And last, but not least, you will get a goal setting sheet. I debated about putting this one in since many of you will skip it. But honestly, goal setting is one of the best things you can do for yourself.
I know it’s cheesy. I know it’s boring and seems stupid. But trust me it’s worth the time if you really set goals that MATTER.
Goals that MATTER are what keep you committed even through the roughest of times. Goals CAN be motivating and keep us on course.
You just have to set goals in a way that don’t allow them to fall by the wayside like most people’s New Years resolutions!
So head over to Redefining Strength and check out those four guides and the video library. I hope it gets you as excited as I am for the programs launching in August!
As always, if you have any questions, feel free to email me at manbiceps@gmail.com.
Home Workouts – 10 Moves You Can Do With An Ikea Table
So yesterday when Ryan and I were doing some foam rolling stuff, I used a table for a couple of the moves.
It was just our little $10 Ikea table, but it was amazingly sturdy considering I put it together…Although that may be better than if Ryan put it together…Sorry Ryan…But it’s true…
Anyway, when I used the table, Ryan said to me, “I wonder if you could do a full body workout with just that table?”
My answer, “You totally could!”
Here are 10 moves you can do with just a cheap little Ikea side table! Love you Ikea! 🙂 (The moves are in no particular order)
1. Decline or Incline Push ups – You can make the push up easier or more advanced using the table. To make the push up easier, put your hands on the table and then perform the push up from your knees or toes. Doing the push up from your knees will make it easier than from your toes. To advance the push up, put your toes on top of the table.
2. Balance Lunges – The balance lunge is a great leg move to do if you don’t have weights. Place your back foot up on the table and hop your front foot out so you are in a nice wide stance. Then lunge down, dropping your back knee toward the ground. Really sit back into the lunge. Make sure you aren’t going forward and that your front knee is not going past your toe. You should feel a nice stretch in the front of the leg that is back when doing this move.

3. Single Leg Squats – This table is a great way for beginners especially to start working on their pistol squats. It is also a great way to really correct imbalances since you are working legs individually. If the table is too low for you at the beginning, start with a two-leg squat to bench. Then progress to one leg. Beginners can completely sit down on the table. As you advance, try to only barely tap the table with your butt before standing up. Do not rely on sitting on the bench to stand back up.

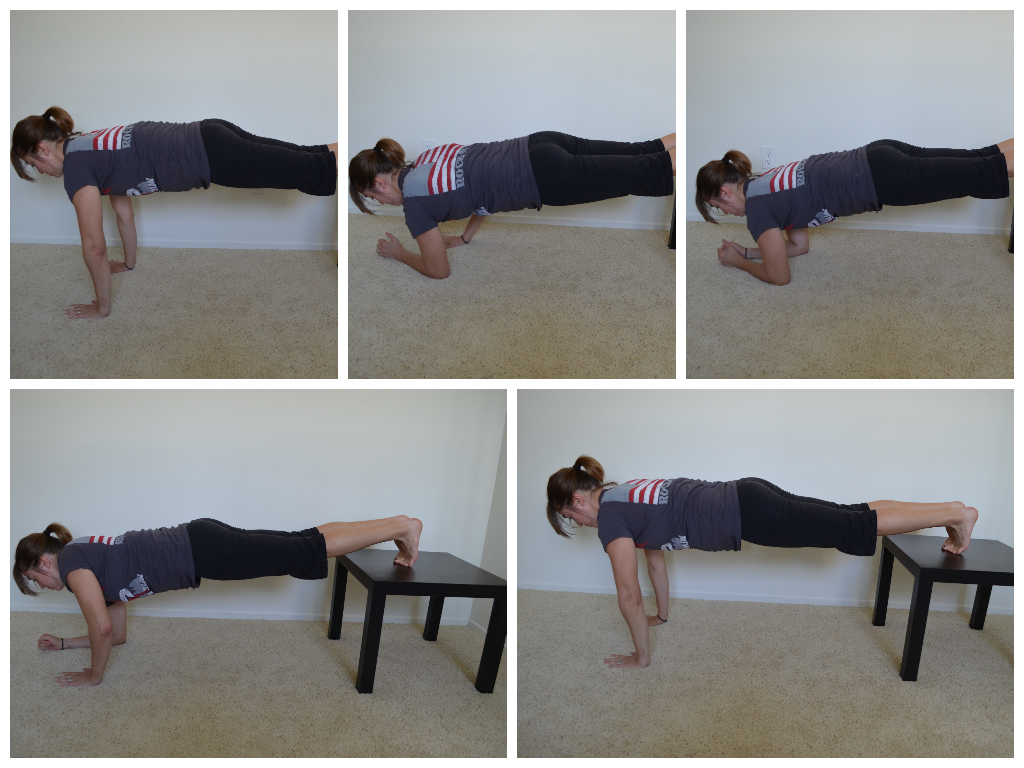
4. Incline or Decline Climbers – These aren’t mountain climbers. With climbers you are working your shoulders and triceps. Beginners should start in a plank position with their forearms on the table. Next climb up one hand at a time until you are at the top of a push up position. Then climb back down to complete the rep. Advanced exercisers should do this move with their feet elevated on the table instead.
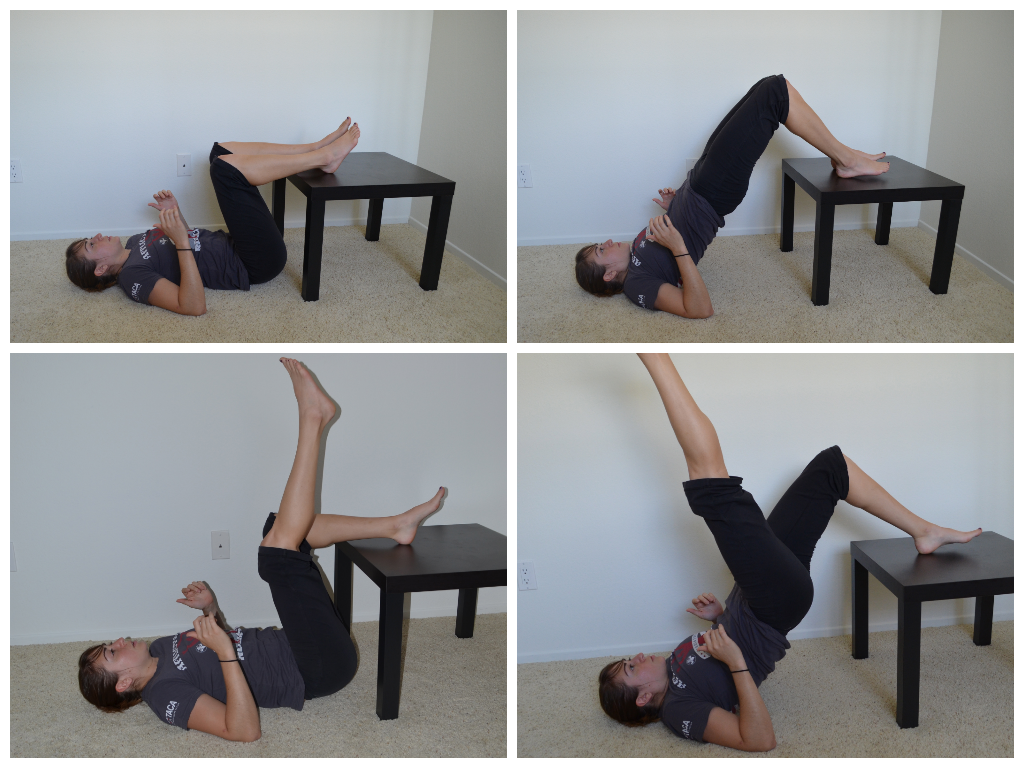
5. Glute Bridge off table – A great way to advance the glute bridge is by putting your feet up on the table. You can do either a double leg glute bridge, which is a bit easier, or a single leg bridge, which is a bit more difficult. Start by lying on the ground with your heels on the table. Your butt should be close to the table. Arms are bent to 90 with elbows driving into the ground. Squeeze the glutes and drive through the heels, lifting your hips as high as you can in the air. Keep your core tight and glutes squeezed. You should not feel this in your low back. To make the move even more beneficial, hold each rep at the top for 2-5 seconds.
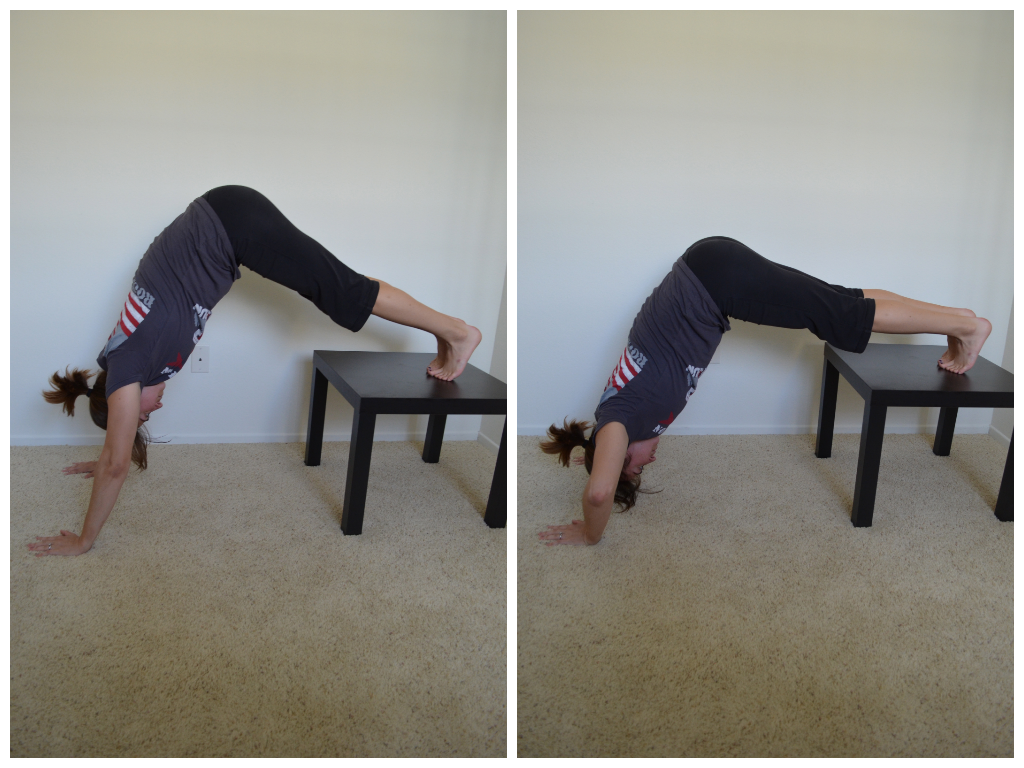
6. Handstands – Handstands are a great upper body move. Using the table you can either do a beginner handstand hold or you can make the move more advanced by adding in a push up. To do the hold, place your feet on top of the table. Walk your hands back a bit and push your butt up towards the ceiling. Push off your toes to get as vertical as possible, creating a nice straight line from your hands, up your arms and core to your tailbone. If this is easy, add the push up in while holding this position. Drop your head down to the ground and then lift back up.
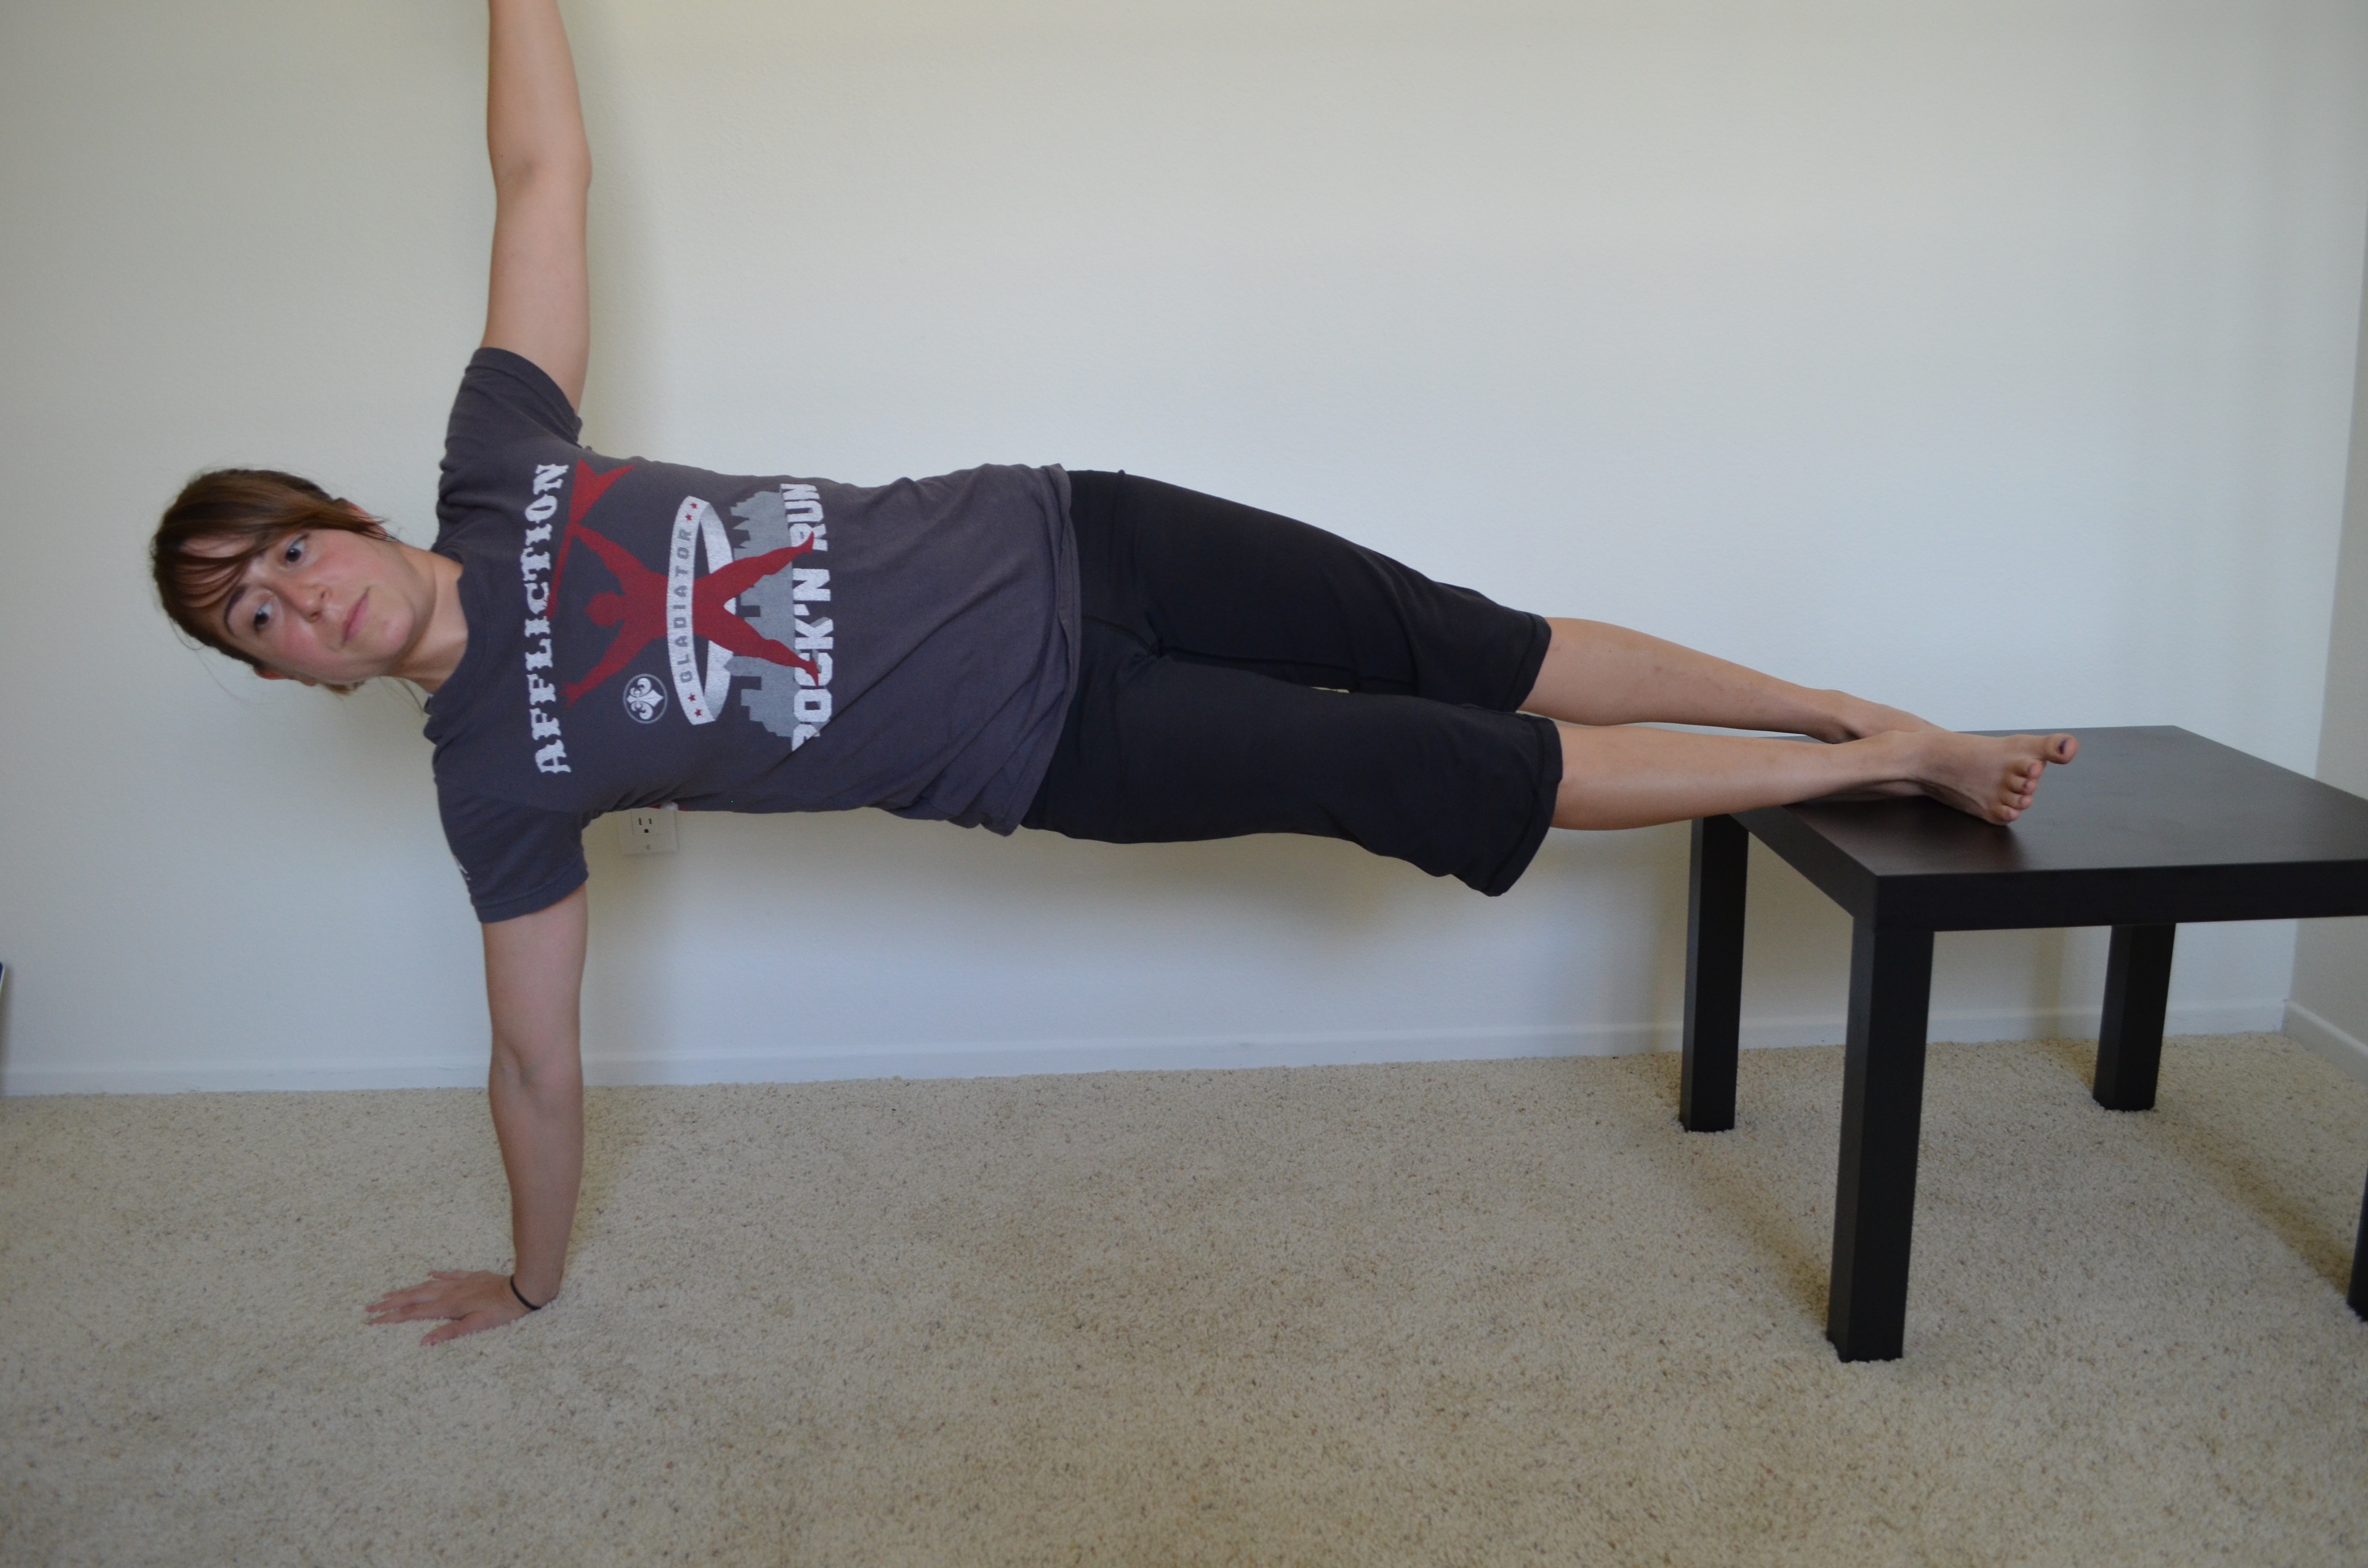
7. Plank Holds – Plank holds are a great overall core move and the table can be used to make the move easier and more difficult. Beginners can hold front and side planks with their hands on the table and feet on the ground while advanced lifters can have their feet on the table and hands on the ground.
8. Lying Bat Wings – One of my favorite moves is scapular wall holds. When playing with the table, I realized you could do the same hold while lying face down on the table. Lie down with your chest on the table. Bend your arms to 90 degrees and then pinch your shoulder blades down and back. Try to bring them together you are pinching back so hard. Hold that move. Beginners can hold for 30 seconds. Advanced can hold for up to a minute. If you want to make it even more challenging, you could add weight to each hand…even if it is just in the form of a book.

9. Reverse Hypers – A great move for the glutes and hamstrings and most easily done with a piece of equipment; HOWEVER, using a table is a PERFECT way to do reverse hypers at home. Lie face down on the table. Make sure your hips are right at the edge. Squeeze your legs together and lift your legs to basically parallel to the ground. Hold for 2-5 seconds and lower. You can do reverse hypers with either bent or straight legs. Both have their benefits. You should not feel either though in your low back. Keep the core tight and really squeeze the glutes.

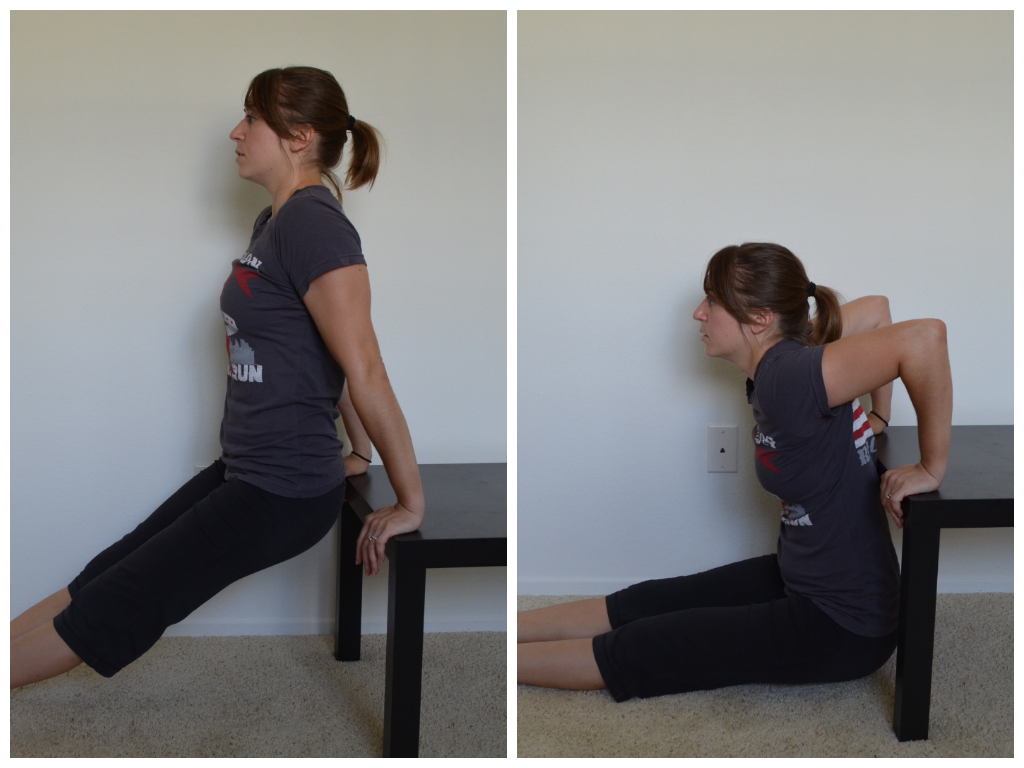
10. Dips – One of the most common home exercise moves, dips can’t be ignored. Place your hands behind you on the table with finger tips hanging over the side. Beginners can bend their legs while more advanced exercisers can keep their legs straight. Drop your butt as close to the ground as possible, bending your arms to 90 degrees and keeping your back and butt close to the table. You could even make the dips harder by doing two push ups followed by two dips for 3-5 rounds. Talk about a way to smoke your triceps….
If you like these moves and have enjoyed other Man Bicep posts, I suggest you head over to my new site Redefining Strength for a sneak peek and a few great workout freebies, including a COMPLETE FOAM ROLLING VIDEO LIBRARY!
P.S. Thank you Ryan for an amazing post idea!
Home Workouts
So I hear all the time that people don’t have the space OR the equipment to get in a great workout at home.
That is ABSOLUTELY ridiculous.
And I just did a workout in my kitchen to prove it….using just a little hand towel. (Which now is a bit dirty but at least I cleaned my floors!)
So here is my Small Space at Home Workout – 5 great moves you can do with just a hand/dish towel!
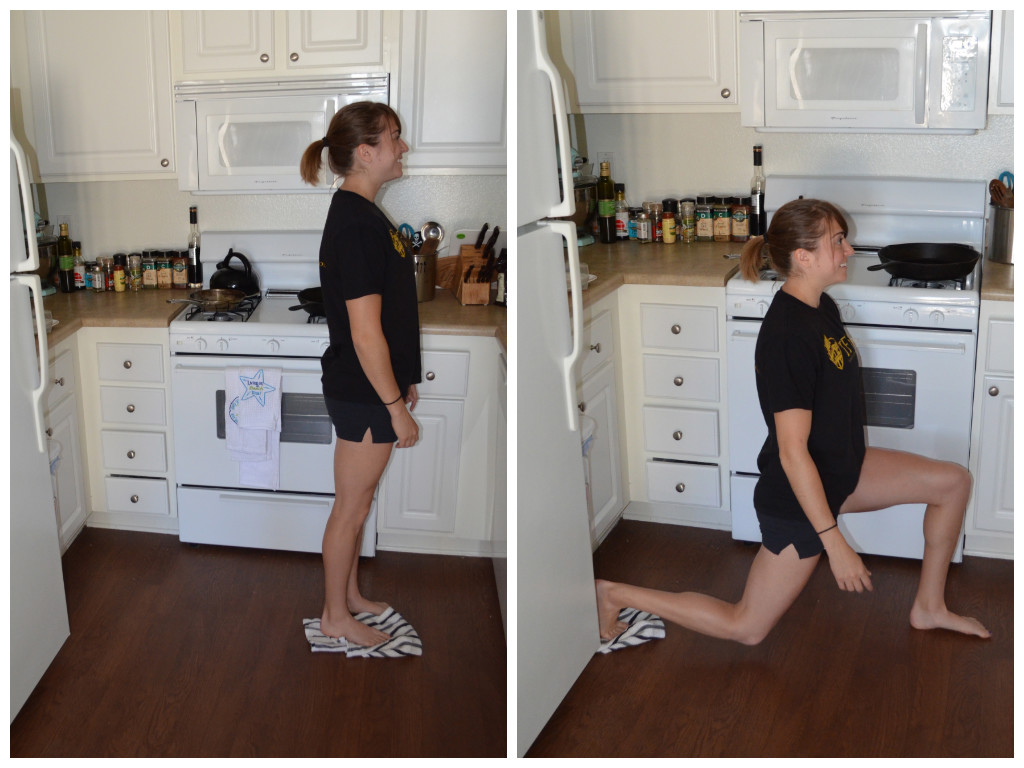
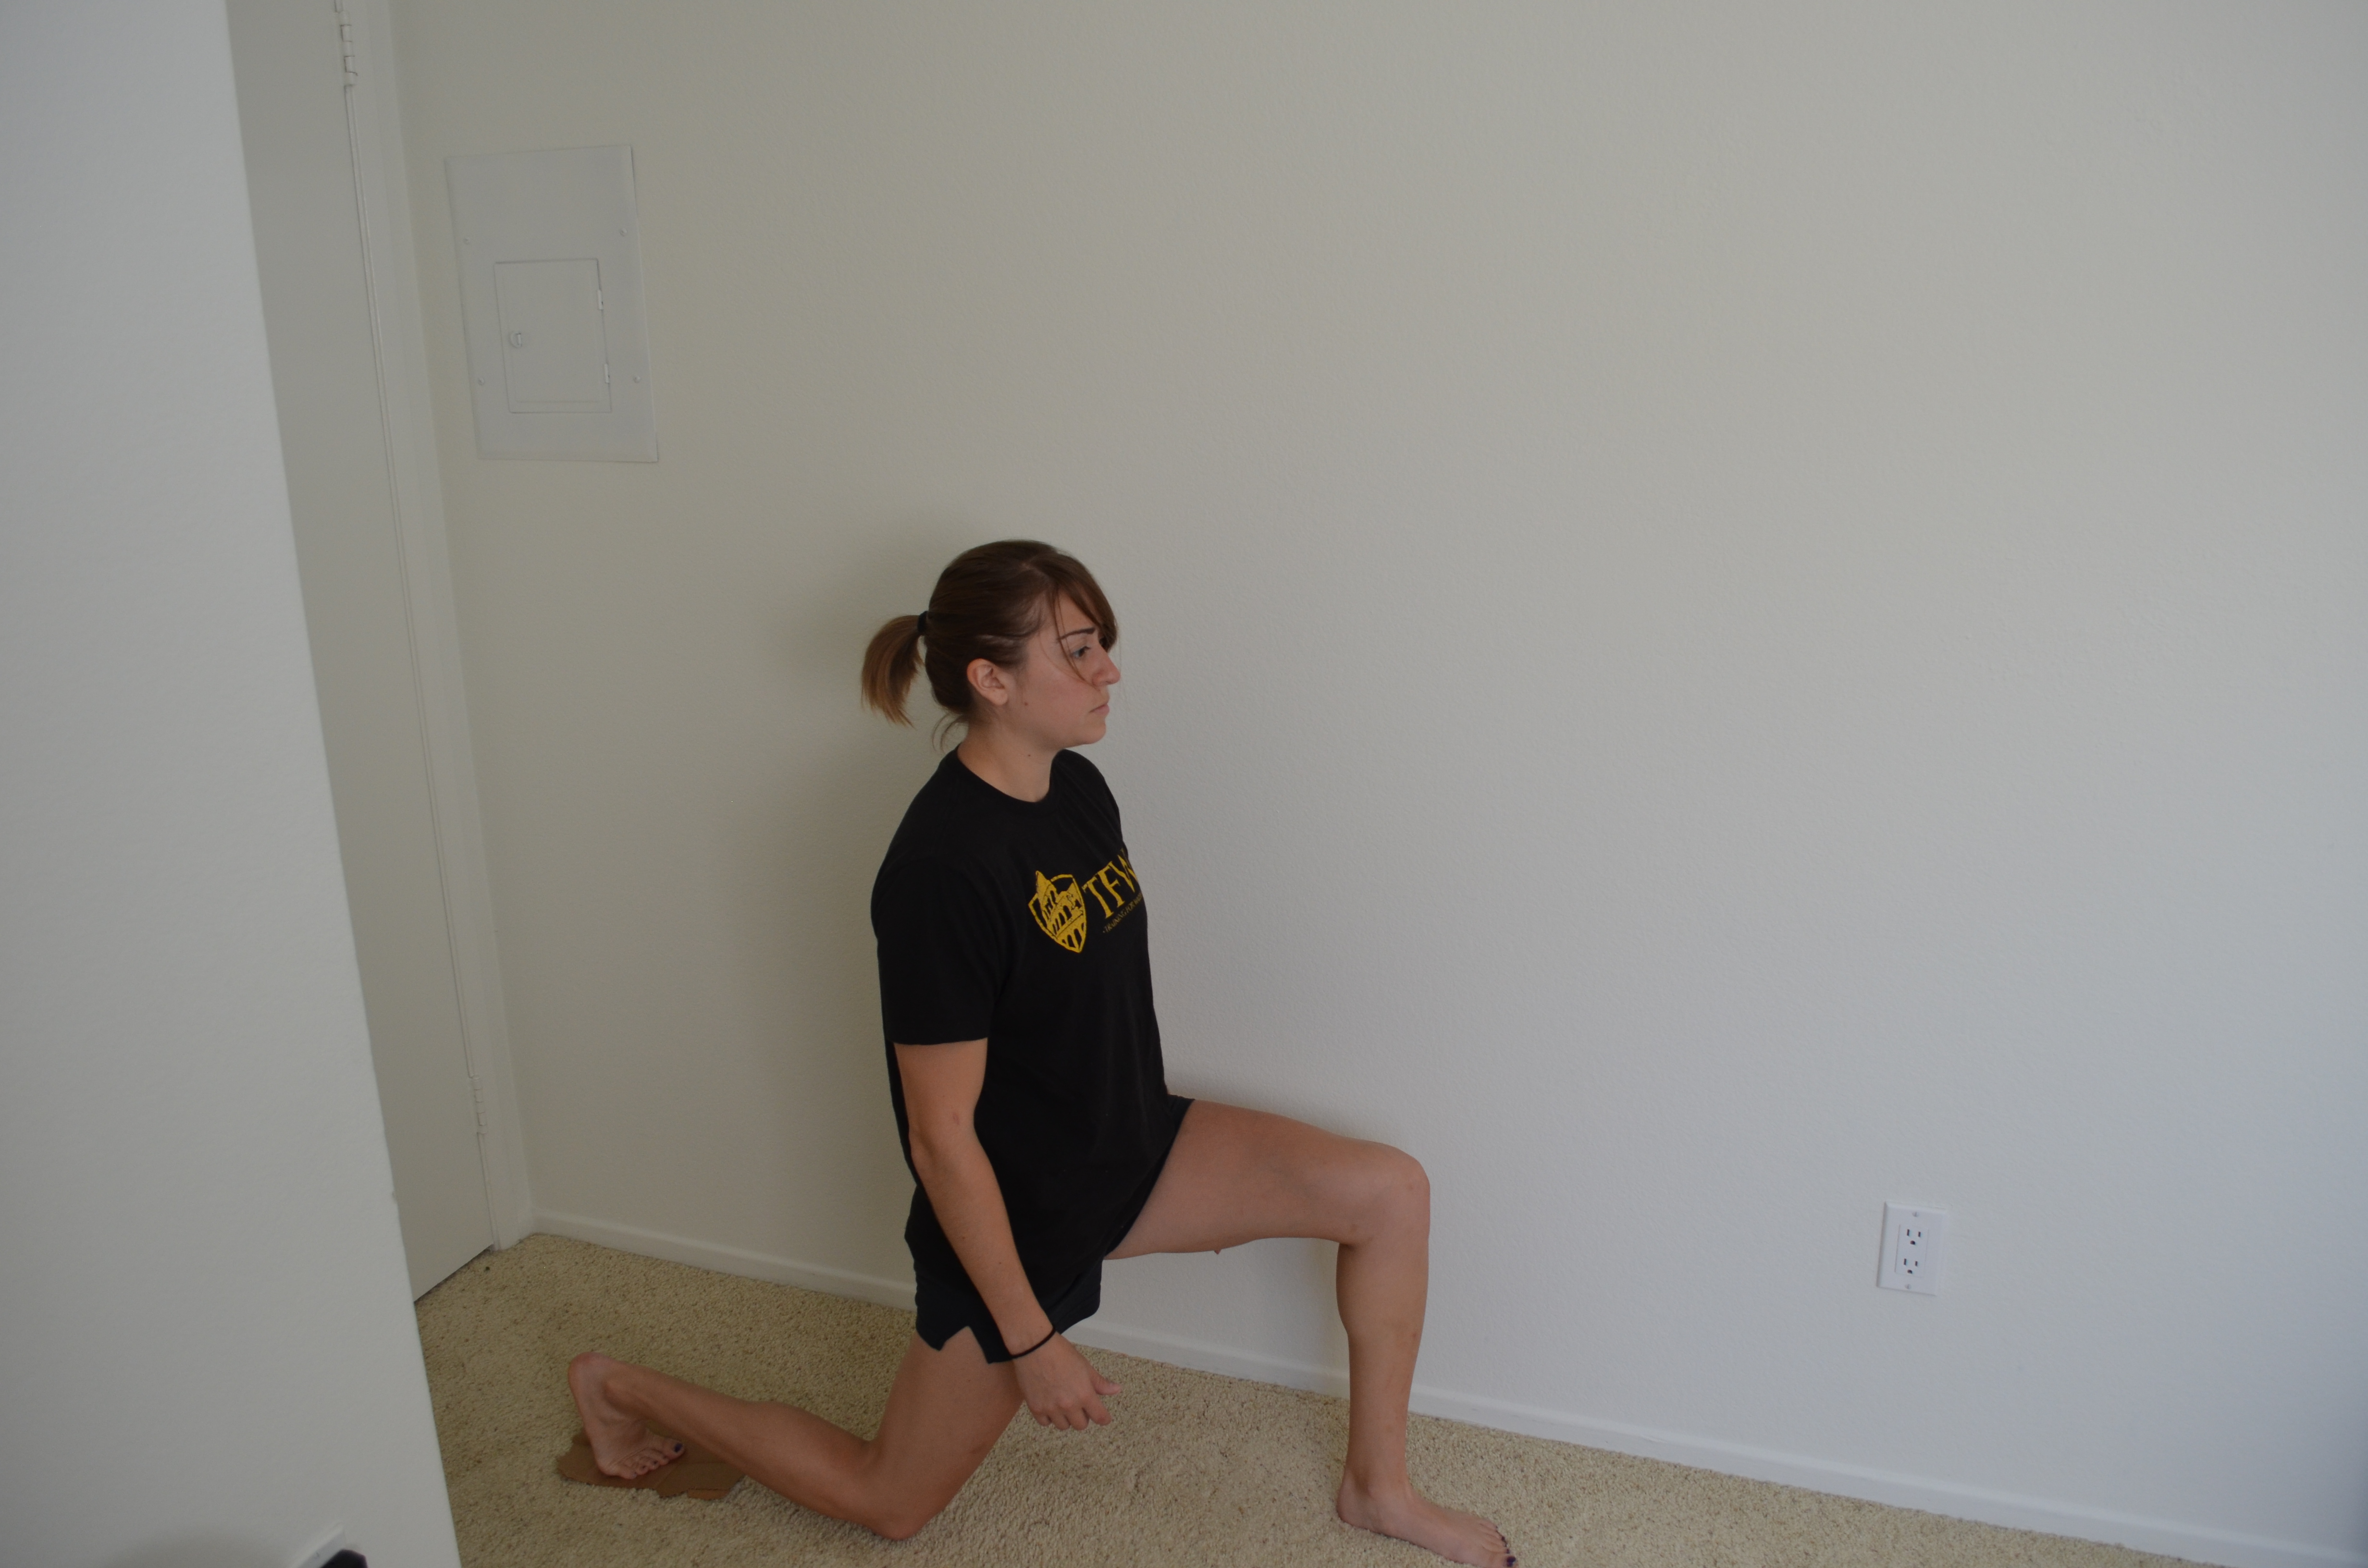
- Towel Backwards Lunge – The backwards lunge is a great move to work the glute and when you use a towel/slider, you increase the intensity AND engage the glute even more. Make sure to really squeeze the glutes as you come back to standing. To perform the move, place the towel under one foot and slide that foot back into as deep a lunge as you can handle. Make sure to really sit back on that front heel. Then driving through that front heel, come back to standing.

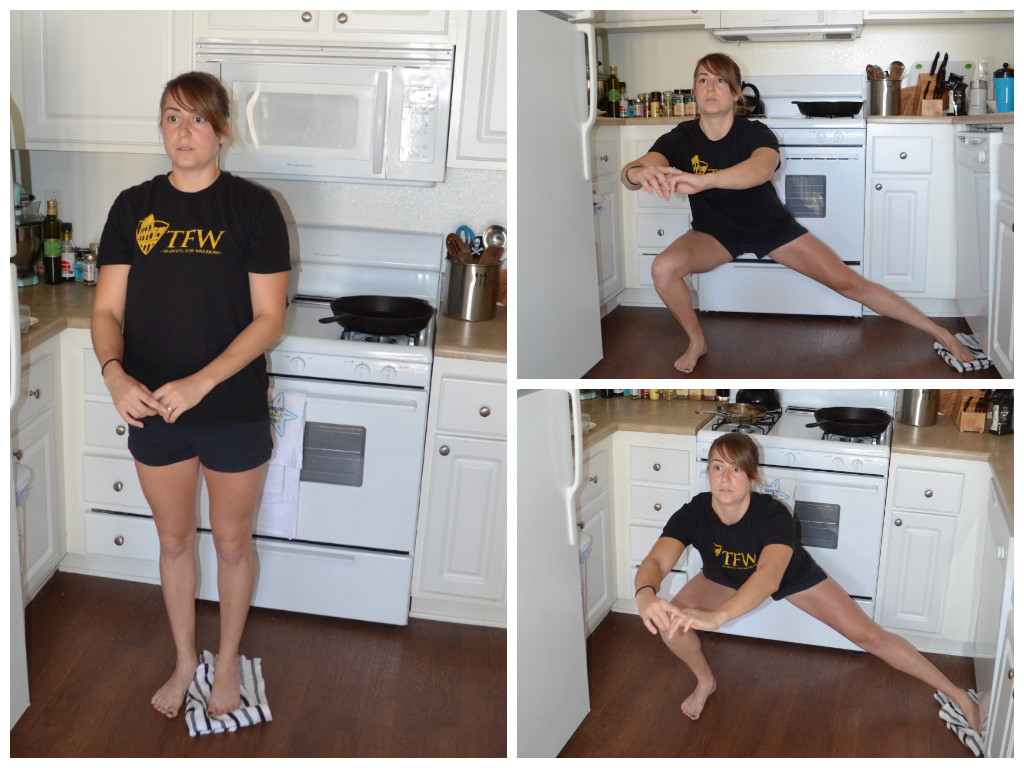
- Towel Side Lunge – This is a great move to work the glute and adductors. Please be careful the first time you try this lunge as it is easy to go too far out and not be able to get back up since there is no traction. To do this move, place the towel under one foot. Slide that foot out to the side, sitting back into the lunge. Then to stand back up, drive through the foot not on the towel. Do not allow yourself to go forward. Make sure to really sit back and then drive off the heel.

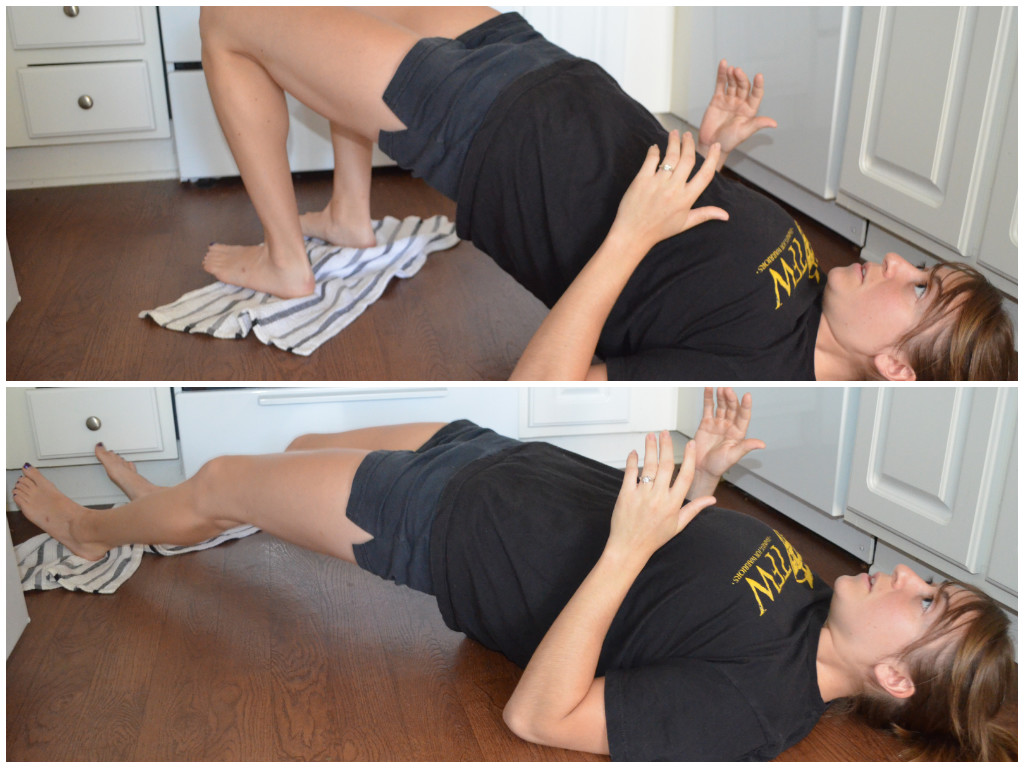
- Towel Bridge and Curl – This one is great although not a beginner move. A beginner may want to start with the towel under only one foot and slide out one leg at a time. To perform the two leg curl, place both feet on a towel about hip width apart. Start in the bridge position and slide your feet out. Keep your hips off the ground and your glutes engaged as you slide out. Then curl the heels back in, bringing the hips up again in a glute bridge.

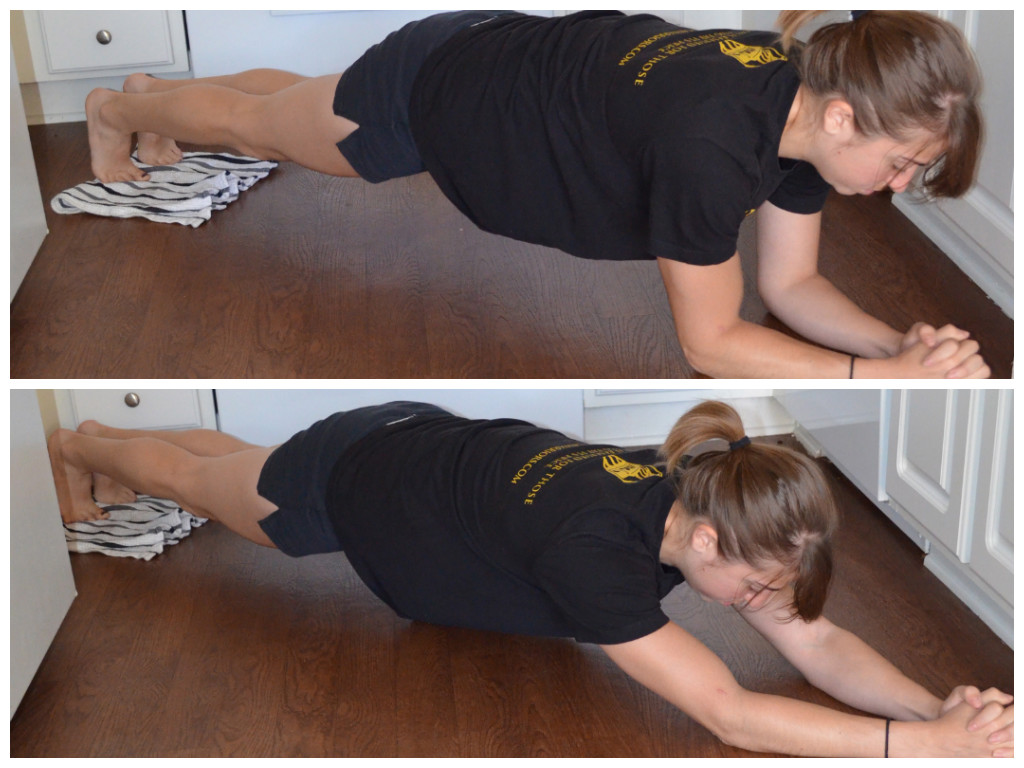
- Body Saw – This is another advanced move. To regress this, perform the move without the towel. Walk your feet backwards and then back in, elongating through your triceps and core. To do this with the towel, keep your body in a straight line with your belly button drawn in. Slide back on the towel, lengthening your body out as much as you can. Then pull straight back in to the plank position. Do not let your hips sag toward the ground or your butt go up in the air. You should not feel this in your low back.

- Fly to Push Up – A great two in one chest exercise. This can be done from the knees or the toes. Start at the top of your push up with one hand on the towel. Then slide the hand out to the side and perform a push up. After the push up, slide the hand back into the starting position. Even though this is a wider push up, don’t let your elbows flare way out by your ears!

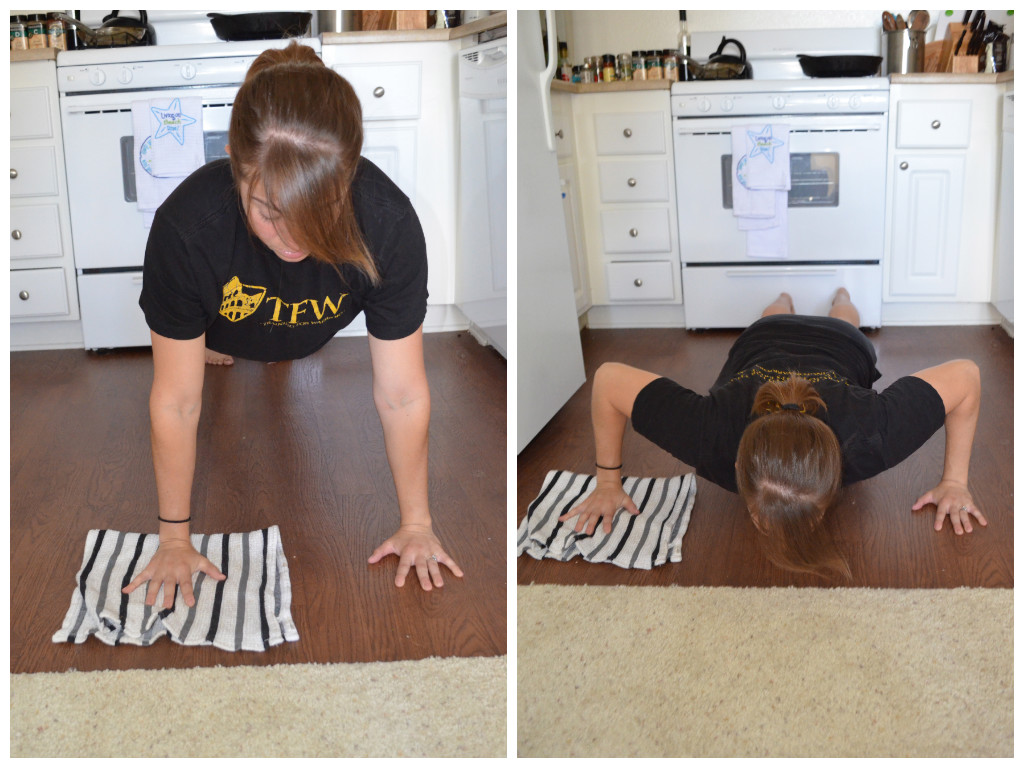
So there you have it. Five moves done with just a dish towel and space that I could barely lie down in.
Here are two other bonus moves…Since I think most people do have a bath towel and two dish/hand towels lying around somewhere!
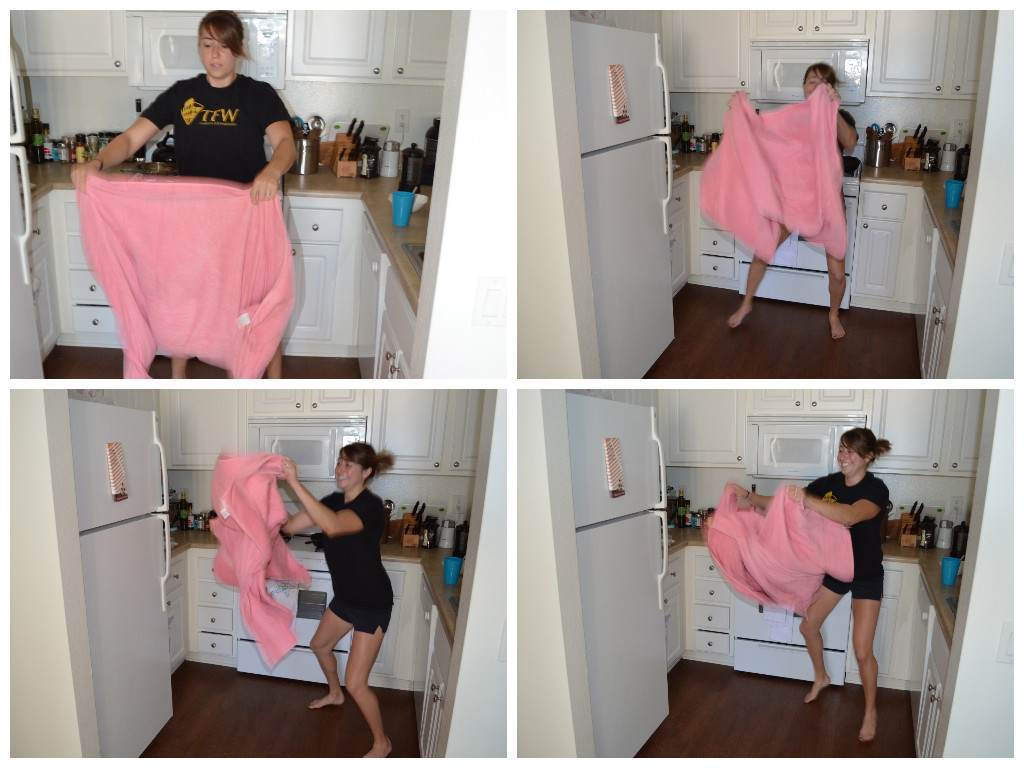
- Towel Taz – So basically anyone at any level can do this. And while challenging, it is rather fun. Move around as quick as you can in every direction and shake the towel down and up and in and out.

- Mountain Climbers – Place a towel under each foot and set up as if you are going to do a push up. Then, keeping your core tight, run your knees in toward your elbows, alternating legs.

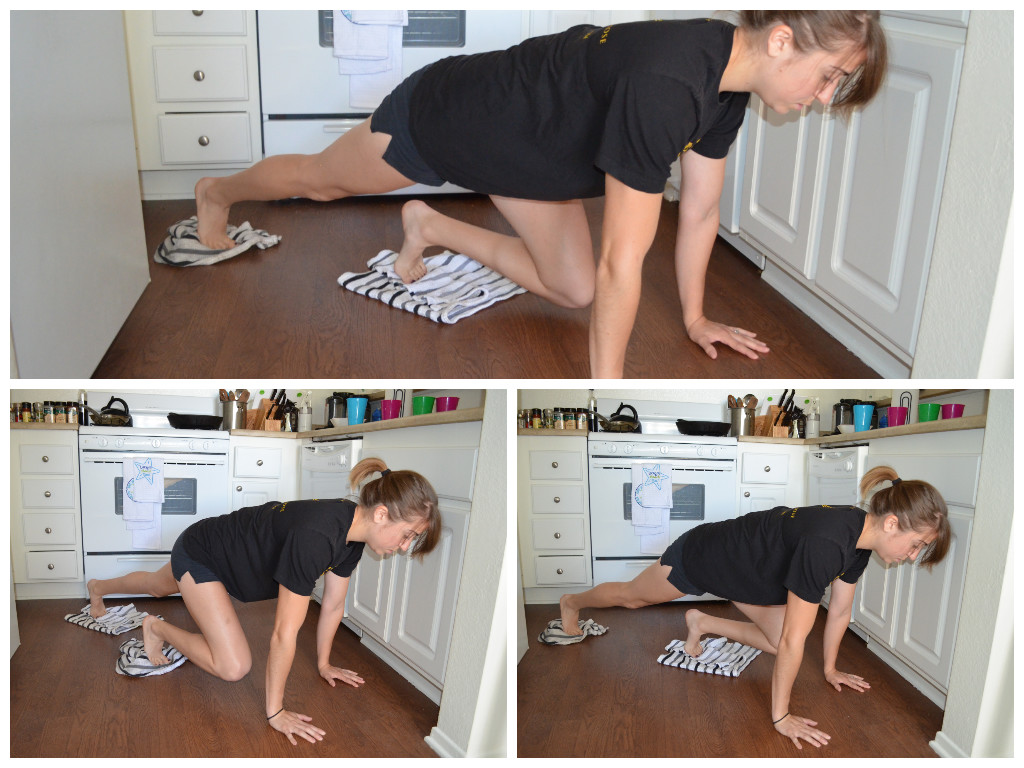
AND if you are thinking…”Well my house is all carpet..”
Mine basically is too! To do all hand towel moves on carpet, all you need is a piece of cardboard…(I tore mine off of a box we used recently to move!)
What moves do you love that require no space and use things you just have lying around the house?
Cauliflower Mash
I’m a bit obsessed with cauliflower. I mean I could literally just eat a whole head of it raw.
Is that strange?
Probably.
But anyway, since it has looked so amazing at the farmers market, we’ve gotten it the last few times and the other night, Ryan created a cauliflower mash with it that was absolutely amazing.
So because I’m cauliflower obsessed and this was a super delicious meal of Wild Caught Salmon steak and Cauliflower Mash, I wanted to share the recipe! (Maybe I should call this the Un-American meat and potatoes…even though I do like grass-fed steak and mashed potatoes…)
Salmon Steak and Cauliflower Mash
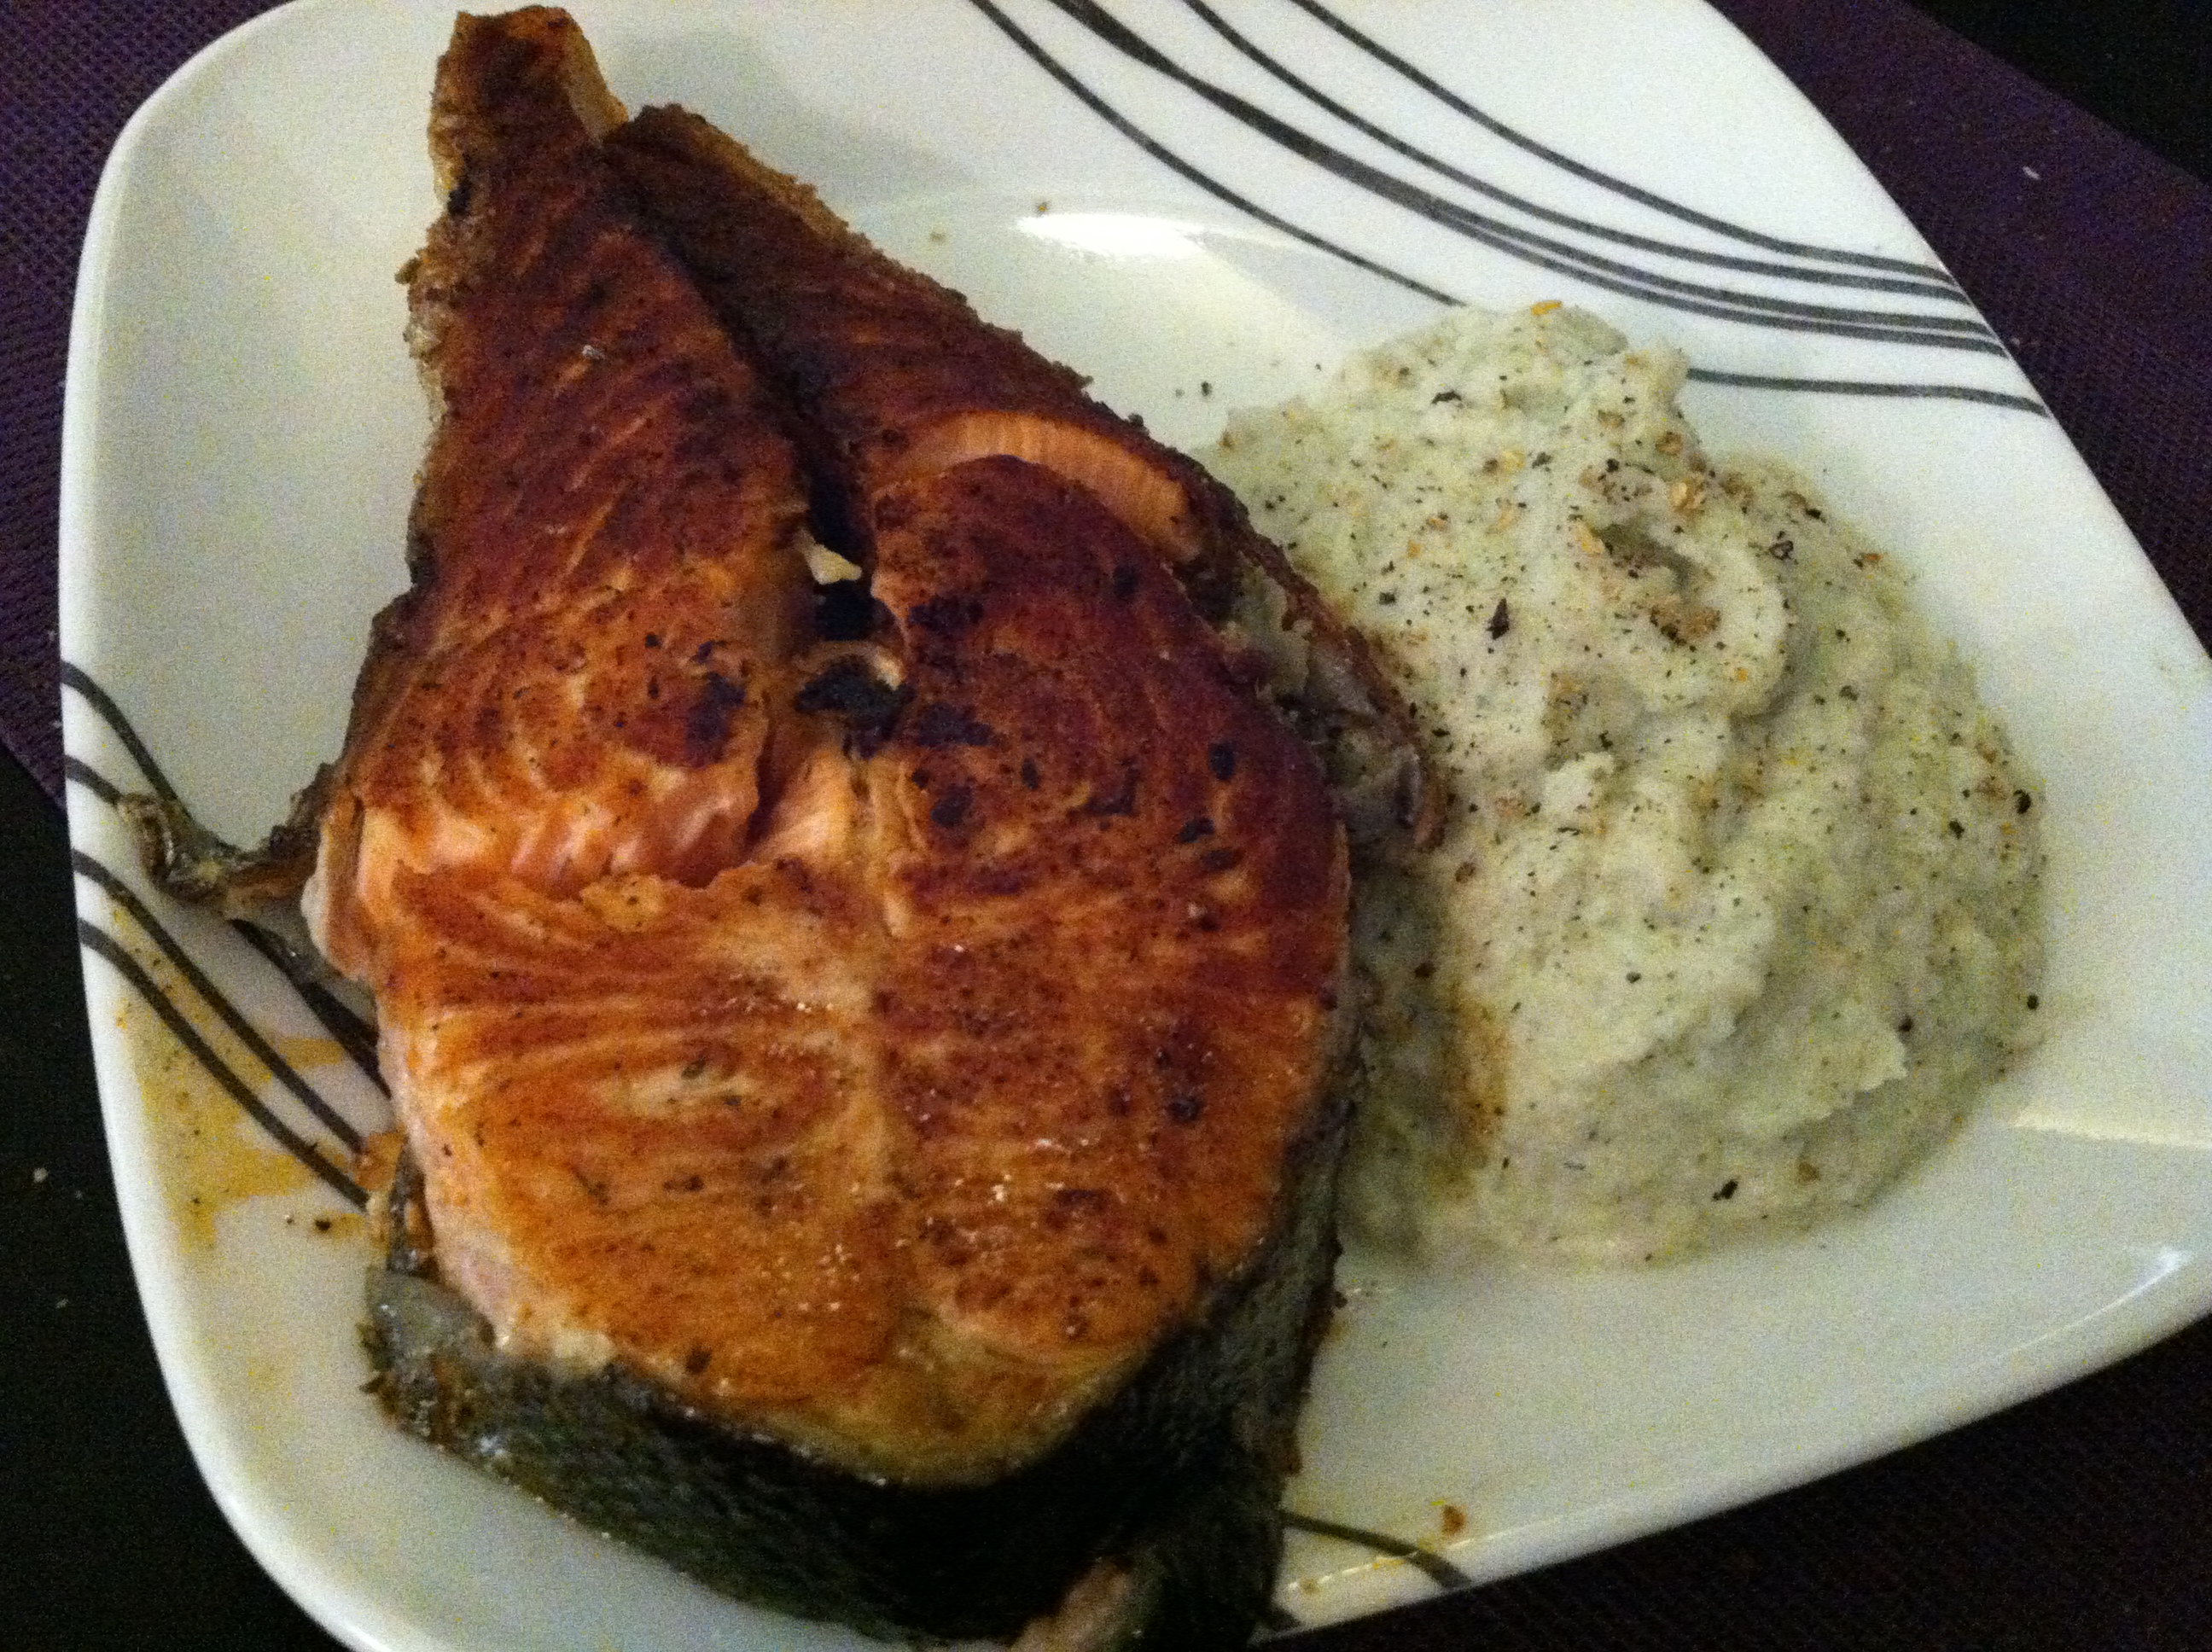
I’m pretty sure I’ll never make a living as a food photographer.
Ingredients:
Salmon:
2 Salmon Steaks
1/2 tbsp Paprika
2 tsp cayenne pepper
Salt and pepper to taste
Cauliflower Mash:
1 tbsp butter
1 tsp diced garlic
1/2 tbsp dill
1 tbsp cream
3/4 head cauliflower
Salt and pepper to taste
For Salmon Steaks:
Sprinkle with spices and then sear in a skillet (with 1 tbsp olive oil) on high heat for 1-2 minute each side. Then lower temperature to medium/low and cook to medium/medium rare. About 8-10 minutes.
Cauliflower Mash:
Steam cauliflower until soft. When you transfer the cauliflower to the food processor, try to get rid of all extra water first. Put into a food processor with butter, garlic, dill, cream and salt and pepper. Blend until everything is mixed and there are no cauliflower chunks.
Then serve steak and mash together. If you are like Ryan, you may even enjoy a bit of hot sauce on your cauliflower mash!
The salmon steaks made one portion for each of us, but the cauliflower mash actually made about four servings…however, it was so good (and low-calorie) that we ended up consuming all four portions! (YUM!)
What random food do you love to consume…like raw cauliflower?
Also, since I’m into self-experimentation and have actually tried a number of the diets on Free the Animal’s list (and happen to agree with his findings), I thought it was interesting to share. What diet have you found to be most effective?
Diet Analysis – Two Diet Approaches
So today I don’t want to discuss what diet is best or what foods you should be eating. Instead I want to discuss HOW to start making changes toward a healthier diet.
I also want to make note that when I say “diet” I don’t mean a fad or a restricted eating program. By diet I mean “The kinds of food that a person, animal, or community habitually eats.”
When you want to change your lifestyle, there isn’t just one way to do it. Every person has to make healthy lifestyle changes in their own way.
But I have found that there are two basic diet approaches that work best for most people.
The ALL OR NOTHING APPROACH:
With this approach, you create a meal plan with everything planned out so that you know exactly what you are eating and when you are eating it. You may even cook and/or prep everything for the week on Sunday so that it is all ready to go.
This is great for people who don’t like having to make decisions. For many, having to figure out what to eat at the end of a long day, or when they are hungry, leads to disaster and binging. Having everything set out ahead of time helps alleviate the stress of making decisions and allows them to more easily instill new habits.
They also don’t mind eating the same thing numerous times a week and do better when they don’t have a ton of different options around the house.
I’ve found this works best for people who are triggered to binge by having “a little” of a food that tempts them or reminds them of old eating habits – this works best for people who think about their new diet as the foods that they CAN HAVE not the foods that they now CAN’T or SHOULDN’T HAVE.
This may also be a great option for someone who is trying to lose weight fairly aggressively for a specific event (while I don’t like when people crash diet for events, sometimes a big push to get the momentum going can help lead to a long-term commitment).
THE TORTOISE APPROACH:
The all or nothing approach doesn’t work for everyone though. Many feel very RESTRICTED when they have a set meal plan because all they can think about is the foods that AREN’T on the schedule.
So the other approach that I often recommend to clients is what I call the Tortoise approach.
This is honestly my favorite way to make diet changes when dealing with clients who are trying to make an overall lifestyle change.
I call it the TORTOISE approach because it reminds me of the story of The Tortoise and The Hare. Slow and steady wins the race. For these people, sprinting ahead on a meal plan or with very strict guidelines, leads to binging and ultimately to failure. They can’t keep up the pace or feel like they are so ahead that they can rest for awhile…just like the Hare. They do much better with a slow steady pace that allows them to adapt to each change before making the next one. The slow steady pace helps them stay on course the entire time and achieve their ultimate goal…just like the Tortoise.
For people like this, having basic guidelines to follow while being able to eat technically whatever they want allows them to never feel deprived (even if they never actually indulge) because they have the OPTION of eating something if they really want it.
So now the question is…Which way will work best for you?
Unfortunately, no one can answer that but you. And maybe you even need to give both a shot for a month or two to figure out which works best.
But before you choose an approach ask yourself two important questions:
- Do you feel deprived and only think about the foods you CAN’T eat? (YES, then you are a Tortoise because meal plans make Tortoise feel restricted. They like to feel like they can eat anything while staying within basic guidelines.)
- Do you get completely derailed by even just a bit of a food you don’t want to consume on a regular basis? (YES, then you are an All or Nothing. All or Nothings can’t have just a little of something and stay within guidelines. Just a little leads to binges that won’t stay within guidelines.)
Made a successful lifestyle change? Which approach did you use? Or did you maybe even combine them?
(I have had people do meal plans to get things going and then ease off to guidelines once they’ve gained some momentum.)
How to do a perfect push up
In my opinion two of the hardest bodyweight moves, especially for women, are pull ups and push ups.
These are also, in my opinion, two moves that EVERYONE should be able to do!
The other week, I outlined some tips and progressions to help you build toward a full pull up and today I want to address the push up.
A few things I usually see when clients do “push ups:”
- They don’t go all the way down. They bend their elbows maybe an inch. (Guys do the opposite of this where they don’t actually lock out at the end of the push up)
- Their head juts forward as if they are looking towards their toes.
- Their shoulder blades are jutting out.
- Their elbows flare out way up by their ears and their fingers are rotated in toward their chest.
- They do THE WORM!
Here is a photo of some pretty ugly form….doing a number of the bad things above.
So if you do one….or maybe all…of these things, how do you do a perfect push up?
Perfect push ups form:
- Your body is in line from your heels to the tip of your head. Your finger tips should be pointing forwards and your hands should be right outside your chest. Your feet are together not shoulder or hip width apart.
- At the top of your push up, your arms are locked out and your legs are straight. You are squeezing your butt cheeks and are drawing your belly button in toward your spine. You are in a straight line. Hips aren’t dropping to the ground. Head is jutting forward. Back is not excessively arched.
- As you lower down, you lower your chest directly between your hands, keeping a nice straight line. Your elbows shouldn’t flare out from your body. Your elbows should almost make an arrow with your body. Like –> Your shoulders, elbows and wrists should all be in a straight line.
- Your chest should touch the ground when you lower. Your body should move together. Hips shouldn’t move back up first. Everything should lift as one. Don’t let the hips sag or the elbows flare out as you lift.
- You should then return to the exact same position you started with.

Now that you know the form for a great push up that doesn’t mean you are going to be able to perform one perfectly.
First you have to address the issues you are having with your form.
While a full range of motion is something that you have to practice and developing strength in your chest, shoulders and triceps is always beneficial, there are some other issues you have to address first.
Below I address areas you should foam roll, stretch and strengthen if you are having some of the problems I listed above. If you don’t know if your form is breaking down, have a friend or a trainer watch you perform a push up!
Problems and some fixes:
- Head jutting forward and/or chin tucked to chest – Roll out and stretch your upper traps and neck.
- Scapular winging (aka if your shoulder blades are really popping out) – Roll out and stretch your chest. Strengthen your mid and lower traps with the scapular wall hold. You can also strengthen your traps and your serratus anterior (the muscles sort of on your ribs under your armpit and down the side) with this great exercise, the push up plus or scapular push up.
- Shoulders are up by your ears – If your shoulders are up by your ears, roll out and stretch your traps and your neck. You are also going to want to do a ton of scapular wall holds to strengthen your mid and lower traps! When doing the push up, focus on engaging the muscles between your shoulder blades.
- Elbows flare out – Many people are taught to do a push up like a T, but that puts a ton of strain on the rotator cuff. Make sure to roll out and stretch your chest. Also, having your elbows in closer will require you to strengthen your triceps since having your elbows in closer engages your triceps more. Also to help you remember to do this, start the push up with your hands right outside your chest. As your hands get wider, it becomes easier to revert back to the T form.
- Hands turn in – Make sure to keep the finger tips pointing straight ahead. Pretend your hands are both on a piece of paper. Try pressing down and apart as if you are trying to rip the piece of paper in half. This will help you keep your hands straight and will help you engage your lats and keep your body tight overall.
- Low back sags and hips go toward the ground – Start by rolling out and stretching your low back and your hips. You will then also want to strengthen your core and your glutes. When I say “strengthen your core,” I don’t mean do a trillion crunches. You want to work on “bracing” your core – you want to work on contracting your abs and drawing your belly button in toward you spine. You can practice this by laying on your back with your knees bent and your feet flat on the ground. Draw your belly button in toward your spine and press your low back into the ground. Hold that position. That is how you want to brace your core during a push up. When doing a push up, to keep your hips from sagging, squeeze your glutes and draw in your belly button!
- Butt goes way up in the air – If this happens you are also going to need to work on core strength. Planks are a great way to build up the core stabilization needed for a push up…Because let’s face it…A push up is basically a moving plank. Also, use the drawing in maneuver I went over above to teach yourself to engage your core! Also, if you squeeze your glutes during the push up, it is going to be extremely difficult to have your butt up in the air!
Once you begin to address those issues, you can start to work on building up toward that perfect push up.
Today, I don’t want to get into all the supplemental moves you can do to strengthen your chest, shoulders, triceps and core, but I do want to discuss how you can regress the push up so that you can do it no matter what level you are starting from.
The first push up regress is NOT from your knees.
The wall push up is the first step. Step about a foot or two away from the wall and place your arms out toward the wall right outside your chest. Your finger tips should point straight up toward the ceiling. As you lower your body toward the wall, your hands should be outside your chest. Go as close to the wall as you can (do not smack your face into the wall). Make sure you keep your elbows in super close to your body. This is a great time to really work the triceps and keep your arms against your body. Your wrists, elbows and shoulders should all be in one straight line. Your body should remain in a straight line with your core and glutes engaged. Don’t worry about keeping your heels on the ground.
If you can perform 3 rounds of 20 wall push ups with perfect form easily, it is time to use a lower incline. Squat racks (if no one is using them because people definitely don’t like you doing anything put squatting in them) and Smith machines are great places to help you work on your push ups. I hate Smith machines so this is about the only time I would use one.
Smith machine push ups allow you to control the incline. As you progress, you can lower the bar until you are basically parallel to the ground. You want to keep the same form as the wall push up.
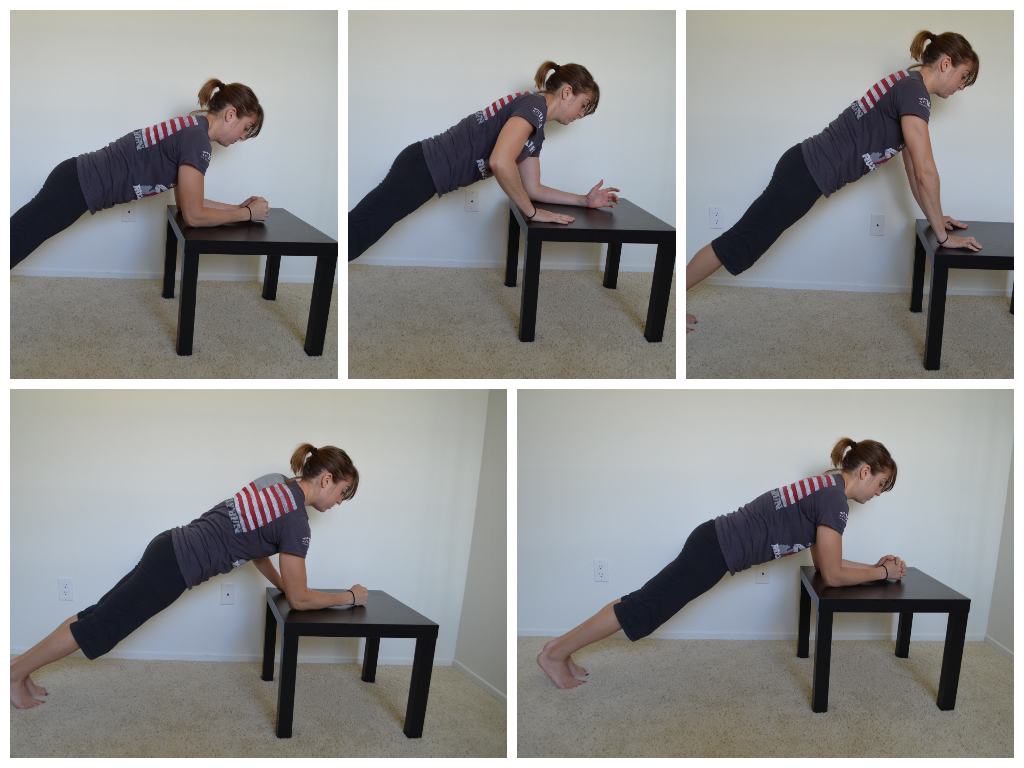
Since we don’t have a Smith machine at the gym (and since we just moved and our jungle gym for squats isn’t set up) I demonstrated these from a bench…which is also another tool you can use if the incline is appropriate.
And if you only have a bench, but the incline is just a bit too low, you can do push ups off the bench two different ways. You can do them from your toes or from your knees.
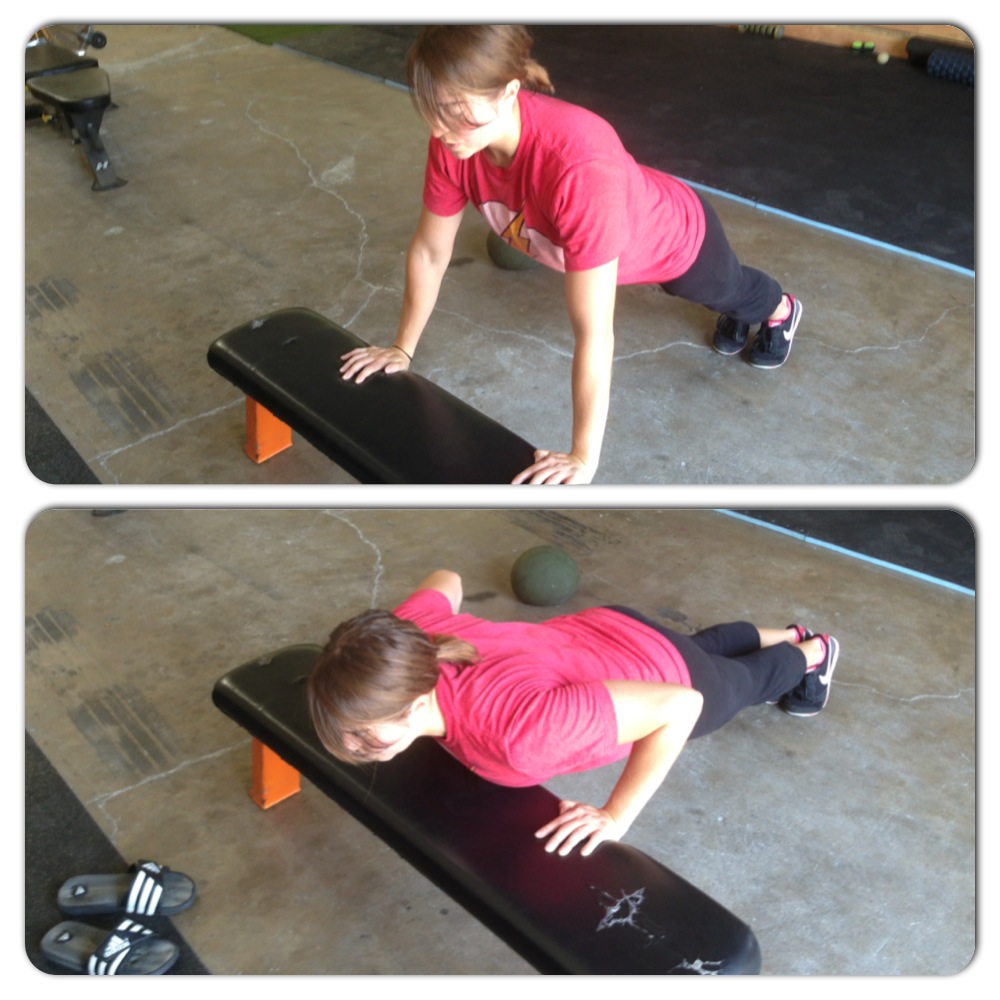
Doing push ups from your knees can allow you to decrease the incline as you progress down toward the ground.
Once you’ve mastered the incline push up and have gotten down to at least the height of a bench (from your toes), you can start to try push ups from your knees on the ground.
If you aren’t completing full reps and your form is breaking down, don’t keep progressing!
You’ve got to EARN the next level!

Then once you can perform perfect push ups from your knees, start to add in one or two push ups from your toes until you can do 5, 10, 15….100 from your toes!
Doing even one perfect push up doesn’t happen overnight. Take your time! Quality is important if you want to get the most out of each and every push up!
Once you’ve mastered the perfect push up, it is then time to start playing around with decline push ups (feet up on bench or such) and other fun variations…Like my favorite the push up to dip!
But remember…YOU’VE GOT TO EARN THE PROGRESSIONS!
Do you love push ups?
No Excuses – Workouts you can do ANYWHERE (in 30 minutes)
So I have a number of clients that travel and/or like to workout at home in between days when we train.
They don’t necessarily have access to equipment or even a ton of space although they can get outside or into the gym once a week for a little sprint session.
They are also generally short on time and need something they can either do quickly at before work or at the end of the night when all they want to do is eat and go to bed.
For these clients, I’ve developed 5 basic workouts that they can do ANYWHERE in only 30 minutes!

A few of these won’t even take you that long!
These workouts include upper and lower body strengthening as well as cardio and metabolic training! You don’t need to do all five every week either.
One week you can do the lower body, upper body and cardio (or metabolic) workouts. And another week you can do the total body, cardio and metabolic workouts. And then a third week you can do the upper body, lower body and total body workouts!
You can really combine the five to help you reach any fitness goals!
Anyway, just a great guide to have if you are ever short on time and don’t have access to much space or equipment!


